motorini BOMBER 125cc User manual

BOMBER
125cc
USER’S
MANUAL

INTRODUCTION
Thank you for purchasing your Motorini Bomber 125.
Customer safety and satisfaction is of genuine concern to Motorini. For this reason, we have
supplied you with this User’s Manual, designed to acquaint you with the proper and safe use
of your Motorini Bomber 125. Please take the time to read and understand the manual
before operating your vehicle. The User’s manual has been designed for reference and safety.
General care instructions are included.

Contents
NOTICE OF USER
PARTS LIST
CONTROL PART
FUEL AND ENGINE OIL RECOMMENDATION
MOTORCYCLE RUNNING-IN
INSPECTION BEFORE RIDING
RIDING TIPS
INSPECTION AND MAINTENANCE
TROUBLESHOOTING
CLEANING AND MAINTENANCE
TECHNICAL SPECIFICATION

NOTICE OF USER
Safety instruction for driver’s operation
Motorcycle riding is great fun and exciting. To
ensure safe riding, you must obey the traffic rules
and the following provisions.
Wear a safety helmet
Wear a helmet correctly. A high quality helmet is
recommended when riding your motorcycle.
.
Riding apparel
Loose clothing can be uncomfortable and
unsafe when riding your motorcycle, choose
good quality motorcycle riding apparel when
riding your motorcycle. Hi Viz is recommended.
Inspection before riding
Please read all the instructions in INSPECTION
BEFORE RIDING.
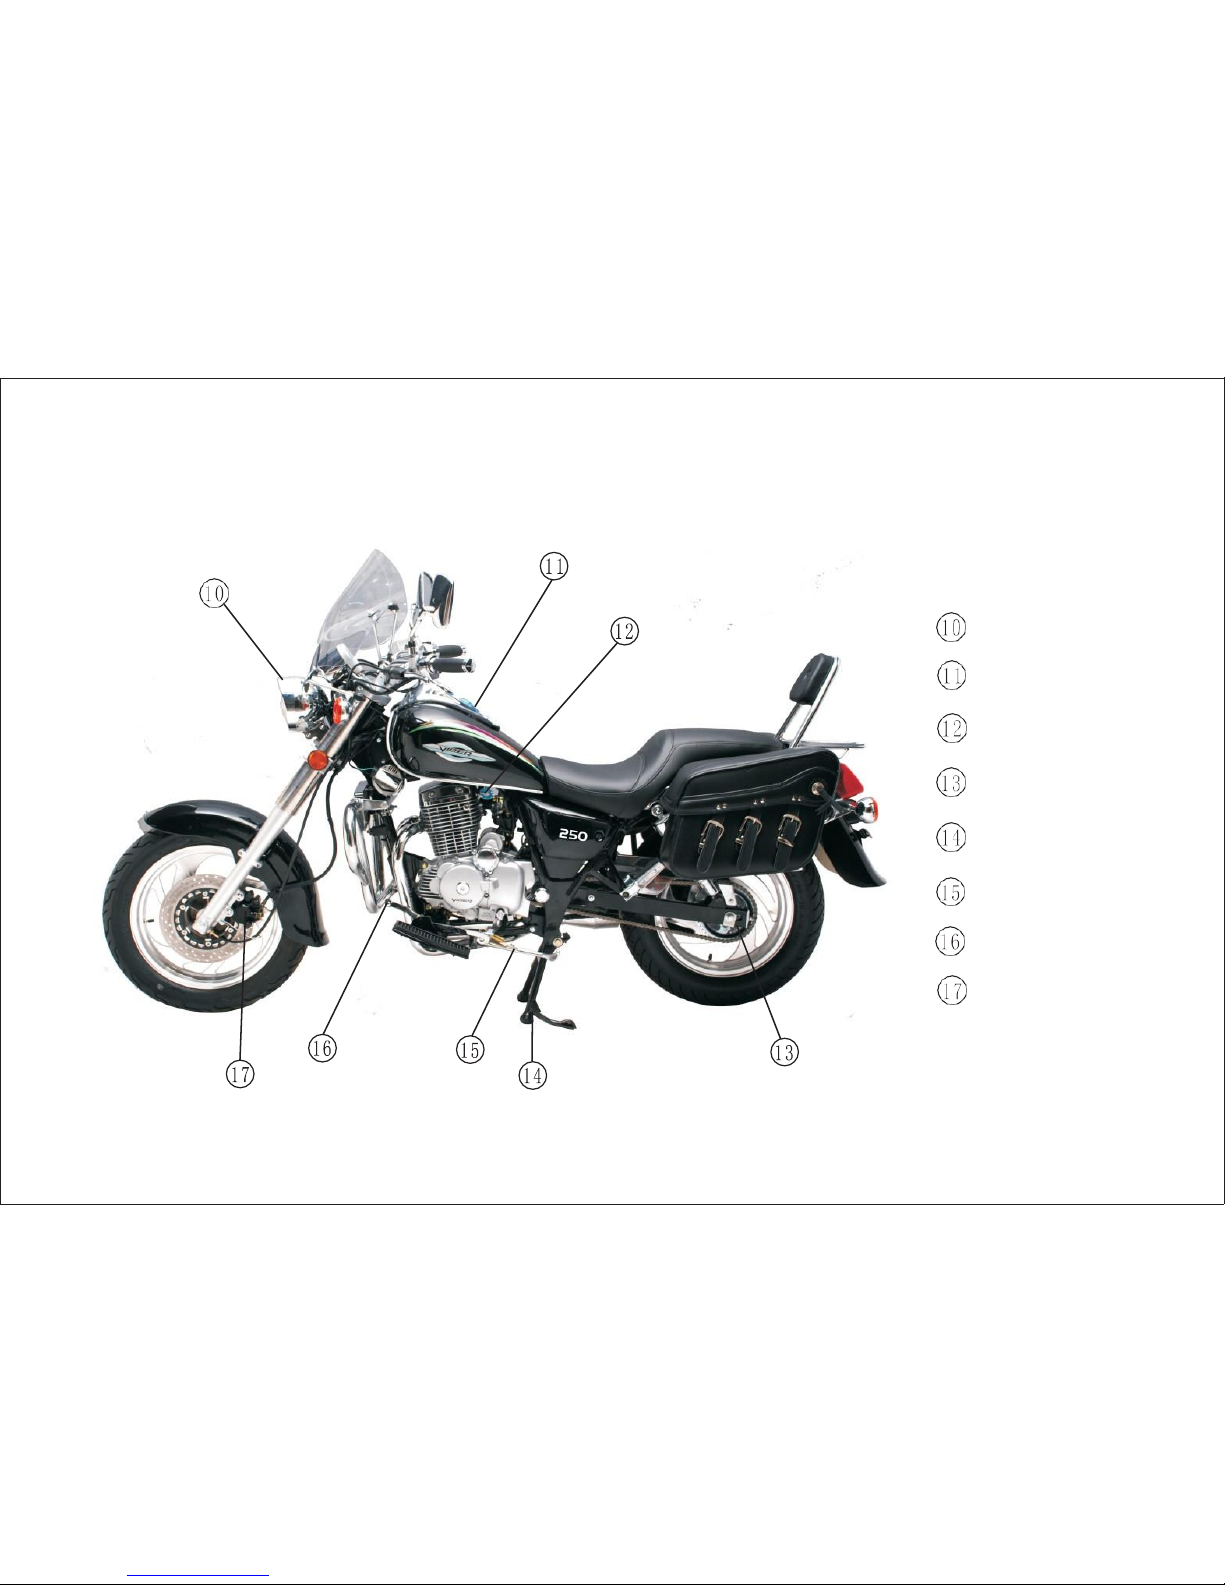
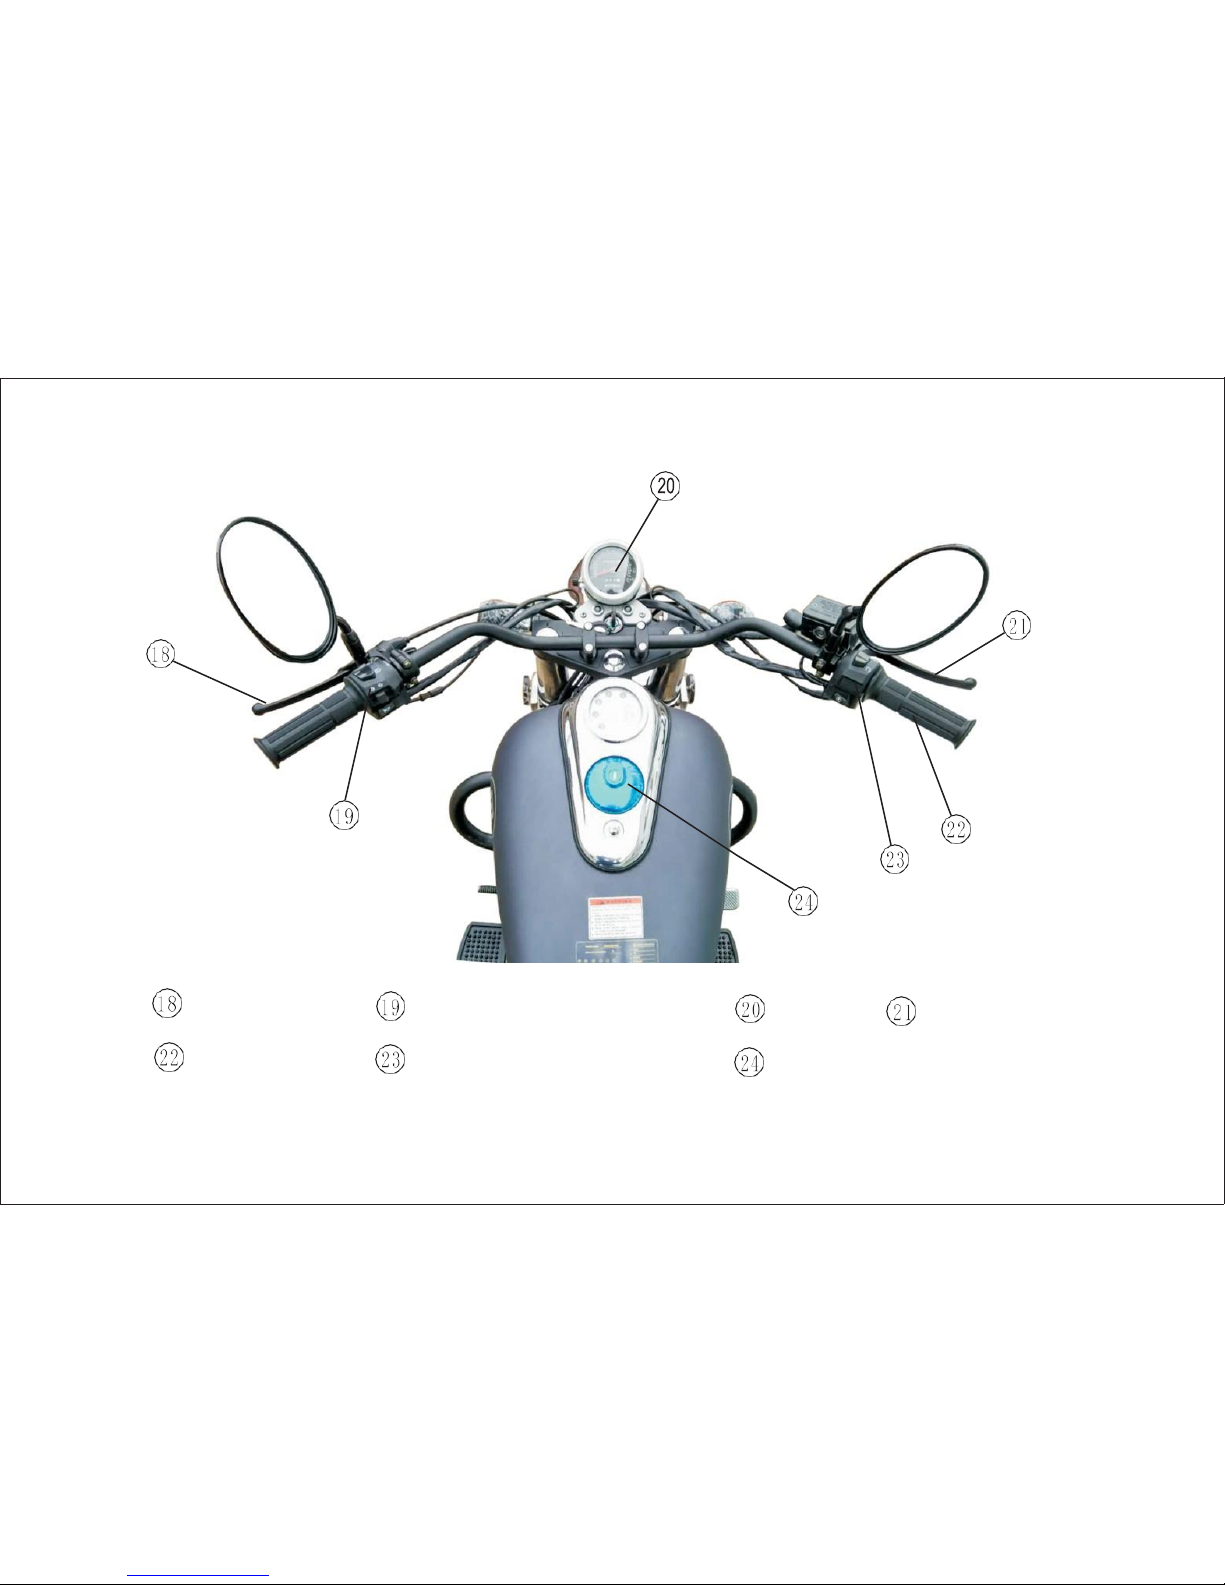
Be familiar with your motorcycle structure
Your riding skill and your mechanical
knowledge is the foundation of safe riding
practices. We suggest that you practice riding your
motorcycle in a non-traffic situation until you are
thoroughly familiar with your machine and its
controls. Remember practice makes perfect.
1

Know your safe speed limits
Ride within the boundaries of your own
skill at all times. Knowing these limits and
staying within them will help you to avoid
accidents.
Pay extra attention to safety when raining
Take special care on rainy days. Bear in mind
the braking distance on a wet road is twice as much
as on a dry one. Remember to ride a safe distance
from the vehicle in front.
Serial number location
The frame (VIN NO) and engine serial numbers
are used to register the motorcycle. The numbers will
assist your dealer to provide a better service
when
ordering spare parts.
Frame number is printed on the
front of the frame, the
engine number is printed on the
left side of the crankcase.
Frame number
( VIN number)
Do not overload
The maximum load of this model is 150KG, it
can be hazardous to over-load and could make it
difficult
to control the motorcycle when riding.
Engine number
2

Please write down the numbers below for future
reference. Important notification of security
Read and observe this Manual carefully. The
terms such as “Warning”, “Caution” and “Notice” are
used to emphasize the intensity of precaution.
Please
study and understand their meanings
thoroughly.
Warning
For warning information, in order to protect you
and other people’s safety as well as to avoid
damaging your motorcycle, this precaution must be
read.
Caution
Notice information; In order to extend the
service life of your motorcycle
Notice
Useful information.
3
Frame number (VIN number)
Engine number

PARTS LIST
Seat
Side cover
Rearview mirror
Turning lights
Oil cooling radiator
Rear brake pedal
Carburetor
Muffler
Rear brake panel
4

Front light
Fuel tank Fuel
Fuel Tap
Rear sprocket
Center stand
Side stand
Gearshift lever
Front disc brake
5

Clutch lever Left handlebar switch Meter Front brake lever
Throttle grip Right handlebar switch
6
Fuel tank cap

CONTROL PART
KEY
This motorcycle is equipped with two
keys, please keep one of them in a safe
place as the spare key.
“”(ON)POSITION
The ignition circuit is connected and the
engine can be started. The key cannot be
removed from the ignition switch in this position.
“”STEERING LOCK
To lock the steering, turn the steering handlebar
all
the way to the left, insert key in the ignition switch
and turn it anti-clockwise.
IGNITION SWITCH
The ignition switch has three positions:
“”(OFF)POSITION
The ignition circuit is on off and the
engine cannot be started, the key can now be
removed from the ignition switch.
7
!WARNING:
With the steering lock on, you cannot turn the
handlebars.

INSTRUMENT PANEL
④
③
②
⑤
①
③
Speedometer
The speedometer indicates the speed in
kilometers / Miles per hour.
④ Odometer
Odometer records total mileage covered.
⑤ High beam indicator
When the headlight is on full beam, the indicator
will show as a blue lamp.
⑦
① Milometer
⑥⑥Turn Signal light
When the indicators are being operated
either to the right or to the left, the indicator will
flash green.
The milometer registers the total distance
that the motorcycle has been ridden.
②
Reset button
When you press button
②
the milometer
resets.
⑦ Neutral light

LEFT HANDLEBAR CONTROL SYSTEM
①
③
Turn signal operation
Moving the switch to the “ “position will
flash the left turn signal. Moving the switch to the
““position will flash the right turn signal.
① Clutch
lever
④③
②
④Horn button
Press the button to sound the horn.
To start the engine or change gear, pull the
lever to disengage the drive system.
② Dimmer switch
High beam/dipped beam operation
Moving the switch to the up position
illuminates the high beam and the blue
indicator. Moving the switch to the down
position will illuminate low beam and the blue
indicator light will go out.
9
!WARNING:
When you want change lanes, turn on the
signal lights in advance. And after a lane change,
turn off the signal lights.

RIGHT HANDLEBAR CONTROL SYSTEM
①②
③
Throttle grip
Engine speed is controlled by the position of the
throttle grip. Twist it toward you to increase the
engine speed.
Light switch
④③
⑤
①Engine stop switch
If your press the switch to the position, the
engine can be started , when pressing the switch
to position, and the circuit is dis-connected,
and the engine cannot be started. This is the
emergency switch.
②Front brake lever
“”POSITION
Turns on the headlight, position light, speedometer
light, taillight at same time.
“”POSITION
Turns on the position light, speedometer light,
taillight at same time.
“”POSITION
Turns off the headlight, position light, speedometer
light, taillight.
⑤
Starting switch
Press this switch, to start the engine.
10

!WARNING:
Continuous use of the starter motor can
cause damage to the electrical circuits Do not
operateformorethan5
seconds a time.
FUEL TANK
③
②
① Fuel tank cap
To open the fuel tank cap insert the ignition
key and turn it clockwise. With the key still held in
a clockwise position remove the cap. To install
the fuel tank cap, simply line up the fuel tank
guide pins and push down until the locking pins
click into position. The key must be in the cap
before installing the cap. Turn the key anti-
clockwise and remove the ignition key from the
cap.
② Gear indicator
The numbers in this indicator shows the
gear position,1,2,3,4, or 5
③
Fuel level gage
This fuel level gage indicates the fuel in the
fuel tank, it is full when the needle points to the
F
position; it is empty when the needle points to the
E position, and you will need to refuel.
①
11

!WARNING:
Donotover- fuel.
CHOKE LEVER
To start the engine from cold, use the choke
lever located on the left side of the handlebar to
open the choke. When the engine reaches
temperature turn the choke off.
Choke Lever
Choke
FUEL TAP
This motorcycle is equipped with a manually
operated fuel tap. There are three positions:
“”POSITION
To run the engine, turn the fuel tap to the
“”
position. In this position, fuel will flow
from the fuel tank to the carburetor.
12

“”POSITION GEAR LEVER
If the fuel in the fuel tank is too low, turn the
lever to the
“ ”
position to use the 1
.
6L
of reserve fuel supply.
“”POSITION
Turn the lever to off
position whenever the
engine for more than a few minutes.
!WARNING:
This model is equipped with a 5 gear
transmission,
Turn the fuel tank switch on the “on” or
“reserve” position when starting.
!NOTICE:
Turn the fuel switch to the off position after
stopping.
13

!NOTICE:
When in neutral, the indicator on the meter
should illuminate green.
REAR ABSORBER
Adjust the rear absorber spring according to the
carrying capacity.
14

!
WARNING:
Left and right shock springs must be adjusted
to the same position. Improper adjustment will cause
instability.
REAR BRAKING PEDAL
The rear brake works when pushing the
brake pedal forward.
STAND
This bike has a side stand ①When you want to
park the motorcycle on the side stand, step onto
the end of the stand, and push down until it
reaches the stop.
①
Side stand ①
15

! WARNING:
!WARNING:
②
①Fuel tank cap
①
②Fuel level
ng. Pay atten on to check whether it turn
FUEL AND ENGINEOIL
RECOMMENDATION
Use unleaded gasoline with an octane
rating of 95 ron or higher.
Never add excessive fuel and avoid over-filling.
Before adding fuel, turn off the engine and turn
the key to “OFF “position.
!WARNING:
Only use the Un-Leaded Petrol.
16

!NOTICE:
When cleaning your motorcycle, avoid washing
the fuel tank with a high-pressure hose, to prevent water
entering the fuel tank.
API attributive classification standard
Engine oil
Use a premium quality 4-stroke engine oil to
ensure longer service life of your motorcycle.
Use only oil which are rated SE or SF under the
API service classification. The recommended
viscosity is SAE 15W-40. If SAE15W-40 engine
oil is not available, select an alternative
according tothe following chart.
20W 50
Machine
!WARNING:
Always store Fuel and oil carefully.
oil
10W 40 10W 50
10W 30
°
C
Temperature - 30 - 20 -10 0 10 20 30 40
°F - 22 - 4 14 32 50 68 86 104
17
15W 40 15W 50
Code
SD
SE
SF
SG
Grade
Low High
Table of contents
Other motorini Motorcycle manuals