Motorola MOT43FLC03 User manual

motorola
androidtv
Hey Google
User Manual
MOT43FLC03
MOT50ULC03
MOT55ULC02
MOT65ULC03
Please read this manual carefully for proper use before installing and using the product. Keep it in a safe place for
future reference. The images in this manual are for reference only.
TV LED


SAFETY WARNINGS
1
Content
Warning and safety notice..................................1
Intallation and connection..................................3
Package ...............................................................3
Tv installation........................................................3
Connecting peripheral equipment......................4
Control panel buttons.........................................6
Remote control....................................................7
Basic operations.................................................8
On / Standby.........................................................8
Signal source selection.........................................8
Description of menu opera......................................
.............................................................................8
Channel scan........................................................9
RECORD option ...................................................9
Program recording option......................................9
Quick Start instructions......................................9
Basic functions......................................................9
Kick start...............................................................9
Smart Apss...........................................................9
Network settings .................................................10
Bluetooth settings ...............................................10
Features ............................................................10
Important statement regarding services network
...........................................................................11
Troubleshooting................................................11
Technical specifications...................................12
Instructions for installtion in base ................ 14
Wall bracket installation...................................14
Guarantee certificate ........................................15
Warning and safety notice
Thank you for choosing our multi-functional, high-performance
smart LED TV. Enjoy the best audiovisual experience. This
product has been designed and manufactured to ensure
personal safety and has been tested under strict quality
standards before leaving the factory. However, improper use
may cause electric shock and fire. To ensure safety, get the
best performance and prolong the life of the product, please
read this manual and marking labels carefully before use and
comply with the following safety instructions.
Keep this user manual for future reference.
Warning
Accident risk
Indicate operations that are not allowed
Atención
Risk of personal injury or material loss
Indicate operations that are allowed
Under the following conditions:
•Power failure or unstable voltage.
•Abnormal sound or smell from the device.
•The AC power cord is damaged.
•The TV is damaged by falls, blows or impacts.
•Any liquid or foreign matter enters the TV.
Turn off the TV immediately, unplug the power cord from
the outlet, and contact authorized service personnel.
• If there is a gas leak or other flammable gases, do not
unplug the power cord of the TV or other electrical
appliances; instead, immediately close the gas valve and
open the doors and windows.

SAFETY WARNINGS
2
Warning
•Use only a 100-240 VAC, 50/60 Hz power source.
•This TV must be connected to a 3-pin power outlet for
safety reasons.
•All cables can be connected or disconnected only
after the power supply is turned off.
•Do not place the TV in an unstable position, as it may
fall, be damaged, or even cause a fire.
•Do not install the TV in an environment:
1. In direct sunlight, humidity, overheating or
excessive dust.
2. With flammable or explosive substances.
3. With flammable or corrosive gas.
4. In the bathroom, kitchen, etc.
•Do not use damaged or unsuitable plugs and make
sure that the plug and socket are connected correctly.
•Keep the plug and socket free of dust and metal parts.
•Do not damage the power cord:
1. It is not allowed to recondition the power cord.
2. Do not place heavy objects on the power cord.
3. Keep the power cord away from heat sources.
4. Do not drag the power cord when you unplug it.
•Do not connect too many appliances to one extension,
otherwise it may cause a fire due to high power
consumption.
•Do not let an open flame (e.g. burning candle) reach
the TV, otherwise it may cause electric shock or fire.
•Do not place a container with water on the TV to avoid
electric shock or fire caused by splashing drops.
•Do not insert any sharp object, metal or liquid into the
signal connector or vents to avoid short circuit and
damage to the product as well as electric shock.
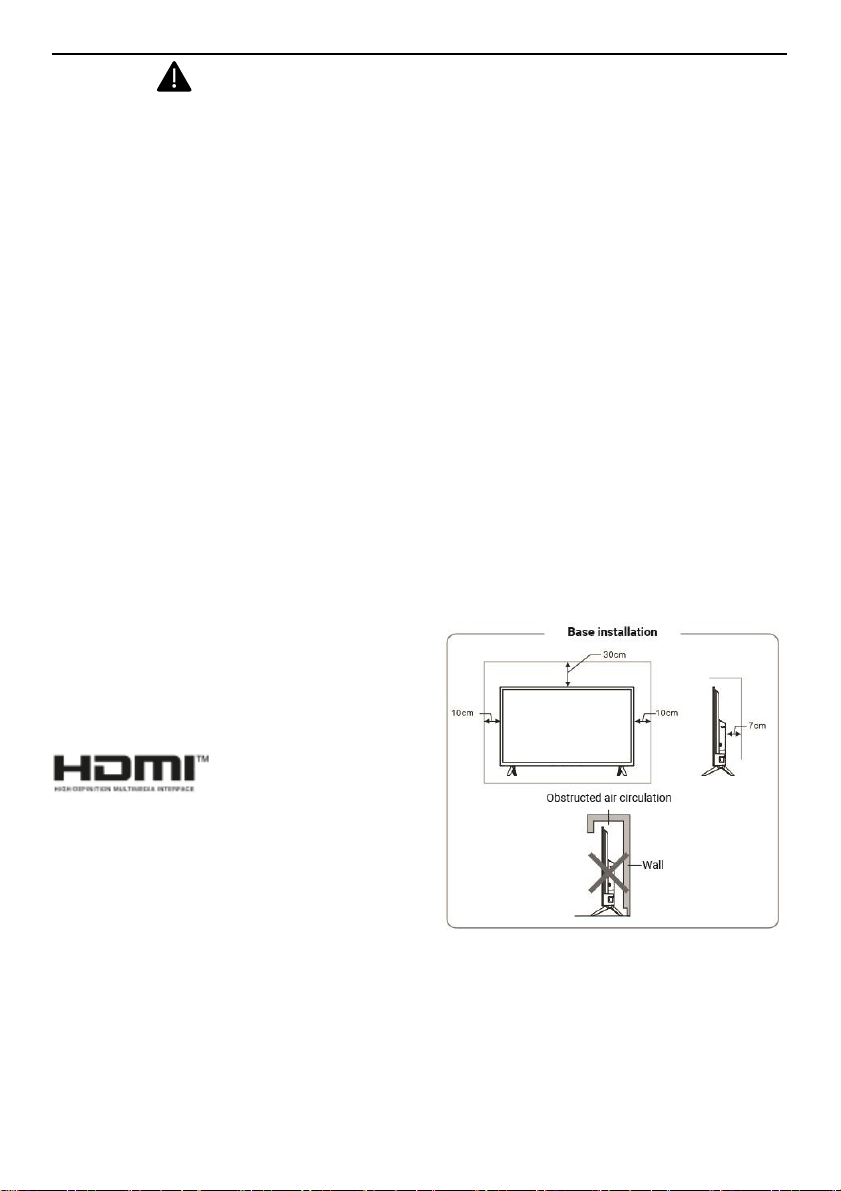
•The grooves in the case are designed to release heat
and ensure that all components inside do not reach high
temperature and can work normally for a long time. Do not
block slots when locating.
Warning
Do not touch the plug with wet hands, as this
may cause an electric shock.
Don't turn on the TV during a storm; instead,
disconnect the power plug and antenna
connector to avoid lightning strike.
Do not disassemble the TV as it may cause
electric shock or fire. Contact qualified
personnel for maintenance.
Atenttion
•Do not allow children to climb on the television.
•Keep small accessories out of the reach of children to
prevent swallowing.
•If the TV will not be used for a long period of time, turn
it off and unplug the power cord.
•Before cleaning the TV, unplug the power cord and
wipe it with a soft tissue; do not use chemical reagents
and avoid foreign substances entering the apparatus.
Improper cleaning (for example, with cleaning liquids,
water, etc.) may cause damage to the appearance and
erase the printed information on the product, even liquid
may enter the interior, damage the components and
cause the appliance to not work.
•To adjust the position or angle of the TV, disconnect
all cables and move it slowly to prevent it from falling.
•Do not rub, hit, bend, or squeeze the screen with any
hard object.
•Do not use the unit immediately after moving it to
places of high or low temperature as it may cause fogging
inside the unit and cause failure.
•If the screen breaks and liquid splashes on the skin,
immediately wash with clean water for 15 minutes and
consult your doctor.
•To carry the TV by hand, grasp it by the corners and
hold the bottom; do not exert force on the panel.

SAFETY WARNINGS
3
Atenttion
•If the same image is displayed for a long time or an
active image with fixed words, the icons will leave a
“afterimage” on the screen that will not disappear and will
remain for some time even after turning off. This
unwanted phenomenon is not covered by the warranty.
•Healthy television habits:
1. It is recommended to watch TV in adequate light;
Poor lighting or prolonged TV viewing can damage your
vision.
2. Proper volume adjustment so as not to hurt your ears.
•Disconnect the power cord of the appliance to cut off
the power.
•If you use a plug or coupler as a disconnect device,
you must make sure it is easy to use.
•The plug must be securely connected. Loose plugs
can cause sparks and fire.
•All technical specifications in the user manual and
packaging are subject to change without notice. If there
is a slight difference between the user manual and the
actual operation, the latter shall prevail.
Google, Google Play, Android TV y Chromecast built-in and
other marks are trademarks of Google LLC.
Google Assistant is not available in certain languages and
countries. Availability of services varies by country and
language.
.
Installtion y conecction
Packing
1. TV crew.
2. User manual.
3. Remote control.
4. Power cord (or attached to the TV).
TV installation
Installation Tips
•The TV should be installed near an electrical outlet for
easy plugging and unplugging.
•For your safety, use an appropriate bracket for wall or base
installation.
•To avoid damage, it is necessary to install the TV on a flat
and stable surface or fix it to a firm wall.
•Consult qualified technical personnel for the installation of
the TV on the wall. Incorrect installation could make the TV
unstable.
•Do not install the TV in a place where it is subject to
mechanical vibration.
•Do not install the TV in a place where insects can enter
inside the set.
•Do not install the TV in front of the air conditioner outlet,
the inner panel of the screen may condense moisture and
cause failure.
•Do not install the TV near strong magnetic fields, this may
cause interference and damage from electromagnetic waves.
The terms HDMI and HDMI High-definition Multimedia
interface and the HDMI logo are trademarks or registered
trademarks of HDML licensing Administrator.lnc. In the United
States and other countries.

CONNECTION OF PERIPHERAL EQUIPMENT
4
Warning
Never place the TV in an unstable place. The TV may fall
and cause serious personal injury or death. Most injuries,
especially in children, can be avoided by taking simple
precautions such as:
•Use cabinets or supports recommended by the
manufacturer of the television.
•Only use furniture that can safely support the TV.
•Ensure that the television does not overhang the edge
of the supporting furniture.
•Do not place the television on tall furniture (for
example, cabinets or bookcases) without anchoring both
the furniture and the television to a suitable support.
•Do not place the television on cloth or other materials
that may be located between the television and
supporting furniture.
•Educate children about the dangers of climbing on
furniture to reach the TV or its controls. If your current
television will be moved and relocated, the same
considerations as above should apply.
Important peripheral equipment connection:
1. When connecting a device that supports ARC function,
please select the HDMI-l interface.
2. HDMI connector can fulfill the function of DVI connector
with external HDMI/DVI switcher..
3. Peripheral devices and cables described in this manual
must be purchased separately.
43"
Salida óptica -------•JOP’
(Y) Yellow (VIDEO signal cable)
(W) White (AUDIO-L signal cable)
(R) Red (AUDIO-R signal cable)
Ventilation
• Keep at least this space around the TV as shown in the
figure.
• Do not cover the vents or insert any object into the case.
• Do not place the set in a confined space, such as on a shelf
or built-in cabinet, unless the TV is well ventilated.
Al conector de alimentación
(100-240 VGA, 50/60 Hz)

CONNECTION OF PERIPHERAL EQUIPMENT
5
50”-65"
Warning
Before connecting the external antenna to the TV signal port, turn off the power supply of
the TV. Do not bring the external antenna close to the high-voltage electrical network to
avoid electric shock. The wired network antenna connected to this TV must be isolated
from protective earth, otherwise it may cause fire or other hazards.

CONTROL PANEL BUTTONS
6
1. LED indicator for power on and remote control receiving
window.
2. Standby: Press this button to turn on the TV or return to
standby mode.
1. Electric LED indicator and remote receiving window.
2. OK Rocker:
Switch on or go to standby mode with the OK button:
1. After plugging the power cord into the socket, you can
press the OK button to turn on the TV.
2. In the power-on state, press the OK Rocker key:
After turning on the TV, press the OK Rocker key:
1. In menu operation without OSD, press OK key to display
the signal source.
2. In OSD menu operation, press OK key to confirm the
operation.
Move Up/Down/Left/Right on the rocker key:
1. In TV mode, move the Up/Down direction button to select
the channel.
2. In smart mode, move the Up/Down direction button to
select the channel.
3. In menu operation without OSD, move the control button
to Left/Right to decrease/increase volume.
4. In OSD menu operation, move Up/Down/Left/Right
direction button to operate menu.
Important
1. The appearance varies depending on the model, and
the actual product shall prevail.
2. Use the remote control to perform more operations.
Control panel buttons
43”-50”

REMOTE CONTROL
7
Remote Control
Remote control battery installation method
Remove the battery compartment cover and insert two
batteries AAA (N.7, 1.5 V). Make sure the polarity of the
batteries matches the polarity markings “+” and in the battery
compartment of the remote control.
Precautions for using the remote control
•When using it, the remote control should be pointed
towards the remote control sensor on the TV. If there is an
object between the remote control and the remote control
sensor of the TV, it may affect normal operation.
•Do not allow the remote control to experience strong
vibrations. Do not place the remote control in direct sunlight
as this may deform it.
•The remote control may fail if the remote control sensor of
the TV is exposed to direct sunlight or strong light; in this case,
change the lighting angle of the TV or use the remote control
near the remote control sensor of the TV.
•The remote control will not work if the batteries are low. In
this case replace the batteries. If you are not going to use the
batteries for a long period of time or if the batteries run out,
please remove them to prevent the remote control from
corroding from battery leakage which may lead to remote
control damage and failure.
•Do not use batteries of different types. Do not use new and
used batteries at the same time. Replace them in pairs.
•Do not throw batteries into fire or charge or allow them to
decompose; do not charge, allow to short-circuit,
disassemble/assemble, heat or burn used batteries. Dispose
of used batteries in accordance with the regulations on
environmental protection.
Bluetooth Remote Control Operation Manual
Bluetooth pairing
If the remote control's Bluetooth is not paired, please press
the Google Assistant key and then long press [VOL-] + [←]
keys to pair. When the TV displays the device, select it and
press the [OK] key to finish.
Note:
1. Some models may not be supported.
2. Your location must match the language to get accurate
search results. Some features may not be available if your
location and language settings are different.
3. You can change the language according to the language
input setting. The languages available for the voice
recognition functions can be changed according to the policy
of the operation of the service.
4. Service details may vary by model.
5. Before using voice recognition, you need to make sure
the remote is paired.

REMOTE CONTROL
8
Bassic opertations
Important:
1. Button operation is for operating the remote controller.
For the operation of the control panel buttons, refer to the
description of the operation of "Panel Control keys".
2. The [ ► ] button indicates the direction and the [ ► ] (play)
button is the playback function.
3. The menu operation descriptions in this manual are
explained according to the TV mode. Operations in other
modes are similar to TV mode, users can take it as a
reference.
4. Before turning on the platform, please make sure the
power supply is stable.
5. The software in different countries may vary. The specific
operation of the software should be subject to the actual
situation.
6. Because the product is constantly updated, the software
is updated at any time, if the actual operation, please refer to
the actual product.
On / Stanby
Plug the power cord into the power outlet, and then press the
[ ] key to turn on the TV. When you use the TV for the first
time, the initialization settings will appear, please configure
them according to your needs. In the power-on state, press
the [ ] key to switch to standby mode.
Signal source selection
You can connect various devices to the TV and view high-
quality images. If your video device has HDMI, composite, and
other video output ports, you can select one of them and
connect it to the corresponding input ports on the TV. Once
connected, turn on the device and press [F* ] key, the signal
source menu will be displayed on the screen. Press [▲] / [▼]
key to select input signal, and press [OK] key to confirm.
Description of menu operation
Press the [ S*t ] key to display the main menu on the screen:
1. Press [▲] / [▼] key to select a menu among Channels,
TV options, Record.
Remote control buttons
Note: The actual appearance of the remote control may be
different from the image; Please refer to the actual device.
Buttons
Function
Turn On ( )
Switches between normal mode and
standby mode.
Silence ( )
Turn the sound on and off.
NETFLIX
Open the app.
O YouTube
Open the app.
prime video
Open the app.
Google Play
Open the app.
Bookmark launches recommended videos.
Turn on Bluetooth remote pairing or tap to
talk to Google.
Configuration ( )
Open the settings menu.
◄, ►, ▲, ▼
Select items or adjust values.
OK
In TV mode, open the channel list. In OSD
menu operation, please confirm the
operation.
Go back (←)
Go back to the previous menu interface.
Home ( )
Shows the home page.
Electronic Program Guide.
VOL+/-
Volume increase/decrease.
Fountain()
Show signal source menu.
CH+/-(˄P ˅)
Change the channel.
Button red
Button green
Button yellow
Button blue
Special function buttons.

BASIC OPERATION
9
2. Press the [ ◄] / [ ►] key to select an item in the menu.
3. Press the [OK] key to enter the submenu.
4. Press the [▲] [▼] key to adjust the value or setting.
5. When the main menu appears on the screen, press the
[S*ss] key to exit the main menu; press [←] key to return to the
previous submenu.
6. During menu operation, the icons for invalid options will
turn gray. channel scan.
Channel scan
Scan for channels before watching TV for the first time. Before
scanning, please make sure the antenna has been connected
correctly.
1. Press the [ S* ] key and press the [▲] [ ▼] [◄] [►] key
to select Channel > Channel installation> Mode
Antenna/Cable.
2. Select Channels > Channel Scan and press [OK] key to
search for the station automatically.
Quick Start instructions
Basic fuctions
Press the key [ H*s] on the remote control to display the home
page.
1. Press the key [◄] [►] to select an application;
2. Press key [OK] to run the application;
3. Press key [←] to return to the previous page;
4. Long press key [ H*s] to open all apps;
Fast boot
Before using the device, please familiarize yourself with the
operations for the operations for a better experience.
Language input setting
Language: In smart mode, select the system language. Press
the key [S*] , and select Device Preferences>Language and
press the [OK] key, press the key [▲] [▼] to select the desired
language and press the key [OK].
Select input method: In smart mode, press key [S*], select
Device Preferences> Keyboard> Current Keyboard, and
press key [▲] [▼] to choose input method in the submenu.
Set system time: In smart mode. press key [S*], select Device
Preferences> Date >&Time > Automatic date & Time, select
“Use network-provide time”, you can only adjust the system
time manually.
Smart apps
Applications: The Applications option helps users to manage
the applications and allows them to install or uninstall
applications on the local drive.
Press H* key, then press [◄ ] [►] key to select an application
and press [OK] key to enter.

BASIC OPERATION
10
•How to install an application?
Long press [ ] key, and select Get more apps, then press
[OK] key to enter, search the apps you want to install.
•How to uninstall an application?
Long press [ ] key and select the application you want to
uninstall, long press [OK] key and select to uninstall it.
MultimediaPlayer: Open the MultimediaPlayer application,
and press [OK] key to enter and select VIDEO, PHOTO,
MUSIC and TEXT.
•Player files on local disk device: Before playing the files
on local disk, please insert the memory device of USB
interface. Open MultiMediaPlayer application, and press [OK]
key to enter. Select target card, press [OK] key to enter folder
and press ← key to return to desktop.
Attention:
1. Non-standard USB devices will probably not be
recognized; in this case, change the standard USB device;
2. The streaming media system has certain restrictions on
the file format; playback may be abnormal if it is out of system
restriction;
3. Please do not unmount the USB device during playback
or any other system or device may have problems; before
changing the USB device. turn off the power supply to the TV;
4. The system supports standard USB.1 and USB.2
devices, such as USB memory devices and removable hard
drives.
5. The maximum output current of the USB port of this
device is 500mA; and self-protection will be on if it is beyond
the limit; use the external power supply if an external device of
higher current is connected.
6. The system is complicated; when you are reading or
playing the files, the display may continue or certain functions
may be invalid due to the compatibility or stability of the USB
device; in this case, turn off the device and restart the system
again.
Network settings
• Wi-Fi
1. In smart mode, select Settings > Network & Internet >
Wi-Fi and press [OK] key to turn on Wi-Fi, then the wireless
network signals searched by your device are listed
automatically. The searched network without the [ ] icon
indicates that the unit connects to the network without a
password. The network with the [ ] icon indicates that it is
encrypted and you need to enter the correct password to
connect to the network.
2. Select the network you want to contact in the network list
and press the [OK] key;
3. Type the network connection password in the box and exit
the keyboard, then select [OK] and press the key to connect to
the network.
• Ethernet
1. Select Settings > Network & Internet > Ethernet;
2. Set Proxy settings and IP settings, press [OK] key to
connect to the internet.
•Wow/wol
Allows remote systems to wake up when the TV is asleep by
sending a frame of a specific format that the network client
anticipates (it is available when the network is connected).
Select Settings > Network & Internet > Wol/Wow, and press
[OK] Key to enable or disable it and press [OK] key to confirm.
Bluetooth settings
In smart mode, select Settings > Remotes & accessories,
and press [OK] key, then follow the prompt to connect.
Note: Select Settings > Device Preferences > About >
Device name, then you can check the name of the TV.

TROUBLESHOOTING
11
Important statement about network services
All content and services obtained from this TV belong to third
parties and are subject to the laws of copyright, patent,
trademark or other intellectual property rights. Such content
and services and services are for non-commercial purposes
only. You are not allowed to use any content or service without
the authorization of the content owner or service provider.
Our company will not assume any responsibility for any direct,
indirect or incidental loss or damage caused by your or a third
party's access to any content or service or any third-party
information or software through this equipment, under any
circumstances.
Third party service may be changed, removed or discontinued
without notice. Our company does not ensure or guarantee the
continuous availability of any service or content within any
given period.
Our company is not responsible for services related to such
service and content.
In addition, we do not assume any responsibility for the service
provided to the client. Please contact the relevant content and
service providers directly if you have a problem or request in
relation to the service or content in question.
Troubleshooting
•Rain is seen on the TV screen and, in addition, the TV
makes noise.
1. Check whether the antenna plug is loose or the cable is
not in good condition.
2. Check the type of antenna (VHF/UHF).
3. Adjust the orientation and position of the antenna.
4. Try using a signal booster.
•There is no picture or sound on the screen. The
indicator light is off.
Check if the power supply is connected.
•The TV image has interfering dots, lines, or streaks.
Do not use a hair dryer near the TV and adjust the orientation
of the antenna to reduce interference.
•The TV screen has double images.
1. Use an antenna in a high position.
2. Adjust the orientation of the antenna.
•The image has no color.
Press the [ ] key and select Picture > Saturation to
increase the color saturation.
•The TV has no sound.
1. Adjust the volume to a suitable level.
2. Press the [ ] key on the remote control to cancel mute
mode.
• Signal input images are not displayed on the screen. The
indicator light blinks.
1. Check whether the signal cable is loose or falls off.
Connect the cable again.
2. The computer may be in standby mode, please restart it.
• The remote control distance is short or out of range.
1. Move the object that blocks the receiving sensor.
2. Replace las batteries.
• The browser cannot access any link.
1. Ask the network administrator to get the available IP
address and other parameters.
2. Check if the network connection cable is correctly
connected.
3. Check with the network service provider.
• The online video playback is very slow.
1. Upgrade your network bandwidth to a higher one.
2. Replace with other addresses for better resources.
• The TV is slow and the system fails. You can't use the TV.
Disconnect the power supply first and connect it after 1-2
minutes. Then turn the TV back on.
Characteristics
Android TV™
Android TV offers a smarter and easier way to get more
out of your TV.
Google Assistant
Use your voice to search for shows, control devices and
much more; you just have to ask Google.
Google Play
Google Play brings your favorite apps and games to your
TV. See, play and do what you want, when you want.
Chromecast built-in™.
Easily cast your favorite movies, music and more to your
TV with Chromecast built-in.

SPECIFICATIONS
12
Technical specifications
Unit
Dimensions (length x width x height) and weight
43"
Resolution max.
1920 X 1080
Optimal resolution
1920 X 1080@60Hz
Power supply
100-240 VGA, 50/60 Hz
Speaker power consumption
8W + 8W
43"
Without base
Without packaging: 958 x 72 x 558 (mm³)
Base included
Without packaging: 958 x 223 x 610 (mm³)
Packaging: 1073 x 119 x 650 (mm³)
Net weight: 6.7 kg
Gross weight: 8.7 kg
50" - 65"
Resolution max.
3840 X 2160
Power supply
100-240 VGA, 50/60 Hz
Speaker power consumption
8 W + 8 W
50"
Without base
Without packaging: 1112 x 70 x 642 (mm³)
Base included
Without packaging: 1112 x 243 x 672 (mm³)
Packaging: 1218 x 120 x 734 (mm³)
Net weight: 10 kg
Gross weight: 12.1 kg
Operating environment:
Temperature: 5 °C -40°C
RH (relative humidity): 20%- 80%
Atmospheric pressure: 86kPa-106 kPa
Storage environment:
Temperature: -20 °C -55 °C
RH (relative humidity): 20%-80%
Atmospheric pressure: 86kPa-106 kPa
TV technical specifications
1. Compatible systems:
ATV: PAL M/N, NTSC M.
DTV: ISDB-T.
2. TV (RF): 75 Q unbalanced.
3. AV video input: 75 Q, 1+0. 1 Vp-p, RCA.
4. AV audio input: 20 k Q, 0.2 -2 V rms.
5. HDMI video input: 480i, 480P, 576i, 576P, 720P, 1080i.
1080P, 2160P.
6. Specific internal memory capacity according to the
actual configuration.
7. Specific cache capacity according to the actual
configuration.
8. Wireless connection: Wi-Fi (IEEE 802.11 b/g/n).
65"
Without base
Without packaging: 1445 x 89 x 833 (mm³)
Base included
Without packaging: 1445 x 350 x 886 (mm³)
Packaging: 1588 x 160 x 938 (mm³)
Net weight: 15.2 kg
Gross weight: 20.4 kg

SPECIFICATIONS
13
Energy management
Mode
Power cosumption 43”
Normal operation
<75 W
Standby
<0.5 W
Mode
Power cosumption 50"
Normal operation
<130 W
Standby
<0.5 W
Mode
Power cosumption 65”
Normal operation
<1 80 W
Standby
<Q.5 W
Note: If you turn on the Wow/Wol function, the maximum
power consumption of the machine in standby mode does not
exceed 1 W.
HDMI display mode
43”
VESA mode
No.
Mode
Resolution
Update frequency
1
VGA
640 X 480
60 Hz
2
SVGA
800 X 600
60 Hz
3
XGA
1024 X 768
60 Hz
4
SXGA
1280 X 1024
60 Hz
5
WXGA
1600 X 900
60 Hz
6
WUXGA
1920 X 1080
60 Hz
50” - 65”
VIDEO mode
No.
Mode
Resolution
Update frequency
1
SD
720 X 480i/p
60 Hz
2
720 X 576i/p
50 Hz
3
HD
1280 X 720p
50 Hz
4
60 Hz
5
FHD
1920 X 1080i/p
50 Hz
6
60 Hz
7
UHD
3840 X 2160p
24 Hz
8
25 Hz
9
30 Hz
10
50 Hz
11
60 Hz
Note: In UHD mode, 50Hz and 60Hz are only effective under
HDMI 2.0 version.
VESA mode
No.
Mode
Resolution
Update frequency
1
VGA
640 X 480
60 Hz
2
SVGA
800 X 600
60 Hz
3
XGA
1024 X 768
60 Hz
4
SXGA
1280 X 1024
60 Hz
5
WXGA
1600 X 900
60 Hz
6
WUXGA
1920 X 1080
60 Hz
7
4K
3840 X 2160
30 Hz
8
60 Hz
Note: In 4K mode, 60Hz refresh rate is only effective under
HDMI version 2.0.

FOUNDATION BASE
14
Base installation instructions
Place the TV on a flat surface. Be sure to distinguish between
the right and left of the stand and the front and rear of the
stand, then insert the stands into the slots on the bottom of
the TV according to the direction of the arrow in the figure.
Align the screw holes and make sure to screw together tightly
(Note that the base module must be adjusted as shown in the
figure, otherwise the installation will be incorrect).
Important: The actual appearance of the base and TV may
differ from the images shown.
Please refer to the actual device.
Wall bracket installation
Warning
•Please purchase a suitable wall mount for the TV when you
install it on the wall.
•Make sure the load capacity of the wall for the installation
of the wall mount is not less than 4 times the weight of the TV
and the wall mount to prevent it from falling.
•For more information on installing the wall mount, see the
instructions supplied with the TV and the wall mount.
•Make sure there are no cables or conduits in the area of the
wall where the wall bracket will be installed.
•If you need help with the installation of the wall mount,
contact a technician. The company is not responsible for
accidents, injuries or personal damage caused by improper
installation of the TV.
Distance between holes in
the wall (H x V) (mm)
Required screws (recommended screw
length) (mm)
43":400 X 200
Top: 2 x M6(8.5+L1<L<30+L1), Machine
screw.
Bottom:2xST6 (L'=6+ L1') Flat head self
tapping screws.
50": 300 X 300
Top: 2 x M6{28+L1<L<30+L1), Machine
screw.
Bottom: 2 x ST6(6+ L1'<L'<9.5+ L1') Flat
head self tapping screws.
65”: 300 X 200
Top: 2 x M6(28+L1<L<30+L1), Machine
screw.
Bottom: 2 x ST6(6+ L1'<L'<9.5+ L1') Flat
head self tapping screws.
Note:
•If you find any screws in the wall mount hole behind the TV
before you install it, remove the screws and save them for later
use.
•Please purchase wall screws according to the actual
installation.
•If you find silver head self-tapping screws in the
accessories, decide if they are suitable to use according to the
actual wall bracket installation.
- 2 self-tapping flat head screws ST6x8 mm (optional).

CERTIFICATE OF GUARANTEE
15
WARRANTY TERMS AND CONDITIONS
Car Sound vision CIA. Ltda. ("Company") warrants that the product is free from manufacturing defects or any other defect as
specified in the Terms and Conditions. The warranty will begin from the date of purchase of the product by the first end user
("Customer") and will be valid for the period described in the Terms and Conditions, which the Customer is deemed to have
accepted at the time of purchasing the product.
1. The warranty period for the product is 24 months from the date of purchase. Warranty service includes replacement or repair
and will be performed only through authorized service centers.
2. The guarantee will be valid only when the original purchase invoice is presented at the time of requesting the service. The
Company reserves the right to refuse warranty service if proof of purchase is not presented.
3. In case of commercial use of the product, the warranty period will be limited to 90 days only.
4. The warranty will cover only functional parts, manufacturing defects and does not cover damage to the product resulting from
unauthorized adaptations, adjustments, tampering or repair; in addition to installation, placement, handling, use or deviation from
the instructions established in the user manual (if applicable). It also does not cover normal wear and tear caused by the use of the
product.
5. The warranty does not cover any accessory of the product.
6. All plastic, rubber, glass or cosmetic parts (consumables) that are replaced will be done at the customer's expense.
7. The guarantee will not apply to damages caused by accidents, voltage fluctuations, lightning, presence of water (beyond
certified limits, if applicable), fire, acts of nature, inadequate ventilation, falls, blows or any external impact. That is, causes that are
beyond the control of the Company.
8. The Company is not responsible for providing repair services or spare parts after the warranty period expires. If the repair
service and spare parts are provided, these will be charged to the customer.
9. Although the Company will take all necessary measures to repair the product that is in the warranty period and maintain a
sufficient stock of spare parts, in certain cases, due to the non-availability of spare parts or finished product; being in a state that is
beyond economical repair, the company may offer a replacement scheme to the Customer. The terms of any such replacement
offer are subject to change from year to year and will also apply to the maximum retail price of the product.
10. All shipping and handling charges incurred during replacement or repair will be borne by the Customer.
11. The guarantee is void if:
•The serial number on the product has been altered, removed or damaged.
•The product is not used according to the instructions provided in the User Manual.
•The defects are caused by pets, rats, cockroaches or any other animal or insect.
12. The warranty automatically expires after the period of time indicated in the Terms and Conditions, even if the product has not
been in use during that time for any reason.
13. This guarantee will not affect the legal rights of Clients under any applicable law.
14. The client agrees to indemnify and hold harmless against all damages, liabilities, costs, expenses, claims, demands and
procedures (including attorneys' fees) that the Company may suffer as a result of: (i) the violation of these Terms and Conditions
of guarantee by theClient; (ii) violation of applicable laws by the Customer; (iii) any action or inaction that results in willful misconduct
or negligence on the part of the Customer.
15. In case of repairs of any part of the product, the guarantee will continue thereafter and will remain in force only during the
unexpired period. In addition, time required for repair and in transit, whether under warranty or otherwise, will not be excluded from
the warranty period.
16. None of the Company's employees, dealers, distributors or authorized service centers have the authority to modify these
terms and conditions.
17. Customer agrees that the courts of this country have exclusive jurisdiction to resolve any dispute that may arise in connection
with this warranty or these terms and conditions.
18. Company shall not be liable for any indirect, special, punitive, exemplary, speculative, or consequential damages, including,
but not limited to, any loss of use, business interruption, and loss of revenue or profit, regardless of whether you had prior notice of
the possibility of such damages.
19. For future reference, assistance or information please contact our Customer Service Center: Servihogar call center: 07-500-
5004.
Write us © : 098-967-4865


120201-1197
This manual suits for next models
3
Table of contents