MOX C40 Series Product manual
IS234 Rev.00 20/11/2019
Série C40
Automatizace pro sek ní zdvihací vrata
Automation for sectional overhead door
Automatisierung für Deckensektionaltor
Automatisme pour portes basculantes sectionnelles
Automatismos para puertas basculantes seccionales
Automações para portas basculantes seccionadas
Automatisering voor sectionale overheaddeur
Automatyzacja bram segmentowych napowietrznych
Originální návod
CZ - Pokyny a výstrahy pro instalatéra
EN - Instructions and warnings for the installer
DE - Anweisungen und Hinweise für den Installateur
FR - Instructions et consignes pour l’installateur
ES - Instrucciones y advertencias para el instalador
PT - Instruções e advertências para o instalador
NL - Aanwijzingen en waarschuwingen voor de installateur
PL - Instrukcja i ostrze enia dla instalatora
2
CZ Všeobecná bezpe nostní opat ení
Nerespektování informací, uvedených v tomto návodu, m že vést k úraz m osob nebo poškození
za ízení.
Tento montážní návod je ur ený jen pro kvalifikovaný personál.
MOX MOTION GATES nem že nést odpov dnost za žádná poškození nebo úrazy, zp sobené nesprávným používáním nebo jakýmkoli jiným
používáním, než je uvedeno v tomto návodu.
Montáž, elektrické zapojení a se ízení musí provést kvalifikovaný personál v souladu s nejlepšími postupy a podle platných p edpis .
P ed montáží výrobku si pe liv p e t te návod. Nesprávná montáž m že být nebezpe ná.
P ed montáží výrobku se ujist te, že je v bezvadném stavu: v p ípad pochybností za ízení nepoužívejte a obra te se jen na kvalifikovaný
personál. Výrobek neinstalujte ve výbušných prostorách a atmosférách: p ítomnost zápalných plyn nebo par p edstavuje vážné
bezpe nostní riziko.
P ed montáží motoriza ního za ízení prove te všechny nutné konstruk ní úpravy pro vytvo ení bezpe né v le a pro zakrytí nebo odd lení všech
prostor s rizikem sev ení, st ihnutí, zachycení a všeobecn nebezpe ných oblastí.
Zajist te, aby stávající konstrukce spl ovala normy, týkající se pevnosti a stability.
MOX MOTION GATES neodpovídá za nedodržování dobrých pracovních metod p i výrob rám , které mají být motorizované a za žádné deformace
p i používání.
Bezpe nostní za ízení (fotobu ky, bezpe nostní hrany, nouzové vypína e atd.) musejí být instalována s ohledem na: platné zákony a p edpisy,
dobré pracovní postupy, montážní pokyny, logiku obsluhy systému a síly, vytvá ené motorizovanými vraty nebo bránami.
Bezpe nostní za ízení musejí chránit p ed místy s nebezpe ím sev ení, íznutí, zachycení a všeobecnými riziky
motorizovaných vrat nebo bran. MOX MOTION GATES odmítá jakoukoli odpov dnost p i montáži díl nekompatibilních s
bezpe ným a správným provozem. Umíst te zákonem požadované štítky pro ozna ení nebezpe ných míst.
Každá instalace musí být opat ená viditelným štítkem, ozna ujícím motorizovaná vrata nebo bránu.
V sí ové elektrické p ípojce musí být namontovaný spína odpojující všechny póly, se vzdáleností kontakt v rozpojeném stavu minimáln 3 mm.
Zajist te, aby v p ívodním napájecím vedení byl instalovaný jisti zbytkových proud , který odpojuje elektrickou soustavu p i nadproudu
maximáln 0,03 A v souladu s nejlepšími postupy a platnými p edpisy.
Pokud je to požadováno, p ipojte automatizaci na ú inný systém uzemn ní, spl ující platné bezpe nostní normy.
B hem postup instalace, údržby a oprav odpojte elektrické napájení p ed otev ením krytu pro umožn ní p ístupu k elektrickým díl m.
S díly elektroniky je nutno manipulovat s nasazenými uzemn nými antistatickými vodivými náramky.
Pro opravu nebo vým nu výrobk používejte jen originální náhradní díly.
Montér musí dodat všechny informace, týkající se automatického, ru ního a nouzového ovládání motorizovaných vrat nebo brány a musí uživateli
poskytnou návod k obsluze.
Obalové materiály (plasty, polystyren atd.) nesm jí být vyhazované do životního prost edí nebo ponechávané v dosahu d tí, nebo p edstavují
potenciální zdroj nebezpe í.
ásti obalu vyhazujte a recyklujte v souladu s platnými normami. Tento návod je nutno uložit a p edat všem možným budoucím uživatel m systému.
Prohlášení o shod
Já, podepsaný, jako zákonný zástupce výrobce:
Roger Technology - Via Botticelli 8, 31021 Bonisiolo di Mogliano V.to (TV)
tímto PROHLAŠUJI, že níže popsané za ízení:
Popis: Automatizace pro sek ní zdvihací vrata
Model: série C40
Spl uje zákonné požadavky následujících sm rnic:
• Sm rnice 89/336/EEC (sm rnice o elektromagnetické kompatibilit ) a následných dodatk ;
• Sm rnice 73/23/EEC (sm rnice pro nízké nap tí) a následných dodatk ;
a že byly použity všechny níže uvedené normy a/nebo technické požadavky:
EN 61000-6-3
EN 61000-6-2
EN 60335-1
EN 60335-2-103
Poslední dv íslice roku, ve kterém bylo provedeno ozna ení
|
08.
Místo: Mogliano V.to Datum: 1.12.2008 Podpis
10
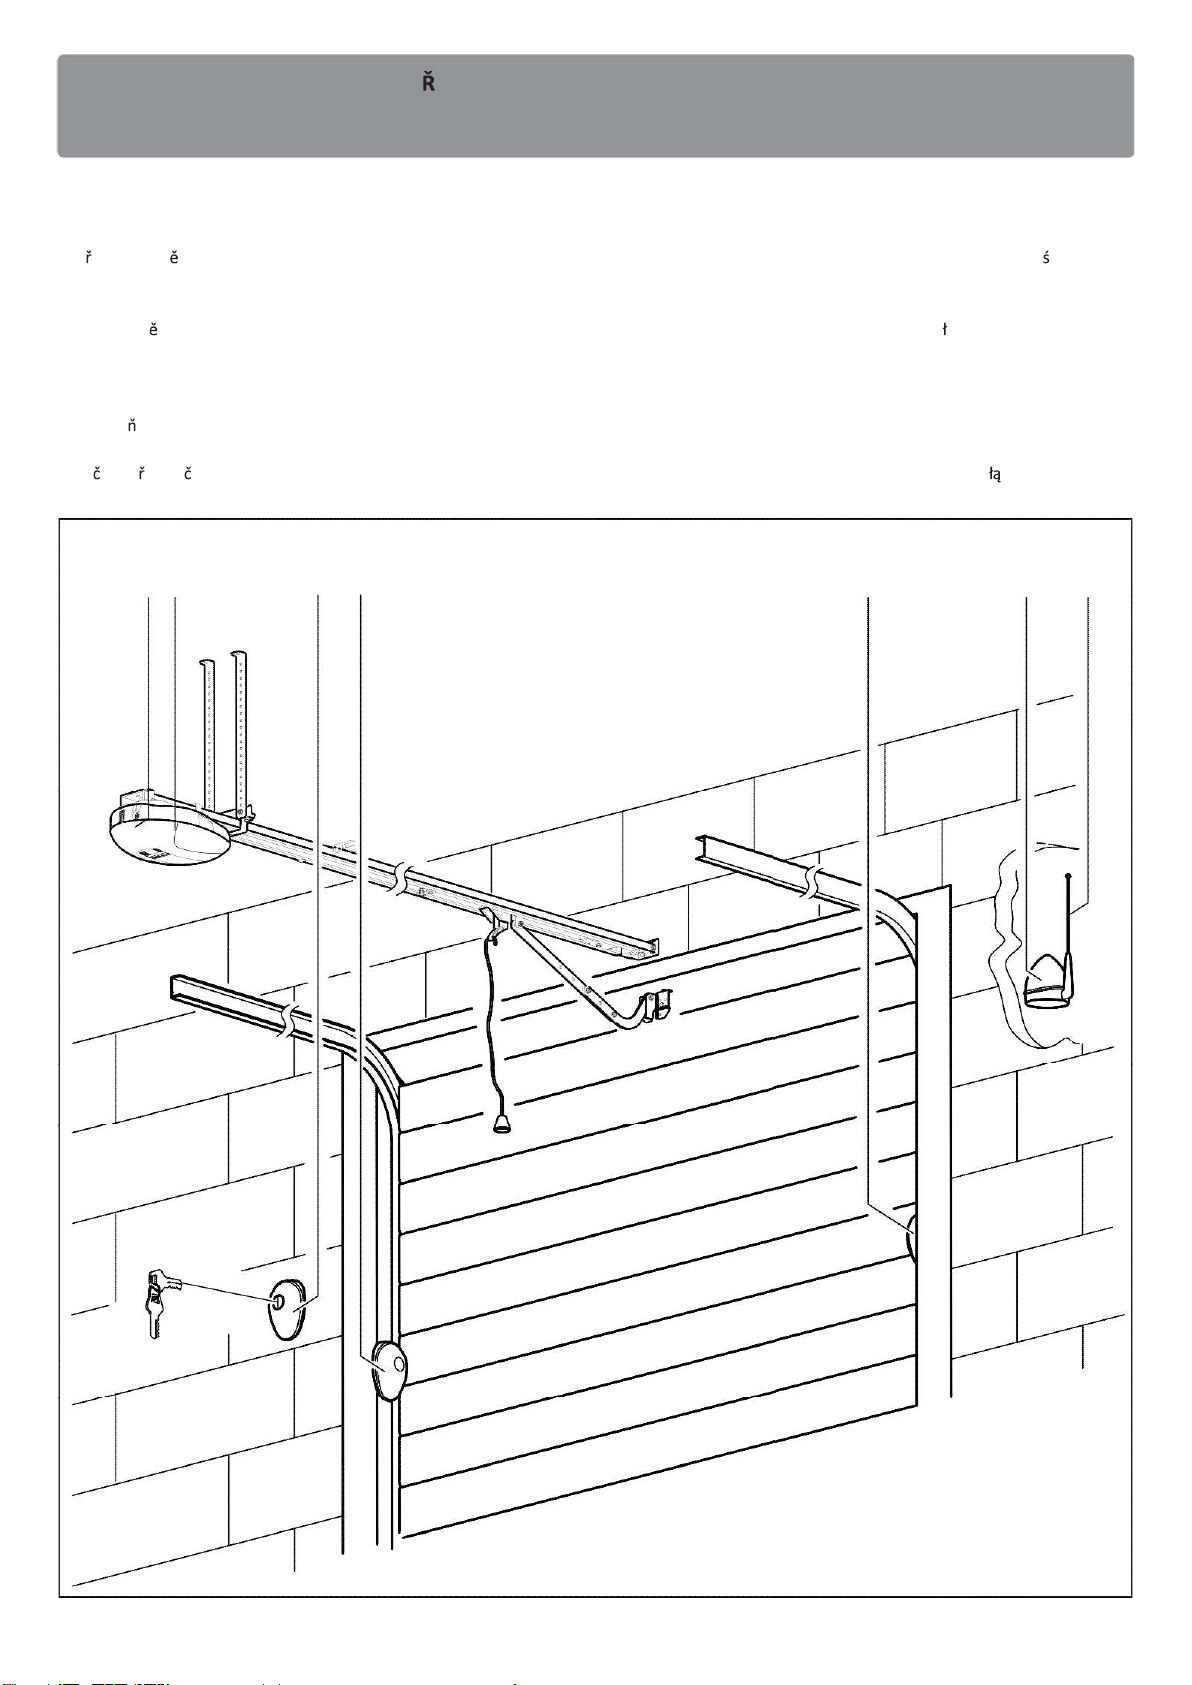
STANDARDNÍ INSTALACE TYPOVÉ ADY C40 • STANDARD INSTALLATION C40 RANGE • ANLAGETYP SERIE
C40 INSTALLATION TYPE SÉRIE C40 • INSTALACIÓN TIPO SERIE C40 • SISTEMA DO TIPO SÉRIE C40
INSTALLATIESERIE C40 • STANDARDOWY ZAKRES INSTALACJI C40
1)
Automatizace C40 • Automatism C40 • Automatisierung C40 • Automatisme C40 • Automatismo C40 • Automatismo C40 • Automatisering C40 •
Automatyzm C40
2)
P íjezdové sv tlo • Courtesy light • Integriertes Licht • Lumière de courtoisie • Luz interior • Luz de cortesia • Welkomstverlichting • O wietlenie
dodatkowe
3)
Blikající sv tlo • Flashing light • Blinkleuchte • Clignotant • Luz intermitente • Luz intermitente • Knipperlicht • Lampa b yskowa
4)
Anténa • Antenna • Antenne • Antenne • Antena • Antena • Antenne • Antena
5)
Fotobu ka • Photocell • Lichtschranke • Cellule photoélectrique • Fotocélula • Fotocélula • Fotocellen • Fotokomórki
6)
Klí ový p epína • Key selector • Schlüsseltaster • Sélecteur à clé • Selector de llave • Selector de chave • Sleutelschakelaar • Prze cznik z kluczem
1 2
6 5
5 3 4

11
MODELY A SPECIFIKACE • MODELS AND SPECIFICATIONS • MODELLE UND EIGENSCHAFTEN MODÈLES
ET CARACTÉRISTIQUES • MODELOS Y CARACTERÍSTICAS • MODELOS E CARACTERÍSTICAS MODELLEN
EN TECHNISCHE KENMERKEN • MODELE I CHARAKTERYSTYKA TECHNICZNA
KIT C40/1000
Pro sek ní zdvihací vrata s maximální silou 1000 N. • For sectional overhead doors with maximum thrust of 1000
N.• Für Deckensektionaltore mit einem maximalen Schub von 1000 N. •Pour portes basculantes sectionnelles avec poussée
maximum de 1000 N. • Para puertas basculantes seccionales con un empuje máximo de 1000 N. • Para portas basculantes
seccionadas com impulso máximo de 1000 N. • Voor sectionale overheaddeuren met een maximale stuwkracht van 1000 N.
•Do bram segmentowych napowietrznych o maksymalnym nap dzie 1000 N.
TECHNICKÁ DATA • TECHICAL DATA • TECHNISCHE DATEN
DONNEES TECHNIQUES • DATOS TECNICOS • CARACTERÍSTICAS TÉCNICAS TECHISCHE GEGEVENS •
DANE TECHICZNE
C40 C40/1000
ELEKTRICKÉ NAPÁJENÍ • POWER SUPPLY • EINSPEISUNG • ALIMENTATION
• ALIMENTACION • ALIMENTAÇÃO • VOEDINGSSPANNING • NAPI CIE ZASILANIA V220V AC ± 10% 50~60 Hz
JMENOVITÝ VÝKON • RATED POWER • NENNLEISTUNG • PUISSANCE NOMINALE
• POTENCIA NOMINAL • POTÊNCIA NOMINAL • NOMINAAL VERMOGEN • MOC ZNAMIONOWA W 200
SÍLA • TORQUE • SCHUB • POUSSEE • EMPUJE • IMPULSO • DDRUST • THRUST N 1000
FREKVENCE POUŽITÍ • FREQUENCY OF USE • AUSSETZENDER BETRIEB • INTERMITTENCE
• INTERMITENCIA • INTERMITÊNCIA • INTERMITTENTIE • CZ STOTLIWO % 50
PROVOZNÍ TEPLOTA • WORKING TEMPERATURE• BETRIEBSTEMPERATUR • TEMPERATURE DE SERVICE •
TEMPERATURA DE FUNCIONAMIENTO • TEMPERATURA DE FUNCIONAMENTO • BEDRIJFSTEMPERATUUR
• TEMPERATURA ROBOCZA °C
-20°C
+50°C
DRUH OCHRANY • PROTECTION RATING • SCHUTZGRAD • DEGRE DE PROTECTION • GRADO DE
PROTECCION • GRAU DE PROTECÇÃO • BESCHERMINGSGRAAD • RATING OCHRONNY IP 40
HMOTNOST POHONU • OPERATOR WEIGHT • ANTRIEBSGEWICHT • POIDS OPERATEUR • PESO DEL
OPERA- DOR • PESO DO OPERADOR • GEWICHT • WAGA kg 4,2
VN JŠÍ ROZM RY • EXTERNAL DIMENSIONS • AUSSENMASSE •
DIMENSIONS D’ENCOMBREMENT • DIMENSIONES TOTALES • DIMENSÕES EXTERNE DIMENSIES •
WYMIARY ZEWN TRZNE
345 mm 226 mm
MAX 400 mm
3000 mm 345 mm
12
P EDB ŽNÉ KONTROLY P ED INSTALACÍ • PRELIMINARY CHECKS PRIOR TO INSTALLATION • VOR DER
INSTALLATION DURCHZUFÜHRENDE KONTROLLEN • CONTRÔLES PRÉLIMINAIRES AVANT L’INSTALLATION
CONTROLES PREVIOS ANTES DE LA INSTALACIÓN • CONTROLOS PRELIMINARES ANTES DA INSTALAÇÃO
VOORAFGAANDE CONTROLES VOORAFGAAND AAN DE INSTALLATIE • KONTROLE WST PNE PRZED INSTALACJ
CZ P EDB ŽNÉ KONTROLY P ED INSTALACÍ
Zkontrolujte, zda vrata spl ují nutné požadavky pro automatizaci:
1-
Konstrukce vrat musí být pevná a vhodná.
2-
Kladky nebo záv sy musejí být v dobrém stavu a dob e namazané.
3-
Ru ní pohyb musí být plynulý a pravidelný bez zasekávání v
kterémkoli bod .
EN PRELIMINARY CHECKS PRIOR TO INSTALLATION
Check that the door has the necessary requirements to be
automated.
1-
The door structure must be solid and suitable.
2-
The pulleys or hinges must be in good condition and well greased.
3-
Manual movement must be smooth and regular without sticking at
any point
DE VOR DER INSTALLATION DURCHZUFÜHRENDE KONTROLLEN
Sicherstellen, dass die Tür die erforderlichen Voraussetzungen für eine
Automatisierung erfüllt:
1-
Die Türstruktur ist robust und geeignet.
2-
Die Laufrollen und Beschläge müssen in gutem Zustand und gut
gefettet sein.
3-
Die manuelle Bewegung des Tors läuft den gesamten Fahrweg über
ungehindert leicht und regelmäßig
FR CONTRÔLES PRÉLIMINAIRES AVANT L’INSTALLATION
S’assurer que la porte possède les caractéristiques requises pour être
automatisé:
1-
Structure de la porte solide et appropriée.
2-
Les poulies et les charnières sont en bon état et bien huilées.
3- Mouvement manuel fluide et régulier sur toute la course sans
à-coups
ES CONTROLES PREVIOS ANTES DE LA INSTALACIÓN
Controle que la puerta tenga los requisitos necesarios para ser
automatizada:
1-
La estructura de la puerta sea sólida y apropiada.
2-
Las poleas o bisagras deben estar buen estado y bien engrasadas.
3-
El movimiento manual sea fluido y correcto por toda su carrera, sin
obstrucciones
PT CONTROLOS PRELIMINARES ANTES DA INSTALAÇÃO
Controle se o puerta possui os requisitos necessários para ser
automatizado:
1-
A estrutura do uerta deve ser sólida e apropriada.
2-
As polias ou dobradiças estejam em bom estado e bem lubrificadas.
3- O movimento manual deve ser fluido e regular em todo o seu curso
sem impedimentos
NL
VOORAFGAANDE CONTROLES VOORAFGAAND AAN DE INSTALLATIE
Controleer of de deur voldoet aan de eisen voor automatisering:
1-
De structuur van de deur is stevig en passend.
2-
De katrollen of scharnieren zijn in goede staat en goed gesmeerd.
3-
De handmatige beweging is soepel en regelmatig gedurende de hele
slag zonder klemmen
PL KONTROLE WST PNE PRZED INSTALACJ
Sprawdzi , czy drzwi spe niaj wymagania dotycz ce automatyzacji:
1-
Konstrukcja drzwi jest solidna i w a ciwa.
2-
Ko a pasowe lub zawiasy s w dobrym stanie i dobrze nasmarowane
3- R czny ruch jest p ynny i regularny przez ca y czas trwania skoku, bez
zaci
SMONTOVÁNÍ VOZÍKU (obr. 1-2) • CARRIAGE ASSEMBLY (fig. 1-2) • MONTAGE WAGEN (Abb. 1-2)
MONTAGE DU CHARIOT (fig. 1-2) • MONTAJE DEL CARRO (fig. 1-2) • MONTAGEM DO CARRO (fig. 1-2)
MONTAGE WAGEN (afb. 1-2) • MONTA WÓZKA (rys. 1-2)
CZ SMONTOVÁNÍ VOZÍKU
A) Obr.1: Nosi držáku zámku Avložte do vozíku B.
B) Obr.2: Zašroubujte šrouby C.
ES MONTAJE DEL CARRO
A) Fig.1: Colocar el soporte porta-desbloqueo Aen el carro B.
B) Fig.2: Enroscar los tornillos C.
EN CARRIAGE ASSEMBLY
A) Fig.1: Insert the lock holder support Ain the carriage B.
B) Fig.2: Screw the screws C.
DE MONTAGE WAGEN
A) Abb.1: Die Halterung der Entsperrung Ain den Wagen Beinsetzen.
B) Abb.2: Die Schrauben Cfestziehen.
FR MONTAGE DU CHARIOT
A)
Fig. 1 : Insérer le support d’appui du déverrouillage Adans le chariotB.
B)
Fig. 2 : Visser les vis C.
PT MONTAGEM DO CARRO
A) Fig.1: Insira o suporte porta-desbloqueio Ano carro B.
B) Fig.2: Aperte os parafusos C.
NL MONTAGE WAGEN
A) Afb.1: Plaats de houder van de poortdeblokkering Ain de wagen B.
B) Afb.2: Draai de schroeven Cvast.
PL MONTA WÓZKA
A) Rys.1: Za o y uchwyt mechanizmu zwalniaj cego blokad Ana
wózek B.
B) Rys.2: Przykr ci ruby C.

13
FIG. 1 FIG. 2
A
C
B
MONTÁŽ MOTORU (obr. 3-4) • MOTOR ASSEMBLY (fig. 3-4) • MONTAGE MOTOR (Abb. 3-4) MONTAGE
DU MOTEUR (fig 3-4) • MONTAJE DEL MOTOR (fig. 3-4) • MONTAGEM DO MOTOR (fig. 3-4)
MONTAGE MOTOR (afb. 3-4) • MONTA SILNIKA (rys. 3-4)
CZ MONTÁŽ MOTORU
A) Obr.3: Klikový h ídel vložte do jeho uložení ve vedení.
B) Obr.4: Zasu te upev ovací U-šrouby Da našroubujte matice E.
EN MOTOR ASSEMBLY
A) Fig.3: Insert the crankshaft in its seat on the guide
B) Fig.4: Insert the fixing U-bolts Dand screw the nuts E.
DE MONTAGE MOTOR
A) Abb.3: Die Motorwelle in den entsprechenden Sitz an der Führung
einsetzen
B) Abb.4: Die Befestigungsbügel Deinsetzen und die Muttern E
festziehen.
FR MONTAGE DU MOTEUR
A) Fig. 3 : Insérer l’arbre d’entraînement dans son logement sur le guide
B) Fig. 4 : Insérer les étriers de fixation Det visser les écrous E.
ES MONTAJE DEL MOTOR
A) Fig.3: Montar el eje motor en el alojamiento de la guía
B) Fig.4: Introducir los pernos en U de fijación Dy enroscar las tuercas E.
PT MONTAGEM DO MOTOR
A) Fig.3: Insira o eixo do motor na sede apropriada na guia
B) Fig.4: Insira as cavilhas de fixação De aperte as porcas E.
NL MONTAGE MOTOR
A) Afb.3: Plaats de drijfas in de specifieke zitting van de geleider
B) Afb.4: Plaats de veerstroppen voor de bevestiging Den draai de
moeren Evast.
PL MONTA SILNIKA
A) Rys.3: Za o y wa ek nap dowy w odpowiednie gniazdo na
prowadnicy
B) Rys.4: Za o y mostki mocuj ce Di przykr ci nakr tki E.

14
E
FIG. 3
FIG. 4
D
E
EE
15
INSTALACE VODÍCÍ LIŠTY • RAIL INSTALLATION • INSTALLATION FÜHRUNG INSTALLATION DU RAIL •
INSTALACIÓN DE LA GUÍA • INSTALAÇÃO DA GUIA INSTALLATIE GELEIDER • INSTALACJA
PROWADNICY
CZ INSTALACE VODÍCÍ LIŠTY
A) P ední držák (F) upevn te uprost ed vrat na st n (obr. 5) a horní
stranu nosníku upevn te p iloženými šrouby (obr. 6).
B) Upevn te držáky (G), p ímo p ed t lesem motoru, vedle ozna eného
bodu pro mechanický doraz a automatiza ní systém zajist te p i
dodržení jeho vodorovné polohy (obr. 7).
C) Upev ovací držáky upevn te ke st eše (H) a podle pot eby odstra te
p ebyte né díly (obr. 7).
D) Do st edu vrat upevn te kotevní držák (I), a p ipojte ho ke spojce s
délkov nastavitelným zak iveným ramenem (obr. 8-9-10- 11-12).
EN RAIL INSTALLATION
A) Fasten the front bracket (F) at the centre of the door in the wall (fig. 5)
and secure the boom head with the screws supplied (fig. 6).
B) Fasten the brackets (G), immediately before the motor body, next to
the identified point for the mechanical stop and secure the automation
system making sure it is level (fig. 7).
C) Secure the fixing brackets to the roof (H) and remove the excess parts,
if necessary (fig. 7).
D) Fix in the door centre the anchor bracket (I) and connect it to shuttle
with the specific curved arm with adjustable length (fig. 8-9-10-11-12).
DE INSTALLATION FÜHRUNG
A) Den vorderen Bügel (F) in der Mitte der Tür in der Mauer (Abb. 5)
befestigen und den Kopf des Schlagbaums mit den mitgelieferten
Schrauben festmachen (Abb. 6).
B) Die Bügel (G) kurz vor dem Motorgehäuse, bei der Stelle für den
mechanischen Feststeller befestigen, dabei darauf achten, dass der
Antrieb nivelliert befestigt wird (Abb. 7).
C) Die Befestigungsbügel an der Decke (H) befestigen und ggf. die
überschüssigen Teile entfernen (Abb. 7).
D) In der Mitte der Tür den Ankerbügel (I) befestigen und ihn mithilfe des
hierzu vorgesehenen in der Länge einstellbaren krummen Arms mit dem
Zubringer verbinden (Abb. 8-9-10-11-12).
FR INSTALLATION DU RAIL
A) Fixer la bride avant (F) au centre de la porte dans le mur (fig. 5)et fixer
la tête de la barrière avec le vis fournies de série (fig. 6).
B) Fixer les brides (G), à peine avant le corps du moteur, à proximité du
point repéré pour la butée mécanique, en faisant attention à la fixation à
niveau de l’automatisme (fig. 7).
C) Monter les brides de fixation au plafond (H) et éventuellement retirer
les parties en excès (fig. 7).
D) Fixer au centre de la porte la bride d’ancrage (I) et la raccorder à la
navette avec le bras courbe correspondant réglable en longueur (fig. 8-9-
10-11-12).
ES INSTALACIÓN DE LA GUÍA
A)
Fijar el estribo delantero(F) en el centro de la puerta, en la pared (fig.
5) y fijar la cabeza de la varilla con los tornillos suministrados (fig. 6).
B)
Fijar los estribos (G) apenas antes del cuerpo del motor, cerca del
punto identificado para el tope mecánico, prestando atención a que la
fijación de la automatización (fig. 7) esté nivelada.
C)
Fijar los estribos de fijación en el techo (H) y retirar el excedente si
hubiere (fig. 7).
D)
Fijar en el centro de la puerta el estribo de anclaje (I) y conectarlo a
la lanzadera con el brazo curvo regulable en longitud (fig. 8-9-10-11-12).
PT INSTALAÇÃO DA GUIA
A) Fixe o suporte dianteiro (F) no centro da porta na parede (fig. 5) e
fixe a cabeça da haste com os parafusos fornecidos (fig. 6).
B) Fixe os suportes (G), imediatamente antes do corpo do motor,
próximo ao ponto identificado para o retentor mecânico, prestando
atenção ao nivelamento do automatismo (fig. 7).
C) Fixe os suportes de fixação no teto (H) e, se necessário, remova as
peças em excesso (fig. 7).
D) Fixe o suporte de ancoragem (I) no centro da porta e conecte-o ao
vaivém com o braço curvo especial ajustável em comprimento (fig. 8-9-
10-11-12).
NL INSTALLATIE GELEIDER
A) Bevestig de voorste beugel (F) in het midden van de poort in de muur
(afb. 5) en bevestig de kop van de stang met de bijgeleverde schroeven
(afb. 6).
B) Bevestig de beugels (G), net vóór het motorhuis, nabij het aangewezen
punt voor de mechanische pal, en let op dat de automatisering
genivelleerd wordt bevestigd (afb. 7).
C) Bevestig de bevestigingsbeugels op het plafond (H) en verwijder
eventueel het overtollige deel (afb. 7).
D) Bevestig de verankeringsbeugel (I) in het midden van de poort, en
bevestig hem op de pendel met de specifieke gebogen arm die in de
lengte kan afgesteld worden (afb. 8-9-10-11-12).
PL INSTALACJA PROWADNICY
A) Zamocowa przedni uchwyt (F) na rodku drzwi w cianie (rys. 5) i
zamocowa g owic listwy dodanymi do kompletu rubami (rys. 6).
B) Zamocowa uchwyty (G) tu przed korpusem silnika, w punkcie
zaznaczonym pod monta mechanicznego ogranicznika. Zwróci uwag
na to, aby automat by po zamocowaniu wypoziomowany (rys. 7).
C) Zamocowa uchwyty mocuj ce na suficie (H) i ewentualnie usun
nadmiar (rys. 7).
D) Zamocowa uchwyt kotwi cy (I) na rodku drzwi i po czy z suwakiem
wahad owym specjalnym, zakrzywionym ramieniem o regulowanej
d ugo ci (rys. 8-9-10-11-12).
F
FIG. 5 FIG. 6

16
FIG. 8
H
I
G
FIG. 9
FIG. 7
FIG. 10 FIG. 11
FIG. 12
17
DORAZ PRO OTEV ENOU POLOHU (obr. 13-14) • STOP FOR OPEN POSITION (fig 13-14)
MECHANISCHE FESTSTELLVORRICHTUNG BEIM ÖFFNEN (Abb 13-14) • BUTÉE MÉCANIQUE EN OUVERTURE
(fig 13-14) • TOPE MECÁNICO DE APERTURA (fig 13-14) • RETENTOR MECÂNICO EM ABERTURA (fig 13-14)
MECHANISCHE PAL IN OPENING (afb 13-14) • MECHANICZNY OGRANICZNIK OTWIERANIA (rys 13-14)
CZ MECHANICKÝ DORAZ OTEV ENÉ POLOHY VRAT (POVINNÝ)
Prove te ru ní otevírací postup do požadované polohy, upevn te
mechanický doraz v otev ené poloze podle obr. 13-14 pro zajišt ní
otev ené polohy.
EN GATE OPENING MECHANICAL STOP (COMPULSORY)
Perform the manual opening manoeuvre, to the desired extent, fix the
mechanical stop in opening position, as indicated in fig. 13-14 so as to
guarantee an absolute position.
DE
MECHANISCHE FESTSTELLVORRICHTUNG BEIM ÖFFNEN (OBLIGATORISCH)
Den manuellen Öffnungsvorgang durchführen und an der gewünschten
Stelle den mechanischen Feststeller befestigen, wie in Abb. 13-14
angezeigt, um eine absolute Position zu gewährleisten.
FR BUTÉE MÉCANIQUE EN OUVERTURE (OBLIGATOIRE)
Effectuer la manœuvre manuelle d’ouverture, fixer la butée mécanique
en ouverture à la mesure souhaitée comme indiqué sur la fig. 13-14 de
façon à garantir une position absolue.
ES TOPE MECÁNICO DE APERTURA (OBLIGATORIO)
Realizar la maniobra manual de apertura a la medida deseada y fijar el
tope mecánico de apertura como se indica en la fig. 13-14para garantizar
una posición específica.
PT RETENTOR MECÂNICO EM ABERTURA (ESTATUTÁRIO)
Execute a manobra manual de abertura na medida desejada e fixe o
retentor mecânico em abertura, como mostrado nas fig. 13-14, de modo
a garantir uma posição absoluta.
NL MECHANISCHE PAL IN OPENING (WETTELIJK)
Voer het handmatige manoeuvre van de opening uit, op de gewenste
afmeting voor de bevestiging van de mechanische pal in opening zoals is
aangeduid in afb. 13-14, zodat een absolute positie wordt gegarandeerd.
PL MECHANICZNY OGRANICZNIK OTWIERANIA (OBLIGACJA)
Wykona r czny manewr otwarcia; w odpowiednim miejscu zamocowa
mechaniczny ogranicznik otwierania (w sposób pokazany na rys. 13-14),
tak aby wyznaczy pozycj absolutn .
FIG. 13 FIG. 14
18
NAPNUTÍ EMENU • BELT TENSION • RIEMENSPANNUNG
TENSION DE LA COURROIE • TENSIÓN DE LA CORREA • TENSÃO DA CORREIA
SPANNING RIEM • NACI G PASKA
CZ NAPNUTÍ EMENU (OBR.15)
Napnutí emenu kontrolujte jednou za šest m síc ; podle pot eby
utáhn te matici M8 klí em na konci a ponechte minimální bezpe nostní a
kompenza ní v li mezi závity pružiny (1 mm).
EN BELT TENSION (FIG.15)
Check the belt tensioning once every six months; if necessary, tighten
the M8 nut with a wrench at the end, leaving a minimum safety and
compensation slack between the spring’s coils (1 mm).
DE RIEMENSPANNUNG (ABB. 15)
Alle sechs Monate die Riemenspannung überprüfen; Wenn nötig die
Mutter M8 am Endteil mit einem Schlüssel anziehen, wobei zwischen den
Windungen der Feder zur Sicherheit und zur Anpassung ein minimales
Spiel (1 mm) gelassen wird.
FR
TENSION DE LA COURROIE (FIG.15)
Vérifier la tension de la courroie tous les six mois vérifier ; si nécessaire,
serrer à l’aide d’une clé l’écrou M8 à l’extrémité, en laissant un jeu de
sécurité et de compensation minimum entre les spires du ressort (1 mm).
ES TENSIÓN DE LA CORREA (FIG.15)
Cada seis meses controlar la tensión de la correa; si fuese necesario,
apretar con una llave la tuerca M8 en el extremo, dejando un mínimo
margen de seguridad y compensación entre las espiras del muelle (1
mm).
PT TENSÃO DA CORREIA (FIG.15)
Verifique a tensão da correia a cada seis meses; se necessário, aperte a
extremidade da porca M8 com uma chave, deixando uma folga mínima
de segurança e compensação entre as espiras da mola (1 mm).
NL SPANNING RIEM (AFB.15)
Controleer de spanning van de riem elke zes maanden; draai indien
noodzakelijk de moer M8 vast op het uiteinde met behulp van een
sleutel, maar laat een minimum aan veiligheidsspanning en compensatie
tussen de windingen van de veer (1 mm).
PL NACI G PASKA (RYS.15)
Co pó roku sprawdza naci g paska; w razie potrzeby dokr ci kluczem
nakr tk M8 na ko cu; luz pozostawiony dla celów bezpiecze stwa i
kompensacji zwojów spr yny powinien by jak najmniejszy (1 mm).
FIG. 15
ELEKTRICKÉ P IPOJENÍ • ELECTRICAL CONNECTIONS • ELEKTRISCHE ANSCHLÜSSE CONNEXIONS
ÉLECTRIQUES • CONEXIONES ELÉCTRICAS • LIGAÇÕES ELÉCTRICAS ELEKTRISCHE AANSLUITINGEN •
PO CZENIA ELEKTRYCZNE
CZ ELEKTRICKÉ P IPOJENÍ
Postupujte podle pokyn pro instalovanou elektronickou
ídící jednotku.
ES CONEXIONES ELÉCTRICAS
Siga las instrucciones de la central electrónica instalada.
EN ELECTRICAL CONNECTIONS
Comply with the instructions for the installed electronic control unit.
PT LIGAÇÕES ELÉCTRICAS
Siga as instruções da central electrónica instalada.
DE ELEKTRISCHE ANSCHLÜSSE
Die Anweisungen der montierten elektronischen Zentrale einhalten.
FR CONNEXIONS ÉLECTRIQUES
Suivre les instructions de la centrale électronique installée.
NL ELEKTRISCHE AANSLUITINGEN
Neem de instructies voor de geïnstalleerde elektronische regeleenheid
in acht.
PL PO CZENIA ELEKTRYCZNE
Przestrzega wskazówek dotycz cych zainstalowanej elektronicznej
jednostki steruj cej.
19
FIG. 16
ZASTAVENÍ (N.O.) / COURTESY STOP (N.O.)
Krok za krokem (N.O.) /Step by step (N.O.)
COM
TX RX
1 2 1 2 3 4 5
(STOP)
(PP)
(COM)
(FOTO)
(+24V)
(FLASH)
SMALL DOOR
Blikaj
í
c
í
sv tlo /
Flashing light
24 Vdc 5W
Dodržte polaritu / Respect polarity
ANTÉNA
BEZPE NOSTNÍ KONCOVÝ SPÍNA / SAFETY STOP
Porta Pedonale (N.C.) /Pedestrian Door (N.C.)
ZÁLOŽNÍ AKUMULÁTOR
2 X 12 V DC - 1,2 Ah
20
MENU PARAMETR • PARAMETERS MENU • MENÜ PARAMETER MENU PARAMÈTRES • MENÚ DE
PARÁMETROS • MENU DE PARÂMETROS
MENU PARAMETERS • MENU PARAMETRÓW
P íprava • Preparation • Vorbereitung • Préparation • Preparación • Preparação • Voorbereiding • Przygotowanie
CZ
-
Vozík ponechte zajišt ný podle obrázku, k ídlo otev ete a zav ete ru n a zajist
te, aby vozík zapadl do spojky
.
EN - Keep the carriage locked as in the image, open and close the leaf manually and make sure that the carriage engages with the shuttle.
DE - Den Wagen wie auf der Abbildung blockieren, die Tür von Hand öffnen und schließen und sicherstellen, dass der Wagen mit dem Zubringer verbunden wird.
FR - Maintenir le chariot bloqué comme montré sur la photo, ouvrir et fermer le vantail manuellement et vérifier si le chariot est raccordé à la navette.
ES - Mantener el carro bloqueado como se muestra en la foto, abrir y cerrar la hoja manualmente asegurándose de que el carro se conecte con la lanzadera.
PT - Mantenha o carro bloqueado conforme mostrado na foto, abra e feche a porta manualmente e verifique se o carro se conecta ao vaivém.
NL - Houd de wagen vergrendeld zoals op de foto, open en sluit het paneel handmatig en zorg ervoor dat de wagen wordt verbonden met de pendel.
PL
-
Przytrzyma
wózek
zablokowany
(jak
na
zdj
ciu),
otworzy
i
zamkn
r
cznie skrzyd
o oraz sprawdzi
, czy
wózek
pod
czy si
do
suwaka
wahad
owego.
CZ
-
Zapn
te elektrické napájení.
Vnit
ní sv
tlo z
stane rozsvícené n
kolik sekund a na LED displeji se sou
asn
zobrazí
íslo od 99 do 11. Pak se ovládací pan
el p
epne do
pohotovostního režimu
.
EN
-
Turn
on
the
power
supply.
The
interior
light
stays
on
for
several
seconds
and
the
LED
display
shows
at
the
same
time
a
number
from
99
to
11.
Then,
the
operating
panel
switches
to
standby.
DE
-
Die
Versorgung
einschalten.
Die
Serviceleuchte
bleibt
einige
Sekunden
lang
eingeschaltet,
gleichzeitig
zeigt
die
LED
die
Zahl
von
99
bis
11
an.
Anschließend
geht
der
Bediener in den
Standby
-
Modus
über.
FR - Activer l’alimentation. La lumière de courtoisie reste allumée pendant quelques secondes et simultanément le voyant affiche le numéro de 99 à 11. Ensuite, l’opérateur se
met
en
att
ente.
ES
-
Encender
la
alimentación.
La
luz
de
cortesía
permanece encendida
durante
algunos
segundos
y
simultáneamente
el
LED
visualiza
el
número
entre
99
y
11.
Luego
el
ope
-
rador entra en espera.
PT
-
Ligue
a
alimentação.
A
luz
de
cortesia
permanece
acesa
por
vários
segundos
e,
ao
mesmo
tempo,
o
LED
exibe
o
número
de
99
a
11.
O
operador
então
entra
no
modo
standby.
NL
-
Schakel
de
voeding
in.
De
hulpverlichting
blijft
verschillende
seconden
ingeschakeld
en
de
LED
gee
ft
gelijktijdig
een
nummer
weer
van
99
tot
11.
Daarna
wordt
het
systeem
in
stand
-
by
gesteld.
PL
-
W
czy
zasilanie. O
wietlenie miejscowe
wieci przez kilka sekund,
a
jednocze
nie wska
nik
LED
wy
wietla
liczb
z
zakresu
od
99
do
11.
Nast
pnie si
ownik przestawia
si
w tryb
standby.
CZ - Na displeji se zobrazí “
”. EN - The display shows “
”. DE - Das Display zeigt " "
an. FR - L’écran affiche «
».
ES - La pantalla visualiza “ ”.
PT - O visor exibe “ ”.
NL - De display geeft “ ” weer.
Nastavení automatického zavírání a otevírání • Automatic closing and opening setting • Einstellung der automatischen Öffnung/
Schließung • Réglage d’ouverture et de fermeture automatique • Configuración de apertura y cierre automático • Configuração de
abertura e fecho automático • Instelling van automatische opening en sluiting• Ustawianie automatycznego otwierania i zamykania
CZ
-
Podržte stisknuté tla
ítko SET, dokud se nezobrazí
“
”.
EN - Press and hold the SET button, until “ ” is displayed.
DE - SET drücken und solange gedrückt halten, bis " " angezeigt wird.
FR - Appuyer sur SET et le maintenir pressé jusqu’à afficher « ».
ES - Mantener presionado SET hasta visualizar “ ”.
PT - Prima SET e mantenha-o premido até “ ” ser exibido.
NL - Houd SET ingedrukt tot “ ” wordt weergegeven.
PL
-
Nacisn
SET
i
przytrzyma
naci
ni
ty,
a
wy
wietl
si
“
”.
CZ
-
Stiskn
te SET pro zobrazení
“
”.
EN - Press SET to show “ ”.
DE - SET drücken, um " " anzuzeigen.
FR - Appuyer sur SET pour afficher « ».
ES - Presionar SET para visualizar “ ”.
PT - Prima SET para exibir “ ”.
NL - Druk op SET om “ ” weer te geven.
PL
-
Nacisn
SET,
aby
wy
wietli
“
”.
CZ
-
Podržte stisknuté
tla
ítko
UP,
“
”
se rozbliká
.
Vrata se otev
ou
.
EN - Press and hold the UP button”, “ ” will flash. The door opens.
DE - UP drücken und gedrückt halten, " " blinkt. Die Türöffnung beginnt.
FR - Appuyer sur UP et le maintenir pressé, « » clignote. La porte commence à s’ouvrir.
ES - Mantener presionado UP, “ ” parpadea. La puerta comienza a abrirse.
PT - Prima UP e mantenha-o premido, “ ” pisca. A porta começa a abrir.
NL - Houd UP ingedrukt, “ ” knippert. De poort begint te openen.
PL
-
Nacisn
i
przytrzyma
UP;
"
"
miga.
Drzwi
zaczynaj
si
otwiera
.
CZ
-
Když vrata dosáhnou otev
ené polohy, okamžit
uvoln
te tla
ítko UP a stiskn
te SET
.
Na displeji se zobrazí
“
”.
EN - When the door reaches the opening position, immediately release the UP button and press SET. The display shows “ ”.
DE - Sobald die Tür die geöffnete Position erreicht hat, sofort UP loslassen und SET drücken. Das Display zeigt " " an.
FR - Lorsque la porte a atteint la position d’ouverture, relâcher immédiatement UP et appuyer sur SET. L’écran affiche « ».
ES - Cuando la puerta ha alcanzado la posición de apertura, soltar de inmediato UP y presionar SET. La pantalla visualiza “ ”.
PT - Quando a porta atingir a posição de abertura, solte UP imediatamente e prima SET. O visor exibe “ ”.
NL - Wanneer de poort de openingspositie heeft bereikt, moet UP onmiddellijk losgelaten worden en moet op SET gedrukt worden. De display geeft “ ” weer.
PL
-
Kiedy
drzwi
otworz
si
do
pozycji
otwarcia,
natychmiast
zwolni
UP
i
nacisn
SET.
Na
wy
wietlaczu wy
wietla
si
“
”.
CZ
-
Pak podržte stisknuté tla
ítko
DOWN,
“
”
se rozbliká
.
Když vrata dosáhnou zav
ené polohy, okamžit
uvoln
te tla
ítko DOWN a stiskn
te SET
.
EN - Then press and hold the DOWN button, “ ” will flash. When the door reaches the closing position, immediately release the DOWN button and press SET.
DE - DOWN drücken und gedrückt halten, " " blinkt. Sobald die Tür die geschlossene Position erreicht hat, sofort DOWN loslassen und SET drücken.
FR - Donc appuyer DOWN et le maintenir pressé, « » clignote. Lorsque la porte a atteint la position de fermeture, relâcher immédiatement DOWN et appuyer sur SET.
ES - Luego mantener presionado DOWN, “ ” parpadea. Cuando la puerta ha alcanzado la posición de cierre, soltar de inmediato DOWN y presionar SET.
PT - Então prima DOWN e mantenha-o premido, “ ” pisca. Quando a porta atingir a posição de fecho, solte DOWN imediatamente e prima SET.
NL - Houd DOWN ingedrukt, “ ” knippert. Wanneer de poort de sluitingspositie heeft bereikt, moet DOWN onmiddellijk losgelaten worden en moet op SET gedrukt worden.
PL
-
Nast
pnie
nacisn
i
przytrzyma
DOWN, “
”
miga.
Kiedy
drzwi
si
zamkn
, natychmiast
zwolni
DOWN
i
nacisn
SET.
CZ
-
Vrata se automaticky
otev
ou a zav
ou pro zmapování požadavk
pro zaznamenání síly p
i otevírání a zavírání
.
EN - The door opens and closes automatically to map the requirements for the opening and closing sensitivity force.
DE - Die Tür wird automatisch geöffnet und geschlossen, um die Kraftanforderungen der Öffnungs- und Schließempfindlichkeit zu erfassen.
FR - La porte s’ouvre et elle se ferme automatiquement pour cartographier les exigences de la force de sensibilité d’ouverture et de fermeture.
ES - La puerta abre y cierra automáticamente para mapear los requisitos de la fuerza de sensibilidad de apertura y cierre.
PT - A porta abre e fecha automaticamente para mapear os requisitos da força de sensibilidade de abertura e fecho.
NL - De poort wordt automatisch geopend en gesloten om de vereisten van de kracht van de gevoeligheid van de opening en de sluiting vast te stellen.
PL
-
Drzwi otwieraj
si
i
zamykaj
automatycznie
w
celu
zmapowania
wymaganej
czu
o
ci,
z jak
maj
si
otwiera
i
zamyka
.
21
CZ - Na displeji se zobrazí “ ”pro potvrzení dokon ení nastavení.
EN - The display shows “ ” to confirm that the setting is complete.
DE - Zur Bestätigung der beendeten Einstellung zeigt das Display " " an.
FR - L’écran affiche « » pour confirmer si le réglage est complet.
ES - La pantalla muestra “ ” para confirmar que la configuración se ha completado.
PT - O visor exibe “ ” para confirmar que a configuração está completa.
NL - De display geeft “ ” weer om te bevestigen dat de instelling is voltooid.
PL - Na wy wietlaczu wy wietla si “ ” co potwierdza, e ustawienie zosta o zako czone.
ZAV ENÍ VRAT x1 s OTEV ENÍ OTEV ENO UVOLN TE
DOOR CLOSE
ZAV ENÍ
CLOSING
ZAV ENO
CLOSE
OPENING
UVOLN TE
RELEASE
OPEN RELEASE
Vložení nebo zm na ovlada e • Inserting or modifying a transmitter • Sender einsetzen oder ändern • Monter ou modifier un
émetteur • Agregar o modificar un transmisor • Inserir ou modificar um transmissor • Een zender invoeren of wijzigen • Wczytywanie
i
modyfikacja nadajnika
CZ
-
Stiskn
te
CODE
pro zobrazení
“
”.
EN - Press CODE to display “ ”.
DE - CODE drücken, um " " anzuzeigen.
FR - Appuyer sur CODE pour afficher « ».
ES - Presionar CODE para visualizar “ ”.
PT - Prima CODE para exibir “ ”.
NL - Druk op CODE om “ ” weer te geven.
PL
-
Nacisn
CODE;
wy
wietli
si
“
”.
CZ
-
Stiskn
te tla
ítko na ovlada
i
,
se vypne
,
pak uvoln
te a znovu stiskn
te stejné tla
ítko
,
“
”
bliká
.
EN - Press a button on the transmitter, switches off, then release and press again the same button, “ ” flashes.
DE - Eine Taste am Sender drücken, schaltet sich ab, anschließend dieselbe Taste loslassen und erneut drücken, " " blinkt.
FR - Appuyer sur un bouton de l’émetteur, s’éteint, puis relâcher et appuyer à nouveau sur le même bouton, « » clignote.
ES - Presionar el botón del transmisor, se apaga, luego soltar y presionar nuevamente el mismo botón, “ ” parpadea.
PT - Prima um botão no transmissor, apaga, então solte e prima novamente o mesmo botão, “ ” pisca.
NL - Druk op een knop van de zender, gaat uit, laat dezelfde knop los en druk hem opnieuw in, “ ” knippert.
PL
-
Nacisn
przycisk
na
nadajniku;
ga
nie;
nast
pnie
zwolni
i
ponownie
nacisn
ten
sam
przycisk;
"
"
miga.
CZ
-
Na displeji se zobrazí
“
”
pro indikaci dokon
ení nastavení
.
Postup opakujte
pro vložení maximáln
20 ovlada
a nebo tla
ítek
.
EN - The display shows “ ” to indicate that the setting is complete. Repeat the steps until encoding maximum 20 different transmitters and/or buttons.
DE - Zur Anzeige der beendeten Einstellung zeigt das Display " " an. Die Vorgänge wiederholen, um ein Maximum von 20 verschiedenen Sendern und/oder Tasten zu codieren.
FR - L’écran affiche « » pour indiquer que le réglage est complet. Répéter les étapes jusqu’à coder un maximum de 20 émetteurs et/ou boutons différents.
ES - La pantalla muestra “ ” para indicar que la configuración se ha completado. Repetir los pasos hasta codificar un máximo de 20 transmisores y/o botones diferentes.
PT - O visor exibe “ ” para indicar que a configuração está completa. Repita os passos até codificar um máximo de 20 transmissores e/ou botões diferentes.
NL - De display geeft “ ” weer om aan te duiden dat de instelling is voltooid. Herhaal de stappen om een maximum van 20 zenders en/of verschillende knoppen te coderen.
PL
-
Na
wy
wietlaczu
wy
wietla
si
“
”
co
informuje,
e
ustawienie
zosta
o
zako
czone.
Powtarza
kroki
a
do
zakodowania
co
najwy
ej
20
ró
nych
nadajników
i/lub
przycisków.
CZ
-
Po uložení 20
kód
se rozbliká
“
”
,
nebo, pokud dojde ke zjišt
ní chyb kódování, je nutno všechny uložené kódy smazat
.
EN - When 20 codes have been memorised, “ ” flashes, or, if encoding errors are anticipated, all memorised codes must be deleted.
DE - Sobald 20 Codes gespeichert sind, blinkt " " oder, um Codierfehlern vorzubeugen, müssen alle gespeicherten Codes gelöscht werden.
FR - Lorsque 20 codes ont été mémorisés « » clignote, pour prévenir des erreurs de codage, il faut supprimer tous les codes mémorisés.
ES - Cuando se hayan memorizado 20 códigos “ ” parpadea, o si se prevén errores de codificación, se deberán borrar todos los códigos memorizados.
PT - “ ” pisca após a memorização de 20 códigos, ou a evitar erros de codificação; é necessário excluir todos os códigos memorizados.
NL - Wanneer 20 codes zijn gememoriseerd, knippert “ ”; wanneer coderingsfouten worden voorzien, moeten alle gememoriseerde codes gewist worden.
PL
-
Po
zapisaniu
w
pami
ci 20
kodów
miga “
”;
aby zapobiec
b
dom
kodowania,
trzeba wykasowa
wszystkie
zapisane
w
pami
ci
kody.
CZ
-
Podržením stisknutého tla
ítka déle než 8 sekund
,
se rozbliká
“
”:
všechny kódy byly smazány
.
EN - By holding the button pressed for more than 8 seconds, “ ” flashes: all codes have been deleted.
DE - Länger als 8 Sekunden gedrückt halten, " " blinkt: alle Codes sind nun gelöscht.
FR - Maintenir pressé plus de 8 secondes, « » clignote : tous les codes ont été supprimés.
ES - Mantener presionado durante más de 8 segundos, “ ” parpadea: se han borrado todos los códigos.
PT - Mantenha premido por mais de 8 segundos, “ ” pisca: todos os códigos foram excluídos.
NL - Houd langer dan 8 seconden ingedrukt, “ ” knippert: alle codes zijn gewist.
PL
-
Przytrzyma
naci
ni
ty
ponad
8
sekund,
“
”
miga:
wszystkie
kody
zosta
y wykasowane.
UVOLN TE
RELEASE
Nastavení síly
•
Force
adjustment
•
Krafteinstellung
•
Réglage
de la
force
•
Regulación
de la
fuerza
•
Regulação
da
força
•
Afstelling van de kracht • Regulacja si y
CZ
-
Podržte stisknuté tla
ítko
SET,
na displeji se zobrazí
“
”.
EN - Press and hold the SET button, the display shows “ ”.
DE - SET drücken und gedrückt halten, das Display zeigt " " an.
FR - Appuyer sur SET et le maintenir pressé, l’écran affiche « ».
ES - Mantener presionado SET, la pantalla visualiza “ ”.
PT - Prima SET e mantenha-o premido, o visor exibe “ ”.
NL - Houd SET ingedrukt, de display geeft “ ” weer.
PL - Nacisn i przytrzyma naci ni ty przycisk SE; na wy wietlaczu wy wietla si “ ”.
22
CZ
-
Op
tovným stiskem tla
ítka UP zobrazte
“
”.
EN - Press the UP button again to display “ ”.
DE - Einmal die Taste UP drücken, um " " anzuzeigen.
FR - Appuyer une fois sur le bouton UP pour afficher « ».
ES - Presionar una vez la tecla UP para visualizar “ ”.
PT - Prima uma vez a tecla UP para exibir “ ”.
NL - Druk één maal op de toets UP om “ ” weer te geven.
PL
-
Nacisn
jeden
raz
przycisk
UP,
aby wy
wietli
“
”.
CZ - Op tovným stiskem tla ítka SET zobrazte sou asný stav. Stiskn te tla ítko UP pro zvýšení síly o jeden stupe nebo stiskn te tla ítko DOWN pro snížení síly o jeden stupe .
Maximální stupe je “ ”, minimální “ ”.
EN - Press the SET button again to display the current status. Press UP to increase the force by one degree or press DOWN to decrease by one degree. The max. degree is “ ”, the min. is “ ”.
DE - Erneut SET drücken, um den aktuellen Zustand anzuzeigen. UP drücken, um die Kraft um ein Grad zu steigern oder DOWN drücken, um sie um ein Grad zu mindern. Das
Höchstgrad ist " ", das Mindestgrad " ".
FR - Appuyer à nouveau sur SET pour afficher la situation actuelle. Appuyer sur UP pour augmenter la force d’un degré ou appuyer sur DOWN pour diminuer d’un degré. Le
degré maximum est « », le minimum est « ».
ES - Presionar nuevamente SET para visualizar la situación actual. Presionar UP para aumentar la fuerza en un grado o DOWN para disminuirla un grado. El grado máximo es “F9” y el mínimo “ ”.
PT - Prima novamente SET para exibir a situação atual. Prima UP para aumentar a força um grau ou prima DOWN para diminuir um grau. O grau máximo é “ ”, o mínimo é “ ”.
NL - Druk opnieuw op SET om de actuele positie weer te geven. Druk UP om de kracht te vergroten met één graad of druk op DOWN om de kracht te verkleinen met één graad.
De maximum graad is “ ”, de minimum graad is “ ”.
PL - Ponownie nacisn SET, aby wy wietli bie c sytuacj . Aby zwi kszy si o jeden poziom, nacisn UP, natomiast aby j zmniejszy o jeden poziom, nacisn DOWN.
Najwy
szy
poziom
to
“
”,
najni
szy
to
“
”.
CZ
-
Potvr
te stiskem tla
ítka SET
.
Standardní nastavení je
“
”.
EN - Press SET to confirm. The default setting is “ ”.
DE - Zur Bestätigung SET drücken. Die Voreinstellung ist " ".
FR - Appuyer sur SET pour confirmer. Le réglage prédéfini est « ».
ES - Presionar SET para confirmar. La configuración predefinida es “ ”.
PT - Prima SET para confirmar. A configuração predefinida é “ ”.
NL - Druk op SET om te bevestigen. De standaard instelling is “ ”.
PL
-
Nacisn
SET,
aby
zatwierdzi
.
Ustawienie
fabryczne
to
“
”.
Fotobu
ky
•
Photocells
•
Lichtschranken
•
Photocellules
•
Fotocélulas
•
Fotocélulas
•
Fotocellen
•
Fotokomórki
CZ
-
Podržte stisknuté tla
ítko SET, na displeji se zobrazí
“
”.
EN - Press and hold the SET button, the display shows “ ”.
DE - SET drücken und gedrückt halten, das Display zeigt " " an.
FR - Appuyer sur SET et le maintenir pressé, l’écran affiche « ».
ES - Mantener presionado SET, la pantalla visualiza “ ”.
PT - Prima SET e mantenha-o premido, o visor exibe “ ”.
NL - Houd SET ingedrukt, de display geeft “ ” weer.
PL
-
Nacisn
i
przytrzyma
naci
ni
ty
przycisk
SE;
na
wy
wietlaczu wy
wietla
si
“
”.
CZ - Dvojitým stiskem tla ítka UP zobrazte “ ”.
EN - Press the UP button twice to display “ ”.
DE - Zweimal UP drücken, um "P3" anzuzeigen.
FR - Appuyer deux fois sur UP pour afficher « ».
ES - Presionar dos veces UP para visualizar “ ”.
PT - Prima UP duas vezes para exibir “ ”.
NL - Druk twee maal op UP om “ ” weer te geven.
PL
-
Nacisn
dwukrotnie
UP,
aby
wy
wietli
“
”.
CZ
-
Stiskem tla
ítka SET zobrazte momentální stav
.
Jedním stiskem tla
ítka UP zobrazte
“
”,
paprsek
fotobu
ky je aktivovaný
.
Jedním stiskem tla
ítka DOWN zobrazte “H0”,
paprsek fotobu ky je deaktivovaný. Pro potvrzení a ukon ení stiskn te SET.
EN - Press the SET button to display the current status. Press the UP button once to display “ ”, the photocell beam is enabled. Press the DOWN button once to display “ ”,
the photocell beam is disabled. Press SET to confirm and exit.
DE - SET drücken, um den aktuellen Zustand anzuzeigen. Einmal UP drücken, " " wird angezeigt, das Strahlenbündel ist aktiviert. Einmal DOWN drücken, " " wird angezeigt,
das Strahlenbündel ist deaktiviert. Zur Bestätigung SET drücken und austreten.
FR - Appuyer sur SET pour afficher la situation actuelle. Appuyer sur UP une fois et « » est affiché, le faisceau des photocellules est activé. Appuyer sur DOWN une fois et «
» est affiché, le faisceau des photocellules est désactivé. Appuyer sur SET pour confirmer et sortir.
ES - Presionar SET para visualizar la situación actual. Presionar UP una vez para visualizar “ ”, el paquete de fotos está habilitado. Presionar DOWN una vez para visualizar
“ ”, el paquete de fotos está deshabilitado. Presionar SET para confirmar y salir.
PT - Prima SET para exibir a situação atual. Prima UP uma vez e “ ” exibido, o feixe de foto é ativado. Prima DOWN uma vez e “ ” é exibido, o feixe de foto é desativado.
Prima SET para confirmar e sair.
NL - Druk op SET om de actuele positie weer te geven. Druk één maal op UP zodat “ ” wordt weergegeven, de straal is geactiveerd. Druk één maal op DOWN zodat “ ” wordt
weergegeven, de straal is gedeactiveerd. Druk op SET om te bevestigen en af te melden.
PL - Nacisn SET, aby wy wietli bie c sytuacj . Nacisn UP jeden raz, wy wietli si “ ”, a wi zka foto zostanie aktywowana. Nacisn DOWN jeden raz, wy wietli si “ ”,
a
wi
zka
foto
zostanie
dezaktywowana.
Nacisn
SET,
aby
zatwierdzi
i wyj
.
CZ
-
Pokud za
ízení paprsku fotobu
ky není použité, zajist
te, aby bylo zobrazeno
“
”,
pro vypnutí funkce
.
EN - If the photocell beam device is not used, make sure that “ ” is displayed, to close the function.
DE - Wenn die Strahlenbündelvorrichtung nicht verwendet wird sicherstellen, dass " " angezeigt wird, um die Funktion zu schließen.
FR - Si le dispositif de faisceau de photocellule n’est pas utilisé, vérifier si « » est affiché, pour fermer la fonction.
ES - Si no se utiliza el dispositivo del paquete de fotos, asegurarse de que se visualice “ ” para cerrar la función.
PT - Se não estiver a utilizar o feixe de foto, verifique se “ ” é exibido para fechar a função.
NL - Als de inrichting van de straal niet wordt gebruikt, moet gecontroleerd worden dat “ ” wordt weergegeven om de functie te sluiten.
PL
-
Je
eli
urz
dzenie emituj
ce
wi
zk
foto
nie
jest
u
ywane,
sprawdzi
,
czy
wy
wietla
si
“
”,
aby
wy
czy
funkcj
.
ZAPNUTÍ/VYPNUTÍ automatického zavírání
• ON/OFF
automatic
closing
•
Automatische Schließung
ON/OFF
•
Fermeture
automatique
ON/OFF •
CZ
-
Podržte stisknuté tla
ítko SET, na displeji se zobrazí
“
”.
EN - Press and hold the SET button, the display shows “ ”.
DE - SET drücken und gedrückt halten, das Display zeigt " " an.
FR - Appuyer sur SET et le maintenir pressé, l’écran affiche « ».
ES - Mantener presionado SET, la pantalla visualiza “ ”.
PT - Prima SET e mantenha-o premido, o visor exibe “ ”.
NL - Houd SET ingedrukt, de display geeft “ ” weer.
PL
-
Nacisn
i
przytrzyma
naci
ni
ty
przycisk
SE;
na
wy
wietlaczu wy
wietla
si
“
”.
CZ
-
Stiskn
te t
ikrát tla
ítko UP pro zobrazení
“
”.
EN - Press the UP button three times to display “ ”.
DE - Dreimal UP drücken, um " " anzuzeigen.
FR - Appuyer trois fois sur UP pour afficher « ».
ES - Presionar tres veces UP para visualizar “ ”.
PT - Prima UP três vezes para exibir “ ”.
NL - Druk drie maal op UP om “ ” weer te geven.
PL
-
Nacisn
trzy
razy
UP,
aby wy
wietli
“
”.
CZ
-
Stiskn te tla
ítko SET pro zobrazení
sou
asného stavu
.
Stiskn te tla ítko UP pro zvýšení asu automatického zavírání nebo tla ítko DOWN pro snížení automatického
asu
zavírání. Maximální as je “ ”, minimální “ ”. Potvr te stiskem tla ítka SET.
EN - Press the SET button to display the current status. Press the UP button to increase the automatic closing time or press the DOWN button to decrease the automatic closing
time. The maximum time is “ ” and the minimum time is “ ”. Press SET to confirm.
DE - SET drücken, um den aktuellen Zustand anzuzeigen. UP drücken, um die automatische Schließzeit zu steigern oder DOWN drücken, um sie zu mindern. Die maximale Zeit
ist " ", die minimale Zeit " ". Zur Bestätigung SET drücken.
FR - Appuyer sur SET pour afficher la situation actuelle. Appuyer sur UP pour augmenter le temps de fermeture automatique ou sur DOWN pour le diminuer. Le temps maximum
est « », le minimum est « ». Appuyer sur SET pour confirmer.
ES - Presionar SET para visualizar la situación actual. Presionar UP para aumentar el tiempo de cierre automático o DOWN para disminuir el tiempo de cierre automático. El
tiempo máximo es “ ”, el mínimo es “ ”. Presionar SET para confirmar.
PT - Prima SET para exibir a situação atual. Prima UP para aumentar o tempo de fecho automático ou prima DOWN para diminuir. P tempo máximo é “ ”, o mínimo é “ ”.
Prima SET para confirmar.
NL - Druk op SET om de actuele positie weer te geven. Druk op UP om de automatische sluitingstijd te verlengen of op DOWN om de automatische sluitingstijd te verkorten.
De maximum tijd “ ”, de minimum tijd is “ ”. Druk op SET om te bevestigen.
PL - Nacisn SET, aby wy wietli bie c sytuacj . Aby wyd u y czas automatycznego zamykania, nacisn UP; aby skróci czas automatycznego zamykania, nacisn DOWN.
Maksymalny
czas
wynosi
"
”,
natomiast
minimalny to
“
”.
Nacisn
SET,
aby
zatwierdzi
.

23
CZ - Standardní nastavení je “ ”. “ ” indikuje deaktivované automatické zavírání. Tato funkce je aktivní, když vrata dosáhnou otev ené polohy.
EN - The default setting is “ ”. “ ” shows the disabled automatic closing. This function is active when the door reaches the opening position.
DE - Die Voreinstellung ist " ". " " zeigt die deaktivierte automatische Schließung an. Diese Funktion ist aktiv, wenn die Tür die geöffnete Position erreicht.
FR - Le réglage prédéfini est « ». « » montre la fermeture automatique désactivée. Cette fonction s’active lorsque la porte atteint la position d’ouverture.
ES - La configuración predefinida es “ ”. “ ” muestra el cierre automático desactivado. Esta función se activa cuando la puerta alcanza la posición de apertura.
PT - A configuração predefinida é “ ”. “ ” mostra o fecho automático desativado. Esta função funciona quando a porta atinge a posição de abertura.
NL - De standaard instelling is “ ”. “ ” geeft aan dat de automatische sluiting is gedeactiveerd. Deze functie werkt wanneer de poort de openingspositie bereikt.
PL - Ustawienie fabryczne to “ ”. “ ” oznacza, e automatyczne zamykanie jest dezaktywowane. Ta funkcja dzia a wtedy, gdy drzwi ustawi si w pozycji otwarcia.
as automatického op tovného zav ení • Automatic reclosing time • Automatische Wiederschließzeit • Temps de refermeture
automatique • Tiempo de cierre automático • Tempo de novo fecho automático • Tijd van automatische hersluiting • Czas
ponownego
zamkni
cia
automatycznego
LED
TIME (SEC.) 0 10 20 30 40 50 60 90 120 180
Poznámka: Automatické zavírání je aktivní jen po namontování a p i správné funkci fotobun k
N.B.: The automatic closing is active only after the photocells are installed and properly functioning
Hinweis: Die automatische Schließung funktioniert nicht, solange die Lichtschranken nicht installiert und funktionstüchtig sind
Remarque : La fermeture automatique ne fonctionne pas jusqu’à ce que les photocellules ne soient pas installées et fonctionnent correctement
Nota: El cierre automático se activa cuando se instalan las fotocélulas y funcionan correctamente
NOTA: O fecho automático não funciona enquanto as fotocélulas não estiverem instaladas e a funcionar corretamente
Opmerking: De automatische sluiting werkt niet als de fotocellen niet zijn geïnstalleerd en correct functioneren
UWAGA: Automatyczne zamykanie nie dzia a, je eli fotokomórki nie s zainstalowane i nie dzia aj prawid owo
ALARMY A PORUCHY • ALARMS AND FAULTS • MELDUNG VON ALARMEN UND STÖRUNGEN SIGNALISATIONS
ALARMES ET ANOMALIES • SEÑALIZACIÓN DE ALARMAS Y ANOMALÍAS • SINALIZAÇÃO DE ALARMES E
ANOMALIAS • SIGNALERING ALARMEN EN STORINGEN • SYGNALIZACJE ALARMOWE I B EDY
PROBLÉM •PROBLEM •PROBLEM • DÉFAUTS
PROBLEMA • PROBLEMA • PROBLEEM • PROBLEM
MOŽNÁ P Í INA • POSSIBLE CAUSE • MÖGLICHE URSACHE
CAUSE PROBABLE • CAUSA POSIBLE • CAUSA POSSÍVEL
MOGELIJKE OORZAAK • MO LIWA PRZYCZYNA
ODSTRAN NÍ • CORRECTIVE ACTION • MAßNAHME
ACTION CORRECTIVE • INTERVENCIÓN • INTERVENÇÃO
HANDELING • DZIA ANIE
emen je hlu ný •The belt is noisy •Die Riemen ist lär- mig
•La courroie fait du bruit •Ruidos en la correa •A corren- te
está ruidosa •De riem maakt lawaai •Paska g o no pracuje
emen je p íliš volný •The belt is too loose •Die Riemen ist
zu lose •La courroie est trop lâche •La correa está muy
floja •A corrente está muito solta •De riem is te los •Paska
jest zbyt lu ny
Matici M8 se i te podle obr. 15 •Adjust the M8 nut by
referring to fig. 15 •Die Mutter M8 einstellen, in- dem auf
Abb. 15 Bezug genommen wird •Régler l’écrou M8 en se
référant à la fig. 15 •Regular la tuerca M8 tomando como
referencia la fig. 15 •Regular a porca M8 consultando a fig.
15 •Regel de moer M8 met verwijzing naar afb. 15 •
Wyregulowa
nakr
tk
M8 wg
rysunku
15
Motor nefunguje •The motor is not wor- king •Der
Motor funktioniert nicht •Le moteur ne fonctionne pas •El
motor no funciona •O motor não funciona
•De motor werkt niet •Silnik nie dzia a
Zásuvka není správn
p
ipojená
nebo je spálená pojistka
•
The socket is not well connected or the fuse is broken •Die
Steckdose ist nicht richtig angeschlossen oder die Sicherung
ist defekt •La prise n’est pas branchée correctement ou le
fusible est défec- tueux •La toma no está bien conectada o el
fusible está roto •A tomada não está bem conectada ou o
fusível está quebrado
•De aansluiting is niet correct verbonden of de zekering is
kapot
•
Gniazdo
nie
jest
dobrze
pod
czone
lub
bezpiecznik
Zkontrolujte zásuvku nebo vym te pojistku •Check the
socket or replacethefuse•Die Steckdose kontrollieren oder
die Sicherung ersetzen •Contrôler la prise ou remplacer le
fusible •Controlar la toma o sustituir el fusible •Verificar a
tomada ou substituir o fusível •Controleer de aansluiting of
vervang de zekering •Sprawdzi gniazdko lub wymieni
bezpiecznik
Po nastavení otev ené a zav ené polohy motor nepracuje •
After having set the opening and closing position, the
motor does not work •Nach Einstellen der geöffneten und
geschlossenen Position funktioniert der Motor nicht •
Après avoir réglé la position d’ouverture et de fermeture, le
moteur ne fonctionne pas •Tras haber configu- rado la
posición de apertura y cierre, el motor no funciona •Depois
de configurar a posição de abertura e fecho, o motor não
funciona •De motor werkt niet nadat de positie van ope-
ning en sluiting is ingesteld •Po ustawieniu pozycji otwierania
i zamykania silnik nie dzia a
Upev
ovací šrouby všech díl
chybí nebo se jedná o poruchy
programu •The fixing screws of all components are missing
or there are program errors •Die Befestigungsschrau- ben
aller Bauteile sind locker oder es bestehen Programm-
fehler •Les vis de fixation de tous les composants sont perdus
ou il y a des erreurs de programme •Los tornillos de fijación
de todos los componentes se han perdido o el programa pre-
senta errores •Os parafusos de fixação de todos os compo-
nentes estão frouxos ou há erros de programa •De bevesti-
gingsschroeven van alle componenten zijn verloren of er zijn
programmafouten •ruby mocuj ce wszystkie komponenty
wypad
y lub w programie s
b
dy
Utáhn te šrouby nebo obnovte otev enou a zav enou polohu
•Tighten the screws or restore the opening and closing
position •Die Schrauben festziehen oder die geöffnete und
geschlossene Position wiederherstellen •Serrer les vis ou
rétablir la position d’ouverture et de fermeture •Apretar los
tornillos o restable- cer la posición de apertura y cierre •
Apertar os parafusos ou restaurar a posição de abertura ou
fecho •Draai de schroeven vast of herstel de positie van
opening en sluiting •Dokr ci ruby lub poprawi pozycj
otwierania i zamykania
Vrata se nezavírají •The door does not close •Die Tür
schließt nicht •La porte ne se ferme pas •La puerta no cier-
ra •A porta não fecha •De poort sluit niet •Drzwi si nie
zamykaj .
Funkce paprsku fotobu ky nepracuje •The photo- cell beam
function is not working •Die Funktion Strahlenbün- del der
Fotozellen funktioniert •La fonction faisceau des pho-
tocellules ne fonctionne pas •La función haz de las fotocélulas
no funciona •A função feixe das fotocélulas não funciona •
De functie van de straal van de fotocellen werkt niet •Funkcja
wi zki fotokomórek nie dzia a.
Zrušte funkci
paprsk
u fotobu
ky podle menu Parametry
-
Fotobu ky •Cancel the photocell beam function, by
referring to the Parameters menu - Photocells
•Die Funktion Strahlenbündel annullieren, indem auf das
Menü Parameter – Fotozellen Bezug genommen wird •An-
nuler la fonction faisceau des photocellules en se référant au
menu Paramètres – Photocellules •Anular la función de pa-
quete de fotos mediante Menú Parámetros – Fotocélulas •
Cancelar a função de feixe de foto, consultando o Menu Parâ-
metros - Fotocélulas •Annuleer de functie van de straal, met
verwijzing naar het Menu Parameters – Fotocellen •Wy czy
opcj wi zki foto; mo na to zrobi w Menu Parametrów - Fo-
tokomórki
Nást nné tla ítko funguje správn , ale ovlada nefunguje •
The wall button is working properly, but the transmit- ter
does not work •Die Taste an der Wand funktioniert, aber
der Sender funktioniert nicht •Le bouton mural fonctionne
correctement mais l’émetteur ne fonctionne pas •El pulsador
de pared funciona bien, pero el transmisor no funciona •O
botão de parede funciona bem, mas o transmissor não funcio-
na •De op de muur werkt goed maar de zender werkt niet •
Przycisk na cianie dzia a dobrze, ale nadajnik nie dzia a
Ovlada
nebyl nau
ený nebo
je vybitá baterie ovlada
e
•
No
transmitter acquisition or the transmitter’s battery is
empty •Kein Lernlauf des Senders oder die Batterie des
Senders ist leer •Aucun apprentissa- ge de l’émetteur ou
batterie de l’émetteur déchargée •El transmisor no ha
efectuado el aprendizaje o su batería está descargada •
Nenhuma aprendizagem do transmissor ou a bateria do
transmissor está descarregada •Geen lering van de zender
of de batterij van de zender is leeg •Nadajnik nie
zapami
tuje
danych
lub
bateria
nadajnika
jest
roz
adowana
Vym te baterii ovlada e •Replace the transmit- ter’s
battery •Die Batterie des Senders austauschen •Rem-
placer la batterie de l’émetteur •Cambiar la batería del
transmisor •Trocar a bateria do transmissor •Vervang de
batterij van de zender •Wymieni bateri nadajnika
Vzdálenost ovlada e je p íliš malá •The transmit- ter’s
distance is too short •Der Abstand vom Sender ist zu klein
•La distance de l’émetteur est trop courte •La distancia del
transmisor es muy corta •A distância do transmissor é
muito curta •De afstand van de zender is te kort •Odleg o
nadajnika jest za ma a
Baterie ovlada e je tém vybitá •The transmit- ter’s
battery is almost empty •Die Batterie des Senders ist fast
leer •La batterie de l’émetteur est presque déchargée •La
batería del transmisor está casi descargada •A bateria do
transmissor está quase descarregada •De batterij van de zen-
der is bijna leeg •Bateria nadajnika jest prawie roz adowana
Vym te baterii ovlada e •Replace the transmit- ter’s
battery •Die Batterie des Senders austauschen •Rem-
placer la batterie de l’émetteur •Cambiar la batería del
transmisor •Trocar a bateria do transmissor •Vervang de
batterij van de zender •Wymieni bateri nadajnika

MOX MOTION GATES
a products brand of ROGER TECHNOLOGY S.R.L.
Via S. Botticelli 8 • 31021 Bonisiolo di Mogliano Veneto (TV) • ITALIA
P.IVA 01612340263 • Tel. +39 041.5937023 • Fax. +39 041.5937024
info@rogertechnology.com • www.rogertechnology.com
Products brand manufactured in Extra-EU
Other manuals for C40 Series
2
Table of contents
Popular Garage Door Opener manuals by other brands


B&D
B&D Roll-A-Door Series 1 installation instructions

Guardian
Guardian 21230L Installation instructions and owner's manual

Anaheim Automation
Anaheim Automation AD1200 owner's manual

Somati system
Somati system OGS User & installation manual

Chamberlain
Chamberlain Dial Code installation manual

CAME
CAME BX704AGM installation manual

Normstahl
Normstahl SMART 42.2 TOF installation instructions

Nexx Garage
Nexx Garage NXG-100 installation manual

BFT
BFT EOS 120 VENERE D Installation and user manual

Chamberlain
Chamberlain 1300 owner's manual

Overhead door
Overhead door 55A Assembly, installation and operating instructions

BFT
BFT Botticelli VENERE D Installation and user manual