MPC Profile 6.5 Product manual


Contents
i
Chapter 1: Getting Started . . . . . . . . . . . . . . . . . . . . . . . . . . . . . . . . . . . . . . . . . . . . . . 1
Getting help . . . . . . . . . . . . . . . . . . . . . . . . . . . . . . . . . . . . . . . . . . . . . . . . . . . . . . . . 2
About this guide . . . . . . . . . . . . . . . . . . . . . . . . . . . . . . . . . . . . . . . . . . . . . . 2
Contact information . . . . . . . . . . . . . . . . . . . . . . . . . . . . . . . . . . . . . . . . . . . . 2
Microsoft Certificate of Authenticity . . . . . . . . . . . . . . . . . . . . . . . . . . . . . . 2
System Specifications . . . . . . . . . . . . . . . . . . . . . . . . . . . . . . . . . . . . . . . . . . . . . . . . 2
Checking out your computer . . . . . . . . . . . . . . . . . . . . . . . . . . . . . . . . . . . . . . . . . . . 4
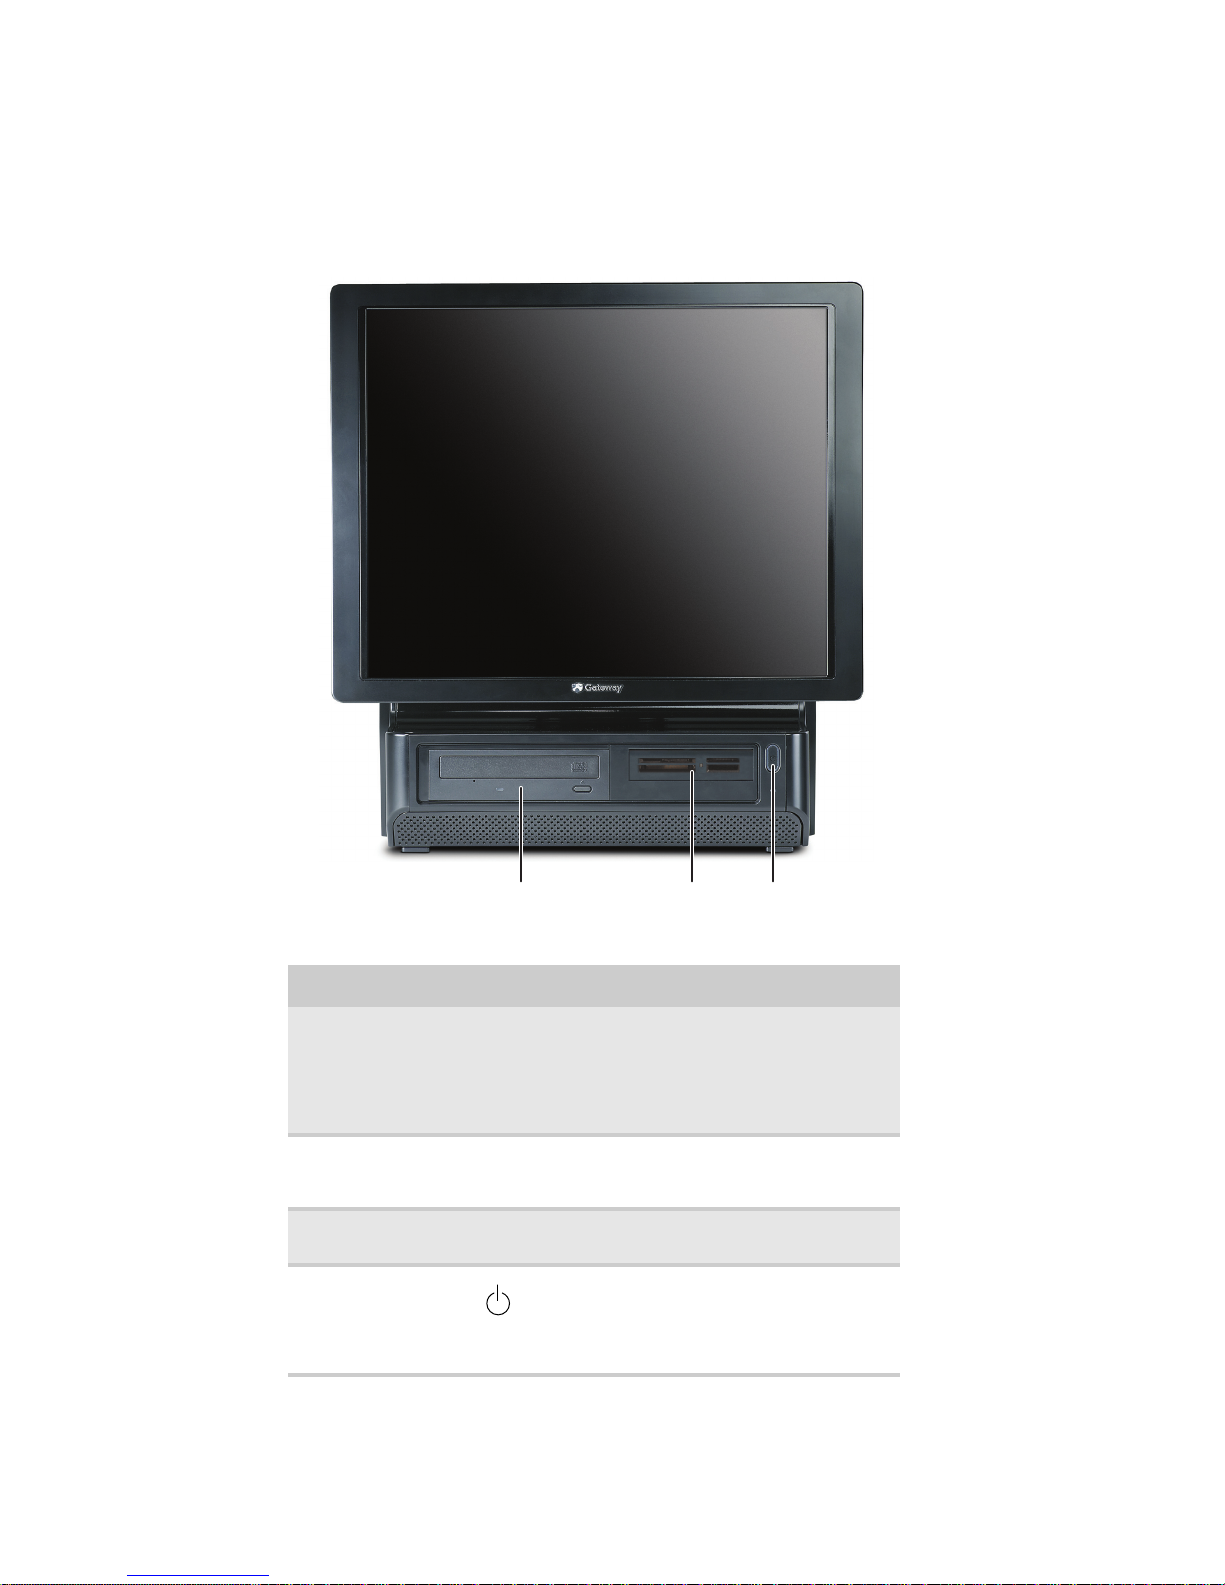
Front . . . . . . . . . . . . . . . . . . . . . . . . . . . . . . . . . . . . . . . . . . . . . . . . . . . . . . . . 4
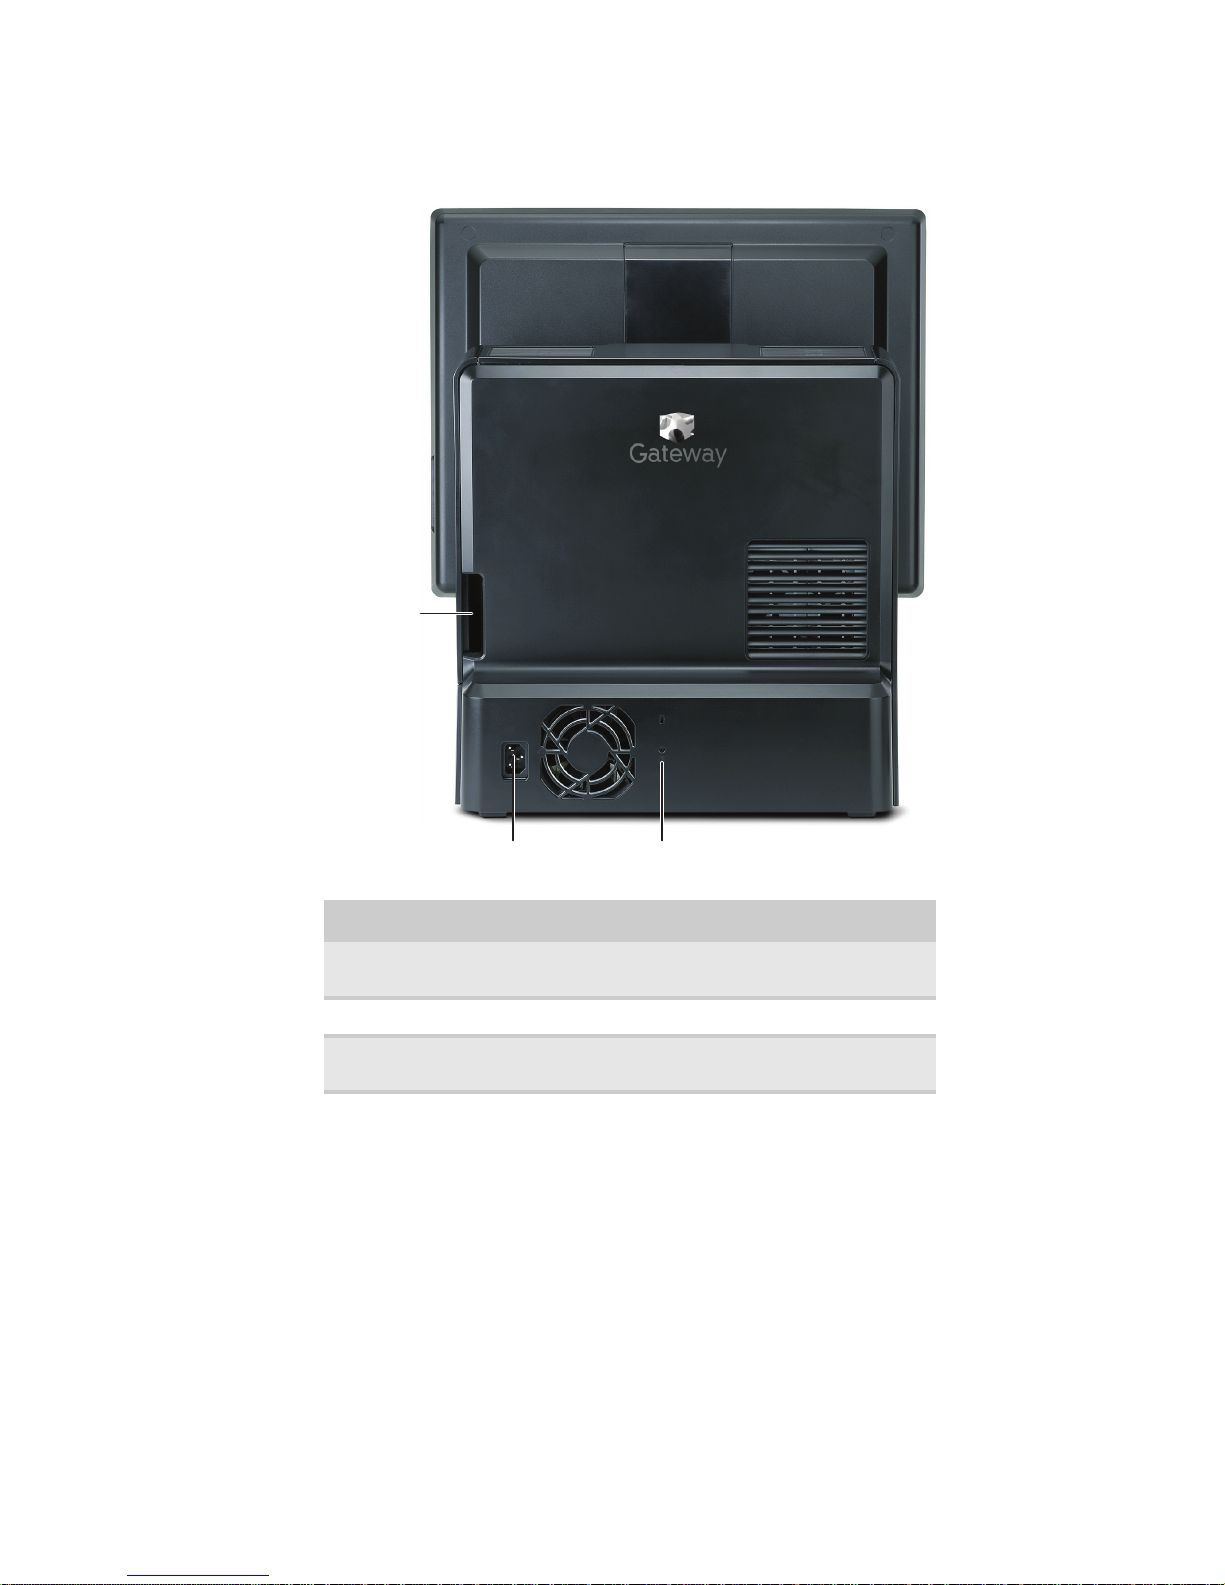
Back . . . . . . . . . . . . . . . . . . . . . . . . . . . . . . . . . . . . . . . . . . . . . . . . . . . . . . . . 5
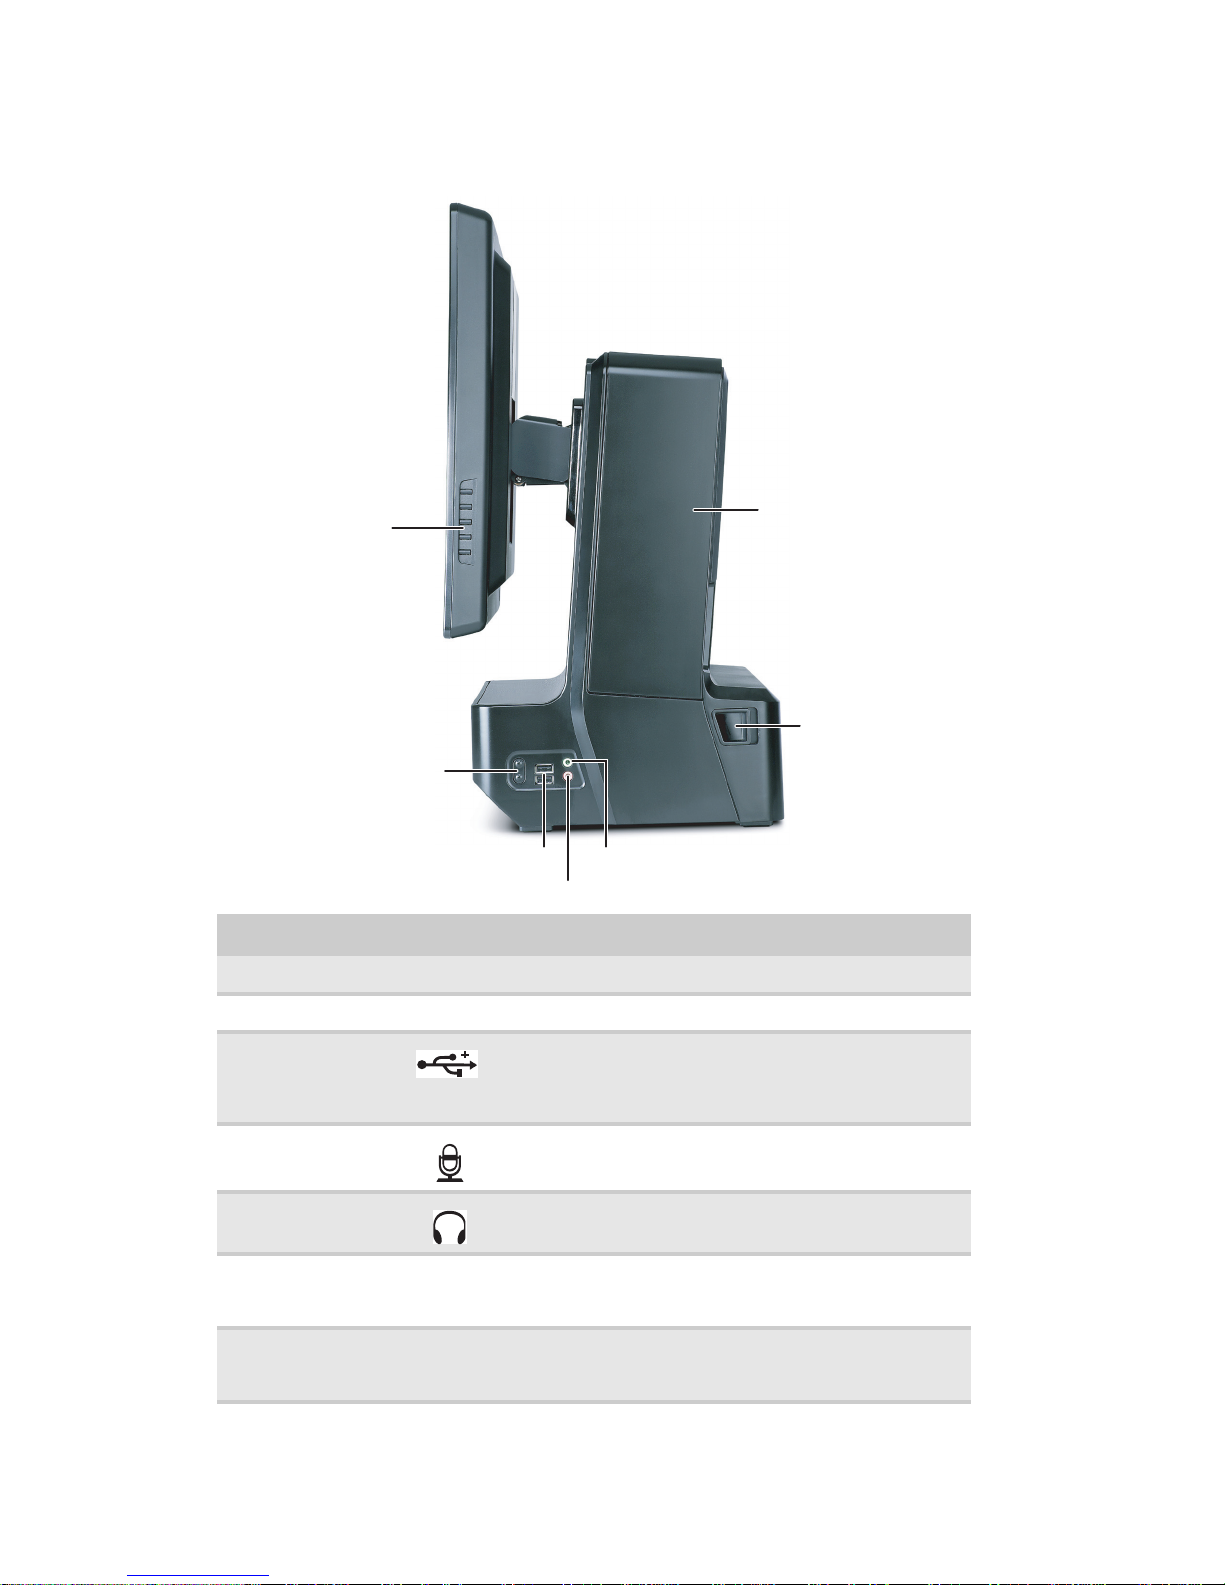
Right side . . . . . . . . . . . . . . . . . . . . . . . . . . . . . . . . . . . . . . . . . . . . . . . . . . . . 6
Side port panel . . . . . . . . . . . . . . . . . . . . . . . . . . . . . . . . . . . . . . . . . . . . . . . 7
Setting up your computer . . . . . . . . . . . . . . . . . . . . . . . . . . . . . . . . . . . . . . . . . . . . . 9
Working safely and comfortably . . . . . . . . . . . . . . . . . . . . . . . . . . . . . . . . . 9
Preparing power connections . . . . . . . . . . . . . . . . . . . . . . . . . . . . . . . . . . . . 9
Connecting to a broadband modem or network . . . . . . . . . . . . . . . . . . . . . . 9
Connecting a dial-up modem . . . . . . . . . . . . . . . . . . . . . . . . . . . . . . . . . . . . 9
Starting your computer . . . . . . . . . . . . . . . . . . . . . . . . . . . . . . . . . . . . . . . . 10
Turning off your computer . . . . . . . . . . . . . . . . . . . . . . . . . . . . . . . . . . . . . 10
Restarting (rebooting) your computer . . . . . . . . . . . . . . . . . . . . . . . . . . . . . 11
. . . . . . . . . . . . . . . . . . . . . . . . . . . . . . . . . . . . . . . . . . . . . . . . . . . . . . . . . . . 11
Adjusting the volume . . . . . . . . . . . . . . . . . . . . . . . . . . . . . . . . . . . . . . . . . 12
Configuring the audio jacks . . . . . . . . . . . . . . . . . . . . . . . . . . . . . . . . . . . . 13
Installing a printer, scanner, or other device . . . . . . . . . . . . . . . . . . . . . . . 14
Chapter 2: Upgrading Your Computer . . . . . . . . . . . . . . . . . . . . . . . . . . . . . . . . . . . 15
Opening the case . . . . . . . . . . . . . . . . . . . . . . . . . . . . . . . . . . . . . . . . . . . . . . . . . . . 16
Removing the back panel . . . . . . . . . . . . . . . . . . . . . . . . . . . . . . . . . . . . . . 16
Replacing the back panel . . . . . . . . . . . . . . . . . . . . . . . . . . . . . . . . . . . . . . 17
Replacing the processor fan . . . . . . . . . . . . . . . . . . . . . . . . . . . . . . . . . . . . . . . . . . 18
Installing memory . . . . . . . . . . . . . . . . . . . . . . . . . . . . . . . . . . . . . . . . . . . . . . . . . . 19
Replacing the power supply . . . . . . . . . . . . . . . . . . . . . . . . . . . . . . . . . . . . . . . . . . 20
Replacing the memory card reader . . . . . . . . . . . . . . . . . . . . . . . . . . . . . . . . . . . . . 21
Replacing an optical disc drive . . . . . . . . . . . . . . . . . . . . . . . . . . . . . . . . . . . . . . . . 21
Replacing the diskette drive . . . . . . . . . . . . . . . . . . . . . . . . . . . . . . . . . . . . . . . . . . 22
Replacing the hard drive . . . . . . . . . . . . . . . . . . . . . . . . . . . . . . . . . . . . . . . . . . . . . 23
Adding or replacing an expansion card . . . . . . . . . . . . . . . . . . . . . . . . . . . . . . . . . 24
Installing a half-height expansion card . . . . . . . . . . . . . . . . . . . . . . . . . . . . 24
Installing a full-height expansion card . . . . . . . . . . . . . . . . . . . . . . . . . . . . 25
Replacing the BIOS battery . . . . . . . . . . . . . . . . . . . . . . . . . . . . . . . . . . . . . . . . . . 27
Replacing the system board . . . . . . . . . . . . . . . . . . . . . . . . . . . . . . . . . . . . . . . . . . 28
Chapter 3: Maintaining Your Computer . . . . . . . . . . . . . . . . . . . . . . . . . . . . . . . . . . 31
Caring for your computer . . . . . . . . . . . . . . . . . . . . . . . . . . . . . . . . . . . . . . . . . . . . 32
Cleaning your computer . . . . . . . . . . . . . . . . . . . . . . . . . . . . . . . . . . . . . . . . . . . . . 32
Cleaning the exterior . . . . . . . . . . . . . . . . . . . . . . . . . . . . . . . . . . . . . . . . . . 32
Cleaning the keyboard . . . . . . . . . . . . . . . . . . . . . . . . . . . . . . . . . . . . . . . . . 32
Cleaning the monitor . . . . . . . . . . . . . . . . . . . . . . . . . . . . . . . . . . . . . . . . . 33

Contents
ii
Cleaning the mouse . . . . . . . . . . . . . . . . . . . . . . . . . . . . . . . . . . . . . . . . . . . 33
Cleaning optical discs . . . . . . . . . . . . . . . . . . . . . . . . . . . . . . . . . . . . . . . . . 33
Backing up files . . . . . . . . . . . . . . . . . . . . . . . . . . . . . . . . . . . . . . . . . . . . . . 33
Operating Environment . . . . . . . . . . . . . . . . . . . . . . . . . . . . . . . . . . . . . . . . . . . . . . 34
Temperature Concerns . . . . . . . . . . . . . . . . . . . . . . . . . . . . . . . . . . . . . . . . 34
Moisture and Humidity Concerns . . . . . . . . . . . . . . . . . . . . . . . . . . . . . . . . 34
Other Environmental Concerns . . . . . . . . . . . . . . . . . . . . . . . . . . . . . . . . . . 34
Chapter 4: Troubleshooting . . . . . . . . . . . . . . . . . . . . . . . . . . . . . . . . . . . . . . . . . . . .37
Safety guidelines . . . . . . . . . . . . . . . . . . . . . . . . . . . . . . . . . . . . . . . . . . . . . . . . . . . 38
First steps . . . . . . . . . . . . . . . . . . . . . . . . . . . . . . . . . . . . . . . . . . . . . . . . . . . . . . . . . 38
Troubleshooting . . . . . . . . . . . . . . . . . . . . . . . . . . . . . . . . . . . . . . . . . . . . . . . . . . . . 38
Internet . . . . . . . . . . . . . . . . . . . . . . . . . . . . . . . . . . . . . . . . . . . . . . . . . . . . . 38
Modem (cable or DSL) . . . . . . . . . . . . . . . . . . . . . . . . . . . . . . . . . . . . . . . . 39
Modem (dial-up) . . . . . . . . . . . . . . . . . . . . . . . . . . . . . . . . . . . . . . . . . . . . . 39
Networking . . . . . . . . . . . . . . . . . . . . . . . . . . . . . . . . . . . . . . . . . . . . . . . . . 41
Memory card reader . . . . . . . . . . . . . . . . . . . . . . . . . . . . . . . . . . . . . . . . . . 42
CD or DVD drives . . . . . . . . . . . . . . . . . . . . . . . . . . . . . . . . . . . . . . . . . . . 42
Hard drive . . . . . . . . . . . . . . . . . . . . . . . . . . . . . . . . . . . . . . . . . . . . . . . . . . 43
Diskette drive . . . . . . . . . . . . . . . . . . . . . . . . . . . . . . . . . . . . . . . . . . . . . . . 43
File management . . . . . . . . . . . . . . . . . . . . . . . . . . . . . . . . . . . . . . . . . . . . . 44
Keyboard . . . . . . . . . . . . . . . . . . . . . . . . . . . . . . . . . . . . . . . . . . . . . . . . . . . 44
Mouse . . . . . . . . . . . . . . . . . . . . . . . . . . . . . . . . . . . . . . . . . . . . . . . . . . . . . 45
Monitor . . . . . . . . . . . . . . . . . . . . . . . . . . . . . . . . . . . . . . . . . . . . . . . . . . . . 45
Sound . . . . . . . . . . . . . . . . . . . . . . . . . . . . . . . . . . . . . . . . . . . . . . . . . . . . . . 46
Power . . . . . . . . . . . . . . . . . . . . . . . . . . . . . . . . . . . . . . . . . . . . . . . . . . . . . . 46
Passwords . . . . . . . . . . . . . . . . . . . . . . . . . . . . . . . . . . . . . . . . . . . . . . . . . . 46
Add-in cards . . . . . . . . . . . . . . . . . . . . . . . . . . . . . . . . . . . . . . . . . . . . . . . . 46
Recovering your system . . . . . . . . . . . . . . . . . . . . . . . . . . . . . . . . . . . . . . . . . . . . . 47
Recovering pre-installed software and drivers . . . . . . . . . . . . . . . . . . . . . . 47
OS Recovery CD . . . . . . . . . . . . . . . . . . . . . . . . . . . . . . . . . . . . . . . . . . . . . 47
Using Microsoft System Restore . . . . . . . . . . . . . . . . . . . . . . . . . . . . . . . . 48
Telephone support . . . . . . . . . . . . . . . . . . . . . . . . . . . . . . . . . . . . . . . . . . . . . . . . . . 51
Before calling technical support . . . . . . . . . . . . . . . . . . . . . . . . . . . . . . . . . 51
Appendix A: Legal Notices . . . . . . . . . . . . . . . . . . . . . . . . . . . . . . . . . . . . . . . . . . . 53
Index . . . . . . . . . . . . . . . . . . . . . . . . . . . . . . . . . . . . . . . . . . . . . . . . . . . . . . . . . . . . . 59
EMA#001131-00

CHAPTER
1
1
Getting Started
•Getting help
•System Specifications
•Checking out your computer
•Setting up your computer

CHAPTER 1: Getting Started
2
Getting help
About this guide
This guide includes information and maintenance instructions that are specific to your model of
computer. Some illustrations in this guide may look different than your computer because hardware
options and port locations may vary.
For more information
For more information about your computer, visit MPC’s Support page at
www.mpccorp.com/support or the Web address shown on your computer’s label. The Support page
also has links to additional documentation and detailed specifications.
Contact information
The label on the side of your computer case contains information that identifies your computer
model and serial number. Technical Support will need this information if you call for assistance.
Microsoft Certificate of Authenticity
The Microsoft Certificate of Authenticity label found on the side of your computer includes the
product key code for your operating system. If you ever reinstall Windows from the installation
DVD, you will need to enter these numbers to activate Windows.
System Specifications
Your Profile 6.5 All-in-One computer features a high-performance system board. The following
specifications describe your system board.
Processor
•Intel Core 2 Duo
•Intel Core 2 Quad

www.mpccorp.com
3
Memory
•DDR2 667/800 memory support
•2 DIMMS, 4 GB maximum
Chipset
•Intel Q35 - ICH9DO
Audio
•5.1 High Definition Audio integrated
•Headphone & microphone ports
Built-in I/O
•8 USB ports (6 back, 2 side)
•1 parallel, 1 serial, 2 PS/2
•1 VGA/DVI in
•1 RJ-45
Graphics
•Intel integrated graphics w/DVMT
•X16 Graphics card support
•Dual Monitor Support (w/add in card)
Expandability
•2 PCI (one full height, one half height)
•1 mini-PCI
•1 PCI Express x 16
•1 mini-card

CHAPTER 1: Getting Started
4
Checking out your computer
Front
Component Icon Description
DVD/CD drive Use this drive to listen to audio CDs, install
games and programs, watch DVDs, and store
large files onto recordable discs (depending on
drive type).
This drive may be a CD, recordable CD, DVD,
or recordable DVD drive.
Memory card reader
(optional) Insert a memory card from a digital camera,
MP3 player, PDA, cellular telephone, or other
devices into the memory card reader.
Diskette drive
(optional) Insert a standard 3.5-inch diskette into the
optional diskette drive.
Power button and
power indicator Press this button to turn the power on or off.
You can also configure the power button to
operate in Standby/Resume mode or Hibernate
mode. The power indicator lights when the
computer is turned on.
DVD/CD drive Power button/
power indicator
Memory card reader or
diskette drive (optional)

www.mpccorp.com
5
Back
Component Description
Opening for cables Route the cables that are plugged into the side ports
through this opening.
Power connector Plug the power cord into this connector.
Kensington lock slot Attach a cable lock to this slot to prevent unauthorized
opening, modification, and theft of your computer.
Opening for
cables
Power connector Kensington lock slot

CHAPTER 1: Getting Started
6
Right side
Component Icon Description
Display controls Press these buttons to adjust the screen image.
Volume control Press to adjust the volume level of the built-in speakers.
USB ports Plug a USB (Universal Serial Bus) device (such as a USB
printer, scanner, camera, keyboard, or mouse) into one of these
ports. For more information, see “Installing a printer, scanner,
or other device” on page 14.
Microphone jack Plug a microphone into this jack. This jack is color-coded red
or pink.
Headphone jack Plug powered, analog front speakers, an external amplifier, or
headphones into this jack. This jack is color-coded green.
Side port cover Remove this cover to access the ports underneath, such as USB,
parallel, serial, IEEE 1394/FireWire™, and audio jacks. For
more information, see “Side port panel” on page 7.
Back panel release
latches For service, pull both of these latches (one on each side of the
case) toward the back of the case, then lift the back panel away
from the case.
Headphone jack
Microphone jack
Volume control
USB ports
Back panel
release latch (2)
Display controls
Side port cover

www.mpccorp.com
7
Side port panel
Access the side port panel by removing the port cover on the right side of your computer.
Important
Your computer’s hardware options and port locations may vary from these illustrations.
Headphone/front speaker out jack
Microphone or center
subwoofer out jack
PS/2 keyboard port
USB ports
Serial port
VGA in port
USB ports
Digital (DVI) video in port
(optional)
Parrallel port
Expansion card slots
Line-in/rear speaker out jack
PS/2 mouse port
RJ-45

CHAPTER 1: Getting Started
8
Component Icon Description
Digital (DVI) video in port If you have a digital video (DVI) expansion card installed, connect
its DVI out port to this DVI in port.
(VGA) in port If you have an analog (VGA) video expansion card installed,
connect its VGA out port to this VGA in port.
Parallel port Plug a parallel device (such as a printer) into this port. For more
information, see “Installing a printer, scanner, or other device” on
page 14.
Serial port Plug a serial device (such as an older digital camera or mouse) into
this port.
USB ports Plug a USB device (such as a printer, scanner, camera, keyboard,
or mouse) into one of these ports. For more information, see
“Installing a printer, scanner, or other device” on page 14.
PS/2 mouse port Plug a PS/2 mouse into this port.
PS/2 keyboard port Plug a PS/2 keyboard into this port.
Microphone jack (pink
plug) Plug a microphone into this jack.
Headphone/analog
speakers jack (green plug)
-OR-
Front speakers jack
If the back of your computer has five audio jacks, this jack is user
configurable for one of the following:
Headphone: Plug headphones or amplified speakers into this jack
(Default).
Stereo out: Plug your front left and right speakers into this jack.
For information on configuring this jack, see “Configuring the
audio jacks” on page 13.
If the back of your computer has three audio jacks, this jack is the
headphone/analog speaker (line out) jack. Plug powered speakers,
an external amplifier, or headphones into this jack.
RJ-45 An eight-wire connector used commonly to connect computers into
a local-area network (LAN).
Expansion card slots Install a PCI card or graphics card into the riser card slots.
Audio input (Line in) jack
(blue plug)
-OR-
Side speaker jack
If the back of your computer has five audio jacks, this jack is user
configurable for one of the following:
Stereo in: Plug an external audio input source (such as a stereo)
into this jack so you can record sound on your computer (Default).
Stereo out: Plug your side left and right speakers into this jack.
For information on configuring this jack, see “Configuring the
audio jacks” on page 13.
If the back of your computer has three audio jacks, this jack is the
audio input (line in) jack. Plug an external audio input source (such
as a stereo) into this jack so you can record sound on your
computer.

www.mpccorp.com
9
Setting up your computer
Working safely and comfortably
Please observe and follow safe ergonomic workplace practices when using this equipment.
Preparing power connections
Protecting from power source problems
During a power surge, the voltage level of electricity coming into your computer can increase to
far above normal levels and cause data loss or system damage. Protect your computer and peripheral
devices by connecting them to a surge protector, which absorbs voltage surges and prevents them
from reaching your computer.
An uninterruptible power supply (UPS) supplies battery power to your computer during a power
failure. Although you cannot run your computer for an extended period of time with a UPS, a UPS
lets you run your computer long enough to save your work and shut down your computer normally.
Connecting to a broadband modem or network
You can connect your computer to a cable or DSL modem or to a wired Ethernet network.
To connect to a broadband modem or to an Ethernet network:
1Insert one end of the network cable into the network jack on the right side of your
computer. For its location, see “Side port panel” on page 7.
2Insert the other end of the network cable into a cable modem, DSL modem, or network jack.
Connecting a dial-up modem
Your computer may have a 56K modem that you can use with a standard telephone line to connect
to the Internet or fax documents.
To connect the modem:
1Insert one end of the modem cable into the modem jack on the modem at the right side
of your computer. For its location, see “Side port panel” on page 7.
2Insert the other end of the modem cable into a telephone wall jack. (The modem will not
work with digital or PBX telephone lines.)
3If you want, connect a telephone to the PHONE jack on the modem on the right side of your
computer.
Warning
High voltages can enter your computer through both the power cord and the modem
connection. Protect your computer by using a surge protector. If you have a telephone
modem, use a surge protector that has a modem jack. If you have a cable modem, use a
surge protector that has an antenna/cable TV jack. During an electrical storm, unplug both
the surge protector and the modem.
Important
Your computer may be equipped with a built-in Ethernet (network) jack.
Warning
To reduce the risk of fire, use only No. 26 AWG or larger telecommunications line
cord.

CHAPTER 1: Getting Started
10
Starting your computer
To start your computer:
1Connect the power, network, mouse, and keyboard cables to your computer according to the
setup poster.
2Press the power button on the front of your computer. If your computer does not turn on,
check the power cable connections.
3If you are starting your computer for the first time, follow the on-screen instructions to select
the language and time zone and to create your first user account.
4Attach and turn on any USB or audio peripheral devices, such as printers or scanners. If you
need to attach a peripheral device to the parallel or serial ports, turn off your computer first.
See the documentation that came with each device for its setup instructions.
5To open your computer’s main menu, click (Start). From that menu, you can run programs
and search for files.
Waking up your computer
When you have not used your computer for several minutes, it may enter a power-saving mode
called Sleep. While in Sleep mode, the power indicator on the power button flashes.
If your computer is in Sleep mode, move the mouse, press a key on the keyboard, or press the
power button to “wake” it up.
Turning off your computer
You can leave your system running for extended hours, but when you do need to power
off, you should complete the following steps:
1Save any work you want to keep, and exit all open applications.
2Make sure that ALL disk activity has completely stopped. The floppy and hard disk drive
indicator LEDs should be off and the floppy drive motors should stop.
3Refer to Windows Help (Press [F1]) for specific instructions about the operating system
you are using.
Manual Shutdown
There are only two situations where you should use the manual shutdown procedure:
Important
Your computer has a built-in, variable-speed fan. In addition, your computer
uses a powerful processor which produces heat and has its own cooling fan. Both
the system fan and processor fan can run at different speeds at times to ensure
correct system cooling. You may notice an increase in the fan noise when the fan
is running at high speed and a decrease in the fan noise when it switches to normal
speed.
Warning
When you turn off your computer, certain components in the power supply and
system board remain energized. In order to remove all electrical power from your
computer, unplug the power cord and modem cable from the wall outlets. We recommend
disconnecting the power cord and modem cable when your computer will not be used for
long periods.
Important
If for some reason you cannot use the Shut Down option in Windows to turn off
your computer, press and hold the power button for about five seconds, then release it.
When you turn off the system in this manner, any unsaved data will be lost.

www.mpccorp.com
11
•Your system has encountered a software error and has failed to respond to any user input
including [Ctrl+Alt+Del].
•The system was booted into command prompt mode (operating system specific).
To manually shut down your system, press and hold the multi-function power button
for more than 5 seconds.
Restarting (rebooting) your computer
If your computer does not respond to keyboard or mouse input, you may need to restart (reboot)
your computer.
To restart your computer:
1Click (Start), click the arrow next to the lock icon, then click Restart. Your computer
turns off, then turns on again.
OR
Click (Start), click Shut Down, select Restart from the drop-down list, then click OK.
2If your computer does not turn off, press and hold the power button until the computer turns
off (about five seconds), then press it again to turn the computer back on.
Warning
If you have not encountered one of these situations, shut the system off through
the operating system shut down function to avoid data loss.
Important
If you turn off your computer without following the proper power on/off steps,
Windows® XP and Windoes Vista will open a disk-checking utility next time you turn
on your system. Follow the directions displayed on the monitor to avoid data loss.

CHAPTER 1: Getting Started
12
Adjusting the volume
You can adjust volume using the volume control buttons on the right side of your computer or the
Windows volume controls. You can also adjust the volume of specific sound devices in your
computer.
To adjust the overall volume using hardware controls:
•Press the + or - buttons on the right side of your computer.
-OR-
If you are using external speakers, turn the knob on the front of the speakers.
-OR-
Use the mute and volume control buttons on the keyboard. For more information, see “” on
page 11.
To adjust the volume from Windows:
1Click (Vol um e ) on the taskbar. The volume control slider opens.
2Click and drag the slider up to increase volume and down to decrease volume.
3To mute the volume, click (Mute). To restore volume, click it again.
Vo l u m e d o wn ( - )
Vol u me up (+)

www.mpccorp.com
13
4To adjust device volume levels, click Mixer. The Vo l u me M i x e r dialog box opens, where
you can click and drag sliders for individual devices.
5Click ×in the top-right corner of the window to close it.
Configuring the audio jacks
If the side of your computer has five audio jacks, they are universal jacks. This means that they
can be used for more than one purpose. For example, the blue jack on the computer can be a stereo
in jack or a stereo out jack. To use the audio jacks for something other than the default audio device,
you need to configure the audio jacks.
To configure the audio jacks:
1Connect your audio device(s) to the computer audio jack(s).
2Click (Start), then click Control Panel. The Control Panel window opens.
3Click Hardware and Sound, Sound, the Playback tab, then click Configure.
-OR-
If your computer has the Realtek Sound Effect Manager installed, double-click the Sound
Effect Manager icon on the taskbar. The Realtek dialog box opens.
4Follow the on-screen instructions to configure the audio jacks for your speaker setup.
Tip
Adjust the Windows Sounds slider to change system sounds volume
independently of general volume (such as the volume used for music and game
sounds).
Help
For more information about adjusting the volume, click Start, then click
Help and Support. Type adjusting volume in the Search Help box, then
press ENTER.
Shortcut
Start Á Control Panel Á Hardware and Sound Á Sound Á click the
device Á Configure

CHAPTER 1: Getting Started
14
Installing a printer, scanner, or other device
Your computer has one or more of the following ports: Universal Serial Bus (USB), serial, and
parallel. You use these ports to connect peripheral devices such as printers, scanners, and digital
cameras to your computer. For more information about port locations, see “Checking out your
computer” on page 4.
USB ports support plug-and-play and hot-swapping, which means that your computer will usually
recognize such a device whenever you plug it into the appropriate port. When you use an USB
device for the first time, your computer will prompt you to install any software the device needs.
After doing this, you can disconnect and reconnect the device at any time.
Parallel and serial port devices are not plug-and-play. See the device documentation for detailed
information and installation instructions.
Important
Before you install a printer, scanner, or other peripheral device, see the
device documentation and installation instructions.
Help
For more information about installing peripheral devices, click Start,
then click Help and Support. Type installing devices in the Search Help box,
then press ENTER.

CHAPTER
2
15
Upgrading Your Computer
•Opening the case
•Replacing the processor fan
•Installing memory
•Replacing the power supply
•Replacing the memory card reader
•Replacing an optical disc drive
•Replacing the diskette drive
•Replacing the hard drive
•Adding or replacing an expansion card
•Replacing the BIOS battery
•Replacing the system board

CHAPTER 2: Upgrading Your Computer
16
Opening the case
Your computer case provides easy access to internal components.
Removing the back panel
To remove the back panel:
1Before opening the computer case, protect yourself from electric shock by following these
guidelines:
•Turn off your computer.
•Disconnect the power cord and modem, network, and all peripheral device cables.
2The components inside your computer are extremely sensitive to static electricity, also known
as electrostatic discharge (ESD). Before opening the computer case, follow these guidelines
to prevent electrostatic discharge:
•Wear a grounding wrist strap (available at most electronics stores) and attach it to a bare
metal part of your computer.
•Avoid static-causing surfaces such as carpeted floors, plastic, and packing foam.
•Touch a bare metal surface on the side of the computer.
3Before working with new or replacement computer components, follow these guidelines:
•Remove components from their antistatic bags only when you are ready to use them.
Do not lay components on the outside of antistatic bags because only the inside of the
bags provide electrostatic protection.
•Always hold expansion cards by their edges or their metal mounting brackets. Avoid
touching the edge connectors and components on the cards. Never slide expansion cards
or components over any surface.
4Place your computer face-down on a clean, soft, dry surface. (Although the photographs show
the computer upright, you should place your computer face-down during servicing to avoid
tipping it over.)
Warning
To avoid exposure to dangerous electrical voltages and moving parts, turn off your
computer and unplug the power cord and modem and network cables before opening the case.
To prevent risk of electric shock, do not insert any object into the vent holes of the power
supply.
Table of contents
Other MPC Desktop manuals