MRC DA-130N User manual

PLEASE READ THIS MANUAL CAREFULLY BEFORE OPERATION
MRC.VER.02-11.10
INSTRUCTION MANUAL FOR
DA-130N
Portable Density/Specific Gravity Meter


Table of contents Page
Safety Precautions......................................................................................................................................................... 1
1. Introduction............................................................................................................................................................... 3
2. About the manual ...................................................................................................................................................... 4
3. Supplied parts............................................................................................................................................................ 5
4. Parts configuration .................................................................................................................................................... 6
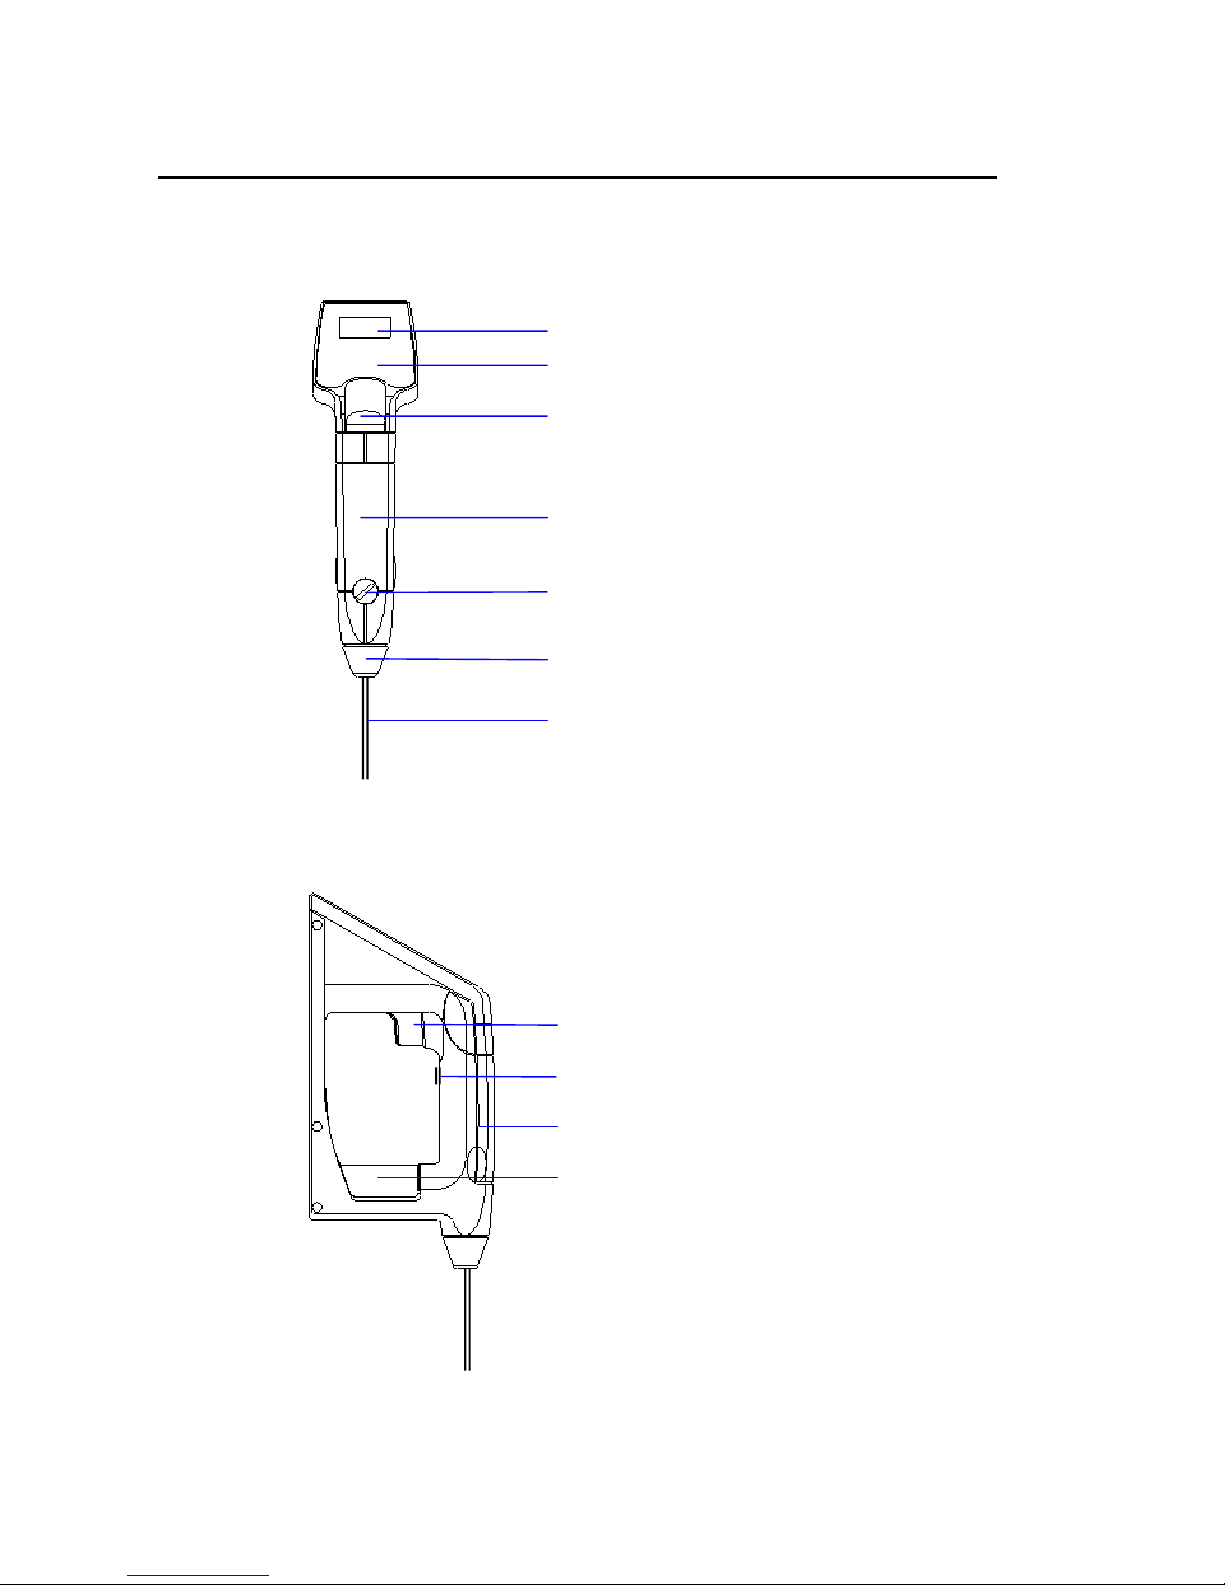
4.1 Front view........................................................................................................................................................... 6
4.2 Side view............................................................................................................................................................. 6
4.3 Rear view ............................................................................................................................................................ 7
4.4 Display window .................................................................................................................................................. 8
4.5 Operating unit ..................................................................................................................................................... 9
5. Preparation for measurement by DA-130N............................................................................................................. 10
5.1 Loading the battery ........................................................................................................................................... 10
5.2 Setting the sampling nozzle .............................................................................................................................. 11
5.3 Setting the memo pad........................................................................................................................................ 11
5.4 Preliminary test ................................................................................................................................................. 12
6. Setting temperature unit, measuring unit and mode................................................................................................ 13
6.1 Temperature unit ............................................................................................................................................... 13
6.2 Measuring unit .................................................................................................................................................. 13
6.3 Configuration of measurement mode................................................................................................................ 17
7. Actual measurement ................................................................................................................................................ 18
7.1 Cautions on measurement ................................................................................................................................. 18
7.2 Sample measurement ........................................................................................................................................ 19
7.2.1 When the built-in syringe is used............................................................................................................... 19
7.2.1.1 Sampling test materials....................................................................................................................... 19
7.2.1.2 Start measurement .............................................................................................................................. 19
7.2.1.3 Hold measurement data ...................................................................................................................... 19
7.2.1.4 Saving measurement data ................................................................................................................... 19
7.2.2 The use of commercially available plastic syringe .................................................................................... 20
7.2.2.1 Sampling............................................................................................................................................. 20
7.2.2.2 Start measurement .............................................................................................................................. 20
7.2.2.3 Hold measurement data ...................................................................................................................... 20
7.2.2.4 Saving measurement data ................................................................................................................... 20
8. Calibration of measuring cell .................................................................................................................................. 21
8.1 Calibration with pure water............................................................................................................................... 21
8.2 Calibration with standard liquid........................................................................................................................ 22
8.2.1 Calibration with standard liquid of which density is known...................................................................... 22
8.3 Calibration with air ........................................................................................................................................... 22
8.3.1 Calibration with air .................................................................................................................................... 22
8.3.2 How to dry the cell..................................................................................................................................... 23
8.3.3 Procedure of calibration with air................................................................................................................ 24
8.4 Calibration of displayed temperature................................................................................................................ 25
8.5 Recalibration..................................................................................................................................................... 25

9. Application of data processing.................................................................................................................................26
9.1 Storage of measuring data..................................................................................................................................26
9.1.1 Auto saving.................................................................................................................................................26
9.1.2 Manual storage ...........................................................................................................................................26
9.2 Making saved data .............................................................................................................................................26
9.3 Deletion of stored data.......................................................................................................................................26
9.4 Display of measurement data and external output.............................................................................................27
9.5 Setting external output.......................................................................................................................................28
9.5.1 Data output to a personal computer via infrared communication ...............................................................28
9.5.2 Data output to Printer..................................................................................................................................30
9.5.3 Data output to PC via RS-232C..................................................................................................................31
10. Other useful functions............................................................................................................................................32
10.1 Selection of beep sound ...................................................................................................................................32
10.2 Adjust brightness of LC display; Setting of Backlight: on/off.........................................................................33
10.3 Setting Automatic Power Off...........................................................................................................................33
10.4 Version number check......................................................................................................................................33
10.5 Set Date ...........................................................................................................................................................34
10.6 Set ID...............................................................................................................................................................34
11. Power source ..........................................................................................................................................................35
11.1 Change the battery ...........................................................................................................................................35
11.2 Auto Power Off................................................................................................................................................35
12. Maintenance...........................................................................................................................................................36
13. Cautions in use...............................................................................................................................................37
14. Parts list .................................................................................................................................................................38
15. Troubleshooting .....................................................................................................................................................40
15.1 Error messages and their remedies ..................................................................................................................40
15.2 Exhibit no repeatability on measured value or show deviation on measured value.........................................41
16. Technical data ........................................................................................................................................................42
17. Warranty and After-Sale Service............................................................................................................................43
Appendix 1: Density of pure water (0∼40°C) ..............................................................................................................44
Appendix 2: Temperature compensation coefficient for various liquids......................................................................44

1
Safety Precautions
Always observe these signs and introductions.
You must observe cautionary messages and warnings in order to protect yourself as well as prevent others
from physical injury or property damages.
Warning!
This symbol means "Danger of severe injury
or possible death".
Caution!
This symbol means "Danger of injury or
property damage".
This symbol means prohibition of an
act.
This symbol means mandatory.
Warning!
Never overhaul or open the casing the unit except by an authorized KEM service
person.
Danger exists of electric shock, fire or malfunction.
Caution!
Do not use the unit in other way than instructed in the manual.
Danger exists of fire and electric shock, and may damage the unit.
Caution!
Load the battery with correct polarity (plus/minus).
If the battery is loaded with reverse polarity, it will heat up and leak, causing fire, injury
and contamination of the environment.
-+

2
Caution!
Do not use a battery other than specified or mix new and old batteries.
Danger exists of battery heated and leaking, causing fire, burn and contamination of
the enviroment.
Caution!
Do not heat or break the battery or discard it in water or in flame.
Danger exists of battery explosion, causing fire, injury and
contamination of the enviroment.
Caution!
Do not use a leaking battery.
Danger exists of electric short circuit and fire by leaking battery.
Caution!
If battery liquid should touch your skin or clothes, immediately wash away with
running water.
It may cause malfunctioning of the instrument.

3
1. Introduction
We appreciate your patronage purchasing 05& product the DA-130N Portable Density Specific Gravity
Meter. By easy operation, you can obtain density and relative gravity of liquid as well as various
concentrations. Please read this manual thoroughly before you use for actual measurement.
1. Supplied parts ············································································································ P.5
Check the supplied parts to see if they are correctly shipped in number.
2. Preparation for measurement ····················································································· P.10
Set the supplied battery in the unit.
3. Preliminary test ·········································································································· P.12
Measure water
(1) Prepare pure water for measurement.
(2) Check the measurement results on pure water.
When delivered
<Caution> If the pure water test did not result within 0.001g/cm3, the measuring cell has to be
calibrated.
Calibration of the meter
4. Measurement ············································································································· P.18
Measure a sample. Prepare a sample and measure it.
Sample measurement
5. Calibration of measuring cell ···················································································· P.21
Calibrate the measuring cell. Prepare pure water.
Daily check

4
2. About the manual
It is recommended to keep this manual near your system in order for quick reference.
Here in below, some important messages are described for your safety, security and assurance.
1. Where there exists a danger of physical injury or possible death
Warning!
Danger of physical injury or possible death if the
warning is ignored.
2. Were there is a danger of property damage
Caution!
Property may be damaged if the instruction is not
followed.
3. Where the instrument may perform its function correctly
Note!
If handled or operated other than instructed, the
instrument may not work to its specified
performance and not satisfy the warranty term
and conditions.
4. Meaning of mark or symbol in the manual
This symbol means technical tips helpful in
operating the unit or useful advice.
* It is prohibited to copy a part or whole of this manual without consent of copyright.
* If you should find any missing part or doubtful descriptions in this manual, please contact your sales
representative or local dealer.
* Manufacturer will not be liable for any damage or loss based on the data depicted in this manual.
* This manual stipulates operating instruction for the standard model. If your unit is customer ordered,
please refer to the accompanying specification and instructions.

5
3. Supplied parts
Make sure you have received all the necessary parts in the carton box. If you should find any missing
part or broken parts, immediately contact your local dealer.
Supplied parts list
Part code Part name Qty Remarks
98-319-0004 (1) Alkaline dry cell
(size “AAA”)
2 pcs LR03G/1.5V
98-319-0005 (2) Battery holder 1 pc
98-560-0021 (3) Sampling nozzle 1 pc Tetrafluoroethylene resin
/with washer
98-560-0103 (4) Nozzle screw 1 pc
98-595-0492 (5) Operation manual 1 copy
98-595-0490 (6) Basic operation manual 1 copy
98-594-0003 (7) Memo pad 1 pc
(8) Warranty
(Inspection card)
1 copy
(9) Carton box 1 pc
•The supplied alkaline dry cell (size “AAA”) is for the purpose of function
test only.
It is recommended to replace them with new ones earlier.

6
4.Partsconfiguration
4.1 Front view
4.2 Side view
(5) Screw stopper
(1) Display window
(2) Operating key
(3) Sample discharging lever
(4) Syringe cover
(7) Sampling nozzle
(6) Nozzle screw
(8) Sample intake lever
(11) Measuring cell
(9) Intake lever stopper
(10) Built-in syringe

7
4.3 Rear view
(12) Battery cover
(13) Infra red receiver/transmitter

8
4.4 Display window
Results screen Memory clear screen
(1) (2) (3) (4)
(5) (6)(7) (8) (9) (10) (11)
(1) Shows unit for measurement data.
(2) Shows measurement data in preset unit.
(3) Shows sample name (a to z or space)
(4) Normal display shows sample number.
Error number will appear in case of error.
(5) Appears when Stability is set at Auto (automatic stability sense mode).
The measurement results are automatically held by the automatic sense.
(6) Appears when Memory in is set at Auto (saving). When measurement data is held,
the results are automatically stored in the unit. When the data are saved, this
symbol blinks.
(7) Appears when Memory out is set at Auto (output). When Printer or Personal
computer is connected, the data is automatically output on data being held. This
symbol blinks when data is being output.
(8) The battery capacity level is shown.
(9) Shows measurement temperature (Celsius /Fahrenheit)
(10) Appears in data deletion mode on Memory clear.
(11) The “*” mark appears when data is marked with [mem. clr/all] key.
This mark is useful for data control to identify unnecessary data of
measurement failure.

9
4.5 Operating unit
(3)
(1)
(2)
(4)
(5) (6)
(1) [mem.clr./all] key: Key to put “*” mark to identify data when data is output externally. When
pressed for more than 2 seconds, all data can be cleared.
Also this key shifts the cursor to the left for numerical entry.
(2) [+/α] key: Key to move the cursor upward on selection. It selects temperature
compensation coefficient αby pressing for more than 2 seconds. This key
also increments a number for numerical entry.
(3) [mem.out/all] key: Key to output data externally. By pressing for more than 2 seconds, all data
or certain data can be output. This key also moves the cursor to the right in
numerical entry.
(4) [-/cal] key: Key to shift the cursor downward on selection. Pressing for more than 2
seconds turns the mode to calibration. This key also decrements a number on
numerical entry.
(5) [ok/meas.] key: Key to start measurement or hold data on measuring screen.
When pressed with [esc] key at the same time, it turns the mode to Function.
This key also confirms the selection or numerical entry. This key stores the
measurement data when Memory in is set at Manu and the data is held. This
key executes data clear or data output.
(6) [esc/on/off] key: Key to return the screen from Function to Measurement. This key also turns
on the unit when pressed for more than 2 seconds while the unit is off, and
turns it off when the unit is on.

10
5. Preparation for measurement by DA-130N
5.1 Loading the battery
Set the dry cells in the battery holder. Use alkaline dry cells (size “AAA”). Insert the cell while paying
attention to the polarity direction. Remove the battery cover by pulling it out.
Slide in the battery holder all the way to the end, and put on the cover.
•Insert to see the flat bottom touch the spring.
•Press [On/Off] to check the display. If display does not appear, check the battery
direction.
•When replace the battery, change all of the cell at the same time.
•Always use the same type of dry cell.
(Note) Do not use other dry cell than alkaline “AAA” type, e.g. NiCd dry cell
Press [On/Off] key for more than 2 seconds to turn on the power.
The below initial screen will appear and when it changes to measuring screen, the unit is working in
normal condition.
Initial screen Measuring screen (above is an example)
The battery capacity can be checked on the measuring screen.
: Enough energy is stored (Level 3)
: It is running down. (Level 2)
: Almost no more energy. (Level 1)
: Change the battery. (Level 0) * the alarm will sound.
•The above capacity level is just for as a guide.
•Beep sounds only when the power is turned on.
+
−
+ −

11
5.2 Setting the sampling nozzle
Attach the supplied sampling nozzle as illustrated:
•Screw the sampling nozzle with the washer into the
nozzle screw, and screw it in clockwise until it is
securely fixed.
•Use your hand to avoid stripping the screw thread.
Caution!
Do not use a tool like pliers.
5.3 Setting the memo pad
Fill necessary items in the memo pad, and put it on the main unit.

12
5.4 Preliminary test
Leave temperature unit (Celsius), measurement unit (g/cm3) and mode (Field) as initial value.
Sample in pure water using the syringe.
•After the measuring cell is filled with sample liquid,
make sure there is no air bubble in the cell. Even a
small bubble would deviate the results. If any
bubbles are found, repeat sampling from the
beginning.
•Always use the supplied sampling nozzle.
Example:
⇐Density at current temperature
The display changes as above, and after confirming it is in the automatic stability sense mode, press
[Meas.] key. When the display density is stabilized, the value will automatically change reversed as
shown below. Read the data at this point as well as the temperature degree.
Example:
⇐The reading changes to reverse display when the value is stabilized.
Look up to the pure water density table (appendix 1). If the results agree within ±0.001g/cm3, you can
go for sample measurement.
Note!
If the results and theoretical value differ more than ±0.001g/cm3,
recalibrate the measuring cell.

13
6. Setting temperature unit, measuring unit and mode
6.1 Temperature unit
Select Celsius or Fahrenheit.
While pressing [esc] key, press [ok/meas.] key to show Function screen.
Select <Temp. Unit> by [ + ], [ −] key.
ok
Select temperature unit with [ + ], [ −] key and confirm by [ok/meas.] key.
6.2 Measuring unit
While pressing [esc] key, press [ok/meas.] key to show Function screen.
Select <Measure Unit> by [ + ], [ −] key.
Select measurement data unit by moving the cursor with [ + ], [ −] key, and confirm by [ok/meas.] key.
Twelve units are selective as below:
(1) Density (5) API (9) Boume
(2) Comp. Density (6) Brix (10) Plato
(3) SG(t/t) (7) Alcohol (11) Proof
(4) SG (8) H2SO4 (12) Conc.
(1) Measurement of density
ok
g/cm3 : Measurement of true density in g/cm3at temperature on display
lb/gal(US) : Measurement by converting to US unit (1g/cm3=8.3454 lb/gal)
lb/gal(IP) : Measurement by converting to British unit(1g/cm3=10.0224 lb/gal)
(2) Measurement of temperature compensated density
ok
Measurement of true density in g/cm3at preset temperature

14
It is necessary to configure temperature compensation coefficient of sample and converted
temperature in advance.
10 coefficients for temperature compensation can be stored.
Comp. No. : Select out of 10 stored values.
Comp. Temp : Set compensation temperature.
α×1000 : Set value of (Temp. comp. coefficient of sample ×1000)
The Comp. Density for Comp. Temp is obtained from the following formula based on the Density at
measurement temperature (Temp.):
Comp. Density = Density ×{1 + α×(Temp – Comp. temp)}
On the temperature compensation coefficients for typical solutions and how to determine the
coefficients, refer to Appendix 2.
How to obtain temperature compensation coefficient: (depends on sample)
(1) Using your unit, obtain density at measurement temperature at different ambient condition
(indoor and outdoor), and calculate density change (α×103) per 1°C from density difference at
different temperature.
(2) Temperature compensation coefficient can be obtained, using Hydrometer or Oscilation-type
meter (e.g. KEM’s DA-500), by changing measurement temperature.
The preset αvalue can be selected on the measuring screen.
While Comp. Density, SG, Conc. is selected, press [ α] key for more than 2 seconds.
The αvalue appears on upper left on the screen. Pressing [ +], [ −] key displays α0 to α9 one after
another. Choose desired
αvalue and confirm by [ok/meas.] key.
(3) Measurement of specific gravity
Measurement of true specific gravity at displayed measurement temperature
(4) Measurement of specific gravity temperature compensated
ok
Measurement of true specific gravity at preset temperature
It is necessary to configure temperature compensation coefficient of sample and two reference
temperature degrees in advance.
10 coefficients for temperature compensation can be stored
On the temperature compensation coefficients for typical solutions and how to determine the
coefficients, refer to Appendix 2.
For how to obtain temperature compensation coefficient, refer to “(2) Density measurement at
temperature compensated.”

15
(5) Measurement of API degree
ok
Measurement of density or API degree compensated in temperature to 15°C or 60°F for the product
group A, B or D.
Selection of temperature, 15°C or 60°F, will be automatically made when setting the temperature unit.
Product group A: Crude oil
[Measurement of density: API A (Density) Measurement of API degree: API A (Degree)]
Product group B: Fuel, Petroleum products
[Measurement of density: API B (Density) Measurement of API degree: API B (Degree)]
Product group D: Lubricant
[Measurement of density: API D (Density) Measurement of API degree: API D (Degree)]
(6) Measurement of Brix concentration
Measurement of Brix concentration (sucrose concentration expressed in weight %) based on density at
20°C
(7) Measurement of Alcohol concentration
ok
Measurement of alcohol concentration of Ethanol/Water mixed system in wt % or vol % at 15°C or
20°C calculated from the density at the measurement temperature.
(8) Measurement of sulfuric acid concentration
Measurement of sulfuric acid concentration in weight % from density measured at 20°C
(9) Measurement of Baume degree
Measurement of Baume degree at converted temperature from density value measured at the
measurement temperature
Set “Comp T” to “15/04°C” and input “α” in the previous (4), measurement of specific gravity with
temperature compensated, followed by setting the unit at “Baume”.

16
(10) Measurement of Plato degree
Measurement of Plato degree at 20°C from density obtained at measurement temperature
(11) Measurement of Proof degree
ok
Measurement of Proof degree at 60°F from density obtained at measurement temperature
Proof degree is one of the units for alcohol content, and there is US Proof and British Proof. Each of
them is different in conversion degree.
Proof (US) : Measure in US Proof unit (100v/v%=200 US Proof)
Proof (IP) : Measure in UK Proof unit (100v/v%=175 British Proof)
(12) Concentration measurement by setting desired concentration conversion formula
Set “Comp. Temp” and “α” in the previous (2), measurement of density with temperature
compensated or in the previous (4), measurement of specific gravity with temperature compensated.
Then, concentration can be calculated using the calculated “Comp D” or “SG”.
User defined concentration conversion formula (Linear expression: y = a + bx)
Conc.(%) Den.(g/cm3) at 20°C Conc.(%) Den.(g/cm3) at 20°C
10.0 0.9820 10.6 0.9842
10.1 0.9824 10.7 0.9845
10.2 0.9827 10.8 0.9849
10.3 0.9831 10.9 0.9852
10.4 0.9835 11.0 0.9855
10.5 0.9838
For example from the above data, a conversion formula can be obtained as follows.
Suppose take y for concentration and x for density, you can obtain y=283.2x–268.1 by the
approximate formula from regression line using commercially available spread sheet software.
Therefore, you input –2.681E+2 for coefficient ‘a’ and 2.832E+2 for coefficient ‘b’.
Example of input: Example of measurement:
(when density is 0.9820 g/cm3)
Table of contents
Other MRC Multimeter manuals