MS Schippers 0401375 User manual

1
0401375
MS Docking Station For Handy Reader UHF

2
Gebruiksaanwijzing - laadstation
Inhoudsopgave
Technische gegevens............................................................................................................................... 3
Laadstation: een overzicht ...................................................................................................................... 3
Betekenis van de ledlampjes................................................................................................................... 4
MS Schippers –Config Tool..................................................................................................................... 4
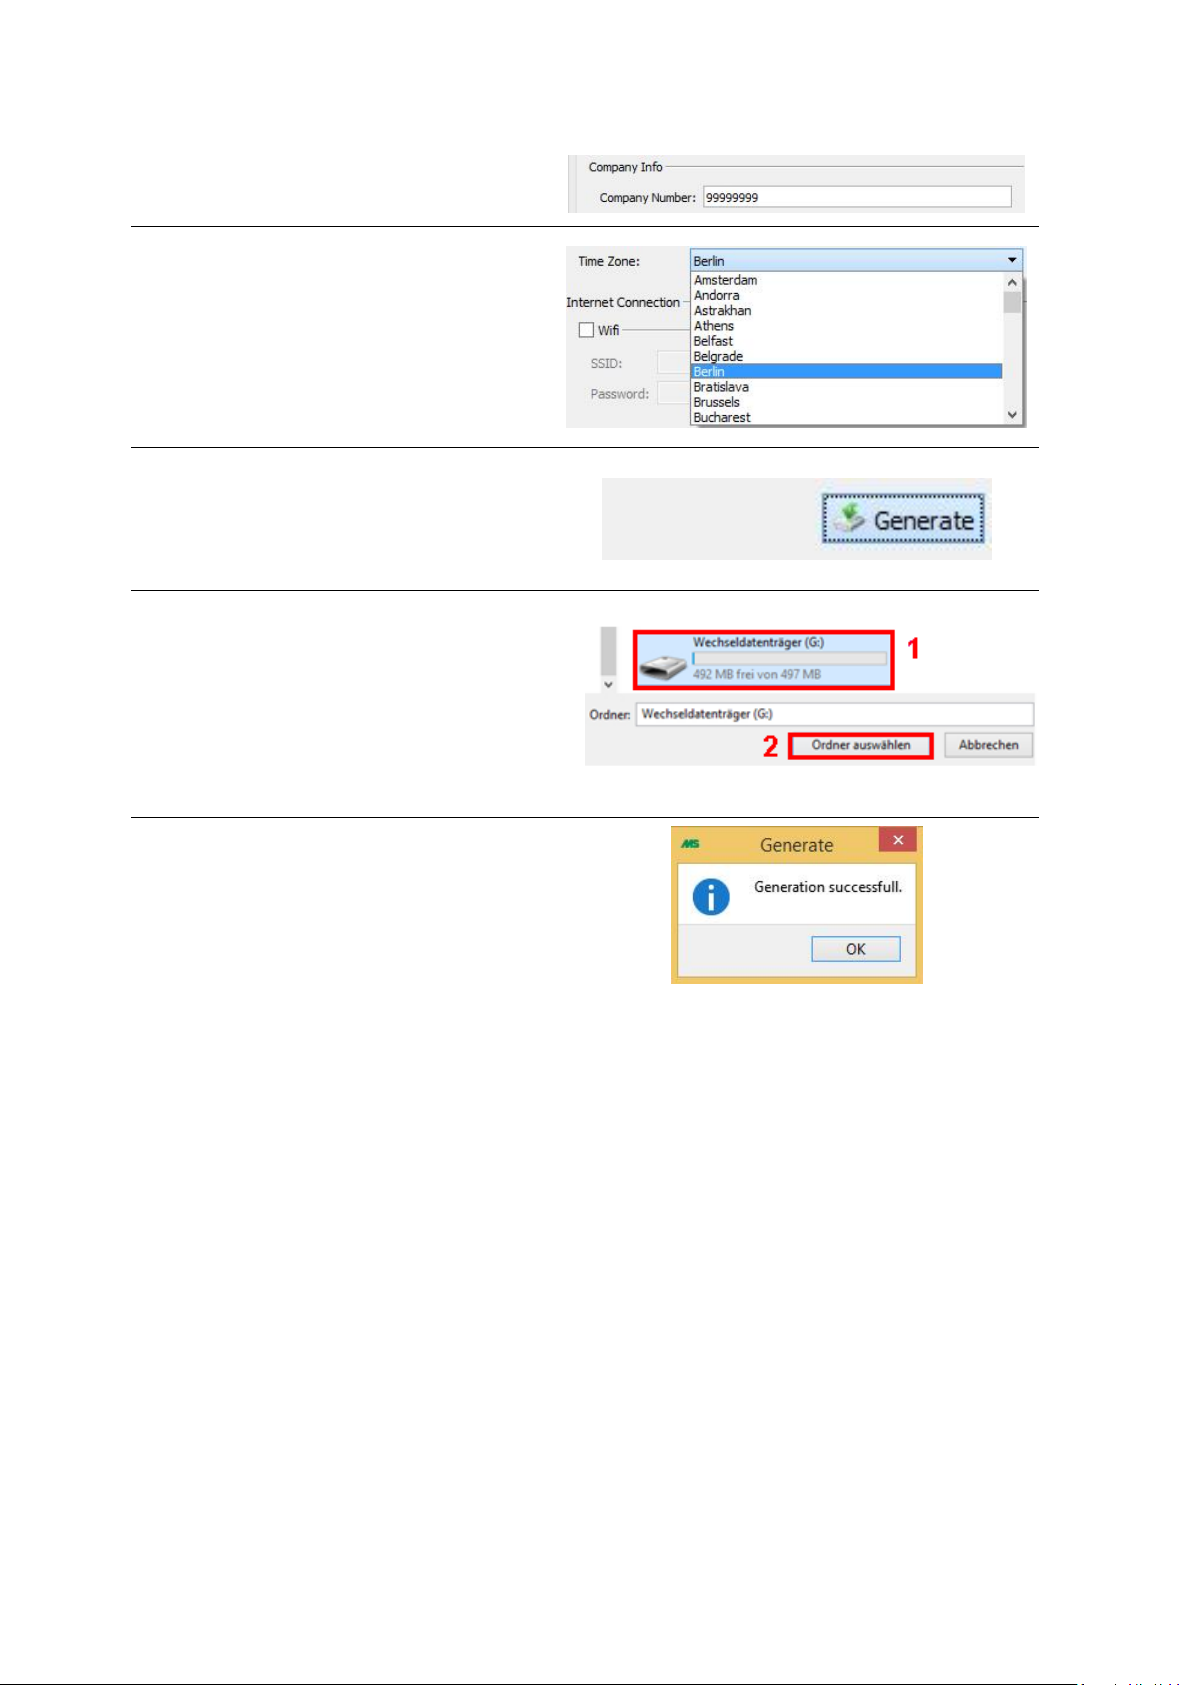
Tijdzone instellen..................................................................................................................................... 4
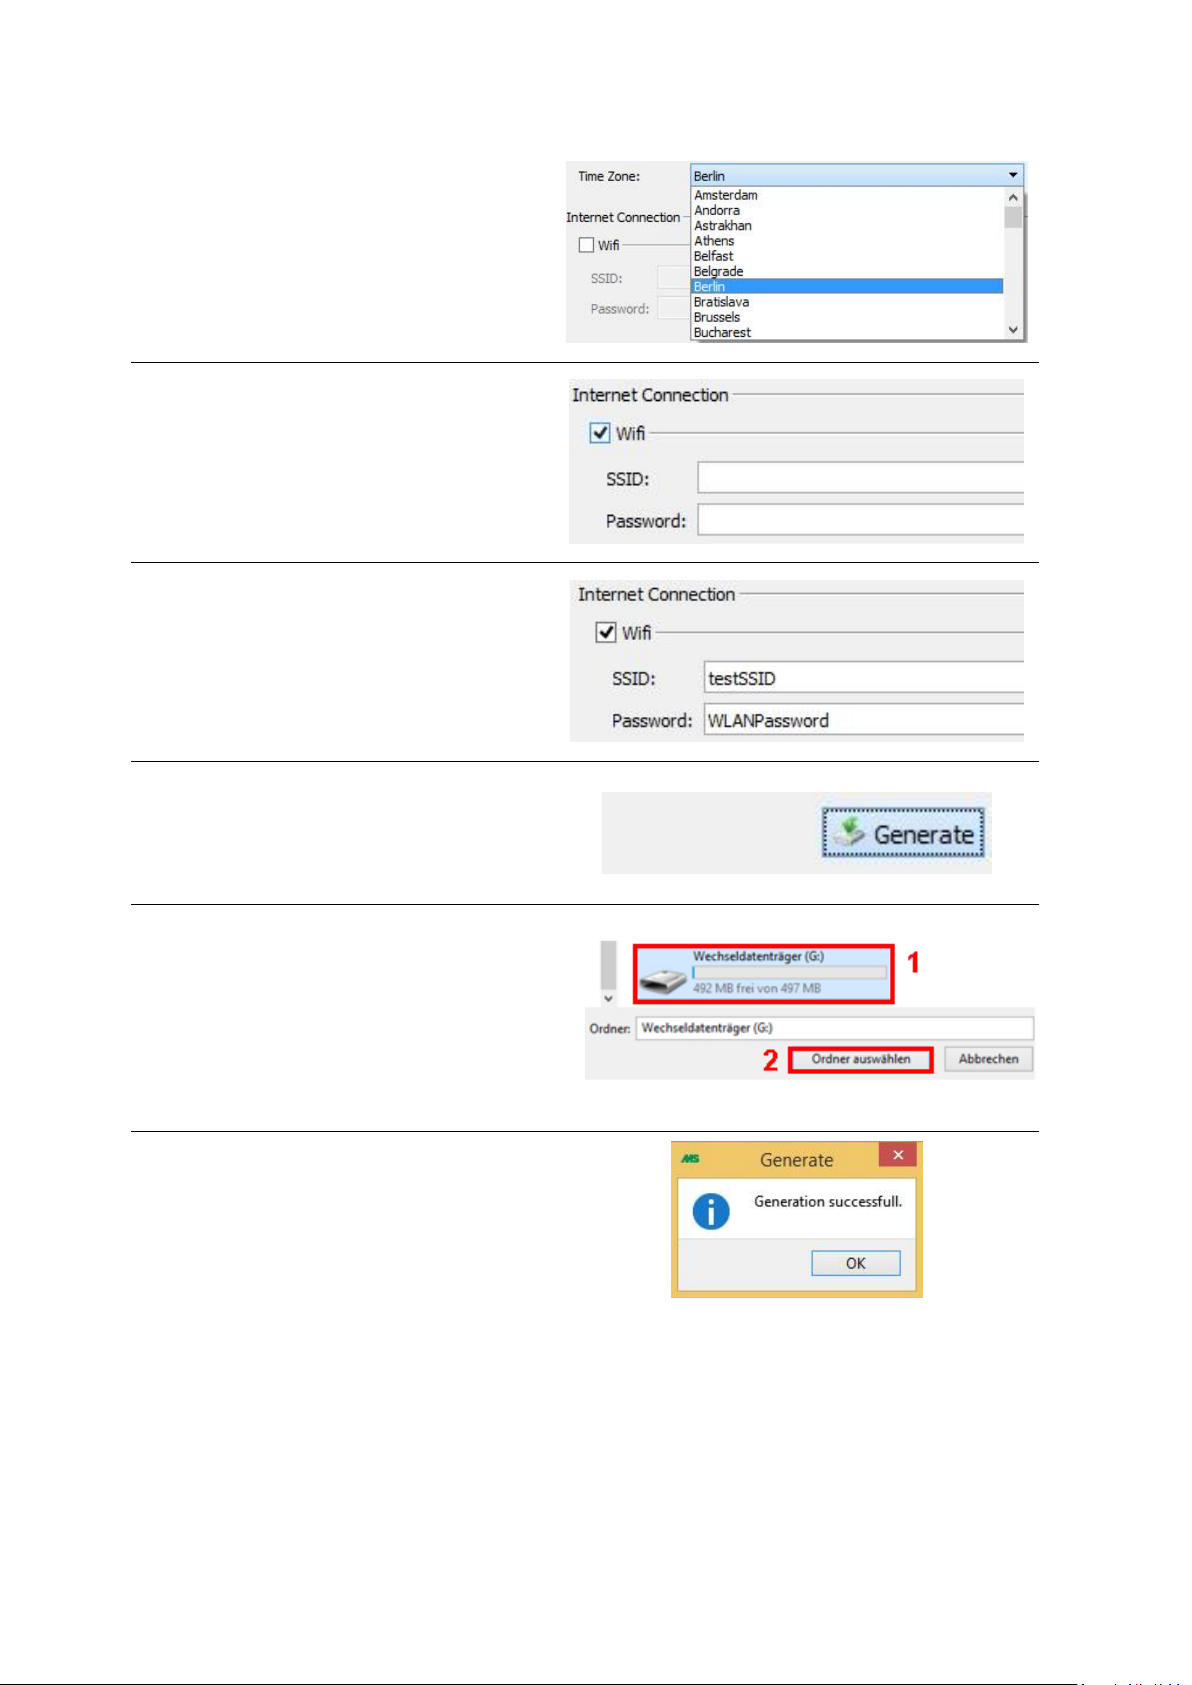
Internetverbinding tot stand brengen .................................................................................................... 6
Ethernet............................................................................................................................................... 6
Wifi ...................................................................................................................................................... 6
GSM-stick............................................................................................................................................. 8
Bediening van het laadstation................................................................................................................. 9
Handleesapparaat ............................................................................................................................... 9
Positionering.................................................................................................................................... 9
Opladen ........................................................................................................................................... 9
Synchronisatie ................................................................................................................................. 9
Ondersteunde hardware....................................................................................................................... 10
USB-stick............................................................................................................................................ 10
GSM-stick (optioneel)........................................................................................................................ 10

3
Technische gegevens
USB
4 USB-poorten
Ethernet
100 Mbit
Wifi
802.11n draadloze LAN (WLAN)
Inductief laadstation
Conform Qi-norm, 500 mA
Voeding
Stekkeradapter met micro-USB-kabel:
INPUT: 100-240 V ~ 50/60 Hz 0,5 A
OUTPUT: +5,1 V --- 2,5 A
Aanbevolen wordt om de geleverde aansluitkabel te gebruiken om schade aan het laadstation te
voorkomen.
Laadstation: een overzicht
Afbeelding 1: vooraanzicht
4.
Afbeelding 2: bovenaanzicht
1
Micro-USB-aansluiting
2
Ethernet
3
USB-aansluitingen
4
Laadoppervlak voor handleesapparaat

4
Betekenis van de ledlampjes
Rood knipperend
Geen onlineverbinding
Blauw knipperend
Zoekmodus voor Bluetooth-apparaat
Blauw brandend
Synchronisatie is bezig
Rood en blauw brandend
Geslaagde overname van de configuratie via een USB-stick
MS Schippers –Config Tool
Installeer deze tool om uw tijdzone aan te passen of uw WLAN-toegang in te stellen, zodat u via wifi
gebruik kunt maken van een internetverbinding.
Tijdzone instellen
AANWIJZING: als u van plan bent om uw laadstation via wifi te gebruiken, kunt u dit onderdeel
overslaan en de tijdzone samen met de wifi-instellingen aanpassen.
Om de tijdzone van uw laadstation te wijzigen, hebt u om te beginnen een USB-stick nodig. Gebruik
uitsluitend de door ons geverifieerde hardware. Een opsomming van de betreffende hardware vindt
u in de bijlage.
Voor het configureren van uw laadstation dient u ook te controleren of u de daarvoor bestemde
configuratietool "MS Schippers –Config Tool“ op uw computer heeft geïnstalleerd.
Sluit nu uw USB-stick aan op uw computer en start de configuratietool. Controleer of uw USB-stick
door uw besturingssysteem wordt herkend en voor verder gebruik ter beschikking staat.
Nadat u de configuratietool hebt gestart,
wordt het volgende venster geopend.
Deze toont diverse instelmogelijkheden om
uw laadstation volgens uw wensen aan te
passen.

5
Typ allereerst uw firmanummer in het
daarvoor bestemde veld.
Controleer ook of de gewenste tijdzone is
geselecteerd.
U kunt deze op elk moment via het
beschikbare vervolgkeuzemenu selecteren
of wijzigen.
Als u tevreden bent met uw instellingen,
kunt u die nu opslaan op uw USB-stick. Klik
daarvoor op de knop "Generate"
(genereren) die zich rechtsonder in het
venster bevindt.
Daarna wordt uw Windows-Verkenner
geopend. Let erop dat uw USB-stick een
andere naam en een station met een andere
letter kan hebben.
(1) Selecteer nu uw USB-stick en (2) bevestig
dit met "map selecteren".
Nadat de bevestiging is gelukt, verschijnt er
een klein pop-upvenster.
Wacht tot dit de afgebeelde melding
weergeeft en bevestig met "OK".
Nadat uw configuratie met succes is voltooid, haalt u de USB-stick uit uw pc.
Controleer of uw laadstation aanstaat en steek de geconfigureerde USB-stick in uw laadstation.
Let daarbij op de ledlampjes van het laadstation. Nadat de instellingen op de USB-stick met succes
zijn gekopieerd, kunt u deze aan de hand van het ledlampje op het laadoppervlak herkennen. Dit
knippert eerst in het rood en wordt na het kopiëren van de instellingen rood en blauw.
Uw instellingen zijn nu met succes gekopieerd.

6
Internetverbinding tot stand brengen
U kunt het laadstation op drie verschillende manieren met het internet verbinden.
Ethernet
Hierbij is een LAN-kabel nodig.
Sluit daarmee het laadstation aan op uw router. Gebruik hierbij de ethernettoegang die te zien is op
afbeelding 1 onder "Laadstation: een overzicht".
Wifi
Om uw laadstation met uw WLAN te kunnen gebruiken, heeft u eerst een USB-stick nodig. Gebruik
uitsluitend de door ons geverifieerde hardware. Een opsomming van de betreffende hardware vindt
u in de bijlage.
Voor het configureren van uw laadstation dient u ook te controleren of u de daarvoor bestemde
configuratietool "MS Schippers –Config Tool“ op uw computer heeft geïnstalleerd.
Sluit nu uw USB-stick aan op uw computer en start de configuratietool. Controleer of uw USB-stick
door uw besturingssysteem wordt herkend en voor verder gebruik ter beschikking staat.
Nadat u de configuratietool hebt gestart,
wordt het volgende venster geopend.
Deze toont diverse instelmogelijkheden om
uw laadstation volgens uw wensen aan te
passen.
Typ allereerst uw firmanummer in het
daarvoor bestemde veld.

7
Controleer ook of de gewenste tijdzone is
geselecteerd.
U kunt deze op elk moment via het
beschikbare vervolgkeuzemenu selecteren
of wijzigen.
Om uw SSID (=naam van het draadloos
netwerk) en wachtwoord voor de WLAN-
toegang in te voeren, zet u - zoals is
afgebeeld - een vinkje bij 'wifi'.
Klik daarvoor met de linkermuisknop op het
vakje naast 'wifi'.
Voer nu de SSID en het wachtwoord (let op:
hoofdlettergevoelig) voor uw WLAN-toegang
in.
Neem contact op met uw beheerder als u
niet weet wat uw inloggegevens zijn.
Als u tevreden bent met uw instellingen,
kunt u die nu opslaan op uw USB-stick. Klik
daarvoor op de knop "Generate"
(genereren) die zich rechtsonder in het
venster bevindt.
Daarna wordt uw Windows-Verkenner
geopend. Let erop dat uw USB-stick een
andere naam en een station met een andere
letter kan hebben.
(1) Selecteer nu uw USB-stick en (2) bevestig
dit met "map selecteren".
Nadat de bevestiging is gelukt, verschijnt er
een klein pop-upvenster.
Wacht tot dit de afgebeelde melding
weergeeft en bevestig met "OK".
Nadat uw configuratie met succes is voltooid, haalt u de USB-stick uit uw pc.
Controleer of uw laadstation aanstaat en steek de geconfigureerde USB-stick in uw laadstation.
Let daarbij op de ledlampjes van het laadstation. Nadat de instellingen op de USB-stick met succes
zijn gekopieerd, kunt u deze aan de hand van het ledlampje op het laadoppervlak herkennen. Dit

8
knippert eerst in het rood en wordt na het kopiëren van de instellingen rood en blauw. Verwijder de
USB-stick nu weer en start uw laadstation opnieuw op.
Om op te starten koppelt u de stroomaansluiting los van het laadstation en sluit u deze daarna, na
een korte wachttijd, opnieuw aan.
Als het rode ledlampje van het laadstation na het opstarten en korte tijd voordat de verbinding is
gemaakt stopt met knipperen, is de verbinding van het laadstation met het WLAN-net geslaagd.
GSM-stick
Gebruik de ontvangen simkaart en de meegeleverde GSM-stick om de internetverbinding via de
GSM-stick tot stand te brengen.
Wij verwijzen hierbij naar de door ons goedgekeurde hardware. De bijlage bevat een uitgebreide
opsomming.
Controleer of uw laadapparaat uitgeschakeld is. Steek nu de GSM-stick in een vrije USB-poort van uw
laadapparaat en sluit vervolgens ook de stroomvoorziening weer aan.
Aan de hand van de stick kunt u zien wanneer uw GSM-stick verbinding heeft gemaakt. Dit is te
herkennen doordat het lampje op de GSM-stick permanent brandt.
Let er ook op dat het laadstation opnieuw moet worden opgestart als de GSM-stick tijdens gebruik
wordt verwijderd.

9
Bediening van het laadstation
Handleesapparaat
Positionering
Plaats het handleesapparaat boven op het laadstation. Let erop dat het leesapparaat zo veel mogelijk
in het midden wordt geplaatst en is ingeschakeld.
Opladen
Als u het handleesapparaat correct op het laadstation hebt geplaatst, kunt u het laadproces volgen
aan de hand van het batterijsymbool op de display van het leesapparaat.
Synchronisatie
Let bij het synchroniseren van uw leesapparaat ook op de beschreven positionering.
Tijdens het synchroniseren verschijnt er naast de batterij nog een symbool op de display van het
leesapparaat. Als dit symbool een vinkje bevat, is uw apparaat met succes gesynchroniseerd.

10
Ondersteunde hardware
USB-stick
Geadviseerd wordt om USB-stick "SanDisk Cruzer Blade 16 GB" te gebruiken met modelnummer:
SDCZ50-016G.
GSM-stick (optioneel)
Gebruik hierbij model "HUAWEI E353".
Controleer ook of u de geverifieerde simkaart hebt ontvangen die met de GSM-stick werd
meegeleverd.

11
Instructions –Charging station
Table of Contents
Specifications......................................................................................................................................... 12
Charging station overview..................................................................................................................... 12
LED description...................................................................................................................................... 13
MS Schippers –Config Tool................................................................................................................... 13
Setting the time zone ............................................................................................................................ 13
Setting up Internet connection ............................................................................................................. 15
Ethernet............................................................................................................................................. 15
Wifi .................................................................................................................................................... 15
GSM dongle ....................................................................................................................................... 17
Operation of the charging station......................................................................................................... 18
Handheld reader................................................................................................................................ 18
Positioning..................................................................................................................................... 18
Charging......................................................................................................................................... 18
Synchronizing ................................................................................................................................ 18
Supported hardware ............................................................................................................................. 19
USB flash drive................................................................................................................................... 19
GSM dongle (optional) ...................................................................................................................... 19

12
Specifications
USB
4 USB ports
Ethernet
100Mbit
Wifi
802.11n Wireless LAN
Inductive charging station
According to Qi standard, 500mA
Power supply
AC adapter with microUSB cable:
INPUT: 100-240V ~ 50/60Hz 0.5A
OUTPUT: +5.1V --- 2.5A
It is recommended to use the supplied connection cable in order to avoid damage to the charging
station.
Charging station overview
Figure 3: Front view
4.
Figure 4: Top view
1
microUSB power connector
2
Ethernet
3
USB ports
4
Charging area for handheld reader

13
LED description
Flashing red
No online connection
Flashing blue
Search mode for Bluetooth devices
Constant blue
Synchronization active
Constant red and blue
Successful transfer of configuration via USB flash drive
MS Schippers –Config Tool
Please install this tool to set your time zone and to set up your Wifi access details to use a Wifi
internet connection.
Setting the time zone
NOTE: If you plan to use your charging station via Wifi, you can skip this step and adjust the time zone
together with the Wifi settings.
To change the time zone of your charging station, you need a USB flash drive. Please only use
hardware verified by us. A list of verified hardware can be found in the appendix.
Please make sure that the dedicated configuration tool “MS Schippers – Config Tool” is installed on
your computer for configuration of your charging station.
Now connect your USB flash drive to your computer and start the configuration tool. Make sure that
your USB flash drive is detected by your operating system and is available for use.
After starting the configuration tool, the
following window is displayed.
The window offers several settings and
options to set up your charging station
according to your preferences.

14
First enter your company number in the box
provided.
Make sure that the correct time zone is
selected.
You can select or change the time zone at
any time with the drop-down menu.
If you are satisfied with your settings, you
can save the settings on your USB flash
drive. Click on the button “Generate”
located at the bottom right of the window.
Afterwards Windows Explorer will open.
Please note that your USB flash drive may
have a different name and a different drive
letter.
(1) Now select your USB flash drive and (2)
confirm your selection with “Select Folder”.
After successful verification, a small pop-up
window is displayed.
Wait until the message shown in the picture
is displayed and confirm with “OK”.
Once your configuration is completed successfully, remove the USB flash drive from your computer.
Make sure that your charging station is turned on and connect the configured USB flash drive to your
charging station.
Pay attention to the LED of the charging station. Once the settings from the USB flash drive have
been applied successfully, you can recognize this by observing the LED on the charging area. The area
will flash red first and then change to a constant red and blue light after the settings have been
applied.
Your settings have now been applied successfully.

15
Setting up Internet connection
You have three options to connect your charging station to the Internet.
Ethernet
This requires a LAN cable.
Use the cable to connect the charging station to your router. Use the Ethernet input marked in
Figure 1 “Charging station overview” to connect the cable.
Wifi
To use your charging station with your wireless network, you will need a USB flash drive. Please only
use hardware verified by us. A list of verified hardware can be found in the appendix.
Please make sure that the dedicated configuration tool “MS Schippers – Config Tool” is installed on
your computer for configuration of your charging station.
Now connect your USB flash drive to your computer and start the configuration tool. Make sure that
your USB flash drive is detected by your operating system and is available for use.
After starting the configuration tool, the
following window is displayed.
The window offers several settings and
options to set up your charging station
according to your preferences.
First enter your company number in the box
provided.

16
Make sure that the correct time zone is
selected.
You can select or change the time zone at
any time with the drop-down menu.
In order to enter your SSID (=name of the
wireless network) and password for your
wireless network, activate the Wifi checkbox
as seen in the picture.
Click on the checkbox next to Wifi with your
left mouse button.
Now enter the SSID and the password
(attention: case-sensitive) for your Wifi
connection.
If you do not know these details, consult
your administrator.
If you are satisfied with your settings, you
can save the settings on your USB flash
drive. Click on the button “Generate”
located at the bottom right of the window.
Afterwards Windows Explorer will open.
Please note that your USB flash drive may
have a different name and a different drive
letter.
(1) Now select your USB flash drive and (2)
confirm your selection with “Select Folder”.
After successful verification, a small pop-up
window is displayed.
Wait until the message shown in the picture
is displayed and confirm with “OK”.
Once your configuration is completed successfully, remove the USB flash drive from your computer.
Make sure that your charging station is turned on and connect the configured USB flash drive to your
charging station.

17
Pay attention to the LED of the charging station. Once the settings from the USB flash drive have
been applied successfully, you can recognize this by observing the LED on the charging area. The area
will flash red first and then change to a constant red and blue light after the settings have been
applied. Now remove the USB flash drive and restart your charging station.
To restart the charging station, disconnect the power connection and connect it again after a short
wait.
If the red LED on the charging station stops flashing after restarting the charging station and a short
time to establish the connection, the charging station has successfully established a connection with
your Wifi network.
GSM dongle
Use the SIM card supplied with the GSM dongle to establish an Internet connection with the GSM
dongle.
Please refer to the list of hardware verified by us. A detailed list can be found in the appendix.
Make sure that your charging station is turned off. Connect the GSM dongle to an empty USB port of
your charging station and then connect the charging station to the power supply again.
Use the LEDs on the dongle to see when the GSM dongle has established a connection. This is
indicated by a permanently illuminated LED on the GSM dongle.
Please note that you will need to restart the charging station if you disconnect the GSM dongle
during operation.

18
Operation of the charging station
Handheld reader
Positioning
Place your handheld reader on top of the charging station. Make sure that the reader is placed in the
center and is turned on.
Charging
If you placed the handheld reader on the charger correctly, you can observe the charging process
with the battery icon on the screen of the reader.
Synchronizing
To synchronize your reader, pay attention to the correct positioning as described above.
During synchronization, another symbol is displayed on the display of the reader next to the battery
icon. When this icon includes a checkmark, your device has been successfully synchronized.

19
Supported hardware
USB flash drive
We recommend the use of a “„SanDisk Cruzer Blade 16GB“ USB flash drive with model number:
SDCZ50-016G.
GSM dongle (optional)
Use the model „HUAWEI E353”“.
Make sure it contains the verified SIM card that was included with the GSM dongle.

20
Gebrauchsanweisung –Ladestation
Inhaltsverzeichnis
Technische Daten ................................................................................................................................ 213
Ladestation im Überblick..................................................................................................................... 213
LED Bedeutung .................................................................................................................................... 224
MS Schippers –Config Tool................................................................................................................. 224
Zeitzone einstellen .............................................................................................................................. 224
Internetverbindung einrichten............................................................................................................ 246
Ethernet........................................................................................................................................... 246
Wifi .................................................................................................................................................. 246
GSM Stick......................................................................................................................................... 268
Bedienung der Ladestation ................................................................................................................. 279
Handheld Reader............................................................................................................................. 279
Positionierung ............................................................................................................................. 279
Aufladen ...................................................................................................................................... 279
Synchronisieren........................................................................................................................... 279
Unterstützte Hardware ..................................................................................................................... 2910
USB-Stick........................................................................................................................................ 2910
GSM-Stick ...................................................................................................................................... 2910
Table of contents
Languages:
Popular Docking Station manuals by other brands

Getac
Getac B300 reference guide

Monoprice
Monoprice Thunderbolt 3 user manual

Fusion
Fusion MS-IPDOCKG2 installation guide

cable matters
cable matters 201350 user manual

Elo TouchSystems
Elo TouchSystems EMV Cradle for Ingenico RP457c Quick installation guide

Denon
Denon ASD-3N - Digital Player Docking Station Errata