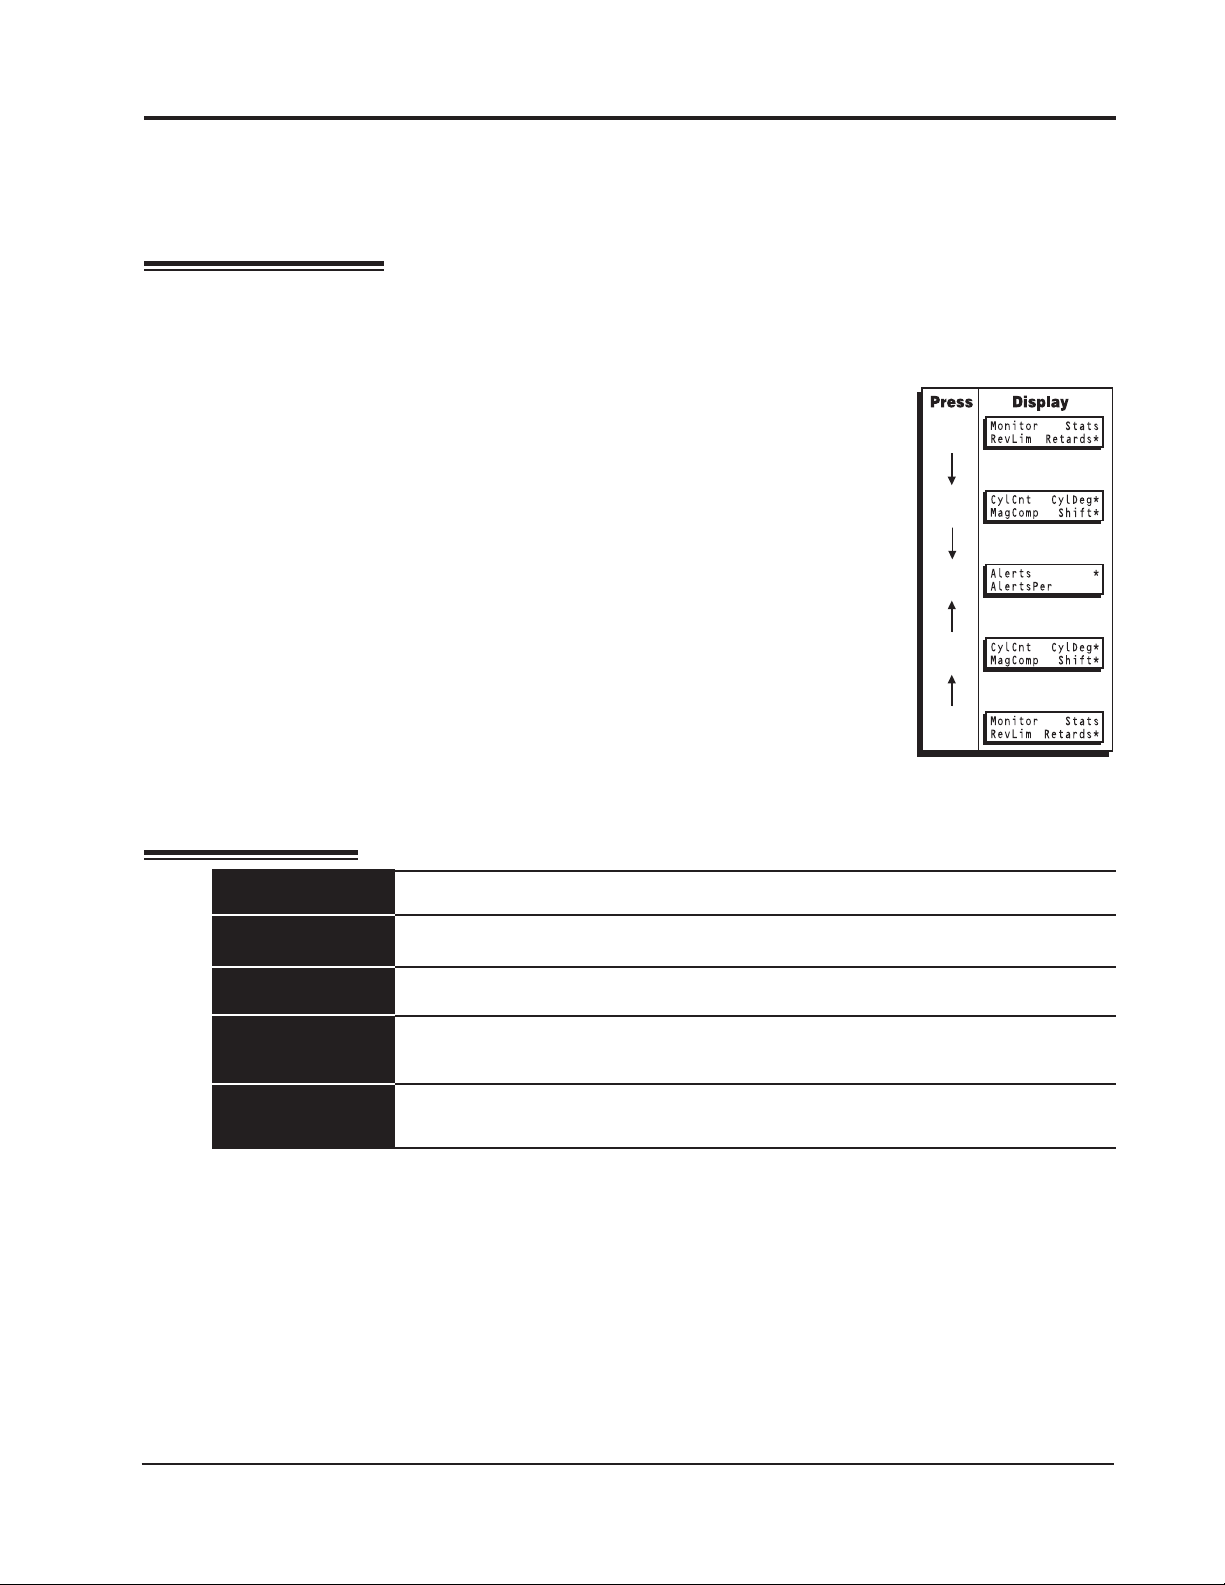
MSD Ignition 7550 User manual

Figure 1 Button Operation.
Hand Held Programmer/Monitor
for the MSD Programmable Digital-7 Ignition Control
PN 7550
These instructions are meant to illustrate the operation of the Programmer/Monitor and how to navigate
its program menus. Reading the instructions as you operate the Programmer to become familiar with
the screens and menus will assist in your programming.
Parts Included
1 – Programmer/Monitor, PN 7550
The PN 7550 Programmer connects to the MSD Programmable Digital-7 Ignition Control with the
supplied 9-pin wiring harness. It can be left connected when making passes or removed. If you choose
to remove it after making changes in the program, you must go to the Save menu to store the new
programs in the Ignition before disconnecting the harness.
There are six buttons on the PN 7550 (Figure 1). The top four are used for programming all of the
features of the PN 7530 Ignition. The two Launch Control buttons put you directly to the Launch RPM
setting adjustment for last minute starting line changes.
ENTER – This is used to open the selected field for further
programming or to load a new program.
NEXT – Pressing this button moves the cursor to the next field.
After making an adjustment to a program, pressing NEXT will
take you to the Save menu.
Up (⇑) and Down (⇓) Arrows – These buttons are used to change
the settings of programs such as rpm or timing. Pressing the up
button increases the rate while the down arrow lowers it.
LAUNCH REV LIMITER
Pressing one of these buttons takes you directly to the RPM
Launch limit for quick starting line changes. Once at this menu,
use the arrow keys to adjust the rpm limit. Note that this rpm
limit will automatically be saved without having to go to the Save
menu.
MSD IGNITION • www.msdignition.com • (915) 857-5200 • FAX (915) 857-3344

2 INSTALLATION INSTRUCTIONS
MSD IGNITION • www.msdignition.com • (915) 857-5200 • FAX (915) 857-3344
MENU TREE
The following menu tree shows the different screens and programs of the Ignition and Monitor.
Figure 2 The Menu Tree.

INSTALLATION INSTRUCTIONS 3
MSD IGNITION • www.msdignition.com • (915) 857-5200 • FAX (915) 857-3344
When you first turn the ignition on, the Programmer will display a short introduction with MSD, the
ignition version and other information. You can bypass this to get to the Main Menu by pressing
Enter.
MAIN MENUS
The Main Menus are shown in Figure 3. Note the * on the right side of the screen. This means that
there is more to this menu above or below list shown. By pressing ⇓you will get to the next part of
the Main Menu. Note that three screens comprise the Main Menu.
NAVIGATING THE MENUS
To move around to the options in a menu, use the Next button. Whichever
subject’s first letter is flashing, that is the active choice. That is, when you press
Next, the next screen will be that choice.
Also note that there is an Previous symbol (^) in the left corner of the monitor.
This will take you to the previous menu. When this is flashing and you select
Enter, you will be taken to the previous screen.
SAVE MENU
This is the Menu that you have to go to in order to change a program. When you
hit Enter or Next after making a change in a program, it automatically takes you
to the Save Menu. Note that there is another screen below the one that comes
up (as indicated by the lower *). There are five choices at the Save Menu:
When the Save screen comes up, the Save command is already flashing. By hitting Enter (or Next)
the value will be saved and the monitor will display the new value.
RPM Example:
Following is an example of how to edit the MaxRev rpm limit (Figure 4).
Main Menu
Press Next until RevLim flashes. Then press Enter.
SAVE MENU
This will save the new program value in the Ignition.
This will restore the previous value.
This restores the program to the default value.
Restores the complete table back to the default value. This is handy in
cases such as the Launch Curve where there are numerous values.
Entering this will restore EVERY PROGRAM back to default properties.
Take note that you will start completely over by entering this!
Save
Cancel
Default Item
Default Table
Default Product
Figure 3 Main Menus.

4 INSTALLATION INSTRUCTIONS
MSD IGNITION • www.msdignition.com • (915) 857-5200 • FAX (915) 857-3344
RPM Limit Menu
Press Next until RevMax flashes, then press ENTER. This takes you to the RevMax rpm program
screen.
RevMax Menu
Press Next until the RPM flashes, then push the ⇓or ⇑button until your value is shown. Then press
Enter which will take you to the Save Menu.
Save Menu
Save will be flashing so press Enter. The screen will go back to the RevMax rpm value to show the
new value/program.
Figure 4 Changing the Overrev RPM Setting.
PROGRAMMING A RUN TIMING CURVE
When using the Programmer to build a timing curve, you must program a timing value for every 100
rpm. If you skip a step, the timing retard will return to the default setting (no retard) for that rpm range.
It is highly recommended to draw the timing curve on a graph and figure out the degree/rpm steps
before attempting to program it into the Ignition.
MSD built in a copy function that will program the same amount of timing for each rpm though each
step still needs to be Entered.
Following is an example of programming the Run curve. With the timing on the engine set at 36°, we
want it to be 16° at idle and begin ramping up at 1,000 rpm. By 3,000 rpm we want to be back at the
full 36° (This means 1° per 100 rpm steps).
To get this incremental amount, divide the rpm range of the curve by 100 (rpm increments). Take this
result and divide it by the total amount of timing changes to come up with the amount of timing that
needs to be adjusted per step (100 rpm).
Main Menu
Press Next until Retards flashes, then press Enter.

INSTALLATION INSTRUCTIONS 5
MSD IGNITION • www.msdignition.com • (915) 857-5200 • FAX (915) 857-3344
First Retard Menu
Note that RunCurve is not listed, but there is an * on lower right of the monitor which means that
there is more to this menu. Push the ⇓button to get to the next part of the menu, then click Next until
RunCurve flashes. Press Enter.
RunCurve Menu
Use the Next button to get to the RPM down to 800 rpm, the lowest programmable rpm. Then use
Next to maneuver to the RetDeg and use the arrows to set it to 20° of retard, then press Enter. This
goes to the Save menu and select Enter again.
Instead of moving through the entire menu Run Curve menu again, press Next until Copy is active.
Now by pressing Enter, you’ll notice that the rpm setting is saved and the Monitor moves to the next
rpm step (rpm). You only need to change the retard rate then press Copy again. Repeat this procedure
for the complete curve. At Deg 0, press NEXT, and ENTER to save the programmed retard curve.
Monitor Mode
In Scan mode the monitor will scroll through all of the settings (or the ones you choose) so you can
view each parameter when the engine is running.
MENU DEFINITIONS
This will display a 1 for No Cam Sync, or a 2 for Low Battery.
Alert
CamSync
Copy
CylCnt
Distributor/
Cranktrigger
CylDeg
GearRetard
LaunchCurve
LaunchRetard
MagComp
Monitor This lets you choose what parameters you can view while the engine
is running, how long the view time lasts and confirm the Cam Sync
signal.
This confirms that the ignition is receiving a sync signal. It will display
either Sync or None.
This comes up on the Run and Launch Curve menus. It eases
programming each step by copying the value of the previous step,
with auto increment of Rpm.
Cylinder Count, for the number of cylinders of your engine.
The amount of timing that you want to pull out of the accompanying
cylinder. 0°-5.0° per cylinder in .1 Deg increments. You also need to
program which cylinder is receiving the retard rate, but note that this
is the cylinder sequence order on distributor, not cylinder number.
The amount of retard that occurs with each gear shift. A different
amount of retard can be activated for each gear from third to sixth.
This is the menu where you program the entire rpm curve in 100 rpm
increments of 0.1° from 0 to 25.0°. This is active in gear 1.
This menu lets you program the retard amount and the setting to ramp
it back to the LaunchCurve.
Magnetic Pickup Compensation. You can compensate for different
magnetic style pickups (crank trigger or distributor) from 0° - 3°.
Selects type of input trigger device connected for optimization of the
RevLimiter.

6 INSTALLATION INSTRUCTIONS
MSD IGNITION • www.msdignition.com • (915) 857-5200 • FAX (915) 857-3344
MENU DEFINITIONS CONT.
This menu leads you to all of the retard function menus that the ignition
is capable of programming including; Step Retards, Launch Retards,
Start, the Run Curve, Step Delays and Gear Retards.
The menu to set the three rev limits; RevBurn, RevMax and RevLaunch.
The rpm setting that will activate a circuit to turn it on. Adjustable from
2,000 – 12,500 rpm. Default is 2,000 rpm.
Retards
RevLim
RpmSw On
RpmSw Off
RunCurve
ScanTime
ShiftLt
StartRetard
Stats
Step1-3
StepOffDelay
The rpm setting that will deactivate a circuit to turn it off. Adjustable
from 2,000 to 12,500 rpm. Default is 6,000 rpm.
This is the menu where you program the entire rpm curve in 100 rpm
increments of 0.1° from 0 to 25.0°. This is active in gears 2-6.
This is the amount of time that a menu stays on the screen when it
is in the Monitor mode. It is adjustable from 1 – 9 seconds. Default is
1 second.
The amount of time that the retard(s) will remain active after the circuit
is deactivated. If a retard is activated through a nitrous solenoid, then
the nitrous is shut off, this delay will leave the retard rate active for
0-2.5 seconds. Default is 0.5-second.
This is the rpm setting that the Shift Light is activated. You can program
five different values (ShiftLt1, 2…) from 2,000 – 12,500 rpm.
The amount of timing retard being used during cranking. Adjustable
from 0° - 25° in 1° increments.
Same as the Monitor list and function, allows items to be scanned or
skipped.
This is the first of three step retards that are activated either by their
corresponding wires when supplied with 12 volts or by rpm activation.

INSTALLATION INSTRUCTIONS 7
MSD IGNITION • www.msdignition.com • (915) 857-5200 • FAX (915) 857-3344
DEFAULT SETTINGS AND ADJUSTMENTS
The following list shows all of the default values and adjustable increment of the PN 7530 Ignition.
Display Default Data Low-High (step by)
ShiftLt1 ###00 Rpm 12,500 2,000-12,500 (100)
ShiftLt2 ###00 Rpm 12,300 2,000-12,500 (100)
ShiftLt3 ###00 Rpm 12,100 2,000-12,500 (100)
ShiftLt4 ###00 Rpm 11,900 2,000-12,500 (100)
ShiftLt5 ###00 Rpm 11,700 2,000-12,500 (100)
LastGear # 5 2-6
MagComp #.# Deg 2.0 0-3.0 (.5)
RevBurn ###00 Rpm 7,000 2,000-12,500 (100)
RevLaunch ###00 Rpm 6,200 2,000-12,500 (100)
RevMax ###00 Rpm 9,500 2,000-12,500 (100)
RetStart ## Deg 10 00-25
Retard1 ##.# Deg 2.0 0-15.0 (.5)
Retard2 ##.# Deg 3.0 0-15.0 (.5)
Retard3 ##.# Deg 5.0 0-15.0 (.5)
Retard1 ###00 Rpm 800 800-12,500 (100)
Retard2 ###00 Rpm 800 800-12,500 (100)
Retard3 ###00 Rpm 800 800-12,500 (100)
RetLaun ##.# Deg 0.0 0-15.0 (.5)
RampTim #.## Sec .50 0-2.50 (.01)
Spark1 #.# Deg 0 0-5.0 (.1)
Spark2 #.# Deg 0 0-5.0 (.1)
Spark3 #.# Deg 0 0-5.0 (.1)
Spark4 #.# Deg 0 0-5.0 (.1)
Spark5 #.# Deg 0 0-5.0 (.1)
Spark6 #.# Deg 0 0-5.0 (.1)
Spark7 #.# Deg 0 0-5.0 (.1)
Spark8 #.# Deg 0 0-5.0 (.1)
CylCnt $ 8 4/6/8
Distributor Distributor Distributor/CrankTrigger
DropRpm ##00 600 500-1500 (100)
RunCurve Rpm ###00 800 800-12500 (100)
RunCurve Deg ##.# 0 0.0-25.0 (.1)
LaunchCurve Rpm ###00 800 800-12500 (100)
LaunchCurve Deg ##.# 0 0.0-25.0 (.1)
StepOffDelay #.## .50 0-2.50 (.01)
AlertsPer # 0 0-1
RpmSw On 2000 2000-12,500 (100)
RpmSw Off 6000 2000-12,500 (100)
Gear3 Retard Deg #.# 0 0.0-5.0 (.5)
Gear4 Retard Deg #.# 0 0.0-5.0 (.5)
Gear5 Retard Deg #.# 0 0.0-5.0 (.5)
Gear6 Retard Deg #.# 0 0.0-5.0 (.5)
ScanTime #Sec 1 1-9
CamSync $$$$ NONE/SYNC
Rpm #### monitor
RetSum ##.# monitor
ShiftLt $$ OFF/ON
LowBatt $$$ OK/LOW
Gear # 1-5
RpmSw $$$ OFF/ON
MaxCylDeg 0.0-5.0
TrigScr NONE/MAG/PTS
Step1In OFF/ON
Step2In OFF/ON
Step3In OFF/ON
RevLaunIn OFF/ON
RevBurnIn OFF/ON

Limited Warranty
M
SD IGNITION warrants this product to be free from defects in material and workmanship under its intended normal
use*, when properly installed and purchased from an authorized MSD dealer, for a period of one year from the date
of the original purchase. This warranty is void for any products purchased through auction websites. If found to be
defective as mentioned above, it will be repaired or replaced at the option of MSD Ignition. Any item that is covered
under this warranty will be returned free of charge using Ground shipping methods.
This shall constitute the sole remedy of the purchaser and the sole liability of MSD Ignition. To the extent permitted
by law, the foregoing is exclusive and in lieu of all other warranties or representation whether expressed or implied,
including any implied warranty of merchantability or fitness. In no event shall MSD Ignition or its suppliers be liable
for special or consequential damages.
*Intended normal use means that this item is being used as was originally intended and for the original application
as sold by MSD Ignition. Any modifications to this item or if it is used on an application other than what MSD Ignition
markets the product, the warranty will be void. It is the sole responsibility of the customer to determine that this item
will work for the application they are intending. MSD Ignition will accept no liability for custom applications.
Service
In case of malfunction, this MSD component will be repaired free of charge according to the terms of the warranty.
When returning MSD components for warranty service, Proof of Purchase must be supplied for verification. After
the warranty period has expired, repair service is based on a minimum and maximum fee.
All returns must have a Return Material Authorization (RMA) number issued to them before
being returned. To obtain an RMA number please contact MSD Customer Service at 1 (888) MSD-7859 or
visit our website at www.msdignition.com/rma to automatically obtain a number and shipping information.
When returning the unit for repair, leave all wires at the length in which you have them installed. Be sure to include
a detailed account of any problems experienced, and what components and accessories are installed on the vehicle.
The repaired unit will be returned as soon as possible using Ground shipping methods (ground shipping is covered
by warranty). For more information, call MSD Ignition at (915) 855-7123. MSD technicians are available from 7:00
a.m. to 6:00 p.m. Monday - Friday (mountain time).
MSD IGNITION • www.msdignition.com • (915) 857-5200 • FAX (915) 857-3344
© 2007 Autotronic Controls Corporation
FRM28586 Revised 05/07 Printed in U.S.A.
TECH NOTES
_________________________________________________________________________________________________________________________
_________________________________________________________________________________________________________________________
_________________________________________________________________________________________________________________________
_________________________________________________________________________________________________________________________
_________________________________________________________________________________________________________________________
_________________________________________________________________________________________________________________________
_________________________________________________________________________________________________________________________
_________________________________________________________________________________________________________________________
_________________________________________________________________________________________________________________________
_________________________________________________________________________________________________________________________
_________________________________________________________________________________________________________________________
_________________________________________________________________________________________________________________________
_________________________________________________________________________________________________________________________
_________________________________________________________________________________________________________________________
_________________________________________________________________________________________________________________________
_________________________________________________________________________________________________________________________
_________________________________________________________________________________________________________________________
_________________________________________________________________________________________________________________________
Table of contents