MSI DR8-A User manual

Version 1.0
January2004
G52-O8408A1
Quick Installation Guide
Multi-Lingual
+
_R
RW
+
_
Warning: This is a RPC-II DVD-ROM drive,
the maximum number of times that you
are allowed to change the regional code
setting is 4.

Copyright Notice
The material in this document is the intellectual property of MICRO-STAR INTERNATIONAL.
We take every care in the preparation of this document, but no guarantee is given as to the
correctness of its contents. Our products are under continual improvement and we reserve
the right to make changes without notice.
Trademarks
All trademarks used in this manual are the property of their respective owners.
Pentium is a registered trademark of Intel Corporation.
Windows is a registered trademark of Microsoft Corporation.
FCC-B Radio Frequency Interference Statement
This equipment has been tested and found to comply with the limits for a class B digital
device, pursuant to part 15 of the FCC rules. These limits are designed to provide
reasonable protection against harmful interference when the equipment is operated in a
commercial environment. This equipment generates, uses and can radiate radio fre-
quency energy and, if not installed and used in accordance with the instruction manual,
may cause harmful interference to radio communications. Operation of this equipment in
a residential area is likely to cause harmful interference, in which case the user will be
required to correct the interference at his own expense.
Notice 1
The changes or modifications not expressly approved by the party responsible for compli-
ance could void the user’s authority to operate the equipment.
Notice 2
Shielded interface cables and A.C. power cord, if any, must be used in order to comply
with the emission limits.
VOIR LA NOTICE D’INSTALLATION AVANT
DE RACCORDER AU RESEAU.
Micro-Star International
TEL.886-2-32345599
FAX.886-2-32345488
http://www.msi.com.tw
Reversion History
Version Note Date
v1.0 First released with 13 languages January 2004
MS-8404A MS-8408A

Table of Contents
Front Panel ..............................................................................1
Rear Panel ...............................................................................1
English ......................................................................................2
French ......................................................................................4
German ....................................................................................6
Spanish ....................................................................................8
Portuguese .............................................................................10
Turkish ....................................................................................12
Russian ...................................................................................14
Japanese................................................................................16
Thai.........................................................................................18
Simplified Chinese ................................................................20
Traditional Chinese ...............................................................22
Persian ...................................................................................24
Arabic .....................................................................................26
ΝοτεΝοτε
ΝοτεΝοτε
Νοτε
1
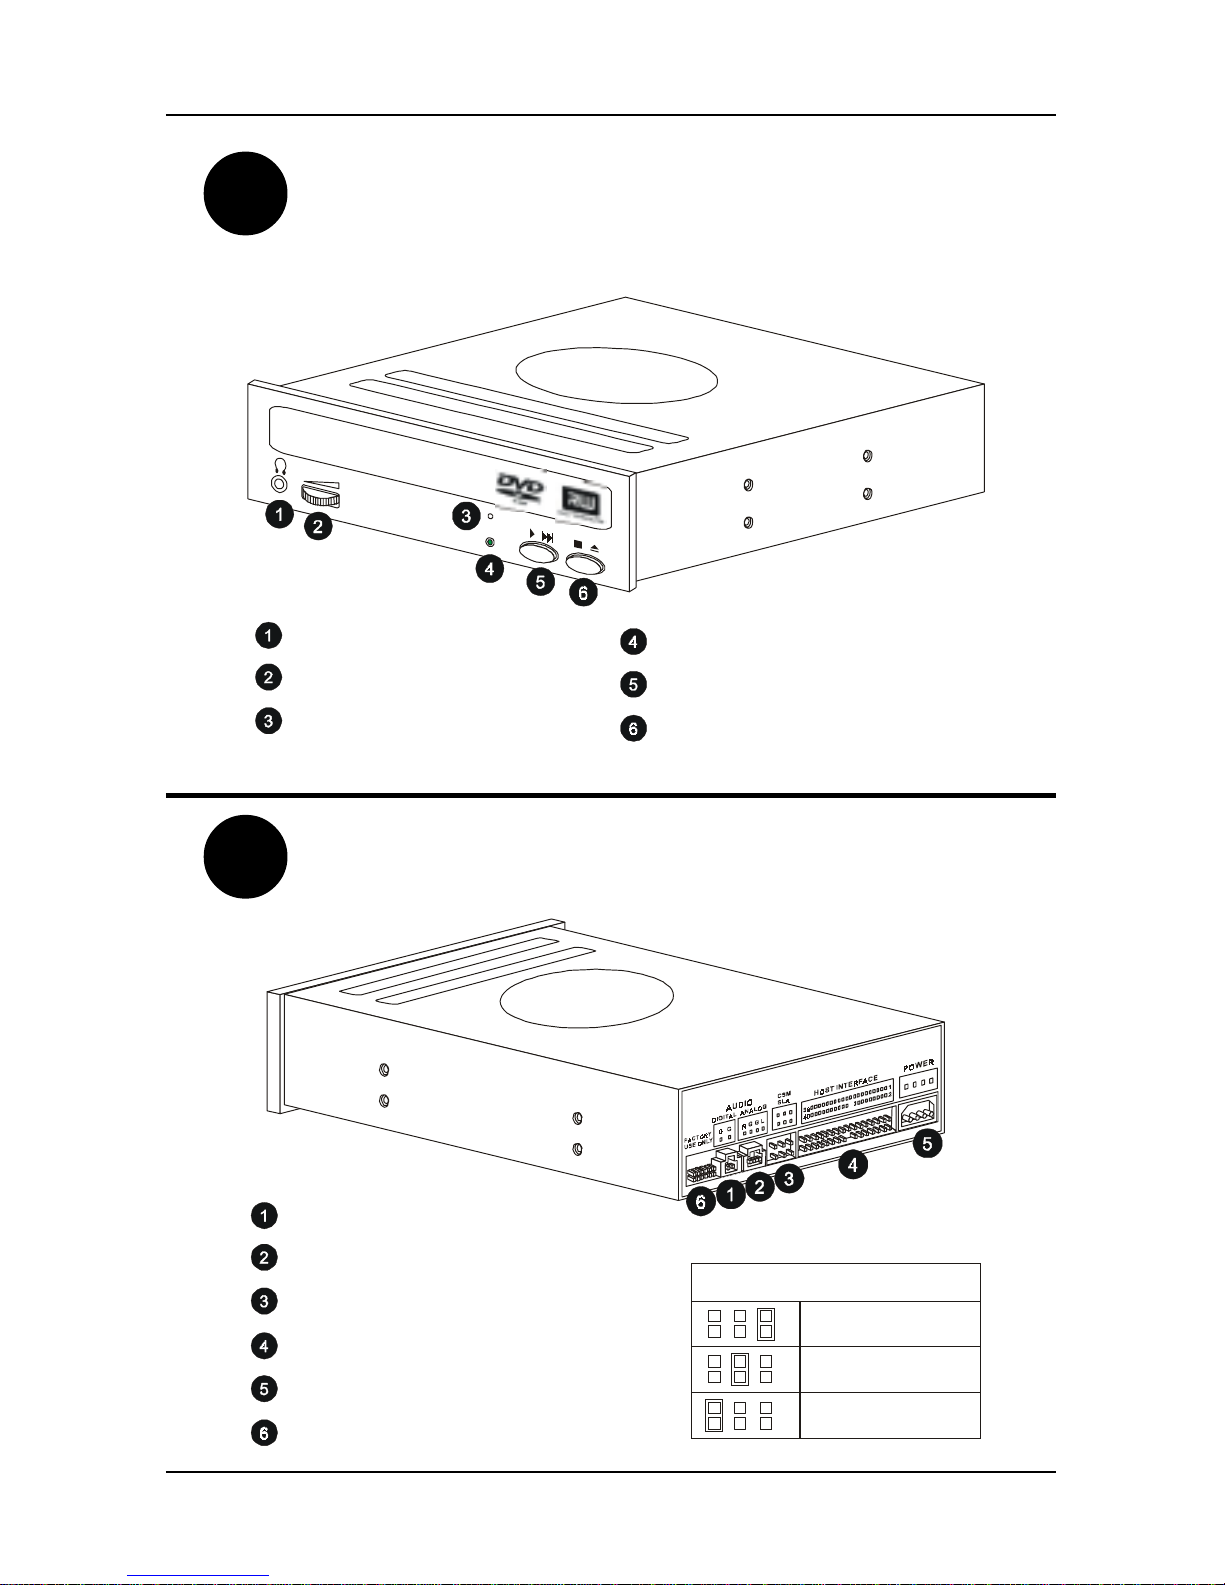
Front Panel
R
Headphone Jack
Volume Control
Emergency Eject Hole
Read(Green) /Write(Red) LED
Play / Skip Button
Stop / Open / Close Button
DigitalAudio Output Connector
Analog Audio Output Connector
Device Configuration Jumper
Host Interface Connector
Power Supply Connector
Test Jumper (Do not use)
MASTER
SLAVE
CableSelect
CSM
SLA
ear Panel

2
ENGLISH
Hardware Installation
1. Turn off the power of the computer.
2. Remove the cover of the computer.
3. Setup the Master/Slave jumpers on the jack of the DVD-Dual drive.
4. Insert the DVD-Dual drive into one of the vacant 5.25-inch bays and secure it with the
mounting screws included in the DVD-Dual package.
5. Connect Power Cable to the Power Plug.
6. Connect the 40-pin IDE Cable to the IDE connector of the DVD-Dual Drive and make
sure that the red edge of the IDE Cable corresponds to pin 1 of the IDE interface on the
DVD-Dual Drive.
7. If you have a sound card, connect the 4-pin CD Audio cable to the DVD-Dual Drive’s
Analog Audio line out connector, and the audio-in connector of the sound card.
8. Replace the cover of the computer and reconnect the power cords.
Warning: Test Jumper is for Factory test only, please DO NOT USE!
Software installation
For Windows 95/98/ME:
This DVD-Dual drive will be automatically detected and the correct device driver will be
loaded automatically also. Hence, there is no need to install any DVD-Dual device driver
under Window 95/98/ME system.
If your DVD-Dual cannot be detected automatically, please do as follows:
a. Restart your computer, and then click on the “control panel” icon under “my
computer.”
b. Double-click on the “add new hardware” icon, and then click “next” and “yes”
at the dialog boxes.
c. Allow windows to search for your new DVD-Dual drive automatically, and
loads the driver software to complete the installation.
For Windows NT/2000/XP or OS/2 WARP or other systems
DVD-Dual drive supports the standard ATAPI drive interface. Your system should be able
to load the appropriate driver for your drive.
Emergency Eject Hole: When the tray cannot be open automatically for any reasons, please
insert an eject-bar (a straightened paper clip with diameter of 1.2mm can be used as an eject-
bar, press it inside of emergency eject hole, and then eject the tray manually. Make sure to
turn off the power before doing this action.

3
ENGLISH
Installing Nero
System Requirements
Your system should come with a pre-installed operating system or you may choose to upgrade
your operating system to the latest. Below you will find a list of those that Nero support.
Please check to make sure that you have one of the following operating systems:
Operating System
•Windows 95 / 98 / 98SE / ME
•Windows NT 4.0 (service pack 6) / Windows 2000 (service pack 2 or higher)
•Windows XP
Hardware
•Your PC must have a 500 MHz system or higher recommended. Please refer to the PC
manuals that came with your system for system configuration information.
•You must have at least 64 MB RAM memory. Generally, more would be better.
•The hard disk access time should be less than 19 milliseconds
•Graphics card with 8 MB or higher (for video).
•We recommend that Nero will be most comfortable to work with in a screen resolution of
1024x768 or greater.
•700 MB of free hard drive space for drive images recommended. Generally, more would
be better.
Installing Nero
Step 1: Insert the Nero CD-ROM into your CD/DVD drive on your PC. If you have a
feature called “Autorun” activated, this will start your installation process
automatically. If you do not have “Autorun” activated, you can go to My
Computer > Click on the drive letter of the CD/DVD drive > click setup.exe
Step 2: Follow prompts until you are finished installing the software.
Step 3: Restart your PC
Uninstalling Nero
Step 1: Go to Start > Control Panel > Add or Remove Programs. In some operating
systems, you will find - Start > Settings > Control Panel.
Step 2: Select Nero in the Add or Remove Programs window and click “remove”.
Step 3: In some cases, you will find that when removing software, there will be one or
two files that the operating system will ask if you want them removed since they
may be shared by other programs. If you are unsure, always opt to keep these
files.

4
FRENCH
Installation matérielle
1. Couper l’alimentation de votre ordinateur
2. Retirer le capôt de votre boîtier
3. Configurer le jumper à l’arrière du graveur en Maître ou Esclave
4. Insérer le graveur DVD dans la baie 5 pouces ¼ vacante, et bloquer le grâce à la visserie
fournie.
5. Connecter le câble d’alimentation
6. Connecter la nappe IDE 40 pins sur le graveur de DVD en vous assurant que la bande rouge
longeant le câble IDE soit alignée avec le pin 1 du connecteur du graveur DVD.
7. Si vous possédez une carte son, connecter la câble CD audio audio 4 pins sur votre sortie
Analogique Audio de votre graveur DVD, et sur l’entrée audio de votre carte son.
8. Replacer le capôt de votre boîtier et connecter l’alimentation.
Attention: Le test jumper est uniquement utilisable pour les tests en usine, veuillez ne
pas utliser cette fonction.
Installation des logiciels
Pour Windows 95/98/Me:
Windows devrait détecter automatiquement votre nouveau graveur de DVD. Les pilotes seront
directement installés et votre lecteur prêt à l’emploi.
Si votre graveur n’est pas détecté automatiquement, veuillez suivre les instructions suivantes:
a. Redémarrez votre ordinateur, et cliquer sur “panneau de configuration”.
b. Double-cliquer sur “ajout de nouveau matériel”, et cliquer sur “suivant” puis “oui” dans
la boîte de dialogue.
c. Laisser windows chercher votre graveur DVD automatiquement, il chargera alors les
pilotes nécessaires.
Pour Windows NT/2000/XP ou OS/2 WARP et autres sytèmes.
Le DVD Dual est à la norme ATAPI. Votre système devraît être capable de charger les pilotes
nécessaires automatiquement.
Ejection en cas d’urgence: Lorsque le tiroir ne peut être ouvert, insérer, dans le petit trou situé
sur la face avant du lecteur, une pointe de 1.2 mm et appuyer assez fortement. Le tiroir doit
alors s’ouvrir. Veillez à couper l’alimentation de votre ordinateur avant de faire cette manipulation.

5
FRENCH
Installation de Nero
Système nécessaire
Votre système d’exploitation doit être au préalable installé dans sa version la plus récente. Ci
dessous vous trouverez la liste des OS supportés par Nero. Assurez vous que vous possédez
bien une des ces versions.
Système d’exploitation
•Windows 95 / 98 / 98SE / ME
•Windows NT 4.0 (service pack 6) / Windows 2000 (service pack 2 or higher)
•Windows XP
Matériel
•La vitesse minimale de votre processeur doit être de 500 MHz.
•La quantité de mémoire vive doit être au minimum de 64 Mo. Plus est vivement conseillé.
•Le temps d’accès du disque dur doit être inférieur à 19 millisecondes.
•Votre carte graphique doit intégrer au minimum 8 Mo de mémoire.
•Nous recommandons d’utiliser la résolution de 1027x768 pour une utilisation optimale
de Nero.
•700 Mo minimum d’espace libre sur votre disque dur sont nécessaires à l’installation de
Neros.
Installation de Nero
Step 1: Première étape: Insérer le CD Nero dans votre lecteur de CD-ROM ou DVD. Si
vous avez activer l’option “insertion automatique”, le logiciel d’installation se
lancera tout seul. Dans le cas contraire, double cliquer sur l’icône de votre lecteur
, puis sur l’icône “Setup.exe.”
Step 2: Seconde étape: Suivez les instructions jusque la fin de l’installation.
Step 3: Troisième étape: Redémarrez votre ordinateur.
Désintaller Nero
Step 1: Première étape: Allez sur le menu “démarrez”, “panneau de configuration”, puis
“ajout/suppression” de programmes.
Step 2: Seconde étape: Sélectionner Nero dans la liste des programmes et cliquer sur
“désinstaller”.
Step 3: Dernière étape: Dans certains cas, vous pouvez trouver après désinstalltion un
ou deux fichiers orphelins. Ceux ci peuvent être utilisés par d’autres programmes.
Si vous n’êtes pas certain de leurs inutilités, veillez à ne pas les effacer.

6
GERMAN
Hardware-Installation
1. Schalten Sie den Computer aus.
2. Entfernen Sie die Gehäuseabdeckung.
3. Setzen Sie den Master/Slave-Jumper auf den Stecker für das DVD-Dual-Laufwerk.
4. Schieben Sie das DVD-Dual-Laufwerk in einen der freien 5.25-Zoll-Einschübe und sichern
Sie es mit den mitgelieferten Montageschrauben.
5. Verbinden Sie das Stromkabel mit dem Stromanschluss.
6. Verbinden Sie das 40-Pin IDE-Kabel mit dem IDE-Anschluss des DVD-Dual-Laufwerks.
Vergewissern Sie sich, dass die rote Kante des IDE-Kabels am Pin 1 des IDE-Anschlusses
anliegt.
7. Falls Sie eine Soundkarte besitzen, verbinden Sie das 4-Pin CD Audiokabel mit dem
analogen Audio-Ausgangsstecker des DVD-Dual-Laufwerks und dem Audio-Eingang der
Soundkarte.
8. Schließen Sie das Gehäuse und verbinden Sie die Netzkabel.
Achtung: Der Test-Jumper ist nur für werkseigene Testzwecke. BITTE NICHT
BENUTZEN!
Software-Installation
Für Windows 95/98/ME:
Das neue DVD-Dual-Laufwerk wird automatisch erkannt und zugewiesen. Die korrekten Geräte-
treiber werden automatisch geladen. Eine Installation von DVD-Dual-Gerätetreibern ist unter
Windows 95/98/ME nicht notwendig.
Wir Ihr DVD-Dual-Laufwerk nicht automatisch erkannt, gehen Sie folgendermaßen vor:
a. Starten Sie Ihren Computer neu, Klicken Sie auf “Systemsteuerung” unter “Mein
Computer.”
b. Klicken Sie doppelt auf “Neue Hardware hinzufügen”, klicken Sie auf “weiter” and
“ja” in den Dialogfeldern.
c. Erlauben Sie Windows die automatische Suche nach Ihrem neuen DVD-Dual-Laufwerk
sowie das Laden der Softwaretreiber, um die Installation zu vervollständigen.
Für Windows NT/2000/XP oder OS/2 WARP oder andere Betriebssysteme
Das DVD-Dual-Laufwerk unterstützt die Standard ATAPI-Laufwerk-Schnittstelle. Ihr Sy-
stem sollte die passenden Treiber für Ihr Laufwerk laden können.
Not-Auswurfloch: Wenn sich der Laufwerkschacht nicht automatisch öffnet, stecken Sie bitte
eine Auswurfhilfe (etwa einen festen Papierstreifen mit einem Durchmesser von ca. 1,2mm) in
das Auswurfloch, um den Schacht zu öffnen (bitte keine spitzen Gegenstände wie Nägel oder
Nadeln verwenden). Vergewissern Sie sich, dass das Gerät abgeschaltet ist und nicht unter
Strom steht, bevor Sie diese Maßnahme durchführen.

7
GERMAN
Installation von Nero
System-Anforderungen
Ihr System sollte über ein vorinstalliertes bzw. aktualisiertes Betriebssystem verfügen.
Nachstehend finden Sie eine Liste von Betriebssystemen, die Nero unterstützen. Bitte
vergewissern Sie sich, dass auf Ihrem PC eines der aufgeführten Betriebssysteme installiert
ist:
Betriebssystem
•Windows 95 / 98 / 98SE / ME
•Windows NT 4.0 (service pack 6) / Windows 2000 (Service Pack 2 oder höher)
•Windows XP
Hardware
•Prozessor mit mindestens 500 MHz. Angaben über die Konfiguration Ihres PCs finden
Sie im dazugehörigen Handbuch.
•Mindestens 64 MB RAM Arbeitsspeicher. Mehr Speicherkapazität wird empfohlen.
•Die Zugriffszeit auf die Festplatte sollte unter 19 Millisekunden liegen.
•Grafikkarte mit 8 MB oder höher (für Video).
•Nero sollte mit einer Bildschirmauflösung 1024x768 oder größer betrieben werden.
•Auf der Festplatte sollten sich mindestens 700 MB Speicherplatz befinden. Mehr
Speicherplatz wird empfohlen.X
Installation von Nero
Schritt 1: Legen Sie die Nero CD-ROM in das CD/DVD-Laufwerk Ihres PCs ein. Verfügt
Ihr PC über das aktivierte Feature “Autorun”, startet der Installationsvorgang
automatisch. Ist “Autorun” nicht aktiviert, wählen Sie „Mein Computer“.
Klicken Sie auf den Laufwerks-Buchstaben des CD/DVD-Laufwerks, dann auf
setup.exe.
Schritt 2: Folgen Sie den Anweisungen bis die Software vollständig installiert ist.
Schritt 3: Starten Sie Ihren PC neu.
Deinstallation von Nero
Schritt 1: Gehen Sie zu Start > Systemsteuerung > Programme hinzufügen oder entfernen.
Manche Betriebssysteme, verfügen über - Start > Einstellungen >
Systemsteuerung.
Schritt 2: Wählen Sie Nero unter >Programme hinzufügen oder entfernen “entfernen”.
Schritt 3: Während der Softwareentfernung kann es in einigen Fällen vorkommen, dass
das Betriebssystem fragt, ob ein oder zwei Dateien, die von anderen Programmen
genutzt werden, tatsächlich entfernt werden sollen. Wenn Sie sich nicht sicher,
sind behalten Sie diese Dateien.

8
Instalación del Hardware
1. Desconecte la corriente de la computadora.
2. Abra el gabinete de la computadora.
3. Configure los puentes Maestro/Esclavo en el conector de la unidad de DVD-Dual según
se necesite.
4. Inserte la unidad de DVD-Dual en una de las bahías de 5 ¼” libres y asegúrela con los
tornillos de montaje incluidos en el paquete de la DVD-Dual.
5. Conecte el cable de electricidad al tomacorriente.
6. Conecte el cable IDE de 40 pines al conector IDE de la unidad de DVD-Dual y
asegúrese de que el borde rojo del cable IDE corresponda con el pin 1 de la interfase IDE
en la unidad de DVD-Dual.
7. Si posee una tarjeta de sonido, conecte el cable de sonido de 4 pines al conector de
sonido análogo de salida de la unidad de DVD-Dual, y al conector de entrada de sonido
de la tarjeta de sonido.
8. Cierre el gabinete de la computadora y conéctela a la corriente.
Advertencia: El puente de prueba es para pruebas de fábrica solamente, por favor NO
LOUTILICE
Instalación del Software
Para Windows 95/98/ME:
La nueva unidad DVD-Dual será detectada e identificada automáticamente y el driver
correcto será cargado. Por ello, no hay necesidad de instalar ningún driver para el DVD-Dual
bajo sistema operativo Window 95/98/ME.
Si su unidad DVD-Dual no puede ser detectada automáticamente, haga lo siguiente:
a. Reinicie su computadora, haga clic en el ícono “Panel de Control” bajo “Mi
Computadora”.
b. Haga doble-clic en el ícono “Agregar Nuevo Hardware”, y luego haga clic en
“Próximo” y “Sí” en las cajas de diálogo.
c. Permita que Windows busque su nueva unidad DVD-Dual automáticamente, y
cargue el software del driver para completar la instalación.
Para Windows NT/2000/XP o OS/2 WARP u otros sistemas:
La unidad DVD-Dual tiene soporte para la interfase ATAPI estándar. Su sistema debería
poder cargar el driver apropiado para su unidad.
Orificio de Expulsión de Emergencia: Si la bandeja no se abre automáticamente por
cualquier motivo, por favor inserte una barrita de expulsión (se puede usar un sujetapapeles
con diámetro de 1.2mm estirado como barrita de expulsión). Insértela en el orificio de
expulsión de emergencia y abra la bandeja manualmente. Asegúrese de cortarle la corriente a
la computadora antes de proceder.
SPANISH

9
Instalación de Nero
Requerimientos del Sistema
A continuación, hallará la lista de todos los sistemas operativos compatibles con el Nero. Por
favor asegúrese que su sistema posea uno de los siguientes sistemas operativos:
Sistemas Operativos
•Windows 95 / 98 / 98SE / ME
•Windows NT 4.0 (service pack 6) / Windows 2000 (service pack 2 o más)
•Windows XP
Hardware
•Se recomienda que su PC tenga un sistema de 500 MHz o más. Por favor refiérase a los
manuales que vinieron con su PC para la información de la configuración del sistema.
•Debe tener por lo menos 64 MB de memoria RAM. Generalmente, más memoria sería
mejor.
•El tiempo de acceso al disco duro debe ser menor a los 19 milisegundos
•La tarjeta gráfica debe tener 8 MB o más (para video).
•Recomendamos una resolución de pantalla de 1024x768 o más.
•700 MB de espacio libre en el disco duro para las imágenes. Generalmente, más espacio
sería mejor.
Instalación de Nero
Paso 1: Inserte el CD-ROM del Nero en la unidad CD/DVD de su PC. Si tiene el “Auto
arranque” activado, el proceso de instalación se iniciará automáticamente. Si no
tiene el “Auto arranque” activado, puede ir a Mi Computadora > Haga clic en la
letra de la unidad del CD/DVD > haga clic en setup.exe
Paso 2: Siga las indicaciones hasta finalizar la instalación del programa.
Paso 3: Reinicie su computadora.
Desinstalación de Nero
Paso 1: Vaya a Inicio > Panel de Control > Agregar o Remover Programas. En algunos
sistemas operativos, encontrará - Inicio > Configuración > Panel de Control.
Paso 2: Seleccione Nero en la ventana de Agregar o Remover Programas y haga clic en
“remover”.
Paso 3: En algunos casos, encontrará que al remover software, el sistema operativo
preguntará si quiere remover uno o dos archivos que pueden ser compartidos con
otros programas. Si no está seguro, siempre opte por guardar los archivos.
SPANISH

10
PORTUGUESE
Insalação de Hardware
1. Desconecte os cabos de seu computador da energia, em seguida, remova a capa do cabimete
de seu computador.
2. Ajuste os jumpers Master e Escravos na saída de eletricidade do aparelho DVD-Dual.
3. Inserte o parelho de DVD-Dual dentro do espaço correspondente a 5.25 polegadas e
asegure-o com os parafusos de montagem que vêm incluídos no pacote do DVD-Dual.
5. Conecte o cabo de eletricidade na tomada.
6. Conecte o cabo IDE de 40 pinos no conector IDE do aparelho DVD-Dual e esteja seguro
de que a extremidade vermelha do cabo IDE corresponda ao pino 1 da interface IDE ao
aparelho DVD-Dual.
7. Deve conectar o cabo de áudio de 4 pinos ao conector de áudio analógico de saída do
aparelho DVD-Dual, e ao conector de entrada da placa de som.
8. Coloque novamente a capa de seu computador, e reconecte os cabos elétricos.
Atenção: O Jumper de teste é somente para uso de fábrica. Por favor,
NÃO O UTILISE!
Instalação do Software
Para Windows 95/98/ME:
O sistema detectará automaticamente, determinará o novo DVD-Dual e carregará driver correto.
Conseqüêntemente, não há necessidade de instalar qualquer driver de DVD-Dual sob o sistema
Window 95/98/ME.
Se o DVD- Dual não puder ser detectado automaticamente, por favor faça o seguinte:
a. Reinicie seu computador, clique no ícone “meu computador” e logo em “painel de
controle”
b. Doble-clique no ícone “adicionar novo hardware”, e logo “seguinte” e depois
“sim” na caixa de diálogos.
c. Siga windows para procurar pelo seu novo driver DVD-Dual automaticamente, e
carregue o driver software to complete a instalação.
Para o sistema windows NT/2000/XP, OS/2 WARP ou outros sistemas o driver DVD-Dual
suporta a interface ATAPI standard e seu sistema poderá ser capaz de carregar o drive apropriado
para seu sistema.
Abertura de ejeção de Emergência: Quando a bandeija não puder se abrir automaticamente
por qualquer razão, por favor inserte à tranca (um clipe de papel com diâmetro de 1.2mm pode
ser usado como tranca de ejeção, pressione-o para dentro da abertura, logo, ejete a bandeja
manualmente. Asegurese-se de desligar a eletricidade antes de fazer todo o processo.

11
PORTUGUESE
Instalação do Nero
Requerimentos do sistema
Seu sistema poderia vir com um sistema de operação pre-instalado ou você pode escolher um
upgrade atual para operação do sistema. Veja a lista abaixo onde você encontrará disponíveis
o suporte do Nero. Por favor revise, para asegurar-se de que você tem um dos seguintes
sistemas de operação:
Sistemas de Operativos
•Windows 95 / 98 / 98SE / ME
•Windows NT 4.0 (service pack 6) / Windows 2000 (service pack 2 or higher)
•Windows XP
Hardware
•É recomendado que seu PC tenha um sistema de 500 MHz ou mais. Por favor observe
que no manual do seu PC vem a informação de figuração do seu sistema.
•Você deve ter pelo menos 64 MB RAM de memória. Geralmente quanto mais, melhor.
•O disco duro acessa um tempo mais curto que 19 milissegundo
•A placa gráfica com 8 MB ou mais (para vídeo).
•Recomendamos uma resolução de 1024x768 ou mais para que trabalhe de forma mais
confortável com o Nero.
•Também é recomendado 700 MB de espaço livre para as imágens em seu disco duro.
Geralmente quanto mais espaço, melhor.
Instalando o Nero
1º Passo: Inserte o CD-ROM Nero dentro da unidade CD/DVD de seu PC. Se você tem
ativada uma característica chamada “Autorun”, isto fará com que a instalação se
processará automaticamente. Se você não tem “Autorun” ativado em seu sistema,
você poderá ir a “Meu Computador” > Clique no na letra de unidade do CD/DVD
> clique “setup.exe”
2º Passo: Siga as instruções até que termine a instalação do programa.
3º Passo: Reinicie seu PC
Desinstalando o Nero
1º Passo: vá a Iniciar > Painel de Controle > Adicionar ou Remover Programas. Em alguns
sistemas operativos, você encontrará - Início > Configuração > Painel de Controle.
2º Passo: Selete Nero na janela de Adicionar e Remover Programas e clique “remover”.
3º Passo: Em alguns casos, você verá que ao remover o software, haverá uma ou duas
pastas que podem ser compartidas com outros programs. Se você não estiver
seguro, sempre opte para guardar estes files.

12
TURKISH
Donanım Montajı
1. Bilgisayararınızıkapatın.
2. Bilgisayarınızın kasasınıaçın.
3. DVD-Dual sürücünün üstündeki jackteki Master/Slave jumperlarınıayarlayın.
4. DVD-Dual sürücüyü boş5.25 inçlik yuvalardan birine yerleştirin ve DVD-Dual paketinden çıkan vidalarl
a
yerini sağlamlaştırın.
5. Power Kablosunu Power fişine takın.
6. 40-pinlik IDE kabloyu DVD-Dual sürücünün IDE konnektörüne takın ve IDE kablonun kırmızıköşesini
n
DVD-Dual sürücünün IDE interfazının pin 1’ine denk geldiğinden emin olun.
7. Eğer bir ses kartınız varsa, 4-pinlik CD Audio kablosunu DVD-Dual sürücünü Analog Audio line ou
t
konnektörüne ve ses kartının audio-in konnektörüne bağlayın.
8. Bilgisayarın kasasınıkapatın ve güç kablolarınıyeniden yerlerine yerleştirin.
Uyarı: Test Jumperısadece fabrika testi içindir, lütfen KULLANMAYINIZ!
Yazılım yükleme
Windows 95/98/ME için:
Yeni DVD-Dual sürücü otomatik olarak sistemde tanınır ve doğru aygıt sürücüsü yüklenir. Bu nedenle, Window
s
95/98/ME sisteminde herhangi bir DVD-Dual aygıt sürücüsü yüklemeye gerek kalmaz.
Eğer DVD-Dual’ınız otomatik olarak sistem tarafından tanınmazsa, lütfen aşağıdaki yolu takip edin:
a. Bilgisayarınızıtekrar başlatın, sonra ‘’bilgisayarım’’ın içindeki ‘’denetim masası’’ ikonu üzerin
e
klikleyin.
b. ‘’Yeni donanım ekle’’ ikonu üzerine çift tıklayın ve diyalog kutularına ‘’evet’’ deyin.
c. Windows’un yeni DVD-Dual sürücünüzü otomatik olarak aramasına ve sürücünün yazılımın
ı
yükleyerek yüklemeyi tamamlamasına izin verin.
Windows NT/2000/XP veya OS/2 WARP veya diğer sistemler için DVD-Dual sürücü standart ATAPI sürüc
ü
interfazınıdestekler. Sisteminiz sürücünüz için uygun sürücüyü yükleyecektir.
Acil Durum Eject Yuvası: Herhangi bir nedenden dolayıyuva açılamadığızaman, lütfen bir eject-barı(1.2m
m
çapında düzleştirilmişbir ataç eject-barıolarak kullanılabilir, acil durum eject yuvasının içine itiniz, ve ejec
t
yuvasınımanuel olarak çıkarınız) yerleştiriniz.

13
TURKISH
Nero’yu yükleme
Sistem Gereksinimleri
Sisteminizde bir operasyon sistemi önyüklemesi olmalıya da operasyon sisteminizi en son haline yenilemeyi seçebilirsiniz.
Aşağıda bunlardan Nero’nun desteklediklerinin bir listesini bulacaksınız.Lütfen emin olmak için aşağıdaki sistemlerden birine
sahip olup olmadığınızıkontrol ediniz.
İşletim Sistemi
Windows 95 / 98SE / ME
Windows NT 4.0 (servis paketi 6) (6 lıpaketler halinde) / Windows 2000 (servis paketi 2 veya üstü) (2li ya da dah
a
fazla paketler halinde)
Windows XP
Donanım
PC nizin 500 MHz ya da daha yüksek olmasıtavsiye edilir.Lütfen sistem konfigürasyon bilgileri için PC niz ile
birlikte gelen sistem bilgisi elkitabına gözatınız.
En az 64 MB RAM hafızasına sahip olmanız gereklidir. Genelde daha yüksek olması, iyi olur.
Hard diske aktarım süresi 19 milisaniyeden az olmalıdır.
Grafik kartı8MB ya da daha yüksek olmalıdır.( video için)
Nero’nun en rahat kullanımıiçin ekran çözünürlüğünün 1024x768 ya da daha iyisi olmasıtavsiye edilir.
Tavsiye edilen boşsürücü alanı700 MB dır. Genel olarak daha fazla alan, daha iyi olur.
Nero’yu Yükleme
1. adım Nero CD’sini CD/DVD sürücünüze yerleştirin. Eğer “Autorun” özelliğiniz aktif durumdaysa yükleme süreci
otomatik olarak başlayacaktır. If you do not have “Autorun” activated, you can go to My Computer > Click on
the drive letter of the CD/DVD drive > click setup.exe
Eğer “Autorun” aktif değilse My Computer > CD/DVD sürücüsü > setup.exe yi tıklayınız.
2. adım Yazılımın yüklemesi bitene kadar adımlarıtakip ediniz.
3. adım PC nizi tekrar başlatın.
Nero’nun Kaldırılması
1. adım: Başlat > Denetim masası> Program Ekle Kaldır
Bazısistemlerde Başlangıç > Ayarlar > Denetim Masasışeklinde olabilir.
2. adım Program Ekle veya Kaldır penceresinde Nero seçilir ve “kaldır” tıklanır.
3. adım Bazıdurumlarda , yazılımısilerken, sistem tarafından bir ya da iki dosyanın başka programlar tarafından da
kullanıldığını, yine de silmek istediğinizden emin olup olmadığınız sorulur. Eğer emin değilseniz bu dosyaları
silmemeyi seçin.

14
RUSSIAN
Уст ановка оборудования
1. Выключите питание вашего компьютера.
2. Снимите крышку системного блока.
3. Спомощью переключателя установите режим Master/Slave вашего комбинированного накопителя DVD/CD-RW.
4. Вставьте комбинированный накопитель DVD/CD-RW водин из свободных 5.25 дюймовых контейнеров системного
блока изакрепите винтами из комплекта поставки.
5. Подключите кабель питания.
6. Подключите 40-контактный IDE кабель кIDE разъёму комбинированного накопителя DVD/CD-RW иубедитесь, что
красный проводник кабеля подключён кпервому контакту IDE разъёма накопителя.
7. Если всистеме есть звуковая карта, соедините 4-хконтактный разъём аналогового аудио (Analog Audio line out) с
линейным входом (audio-in) звуковой карты.
8. Закройте крышку системного блока иподключите шнур питания.
Внимание: Тестовый переключатель предназначен только для технологических целей, пожалуйста, Н
Е
МЕНЯЙТЕ ЕГО ПОЛОЖЕНИЕ!
Уст ановка программного обеспечения
Для Windows 95/98/ME:
Система автоматически определит комбинированный накопитель DVD/CD-RW изагрузит соответствующий драйвер.
Таким образом, нет необходимости устанавливать дополнительные драйверы комбинированного накопителя
DVD/CD-RW для Window 95/98/ME.
Если ваш накопитель DVD/CD-RW не определился автоматически, пожалуйста, выполните следующие действия:
a. Перезапустите компьютер, зайдите в“Панель Управления”( “Control Panel”) из закладки “Мой компьютер”
(“My Computer”).
b. Дважды кликните на иконке “Добавить новое оборудование”( “Add New Hardware”), затем выберите ответы
“Далее”(“Next”)и“Да”(“Yes”)впоявляющихся диалоговых окнах.
c. Позвольте операционной системе автоматически найти комбинированный накопитель DVD/CD-RW, загрузить
драйверы иустановить программное обеспечение.
Для Windows NT/2000/XP или OS/2 WARP или других операционных систем
комбинированный накопитель DVD/CD-RW имеет стандартный интерфейс ATAP I устройств, иваша операционная
система должна поддерживать такие устройства.
Механизм ав3арийного извлечения диска:Если лоток сдиском не выдвигается автоматически, то, после выключения
питания, следует воспользоваться ключом аварийного извлечения диска. Этот ключ вставляется вотверстие аварийного
извлечения диска, нажимается на рычаг внутри накопителя , затем лоток выдвигается вручную. При отсутствии
специального ключа, можно использовать выпрямленную скрепку для бумаг диаметром 1,2 мм.

15
RUSSIAN
Уст ановка ПО Nero
Системные требования
На компьютере должна быть установлена одна из нижеприведённых операционных систем, которые поддерживают
программное обеспечение (ПО) Nero. Перед установкой ПО убедитесь, что увас установлена одна из операционных
систем:
Программное обеспечение
Windows 95 / 98SE / ME
Windows NT 4.0 (service pack 6) / Windows 2000 (service pack 2 или более поздний)
Windows XP
Аппаратное обеспечение
ПК спроцессором частотой 500 МГц ивыше. (Необходимые данные можно найти вРуководстве
Пользователя ПК).
Не менее 64 МБ оперативной памяти. Вообще говоря, чем больше, тем лучше.
Жёсткий диск со временем доступа не более 19 мс.
Видеокарта свидеопамятью не менее 8 МБ (для воспроизведения видео).
Рекомендованное разрешение экрана для работы сПО Nero 1024x768 или выше.
Не менее 700 МБ свободного места на жёстком диске для записи образа CD-диска. Вообще говоря, чем
больше, тем лучше.
Ус т ано вка ПО Nero
Шаг 1: Вставьте CD-ROM спрограммой Nero внакопитель CD/DVD вашего компьютера. Если ввашей системе
разрешена функция “Автозапуск” (“Autorun”), то процесс инсталляции запустится автоматически. Если в
вашей системе не разрешена функция “Автозапуск”, то вам следует выполнить следующие действия: Мой
Компьютер> затем выберите накопитель CD/DVD икликните на программе setup.exe
Шаг 2: Следуйте указаниям на экране, появляющимся впроцессе установки.
Шаг 3: Перезапустите компьютер
Деинсталляция ПО Nero
Шаг 1: Выполните следующую последовательность Пуск > Панель управления > Установка/Удаление
программ (Start > Control Panel > Add or Remove Programs). Внекоторых операционных системах
следует выполнить Пуск > Ус т ано вк и > Панель управления (Start > Settings > Control Panel).
Шаг 2: Выберите Nero вокне Ус т ан овк а/Удаление программ (Add or Remove Programs) инажмите “уда лить”
(“remove”).
Шаг 3: Внекоторых случаях, при удалении ПО может появиться предупреждение операционной системы отом,
что некоторые из удаляемых файлов могут совместно использоваться другими программами. Если вы не
уверены втом, что эти файлы не используются другими программами, всегда выбирайте опцию “сохранить
файлы” (“Keep Files”).

16
JAPANESE
ドライブの接続
1. コンピュータの電源ケーブルを抜きます。
2. コンピュータのケースカバーを開けます。
3. DVDデュアルドライブの「Master/Slave」ジャンパを設定します。
4. 付属のネジを使用して、空いている5インチベイにドライブを固定します。
5. 平型4ピンの汎用電源コネクタをドライブに接続します。
6. マザーボード側のIDE端子とドライブ側のIDE端子とドライブ側端子を接続
します。
7. アナログ音声を接続する場合は、ドライブ背面のアナログ音声出力端子と、マザ
ーボード(またはサウンドカード)の音声入力端子を接続してください。
8. ケースカバーを元に戻し、電源ケーブルを接続します。
警告: テスト用ジャンパーピンは、工場出荷試験専用のピンです。お客様は操作しな
いでください。
ソフトウェアのインストール
Windows 95/98/ME をご使用の場合:
本機はOS標準ドライバーソフトで動作しますので、別途ドライバーソフトをイン
ストールする必要はありません。
もし、DVDドライブとしてしか認識されない場合は、以下の方法で再検出を行っ
てください。:
a. システムを再起動し、「コントロールパネル」の中にある「マイコンピュー
タ」を開きます。
b. 「新しいハードウェアの検出」をダブルクリックし、「次へ」と「はい」を
クリックして自動検出作業を進めます。
c. DVDドライブが検出され、自動的にドライバーソフトが読み込まれます。
(OSインストールCD−ROMを要求される場合があります。)
Windows NT/2000/XP などをお使いの場合
本機はOS標準ドライバーで動作しますので、別途ドライバーソフトを導入する必
要はありません。
緊急取り出し穴について: 何らかの事情によりメディアを強制排出する必要がある
場合、次の方法で取り出すことができます。
・ クリップなどを加工し、直径 1.2 ミリの折れ曲がっていない針金を用意します。
・ 取り出しボタン付近にある緊急取り出し穴に差し込み、内部にある排出機構を押
しこみます。
※電源が入っている状態でこの操作を行わないでください。
Other manuals for DR8-A
2
This manual suits for next models
3
Table of contents
Languages:
Other MSI DVD Drive manuals


