MSI MS-5654 User manual

1
MS-5654
User guide

2
IMPORTANT
Satellite signals are required for this product to function in Navigation
Mode. There may be occasions within your home or surrounding area when
the signal strength is limited and Navigation Mode may not be possible.
This is quite normal for products of this type. If you experience difficulty in
receiving a signal in your car you may need to use an external antenna
(optional).
Safety
The Global Positioning System
The Global Positioning System (GPS) is a satellite based system that provides
location and timing information around the globe. GPS is operated and controlled
under the sole responsibility of the Government of the United States of America,
who are responsible for its availability and accuracy. Any changes in GPS
availability and accuracy, or in environmental conditions, may impact the
operation of your Personal Navigation Device (PND).
Using Your PND in the Car
When using your PND while driving it is essential that you drive with due care
and attention. Never modify the settings or program your PND while driving. Only
look at the PND map when it is safe to do so. Only follow the PND instructions
when the road regulations allow you to do so. When mounting the PND in your
car make sure that it does not obscure your view or impede the operation of any
driving controls.
Prohibited Areas
Do not operate your PND in hospitals or near any electrical medical
equipment.
Do not operate your PND in aircraft.
Do not operate your PND in a petrol station forecourt.
Battery
Your PND uses a Li-ion battery. Do not use it in humid, wet or corrosive
environments. Do not operate or store your PND in high temperatures (>60℃) or
in direct sun light. Do not pierce or break the battery casing.
Failure to follow these cautions will invalidate the warranty and may
cause the battery to leak acid, become hot, explode or ignite and
cause injury or damage.
If you come into contact with leaked battery acid wash the contact
area thoroughly and seek medical attention.
The Li-ion battery contained in this unit must be recycled or disposed of properly.
Do not dispose of in household waste or burn.

3
CONTENTS
IMPORTANT.............................................................................................2
Safety........................................................................................................2
The Global Positioning System .......................................................................2
Using Your PND in the Car ..............................................................................2
Prohibited Areas...............................................................................................2
Battery..............................................................................................................2
CONTENTS..............................................................................................3
Getting Started .........................................................................................4
Position of the controls ....................................................................................4
Car Adapter ......................................................................................................6
External Antenna (sold separately)..................................................................6
Switching On/ Off .............................................................................................6
Sleep Mode......................................................................................................7
Connect to PC..................................................................................................9
GPS ........................................................................................................10
Safety Instructions .........................................................................................10
Handsfree...............................................................................................11
Paired List ......................................................................................................11
Dial .................................................................................................................13
Last Calls .......................................................................................................14
Auto Answer...................................................................................................15
Travel Kit ................................................................................................16
Music..............................................................................................................16
Video ..............................................................................................................18
Photo..............................................................................................................21
UnitConverter.................................................................................................24
Currency Converter........................................................................................25
Settings...................................................................................................26
Display ...........................................................................................................27
Language .......................................................................................................29
Restore...........................................................................................................30
System Info ....................................................................................................31
Firmware Upgrade (advanced feature)..........................................................32
FM Adjust .......................................................................................................33
Technical Specifications .........................................................................35

4
Getting Started
This device combines GPS functionality with a photo viewer and Bluetooth
Hands-free. Before you begin to install and use this product, please read this
manual carefully for fully exploiting the functions of this product. If you experience
any problems, go through the user guide before contacting the customer helpline.
Position of the controls
1. Power Button
2. SD Card Slot
3. Touch Panel
4. Menu Button
5. Indicator Light*
6. TMC Antenna Jack
7. USB Port
8. Strap Hole
9. Battery Switch
10. Headphone Jack
11. External GPS Antenna
Port
12. Speaker
13. Stylus Pen/ Slot (Slide
the stylus pen out of
the slot when needed.)
*: When charging the light will be red; when fully charged the light will become green.
** When not using the unit for a long period of time, you are advised to turn the unit off by this
switch. Use the stylus to operate the switch.

5
Battery Information
The device is integrated with a 1000mAH/ 3.7V Li-polymer battery. It allows the
unit to be used for approximately 2 hours, without being connected to a power
source.
The battery icon which is shown at different point on the display depending on
which screen is currently being displayed. The icon indicates the current battery
status.
: means the battery capacity is full.
: means the battery capacity is 80%.
: means the battery capacity is 60%.
: means the battery capacity is 40%.
: means the battery capacity is 20%.
You can also go to the Main Menu / Settings / Power Status to view the actual
percentage of the remaining battery capacity.
The display shows the “Low Battery!” message automatically. When the battery
capacity drops below 15%, this message will be shown for 2 seconds. However,
when battery capacity drops below 5%, this message will stay on the screen until
the user connects the unit via the car charger or the battery capacity becomes
too low to power the unit.
Charging the Battery
Before using your PND for the first time, we recommend you to charge the unit
for 5 hours via the USB cable or 2 hours via the car charger in order to charge
the battery.
Plug the USB cable or the car charger into the USB socket .
When you use the PND in your car, we recommend that you always use the car
charger in order to maintain the battery level.
*Disclaimer: some laptops could have insufficient power through the USB port to
charge the unit; this could lead to damage to your laptop USB port. MS-5654 will
not be held in any way responsible for the damages caused to any laptop by
charging the device through the laptop USB port
*It is recommended that when charging via the USB cable that the power switch
is set to the Off position.
When the device is connected to the car charger/USB cable the battery icon will
change to , and LED indicator light on the front of the unit will be lit red.
When the battery is fully charged, and the car charger/USB cable is still
connected. The icon will change to , and the LED indicator light on the front of
the unit will turn green.

6
Car Adapter
When using your PND in the car we recommend that you always use the in-car
charger to power the unit, especially on long journeys.
Plug the in-car charger into the USB socket on the unit. Plug the other end of the
adapter into the car’s cigarette-lighter / 12V DC socket.
External Antenna (sold separately)
If the GPS receiver fails to acquire a valid signal when mounted in your car it may
be due to a heat reflecting coating or heating elements in your windscreen. In
these cases use an external antenna.
The antenna has a magnet and can be positioned in various locations in or
outside your car to obtain the best signal reception. Push the antenna into the
socket on the rear of the unit until it clicks into place. Then position the antenna
so that you receive a valid signal.
*External Antenna Optional
Switching On/ Off
Use the stylus pen to switch the unit on by the power switch on the bottom of the
unit. You will see the booting screen for a short while, then the screen will change
to show the below message to warn you about driving safety. Tap on the
button to continue.
The screen will then change to the Main Menu screen shown below. This is the
starting point for using all of your MS-5654 features.
Position the antenna on the roof of your ca
r
Plugs into the back of the PND

7
Sleep Mode
You can use Sleep mode to conserve battery power if the unit is not going to be
used for a short while, for example if you have scheduled a stop at a service
station. NOTE: if the unit is not to be used for a long period of time, the unit
should be switched off by the On/Off switch.
Press the Power Button for 3 seconds to put the unit into Sleep Mode.
Press the Power button for 3 seconds to wake up the device, the display show
the same screen as when the unit was put into sleep mode.

8
SD Card Installation
If you have a SD or MMC memory Card, you may install it to extend the storage
capacity of the unit, or to view photos saved on the card. When installing it can
only be fitted one way – the wording side facing towards you and the cut-off
corner at the bottom as shown. Insert the card and push it in so that it clicks into
place.
Insert a SD card into the slot, and you will see the below message.
If you need to remove the SD card, push the card in and it will eject from the slot.
You will then see the below message.
Note: the card slot can also be used as a card reader, refer to the following
section to operate the unit as an SD card reader..

9
Connect to PC
You can connect the unit to a PC for transferring data. Insert a SD/ MMC card to
the card slot; you can then use the unit as a card reader.
1. Power on the unit.
2. Plug B-type end of the supplied USB cable to the mini USB port on the unit,
then plug the other end into your computer.
3. The system will try to recognize and connect to the device; the unit display will
show the below screen.
4. Once the device has been connected to you will find 2 new USB devices
under ”My Computer”. The second device represents the memory card slot,
and is only available when a SD/ MMC card is inserted. Copy or move the data
needed between your PC and the unit.

10
GPS
You have chosen a cutting-edge navigation system. Congratulations! Please
enjoy using it. This navigation system leads you straight to your destination,
whether you are travelling by car or on foot. You can navigate and plan your
route with an easy-to-use and intuitive interface, just by using your finger or the
stylus. You can also use this application to plan your trip to suit your personal
preferences and interests and to save interesting destinations before you set off
on your journey. This manual leads you through the main features of the system.
Safety Instructions
yThe driver’s attention should always be on the road. If you are the driver of the
vehicle, we do not recommend you to operate this unit while driving. Plan your
route before departure and pull over if you need to change route parameters.
yThe MS-5654 has a built-in Safety Mode that will prevent you from using the
screen functions if your car is in motion. Unless a passenger will be the only
one to operate the MS-5654, we strongly encourage you to turn on the Safety
Mode.
yIt is also important that you look at the display only if it is absolutely safe to do
so.
yYou should always observe traffic signs and road geometry before obeying
instruction from the MS-5654.

11
Handsfree
This device can be linked to a mobile phone as a Bluetooth Hands-free device.
After being linked to a mobile phone, you can use the MS-5654 to call and
answer the phone without holding your mobile phone. Tap on the Hands-free
icon on the Main Menu to enter.
To operate the Hands-free function, tap on Bluetooth option to switch it on. You
will see a message as below. Remember the passkey for later usage.
Then you can see the menu as below.
Paired List
To use the Hands-free function, you have to pair the device with a mobile phone
first. If the MS-5654 has been paired with any mobile phone, you can see it on
Paired List. If the Paired List option is dark in colour and can not be entered,
that means there is no paired phone.
Follow the procedure below to pair your phone with the device.
1. Switch on the Bluetooth feature on your mobile phone and on your MS-5654. A
pop-up message will prompt to tell the passkey, 0000.

12
2. Place the MS-5654 and your phone nearby, and press relative keys on your
phone to make it search for new devices.
3. When the searching is complete, you should see a new device named
“MS-5654” on the list.
4. Select it from the list, and then your phone will ask you to enter a passkey.
Enter 0000 as the pop-up message prompts. Then the MS-5654 is now on the
paired list of your phone.
5. Select the MS-5654 and press the required buttons to connect it. Now you can
see your phone on the paired list of the MS-5654.
6. Or you can also connect your phone and the MS-5654 via the MS-5654 when
you want to operate the Bluetooth feature. Tap on the phone name in the
paired list of the MS-5654 first and then tap on button to start connecting.
You will see the “Connecting” message on the display.
7. Your phone will ask if you want to accept the connection request from the
MS-5654. Press Yes to continue. You will see the “Connection Completed!”
message on the display.
8. If you want to disconnect the Bluetooth connection, press the relative buttons
on your phone to disconnect it from the MS-5654.
9. If you connected several phones to the MS-5654, the Paired List will list them
all. If need be, tap on a phone name and tap on button to delete it from
the device list. A confirm window will prompt, tap on button to delete, or
tap on to cancel and exit.

13
Dial
Once a phone is paired and connected to the MS-5654, the Hands-free features
of the MS-5654 are now enabled. You can dial from and answer your phone via
the MS-5654.
Tap on Dial to begin entering a number to dial out, you will see the number pad
as below.
Tap to enter the phone number you want to call, and then tap on the
button. If a number is dialled wrong, tap on once to erase a digit at a time.
While dialling, the display will change to the below.
Wait until the call is answered, then the MS-5654 becomes a Hands-free device.
You do not have to hold the phone, nor the MS-5654 to make the phone call. This
14
is useful when you are driving a vehicle.
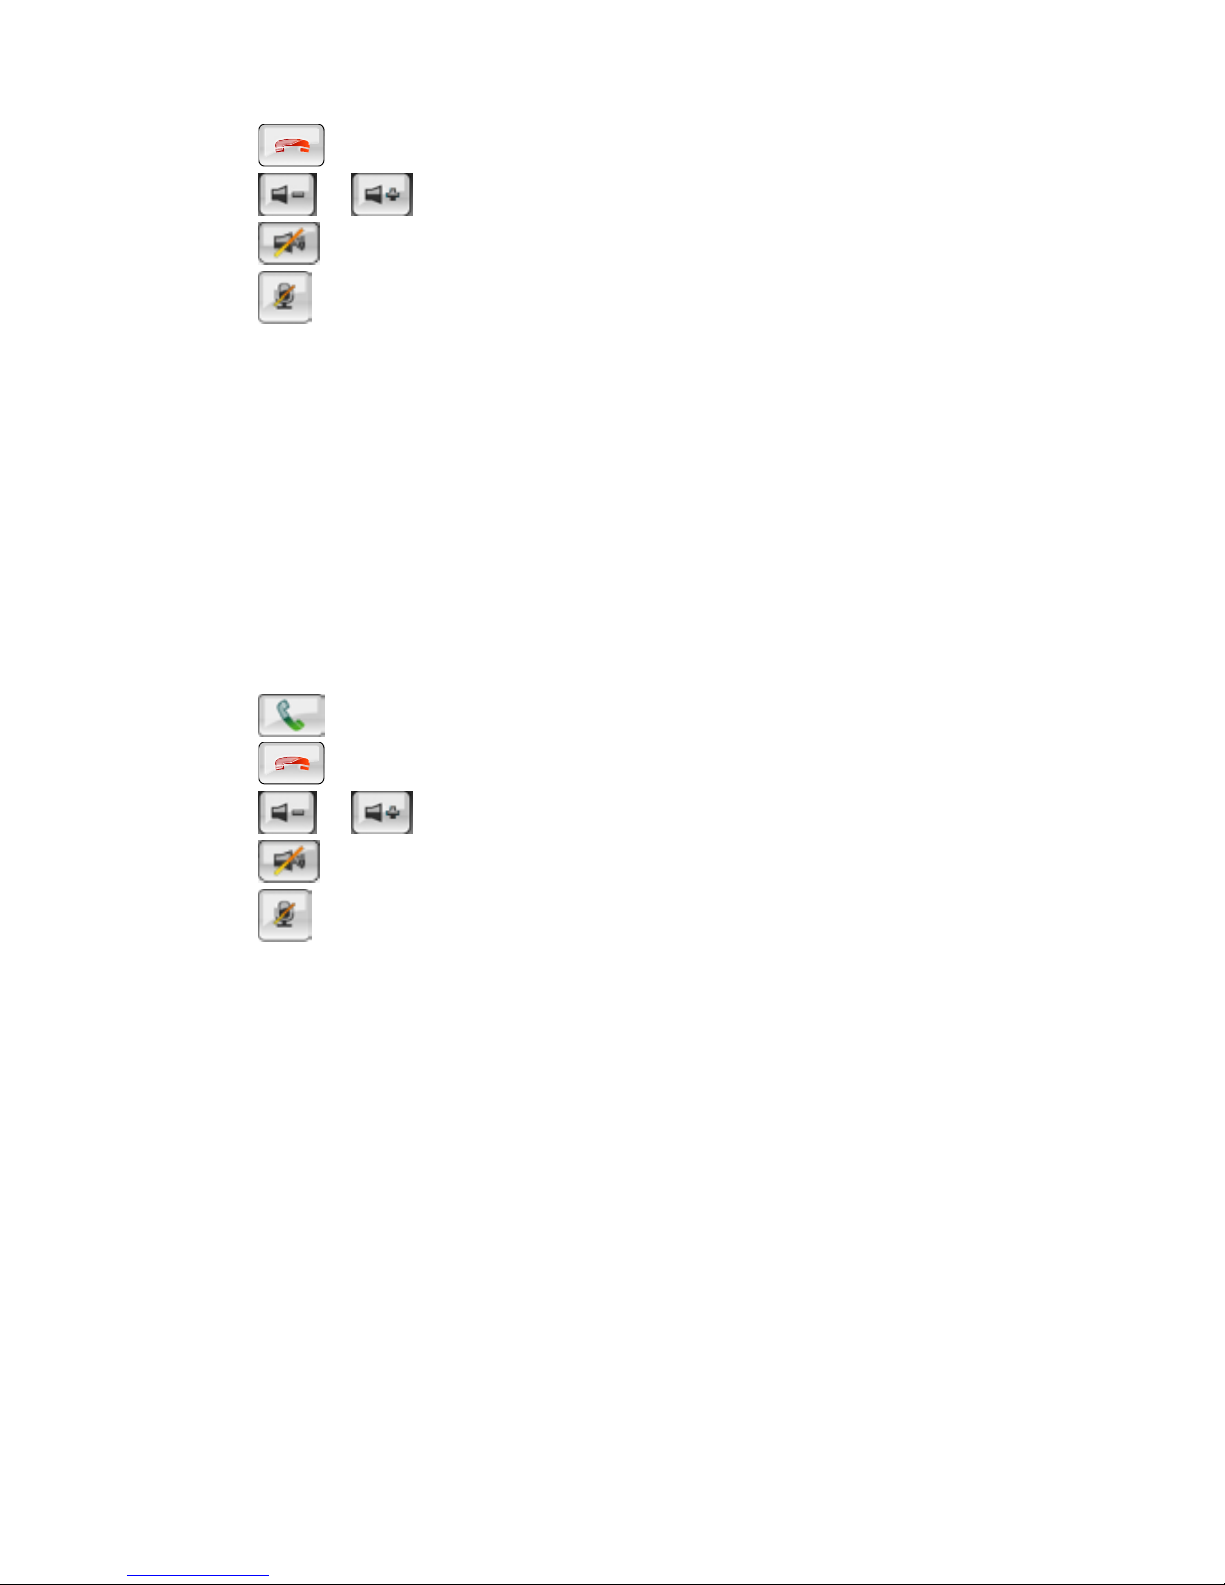
yTap on button to hang up the call.
yTap on / button to adjust the volume.
yTap on button to mute the volume.
yTap on button to mute your voice.
When a phone call is received while the MS-5654 and your phone are connected,
you will see the below screen appear. The name or number of the caller will be
shown on the first line of the display.
yTap on button to answer the call.
yTap on button to hang up the call.
yTap on / button to adjust the volume.
yTap on button to mute the ring volume.
yTap on button to mute your voice.
Note: if Auto Answer is set to On, the call will be answered automatically after 3
seconds automatically.
Last Calls
The device records also the dialled calls, answered calls, and missed calls. You
can look them up and make a phone call to any of them when needed.
Dialled Number
If you have made a call via the MS-5654, you will see the number in the list.

15
yTap on a number and then tap on button to call that number again.
yTap on if you want to delete the number from the list. A message will
prompt you to confirm.
Answered Calls
If you have answered a call via the MS-5654, you will see that number on the list.
yTap on a number and then tap on button to call the number back.
yTap on if you want to delete that number from the list. A message will
prompt you to confirm.
Missed Calls
If there are any incoming calls that you did not answer, you will see the numbers
on the list.
yTap on a number and then tap on button to call the number back.
yTap on if you want to delete the number from the list. A message will
prompt you to confirm.
If there are no numbers recorded in a list, you will see the “No record!” message
on the display.
Auto Answer
The MS-5654 supports answering incoming calls automatically, tap on Auto
Answer to set it to On/Off. If it is set On, any received call will be answered
automatically after 3 seconds. If it is set Off, then you have to tap on the
button to answer the call when it comes.

16
Travel Kit
This device integrates several multimedia programs. You can watch video clips,
view photo, and also listen to music. Enter each function to enjoy your media
files.
Music
This device supports MP3, WMA formats. Enter "Music" function to read music
list.
Note 1: if the music file was saved into the Memory card, enter the Memory card
folder to find it.
Note 2: if the music file was saved into a specific folder, enter the folder to find it.
Note 3: press Menu button to go back main menu.
Tap on the screen to select a file from the list to play; you will see the display
shows as below.
yTap once to pause the playback.
yTap once to play the previous track. Or press it longer to rewind the
playback and find the section you need.

17
yTap once to skip and play the next track. Or press it longer to fast-forward
the playback and find the section you need.
yTap once to select the repeat mode.
Tap to set Repeat One.
Tap to repeat all.
Tap to play the files once in regular sequence.
yTap on button to mute the volume.
yTap on / button to adjust the volume.

18
Video
This device supports MPEG4, WMV formats. Enter Video function to watch video
clips.
Note 1: if the video clip was saved into the Memory card, enter the Memory card
folder to find it.
Note 2: if the video clip was saved into a specific folder, enter the folder to find it.
Note 3: press Menu button to go back main menu.
Enter Video function, you will see the figure as below, supported video clips will
be listed.
You can set to preview the selected clip. If the icon is activated, the tapped
clip will be played in thumbnail. Press the icon to play it in full screen. If you
tapped again to make the icon become , the tapped clip will be played in full
screen without previewing.
Tap on the icon to enter Settings. You can select if to resize the clip to fit the
screen for watching. And you can set the Zoom Mode to be Letter Box or Pan
Scan. Tap on to apply and exit the settings.

19
Tap on the icon to read the information of the software company.
Tap on the icon to view the detail information of the selected clip.
Once a clip is selected and being playing, you can tap on the screen to call the
function buttons.

20
y: Tap on this button to pause the playback. Tap on to resume to play.
y& : Tap on these buttons to adjust volume. Tap on to mute.
y: Tap on this button to set playing mode as Random or Ordinal.
y: Tap on this button to set repeat mode as Repeat Loop, Repeat One, or
Repeat List.
y: Tap on this button to go to the list and find a file to open.
Table of contents
Other MSI GPS manuals


