Mueller DW-600 User manual

Your satisfaction is guaranteed. If you are not completely satisfied
with our UltraCompact and the results it brings, we insist that you let
us know. We’ll help you make the countertop dishwasher work for you,
or we’ll refund your money.
MODEL: DW-600
USER MANUAL
UltraCompact
Portable Countertop
Dishwashwer

CONTENTS
IMPORTANT SAFETY INSTRUCTIONS…………………………….....………….........…...……1
Important safeguards…………………………………………………………...........…………........…………1
Electrical requirements……………....................……………………………………...………..............3
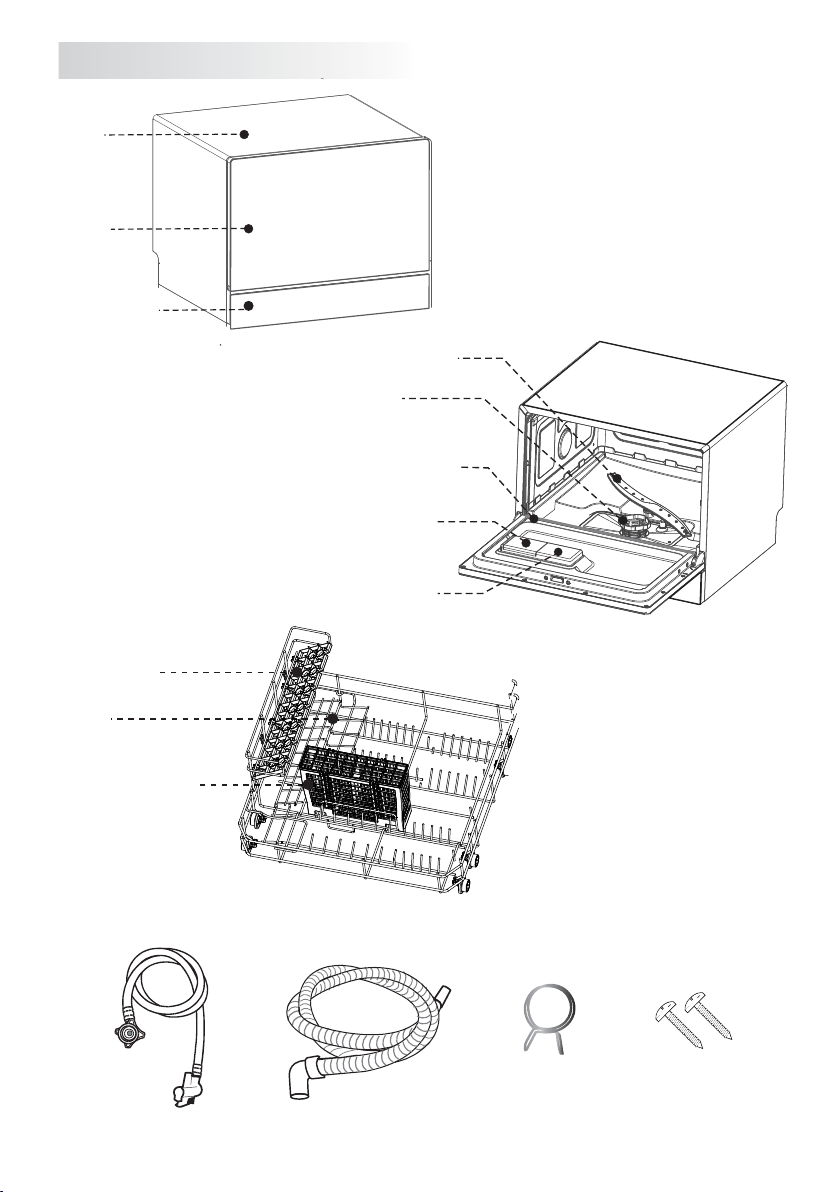
PARTS AND FEATURES…………………………….........................………………………......…4
Packaging content……………………………………………………………………………………….................4
Features…………………........................…………………………………………………………………………4
Parts……………………….................………………………………………………………………………………5
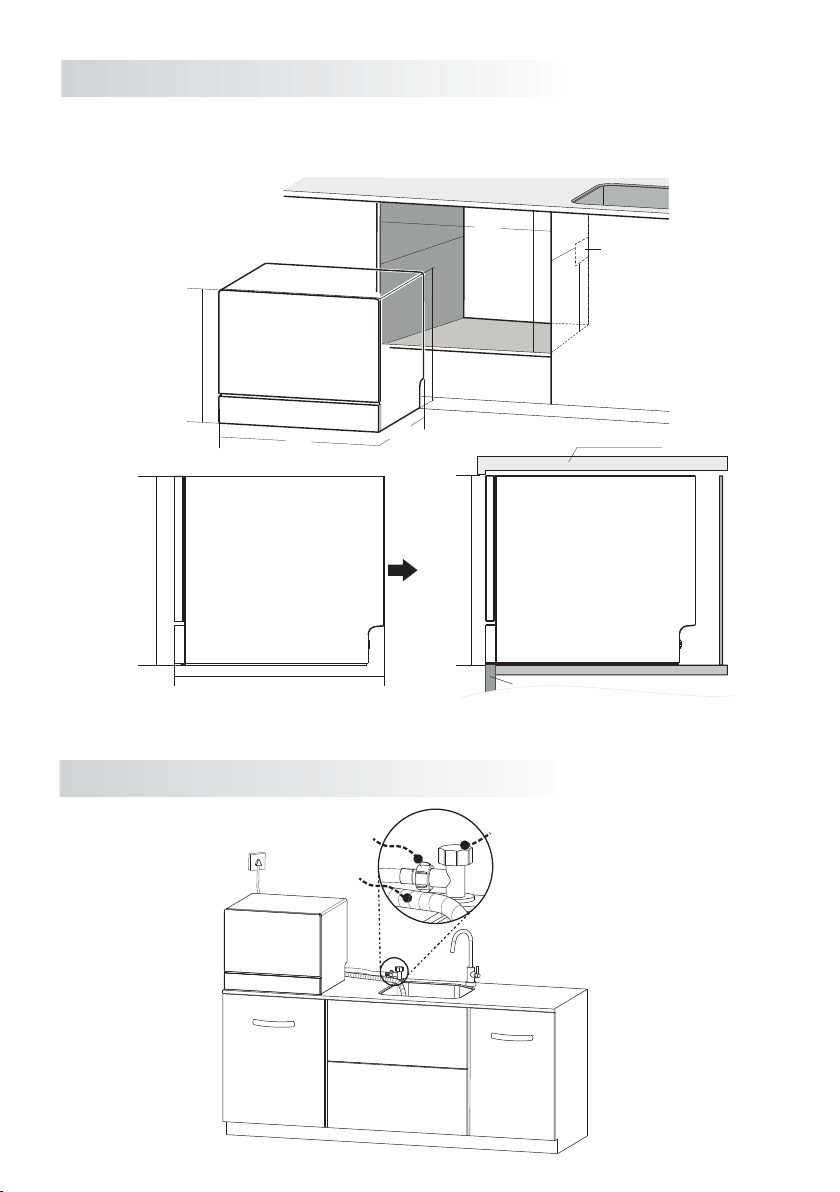
INSTALLATION………………………………………………………………………………………….....6
Unpacking and proper placement………………………………………….........................…………7
Built-in installation diagram……………………………………………………..................…………..……7
Countertop layout diagrams………………………………………...........................……………………7
Inlet hose connection………………………………………….................................………………………8
Drain hose connection…………………………………………….............................……………………10
Level and secure the dishwasher……………………….....................………………………………10
USING YOUR ULTRA COMPACT………...………….......................……………………………11
Prior to use…………………….………………………….............................……………………………………11
Loading the dishwasher……………………………...............................………………………………11
Detergent dispenser…………………………………………..............................…………………………13
Detergents…………………………………………………………....................................…………………13
Detergent tablets/pods……………………………………...........................……………………...……13
Filling the Rinse aid dispenser……….……………...........................………………………………14
Operating the dishwasher………………………............................………………………………….…14
Wash cycle table………………………………...............................…………………………………………15
Child lock……………………………........................................………………………………………………15
Delay function………………………….……..........................…………………………………………………15
CARE AND MAINTENANCE…………………………...............………………………………………16
How to maintain your dishwasher…………….................………………………………….………16
Cleaning the dishwasher……………............................…………………………………………………16
Cleaning the door………………………...........................……………………………………………………16
Filter system…………………………..............................………………………………………………………16
Cleaning the Spray arms………….......................…………………………………………………………17
Protect against freezing…………....................……………………………………………………………17
Preparation for storage………......................……………………………….………………………………18
Moving the dishwasher………...........................…………………………………………………………18
TROUBLESHOOTING……………………………...........……………………………………………18
TECHNICAL SPECIFICATIONS……...................…………………………………………………21
CIRCUIT DIAGRAM..................……...................…………………………………………………21

Inside you will find helpful information on how to use and maintain your
dishwasher properly. Following these guidelines can save you a great deal of time
and money over the life of your dishwasher. Additional answers to common prob-
lems can be found in the chart of Troubleshooting Tips.
WARNING! To prevent the risk of fire, electric shock, or injury to user and other
people, the following safety and electrical instructions must be followed when
using this appliance.
WARNING! DO NOT USE THIS APPLIANCE FOR ANY OTHER PURPOSE THAN ITS
INTENDED USE. FAILURE TO ADHERE TO THESE INSTRUCTIONS AND PRECAU-
TIONS WILL VOID THE MANUFACTURER’S WARRANTY.
READ THIS MANUAL AND ALL INSTRUCTIONS BEFORE USE.
• For household use. Do not use this appliance for commercial dishwashing
purposes.
• This appliance is not intended for use by persons (including children) with
reduced physical, sensory or mental capabilities, or lack of experience and knowl-
edge, unless they have been given supervision or instruction concerning use of
the appliance by a person responsible for their safety. Children should be super-
vised to ensure that they do not play with the appliance.
• Please keep the appliance at room temperature for 8 hours after receiving the
product in winter.
• Remove the cable ties on the drainage pipe and power cord carefully during
unpacking. Sharp scissors might burst the pipe or cord and cause leakage.
• This appliance must be properly installed in accordance with the installation
instructions before its use.
• This appliance must be connected to a proper electrical outlet with the correct
electrical supply.
• The installation position of the drainage pipe CANNOT exceed 15.5in / 40cm
higher than the top of the appliance, which would cause poor drainage, electrical
leakage, and water leakage.
• Proper grounding must be ensured to reduce the risk of shock and fire. DO NOT
CUT OR REMOVE THE GROUNDING PLUG. If you do not have a three-prong electric
receptacle outlet in the wall, have a certified electrician install the proper recepta-
cle. The wall receptacle MUST be properly grounded.
• If the power cord is replaced, replacement work must be performed by autho-
rized personnel only.
•
IMPORTANT SAFETY INSTRUCTIONS
IMPORTANT SAFEGUARDS
1

• Position the appliance in the desired location. Confirm that the machine has
been leveled.
• Do not use extension cords or adapters to connect the unit to any electrical
power source.
• Do not unplug your appliance by pulling on the power cord. Always grasp the
plug firmly and pull it straight out from the outlet.
• Do not operate your appliance in the presence of explosive fumes.
• Do not add or mix any flammable or explosive substances to the dishwasher to
wash.
• Do not operate your appliance when parts are missing or broken.
• Do not abuse, sit on, or stand on the door or the dishwasher rack.
• Do not put anything else on either side of the dishwasher. The openings must
not be obstructed.
• Use specialized detergents or wetting agents recommended for use in a
dishwasher and keep them out of reach of children. Do not use washing-up liquid,
washing powder, hand sanitizer soap or other detergents that are not specialized
for a dishwasher.
• Do not wash plastic items unless they are marked “dishwasher safe” or the
equivalent. For plastic items without such markings, check the manufacturer’s
recommendations.
• Knives and other sharp utensils with sharp points must be loaded in the basket
with their points facing downwards or placed in a horizontal position.
• When loading items to be washed, carefully position sharp items to prevent any
damage to the door seal.
• Utensils will be hot after washing. Allow 30 minutes to cool off before taking
out.
• Do not operate this appliance unless all enclosure panels are properly in place.
• Do not tamper with controls.
• Do not allow children to play in or on the appliance. To reduce risk of injury, close
supervision and observation of children is needed around the dishwasher.
• Do not repair or replace any part of the appliance or attempt any servicing
unless specifically recommended in the user repair instructions and you under-
stand and have the necessary skills to carry out such dishwasher servicing.
• Do not move or clean the appliance while it is working. It might cause electrical
or water leakage.
• Do not open the door during operation as the steam dispersed may harm you. If
it is necessary to load or unload some items, please push the Pause button and
wait 10 seconds, then open the door slightly and wait for the steam to dissipate
completely, then open the door and move your items.
• Do not use this dishwasher outdoors.
• Do not try to use this appliance in a damp place. High humidity may cause the
2

appliance to rust.
• This dishwasher is an automatic appliance, do not add water manually when the
appliance is working. It will cause overflow and is dangerous.
• To reduce the risk of injury, immediately replace work power cords, loose plugs
and/or power outlets.
• Disconnect electrical power and water intake hose to the dishwasher before
cleaning and/or servicing.
• If your old appliance is not being used, we recommend that you store the unit out
of the reach of children and remove its door. This will reduce the risk of injury to
children.
• Hydrogen gas may be produced if the water heater has not been used in more
than two weeks. This could be explosive and can explode under certain circum-
stances. If this is the case, before using this appliance, turn on all the hot water
faucets and let the hot water run for a few minutes. This will let the trapped hydro-
gen escape. During this process do not turn on an electric appliance, smoke, light
a match or lighter, or use a flame to avoid serious injury, due to the highly flamma-
ble nature of hydrogen gas.
This appliance must be plugged into at least a 120 Volt 60 Hz outlet. This appli-
ance must be grounded. It is equipped with a 3-prong power cord with a grounding
plug. The plug must be plugged into an outlet that is properly installed and ground-
ed.
WARNING! Improper use of the grounded wire can result in the risk of electric
shock.
Consult a qualified electrician if necessary. Do not attempt to tamper or modify
the plug in any form.
ELECTRICAL REQUIREMENTS
GROUNDING INSTRUCTIONS
3
Wall outlet with a
3-prong receptacle
Power supply cord with
3-prong grounding plug
DO NOT, under any
circumstamces, cut,
remove or bypass the
grounding prong!

PARTS AND FEATURES
Avoid the use of an extension cord because it may overheat and cause a risk of
fire.
However, if it is necessary to use an extension cord:
A) Use only a 3-prong extension cord with a 3-prong grounding plug.
B) The marked rating of the extension cord must be equal to or greater than the
rating of this appliance.
C) The extension cord should be positioned such that it does not drape over the
counter or tabletop where it can be pulled by children or tripped over.
ATTEMPTING ANY MAINTENANCE OR CLEANING
To minimize the possibility of electric shock, unplug this appliance from the
power supply or disconnect at the household’s electrical panel by removing the
fuse or switching off the circuit breaker before attempting any maintenance or
cleaning.
NOTE: Pressing the Power ON/OFF button to an OFF position does NOT discon-
nect the appliance from the power supply.
PACKAGING CONTENT:
FEATURES:
NAME QUANTITY NAME QUANTITY
Complete appliance 1 Drain hose 1
Rack 1 Screws 2
Cutlery basket 1 Clamping band 1
Inlet water hose 1 User manual 1
CONTROL PANEL
Power
Delay start / Child lock Program
Start/Pause
4

Detergent
dispenser
Rinse aid
dispenser
Filter
assembly
Spray arms
Rack
Cutlery basket
Inlet water hose Drain hose
Clamping band Screws
PARTS:
ACCESSORIES:
Shell
Panel
Baseboard
Cup holder
Bottom seal
of the door
5

INSTALLATION
UNPACKING AND PROPER PLACEMENT
UNPACKING:
WARNING: Ensure that any packing material, including any plastic bags or film,
are disposed of safely and kept out of the reach of children.
1. Inspect and remove any remains of packaging, tape, or printed materials before
powering on your appliance.
2. Check to see if you have all of the following parts:
- Rack (1)
- Cutlery/Silverware Basket (1)
- Inlet water hose (1)
- Drain hose (1)
- Screws (2)
- Clamping band (1)
3. Clean the interior surface with lukewarm water using a soft cloth.
PROPER PLACEMENT:
1. First determine the best location for your new dishwasher. It must be close to
a 120 Volt outlet and a sink with water supply and drainage system.
2. The minimum height clearance required to install your dishwasher on a coun-
tertop surface with overhead cupboards or kitchen cabinets is 17.8”. This counter-
top dishwasher is 17.7” in height.
6

BUILT-IN INSTALLATION DIAGRAM:
COUNTERTOP LAYOUT DIAGRAMS:
Water valve
Inlet hose
Drain hose
Dishwasher
sink
Hole size:
The counter
Dishwasher side Dishwasher side
Cupboard door
≥
≥
≥
≥
The direction of perforation 2.4 x 2.4in (60x60mm) according to
the position of the sewer
17.7in
450mm
17.9in
455mm
17.7in
450mm
21.7in
550mm
19.7in
500mm
19.7in
500mm
19.7in
500mm
17.7in
450mm
2.4x2.4in
60x60mm
17.9in
455mm
15.8in
400mm
21.9in
555mm
21.7in
550mm
7

Quick
connector
Inlet water
hose
Inlet water
connector
Tap
Connect Inlet
water hose
to the Inlet hose
connector
8
INLET WATER HOSE CONNECTION:
Connecting the Inlet water hose to the Tap:
1. Connect the Quick connector to the Tap.
2. Connect one end of the Inlet water hose to the Quick connector.
3. Connect the other end of the Inlet water hose to the Inlet hose
connector located at the back side of the dishwasher.
3
1
2

Connecting the Inlet water hose to the Water supply pipe:
Angle valve
Water supply hose
Valve
Inlet water
hose
Inlet water
connector
Attach
inlet water
hose to the
Inlet hose
connector
9

DRAIN HOSE CONNECTION:
LEVEL AND SECURE THE DISHWASHER:
Drain hose
Drain hose connector
Sewer
Drain hose
Dishwasher
Power outlet
Water Inlet hose
Water supply valve
Ensure that the appliance is leveled before operation; otherwise, it may cause an
overflow and electric leakage.
If the dishwasher does not seem level, you can adjust the adjustable feet to
balance the unit. Turn the adjustable foot clockwise to raise the height, and coun-
terclockwise to lower the height.
Bottom vent
21.6x2 in
550x50 mm
A properly loaded dishwasher is key for optimal performance. Never overfill the
dishwasher as it can reduce the unit’s efficiency. Improper placement of items can
also affect the dishwasher’s performance. Position the dishes and utensils so they
are secure during the wash cycle and will not be moved by sprayed water.
NOTE: DO NOT wash items that are not listed as dishwasher safe.
NOTE: Some types of glasses may become dull after a large number of washes.
NOTE: Silver and aluminum may tarnish or discolor during washing.
NOTE: Cast iron items may rust after being washed in a dishwasher.
For best performance, follow these guidelines when loading:
1. Scrape off any large amounts of leftover food. Soak burnt food in pans to
loosen. It is not necessary to rinse the dishes under running water.
2. Place items such as cups, glasses, pots/pans etc. face down so that water will
not collect in them.
3. Curved items, or those with recesses, should be loaded at a slant so that water
can run off.
4. All utensils should be placed in a manner so that they cannot tip over.
5. All utensils should be placed in the way that prevents them from interfering
with the spray arm during washing.
6. Items should not be inside one another or covering other items.
7. DO NOT let large glasses touch each other. Doing so may damage them.
8. Most silverware should be placed in the cutlery basket with handles down.
9. Small knives and sharp objects should be placed handle up to prevent injury.
10. Large sharp objects such as long-bladed knives can present a hazard and
should be placed horizontally in the rack.
11. DO NOT put small items that can fall out of the basket in the dishwasher.
12. DO NOT overload your dishwasher.
13. When pushing the basket back, do not let any sharp utensils cut the door
seal/gasket.
14. The top coating of the basket should not be scratched; otherwise, it may rust.
15. Move the spray arms manually after pushing the basket in, to check if the
spray arms can freely rotate.
1.6in
4 0mm
0.4in
10mm
15.7in
400mm
11in
280mm
Counter
10

USING YOUR ULTRA COMPACT
IMPORTANT! To get the best performance from your dishwasher,
read all operating instructions.
PRIOR TO USE:
LOADING THE DISHWASHER:
The following should be checked before starting the dishwasher.
1. The dishwasher is level.
2. The water supply is open.
3. There are no leaks at the connections.
4. The plug is connected securely to a properly grounded outlet.
5. The power is switched on.
6. The inlet and drain hoses are properly connected.
7. All packing and printed materials are removed from the dishwasher.
A properly loaded dishwasher is key for optimal performance. Never overfill the
dishwasher as it can reduce the unit’s efficiency. Improper placement of items can
also affect the dishwasher’s performance. Position the dishes and utensils so they
are secure during the wash cycle and will not be moved by sprayed water.
NOTE: DO NOT wash items that are not listed as dishwasher safe.
NOTE: Some types of glasses may become dull after a large number of washes.
NOTE: Silver and aluminum may tarnish or discolor during washing.
NOTE: Cast iron items may rust after being washed in a dishwasher.
For best performance, follow these guidelines when loading:
If the dishwasher is to be
built-in, after the dishwash-
er has been balanced, use
the two screws provided to
screw into the allocated
area on both sides of the
dishwasher to secure it to
the cabinet. Then put on the
side safety caps.
TIPS:
- After installation, save this User Manual for future reference.
- NOTE: Each product is tested before leaving the manufacturing facility. If you
notice a yellowish water during the initial use, do not worry. That is normal due to
water residue. We recommend running an empty cycle during initial use to remove
any foreign residue.
1. Scrape off any large amounts of leftover food. Soak burnt food in pans to
loosen. It is not necessary to rinse the dishes under running water.
2. Place items such as cups, glasses, pots/pans etc. face down so that water will
not collect in them.
3. Curved items, or those with recesses, should be loaded at a slant so that water
can run off.
4. All utensils should be placed in a manner so that they cannot tip over.
5. All utensils should be placed in the way that prevents them from interfering
with the spray arm during washing.
6. Items should not be inside one another or covering other items.
7. DO NOT let large glasses touch each other. Doing so may damage them.
8. Most silverware should be placed in the cutlery basket with handles down.
9. Small knives and sharp objects should be placed handle up to prevent injury.
10. Large sharp objects such as long-bladed knives can present a hazard and
should be placed horizontally in the rack.
11. DO NOT put small items that can fall out of the basket in the dishwasher.
12. DO NOT overload your dishwasher.
13. When pushing the basket back, do not let any sharp utensils cut the door
seal/gasket.
14. The top coating of the basket should not be scratched; otherwise, it may rust.
15. Move the spray arms manually after pushing the basket in, to check if the
spray arms can freely rotate.
11

A properly loaded dishwasher is key for optimal performance. Never overfill the
dishwasher as it can reduce the unit’s efficiency. Improper placement of items can
also affect the dishwasher’s performance. Position the dishes and utensils so they
are secure during the wash cycle and will not be moved by sprayed water.
NOTE: DO NOT wash items that are not listed as dishwasher safe.
NOTE: Some types of glasses may become dull after a large number of washes.
NOTE: Silver and aluminum may tarnish or discolor during washing.
NOTE: Cast iron items may rust after being washed in a dishwasher.
For best performance, follow these guidelines when loading:
1. Scrape off any large amounts of leftover food. Soak burnt food in pans to
loosen. It is not necessary to rinse the dishes under running water.
2. Place items such as cups, glasses, pots/pans etc. face down so that water will
not collect in them.
3. Curved items, or those with recesses, should be loaded at a slant so that water
can run off.
4. All utensils should be placed in a manner so that they cannot tip over.
5. All utensils should be placed in the way that prevents them from interfering
with the spray arm during washing.
6. Items should not be inside one another or covering other items.
7. DO NOT let large glasses touch each other. Doing so may damage them.
8. Most silverware should be placed in the cutlery basket with handles down.
9. Small knives and sharp objects should be placed handle up to prevent injury.
10. Large sharp objects such as long-bladed knives can present a hazard and
should be placed horizontally in the rack.
11. DO NOT put small items that can fall out of the basket in the dishwasher.
12. DO NOT overload your dishwasher.
13. When pushing the basket back, do not let any sharp utensils cut the door
seal/gasket.
14. The top coating of the basket should not be scratched; otherwise, it may rust.
15. Move the spray arms manually after pushing the basket in, to check if the
spray arms can freely rotate.
Cup
Water
glass
Serving
spoon
Serving Bowl
Bread and butter plate
Dinner plate
Serving
plate
Saucer
Soup bowl
Tea spoon
Fork
Knife
12

DETERGENT DISPENSER:
A properly loaded dishwasher is key for optimal performance. Never overfill the
dishwasher as it can reduce the unit’s efficiency. Improper placement of items can
also affect the dishwasher’s performance. Position the dishes and utensils so they
are secure during the wash cycle and will not be moved by sprayed water.
NOTE: DO NOT wash items that are not listed as dishwasher safe.
NOTE: Some types of glasses may become dull after a large number of washes.
NOTE: Silver and aluminum may tarnish or discolor during washing.
NOTE: Cast iron items may rust after being washed in a dishwasher.
For best performance, follow these guidelines when loading:
1. Scrape off any large amounts of leftover food. Soak burnt food in pans to
loosen. It is not necessary to rinse the dishes under running water.
2. Place items such as cups, glasses, pots/pans etc. face down so that water will
not collect in them.
3. Curved items, or those with recesses, should be loaded at a slant so that water
can run off.
4. All utensils should be placed in a manner so that they cannot tip over.
5. All utensils should be placed in the way that prevents them from interfering
with the spray arm during washing.
6. Items should not be inside one another or covering other items.
7. DO NOT let large glasses touch each other. Doing so may damage them.
8. Most silverware should be placed in the cutlery basket with handles down.
9. Small knives and sharp objects should be placed handle up to prevent injury.
10. Large sharp objects such as long-bladed knives can present a hazard and
should be placed horizontally in the rack.
11. DO NOT put small items that can fall out of the basket in the dishwasher.
12. DO NOT overload your dishwasher.
13. When pushing the basket back, do not let any sharp utensils cut the door
seal/gasket.
14. The top coating of the basket should not be scratched; otherwise, it may rust.
15. Move the spray arms manually after pushing the basket in, to check if the
spray arms can freely rotate.
Dishwasher detergent is necessary to remove food from dishes and help move it
out of the dishwasher. Only use detergents that are specifically made for dishwash-
ers. Fill the detergent dispenser before the start of each wash. ALWAYS add the
detergent just before starting the dishwasher to avoid it getting wet as that may
prevent it from dissolving properly.
DETERGENTS:
If powdered detergents that do not contain phosphate are used with hard water,
white spots may appear on dishes. If this occurs, add more detergent to the
dishwasher for better results. Detergents that do not have chlorine may not
completely remove food and spots from dishes. If this occurs, choose a wash
program with a higher temperature.
DETERGENT TABLETS/PODS:
Different brands of detergent tablets/pods dissolve at different rates. For this
reason, some tablets/pods may not fully dissolve and therefore may not fully clean
the dishes. When using tablets/pods, be sure to use a longer wash program to
ensure that the tablet dissolves and that all residual detergent is rinsed out of the
dishwasher.
To add the detergent powder, or a tablet/pod:
1. Press the release button on the detergent compartment.
2. The cover will open.
3. Add a detergent powder, or a tablet/pod.
4. Close the cover.
A: Powder
B: Tablet
1
3
WARNING: DO NOT allow any item to stick out below the dish rack as that may
interfere with the spray arm and damage the dishwasher.
WARNING: DO NOT load any sharp objects point up. Place them point down or
lay them horizontally in the rack.
ALWAYS position the dishes and cookware in a manner that will prevent them
from being moved by spraying water.
13

OPERATING THE DISHWASHER
• To operate the dishwasher, load the basket as described in previous instruc-
tions, add the detergent and rinse aid based on the wash cycle being chosen, close
the door and press the On/Off button.
• Press the Program Select button to filter through wash cycles and choose the
one you want: INTENSIVE >> NORMAL >> ECO >> GLASS >> RAPID
• Press the Start/Pause button, and the dishwasher will start.
NOTE: When you press the Start/Pause button to pause the wash cycle, all the
lights on the display will illuminate, and the program will pause until you restart it.
NOTE: If you open the door while the dishwasher is running, the unit will pause the
wash cycle. When you close the door, the wash cycle will continue.
FILLING THE RINSE AID DISPENSER:
The rinse aid is released during the final rinse to prevent water droplets that can
leave spots and streaks from forming on your dishes. It also improves drying by
allowing water to ‘sheet’ and drain off the dishes. Your dishwasher is designed to
use liquid rinse aids. The rinse aid dispenser is located on the inside surface of the
door next to the detergent dispenser.
When the Rinse Aid compartment needs refilling, the indicator light will illuminate
on the display panel.
The amount of rinse aid released can be adjusted. The default settings is 3.
Larger value means increasing the dosage, and vice versa. Turn the arrow adjuster
inside the dispenser to the desired setting by either using your fingers or inserting
a flat-blade screwdriver into the center of the arrow and turning.
Wipe up any spills
with a cloth
slot type screwdriver
NOTE: If the surface of the dishes feel greasy after a cycle, lower the rinse aid
settings and wash again.
Press the button
to select the desired
program
Start wash cycle by
pressing button
Close the door of the
dishwasher and start the appliance
by pressing for one second
14

WASH CYCLE TABLE:
CHILD LOCK:
NOTE: For better washing results when using the Eco program, it is recommend-
ed to add 1/2 of detergent powder directly into the interior of the dishwasher, and
another 1/2 into the detergent dispenser.
NOTE: The detergent is not necessary for the Rapid program.
With the child lock feature you can prevent any program from being unintentional-
ly terminated, and door opened (e.g. improper operation by children).
To activate the lock button: Hold down the Delay/Child lock
button for 3 seconds until “Lock” is illuminated on the digital
display.
To deactivate the button lock: Hold down the Delay/Child lock
button for 3 seconds until the “Lock” light turns off.
DELAY FUNCTION:
The start of the dishwasher can be delayed between 1 and 24 hours, with adjust-
ment in one-hour increments.
Eco
Normal
Intensive
Glass
Rapid
2:25
1:10
2:10
1:40
0:25
Part dried, common household
food remnants
Little dried, normal household
food remnants
Very adhesive burned-on or
dried-on food remnants
Slightly adhesive, temperature-
sensitive plastic and glasses
Fresh food remnants, Light and
less oil
0.8oz / 23g
0.8oz / 23g
0.8oz / 23g
CONSUMPTION OF
DETERGENT
WASHING POWDER
TYPE OF SOILING TIME
CYCLE
PROGRAM
0.8oz / 23g
(or no detergent)
0.4 + 0.4 oz /
11.5 +11.5 g
15

CARE AND MAINTENANCE:
HOW TO MAINTAIN YOUR DISHWASHER:
After each use, leave the dishwasher door slightly ajar so that any moisture and
odor are not trapped inside the appliance.
CLEANING THE DISHWASHER:
To clean the exterior and rubber parts of the dishwasher, do not use solvents or
abrasive cleaning products. Rather, use a soft wash cloth and warm soapy water.
To remove spots or strains from the interior surface, use a soft wash cloth damp-
ened with water and a little white vinegar, or a cleaning product made specifically
for dishwashers.
CLEANING THE DOOR:
Use only a soft, damp cloth with warm water to clean the edges around the door.
To avoid penetration of water into the door lock and electrical components, do not
use a spray cleaner of any kind.
FILTER SYSTEM:
For best performance and results, the filter must be cleaned regularly. For this
reason, it is a good idea to remove the larger food particles trapped in the filters
after each wash cycle by rinsing the filters under running water.
NOTE: It is recommended that the filter assembly should be cleaned once a week.
WARNING: Never run the dishwasher without the filter in place!
The display shows the delay time
Steps:
Select suitable
program 1 hr increments
Delay start Press button to delay the
start of the program
Press button, the display repeatedly
shows H:00 H:01...H:24. Select delay start
time. If press for 3 seconds, the screen
will be reset to H:00, which means no
preselection.
Start the appliance
16

CLEANING THE SPRAY ARMS:
The spray arm can be easily removed for periodic
cleaning of the nozzles to prevent possible clogging
and limescale buildup.
Remove the spray arm by grasping the middle and
pull upwards. Wash the spray arm under running
water and carefully reinstall making sure the rotary
movement is in no way impeded.
NOTE: If spray arms water holes are blocked, use a
thin wire to remove the blockages out of the holes,
or flush the holes with water.
Please take frost protection measures during the winter months. Please follow
these procedures after each wash:
1. Turn off the dishwasher.
2. Turn off the water supply and disconnect the water inlet hose from the back of
the unit.
3. Drain water from the inlet hose and inlet port - use a pan to catch the water.
4. Reconnect the water inlet hose to the inlet port.
5. Remove the Stainless steel filter (see “Filter System” above), and use a sponge
to absorb the water in the sump.
NOTE: if your dishwasher cannot operate due to ice, please contact a service
professional.
PROTECT AGAINST FREEZING:
1. Rotate the filter assembly counterclockwise, then
lift upward.
2. Remove the stainless steel filter from the filter
assembly.
3. Rinse the filter assembly and stainless steel filter
with running water.
4. After cleaning, position the stainless steel filter
back to its place. Insert the filter assembly back into
the stainless steel filter, and turn clockwise to lock in
place.
17

PREPARATION FOR STORAGE:
It is recommended you run a wash cycle with the dishwasher empty. Disconnect
from power and turn off the water supply. Remove any water remaining in the sump
area with a sponge. Leave the door slightly open, this will help the door seals to last
longer and prevent odors from forming inside the dishwasher.
MOVING THE DISHWASHER:
If the dishwasher must be moved, try to keep it in the upright position. Never
position the dishwasher on its side or upside down.
TROUBLESHOOTING:
Thermistor short circuit
The appliance is not
heating
Please contact authorized service provider.
1. Ensure tableware is placed correctly. Water
can get trapped in a plate/bowl.
2. Please contact authorized service provider.
Please contact authorized service provider.
1. Lean the appliance about 30°to 45°to pour
out excess water from the bottom plate.
2. Check if the drainage pipe is placed too high.
3. Check if the pipe is blocked.
4. Check if the appliance is properly
positioned/level.
5. Exclude above causes, and and restart the
appliance.
Please contact authorized service provider.
1. The valve is not fully opened.
2. Small inflow and low water pressure.
3. Start-up multiple times in case of water
shortage.
4. Please contact authorized service provider.
Error
code Cause Solution
Overflow
Inlet valve failure
Water inflow abnormal
Heating function abnormal
18
Table of contents
Other Mueller Dishwasher manuals