Munchies Vibe User manual

The Future of Predictability
INSTRUCTIONS FOR USE

MUNCHIES® VIBE has been created to ensure the very best outcome
in your clear aligner therapy treatment. It is designed to:
Indications for Use: The MUNCHIES® VIBE is used to assist in seating thermoplastic orthodontic aligners
or retainers. MUNCHIES® VIBE is also used to ensure that orthodontic tooth movements occur as predictably
and comfortably as prescribed by your Doctor. You may experience excessive saliva production during use.
Contraindications: None known
Warnings: Use of excessive pressure to seat the aligners or retainers may cause damage to either the
device or the aligners.
Precautions: This device is designed for intra-oral use only.
Adverse Reactions: None known Page 2
1. Wrap around each tooth to help aid in the acceleration of tooth
movement;
2. Optimize seating of your aligners;
3. Help increase the predictability of orthodontic tooth movements;
4. Shorten treatment time and refinements.

Charge me - 2 to 4 hours
QUICK START GUIDE
Plug in the USB cable to the back of the case and
connect the USB cable to a USB adaptor or USB
port (computer/powerboard).
The Green light will blink when the Hub is
charging, Red light indicates power on.
Remove hub from the tray and
select attachment
Connect 1 or more attachments to the Hub, see
page 6.
Insert your aligners and seat with
Munchies® EPS
Gently bite down on the Munchies EPS device
and work the aligner into place, see page 8.
To start the Vibration, press in the center
of the Hub
Lights indicate the speed the VIBE is on (choose 1, 2, or 3)
Select the Anterior Nodular Attachment to begin
Gently engage your front top/bottom teeth in the center
of the nodular attachment and hold there for 2 mins.
Repeat. See page 7 for further instructions.
Note: VIBE is on an automatic 2min timer.
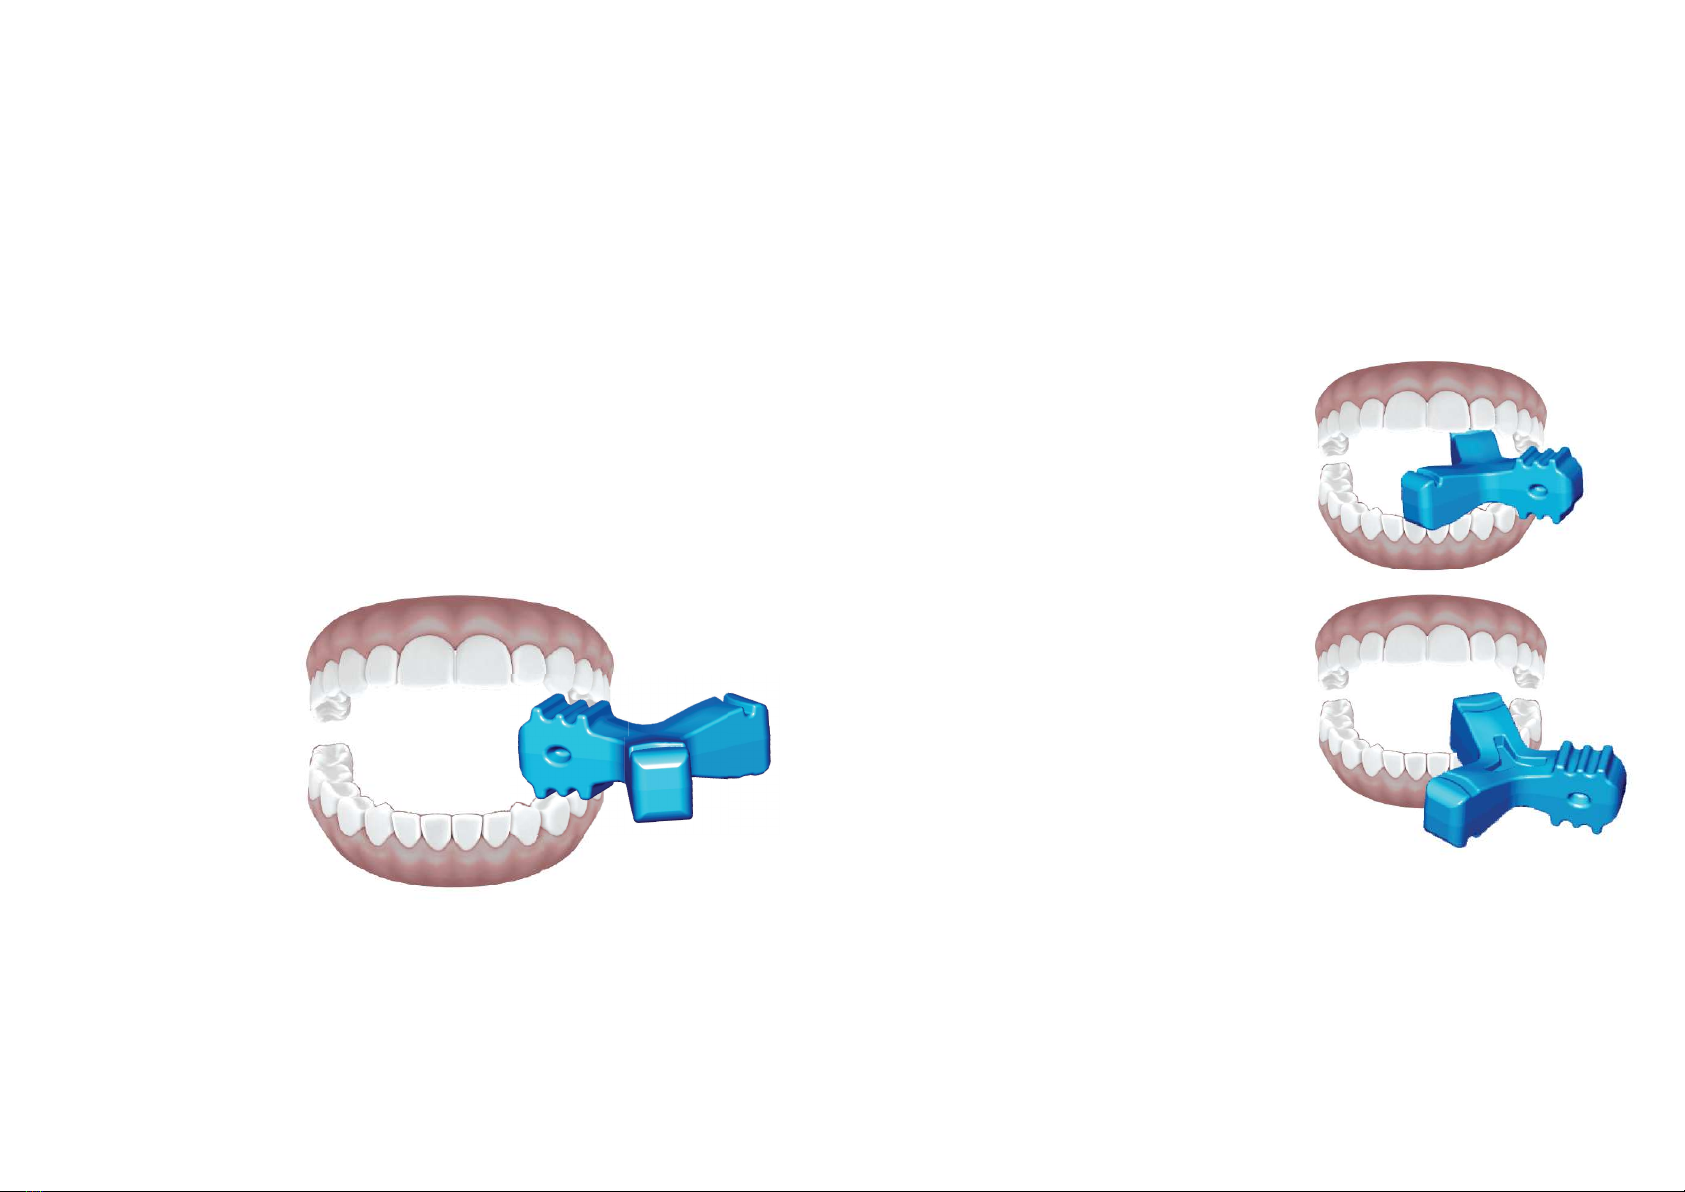
Select the Posterior Nodular Attachment
On one side of your mouth, gently engage your back
top/bottom teeth on the nodular attachment and
hold there for 2 mins, swap to the other side of your
mouth for 2 mins. Then repeat on both sides again.
See page 7 for further instructions.
Page 3
To turn off the Vibration, wait 5 seconds, then
press in the center of the Hub.

MUNCHIES® VIBE
components
Anterior
Nodular
Attachment
Vibrating
Hub Upper
Grooved
Attachment
Lower
Grooved
Attachment
Posterior
Nodular
Attachment
Page 4

Nodular Attachments Grooved Attachments
Vibrating Hub
- Vibrating Hub to connect
to the attachments.
- 3 speeds to choose from
- splashproof
- Anterior
attachment for
your front teeth
(upper and
lower)
- Posterior
attachment for
your back teeth
(upper and lower)
- Large grooved
attachment for
your upper teeth
- Small grooved
attachment for
your lower teeth
Page 5
Gently press the
center of the Hub
to turn on the
device.
2 min
timer

How to connect the attachments
Select any attachment from the tray
and connect to the Hub by gently
guiding it over an arm.
All attachments fit on any of the Hubs’
three arms.
Attachments can be easily removed
by gently holding the attachment and
disconnecting it from the Hub.
Gently guide the
attachments onto
the Hub arms
Remember to store the attachments in the tray after removal and cleaning
Page 6

How to engage your teeth on the attachments
As shown in the image to the right, gently engage your
front top/bottom teeth in the center of the nodular
attachment and hold there for 2 mins. Repeat again.
Note: VIBE is on an automatic 2 min timer.
As shown in the image to the right, on one side of your
mouth, gently engage your back top/bottom teeth on
the nodular attachment and hold there for 2 mins,
swap to the other side of your mouth for 2 mins.
Then repeat on both sides again.
Anterior Nodular Attachment
Posterior Nodular Attachment
Page 7

With your aligners in place, put
your top teeth into the bigger
groove on the Munchies® EPS
and bite your lower teeth
against it. Bite on all your front
teeth for about 20 seconds each.
2.
With your aligners in place, put
your bottom teeth into the
smaller groove on the
Munchies® EPS and bite your
top teeth against it. Bite on
all your front teeth for about
20 seconds each.
3.
With your aligners in place, put the ridged end
of the Munchies® EPS between your upper and
lower back teeth on one side of your mouth and
bite up and down for 30 seconds.
You will feel the aligner fit far better.
Repeat on the other side of your mouth.
1.
Repeat this process each time you re-insert
your aligners.
4.
How to seat your aligners with Munchies EPS
Page 8

IMPORTANT SAFEGUARDS
READ ALL INSTRUCTIONS BEFORE USE
Read this user manual carefully before using
the device and save it for future reference.
Always follow safety precautions when you
use any electrical product, especially when
children are present.
DANGERS
To reduce risk of electrocution or fire:
VOLTAGE
DO NOT plug the device into an outlet with a voltage
other than specified. Voltage converters DO NOT
guarantee voltage compatibility.
Never force the plug into an outlet; if it does not easily
fit into the outlet, discontinue use.
WATER
DO NOT submerge the charging case in water.
DO NOT place or store the charging case where it can
fall or be pulled into a bathtub, sink or toilet.
DO NOT reach for a charging case that has fallen into
water. Unplug immediately.
DO NOT use while bathing. Unplug the charging base
before cleaning and assure that it is dry before plugging
into an electrical outlet..
WARNINGS
1. Discontinue use if this product appears damaged in
any way (hub, charger). This device contains no
serviceable parts. Refer to page 12 for Troubleshooting
tips if your MUNCHIES® VIBE no longer works properly.
2. Never use the charger if it has a damaged cord or
plug. Keep away from heated surfaces.
Page 9

3. Avoid using a attachment with damaged nodules.
Damaged nodules may break off when in your mouth.
Replace the nodule head with a new one every 6
months or sooner if signs of wear appear. Inappropriate
cleaning may cause nodule damage.
(See page 11 ‘Cleaning’).
4. This device is designed to gently vibrate your teeth
only. Use this device only for its intended use as
described in this booklet. Discontinue use of this device
and contact your dentist/orthodontist if discomfort or
pain is experienced.
5. Children should be supervised to ensure that they do
not play with the appliance. There is a risk of
strangulation with the UBS cable.
6. MUNCHIES® VIBE is a personal care device and is
not intended for use on multiple patients in a dental
office or institution.
7. Do not tamper with the device and expose the battery and
risk chemicals being released.
8. Do not use attachments other than those recommended
by the manufacturer.
9. Do not clean the MUNCHIES® VIBE heads or the charger
in the dishwasher.
MEDICAL WARNINGS
1. Advise your dentist before you use this product if you have
had oral or gum surgery in the previous two months.
2. Address questions concerning usage with a pacemaker or
other implanted device to your physician or the implant device
manufacturer.
3. Munchies® VIBE has been tested and is compliant with
safety standards for electromagnetic devices.
Page 10

Maintenance & Cleaning
The Hub is waterproof, so it can be submerged in water
when cleaning. DO NOT submerge the Charging case
in water, wipe with a damp cloth and dry after. Prior to
use, rinse the Attachment heads under warm water for
at least 10 seconds.
After rinsing, dry and place the Attachments in the carry
case. MUNCHIES® VIBE attachments can also be gently
scrubbed with your toothbrush and toothpaste or
placed in an Ultrasonic cleaning bath.
Page 11
Wear & Lifespan
Chewing too aggressively or too often on the attachments
can cause damage to them. Premature tearing is generally
due to overuse or too great a force being applied.
Torn attachments should be replaced immediately.
Each head should last approximately 3-4 months.
Battery Recycling
The vibrating hub contains a Lithium Ion battery. The
battery must be recycled or disposed of properly.
The battery inside the MUNCHIES® VIBE cannot be
replaced, at the end of the life of the MUNCHIES® VIBE,
please hand in at an official collection point for recycling.
By doing this you are helping to protect and preserve
the environment.
Storage & Transportation
The charging case has been designed to store and charge
the Hub and hold the attachment heads when not in use.
If the device is not to be used for an extended period of
time it should be unplugged from the electrical outlet,
cleaned, stored in a cool, dry area, away from direct
sunlight. The USB cable should be curled in an
organized manner.

TROUBLESHOOTING
1. The device does not start
Ensure you have charged the device for at least a few hours, and you are applying enough pressure
in the center of the Hub to activate the vibration.
2. Why are there 3 speeds?
The device offers 3 different speeds so patients can select a speed that they find comfortable. You can
change the speeds within 5 seconds of activating the Hub, after 5 seconds has elapsed, another press
of the Hub will turn off the device.
3. How do I turn off the device?
The device can be turned off after 5 seconds has elasped from activating the Hub.
4. One of the attachments has broken
Ensure you are not biting aggressively on the heads. If you need replacement heads, please request them
from your doctor or purchase online at www.orthomunchies.com
Page 12

Manufacturing Quality
The Munchies® VIBE device has been manufactured using FDA approved biocompatible
and medical grade plastics, pigments and silicones.
The Munchies® VIBE has been designed in Australia and is manufactured in China.
CUSTOMER SERVICE INFORMATION
If you have any questions after reading this instruction booklet, feel free to contact us.
Customer Care: USA ph: 844 808 8272
Australia ph: 1300 688 565
Page 13

Page 14
BLANK PAGE

Page 15
BLANK PAGE

For more information visit: www.orthomunchies.com
Page 16 Revision Number: 2019.11.01
Manufacturer: EOCA MD Pty Ltd - 16 Transvaal Avenue, Double Bay NSW 2028 Australia
Sponsor: David Penn Consulting Pty Ltd - 16 Transvaal Avenue, Double Bay NSW 2028 Australia
EU Rep: MT Promedt Consulting GmbH - Altenhofstrasse 80, 66386 St. Ingbert, Germany
Distributors: USA Esthetic Orthodontic Company of America LLC , www.eocamerica.com
2860 Scherer Drive North, Suite 650 St. Petersburg, FL 33716, USA
Australia 1122Corp Pty Ltd, www.1122corp.com
32/19-25 Flinders Road, Earlwood NSW 2206 Australia
Portugal Clear Alignment Lda, http://www.4aligner.com/
Rua da Natária, 4, 2560-046 Torres Vedras, Portugal
Customer Care: USA ph: 844 808 8272 / Australia ph: 1300 688 565
Table of contents
Popular Dental Equipment manuals by other brands

Ivoclar Vivadent
Ivoclar Vivadent IvoBase Injector Short instructions

3Disc
3Disc Heron IOS quick start guide

Dentsply Sirona
Dentsply Sirona CEREC AC operating instructions

DENTSPLY
DENTSPLY Multimat Easy Instructions for use

AMD Lasers
AMD Lasers PICASSO Operating instructions manual

KaVo
KaVo SURGmatic S201 C Instructions for use

Denstply Sirona
Denstply Sirona Schick 33 Getting started

Pulpdent
Pulpdent BioACTIVE-RESTORATIVE quick start guide

KaVo
KaVo KaVo UniK use instructions

NSK
NSK Ti-Max X500L Operation manual

KaVo
KaVo MASTERmatic LUX M10 L Instructions for use

Dentsply Sirona
Dentsply Sirona CEREC Zirconia meso Processing instructions