MUSITEL 742 User manual

Musitel 742
Alarms and commands by SMS
Users Manual
Configuration of the alarm transmitter
Software version 1.20 and above
06-06-2011

Index
Preparing the Sim Card .................................................................................................. 3
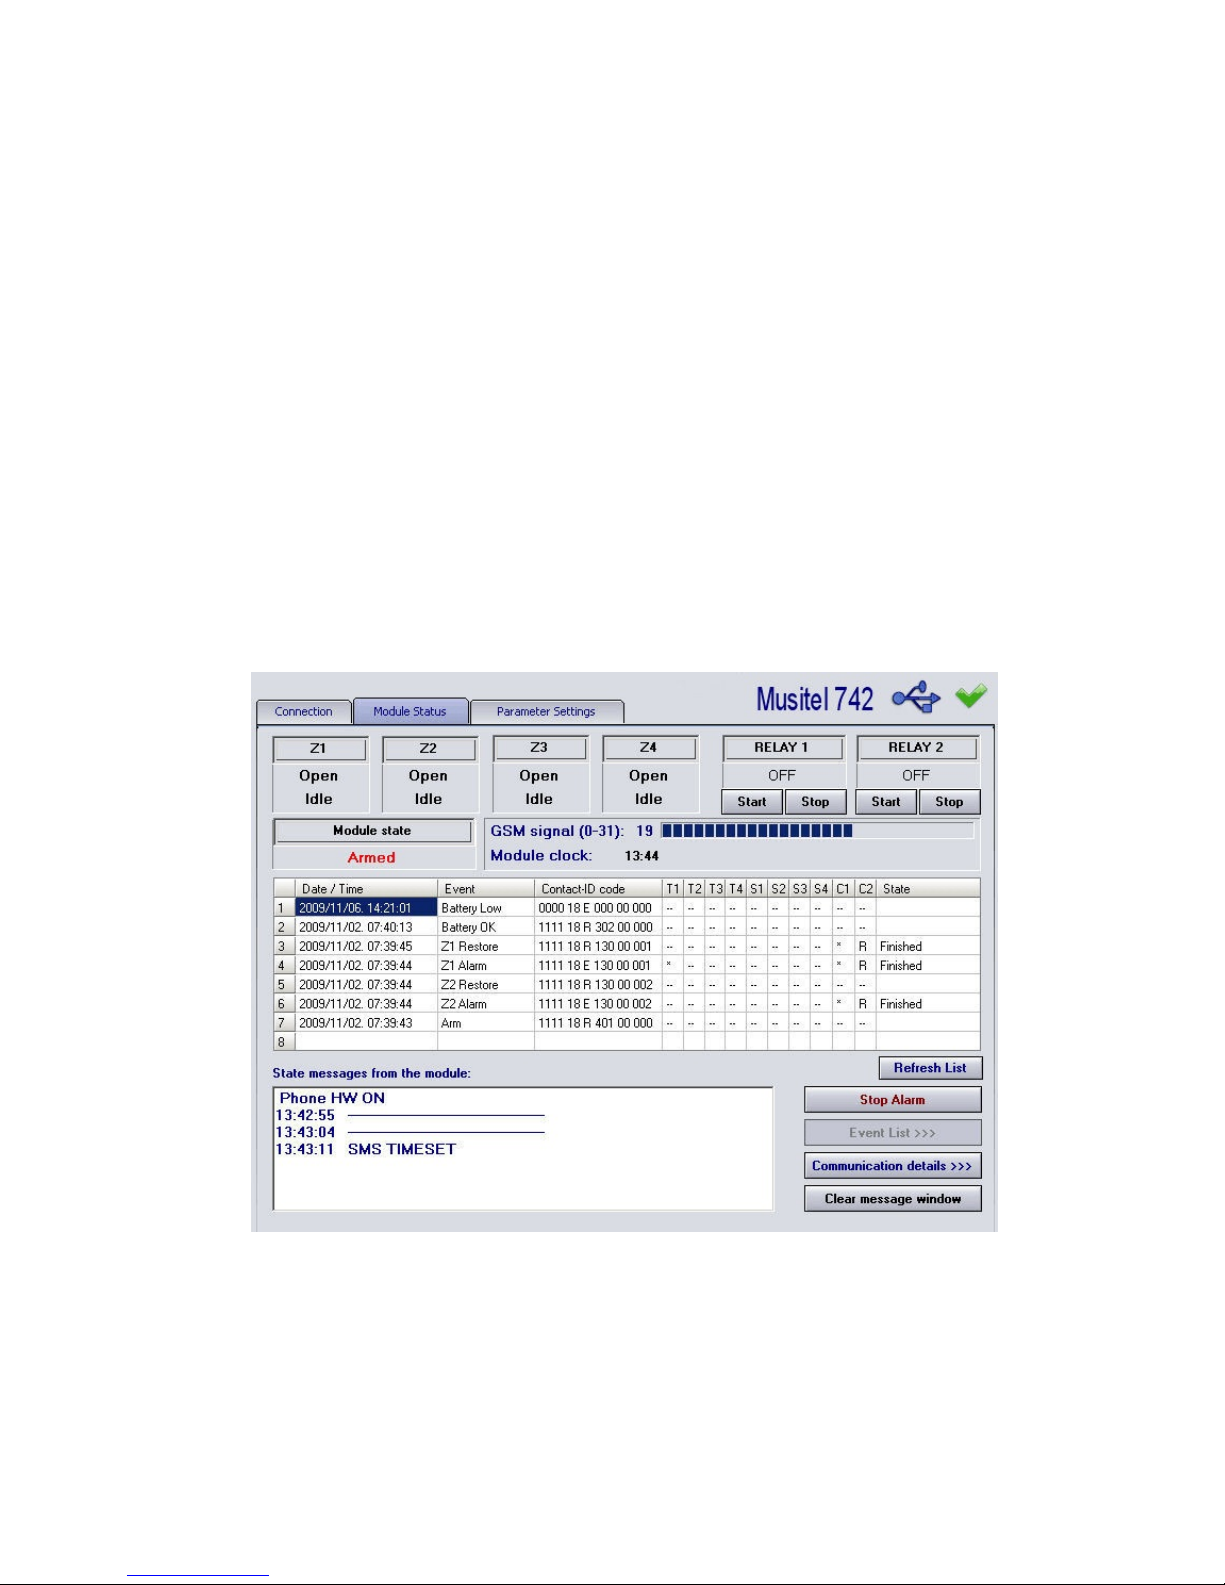
“Module Status” Screen ................................................................................................... 4
Configuration of the Musitel 742 ...................................................................................... 5
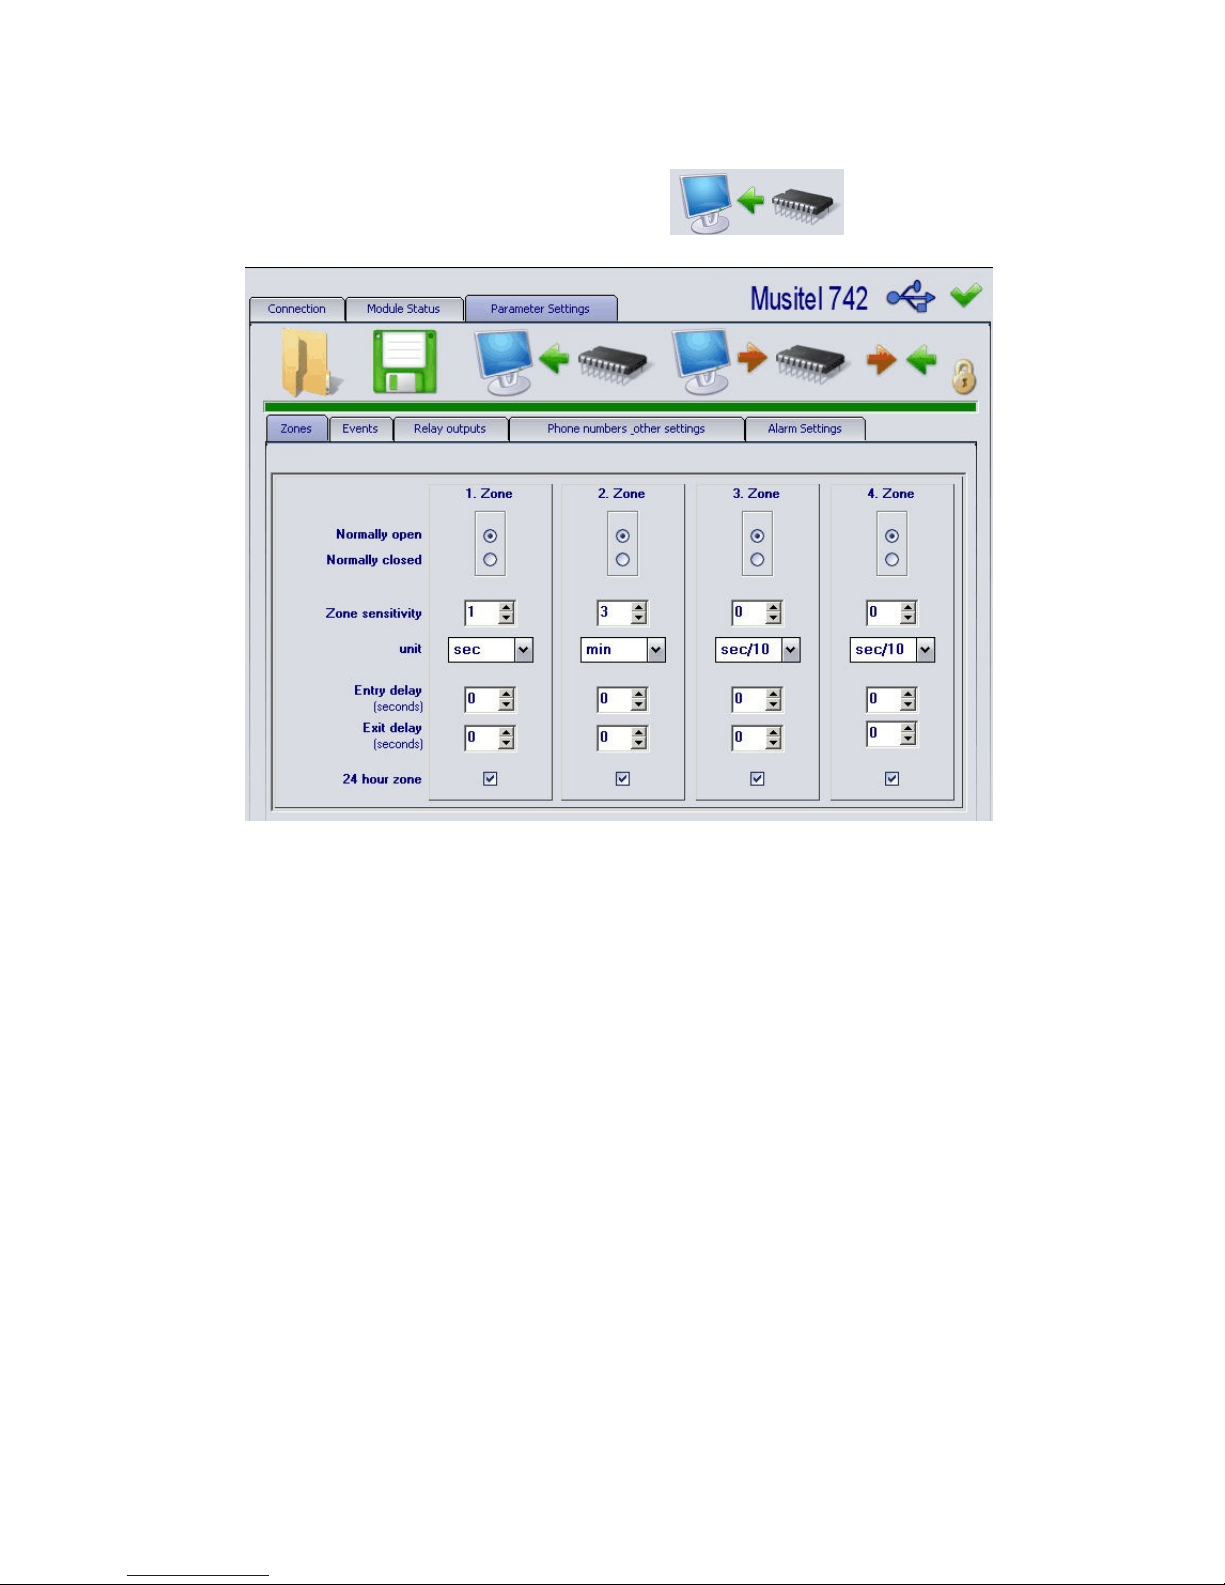
Alarm Inputs ..................................................................................................................... 6
Events Screen .................................................................................................................. 7
“Phone numbers....” Screen .............................................................................................. 8
“Relay outputs” Screen ...................................................................................................... 10
“Alarm Settings” Screen ..................................................................................................... 12
Changing the password ..................................................................................................... 14
“Event list” Screen ............................................................................................................. 15
Recording a voice message by using a telephone call ..................................................... 16
Command and verify the status of the relays by a telephone call ..................................... 18
Arm - Disarm, the unit by using a telephone call ............................................................... 19
Save the telephone numbers by SMS ............................................................................... 20
Command and verify the status of the relays by SMS ...................................................... 23
Verify the current status of the Musitel unit by SMS ......................................................... 25
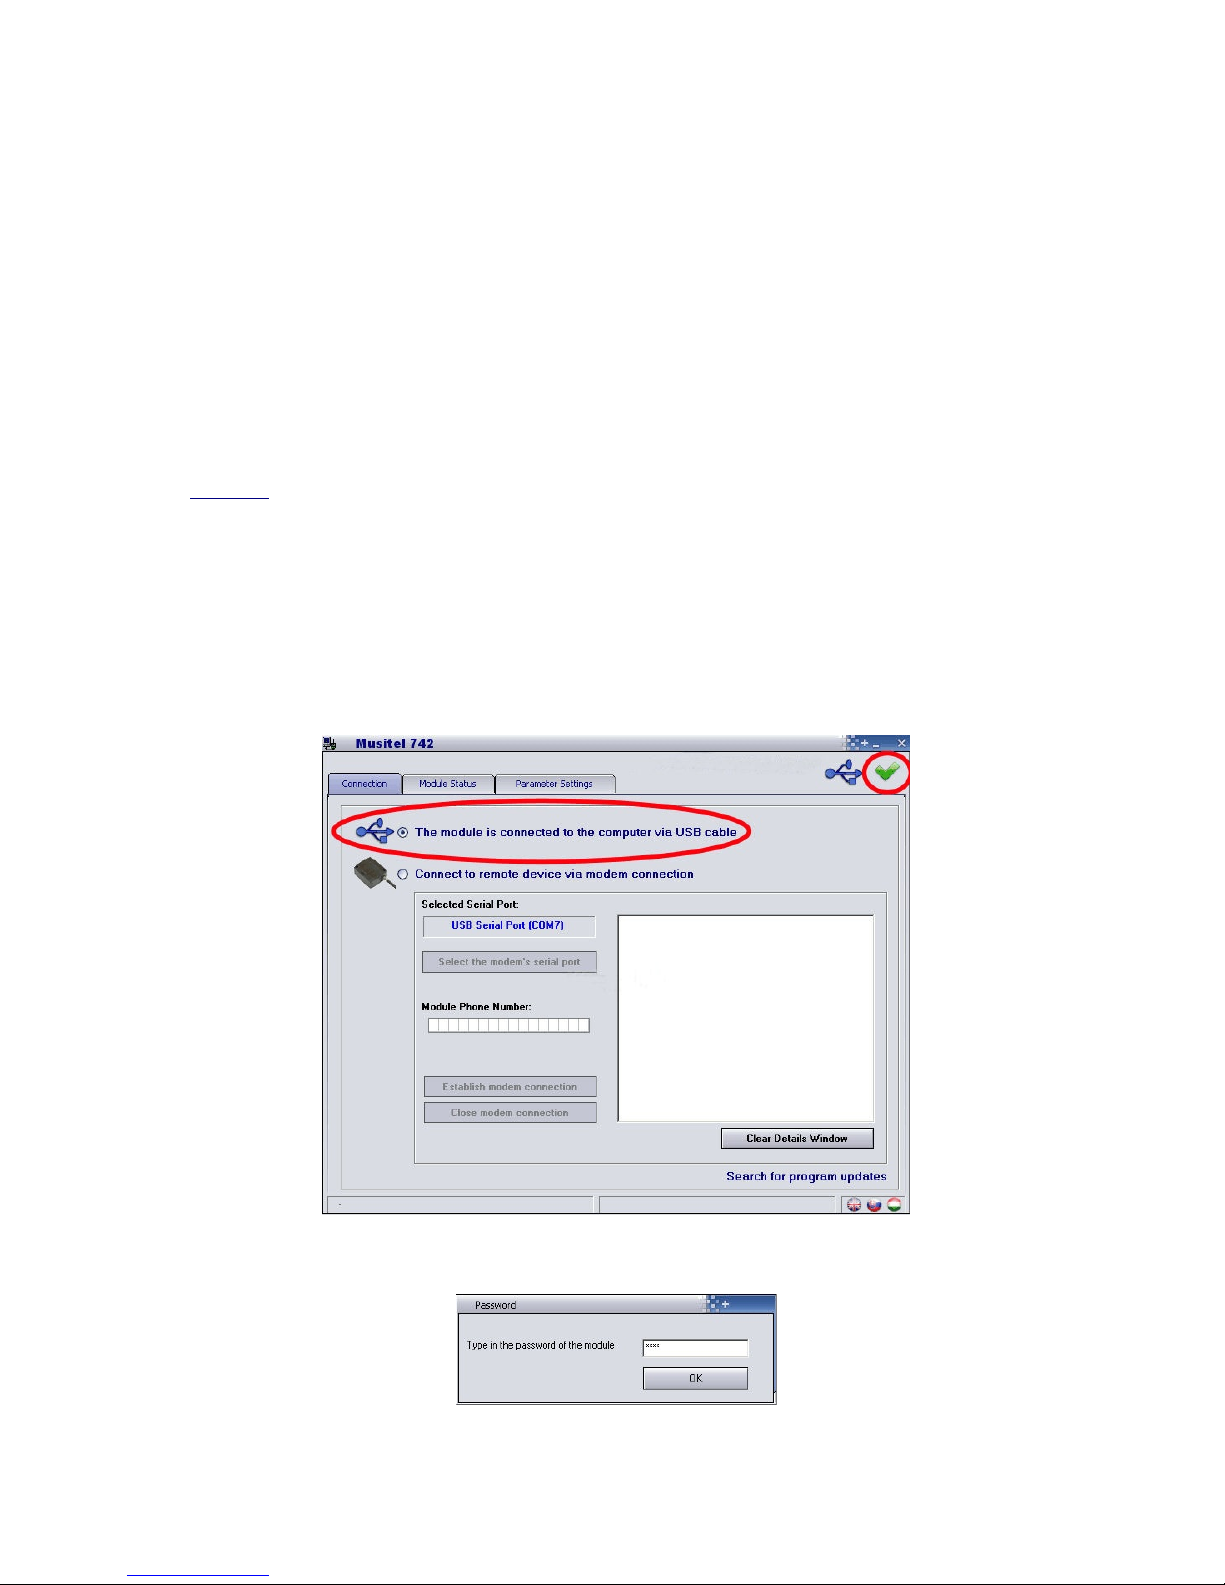
Connecting the Musitel ...................................................................................................... 26
Light signals ....................................................................................................................... 26
Commands by telephone calls ........................................................................................... 27
SMS Commands ................................................................................................................. 28
Technical Characteristics.................................................................................................... 30

Preparing the SIM card
a) Preparing the SIM card :
- Using an ordinary GSM, dial a number, for example a free of charge number. This will
empty the SIM card memory of sent SMS.
- Desactivate the PIN number; the GSM must go directly into operation and log on to the
network when turning it on, it must not ask for a PIN number.
- Desactivate the voice-mail functions. Caution: Usually, the voice-mail is activated for
all new SIM cards.
b) Insert the SIM card in the equipment.
The supply line and the USB cable MUST be unplugged before inserting the SIM card in
its place.
The same must be respected to take out the SIM card.
When the led indicator blinks alternating between red and green, the equipment has
logged onto the GSM network.
Caution :
If by distraction you have inserted or taken the SIM card out while the Musitel was
plugged into a power supply, you must, by using an ordinary GSM, make a phone call
where the person being called answers. This will unblock the SIM card..
c) Connect the equipment to the PC by using the cable supplied in the package.
d) Click on “The module is connected to the computer via USB cable”
While the icon Uappears, the Musitel 742 is connected.
e) Type in the password if needed. Default password: “1111"
f) Choose the « Module Status » tab”
Page 3

“Module Status” Screen
a) “GSM signal” : shows the quality of the GSM signal..
b) Z1 à Z4 are the inputs.
Idle = input is on idle (no alarm is present)
Alarm = an alarm has been detected at an input.
c) Relay 1 and 2 are the relays that can be activated at a distance.
ON = the relay is active
OFF = the relay is inactive.
d) “Last 8 events”: gives the last 8 status changes and/or actions.
e) “Module clock” :gives the actual time of the Musitel 742.
f) “Communication details” :
allows visualizing the internal commands of the
Musitel. This screen is used only for «Troubleshooting», for example to analyze
the events when faults have been detected.
As long as you are connected to the Musitel, either by USB cable or Modem, you can
follow in real time, the commands received and the messages sent by the
equipment.
You can see the actual status of the input alarms as well as the status of the relays.
g) Choose the “Parameter Settings” tab
Page 4

Configuration of the Musitel 742
To read the existing configuration of the Musitel 742.
After reading, a green horizontal bar must appear underneath the
icone.
To write the new configuration for the Musitel 742
To save the existing configuration on a file on the PC.
To open a configuration file.
To change the password. Default password : 1111
To compare the parameters with those of the Musitel 742
Page 5

Alarm Inputs
a) Choose the “Zones” tab
Before modifying the Musitel configuration, it is wise to start by reading the
existing configuration by using the icon
a) Zone
Normally Open = at the rest position, the input is “in the air”,
Normally closed = at the rest position, the input is linked to the ground.
The input is connected to the V- of the equipment
b) Zone sensitivity + unit = The alarm must be present for X seconds before
it is valid.
Default setting : 1 second. It can be modified between 1/10 of a
second and 254 minutes.
c) 24 hr zone = active 24h/24.
If this case is checked, the alarm inputs will be active 24h/7, no
matter if the equipment is Armed (Arm) or Disarmed (Disarm).
See Arm - Disarm.
d) Entry delay = 0 to 254 sec.
It is used when the “Arm – Disarm3 function is activated.
It allows a delay to activate the alarm, this will give some
flexibility in case the alarm is temporary, for example.
d) Exit delay = 0 to 254 sec.
It is used when the “Arm – Disarm3 function is activated.
It allows ignoring the alarm for X seconds before activating the
alarm (Arm).
Page 6

“Events” Screen
Actions to take in case of activation of one or more inputs.
a) T1, T2, T3 and T4 : Choose the numbers that should be called to send the voice
messages.
b) S1, S2, S3 and S4 : Choose the numbers to which an SMS should be sent.
c) “Z1 Alarm” : a message will be sent when there is an alarm.
“Z1 Restore” : a message will be sent when the alarm has been restored.
d) “Battery Low” : Sends an alarm when the battery voltage of the Musitel is
lower than 11.8 V or 23.6 V for more than 60 seconds.
“Battery OK” : Sends an alarm when the battery voltage of the Musitel is at
normal level, above 11.8 V or 23.6 V for more than 60
seconds.
This function is useful when a battery is used.
e) The “Voice msg” box :
if checked, it indicates that a voice message must be sent
(it must be recorded in advance) instead of the beep and
siren message..
f) “Contact ID code” and “Central”
must be activated when the Musitel is used in combination
with an Alarm Center..
Page 7

“Phone numbers....” screen
a) In case of alarm, the equipment can call 4 numbers to send either an SMS or a
voice mail.
b) Acknowledgement : requests the acknowledgment of the alarm, it concerns the
voice messages received. If there is no acknowledgment of the alarm, the
transmitter will continue to call.
0 - No ack. If this response is chosen, there is no action to be taken. The
equipment will continue to call the other numbers.
1 - r= ack When there is a call made by the equipment, you must answer and dial
rto stop the alarm. The other numbers will also be called. If you do
not acquit the alarm, you will be called until the alarm is acquitted
2 - r=ack., # = stop rto acquit the alarm
#to stop the calls to the other numbers
If you dial rpassword#, you will stop the transmission of all alarms that could
be present in the other inputs.
c) Caller ID : It applies when commands will be sent to the equipment in order
to activate or deactivate the relays, as well as to save voice messages.
0 - None: The password is required to access remote control and send
commands.
1 - No pwd req : The password is not required to access remote control and
send commands.
2 - Relay2 ON :Activates the relay 2 by recognizing the CLIP of the caller.
The call is free of charge.
3 - Relay2 On + pick up :
Activates the relay 2 and then it answers the call in
order to allow reception of other remote control commands.
Page 8

d) SMS forwarding : it is the number(s) to which the SMS received by the SIM card
will be transferred. It can be useful for the pre-paid cards which receive SMS's
with the available credit.
e) Monitoring station Phone numbers : It is useful when used with Alarm
Centers. Not used in this application.
Page 9

“Relay outputs” Screen
The relays can be commanded either
- by sending an SMS with or without an SMS confirmation in return;
- by a telephone call from one of the 4 numbers previously saved;
- by a telephone call from any phone number, protected by a password;
- by relationship to the status of one or several alarm inputs;
- by using the “Start” and “Stop” keys on the “Module Status” screens while
connected by a USB cable or by modem.
a) 00. Control through phone call
The relays 1, 2 or both of them can be on remote control by calling the unit.
If these cases are not checked, it is impossible to control the relays by using a
telephone call, but it can be done by SMS.
01. Z1 Alarm, 02 Z1 Restore, 03 Z2 Alarm, .......
The activation of one or several alarm inputs will activate one or more relays.
The same situation is valid when the inputs return to the normal status.
b) Max ON time (0-255 sec)
Timer function, from 1 to 254 seconds :
When the command is received, the relay will change position and hold the
position for the amount of time chosen and then it will return to its normal position.
Page 10

Bi-stable function :
If the chosen value is 255, the relay will work in the bi-stable function.
Once the relay is activated it will not come back to its normal position automatically.
In order to change its position, a command must be sent either by a telephone call or
by an SMS.
c) Turn off relays 1 (2) on Disarm :
This function will force the relays 1 or 2 to their normal position when the
equipment is disarmed.
This function is not active if the mode “Always Armed” has been chosen.
d) Beep on Arm/Disarm :
The relays close shortly, 1 time when arming the unit and 2 times when disarming
the unit. This function is used to activate a horn or light to signal that the unit has
been armed or disarmed.
e) Relay 2 indicates GSM fault
The relay 2 will close when the unit is not logged onto the GSM network
Note:
When the unit is in “Always Armed” mode, the relays that are in bi-stable and the
boxes “Control via phone call” are NOT checked, once one of the relays is
activated it will not be possible to deactivate it by a telephone call. The relay must be
deactivated either by using the installation software, unplugging the unit or by
sending an SMS.
Page 11

“Alarm Settings” screen
a) Arm/Disarm method
Arm = arming.
When the unit is “armed” all functions are active all the time.
Disarm = desarming
When the unit is “disarmed”, only the inputs checked for 24hr/24 will be active all
the time. The other inputs will be active only when the unit is armed.
Arming and disarming the unit allows monitoring the situation, for example, only
when the building is empty. .
0 Always Armed : The unit is always armed, the 4 inputs are available to
monitor the situation.
1,2 Using switch : The Z4 input is used for the arming and disarming
commands.
3 Using Impuls : Using the Z4 input with a push button for “Arm” and Disarm”.
4,5 Using Impuls : Using the Z3 and Z4 input with push buttons for “Arm” and
“Disarm”.
Note :
When using the modes 0, 1, and 2, it is impossible to command the unit to
“Arm” “Disarm” by using a telephone call.
If you wish to be able to control the unit remotely by the use of a telephone call,
you must choose 3. Caution: input Z4 cannot be used as an alarm input
Arming is not allowed if any zone is active :
The unit cannot be armed if an alarm is present in one of the 3 inputs.
Page 12

b) Maximum Alarming Time (5-25 min)
This parameter is for the time that the unit will call for when an alarm is active
( between 5 and 25 minutes). The unit will stop calling once this amount of time is
reached.
c) Test Report frequency
The Musitel 742 unit can send SMS messages regularly with the unit's status.
You can determine the periodicity at which you will receive the SMS.
From 1 to 255 hours. 0 = no SMS.
d) Test Report Time
The first day of each month, at the chosen time, the Musitel 742 unit will send an
SMS Test Report. After that, it will send SMS's regularly, every X hours,
depending on the value entered for the “Test Report Frequency”.
The first day of the following month, the cycle will restart.
e) “Send test report now”
Allows verifying if the unit's internal date and time are correct. .
f) Maximum number of alarms per zone.If for example, you choose 5, after 5
alarm inputs, the Musitel unit will ignore the new alarms.
The unit must be disarmed and rearmed to reset the counter to zero.
This function can be useful when there is a risk that the alarm goes off randomly.
0 = amount of alarms unlimited.
g) Limitation duration
When the number of “Maximum number of alarms per zone” is reached, it blocks
the alarm input during x hours. The counter will be reset to zero after this amount
of time. This function is available only when the “Always Armed” mode is active.
Example of application :
If an alarm is still active, and you wish to be signaled every 4 hours.
“Maximum number of alarms per zone” = 1
“Limitation duration” = 4
The SMS and calls will stop when the alarm is acquitted.
Automatic time setting of the Musitel 742
e) “Internal Clock Settings”:
Enter the number of the GSM corresponding to the SIM card that is in the unit.
This will allow the unit to ask the actual date and time of the GSM network.
It is essential for the events historic.
After each restart of the unit, after every power supply interruption and every 20
days, the Musitel 742 will send an SMS to the GSM operator to ask for the actual
date and time.
You can also force updating the date and time of the unit by sending an SMS to
the number of the SIM card in the unit, with the message #dtrs# .
Caution:
Summer and winter time changes are not automatic. There can be a 20
day delay.
Page 13

Changing the password
The password is needed for :
• configure the Musitel 742 using a USB and the configuration software,
• configure the Musitel 742 remotely by a modem connection,
• configure the Musitel 742 by a telephone call except for the users for which the
“Caller ID” is “1 No pwd req”
• configure the Musitel 742 by SMS except for the users for which the “Caller ID” is
“1 - No pwd req”
Changing the password :
Click on the icon :
The new password will be a number between 0000 and 9999.
The default password is: 1111
Page 14

“Event list” screen
a) Click on the “Event List” icon on the “Module status” screen
b) Click on “start event log download”
c) T1, T2, ... T4 are the telephone calls made to the numbers 1, 2, ...4.
S1, S2, ... S4 are the SMS sent to the numbers 1, 2, ...4.
C1, C2 are the telephone calls made to the Alarm Center.
CID is the content of the message sent to the Alarm Center.
d) symbols on the columns T1- 4, S1-S4 and C1, C2
?transmitting;
*transmission successful;
Rtransmission has been done, useless to send new message (Alarm Center);
!transmission failed;
Sthe alarm was canceled, no need to send the alarm message;
Ttime delay has expired, no transmission, see settings in “Alarm Settings”;
e) “Export to file” you can export the data to the following formats :
Excel : Microsoft excell format
CSV : text file, columns are separated by commas
TXT: text file, columns are separated by tabs.
Page 15

Recording a voice message by using a telephone call
8 voice messages can be recorded for the 4 alarm inputs of the Musitel :
Each input can have 2 voice messages, the odd number will be the alarm message
and the even number will be the message for when the situation has come back to
normal.
Of course, several commands can be sent in one telephone call, but the characters
rand #must be used to indicate the beginning and the end of each command ( r
for the beginning and #for the end)..
The maximum duration of a voice message is 8 seconds..
Once you have dialed the Musitel telephone number:
1. Enter the password (défault : 1111)
Command Description Musitel Response
r9password# Logging on with the
password
Password accepted: 3 beeps
Password refused: 4 beeps
Example: Logging on with the password
!Enter: r91111# (password accepted: 3 beeps)
2. Recording a new voice message
Command Description Musitel Response
r890M# Record a voice
message
M= n° of voice
message, 1-8
Long beep, then recording
for 8 seconds, and finishes with
another long beep.
Example : Recording voice message number 3 (input Z2 - Alarm)
!Enter the password: r91111# (password accepted: 3 beeps)
!Record the message: r8903# (long beep) recording (long beep)
3. Listening an existing voice message
Command Description Musitel Response
r800M# Listening an existing voice
message
M= n° voice message, 1-8
Voice message
Page 16

Example : Ecoute du message vocal 4(entrée Z2 - Restore)
!Enter the password: r91111# (password accepted: 3 beeps)
!Listening the existing voice message: r8004# (listen the message)
If you wish to record message number 1 and then hear it:
Call, then dial r91111# >then dial> r8901# > Record>> then dial> r8001# >Listen> Hang up.
Page 17

Command and verify the status of the relays by a
telephone call
A simple telephone call to the Musitel SIM card number allows you to open or close the
relay contacts. These commands can also be sent by SMS – see further on this manual.
You can also verify the current status of the relays.
It is of utmost importance that each command message starts with the character rand that
it finishes by #.
Once you have called the Musitel number:
1. Enter the password (défault : 1111)
Command Description Musitel Response
r9passeword# Logging on with the
password
Password accepted: 3 beeps
Password refused: 4 beeps
Example : Logging on with the password
!Enter: r91111# (password accepted: 3 beeps)
2. Activate the relays
Command Description Musitel Response
r3RS#
Activate the Musitel relays
R = relay number,1 or 2
S = Relay status
0: Open
1 : Close
The relay opens : 3 beeps
The relay closes : 6 beeps
Example : Activate Musitel's relay 1
!Enter: r91111# (password accepted: 3 beeps)
!Activate the relay 1: r311# (relay 1 contact closes: 6 beeps).
3. Verify the relay's status
Command Description Musitel Response
r3R9# Verify the relay's status
R = relay's number,1 or 2
Relay's contact open: 3 beeps
Relay's contact closed: 6 beeps
Example : Verify the status of relay 2
!Enter : r91111# (password accepted: 3 beeps)
!Verify the status of relay 2: r329# (relay 2 contact closed: 6 beeps).
Page 18

Arm - Disarm, the unit by using a telephone call
Once you have called the Musitel number:
1. Enter the password (default : 1111)
Command Description Musitel Response
r9password# Logging on with the
password
Password accepted: 3 beeps
Password refused: 4 beeps
Example : Logging on with the password
!Enter: r91111# (password accepted: 3 beeps)
2. Arm the Musitel - ARM
Command Description Musitel Response
r1# Arm the Musitel 6 beeps
Example : Arm the Musitel
!Enter : r91111# (password accepted: 3 beeps).
!Arm the Musitel : r1# (6 beeps).
3. Disarm the Musitel - DISARM
Command Description Musitel Response
r0# Disarm the Musitel 3 beeps
Example : Disarm the Musitel
!Enter : r91111# (password accepted: 3 beeps)
!Disarm the Musitel : r0# (3 beeps)
4. Status of the Musitel – Armed or Disarmed
This function allows you to know if the Musitel is currently armed or disarmed
Command Description Musitel Response
r2# Check if the Musitel is
armed or disarmed
Disarm : 3 beeps
Arm : 6 beeps
Example : Check if the Musitel is armed or disarmed.
Enter: r91111# (password accepted: 3 beeps).
Status – Armed or Disarmed : r2#
Page 19

Save the telephone numbers by SMS
Several commands can be sent in one message, but the characters rand #must be used
to indicate the beginning and the end of each SMS ( rfor the beginning and #for the end).
The different commands will be separated by a comma “,”..
The SMS must not exceed 160 characters.
If the sent SMS has an error, you will receive a response with the message “SYNTAX
ERROR”.
Password :
The password is not required for the users for which the value of “Caller ID” is “1 - No pwd
req”. All other users are considered as not authorized In this case the password will be
required. The password command must be entered in the SMS.
SMS Structure : .PWD=yyyy
PWD = password
yyyy = password, number between 0000 and 9999, default number: 1111
To be contacted in case of an active alarm :
When an alarm becomes active, the unit can call 4 numbers – the users..
SMS Structure : rUX=0475123456, PWD=1111#
SMS response: USER PHONE NR. CHANGED.
r= Beginning of SMS
U= Add a GSM number to contact in case of alarm
X= Replace X by the user's number (1,2,3,4)
0475123456 = GSM telephone number of the person to contact in case of alarm .
(for this example : 0475 123 456)
,= Separates the commands
PWD = Password
1111 = Password
#= End of SMS
Example : Program several telephone numbers by one SMS :
- user n° 1 = 0475123456
- user n° 2 = 0612345678
- user n° 3 = 0475654321
- password = 1111
rU1=0475123456, U2=0612345678, U3=0475654321, PWD=1111#
Page 20
Table of contents