N'oveen Xline MLB910 User manual

INSTRUKCJA OBSŁUGI
USER MANUAL
BETRIEBSANLEITUNG
MANUAL DE INSTRUCCIONES
MANUAL DE INSTRUÇÕES
ΟΔΗΓΙΕΣ ΧΡΗΣΗΣ
MANUAL DE UTILIZARE
N VOD K OBSLUZE
POUŽÍVATEĽSK PRÍRUČKA
ІНСТРУКЦІЯ З ЕКСПЛУАТАЦІЇ
Multi Lunch Box Noveen MLB910 Xline
Multi Lunch Box Noveen MLB911 Xline
1
MLB910/911
POLSKI.....................................................................................................................................................................................................s. 6
ENGLISH................................................................................................................................................................................................p. 10
DEUTSCH...............................................................................................................................................................................................s. 14
ESPAÑOL...............................................................................................................................................................................................p. 18
PORTUGUÊS.........................................................................................................................................................................................p. 22
ΕΛΛΗΝΙΚΑ.............................................................................................................................................................................................Σ. 26
ROMÂNĂ................................................................................................................................................................................................p. 30
ČEŠTINA................................................................................................................................................................................................s. 34
SLOVENSKÝ..........................................................................................................................................................................................S. 38
УКРАЇНСЬКА..........................................................................................................................................................................................С. 42
2

1
2
3
3
4
5
6
4
7
8
5

POLSKI PL
Dziękujemy za zakup naszego produktu.
Przed użyciem zapoznaj się z dołączoną do niego instrukcją obsługi. Instrukcję zachowaj na wypadek
potrzeby ponownego z niej skorzystania. Wierzymy, że unch Box przyniesie komfort i wygodę Tobie i
Twojej rodzinie dzięki doskonałej funkcjonalności. W razie potrzeby zachęcamy do kontaktu z nami lub
z naszym punktem serwisowym, chętnie pomożemy! Więcej produktów w marce N'oveen znajdziesz
na stronie www.noveen.pl
Przed użyciem przeczytaj wszystkie informacje dotyczące bezpieczeństwa
i zachowaj niniejszą instrukcję obsługi w celu późniejszego wykorzystania
1. Nigdy nie demontuj obudowy urządzenia bez konsultacji z wykwalifikowanym personelem.
2. Jeśli przewód zasilający lub inny element jest uszkodzony, musi on zostać wymieniony przez
producenta, przedstawiciela serwisowego lub wykwalifikowane osoby, aby uniknąć
niebezpieczeństwa. Samodzielna próba naprawy skutkuje utratą gwarancji urządzenia.
3. Sprawdź czy napięcie znamionowe jest takie samo, jak napięcie, którego używasz.
4. Nie używaj w pobliżu łatwopalnych materiałów.
5. Nie dotykaj wtyczki zasilania mokrymi rękami - ryzyko porażenia prądem.
6. Tylko profesjonalny personel serwisowy może dokonywać naprawy urządzenia.
7. Nie podgrzewać żywności dłużej niż czas wskazany przez producenta.
8. Nie umieszczać urządzenia w kuchence mikrofalowej lub lodówce, jedynie pojemniki można
podgrzać lub schłodzić osobno.
9. W przypadku wystąpienia nietypowego zapachu podczas normalnej pracy należy wyłączyć
urządzenie, odłączyć zasilanie i skontaktować się z serwisem.
10. Nigdy nie włączaj urządzenia, gdy w pojemniku nie ma żywności.
11. Przed czyszczeniem i konserwacją urządzenie należy odłączyć od zasilania.
12. Urządzenie do użytku przez osoby dorosłe, lub pod ich nadzorem.
13. W przypadku wątpliwości co do pełnej sprawności urządzenia skontaktuj się z serwisem.
14. Urządzenie nagrzewa się do temperatury 100 stopni, zachowaj ostrożność!
15. Do podgrzewania, gotowania używa się wody, zachowaj ostrożność!
16. Do wyjmowania po ugotowaniu ceramicznych pojemników używaj rękawicy kuchennej lub
ręcznika
17. Urządzenie działa pod napięciem, zachowaj wszelką ostrożność!!!
Uwaga: Na pokrywie urządzenia znajduje się otwór, przez który podczas pracy unch Boxa uchodzi
gorąca para wodna. Dotyczy to zarówno funkcji gotowania jak
i podgrzewania żywności, zachowaj ostrożność istnieje możliwość poparzenia!!!
Otwór umieszczony na pokrywie urządzenia musi być odsłonięty podczas użytkowania!!!
Nie przenoś urządzenia podczas pracy, możesz zostać poparzony przez gorącą wodę znajdującą się
6

wewnątrz urządzenia.
Podczas używania produktu większość elementów może się nagrzewać, zachowaj ostrożność.
Nie otwieraj pokrywy podczas pracy urządzenia, uruchomione urządzenie nagrzewa wodę do
temperatury wrzenia przez co może ona po otwarciu pokrywy wydostać się na zewnątrz.
DANE TECHNICZNE
Model: M B910/M B911
Napięcie: 220-240V ~
Częstotliwość: 50/60 Hz
Moc: 300 W
Pojemność: 1
Wymiary: 225 x 130 x 91 mm
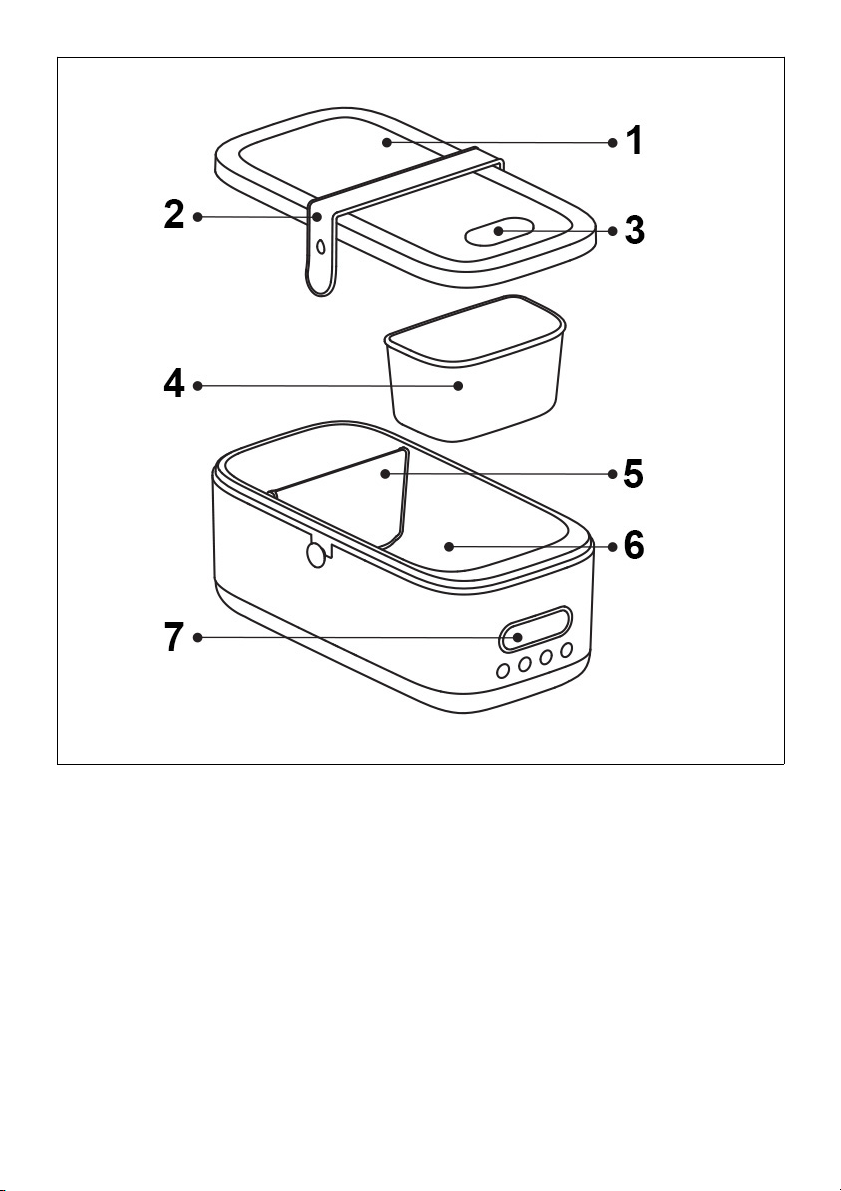
BUDOWA URZĄDZENIA
1. Górna pokrywa
2. Silikonowa opaska zamykająca
3. Otwór wylotowy pary
4. Dodatkowy pojemnik
5. Wyjmowana przegroda
6. Stały pojemnik wewnętrzny
7. Wyświetlacz z panelem sterowania
OBSŁUGA URZĄDZENIA
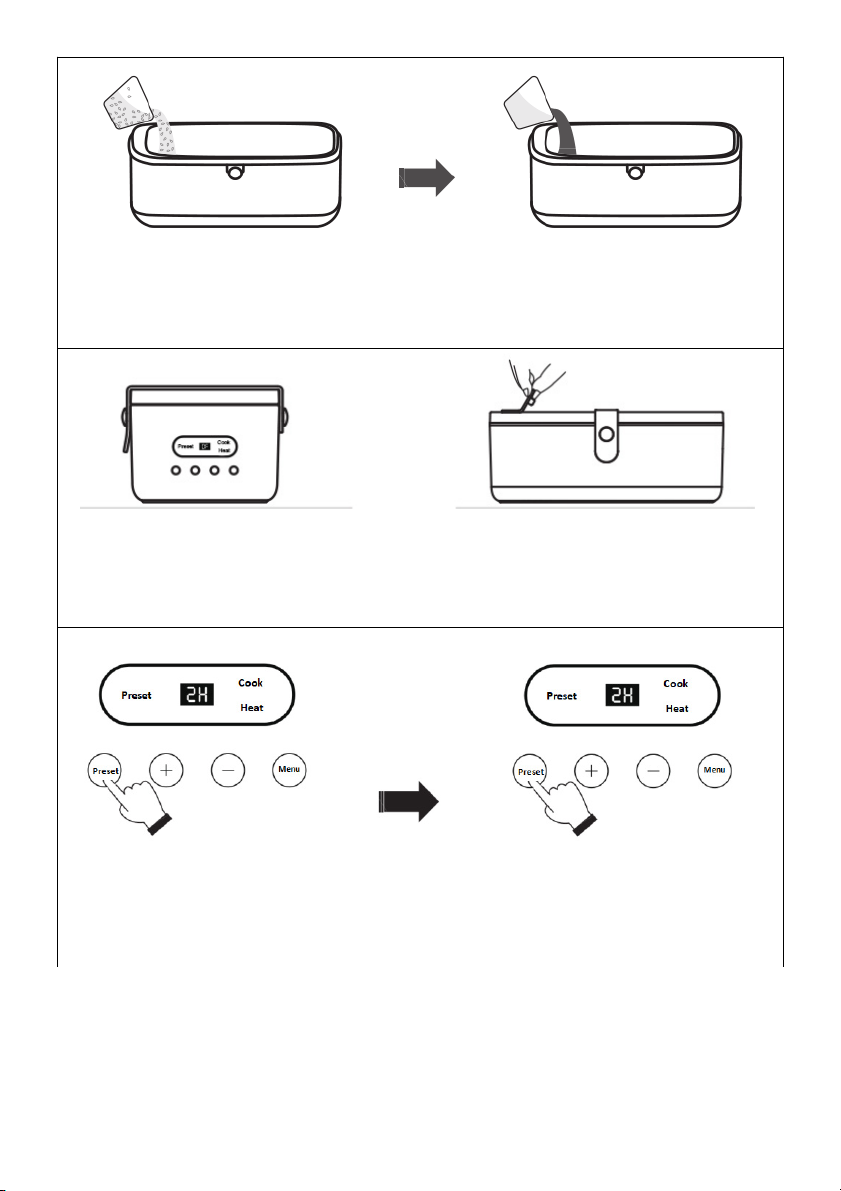
1. Podgrzewanie
Patrz Rysunek 1
Umieść pojemnik z potrawą w wewnętrznym
pojemniku (opcjonalnie)
Użyj przegrody, aby oddzielić żywność
(opcjonalnie)
Patrz Rysunek 2
Umieść pozostałą cześć, którą chcesz podgrzać po drugiej stronie wewnętrznego pojemnika załóż
górną pokrywę zamknij za pomocą silikonowej opaski
Patrz Rysunek 3
Otwórz otwór wylotowy pary, wyciągając z
pokrywy jeden z jego boków. Podłącz kabel zasilający, unch Box wejdzie w
stan czuwania, a na panelu sterowania zostanie
wyświetlony komunikat "OF". Naciśnij dolne
menu i wybierz funkcję podgrzewania (Heat)
przyciskiem menu.
7

2. Gotowanie (na przykładzie ryżu)
Patrz Rysunek 4
Użyj miarki (brak w zestawie), aby dodać 80g
ryżu do wewnętrznego pojemnika. Użyj miarki (brak w zestawie), aby dodać 150ml
wody do wewnętrznego pojemnika.
Patrz Rysunek 5
Podłącz kabel zasilający. unch Box wejdzie w
stan czuwania, a na panelu sterowania zostanie
wyświetlony komunikat "OF". Naciśnij przycisk
menu i wybierz funkcję gotowania (Cook).
Po zakończeniu pracy urządzenia, należy
podnieść otwór wylotowy pary, a następnie
otworzyć górną pokrywę.
Uwaga: Gdy produkt działa, nie należy dotykać jego górnej pokrywy i otworu wylotowego pary.
Uważaj na gorącą parę.
Funkcja Waga żywności Ilość wody (ml) do dodania Domyślny czas
działania Zakres czasu
działania
Cook 80g ryż 150 30 min 10 min – 5
godz.
Heat Odpowiednia ilość Odpowiednia ilość 20 min 5 min – 1 godz.
Preset 2 godz. 1 min – 9 godz.
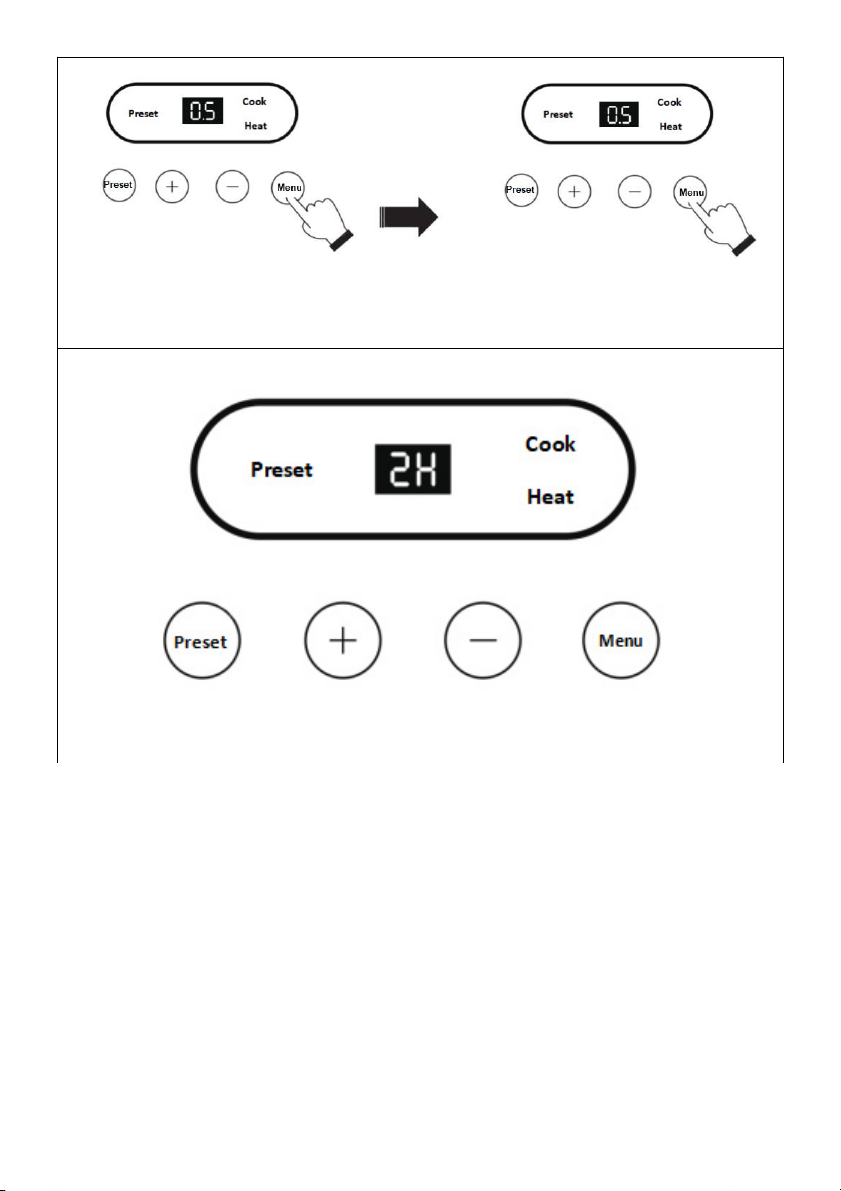
3. Funkcja preset
Patrz Rysunek 6
Wyświetlacz na panelu sterowania podczas
ustawiania harmonogramu Wyświetlacz na panelu sterowania podczas
wyboru funkcji po zakończeniu
Po naciśnięciu przycisku Preset, wskaźnik zacznie migać i zostanie wyświetlony domyślny czas
("2H"). Czas może być szybko zwiększany lub zmniejszany przez długie naciśnięcie przycisków +/-.
Po dokonaniu ustawienia, należy nacisnąć przycisk Menu, następnie wskaźnik będzie włączony, co
oznacza zakończenie ustawień. Urządzenie wchodzi w stan wyboru funkcji.
Uwaga: Jeśli ustawienie Preset nie jest konieczne, należy nacisnąć bezpośrednio przycisk
Menu, aby przejść do trybu wyboru funkcji.
4. Wybór funkcji
Patrz Rysunek 7
Wyświetlacz na panelu sterowania podczas
wybierania funkcji 10s po wybraniu funkcji, urządzenie zacznie
działać automatycznie.
Jeśli przycisk Menu zostanie naciśnięty w trybie czuwania lub po ustawieniu harmonogramu, produkt
przejdzie do trybu wyboru funkcji. Po każdym naciśnięciu tego przycisku produkt przełączy się na
8

odpowiednią funkcję i wskaźnik będzie migać. Czas pracy można regulować za pomocą przycisków (+
/ -). Produkt rozpocznie pracę 10s później. Naciśnięcie przycisku Menu w trakcie pracy spowoduje
zatrzymanie ustawienia lub pracy i przejście do trybu czuwania.
Wskazówki:
1. Przełączanie funkcji odbywa się w następującej kolejności: standby (czuwanie), cook (gotowanie),
heat (podgrzewanie) i standby.
2. Ustawienie Preset nie może działać podczas wyboru funkcji. Aby uruchomić ustawienie Preset,
należy nacisnąć przycisk Menu, aby na panelu sterowania wyświetlić komunikat "OF" (tryb czuwania).
5. Funkcja utrzymywania ciepła
Wyświetlacz na panelu sterowania podczas trybu utrzymywania ciepła. Patrz Rysunek 8
Po upływie ustawionego czasu pracy, urządzenie przechodzi automatycznie w tryb utrzymywania
ciepła, który domyślnie trwa 2 godziny. Użytkownik może poczekać, aż urządzenie przejdzie w tryb
czuwania po zakończeniu domyślnego czasu utrzymywania ciepła lub nacisnąć przycisk Menu, aby
przerwać pracę, następnie wyłączyć urządzenie i odłączyć kabel zasilający.
Uwaga: Jeśli chcesz otworzyć pokrywę górną podczas gotowania/podgrzewania, uważaj na parę i
wrzącą wodę.
Czyszczenie i konserwacja
Po użyciu odłącz kabel zasilający.
Nie należy używać drucianej gąbki, aby uniknąć uszkodzenia ich powierzchni. Użyj płynu do
mycia naczyń i gąbki do mycia pojemnika i pokrywy górnej.
Gdy urządzenie jest brudne, nie należy go myć w wodzie, lecz przetrzeć mokrym
ręcznikiem, aby zapobiec urazom.
Jeśli urządzenie nie będzie używane przez dłuższy czas, należy go wyczyścić, włożyć do
opakowania i umieścić w suchym i dobrze wentylowanym miejscu.
Rozwiązywanie problemów
Problem Możliwa przyczyna
Wskaźnik zasilania jest wyłączony. a. Awaria zasilania;
b. Kabel zasilający nie jest włożony do gniazda zasilania;
c. Gniazdo zasilania jest wyłączone;
d. Wtyczka kabla zasilającego produktu nie jest poprawnie włożona do
złącza zasilania w urządzeniu; lub
e. Urządzenie zabezpieczające przed pracą bez wody jest aktywne.
Żywność nie jest do końca
ugotowana. a. Dodano za dużo lub za mało wody.
b. Czas pracy jest nieprawidłowo ustawiony.
Uwaga: Jeśli po wykonaniu powyższych czynności usterka nadal się utrzymuje, należy
skontaktować się z serwisem lub sprzedawcą.
9

ENGLISH EN
Thank you for purchasing our product.
Before use, please read the user manual enclosed with the product. Keep this manual in case you
need to use it again. We believe that the unch Box will bring comfort and convenience to you and
your family thanks to its excellent functionality. If you have any questions, please do not hesitate to
contact us or our service center, we will be happy to help! For more N'oveen brand products, please
visit www.noveen.pl
Read all safety information before use and keep these operating instructions for future
reference.
1. Never disassemble the unit without consulting qualified personnel.
2. If the power cord or other component is damaged, it must be replaced by the manufacturer, service
representative or qualified personnel to avoid danger. If you attempt to repair the unit yourself, your
warranty will be void.
3. Check that the rated voltage is the same as the voltage you are using.
4. Do not use flammable materials close by.
5. Do not touch the power plug with wet hands - risk of electric shock.
6. Only professional service personnel may repair the unit.
7. Do not heat food longer than the time specified by the manufacturer.
8. Do not place the device in a microwave or refrigerator, only containers can be heated or cooled
separately.
9. If there is an abnormal odor during normal operation, turn OF the unit, disconnect the power supply
and contact the service department.
10. Never turn on the unit when the container is empty.
11. Before cleaning and maintenance, disconnect the appliance from the power supply.
12. The appliance should be used by or under the supervision of adults.
13. If you are unsure whether the appliance is in full working order, contact the service department.
14. The device heats up to 100 degrees, be careful!
15. Water is used for heating and cooking, be careful!
16. Use a kitchen glove or towel to handle ceramic containers after cooking.
17. The device is operating under voltage, be careful!
Note: There is a hole on the cover of the unit through which hot steam escapes during operation. This
applies to both the cooking and heating function, Careful: possibility of burns!!!!!
Opening on the lid of the appliance must be exposed during use!
Do not carry the appliance during operation, you could be burned by hot water
from inside the device.
During operation (cooking or heating) ceramic containers placed inside are hot!!!!! Be careful.
10

When using the product, most parts can become hot, handle with care.
Do not open the cover while the unit is running, the unit during operation heats up the water to boiling
point so it can escape after opening the lid.
TECHNICAL DATA
Model: M B910/M B911
Rated Voltage: 220-240V ~
Rated Frequency: 50/60 Hz
Rated Power: 300 W
Capacity: 1
Dimensions: 225 x 130 x 91 mm
DEVICE DESCRIPTION
1. Top cover
2. Silicone closing band
3. Steam outlet
4. Additional container
5. Removable divider
6. Fixed inner container
7. Display with control panel
USING GUIDE
1. Heating
See picture 1
Place the food container in the inner container
(optional)
Use the removable divider to separate the food
(optional)
See picture 2
Place the rest of the food you want to heat on the other side of the inner container, put on the top
cover and close with a silicone band
See picture 3
Open the steam outlet by pulling out one of its
sides from the cover Connect the power cord, the unch Box will enter
the standby mode, and the control panel will
display "OF". Press the bottom menu and select
the Heat function using menu button
11

2. Cooking (rice as an example)
See picture 4
Use a measuring cup (not included) to add 80g of
rice into the inside pot Use a measuring cup (not included) to add 150ml
of water into the inside pot.
See picture 5
Connect the power cable. The unch Box will
enter the standby mode and the control panel will
display "OF". Press the menu button and select
the cooking function (Cook).
When the unit is finished, lift the steam outlet and
then open the top cover.
Note: When the product is working, do not touch the top cover and the steam outlet. Beware of
hot steam.
Function Food weight Volume of water added into
the lunch box (ml) Default operationg
time Range of
operating
time
Cook 80g rice 150 30 min 10 min – 5 h
Heat Proper amount Proper amount 20 min 5 min – 1 h
Preset 2 h 1 min – 9 h
3. Preset function
See picture 6
Display on operation panel during schedule
setting Display on operation panel during function
selection after completed
After pressing Preset buttom, the indicator will flicker and the default time (“2H”) will be displayed. The
time can be quickly increased or decreased by long pressing +/- buttons. After setting, press Menu
bottom then the indicator is on, which shows the presetsetting is completed. The unit enters the
function selection status.
Note: If preset setting is not necessary, press Menu bottom directly to enter the function
selection mode.
4. Function selection
See picture 7
Display on operation panel during function
selection 10s after function selection, the item will begin to
work automatically
12

If Menu buttom is pressed in the standby mode or after schedule setting, the product will enter the
function selection mode. Each time this button is pressed, the product will switch to the corresponding
function and indicator will flicker. The operating time can be adjusted through the +/- buttons. The
product will begin to work 10s later. If Menu buttom is pressed during work, the unit will stop preset or
working and become standby.
Tips:
1. Function switching follows the sequence below: standby, cook, heat and standby.
2. The preset function cannot work during function selection. If want to use preset function, press
Menu to make “OF” (standby mode) display on the operation panel.
5. Keep warrm function
Display on operation panel during keep warm See picture 8
Upon end of the set operating time, the item will enter the keep warm mode automatically and last for
2h by default. User can wait till the item enters standby after the default keep warm time is completed,
or press Menu to stop work, then power it OF (the indicators will go out) and unplug the power cable.
Note: If want to open the top cover during cooking/heating, pay attention to the steam and the boiling
water from the lunch box.
Cleaning and maintenance
After use, unplug the power cable.
Do not use hard steel wire but dishwashing liquid and sponge to wash the bowl and the top
cover to avoid damage to their surfaces.
When the item is dirty, do not wash it in water but wipe with with a wet towel to prevent
electric leakage and accidents.
If the item is not to be used for a long time, clean it, put it into its package and place it in a
dry and well-ventilated place.
Troubleshooting
Problem Possible cause
The power indicator is out. a. Power failure;
b. Power cable is not inserted into the power socket;
c. Power socket is OF;
d. Product’s power cable plug is not securely inserted into the
power connector of the lunchbox; or
e. The product is protecting itself from working without water.
The food is not well steamed or
cooked. a. Added too much or little water.
b. The operating time is wrongly set.
Note: If the fault still persists after the examination above, contact service center or dealer.
13

DEUTSCH DE
Vielen Dank für den Kauf unseres Produkts.
Vor der Verwendung lesen Sie das Benutzerhandbuch. Bewahren Sie dieses Handbuch zum späteren Nachschlagen
auf. Wir glauben, dass die unch Box Ihnen und Ihrer Familie durch perfekte Funktionalität , Komfort und
Bequemlichkeit bietet. Wenn Sie Hilfe brauchen, kontaktieren Sie uns bitte oder unsere Service. Wir helfen Ihnen
gerne! Weitere Produkte der Marke N’OVEEN finden Sie unter www.noveen.pl.
Lesen Sie vor dem Gebrauch alle Sicherheitsinformationen und bewahren Sie dieses Handbuch zum
späteren Nachschlagen auf.
1. Öffnen Sie das Gerätegehäuse niemals ohne Rücksprache mit qualifizierten Person.
2. Wenn das Netzkabel oder eine andere Komponente beschädigt ist, muss es vom Hersteller, seinem
Servicemitarbeiter oder einer qualifizierten Person ausgetauscht werden. Wenn Sie versuchen das Gerät selbst zu
reparieren, erlischt die Garantie für das Gerät. .
3. Überprüfen Sie ob die Nennspannung mit der von Ihnen verwendeten Spannung übereinstimmt.
4. Verwenden Sie keine brennbaren Materialen.
5. Berühren Sie den Netzstecker nicht mit nassen Händen – es besteht die Gefahr eines Stromschlags.
6. Das Gerät darf nur von professionellem Servicepersonal repariert werden.
7. Erhitzen Sie Speise nicht länger als die vom Hersteller angegebene Zeit.
8. Stellen Sie das Gerät nicht in eine Mikrowelle oder einen Kühlschrank. Die Behälter können separat beheizt oder
gekühlt werden.
9. Wenn während des normalen Betriebs ein ungewöhnlicher Geruch auftritt, schalten Sie das Gerät aus, trennen Sie
die Stromversorgung und wenden Sie sich an das Servicecenter.
10. Schalten Sie das Gerät niemals ein, wenn sich keine Speise im Behälter befinden.
11. Trennen Sie das Gerät vor der Reinigung und Wartung von der Stromversorgung.
12. Das Gerät zur Verwendung durch Erwachsene oder unter deren Aufsicht.
13. Wenn das Gerät nicht ordnungsgemäß funktioniert, wenden Sie sich an das Servicecenter.
14. Das Gerät heizt sich auf 100 Grad auf. Seien Sie Vorsicht!
15. Wasser wird zum Heizen und Kochen verwendet. Seien Sie Vorsicht!
16. Verwenden Sie ein Handtuch um die Keramikbehälter nach dem Kochen zu entfernen.
17. Das Gerät arbeitet unter Spannung. Seien Sie Vorsicht!
Beachtung! Am Deckel des Geräts befindet sich eine Öffnung, durch die heißer Dampf entweicht, während die
unch Box in Betrieb ist. Dies gilt sowohl für Kochfunktionen und Erhitzen von Speisen. Seien Sie Vorsicht. Es
besteht Verbrennungsgefahr!!
Die Öffnung an den Deckel des Geräts muss während des Betrieb freigelegt werden!!!
Während der Arbeit, bewegen Sie das Gerät nicht. Möglicherweise wird es durch das heiße Wasser im Gerät
verbrüht. Bei der Verwendung des Geräts können die meisten Teile heiß werden. Seien Sie Vorsicht! Während das
Gerät in Betrieb ist, öffnen Sie die Abdeckung nicht. Wenn das Gerät gestartet wird, erwärmt sich das Wasser bis
zum 100 Grad, sodass es nach dem Öffnen den Deckel nach außen entweichen kann.
14

BAU DES GERÄTS
1. Obere Deckel
2. Silikonschließband
3. Dampfaustritt
4. Zusätzlicher Behälter
5. Entfernbarer Trennwand
6. Nicht entfernbarer Innenbehälter
7. Anzeige mit Bedienfeld
TECHNISCHEN DATEN
Modell: M B910/M B911
Stromversorgung: 220-240V ~ 50/60 Hz
eistung: 300 W
Kapazität: 1
Messungen: 225 x 130 x 91 mm
GERÄTEBETRIEB
1.Aufheizen
Zeichnung 1 sehen
Stellen Sie den Behälter in den Innenbehälter
(optional)
Verwenden Sie eine Trennwand um das Speisen
zu trennen (optional)
Zeichnung 2 sehen
egen Sie den Teil die Speise den Sie erhitzen möchten auf die andere Seite des Innenbehälter.
Verschließen Sie die obere Deckel mit einem Silikonband.
Zeichnung 3 sehen
Öffnen Sie den Dampfaustritt, indem Sie eine
seiner Seiten aus dem Deckel ziehen. Stecken Sie das Netzkabel ein, die unch Box
wechselt in den Standby-Modus. Auf dem
Bedienfeld wird OF angezeigt. Drücken Sie
untere Menü und wählen Sie die Heizfunktion
(Heat) mit der Menütaste.
2. Kochen (am Beispiel von Reis)
Zeichnung 4 sehen
Verwenden Sie einen Messbecher (nicht im Set
enthalten) um 80g Reis und geben zu
Innenbehälter.
Verwenden Sie einen Messbecher (nicht im Set
enthalten) um 150ml Wasser und geben zu
Innenbehälter.
15

Zeichnung 5 sehen
Stecken Sie das Netzkabel ein, die unch Box
wechselt in den Standby-Modus. Auf dem
Bedienfeld wird OF angezeigt. Drücken Sie die
Menütaste und wählen Sie die Kochfunktion
(Cook).
Wenn das Gerät wird die Arbeit beenden, heben
Sie den Dampfaustritt an und öffnen Sie die
obere Deckel.
Beachtung: Wenn das Gerät in Betrieb ist, berühren Sie nicht obere Deckel. Achten Sie auf
heißen Dampf!
Funktion Essen Gewicht Menge Wasser (ml) die
hinzugefügt werden soll Standardlaufzeit Betriebszeitbereich
Cook 80g Reis 150 30 min 10 min – 5 Std.
Heat Richtige Menge Richtige Menge 20 min 5 min – 1 Std.
Preset 2 godz. 1 min – 9 Std.
3. Preset-Funktion
Zeichnung 5 sehen
Anzeige auf dem Bedienfeld beim Einstellen des
Zeitplans Anzeige auf dem Bedienfeld nach Abschluss auf
dem Bedienfeld
Nach dem Drücken der Preset-Taste blinkt die Anzeige und die Standardzeit (2H) wird angezeigt. Die
Zeit kann durch langes Drücken der +/- Tasten schnell erhöht oder verringert werden. Nach dem
Einstellen drücken Sie die Menütaste. Die Anzeige leuchtet was bedeutet, dass die Einrichtung
abgeschlossen ist. Das Gerät wechselt in den Funktionauswahlstatus.
Beachtung: Wenn die Preset-Funktion nicht erforderlich ist, drücken Sie die Menütaste direkt
um den Funktionsauswahlmodus aufzurufen.
4. Funktionsauswahl
Zeichnung 6 sehen
Anzeige auf dem Bedienfeld bei Auswahl einer
Funktion. 10 Sekunden nach Auswahl der Funktion beginnt
das Gerät automatisch zu arbeiten.
Wenn die Menü-Taste im Standby-Modus oder nach dem Festlegen eines Zeitplans gedrückt wird,
wechselt das Produkt in Funktionsauswahlmodus. Jedes Mal, wenn Sie diese Taste drücken, wechselt
das Produkt zur entsprechenden Funktion und sie Anzeige blink. Die Arbeitszeit kann mit den Tasten
(+ / -) eingestellt werden. Das Produkt wird 10s später funktionieren. Durch Drücken der Menü-Taste
während des Betriebs wird die Einstellungen oder der Betrieb gestoppt und der Standby-Modus
aufgerufen.
16

Tipps:
1. Die Funktionen werden in der folgenden Reihenfolge umgeschaltet: Standby (Wache), Cook
(Kochen), Heat (Heizung) und Standby.
2. Die Voreinstellung kann während der Funktionsauswahl nicht funktionieren. Um die Voreinstellung
auszuführen, drücken Sie die Menü-Taste, um OF (Standby) auf dem Bedienfeld anzuzeigen.
5. Warmhalten
Anzeige auf dem Bedienfeld im Warmhaltemodus. Zeichnung 7 sehen
Nach Ablauf der eingestellten Betriebszeit wechselt das Gerät automatisch in den Warmhaltemodus,
dies dauert standardmäßig 2 Stunden. Der Benutzer kann warten bis das Gerät nach Ablauf der
Standard Warmhaltzeit in den Standby-Modus wechselt oder drücken Sie die Menü-Taste um den
Betrieb zu beenden. Dann schalten Sie das Gerät aus und ziehen Sie das Netzkabel ab.
Beachtung:
Wenn Sie die obere Abdeckung während des Kochens/Aufheizens öffnen möchten, bleiben Sie
vorsichtig mit Dampf und kochendem Wasser um.
Reinigung und Wartung
Nach dem Gebrauch ziehen Sie das Netzkabel ab.
Verwenden Sie zum Waschen keinen Drahtschwamm um eine Beschädigung der
Oberfläche zu vermeiden. Verwenden Sie Geschirrspülmittel und einen Schwamm um dem
Behälter und die obere Deckel zu waschen.
Wenn das Gerät verschmutzt ist, waschen Sie es nicht in Wasser. Es sollte mit einem
feuchten Handtuch abgewischt werden.
Wenn das Gerät längere Zeit nicht verwendet wird, reinigen Sie es, legen Sie es in die
Verpackung und lagern Sie es an einem trockenen Platz.
Problemem lösen
Problem Mögliche Grund
Die Betriebsanzeige ist aus a. Stromausfall;
b. Das Netzkabel ist nicht an die Steckdose angeschlossen;
c. Die Steckdose ist ausgeschaltet;
d. Der Netzstecker des Geräts ist nicht richtig in den
Netzanschluss des Geräts eingesteckt;
e. Die Sicherheitseinrichtung gegen Betrieb ohne Wasser ist aktiv.
Speise ist nicht vollständig
gekocht a. Es wurde zu viel oder zu wenig Wasser hinzugefügt.
b. Das Arbeitszeit ist falsch eingestellt.
Beachtung: Wenn das Problem nach Durchführung der oben genannten Schritte weiterhin
besteht, wenden Sie sich an das Servicecenter.
17

ESPAÑOL ES
Gracias por la compra de nuestro producto.
eer el manual de instrucciones adjuntado antes del uso. Conservar las instrucciones para el caso de
que sean necesarias en el futuro. Creemos que uch Box os aportará a ti y a tu familia confort y
comodidad gracias a su perfecta funcionalidad. En caso de necesidad, animamos a contactar con
nosotros o con nuestro punto de servicio, ¡estaremos encantados de ayudar! Encontrarás más
productos de la marca N'oveen en la página www.noveen.pl
Antes del uso, leer toda la información relativa a la seguridad
y conservar este manual de instrucciones para futuras referencias
1. Nunca desmontar la carcasa del dispositivo sin consultarlo con personal cualificado.
2. Si el cable de alimentación u otro elemento está dañado debe ser sustituido por el fabricante, su
representante técnico o por una persona cualificada, para evitar riesgos. El intento de reparación por
uno mismo provocará la pérdida de la garantía del dispositivo.
3. Comprobar que la tensión nominal es la misma que la tensión utilizada.
4. No utilizar cerca de materiales inflamables.
5. Nunca tocar el enchufe de alimentación con las manos mojadas: riesgo de descarga eléctrica.
6. Solo el personal técnico profesional puede reparar el dispositivo.
7. No calentar los alimentos más tiempo del indicado por el fabricante.
8. No introducir el dispositivo en el horno microondas ni el frigorífico, solo los recipientes pueden
calentarse o enfriarse por separado.
9. En caso de aparecer un olor atípico durante el funcionamiento normal se debe apagar el
dispositivo, desconectar la alimentación y contactar con el servicio técnico.
10. Nunca encender el dispositivo si no hay alimentos en el recipiente.
11. Antes de la limpieza y el mantenimiento es necesario desconectar el dispositivo de la
alimentación.
12. El dispositivo puede ser utilizado por personas adultas, o bajo la supervisión de estas.
13. En caso de dudas sobre la eficiencia total del dispositivo, contactar con el servicio técnico.
14. El dispositivo se calienta hasta una temperatura de 100 grados, ¡proceder con precaución!
15. Para calentar y cocinar se utiliza agua, ¡proceder con precaución!
16. Para sacar los recipientes cerámicos una vez cocinados utilizar un guante de cocina o un paño.
17. El dispositivo funciona bajo tensión, ¡proceder con especial precaución!
Atención: En la tapa del dispositivo hay un orificio por el que sale vapor de agua caliente durante el
funcionamiento de unch Box. Esto hace referencia tanto a la función de cocción como la de
calentamiento de alimentos, ¡proceder con precaución, existe un riesgo de quemaduras!
¡El orificio situado en la tapa del dispositivo debe estar destapado durante el uso!
No trasladar el dispositivo durante su funcionamiento, es posible quemarse con el agua caliente que
18

se encuentra en el interior del dispositivo.
Durante el uso del producto la mayoría de los elementos pueden calentarse, proceder con
precaución.
No abrir la tapa durante el funcionamiento del dispositivo. El dispositivo encendido calienta el agua
hasta la temperatura de ebullición, por lo que esta puede salir al exterior tras abrir la tapa.
ESTRUCTURA DEL DISPOSITIVO
1. Tapa superior
2. Banda de silicona de cierre
3. Orificio de salida del vapor
4. Recipiente adicional
5. Pared extraíble
6. Recipiente interior fijo
7. Pantalla con panel de control
MANEJO DEL DISPOSITIVO
1. Calentamiento
Ver figura 1
Colocar el recipiente con la comida en el
recipiente interior (opcionalmente).
Utilizar la pared para separar los alimentos
(opcionalmente).
Ver figura 2
Colocar la parte restante a calentar en la otra parte del recipiente interior, colocar la tapa superior y
cerrarla con la banda de silicona.
Ver figura 3
Abrir el orificio de salida del vapor, tirando de la
tapa por uno de sus lados. Conectar el cable de alimentación, unch Box
entra en el estado de espera y en el panel de
control se mostrará el mensaje «OF». Presionar
el menú inferior y seleccionar la función de
calentamiento (Heat) con el botón menú.
2. Cocción (por ejemplo, arroz)
Ver figura 4
Utilizar una medida (no incluida) para añadir 80g
de arroz al recipiente interior. Utilizar una medida (no incluida) para añadir
150ml de arroz al recipiente interior.
19

Ver figura 5
Conectar el cable de alimentación. unch Box
entra en el estado de espera y en el panel de
control se mostrará el mensaje «OF». Presionar
el botón menú y seleccionar la función de
cocción (Cook).
Al finalizar el funcionamiento del dispositivo se
debe levantar el orificio de salida del vapor y a
continuación abrir la tapa superior.
Atención: Mientras el producto está funcionando no se debe tocar su tapa superior ni el
orificio de salida del vapor. Tener cuidado con el vapor caliente.
Función Peso del alimento Cantidad de agua
(ml) a añadir Tiempo de
funcionamiento
predeterminado
Rango de tiempo
de
funcionamiento
Cook 80g arroz 150 30 min 10 min – 5 horas
Heat Cantidad adecuada Cantidad adecuada 20 min 5 min – 1 hora
Preset 2 horas 1 min – 9 horas
3. Función Preset
Ver figura 6
Pantalla en el panel de control durante la
configuración del programa. Pantalla en el panel de control durante la
selección de la función tras la finalización.
Tras presionar el botón Preset el indicador comienza a parpadear y se muestra el tiempo
predeterminado («2H»). El tiempo aumentarse o disminuirse rápidamente mediante una presión
prolongada de los botones +/-. Tras realizar la configuración, se debe presionar el botón Menú, a
continuación el indicador se activará, lo que indica la finalización de los ajustes. El dispositivo pasa al
estado de la selección de la función.
Atención: Si la configuración Preset no es necesaria, se debe presionar directamente el botón
Menú para pasar al modo de selección de la función.
4. Selección de la función
Ver figura 7
Pantalla en el panel de control durante la
selección de la función. 10s después de la selección de la función el
dispositivo comenzará a funcionar
automáticamente.
Si se presiona el botón Menú en el modo de espera o tras la configuración del programa, el producto
pasa al modo de selección de la función. Tras cada presión de este botón el producto cambia a la
función correspondiente y el indicador parpadeará. El tiempo de funcionamiento puede regularse con
los botones (+ / -). El producto comienza a funcionar 10s después. a presión del botón Menú durante
el funcionamiento provoca la detención de la configuración o el funcionamiento y el paso al modo de
espera.
20
This manual suits for next models
1
Table of contents
Languages:
Other N'oveen Warming Drawer manuals

Popular Warming Drawer manuals by other brands

Siemens
Siemens BI710 1 1 Series User manual and installation instructions

Electrolux
Electrolux E30WD75DSS1 installation instructions

Frigidaire
Frigidaire PLEW30S3C Factory parts catalog

CDA
CDA VW143 Installation, use and maintenance guide

Carter Hoffman
Carter Hoffman HDW-1 Operation manual

Wolf
Wolf WWD30-2 Installation information


