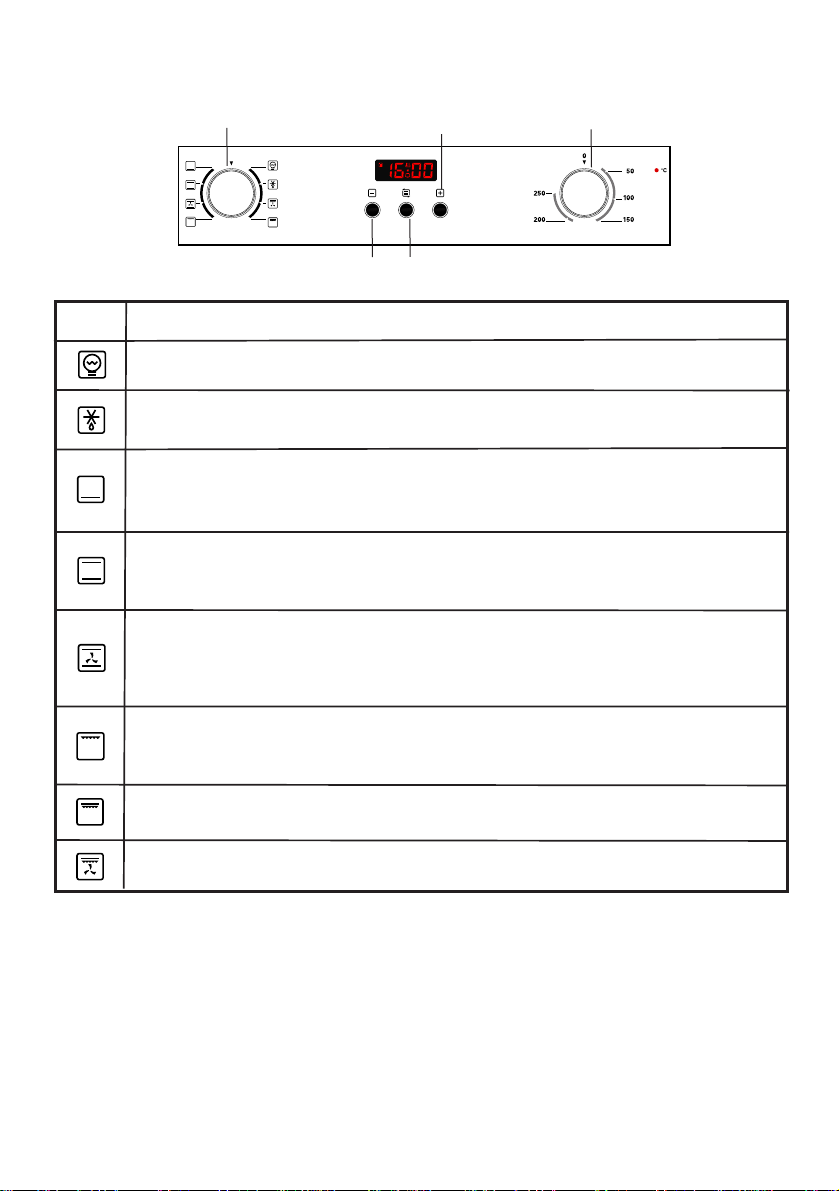
OPERATION INSTRUCTIONS
When the oven is first connected to the electrical supply, wait for the display automatically show "12.30",
a beep sound once and the "." flash. Ensure the correc time of the day is set before using the oven.
please note: that is 24 hour clock, for example 2PM shown as 14.00.
To set the correct time of day
1> Press "+" "-" button to adjust the hour setting.
2> Press" " to confirm the hour setting.
3> Press"+" "-" button to adjust the minute setting.
4> Press" " to confirm the minute setting and return to waitting state.
Time function setting
In waitting state, Press" " can enter the time function state, the sequence of the function setting is :
Waitting state-Minute minder-Dur-End-Waitting state. Then selected cooking function and ajust the cook
temperature, if required.
Audible warning time adjustment:
This function can be used to receive audible warning at the completion of the ajusted time period.
1>Press " " button to select the minute minder function. The relevant " " " ." symbol will flash.
2>Use " +" "- " button to adjust minute minder. (Refer to the instructions for setting the correct time of day.)
some time after the completion of the adjustment, the " "symbol will begin to light continuously. When
the " "symbol begins to light continuously, the audible warning time adjustment is done.
3>When the time is up, the timer gives an audible warning and the" "symbol begins to flash on the
screen. Long pressing any key for 3 second,it will stop the audible waring and the " "symbol
disappears on the screen. Audible warning time adjustment is for warning purposes only.
Semi-automatic programming according to cooking period:
This function is used to cook in the desired time range, The food to be cooked are put into the oven.
The oven is adjustment to the desired cooking function and temperature degree.
1>Press " " button until you see " Dur " on the timer screen.(Before setting cooking period.)
2>Use " +" "- " button to adjust cooking period for the food you wish to cook. (Refer to the instructions for
setting the correct time of day.) some time after the adjustment operation is completed, the day's time will
appear on the screen and the symbols "A" " "will light on the screen. While doing this, the oven will
also start to operate.
3>At the completion of the set duration, the timer will stop the oven and give an dudible warning. Also, the
symbol" A" will begin to flash on the screen. After bringing the cooking function and oven temperature
button to "0" position. Long pressing any key for 3 second,it will stop the audible waring.
Semi-automatic programming accroding to finishing time:
This function is used to cook according to the desired finishing time. The food to be cooked is put into
the oven.The oven is adjusted to the desired cooking function and temperature degree.
1>Press " " button until you see " End " on the timer screen.(Before setting finished time).
And the symbol"A"and the day time will respectively begin to flash.