Napa Technology Pristine PLUS CX User manual

Napa Technology Customer Support 800.603.6550!
WineStation®!
Pristine PLUS CX!
Manual!

Introduction!
Thank you for your purchase of the WineStation
®
Intelligent Dispensing System.
The WineStation
®
is the world’s most advanced, automated, measured dispensing and
preservation solution. Napa Technology has created the WineStation as an exquisite wine
serving solution that lets you enjoy the freshest wine, each and every time. Our patented
Clean-Pour
®
hygienic dispensing technology with its unique seal and purge delivery, will
provide a winery fresh taste every time for a period of 60 days. This feature allows you to
uncork and enjoy multiple vintages from your personal wine collection without having to
throw away what’s left over from the evening.
We strive for superior customer satisfaction and timely, effective support. Please do not
hesitate to contact us at any time so that we may serve your needs.
Sincerely,
The Napa Technology Team
Napa Technology Customer Support 800.603.6550!Page 2!

Section !Page!
1. Safety Messages !4!
2. System Overview !8!
3. Preparing the Site, Unpacking and Installation Instructions !9!
4. Attaching the Clean-Pour Dispensing Heads !13!
5. WineStation Operation & Screen Functions!
5-1. Unlocking your WineStation !17
5-2. WineStation Bottle Service Set Up !17
5-3. Setting Pour Volumes !19
5-4. Prepping Bottles for Use !19
5-5. Setting the Temperature !20
5-6. Adjust Bottle Light !21
5-7. Pour Detection !22!
5-8. Diagnostic Information !22!
6. Cleaning and Care !23!
Appendix:!
8. Product Specifications !27!
9. Pre Programmed Wine Selections !31!
10. Clean-Pour Head Gasket Removal & Replacement !32!
11. Gas Replacement Orders !34!
12. Troubleshooting Guide !35!
13. Limited Warranty Terms & Conditions !38!
Revised 11.06.13 Version 3.1!
Table of Contents!
Napa Technology Customer Support 800.603.6550!Page 3!

This guide contains many important safety messages.
Always read and obey all safety messages.!
Safety Messages!
This is the safety alert symbol. It alerts you to safety messages that
inform you of hazards that can kill or hurt you or others, or!
cause damage to the product.!
All safety messages will identify the hazard, tell you how to reduce the chance of injury,
and tell you what can happen if the instructions are not followed.!
All safety messages will be preceded by the safety alert symbol and the hazard signal word!
DANGER, WARNING, or CAUTION. These words mean:!
You will be killed or seriously injured if you do not
follow instructions.!
You can be killed or seriously injured if you do not
follow instructions.!
Indicates a hazardous situation which, if not avoided,
may result in minor or moderate injury or!
product damage.!
Your hand or fingers can be injured.
Do not place in area of moving parts.!
Napa Technology Customer Support 800.603.6550!Page 4!

Excessive Weight Hazard!
Use two or more people to move and install WineStation.!
Failure to do so can result in back or other injury.!
Electrical Shock Hazard!
FOR PERSONAL SAFETY, the WineStation must be properly grounded.!
Have the wall outlet and the circuit checked by a qualified electrician
to make sure the outlet is properly grounded.!
3-prong grounding type wall receptacle!
Ensure 3-prong grounded plug
exists before use!
Ensure proper grounding exists before use!
Recommended Grounding Method!
The WineStation should always be plugged into its own individual properly grounded electrical outlet rated
for 115 Vac, 10A 50/60 Hz, AC only (230Vac 10A 50/60Hz in Europe). This provides the best performance
and also prevents overloading facility wiring circuits which could cause a fire hazard from overheated wires.
It is recommended that a separate circuit serving only the WineStation be provided. Use receptacles which
cannot be turned off with a switch or pull chain. Do not use an extension cord. Where a standard two-
prong wall outlet is encountered, it is your personal responsibility and obligation to have it replaced with!
a properly grounded three-prong wall outlet.!
Do not, under any circumstances, cut or remove the third (ground) prong from the power cord.!
NOTE: Before performing any type of installation, cleaning, or removing of parts, turn the control OFF and
then disconnect the WineStation from the electrical source. When you are finished, reconnect the
WineStation to the electrical source and reset the controls to the desired setting.!
Warning Messages and Safety Information!
Napa Technology Customer Support 800.603.6550!Page 5!

To reduce the risk of fire, electric shock, or injury to persons using your product, basic safety
precautions should be followed, including the following;!
• Read all instructions before using this product.!
• The WineStation must be properly installed in accordance with the instructions provided!
by the manufacturer.!
• Unplug your WineStation or turn off power at the circuit breaker or fuse box before cleaning, parts!
replacement or repairs. Servicing must be performed by a qualified service professional.!
• NEVER unplug your WineStation by pulling on the power cord. Always grip the plug firmly and pull it !
straight out from the outlet.!
• Repair or replace immediately all electric service cords that have become frayed or otherwise damaged. !
Do not use a cord that shows cracks or abrasion damage along its length or at either the
plug or connector end.!
• When moving your WineStation away from the wall, be careful not to roll over or damage the power
cord.!
• DO NOT store or use gasoline or other flammable vapors and liquids in the vicinity of this or!
any other appliance.!
• DO NOT allow children to climb, stand, or hang on the WineStation doors. They could damage!
the WineStation and seriously injure themselves.!
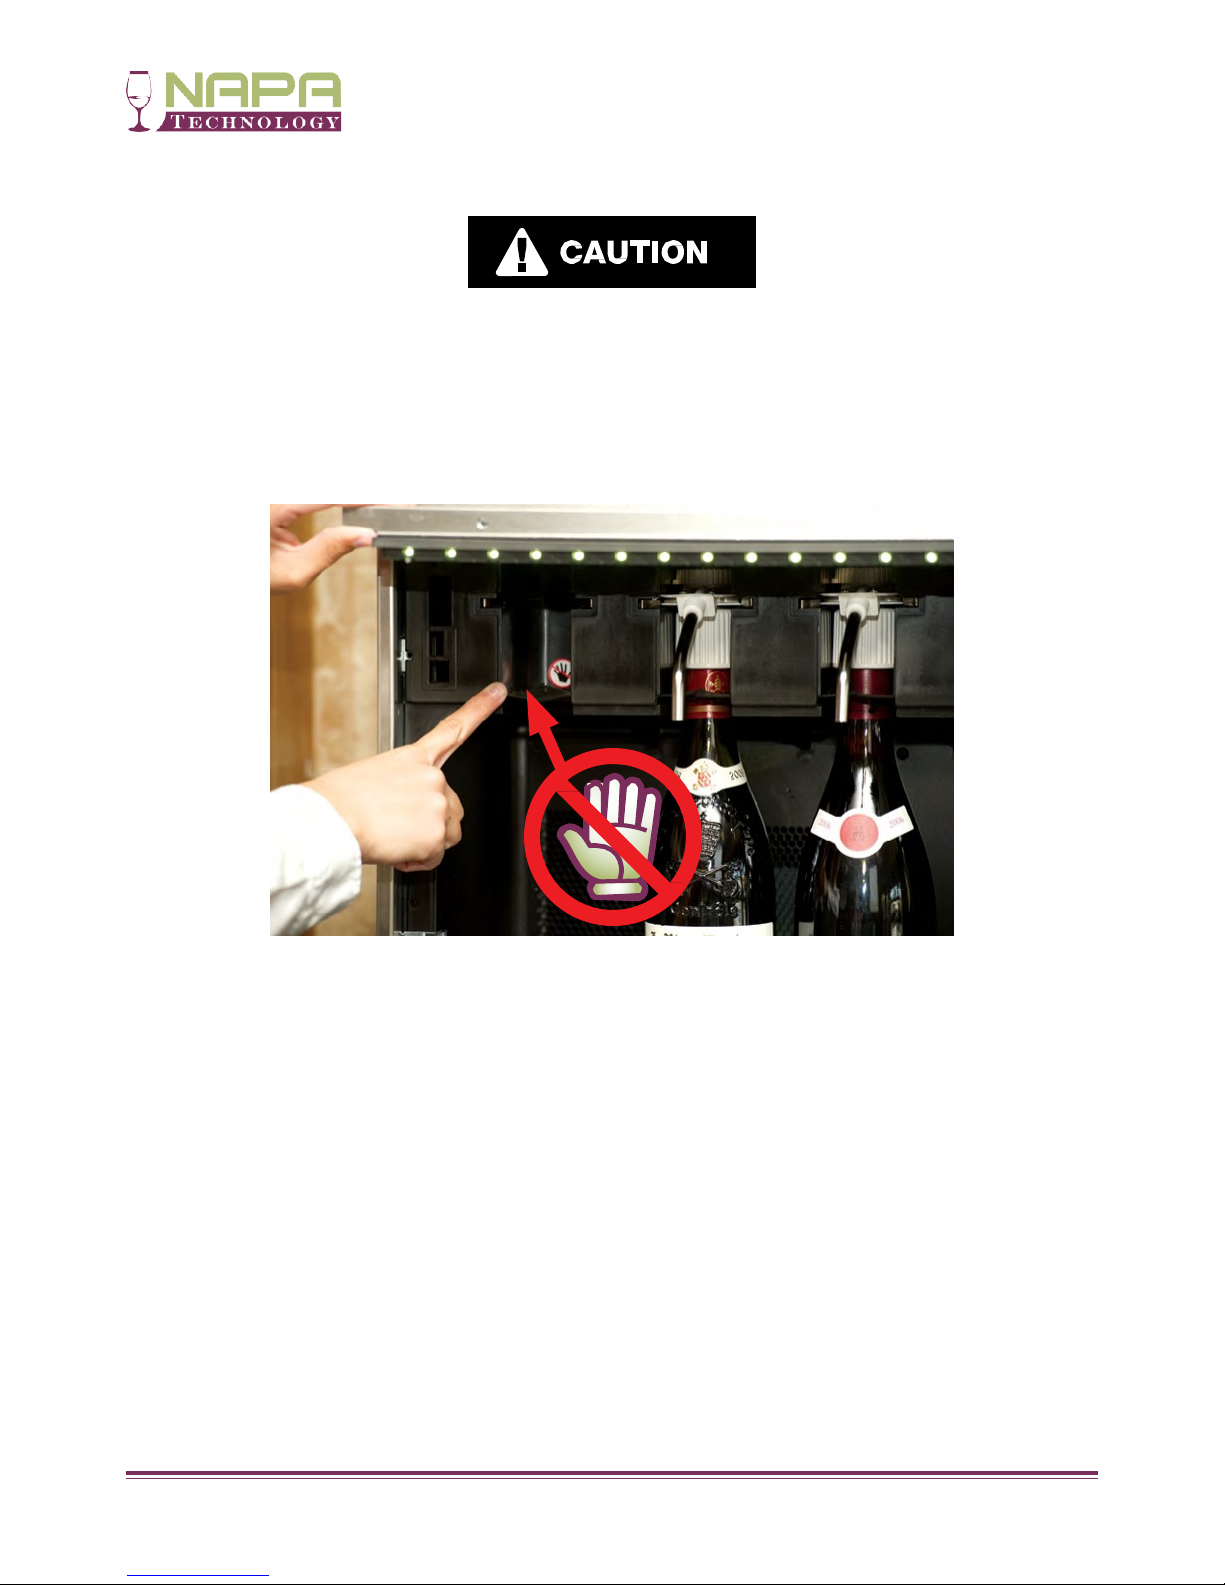
• Keep fingers out of pinch point areas; clearances between the doors and cabinet are necessarily small.!
Be careful closing doors when children are in the area.!
• Do not insert pens, pencils or other objects into any opening of the WineStation. Do not put hands
or foot or metal sticks into air vents, base grille, or bottom of the WineStation. You may be injured or
receive an electrical shock.!
• Avoid contact with the moving parts. DO NOT place fingers or hands into the bottle bay assembly!
to diagnose potential problems with the WineStation.!
• Do not modify or extend the power cord length. It will cause electric shock or fire. !
• Care should be taken when handling pressurized gas. You should ensure the proper tubing and!
shut-off valves are used.!
• Not suitable for installation in an area where a water jet could be used.!
• Only to be installed in locations where its installation and maintenance is restricted to trained personnel.!
• The WineStation must be placed in a horizontal position.!
** SAVE THESE INSTRUCTIONS FOR FUTURE REFERENCE **!
Napa Technology Customer Support 800.603.6550!Page 6!
Important Warning and Safety Instructions!

Access to the WineStation for service, including bottle changing and preparation,
should be limited to qualified service professionals and trained staff only!!
DO NOT place fingers or hands into the bottle bay assembly to
to diagnose potential problems with the WineStation.!
Napa Technology Customer Support 800.603.6550!Page 7!

System Overview!
Easy to Read LCD Screen shows the
Wine Information for a Taste,!
Half or Full Glass pour.!
Patented
Clean-Pour
Technology
keeps Wine
fresh for up
to 60 days!
Locking
Door!
WineGas Preservation
System for Increased
Wine Shelf Life!
Painted Steel Cabinet!
Napa Technology Customer Support 800.603.6550!Page 8!
State of the Art Cooling and Temperature
Control gives you the Optimum Tasting
Experience!
Dual Zone Divider!

Preparing the Installation Site!
If you have not already done so, please review the productspecifications in the Appendix,
and ensure that the intended installation location meets all of the technical and!
legal requirements.!
In particular, consider the following:!
• Adequate space availability.!
• Adequate weight load capacity.!
• Adequate ventilation (see drawings for air circulation paths).!
• A nearby grounded electrical outlet.!
• An external UPS with backup battery is recommended.!
• Sourcing of external argon or food-grade nitrogen gas cylinder (preferably two
cylinders, one for backup). Tank sizes may range in side dependant on the size
of the system.!
• Any potential safety hazards that might interfere with the installation!
or operation of the unit.!
• Compliance with any applicable laws, regulations, standards, and other legal
requirements that may apply to the installation and operation of the WineStation
in your establishment.!
Finally, please ensure that the installation surface is level, clean, dry, and free of any debris,
loose parts or potential safety hazards that might interfere with the installation.!
Napa Technology Customer Support 800.603.6550!Page 9!
IMPORTANT NOTICE:!
Before installing the WineStation, please ensure that you have read, understood
and complied with the safety information and installation requirements
contained in the previous section.!
Failure to do so could result in death, serious injury, or product damage,
and void your warranty.!
If you have any questions or concerns regarding the above, please contact us
before you proceed.!

1. Unpacking and Installing the WineStation!
Unpacking and Installing your WineStation(s)!
a. Please move box to the installation location. The WineStation system is packed
in each box, so that it will arrive with the display window facing up towards the
box opening.!
b. It is suggested to open box along the taped closure.!
c. Open the ship kit box and remove the four (4) Levelingfeet.!
d. Remove the foam brace. Along each side, you will find spacing to allow for a firm
grip of the WineStation, so that you may lift it straight out of the box and onto its
back on a flat counter or surface.!
e. Resting the WineStation on its “back” will not harm the system and allow for
proper application of the Leveling Feet.!
f. Once the Leveling Feet have been firmly secured, the WineStation can be lifted
into an upright position.!
g. Ensure that the WineStation is properly leveled. If necessary, adjust the four
leveling feet on the bottom of the unit by turning them in the appropriate
direction. Normally, all four leveling feet should be fully tightened (as short as
possible). DO NOT remove the leveling feet – they are required for proper air
circulation; doing so will void the warranty. (See Appendix ProductSpecifications
for clearance and spacing information.)!
Excessive Weight Hazard!!
Your WineStation is heavy (see Product Specifications).
Always use two or more persons to move the
WineStation Failure to do so can result in serious back or
other injury.!
Napa Technology Customer Support 800.603.6550!Page 10!
Protect your Counter top / Installation Area!!
When moving the WineStation for installation, cleaning
or service purposes, be sure to protect your counter
top. Always lift and pull the WineStation straight out
when moving it. Do not wiggle or walk the
WineStation, as this may cause counter top and/or
product damage.!

2. Connecting the Gas Cylinder.!
a. Remove the plastic cap from the gas tank.!
b. Find'the'gas'regulator'assembly'that'comes'with'the'system.'Make'sure'the'regulator'
adjustment'knob'is'turned'all'the'way'in'the'OFF#direc9on.'
c. Insert the top of the gas cylinder into the bottom of the gas regulator assembly
and turn it clockwise, by hand, until it is snug. Do not use a wrench or over tighten.
d. Turn the regulator knob in the ON direction until it stops.
c. Position the Gas Cylinder onto the rear of the WineStation and utilizing the
Velcro strap, secure the cylinder to the rear of the WineStation. Plug the hose
end from the regulator into the Gas connector located on the Rear of the
WineStation. (Note: If the WineStation will be positioned or mounted such that
the Gas Cylinder will not be accessible from the rear, an extension Gas hose is
provided so that the Gas Cylinder can be externally positioned. Use the
extension hose to plug into the WineStation and plug the other end of the
extension hose into the regulator hose. Make sure that the gas cylinder is safely
secured at the location where it will reside.)
Note: Gas Connectors are all quick disconnects and when “Grey” button is pressed will
“pop-off” and maintain the gas pressure in the WineStation and the hoses.!
Napa Technology Customer Support 800.603.6550!Page 11!
Unpacking and Installing your WineStation(s)!
Velcro'
Strap'
Gas'cylinder'
Can'be'secured'
With'Velcro'Strap'
Regulator'
Assembly'
Tank'can'sit'on'table'

3. Power on the WineStation.!
a. Plug the power cord (provided) into the power plug on the rear of
the WineStation.
b. Plug the power cord into the grounded 120 Vac.,
60 Hz. electrical outlet. (See Appendix Product
Specifications).
c. Open the door on the front of the system. Swing the spout cover to the up
position.
d. Slide the power switch all the way up to the ON position.
e. The WineStation will run through a series of self-tests, which could take up to
approximately 5 minutes. Once this process is completed, the green lights below
the LCD screens will be illuminated, indicating that the WineStation is ready for
service.!
f. If the control panel is locked, perform the following steps:
Slide the power switch down one notch to the SERVICE MODE
Push WineStation Service next to any of the displays. Push Exit.
Slide the power switch up to the ON position. The positions will now be un-locked.
Napa Technology Customer Support 800.603.6550!Page 12!
Congratulations!!!!
You have completed the Hardware Installation.!
You are now ready to set up your wine bottles.!
Unpacking and Installing your WineStation(s)!

Attaching Clean-Pour Dispensing Heads!
1. Clean-Pour Head Overview:!
Gasket Sizes and Colors
The inner gaskets come in
different sizes!
(to fit various bottleneck widths).
Each gasket size has its unique
color.!
1. Wide (Green)!
2. Standard (Red)!
3. Narrow (White)!
Cap!
Spout!
Pick Up Tube!
Collar!
Main
Body!
Rotor
Switch!
1!
Napa Technology Customer Support 800.603.6550!Page 13!
2!3!

a. Open the bottle and place it on a flat, dry surface.!
b. Using the Head Selection Tool (see photo), insert it into
the bottleneck to determine the correct gasket size.!
Note:!
• The gasket should be fully un-tightened (collar all the way!
up, touching the main body) before you insert the head.!
• The correct sized gasket should go into the bottle easily
using light pressure. Do not lean on the head or use force,
as this may damage the gasket.!
c. Take a clean dispensing head of the size you selected. Check that the gasket is in good
condition, the cap is properly mounted, and the rotor switch is in the correct position.
(See the “Cleaning and Care” section for more details).!
d. Insert a clean pick up tube into the bottle. (It is normal for the upper end of the tube
to extend beyond the tip of the bottle at this point).!
e. Insert the upper end of the pick up tube firmly into the opening on the bottom of the!
head, as shown. (Keep the rest of the tube inside the bottle while doing this).!
f. Carefully insert the dispensing head (with
the pick up tube attached) into the bottle.
The head should go in easily with light
pressure. Do not lean on the head or force
it in, as this may damage the gasket and/or
the top of the glass wine bottle.!
Napa Technology Customer Support 800.603.6550!Page 14!
Head Sizing Tool!

Important:!
Before inserting the head into the
bottle, always make sure that the
collar is fully un-tightened (turn the
collar all the way up until it touches
the main body, as shown).!
g. Turn the head to align the spout with the bottle label.!
h. Press down on the head with one hand. While pressing, tighten the collar (turn
clockwise) with your other hand. Use only twofingers and your thumb to turn (no
need to use the entire force of your hand). As you turn, the gasket will expand
inside the bottleneck, sealing and holding the bottle from the inside.!
1. Press down on the
head with one hand.
The head should rest
firmly on the bottle.
Do not let the tube
push the head out!
of the bottle. (instead,
the tube should coil
slightly at the bottom
of bottle.)!
2. Tighten the collar (turn
clockwise) with your other hand.
Turn only with your thumb and two
fingers, to avoid applying too much
pressure.!
3. Do not over-tighten. If more than
three threads become visible, either
the gasket is damaged or you could
be using the wrong size. Untighten
the collar, remove the head, check
the gasket for damage, verify the
correct size, wipe the gasket and
bottleneck dry,!
and try again.!
Napa Technology Customer Support 800.603.6550!Page 15!

2. Final Verification!
Lift the bottle in the air about 1-2”, holding it only by the head. Gently pull up the head
a bit higher and lower it down a few times, to check if it holds the bottle properly. If all
has been done correctly the bottle should not slip out, and you should not feel any
looseness of the gasket inside the bottleneck.!
If the bottle begins to slip, or the gasket feels loose, put the bottle down and do the
following:!
1. Hold the head in place with one hand.!
2. With your other hand, fully un-tighten the collar (until it touches the main body).!
3. Remove the dispensing head from the bottle and detach it from the pickup tube.!
4. Check the gasket for damage. If needed, replace with an undamaged head.!
5. Check the correct gasket size. If needed, switch to a wider gasket size.!
6. Wipe the gasket and inner part of the bottleneck dry, and try again.!
Congratulations! You are now ready to insert the bottle into the WineStation.!
Important: When carrying around bottles
with the dispensing heads attached, always
hold the bottle itself (and not just the head),
as an extra safety precaution.!
Napa Technology Customer Support 800.603.6550!Page 16!
Dispensing Head Instructions
http://www.napatechnology.com/
dispensing-head-instructions/

The WineStation is designed to provide you with a wide range of operating functions.
Below you will find an in depth review of each LCD Screen and its function:!
1. Unlocking your WineStation!
a. Open the front door.!
b. Lift the spout cover.!
c. Underneath the spout cover you
will find a switch board. Move the
switch down one notch to access
the main service menu.!
d. Select “Bottle Service.”!
e. Select “Exit.”!
f. Next, move the switch back to
the up position.!
g. Close the spout cover.!
h. Close the front door.!
i. Your WineStation is now unlocked.!
2. WineStation Bottle Service Set Up Screen,
Default Settings:!
a. To begin utilizing the functionality
of your WineStation, first open the
front door, lift the spout cover and
move the switch down one notch
to get to the main menu.!
Note: When you are done using the service menu, you will need to move the switch back
to the up position in order to use the dispensing function of the system.!
Operations and Screen Functions!
Napa Technology Customer Support 800.603.6550!Page 17!

b. To begin preparing your bottles
for insertion in the WineStation,
select “Bottle Service.”!
c. !From the Bottle Service Screen,
you will select “Wine Display”so
that you may set up the display to
showcase Wine Type, Wine Year,
and Wine Varietal.!
d. !Now you can select Wine Type
(Red or White).!
e. !Select the varietal by utilizing!
the side buttons to scroll through
the list, then press “Exit”.!
The Pristine PLUS has over 100 wine
varietal options including unique offerings,
found using the Other button.!
See Appendix for complete listing.!
Napa Technology Customer Support 800.603.6550!Page 18!

f. !Next you will select Set Year,
utilizing the side buttons!
to set year.!
g. !Next you will select “Set VOL”.!
3. Setting Pour Volumes.!
a. Volume sizes will appear on the
Volume Size selection screen.
Using the buttons on the right,
you can set the desired pour
volume in ½ounce increments,
as shown right:!
4. Prepping Bottles For Use.!
a. First, insert the wine bottle with the attached Clean-Pour dispensing head
into the WineStation position.!
Napa Technology Customer Support 800.603.6550!Page 19!

b. !At this time, select “Purge” so that
the argon or food grade nitrogen will
replace the oxygen in the bottle,
assuring preservation.!
c. !The wine is now ready for serving.
You can now repeat this process
for the other 3 positions.!
5. Setting the Temperature (since this
system is equiped with a Dual Zone
divider, this will set the temp for the
right zone-the white wine side)!
a. To set the desired temperature,
select “WineStation Service” from
the default menu screen and then
select “More.”!
b. !Next, select “Set Temp”.!
Napa Technology Customer Support 800.603.6550!Page 20!
Table of contents
Other Napa Technology Beverage Dispenser manuals
Popular Beverage Dispenser manuals by other brands

Carnival King
Carnival King 382SM1 user manual

Cornelius
Cornelius A.B.S. Unit Operator's manual

Cornelius
Cornelius CTP-20 Illustrated parts list

Multiplex
Multiplex Blend-In-Cup Machine Welbilt KitchenCare... manual

Bunn
Bunn TDO-N-3.5 Specifications

Cornelius
Cornelius FCB PINNACLE 2 Flavour Operator's manual

Taylor
Taylor RD30 Operator's manual

OYPLA Home
OYPLA Home 3645 user manual

Bunn
Bunn TCD-1 Installation and operating manual

lancer
lancer 85-3151R-VV Operation manual

Cornelius
Cornelius Cornelius VANTAGE POST-MIX DISPENSER Service maintenance manual

Cornelius
Cornelius FlavorFusion 255 installation instructions