Napa Technology WineStation Home User manual

Napa Technology Customer Support 800.603.6550
WineStation®Home Model
Manual 2011

Napa Technology Customer Support 800.603.6550 Page 2
Introduction
Thank you for your purchase of the WineStation®Intelligent Dispensing System.
The WineStation®is the world’s most advanced, automated, measured dispensing and
preservation solution. Napa Technology has created the WineStation as an exquisite wine
serving solution that lets you enjoy the freshest wine, each and every time. Our patented
Clean-Pour™hygienic dispensing technology with its unique seal and purge delivery, will
provide a winery fresh taste every time for a period of 60 days. This feature allows you to
uncork and enjoy multiple vintages from your personal wine collection without having to
throw away what’s left over from the evening.
We strive for superior customer satisfaction and timely, effective support. Please do not
hesitate to contact us at any time so that we may serve your needs.
Sincerely,
The Napa Technology Team

Napa Technology Customer Support 800.603.6550 Page 3
Section Page
1. Safety Messages…………………………………………………….................................. 4
2. Installation Instructions………………………………….………..................................... 9
3. System Overview …………………………….……………..…..….................................. 12
4. Attaching the Clean-Pour Dispensing Heads …………………....................................13
5. WineStation Operation & Screen Functions.....…….……………….............................17
6. Cleaning and Care ………………………………….….......…….................................... 25
7. Additional Functions.......………………………….…….......…...................................... 30
Appendix:
8. Product Specifications……………………….........….................................................... 31
9. Clean-Pour Head Gasket Removal & Replacement…………………………................ 35
10. Gas Replacement Orders…………………………………............................................. 37
11. Troubleshooting Guide…………………………………….……..................................... 38
12. Limited Warranty Terms & Conditions………………….……....................................... 41
Table of Contents

Napa Technology Customer Support 800.603.6550 Page 4
This guide contains many important safety messages.
Always read and obey all safety messages.
Safety Messages
This is the safety alert symbol. It alerts you to safety messages that
inform you of hazards that can kill or hurt you or others, or
cause damage to the product.
All safety messages will be preceded by the safety alert symbol and the hazard signal word
DANGER, WARNING, or CAUTION. These words mean:
All safety messages will identify the hazard, tell you how to reduce the chance of injury,
and tell you what can happen if the instructions are not followed.
You will be killed or seriously injured if you do not
follow instructions.
You can be killed or seriously injured if you do not
follow instructions.
Indicates a hazardous situation which, if not avoided,
may result in minor or moderate injury or
product damage.
Your hand or fingers can be injured.
Do not place in area of moving parts.

Napa Technology Customer Support 800.603.6550 Page 5
Excessive Weight Hazard
Use two or more people to move and install WineStation.
Failure to do so can result in back or other injury.
Electrical Shock Hazard
FOR PERSONAL SAFETY, the WineStation must be properly grounded.
Have the wall outlet and the circuit checked by a qualified electrician
to make sure the outlet is properly grounded.
Recommended Grounding Method
The WineStation should always be plugged into its own individual properly grounded electrical outlet rated
for 115 Vac, 10A 50/60 Hz, AC only (230Vac 10A 50/60Hz in Europe). This provides the best performance
and also prevents overloading facility wiring circuits which could cause a fire hazard from overheated wires.
It is recommended that a separate circuit serving only the WineStation be provided. Use receptacles which
cannot be turned off with a switch or pull chain. Do not use an extension cord. Where a standard two-
prong wall outlet is encountered, it is your personal responsibility and obligation to have it replaced with
a properly grounded three-prong wall outlet.
Do not, under any circumstances, cut or remove the third (ground) prong from the power cord.
NOTE: Before performing any type of installation, cleaning, or removing of parts, turn the control OFF and
then disconnect the WineStation from the electrical source. When you are finished, reconnect the
WineStation to the electrical source and reset the controls to the desired setting.
3-prong grounding type wall receptacle
Ensure 3-prong grounded plug
exists before use
Ensure proper grounding exists before use
Warning Messages and Safety Information

Napa Technology Customer Support 800.603.6550 Page 6
To reduce the risk of fire, electric shock, or injury to persons using your product, basic safety
precautions should be followed, including the following;
• Readallinstructionsbeforeusingthisproduct.
• TheWineStationmustbeproperlyinstalledinaccordancewiththeinstructionsprovided
by the manufacturer.
• UnplugyourWineStationorturnoffpoweratthecircuitbreakerorfuseboxbeforecleaning,parts
replacement or repairs. Servicing must be performed by a qualified service professional.
• NEVERunplugyourWineStationbypullingonthepowercord.Alwaysgriptheplugrmlyandpullit
straight out from the outlet.
• Repairorreplaceimmediatelyallelectricservicecordsthathavebecomefrayedorotherwisedamaged.
Do not use a cord that shows cracks or abrasion damage along its length or at either the plug
or connector end.
• WhenmovingyourWineStationawayfromthewall,becarefulnottorolloverordamagethepowercord.
• DONOTstoreorusegasolineorotherammablevaporsandliquidsinthevicinityofthisor
any other appliance.
• DONOTallowchildrentoclimb,stand,orhangontheWineStationdoors.Theycoulddamage
the WineStation and seriously injure themselves.
• Keepngersoutofpinchpointareas;clearancesbetweenthedoorsandcabinetarenecessarilysmall.
Be careful closing doors when children are in the area.
• Donotinsertpens,pencilsorotherobjectsintoanyopeningoftheWineStation.Donotputhandsor
foot or metal sticks into air vents, base grille, or bottom of the WineStation. You may be injured or
receive an electrical shock.
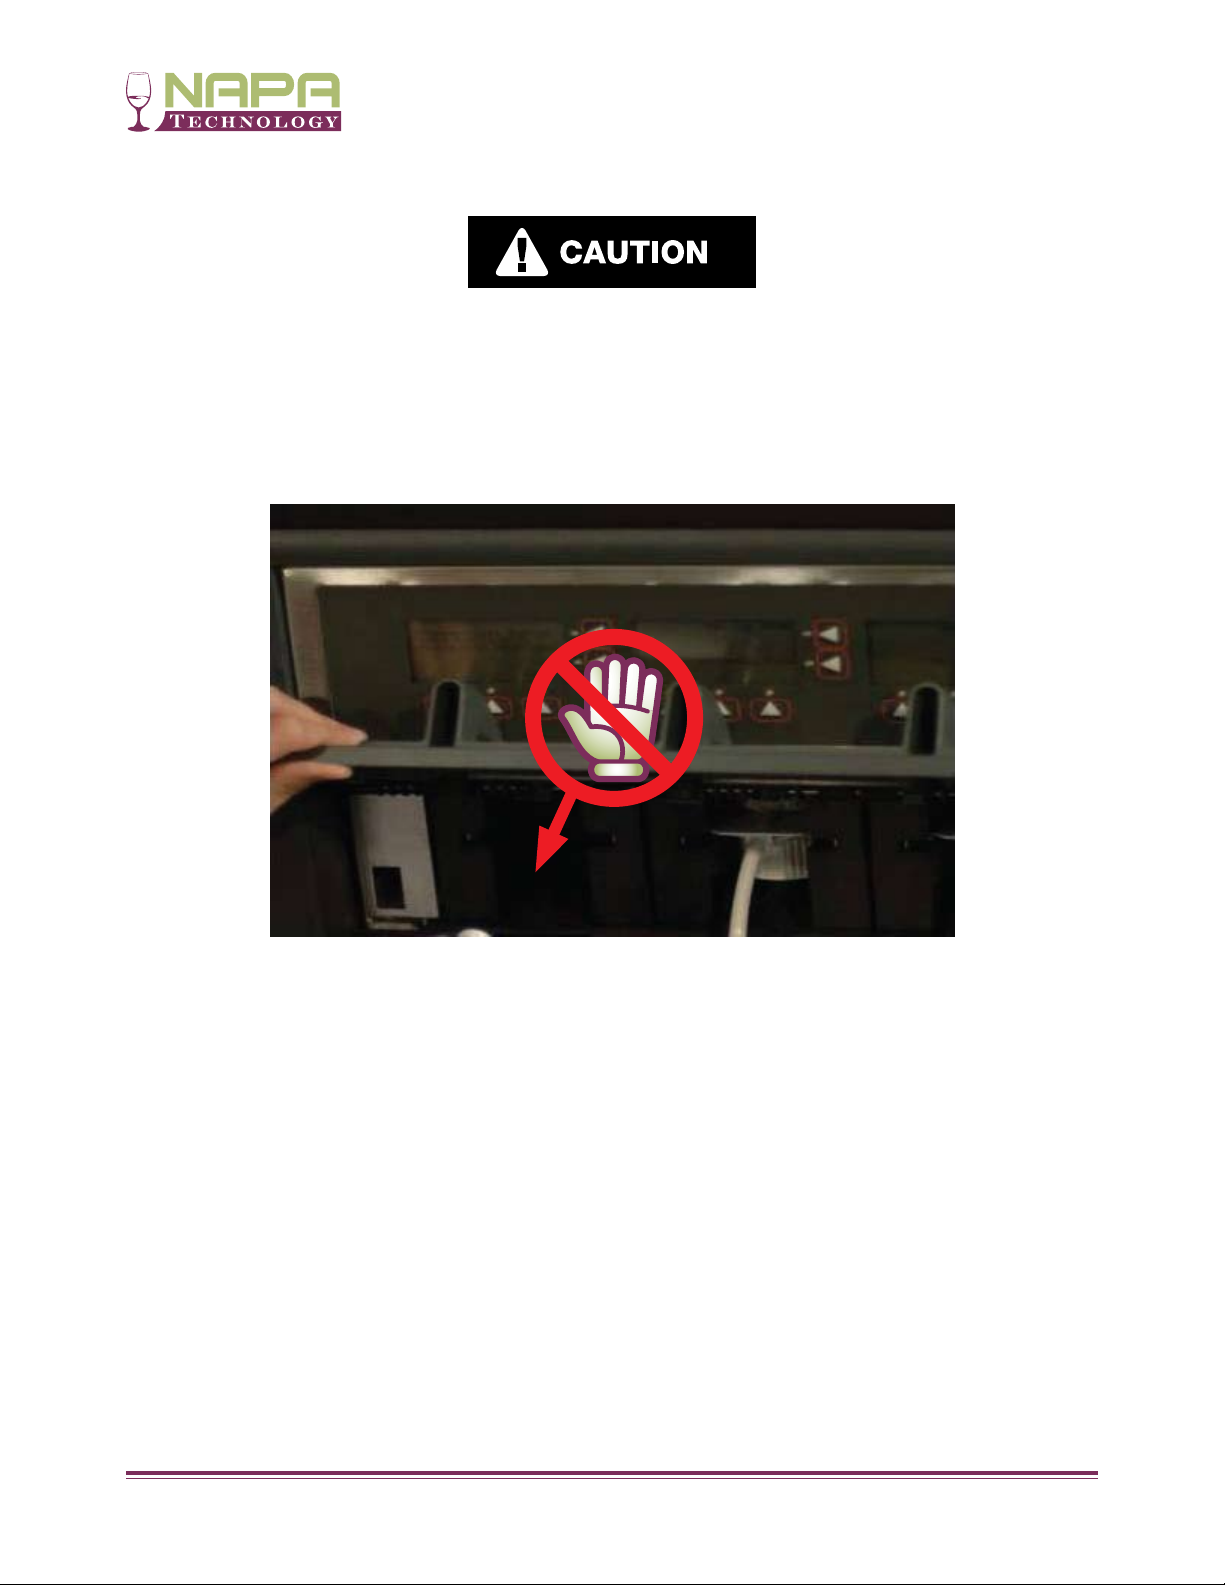
• Avoidcontactwiththemovingparts.DONOTplacengersorhandsintothebottlebayassembly
to diagnose potential problems with the WineStation.
• Donotmodifyorextendthepowercordlength.Itwillcauseelectricshockorre.
• Careshouldbetakenwhenhandlingpressurizedgas.Youshouldensurethepropertubingand
shut-off valves are used.
• Notsuitableforinstallationinanareawhereawaterjetcouldbeused.
• Onlytobeinstalledinlocationswhereitsinstallationandmaintenanceisrestrictedtotrainedpersonnel.
• TheWineStationmustbeplacedinahorizontalposition.
** SAVE THESE INSTRUCTIONS FOR FUTURE REFERENCE **
Important Warning and Safety Instructions

Napa Technology Customer Support 800.603.6550 Page 7
Access to the WineStation for service, including bottle changing and preparation,
should be limited to qualified service professionals and trained staff only!
DO NOT place fingers or hands into the bottle bay assembly to
to diagnose potential problems with the WineStation.

Napa Technology Customer Support 800.603.6550 Page 8
If you have not already done so, please review the product specifications in the Appendix,
and ensure that the intended installation location meets all of the technical and
legal requirements.
In particular, consider the following:
• Adequatespaceavailability
• Adequateweightloadcapacity
• Adequateventilation(seedrawingsforaircirculationpaths)
• Anearbygroundedelectricaloutlet
• Sourcingofexternalargonornitrogengascylinder
(preferably two cylinders, one for backup).
• Anypotentialsafetyhazardsthatmightinterferewiththeinstallation
or operation of the unit
• Compliancewithanyapplicablelaws,regulations,standards,andotherlegal
requirements that may apply to the installation and operation of the WineStation
in your establishment.
Finally, please ensure that the installation surface is level, clean, dry, and free of any debris,
loose parts or potential safety hazards that might interfere with the installation.
Preparing the Installation Site
IMPORTANT NOTICE:
Before installing the WineStation, please ensure that you have read, understood
and complied with the safety information and installation requirements
contained in the previous section.
Failure to do so could result in death, serious injury, or product damage,
and void your warranty.
If you have any questions or concerns regarding the above, please contact us
before you proceed.

Napa Technology Customer Support 800.603.6550 Page 9
1. Unpack the WineStation
Unpacking and Installing your WineStation(s)
a. Move the box to the installation location. Note: the WineStation is packed upside
down. You will need to roll the box over and lift it up, before you can access the
WineStation.
b. Open the top of the box and remove any loose accessories such as the drip trays
and regulator (if you have not already done so). Do not remove the protective
foam packaging.
c. Foldoneofthetopapsoutwardsandrolltheboxontothatside.Theap
should now be folded under the box.
d. Foldtheremainingthreeapsoutwards,andcarefullyrolltheboxonemoretime.
Theopensideoftheboxshouldnowbefacingdown,andallfourapsshouldbe
facing outwards.
e. Carefully lift the box upwards. The WineStation should now be standing upright
inside the foam packaging.
f. Remove the top part of the foam packaging from the WineStation.
g. Remove the film from the door and WineStation label, if not already removed.
i. To remove any glue residue, rub a small amount of liquid dish soap over
the adhesive with your fingers. Wipe with warm water and dry.
ii. Donotusesharpinstruments,rubbingalcohol,ammableuids,or
abrasive cleaners to remove tape or residue. These products can damage
the surface of your WineStation.
Excessive Weight Hazard!
Your WineStation is heavy (see Product Specifications).
Always use two or more persons to move the WineStation
Failure to do so can result in serious back or other injury.
Protect your Counter top / Installation Area!
When moving the WineStation for installation, cleaning
or service purposes, be sure to protect your counter top.
Always lift and pull the WineStation straight out when
moving it. Do not wiggle or walk the WineStation, as
this may cause counter top and/or product damage.

Napa Technology Customer Support 800.603.6550 Page 10
2. Installing the WineStation.
a. Carefully lift the WineStation, while detaching it from the lower foam cushioning,
and position the WineStation into the installation location.
b. Ensure that the WineStation is properly leveled. If necessary, adjust the four
leveling feet on the bottom of the unit by turning them in the appropriate
direction. Normally, all four leveling feet should be fully tightened (as short as
possible). DO NOT remove the leveling feet – they are required for proper air
circulation; doing so will void the warranty. (See Appendix Product Specifications
for clearance and spacing information.)
3. Connecting the Gas Cylinder.
Note: If you have purchased argon or food grade nitrogen gas filled canister tank from an
external national gas company, follow these instructions:
a. Install the gas regulator assembly (provided) into the gas tank
(customer provided).
b. Plug one end of the gas tubing with male/female connectors (provided) into the
connector at the back of the WineStation.
c. Plug the other end of the gas tubing into the gas regulator assembly.
d. Turn gas tank valve on.
Note: If you have purchased a pack of Napa Technology Argon Gas disposable tanks
follow these instructions:
a. Remove the plastic cap from the gas tank.
b. Install the gas regulator assembly (provided) into the gas tank.
Note: The gas regulator provided with the purchase of the Napa Technology
Argon Gas disposable tanks are different from the regulators provided to
customers who choose to source the gas externally.
Unpacking and Installing your WineStation(s)

Napa Technology Customer Support 800.603.6550 Page 11
c. Plug one end of the gas tubing with male/female connectors (provided) into the
connector at the back of the WineStation.
d. Plug the other end of the gas tubing into the gas regulator assembly.
e. Once the regulator has been secured to the gas tank and the gas tubing has been
plugged in, turn the knob on the top of the regulator to fully on.
4. Power on the WineStation.
a. Plug the power cord (provided) into the power plug on the rear of the
WineStation.
b. Plug the other end into a grounded power outlet (see Appendix-Product
Specifications (p 34)).
c. Turn on the power switch on the rear of the WineStation.
d. The WineStation will run through a series of self-tests, which could take up
to approximately 5 minutes. Once this process is completed, the green lights
below the LCD screens will be illuminated, indicating that the WineStation is
ready for service.
Congratulations!!!
You have completed the Hardware Installation.
You are now ready to set up your wine bottles.
Unpacking and Installing your WineStation(s)

Napa Technology Customer Support 800.603.6550 Page 12
System Overview
Easy to Read LCD Screen shows the
Wine Information & Pricing for a Taste,
Half or Full Glass pour.
Patented
Clean-Pour
Technology
keeps Wine
fresh for up
to 60 days
Locking
Service Door
Nitrogen or Argon Gas
Preservation System for
Increased Wine Shelf Life
Cabinet Available in
Bronze-Copper
(Custom colors available upon request)
State of the Art Cooling and Temperature
Control gives you the Optimum Tasting
Experience

Napa Technology Customer Support 800.603.6550 Page 13
1. Clean-Pour Head Overview:
Attaching the Dispensing Heads
Gasket Sizes and Colors
The inner gaskets come in different sizes
(to fit various bottleneck widths).
Each gasket size has its unique color.
Wide
(Green)
(not shown)
Cap
Spout
Pick Up Tube
Collar
Main
Body
Rotor
Switch
Standard
(Red)
Narrow
(White)

Napa Technology Customer Support 800.603.6550
a. Open the bottle and place it on a flat, dry surface.
b. If you have a Head Selection Tool (see photo), insert it into
the bottleneck to determine the correct gasket size.
If you do not have a Head Selection Tool, try inserting
different heads into the bottle, from wide to narrow (green,
red, white), until you find the correct size that fits.
Note:
•Thegasketshouldbefullyun-tightened(collaralltheway
up, touching the main body) before you insert the head.
•Thecorrectsizedgasketshouldgointothebottleeasily,
with one arm extended forward. Do not lean on the head
or use force, as this may damage the gasket.
c. Take a clean dispensing head of the size you selected. Check that the gasket is in
good condition, the cap is properly mounted, and the rotor switch is in the correct
position. (See the “Cleaning and Care” section for more details).
d. Insert a clean pick up tube into the bottle. (It is normal for the upper end of the tube
to extend beyond the tip of the bottle at this point).
e. Insert the upper end of the pick up tube firmly into the opening on the bottom of the
head,asshown.(Keeptherestofthetubeinsidethebottlewhiledoingthis).
Page 14
Head Selection Tool
f. Carefully insert the dispensing head (with
the pick up tube attached) into the bottle.
The head should go in easily with one arm
extended forward. Do not lean on the head
or force it in, as this may damage the gasket
and/or the top of the glass wine bottle.

Napa Technology Customer Support 800.603.6550 Page 15
g. Turn the head to align the spout with the bottle label.
h. Press down on the head with one hand. While pressing, tighten the collar (turn
clockwise) with your other hand. Use only two fingers and your thumb to turn (no
need to use the entire force of your hand). As you turn, the gasket will expand
inside the bottleneck, sealing and holding the bottle from the inside.
Important:
Before inserting the head into the
bottle, always make sure that the
collar is fully un-tightened (turn the
collar all the way up until it touches
the main body, as shown).
1. Press down on the
head with one hand.
The head should rest
firmly on the bottle.
Do not let the tube
push the head out
of the bottle. (instead,
the tube should coil
slightly at the bottom
of bottle.)
2. Tighten the collar (turn
clockwise) with your other hand.
Turn only with your thumb and two
fingers, to avoid applying too much
pressure.
3. Do not over-tighten. If more
than three threads become visible,
either the gasket is damaged or you
could be using the wrong size.
Untighten the collar, remove the
head, check the gasket for damage,
verify the correct size, wipe the
gasket and bottleneck dry,
and try again.

Napa Technology Customer Support 800.603.6550 Page 16
2. Final Verification
Lift the bottle in the air about 1-2”, holding it only by the head. Gently pull up the
head a bit higher and lower it down a few times, to check if it holds the bottle properly.
If all has been done correctly the bottle should not slip out, and you should not feel
any looseness of the gasket inside the bottleneck.
If the bottle begins to slip, or the gasket feels loose, put the bottle down and do the
following:
1. Hold the head in place with one hand.
2. With your other hand, fully un-tighten the collar (until it touches the main body).
3. Remove the dispensing head from the bottle and detach it from the pickup tube.
4. Check the gasket for damage. If needed, replace with an undamaged head.
5. Check the correct gasket size. If needed, switch to a wider gasket size.
6. Wipe the gasket and inner part of the bottleneck dry, and try again.
Congratulations! You are now ready to insert the bottle into the WineStation.
Important: When carrying around bottles
with the dispensing heads attached, always
hold the bottle itself (and not just the head),
as an extra safety precaution.

Napa Technology Customer Support 800.603.6550 Page 17
The WineStation is designed to provide you with a wide range of operating functions.
Below you will find an in depth review of each LCD Screen and its function:
1. Unlocking your WineStation
a. Open the front door.
b. Lift the spout cover.
c. Select Bottle Service.
d. Select Exit.
e. Close the spout cover.
f. Close the front door.
Operations and Screen Functions

Napa Technology Customer Support 800.603.6550 Page 18
2. WineStation Bottle Service Set Up Screen, Default Settings:
a. To begin utilizing the functionality of your WineStation, begin with selecting
“Bottle Service” on the LCD screen by selecting the button of the action desired.
b. To begin preparing your bottles for insertion in the WineStation,
select “Service Mode.”
c. From the Service Mode Screen, you will select “Bottle Service.”

Napa Technology Customer Support 800.603.6550 Page 19
d. Once on the Bottle Service Screen, you will then select new bottle, so that
you may set the display to showcase Wine Type, Wine Year, and Wine Varietal.
e. Now select Wine Type (Red or White)
f. Now select the Wine Varietal, using the side buttons to scroll through
varietal options.
g. Next you will select the Year, utilizing the side buttons to set year.

Napa Technology Customer Support 800.603.6550 Page 20
h. When complete, return to the Bottle Service Menu.
3. Setting Pour Volumes:
This feature allows you to set three pour volume sizes in 1/2 ounce increments.
a. To do so, from the Bottle Service Screen, select Set VOL
b. Volume sizes will appear on the Volume Size selection screen.
i. Using the buttons on the right, you can set the desired pour volume
in ½ ounce increments, as shown below:
Table of contents
Other Napa Technology Beverage Dispenser manuals
Popular Beverage Dispenser manuals by other brands

Carnival King
Carnival King 382SM1 user manual

Cornelius
Cornelius A.B.S. Unit Operator's manual

Cornelius
Cornelius CTP-20 Illustrated parts list

Multiplex
Multiplex Blend-In-Cup Machine Welbilt KitchenCare... manual

Bunn
Bunn TDO-N-3.5 Specifications

Cornelius
Cornelius FCB PINNACLE 2 Flavour Operator's manual

Taylor
Taylor RD30 Operator's manual

OYPLA Home
OYPLA Home 3645 user manual

Bunn
Bunn TCD-1 Installation and operating manual

lancer
lancer 85-3151R-VV Operation manual

Cornelius
Cornelius Cornelius VANTAGE POST-MIX DISPENSER Service maintenance manual

Cornelius
Cornelius FlavorFusion 255 installation instructions