National Geographic IN103TOP User manual

1
Jumbo Wireless Thermo-Clock
Thermo-horloge jumbo sans fil
Jumbo draadloze thermo-klok
Drahtlose Wetterstation
Reloj gigante con termómetro inalámbrico
Jumbo trådløs termoklokke
Jumbo trådløs termomete-klocka
Jumbo trådløst termo-ur
Duzy zegar z bezprzewodowy termometrem
ENG
FR
DU
DE
ES
NO
SW
DA
PL
IN103TOP
3 - 8
9 - 14
15 - 20
21 - 26
27 - 32
33 - 37
38 - 43
44 - 49
50 - 55

2
1.
2.
3.
4.
1. Time / Heure / Tijdvenster / Uhrzeit / Tiempo / Tidsvindu / Tidsfönster /
Tidsvindue / Godzina
2. Outdoor Temperature / Tempérture extérieure / Buitentemperatuur /
Aussentemperatur / Temperatura exterior / Utendørs temperatur /
Utomhustemperatur / Udendørstemperatur / Temperatura na zewnątrz
pomieszczenia
3. Indoor Temperature / Température intérieure /
Binnen Temperatuur / Innentemperatur / Temperatura de Interior / Innendørs
termometer / Inomhustemperatur /
Indendorstemperatur / Temperatura Wewnętrzny
4. Wireless Remote Sensor / Capteur sans fil / Draadloze buitensensor / Entfernter
Radiosensor / Sensor remoto inalámbrico / I trådløs fjernsensor /
Trådlös fjärrsensor / Trådløse eksterne sensor / Bezprzewodowy zdalny czujnik
5. Alarm / Alarme / Alarm / Alarm / Alarma / Alarm / Alarm / Alarm / Alarm
6. Low Battery Signal / Indicateur de pile faible / Batterij bijna laag / Symbol für
schwache / Batterie / Icono de batería baja / Lavt batteri-ikon /
Ikon för låg batterinivå / Ikon for lav batteristatus / Ikonę słabej mocy baterii
7. Calendar Window / Fenêtre du calendrier / Kalender venster / Datumsanzeige /
Ventana de calendario / Kalendervindu / Kalenderfönster / Kalendervindue /
Okno kalendarza
5.
6.
7.

3
Jumbo Wireless Thermo-Clock
Instruction Manual
Battery Installation & Registration of Sensors
IMPORTANT: Install batteries to the home receiver FIRST and then the remote sensor.
For Home Receiver:
Remove the battery cover from the back of the unit. Insert (2) AA size batteries into the
battery compartment according to polarity indicated, close the battery cover. After installing
batteries to the home receiver, the outdoor channel (--) dash icon will flash for 2 minutes
indicating that the unit is waiting for remote sensor registration signal. The batteries must
be installed in the remote during this 2 minute interval. If the batteries have been placed into
the unit correctly, a beep will be heard.
For Wireless Remote Sensor:
During the 2 minutes that the home receiver is looking for home registration signal,
remove the battery cover using a coin or flat head screwdriver. Insert (1) 3V battery into
the compartment according to polarity indicated. Place the round rubber seal into the
compartment and replace the battery cover.
• If registration is successful, a beep confirmation tone can be heard. If not, check the
condition of the AA batteries, repeat the registration procedure again. Close the battery
door and back cover and tighten the screw on the sensor.
Note:
• The sensor will transmit the registration code automatically to complete the registration
after the batteries are inserted. If the batteries have already been inserted into the battery
compartment, use a pen to press & hold the yellow button for 2 seconds for registration.
• If (---) dash icon appears on the outdoor channel, move the sensor closer to the home
receiver. Repeat the registration procedure again.
Getting Started
Immediately after the installation of the batteries, the indoor temperature will show. The unit
starts to search for the outdoor temperature signal. The outdoor temperature will show in 3
minutes provided it is within the transmission range.
+
+
–
–
A
BC
DRESET
3V
TX

4
After the outdoor temperature is received, the unit will automatically
search for the DCF77 signal (Radio reception symbol will flash at
the top of the screen) “ ”. The correct date and time will show
as soon as the DCF77 signal is received.
The temperature will appear on the LCD of the receiving unit. If not, press and hold the yellow
button for 2 seconds on the back of the sensor to force out sensor registration signal.
About Radio Reception
Unit will search for radio reception for 5 minutes and then the radio reception symbol will
disappear. You may need to set the correct date and time manually.
Manual Clock Setting
If setting the unit manually, after the OUT temperature is received, press and hold button “B”
(CLK) to enter the clock setting mode.
12/24 Hour Format
To enter setting mode, press and hold button “B”, hour format “12Hr” flashes at the third
line of display. Press button “A” (SET) to select 12 or 24 hour format. Press button “B” to
confirm.
Time Zone Adjustment
After hour format is set, press button “A” to adjust the time zone of your local area:
0 Central Time Zone
+1 One hour ahead
+2 Two hours ahead
-2 Two hours behind
-1 One hour behind
Press button “B” (CLK) to confirm.
Multi Language Day of Week
The display language for the day of the week is selected in the Clock Calendar mode and
will flash in the “day of week” box. The Language format is as follow:
E - English
G – German
F – French
I - Italian
Press button “B” (CLK) to confirm.
Manual Time Setting
After the language for display is set, minute digits will flash. Press button “A” to set the
minutes. Press “B” to continue to the hour. The hour digits will flash, press button “A” to set
the hours. PM time will be indicated by PM.
Manual Date and Day Setting
After hour and minute are set, date digit flashes, press button “A” to set the date. Then the
month digit flashes, press button “A” to set the DAY. Press button “B” to confirm.

5
Dual Alarm Setting
Up to 2 Alarm times may be set.
1. Check the Alarm time
Press button “D” to check for Alarm 1 (A1) and Alarm II (A2).
Press once more and the date/day mode will be displayed.
2. Set the Alarm Time
Press and hold button “D” to enter Alarm (A1) or Alarm II (A2) setting mode. The minute
digits flash, press button “A” to set the minutes. Press button “D” to confirm. Then the
hour digits flashes, press the button “A” to set hours. Press button “D” to confirm.
3. Activate the Alarm
Press button “A” once to activate Alarm 1 “ “
Press button “A” again to activate Alarm 2 “ “
Press button “A” again to activate Booth Alarm 1 & 2 “ “
Press button “A” again, all alarms will be deactivated.
4. Snooze alarm
To enter snooze alarm mode (Zz), press any button when the alarm sound is on. Alarm
sound will stop first and then reactivate 5 minutes later, you can keep the snooze function
working for a maximum of 15 minutes.
To turn off the alarm sound, wait 5 minutes, and then the alarm sound will stop automatically
or press button “A” twice.
˚C / ˚F Selection
Press and hold button “C”, ˚C / ˚F will flash. Press button “A” to select degrees ˚C or ˚F and
press button “C” to confirm.
Maximum and Minimum Memory
1. Recall Max / Min memory:
Press button “C” once: Max and Min of IN temperature will show.
Press button “C” again: Max and Min of OUT temperature will show.
Press button “C” again: Back to normal display.
2. Reset Memory:
Press button “C” to view the Max / Min Memory of IN temperature. Press the button “A”
to clear the memory.
Press button “C” again to view the Max / Min Memory of OUT temperature, press button
“A” to clear the memory.
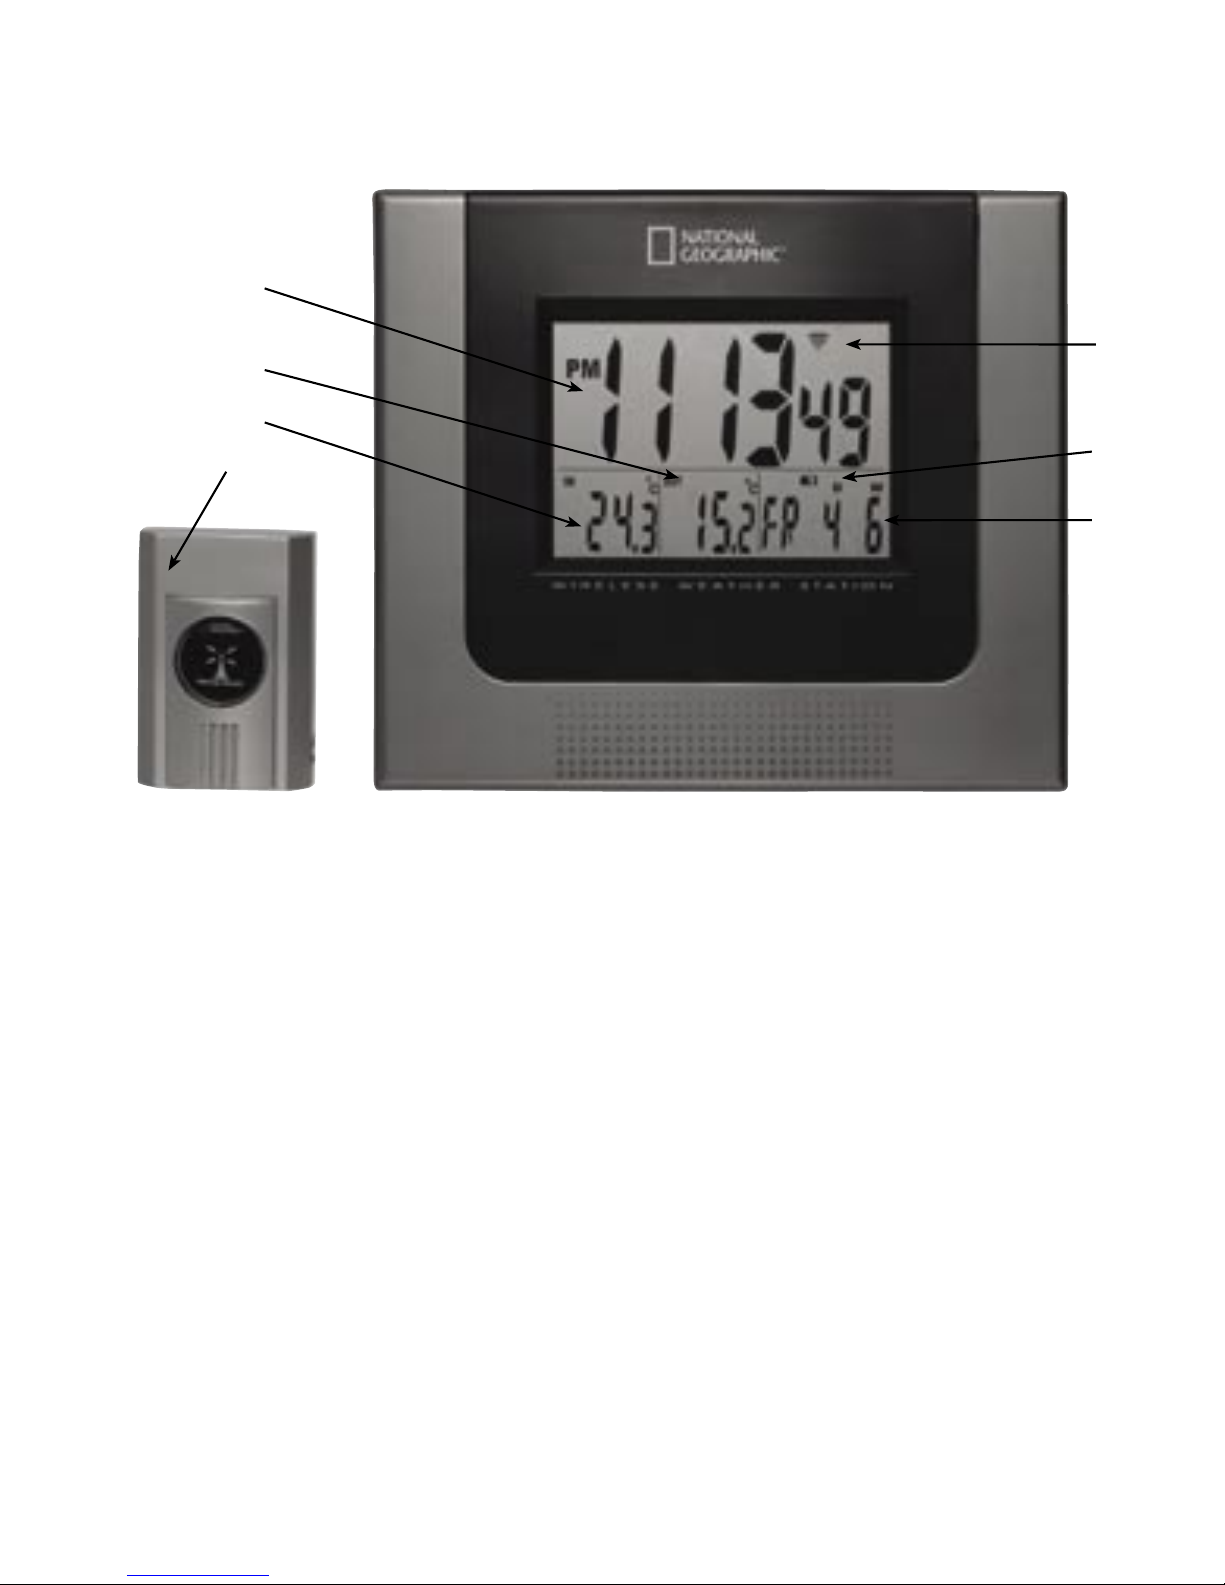
Transmitter Installation
To prevent temperature interference, place the transmitter away from direct sunlight, air
conditioning, and heater vents. To keep the unit in good operating condition, do not put the
transmitter in conditions over 60°C or under -20°C (140°F or under -4°F).
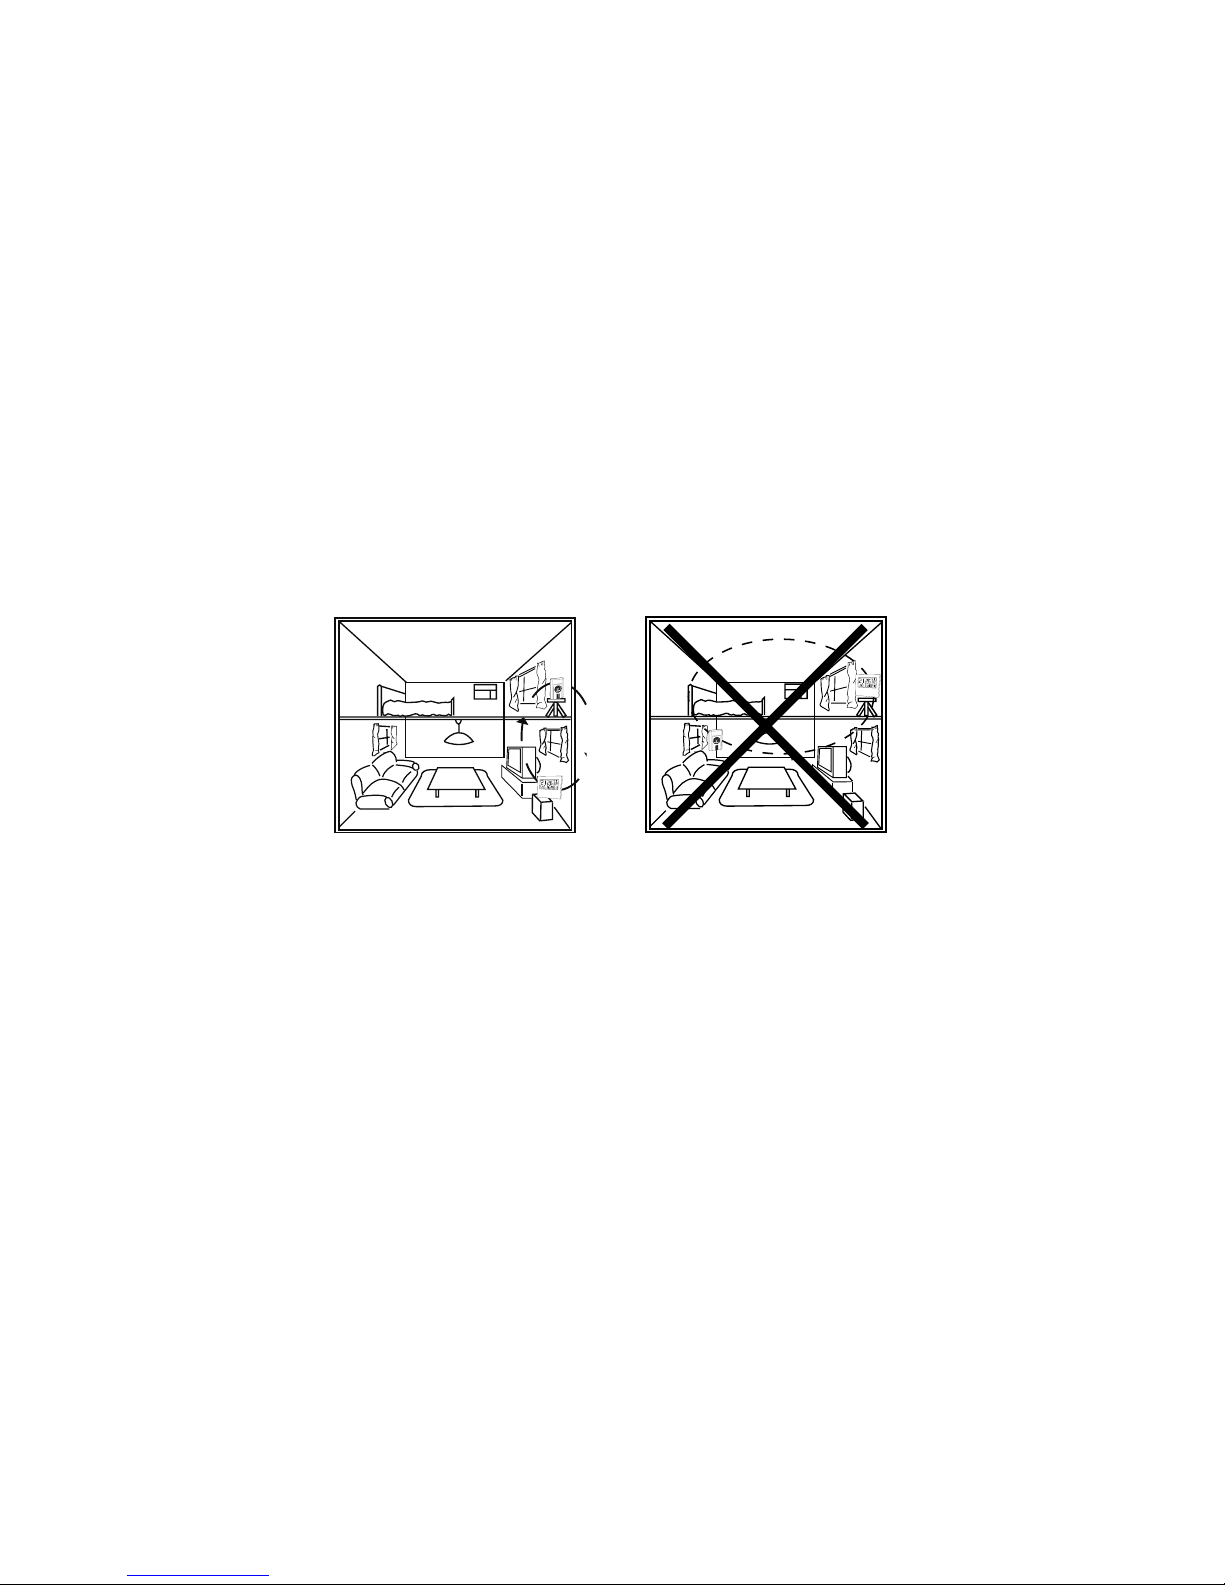
For accurate data transmission do the following:
• Keep in open air at an operating distance of 30 metres maximum between the outdoor
transmitter and the indoor unit.
• When there are obstacles between the two units (e.g. concrete walls, home appliances,
or metal objects), keep the operating distance less than 5 metres apart.

6
• Keep the outdoor transmitter and the indoor monitor in an open loop and as close to each
other as possible (e.g. put both the outdoor transmitter and indoor monitor at the same
side of the windows)
• Put the outdoor transmitter in a position higher than the weather station, but not on a
concrete wall or a metal plate.
Care of your Wireless Thermometer
Wipe off dirt by using a soft damp cloth and a solution of mild detergents, wipe dry with
a soft dry cloth. Avoid exposing this electronic device to extreme temperatures including
prolonged exposure to direct sunlight or wind chill. Handle the precision device with care,
never drop on hard surfaces or subject to severe shock. The remote sensor is splash proof
designed, never immerse into water or expose to heavy rain.
Battery Replacement
When any of the batteries (home receiver or remote sensor) becomes weak, the low battery
icon will appear on the respective channel. Replace batteries in the unit whenever the icon
appears. Follow the registration procedures mentioned in this manual.
IN
DM
OUT
DM
OUT

7
SPECIFICATIONS
Displayed Indoor Temperature
Range
0°C to 50°C (32°F to 122°F)
Recommended Remote Sensor Operating Range
Sensor with LCD Display 0°C to +50°C (+32°F to +122°F)
Sensor without LCD Display -20°C to 50°C (-4°F to 122°F)
Detachable Outdoor Probe -50°C to 70°C (-58°F to 158°F)
Transmission Range Maximum 30m (100 ft) open area
Transmission Frequency 433.92 MHz.
Clock Quartz
Batteries
Thermometer Station DC 1.5V size AA 2 pieces (home receiver)
Remote Sensor DC 3V x 1 pieces (sensor)
Battery Life (Status)
Receiving Unit Approximately 1 year
Remote Sensor Approximately 6 months
Disposal of the device (environment)
At the end of the product lifecycle, you should not throw this product into the
normal household garbage but bring the product to a collection point for the
recycling of electrical and electronic equipments. The symbol on the product,
user guide and/or box indicate this.
Some of the product materials can be re-used if you bring them to a recycling point. By
reusing some parts or raw materials from used products you make an important contribution
to the protection of the environment. Please contact your local authorities in case you need
more information on the collection points in your area.
Batteries must be removed before disposing of the device.
Dispose of the batteries in an environmental manner according to your country regulations.

8
Topcom warranty
Warranty period
The Topcom units have a 24-month warranty period. The warranty period starts on the
day the new unit is purchased.
Consumables or defects causing a negligible effect on operation or value of the equipment
are not covered.
The warranty has to be proven by presentation of the original purchase receipt, on which
the date of purchase and the unit-model are indicated.
Warranty handling
A faulty unit needs to be returned to a Topcom service centre including a valid purchase
note.
If the unit develops a fault during the warranty period, Topcom or its officially appointed
service centre will repair any defects caused by material or manufacturing faults free of
charge.
Topcom will at its discretion fulfill its warranty obligations by either repairing or exchanging
the faulty units or parts of the faulty units. In case of replacement, colour and model can
be different from the original purchased unit.
The initial purchase date shall determine the start of the warranty period. The warranty
period is not extended if the unit is exchanged or repaired by Topcom or its appointed
service centres.
Warranty exclusions
Damage or defects caused by incorrect treatment or operation and damage resulting from
use of nonoriginal
parts or accessories not recommended by Topcom are not covered by the warranty.
The warranty does not cover damage caused by outside factors, such as lightning, water
and fire, nor any damage caused during transportation.
No warranty can be claimed if the serial number on the units has been changed, removed
or rendered
illegible.
This product is in compliance with the essential requirements and other relevant provisions
of the directive.
CE

9
Thermo-horloge jumbo sans fil
Mode d’emploi
Installation des piles & enregistrement des détecteurs
IMPORTANT: Installez les piles dans le récepteur principal EN PREMIER, puis dans le
détecteur à distance.
Pour le récepteur principal:
Enlevez le couvercle du compartiment des piles situé à l’arrière de l’unité. Insérez 2 piles AA
dans le compartiment des piles selon la polarité indiquée et fermez le couvercle. Après avoir
installé les piles dans le récepteur principal, l’icône à tirets (--) du canal extérieur clignotera
pendant 2 minutes pour indiquer que l’unité attend le signal d’enregistrement du détecteur
à distance. Les piles doivent être installées dans le détecteur pendant cet intervalle de 2
minutes. Si les piles ont été placées correctement dans l’unité, vous entendrez un signal
sonore.
+
+
–
–
A
BC
DRESET
3V
TX
Pour le détecteur à distance sans fil:
Durant les 2 minutes nécessaires au récepteur principal pour trouver le signal
d’enregistrement, enlevez le couvercle du compartiment des piles à l’aide d’une pièce de
monnaie ou d’un tournevis à tête plate. Insérez 1 pile de 3 V dans le compartiment selon la
polarité indiquée. Placez le joint rond d’étanchéité en caoutchouc dans le compartiment et
replacez le couvercle du compartiment de la pile.
• Si l’enregistrement réussit, vous entendrez une tonalité de confirmation. Si vous ne
l’entendez pas, vérifiez les piles AA et répétez le processus d’enregistrement. Fermez la
porte du compartiment de la pile et le couvercle arrière et serrez les vis sur le détecteur.
Remarque:
• Le détecteur transmet automatiquement le code d’enregistrement pour terminer
l’enregistrement après l’insertion des piles. Si les piles sont déjà insérées dans le
compartiment des piles, utilisez un stylo pour appuyer et maintenir le bouton jaune
pendant 2 minutes pour l’enregistrement.
• Si l’icône «---» apparaît sur le canal extérieur, rapprochez le détecteur du récepteur
principal. Répétez la procédure d’enregistrement à nouveau.

10
Comment démarrer
Immédiatement après l’installation des piles, la température intérieure apparaît. L’unité
commence à chercher le signal de la température extérieure; la température extérieure
apparaîtra en 3 minutes, si l’unité se trouve dans la distance d’émission.
Après avoir reçu la température extérieure, l’unité cherche
automatiquement le signal DCF77 (le symbole de réception radio
clignotera en haut de l’écran) “ ”. L’heure et la date corrects
apparaissent dès que le signal DCF77 est reçu.
La température apparaîtra sur l’écran à cristaux liquides (ACL) de l’unité réceptrice. Si elle
n’apparaît pas, appuyez et maintenez le bouton jaune pendant 2 secondes à l’arrière du
détecteur pour éliminer le signal d’enregistrement du détecteur.
Réception radio
Le symbole de réception radio est détecté pendant 5 minutes; le symbole de réception radio
disparaîtra. Vous pourriez devoir régler l’heure et la date correctes manuellement.
Réglage manuel de lʼhorloge
Si vous réglez l’unité manuellement, après avoir reçu la température OUT (extérieure),
appuyez et maintenez le bouton “B” pour accéder au mode de réglage de ‘horloge.
Format 12/24 heures
Pour accéder au mode de réglage, appuyez sur le bouton [B] et maintenez-le, le format
«12Hr» clignote à la troisième ligne de l’affichage. Appuyez sur le bouton [A] (SET) pour
sélectionner le format 12 ou 24 heures. Appuyez sur le bouton [B] pour confirmer.
Ajustement de fuseau horaire
Après avoir réglé le format de l’heure, appuyez sur le bouton [A] pour ajuster le fuseau
horaire de votre zone locale:
0 Fuseau horaire du centre
+1 Une heure de plus
+2 Deux heures de plus
- 2 Deux heures de moins
- 1 Une heure de moins
Appuyez sur le bouton [B] (CLK) pour confirmer
Jour de la semaine multilingue
La langue pour le jour de la semaine est sélectionnée dans le mode horloge/calendrier et
clignotera dans la fenêtre du jour de la semaine. Le choix de langue est le suivant:
E – Anglais
G – Allemand
F – Français
I – Italien
Appuyez sur le bouton [B] (CLK) pour confirmer

11
Réglage manuel de lʼheure
Après le réglage de la langue d’affichage, les chiffres des minutes clignotent. Appuyez sur
le bouton [A] pour régler les minutes. Appuyez sur le bouton [B] pour procéder à l’heure.
Lorsque les chiffres de l’heure clignotent, appuyez sur le bouton [A] pour régler les heures.
L’heure PM sera indiquée par PM.
Réglage manuel de la date et du jour
Après le réglage de l’heure et des minutes, les chiffres de la date clignotent. Appuyez sur le
bouton [A] pour régler la date. Ensuite, le chiffre du mois clignote; appuyez sur le bouton [A]
pour régler le jour. Appuyez sur le bouton [B] pour confirmer.
Réglage des deux alarmes
Vous pouvez régler deux alarmes
1. Vérifiez lʼheure dʼalarme
Appuyez sur le bouton [D] pour vérifier l’alarme 1 (A1) et l’alarme II (A2). Appuyez une fois
de plus pour afficher le mode date/jour.
2. Réglez lʼheure dʼalarme
Appuyez sur le bouton [D] et maintenez-le afin d’accéder au mode de ré-
glage de l’alarme 1 (A1) ou de l’alarme II (A2). Les chiffres des minutes
clignotent, appuyez sur le bouton [A] pour régler les minutes. Appuyez sur le bouton [D]
pour confirmer. Ensuite, lorsque les chiffres de l’heure clignotent, appuyez sur le bouton
[A] pour régler les heures. Appuyez sur le bouton [D] pour confirmer.
3. Activez lʼalarme
Appuyez sur le bouton [A] une fois: activez l’alarme 1 “ ”
Appuyez sur le bouton [A] encore une fois: activez l’alarme 2 “ ”
Appuyez sur le bouton [A] une fois de plus: activez les alarmes 1 & 2 “ ”
Appuyez sur le bouton [A] une dernière fois: toutes les alarmes sont désactivées
4. Rappel dʼalarme
pour accéder au mode de rappel d’alarme (Zz), a puyez sur n’importe quel bouton lorsque
l’alarme sonne. La sonnerie de l’alarme s’arrêtera, puis redémarrera 5 minutes plus tard.
Vous pouvez faire fonctionner le rappel d’alarme pendant un maximum de 15 minutes.
Pour éteindre complètement la sonnerie de l’alarme, attendez 5 minutes et la sonnerie
s’arrêtera automatiquement, ou appuyez sur le bouton [A] deux fois.
Sélection ˚C / ˚F
Appuyez sur le bouton [C] et maintenez-le, ˚C / ˚F clignote. Appuyez sur le bouton [A] pour
choisir les degrés ˚C ou ˚F et appuyez sur le bouton [C] pour confirmer.
Mémoire maximum et minimum
1. Rappelez la mémoire Max/Min
Appuyez sur le bouton [C] une fois: les valeurs max et min de la température IN
(intérieure) apparaissent.
Appuyez sur le bouton [C] encore une fois: les valeurs max et min de la température OUT
(extérieure) apparaissent.

12
Appuyez sur le bouton [C] une fois de plus: retour à l’affichage normal.
2. Remise à zéro de la mémoire
Appuyez sur le bouton [C] pour visionner la mémoire Max/Min de la température IN
(intérieure). Appuyez sur le bouton [A] pour effacer la mémoire.
Appuyez sur le bouton [C] une fois de plus pour visionner la mémoire Max/Min de la tem-
pérature OUT (extérieure). Appuyez sur le bouton [A] pour effacer la mémoire.
Installation du transmetteur
Pour empêcher les interférences de température, placez le transmetteur loin d’un
ensoleillement direct, d’un climatiseur et d’un chauffage.
Afin de maintenir de bonnes conditions de fonctionnement, ne mettez pas le transmetteur
dans des endroits de plus de +60°C ou de moins de -20°C (plus de 140°F ou moins
de -4°F).
Pour une transmission adéquate des données, veuillez suivre les directives
suivantes:
• En plein air, gardez le transmetteur extérieur et l’unité intérieure à un maximum de 30 m
l’un de l’autre.
• Si des obstacles tels que des murs en béton, des appareils électroménagers ou des
objets métalliques se trouvent entre les deux unités, la distance maximale entre elles
devrait alors être réduite à 5 m ou moins.
• Gardez le transmetteur extérieur et le moniteur intérieur en boucle ouverte et aussi proche
l’un de l’autre que possible (par exemple, mettez le transmetteur extérieur et le moniteur
intérieur du même côté de la fenêtre – voir ci-dessous)
• Positionnez le transmetteur extérieur plus haut que le thermomètre, mais non sur un mur
en béton ou une plaque métallique.
Prendre soin de votre thermomètre sans fil
Essuyez la saleté à l’aide d’un chiffon doux et humide et d’une solution de détergent doux,
puis essuyez le thermomètre avec un chiffon doux et sec. Évitez d’exposer cet appareil
électronique à des températures extrêmes, y compris une exposition prolongée à un
ensoleillement direct ou à un vent froid. Manipulez l’appareil de précision avec soin: ne
jamais le laisser tomber sur des surfaces dures ou lui faire subir un choc important. Le
détecteur à distance est conçu pour être étanche aux éclaboussures : ne jamais l’immerger
dans l’eau ou l’exposer à des pluies abondantes.
Changer les piles
Lorsque l’une des piles (récepteur principal ou détecteur à distance) devient faible, l’icône
de pile faible apparaît sur le canal respectif. Remplacez les piles pour l’unité respective à
chaque fois que l’icône apparaît. Suivez les procédures d’enregistrement mentionnées dans
ce mode d’emploi.

13
SPÉCIFICATIONS
Gamme affichée de la
température intérieure
0°C à +50°C (+32°F à +122°F)
Gamme d’utilisation recommandée du détecteur à distance
Détecteur avec affichage ACL 0°C à +50°C (+32°F à +122°F)
Détecteur sans affichage ACL -20°C à +50°C (-4°F à +122°F)
Sonde extérieure détachable -50°C à +70°C (-58°F à +158°F)
Gamme de transmission Zone ouverte de 30 m maximum (100 pieds)
Fréquence de transmission 433,92 MHz
Horloge Quartz
Piles
Poste thermomètre 2 piles AA, 1.5 V (récepteur principal)
Détecteur à distance 1 pile c.c. 3V (détecteur)
Durée de la pile (Statut)
Unité réceptrice Généralement 1 an
Détecteur à distance Généralement 6 mois
Mise au rebut de l’appareil (environnement)
Au terme du cycle de vie de ce produit, ne le jetez pas avec les déchets
ménagers ordinaires mais déposez-le dans un point de collecte prévu pour le
recyclage des équipements électriques et électroniques. Le symbole indiqué sur
ce produit, sur le mode d’emploi et/ou sur la boîte est là pour vous le rappeler.
Certains matériaux qui composent le produit peuvent être réutilisés s’ils sont déposés
dans un point de recyclage. En réutilisant certaines pièces ou matières premières de
produits usagés, vous contribuez fortement à la protection de l’environnement. Pour toute
information supplémentaire sur les points de collecte dans votre région, contactez les
autorités locales.
Avant de jeter l’appareil, retirez les piles.
Éliminez les piles de manière écologique, selon les réglementations en vigueur dans votre
pays.
IN
DM
OUT
DM
OUT

14
Garantie Topcom
Période de garantie
Les appareils Topcom bénéficient d’une période de garantie de 24 mois. La période de
garantie prend effet le jour de l’achat du nouvel appareil.
Les accessoires et les défauts qui ont un effet négligeable sur le fonctionnement ou la valeur
de l’appareil ne sont pas couverts.
La garantie s’applique uniquement sur présentation du récépissé d’achat original sur lequel
figurent la date de l’achat et le modèle de l’appareil.
Mise en oeuvre de la garantie
Tout appareil défectueux doit être retourné à un centre de service après-vente Topcom
accompagné d’un justificatif d’achat valable.
En cas de panne pendant la période de garantie, Topcom ou son centre de service après-
vente officiel réparera gratuitement les dysfonctionnements dus à un vice de matière ou de
fabrication.
Topcom assurera, à sa seule discrétion, ses obligations en matière de garantie en réparant
ou en remplaçant les pièces ou les appareils défectueux. En cas de remplacement, la
couleur et le modèle peuvent être différents de ceux de l’appareil acheté initialement.
La date d’achat initiale détermine le début de la période de garantie. La période de garantie
n’est pas prolongée si l’appareil est remplacé ou réparé par Topcom ou par l’un de ses
centres de service aprèsvente officiels.
Exclusions de garantie
Les dommages et les pannes dus à un mauvais traitement ou à une utilisation incorrecte et
les dommages résultant de l’utilisation de pièces et d’accessoires non recommandés par
Topcom ne sont pas couverts par la garantie.
La garantie ne couvre pas les dommages causés par des éléments extérieurs tels que la
foudre, l’eau et le feu ni les dommages provoqués par le transport.
Aucune garantie ne pourra être invoquée si le numéro de série indiqué sur les appareils a été
modifié, supprimé ou rendu illisible.
Ce produit est conforme aux exigences essentielles et autres dispositions de la directive.
CE

15
Plaatsen van de batterij en & registratie van de sensoren
BELANGRIJK: plaats eerst de batterijen in de binnenontvanger, en pas daarna die van de
buitensensor.
Voor de binnenontvanger:
Verwijder het batterijdeksel achteraan het toestel. Plaats (2) AA batterijen in het batterijvak
met de aangeduide polariteit, en sluit het deksel. Na het plaatsen van de batterijen in de
binnenontvanger, zal het pictogram van het buitenkanaal (--) 2 minuten gaan knipperen, om
aan te geven dat het toestel wacht op het registratiesignaal van de buitensensor.
Tijdens dit interval moeten de batterijen in de buitensensor worden geplaatst. Indien de
batterijen correct in het toestel werden geplaatst, wordt een pieptoon hoorbaar.
Voor de draadloze buitensensor:
Gedurende de 2 minuten dat de buitensensor zoekt naar het registratiesignaal het
batterijdeksel wegnemen met behulp van een munststuk of een schroevendraaier met
vlakke kop. Plaats (1) 3V batterij met de aangegeven polariteit in het batterijvak. Plaats de
ronde rubber afdichting in het batterijvak, en plaats het deksel terug.
• Indien de registratie lukt, wordt een bevestigingspiep hoorbaar. Als dat niet zo is, de
toestand van de AA batterijen controleren, en de registratieprocedure herhalen. Sluit
opnieuw het batterijdeksel en de achterzijde, en schroef de sensor vast.
Opmerking:
• De sensor zal de registratiecode automatisch uitzenden na het plaatsen van de van de
batterijen, dit om de registratie te voltooien. Indien de batterijen in het batterijvak werden
geplaatst, een pen gebruiken om de gele knop gedurende 2 seconden ingedrukt te
houden voor de registratie.
• Indien het streepjessymbool (---) op het buitenkanaal zichtbaar wordt, de sensor dichter
bij de binnenontvanger houden. Herhaal de registratieprocedure.
+
+
–
–
A
BC
DRESET
3V
TX
Jumbo draadloze thermo-klok
Handleiding

16
Aan de slag
Meteen na het plaatsen van de batterijen, wordt de
binnentemperatuur zichtbaar. Het toestel zoekt naar het
signaal van de buitensensor. Binnen de 3 minuten wordt de
buitentemperatuur zichtbaar, indien de sensor binnen het
ontvangstbereik valt. Na ontvangst van de buitentemperatuur zoekt het toestel automatisch
naar het DCF77-signaal (het radio-ontvangstsymbool gaat bovenaan het scherm knipperen)
“ ”.
De juite datum en tijd worden zichtbaar van zodra het DCF77-signaal wordt ontvangen.
De temperatuur wordt zichtbaar op de LCD van de ontvangsteenheid. Als dat niet het geval
is de gele knop op de achterzijde van de sensor 2 seconden ingedrukt houden om een
registratiesignaal te forceren.
Over radio-ontvangst
Het toestel zal 5 minuten naar radio-ontvangst zoeken, waarna het radio-ontvangstsymbool
verdwijnt. Mogelijk moeten de juiste datum en uur handmatig worden ingesteld.
Handmatig instellen van de klok
Houd bij het handmatig instellen van het toestel, na ontvangst van de OUT-temperatuur, de
knop “B” (CLK) ingedrukt om naar de insteling van de klok te gaan.
12/24 uurs-formaat
Houd om naar de instelmodus te gaan knop “B” ingedrukt; het uurformaat “12Hr” knippert
op de derde lijn van het display. Druk op de knop “A” (SET) om het 12- of 24-uurs formaat
te selecteren. Druk op de knop “B” om te bevestigen.
Instellen van de tijdzone
Druk na het instellen van het uurformaat op de knop “A” om de plaatselijke tijdzone in te
stellen:
0 Centrale tijdzone
+1 Eén uur later
+2 Twee uren later
-2 Twee uren vroeger
-1 Eén uur vroeger
Druk op knop “B” (CLK) om te bevstigen.
Taal voor de weekdag
De taal voor de weekdag wordt geselecteerd in de klok-kalender modus, en knippert in het
vak “dag van de week”. Het taalformaat is als volgt:
E – Engels
G – Duits
F – Frans
I - Italiaans
Druk op knop “B” (CLK) om te bevestigen

17
Handmatig instellen van de tijd
Na het instellen van de displaytaal zullen de cijfers van de minuten knipperen. Druk op knop
“A” om de minuten in te stellen. Druk op “B” om door te gaan met het uur. De cijfers van de
uren gaan knipperen; druk op knop “A” om het uur in te stellen. Een tijdstip ‘s namiddags
wordt aangegeven met PM.
Handmatig instellen van datum en dag
Druk na het instellen van de uren en de minuten, zodra de datum knippert op knop “A” om
de datum in te stellen. Daarna knippert de maand; druk op “A” om de dag in te stellen. Druk
op “B” om te bevestigen.
Instellen dubbel alarm
U kunt tot 2 alarmtijden instellen
1. De alarmtijd controleren
Druk op knop “D” om Alarm 1 (A1) en Alarm II (A2) te controleren.
Nogmaals indrukken en de datum/tijd-mode wordt zichtbaar.
2. Instellen van de alarmtijd
Druk op knop “D” om deinstellingen voor Alarm 1 (A1) of Alarm II (A2) in te geven.
De cijfers voor minuten knipperen. Druk op knop “A” om de minuten in te stellen. Druk
op knop “D” om te bevestigen. Daarna gaan de cijfers van het uur knipperen; druk op
“A” om de urenom de uren in te stellen. Druk op “D” om te bevestigen.
3. Het alarm inschakelen
Druk één keer op knop “A” om alarm 1 te activeren “ “ .
Druk nogmaals op knop “A” om alarm 2 in te schakelen. “ “
Bij nogmaals indrukken worden alarm 1 &2 beide ingeschakeld “ “ .
4. Snooze alarm
Druk om naar de snooze alarmmode (Zz) te gaan op om het even welke knop terwijl
het alarm gaat. Het alarmgeluid stopt en wordt na 5 minuten terug hoorbaar. U kunt de
snoozefunctie gedurende maximaal 15 minuten gebruiken.
Wacht om het alarmgeluid uit te schakelen 5 minuten, en het alarmgeluid stopt
automatisch,of druk twee keer op de knop “A”.
˚C / ˚F selectie
Houd knop “C” ingedrukt, ˚C/˚F gaat knipperen. Druk op knop “A” om graden ˚C of ˚F te
selecteren, en op “C” om te bevestigen.
Maximum en minimum geheugen
1. Max/Min geheugen terug oproepen:
één keer drukken op knop “C”: de max en min binnentemperatuur worden zichtbaar.
Druk nogmaals op knop “C”: de max en min buitentem- peratuur worden zichtbaar.
Druk nogmaals op knop “C”: u keert terug naar het gewone display.
2. Geheugen herstellen:
Druk op knop “C” om de max/min binnentemperatuur uit het geheugen te zien. Druk
op knop “A” om het geheugen te wissen. Druk nogmaals op “C” om de max/min

18
buitentemperatuur te zien, druk op “A” om het geheugen te wissen.
Installatie van de zender
Om temperatuurstoringen te vermijden de zender niet in direct zonlicht plaatsen of in de buurt
van airconditioning of een ventilatie opening. Om het toestel in goede staat te behouden de
zender niet in een omgeving plaatsen met temperaturen boven 60°C of beneden -20°C
(140°F of beneden -4°F).
Let op de volgende zaken voor een nauwkeurige gegevensoverdracht:
• Houd in open lucht een maximumafstand van 30 meter tussen de zender buiten en het
weerstation binnen.
• Als er obstakels staan tussen de twee eenheden (bijvoorbeeld betonnen muren,
huishoudtoestellen of metalen voorwerpen), beperk de afstand dan tot minder dan 5
meter.
• Houd de buitenzender en het weerstation (binnen) in een open circuit en zo dicht mogelijk
bij elkaar als mogelijk (zet bijvoorbeeld zowel de buitenzender als het weerstation langs
dezelfde kant van het venster).
• Plaats de buitenzender op een grotere hoogte dan het weerstation, maar niet op een
betonnen muur of metalen plaat.
Je draadloze thermometer onderhouden
Verwijder vuil met een zachte vochtige doek en een sopje van milde schoonmaakmiddelen
en droog af met een zachte droge doek. Zorg ervoor dat het toestel niet wordt blootgesteld
aan extreme temperaturen zoals lange blootstelling aan rechtstreeks zonlicht of windchill.
Wees voorzichtig met dit precisietoestel, laat het nooit vallen op harde oppervlakken en
vermijd zware schokken. De buitensensor is spatwaterdicht, dompel hem nooit onder in
water of stel hem niet bloot aan hevige regenbuien.
Vervangen van de batterijen
Zodra een van de batterijen (binnen, - of buitensensor) leeg geraakt, wordt het lege
batterijsymbool zichtbaar op het betrokken kanaal. Vervang de batterijen van de betrokken
eenheid. Volg de registratieprocedures in deze handleiding aangehaald.
IN
DM
OUT
DM
OUT

19
SPECIFICATIES
Weerg. binnen-temperatuurbereik 0°C tot 50°C (32°F tot 122°F)
Aanbevolen werkgebied buitensensor
Sensor met LCD display 0°C tot +50°C (+32°F tot +122°F)
Sensor zonder LCD- display -20°C tot 50°C (-4°F tot 122°F)
Afneembare buiten-opnemer -50°C tot 70°C (-58°F tot 158°F)
Zendbereik Maximum 30m (100 ft) open terrein
Zendfrequentie 433.92 MHz.
Klok Quartz
Batterijen
Thermometerstation DC 1.5V AA 2 stuks (binnenontvanger)
Buitensensor DC 3V x 1 stuks (sensor)
Levensduur batterij (status)
Ontvanger Ongeveer 1 jaar
Buitensensor Ongeveer 6 maanden
Afvoeren van het toestel (milieu)
Na afloop van de levenscyclus van het product mag u het niet met het normale
huishoudelijke afval weggooien, maar moet u het naar een inzamelpunt brengen
voor recycling van elektrische en elektronische apparatuur. Dit wordt aangeduid
door het symbool op het product, in de handleiding en/of op de verpakking.
Sommige materialen waaruit het product is vervaardigd kunnen worden hergebruikt als u
ze naar een inzamelpunt brengt. Door onderdelen of grondstoffen van gebruikte producten
te hergebruiken, levert u een belangrijke bijdrage aan de bescherming van het milieu. Wend
u tot de plaatselijke overheid voor meer informatie over de inzamelpunten bij u in de buurt.
Verwijder de batterijen voordat u het toestel naar een inzamelpunt brengt.
Voer de batterijen op een milieuvriendelijke manier af volgens de regels die gelden in uw
land.

20
Topcom-garantie
Garantietermijn
De Topcom-toestellen hebben een garantietermijn van 24 maanden. De garantietermijn gaat
in op de dag waarop het nieuwe toestel wordt aangeschaft.
Verbruiksartikelen en defecten die een verwaarloosbaar effect hebben op de werking of
waarde van het toestel worden niet gedekt door de garantie.
De garantie moet worden bewezen door het kunnen voorleggen van de originele
aankoopbon waarop de aankoopdatum en het toestelmodel staan aangegeven.
Afwikkeling van garantieclaims
Een defect toestel moet worden geretourneerd aan het onderhoudscentrum van Topcom,
samen met een geldige aankoopbon.
Als het toestel defect raakt tijdens de garantietermijn, zal Topcom of een van haar officieel
aangewezen servicecentra defecten ingevolge materiaal- of fabricagefouten kosteloos
repareren.
Topcom zal naar eigen inzicht voldoen aan haar garantieverplichtingen door defecte toestellen,
of onderdelen ervan, te repareren dan wel te vervangen. In het geval van vervanging kunnen
de kleur en het model verschillend zijn van het oorspronkelijk aangeschafte toestel.
De oorspronkelijke aankoopdatum bepaalt wanneer de garantietermijn ingaat. De
garantietermijn wordt niet verlengd als het toestel wordt vervangen of gerepareerd door
Topcom of een van haar aangewezen servicecentra.
Garantiebeperkingen
Schade of defecten als gevolg van een onjuiste behandeling of onjuist gebruik en schade
als gevolg van het gebruik van niet-originele onderdelen of accessoires die niet worden
aanbevolen door Topcom, vallen buiten de garantie.
De garantie dekt geen schade te wijten aan externe factoren, zoals bliksem, water en brand,
noch enige tijdens transport veroorzaakte schade.
Er kan geen aanspraak worden gemaakt op garantie als het serienummer op de toestellen
is veranderd, verwijderd of onleesbaar gemaakt.
Dit product voldoet aan de basiseisen en andere relevante bepalingen van de richtlijn.
CE
Table of contents
Languages: