Natural Light Tubular Skylights User manual
Installation Instructions
10821 North 23rd Av nu
Pho nix, AZ 85029
800-363-9865
www nltubular com
14
13
12
11
8
7
6
5
4
3
2
1
10
9
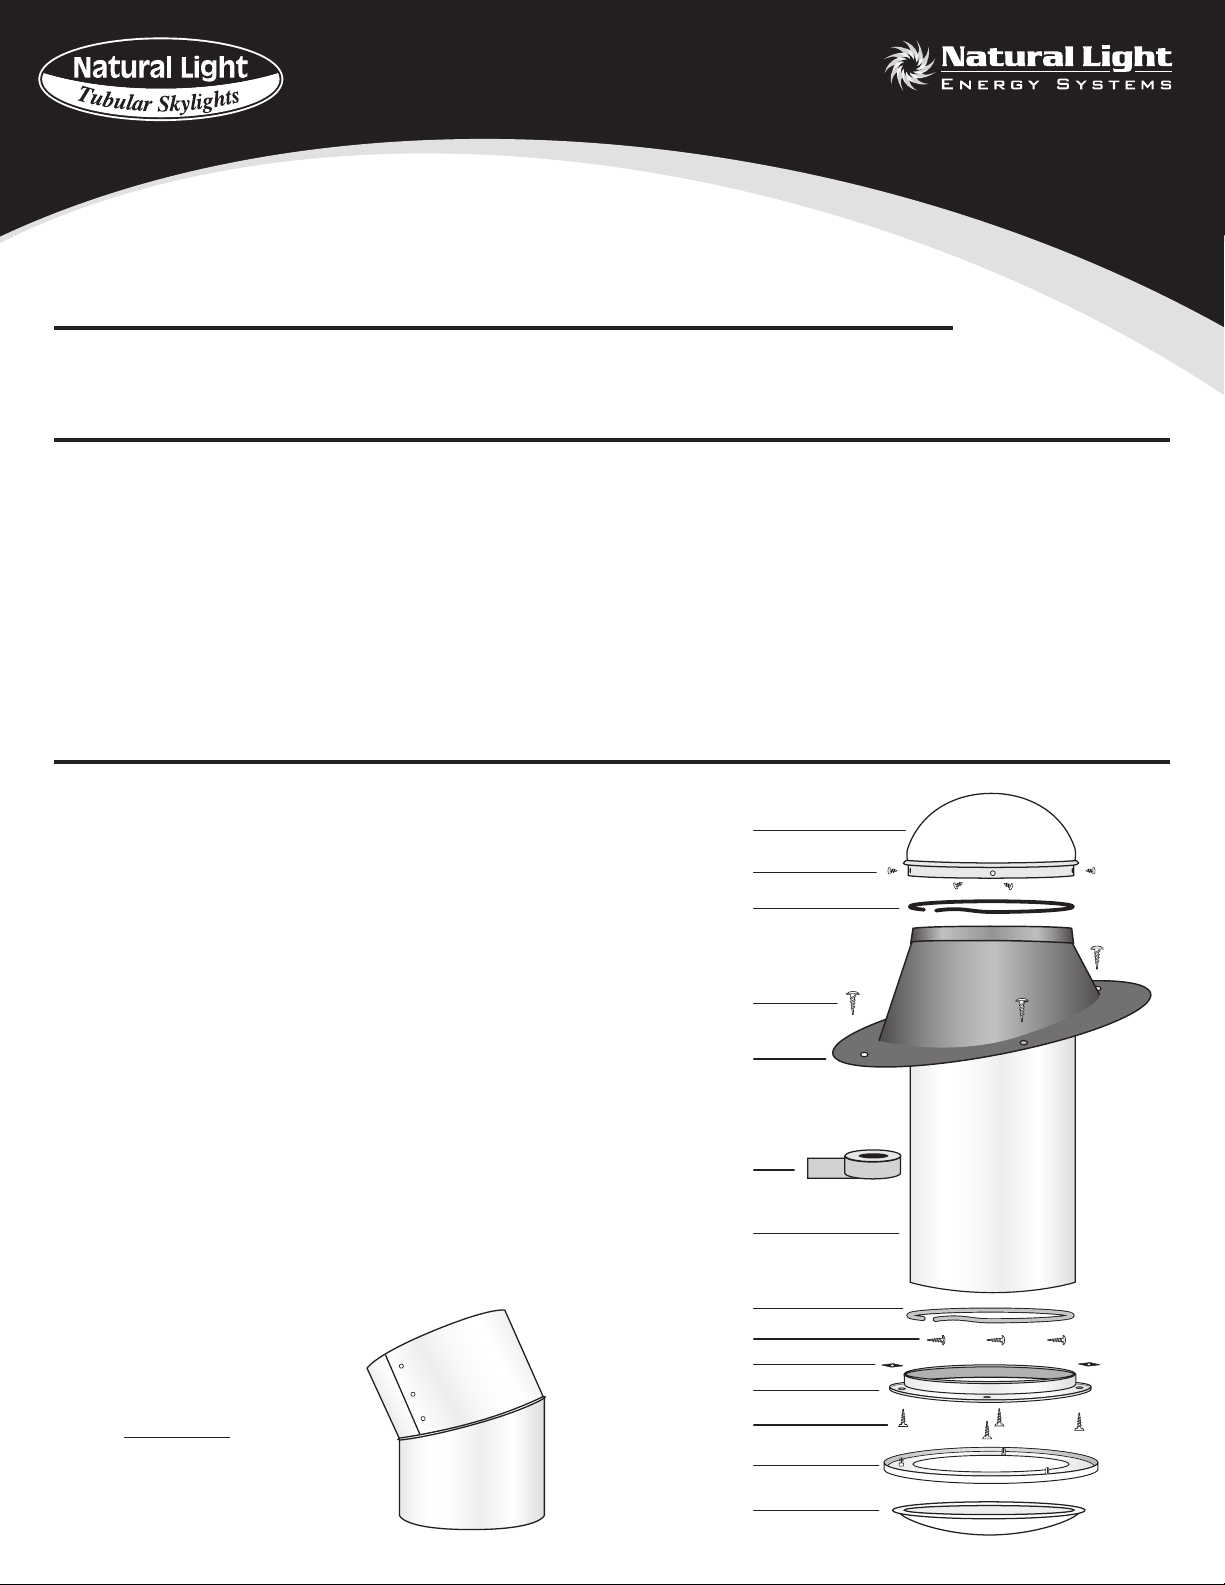
1 Cl ar UV Prot ct d, High Impact Acrylic Dom
2 (4) Phillips H ad Stainl ss St l 1/4” Sh t M tal Scr ws
3 Black Nylon Hors Hair Gask t (s lf adh siv back d)
4 (6) Philip H ad Stainl ss St l 1 1/2” Scr ws
5 1100 S ri s Aluminum Flashing
6 H avy Duty Foil Tap
7 Light Pip
8 Whit Nylon Hors Hair Gask t (s lf adh siv back d)
9 (8) T k Scr ws
10 (3) Black Sp d Nuts
11 C iling Ring
12 (3) 1 1/2” Phillips Scr ws
13 Whit Powd r Coat d Aluminum Trim Ring
14 High Impact Acrylic Soft Whit or Prismatic Diffus r
1. Light Pip mat rial is v ry sharp wh n cut. Pl as us xtr m caution wh n handling th light pip .
2. Light Pip is v ry bright, us prop r y prot ction wh n installing. AVOID LEAVING THE PIPE EXPOSED
TO THE SUN WITHOUT THE PROTECTIVE COATING OR DIFFUSERS IN PLACE PRIOR TO INSTALLATION.
(Th prot ctiv coating should only b r mov d during St p 14.)
3. Ensur normal saf ty pr cautions ar tak n wh n using tools and walking on roofs.
4. Do not cut any structural m mb rs in th hous .
5. Ensur wir runs, plumbing or v ntilation ducts will not int rf r with th light pip installation.
6M asur twic and cut onc .
Pl as tak th tim to r ad through th ENTIRE instructions prior to starting any work.
Parts List
IMPORTANT: Before Installing
Precautions
Optional: (not included)
Angl Adapt r
Installation Pointers
• Wh n d t rmining location of th unit, try to plac th flashing unit on th south sid of th roof, also consid r
pot ntial probl ms such as obj cts shading th unit during c rtain tim s of th day.
• Although adjustabl lbows ar availabl for us , straight light pip runs r sult in high r light output and
asi r installation.
• Prior to starting th job, cl an off th oil r sidu on th flashing.
• It is highly critical to ch ck for obstructions abov th c iling which may hind r th installation. If possibl , visually
ch ck to nsur that th r ar no l ctrical wir s or oth r obstructions wh r you plan to install th skylight. If you
can not ch ck visually, us a pi c of wir as outlin d in St p 1.
• R ciprocating Saw
•M asuring Tap
• Hamm r
• Drill & Bits
• Drywall Saw
• Razor Knif
•Flat Bar
• Flashlight
• Caulking Gun
• Stud Find r
• Drop Cloth
•Ladd rs
• Marking P n
• Wir
• Tin Snips
Tools Required
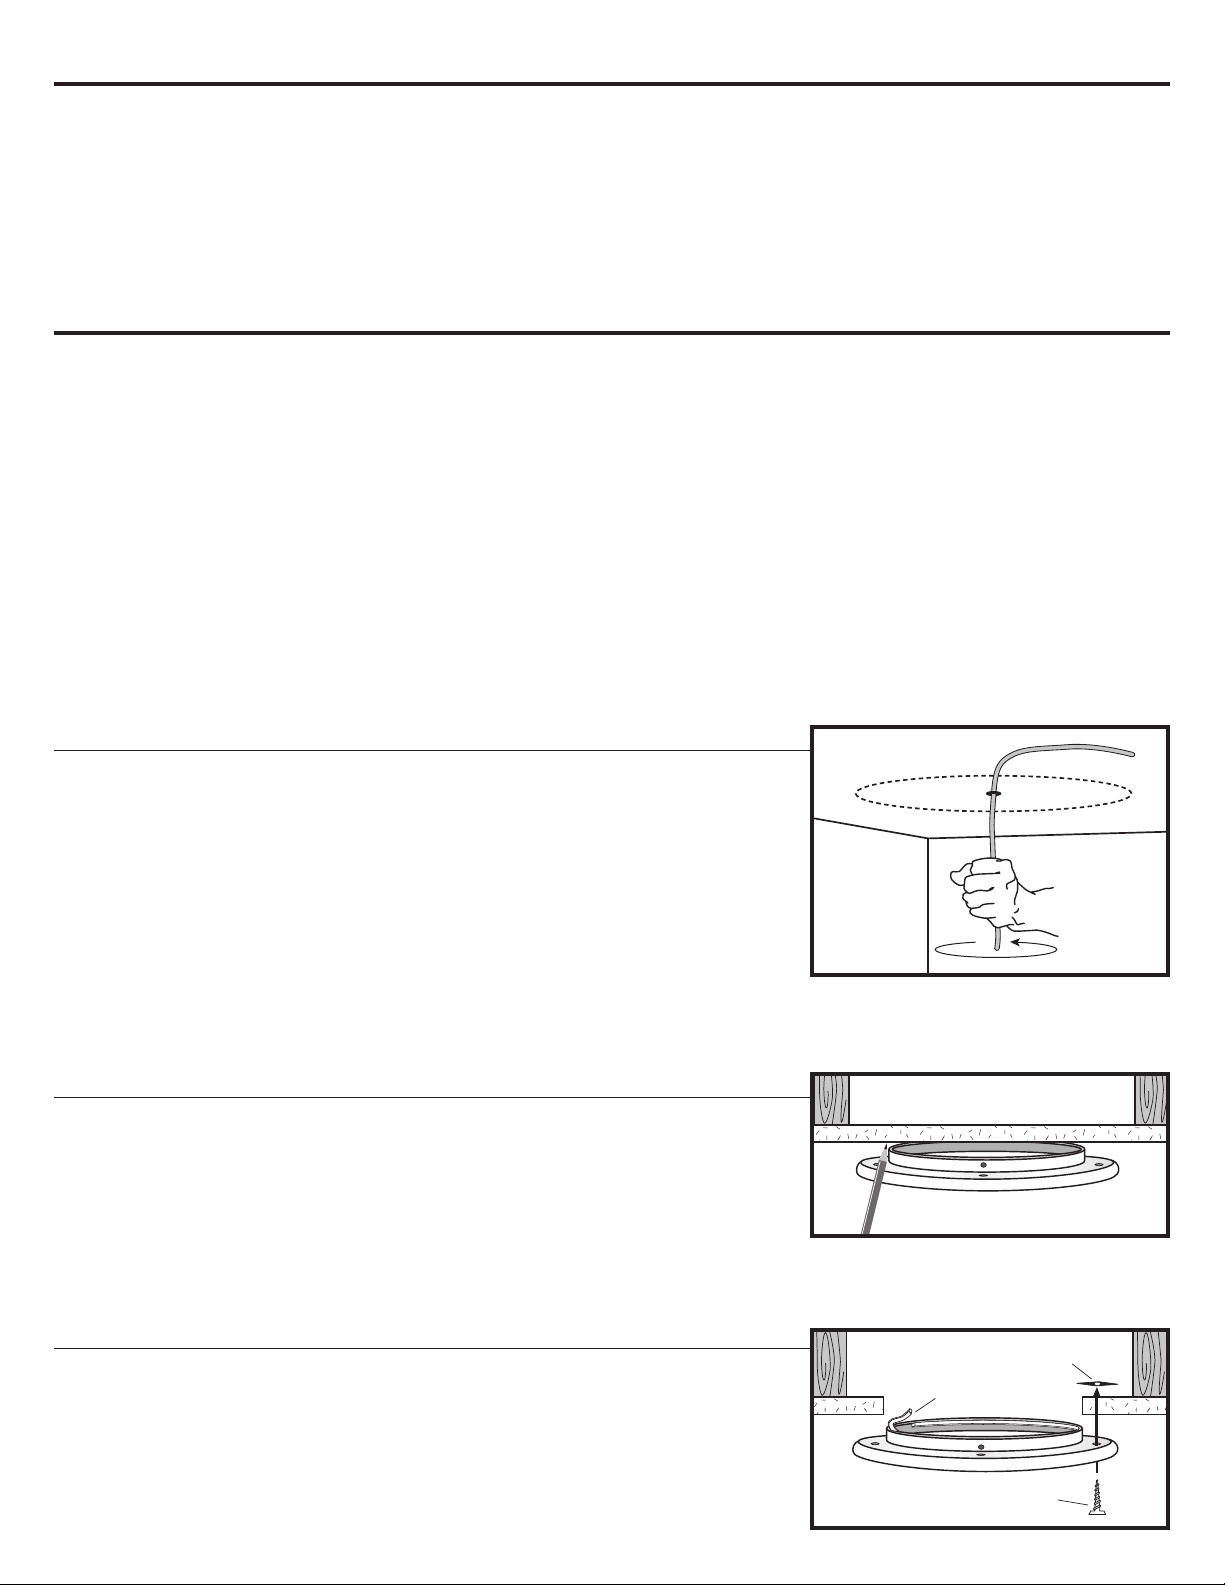
To facilitat installation, onc th d sir d location is obtain d, nsur that
th r ar no obstructions in th attic b tw n th roof and c iling. With a
stud find r locat th c iling joists and c nt r c iling ring b tw n joists as
clos to th d sir d installation ar a as possibl . Mark th c nt r of th
c iling ring, drill a hol and ins rt pi c of wir b nt at a 90 d gr angl .
Rotat th wir around 360 d gr s. Whil rotating, f l for r sistanc that
could indicat wir runs or oth r obstructions.
Step 1
If th r ar no obstructions, scrib a mark around th c iling ring inn r
collar, s diagram. Using a drywall saw, cut out th scrib d mark in th
c iling.
Step 2
Install th c iling ring in th c iling. Plac c iling ring in th c iling. P l
th prot ctiv cov ring off th whit color d hors hair gask t and apply
gask t to th inn r lip of th c iling ring. This gask t nsur s a dust fr fit
b tw n th light pip and th c iling ring. S cur th c iling ring to
c iling by ins rting a whit scr w into on of th thr pr -drill d hol s
and scr wing it up through th drywall into sp d nut provid d. R p at
this proc ss for all thr scr ws.
gasket
speed nut
1.5" screw
Step 3
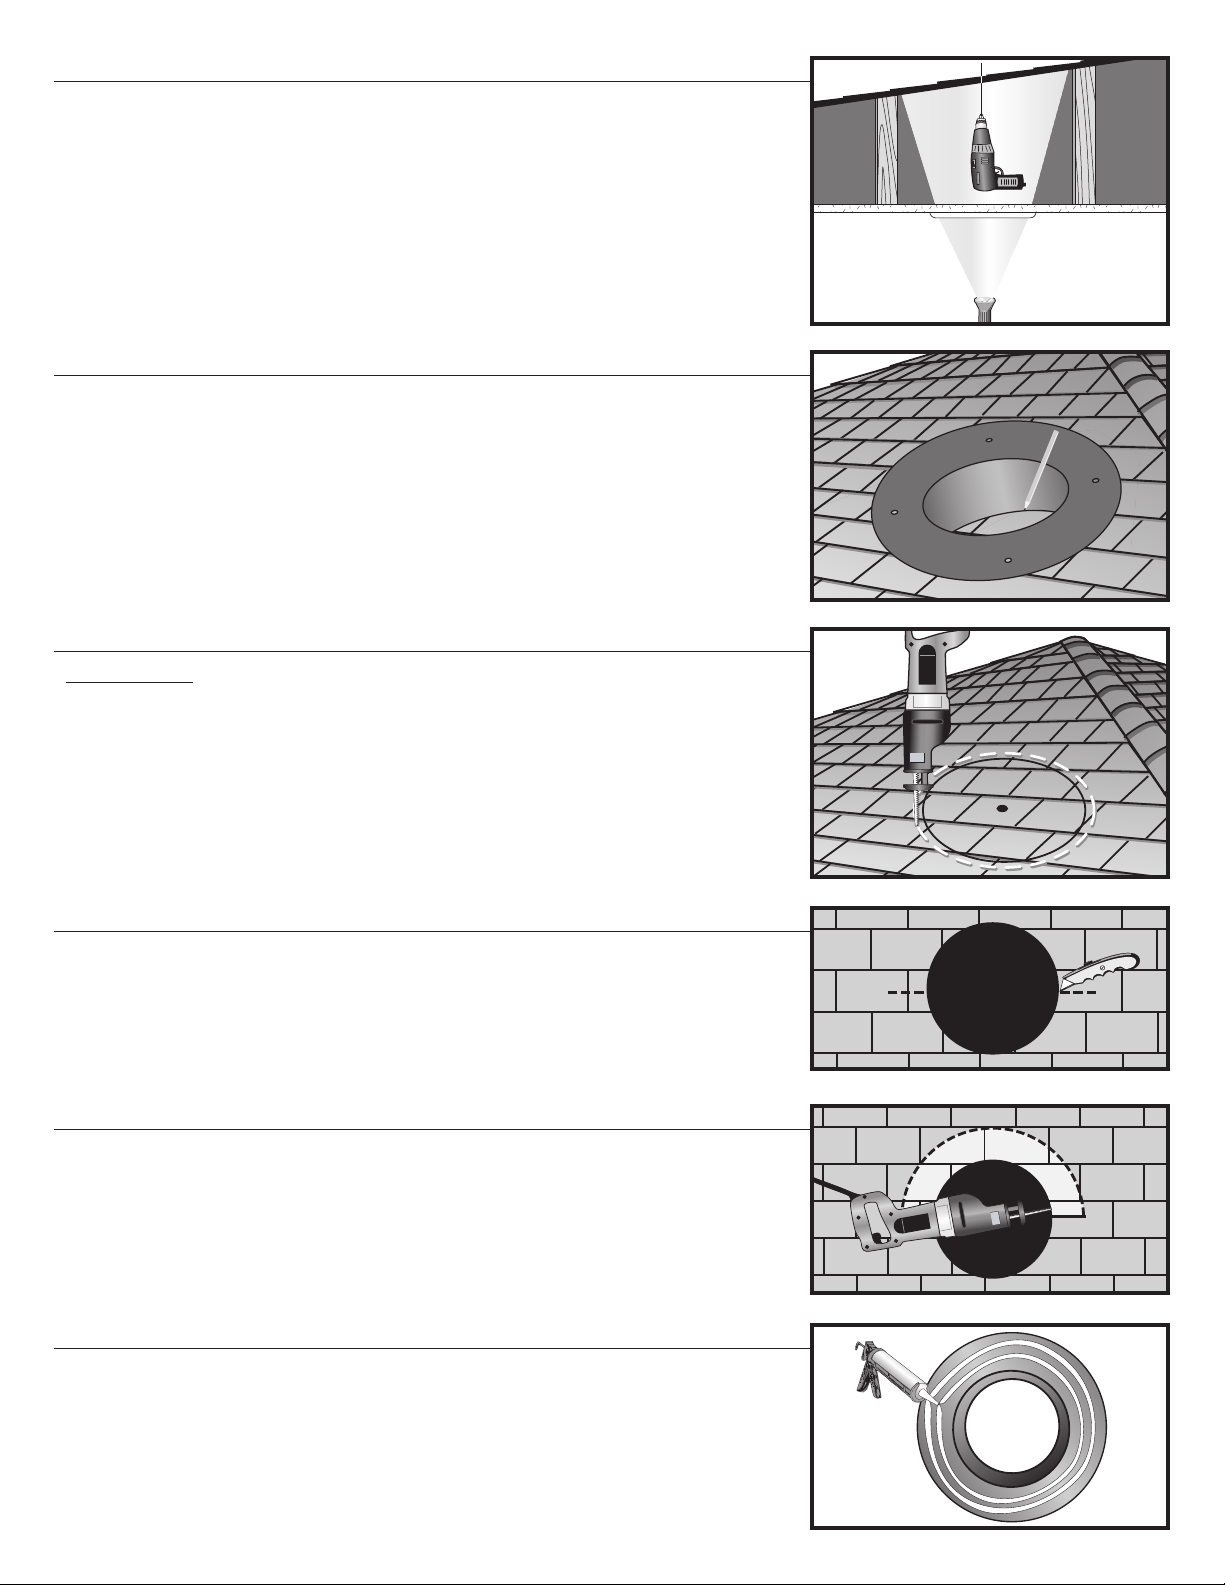
For th roof p n tration, plac a st p ladd r und r th c iling ring hol
and plac a flashlight on top of th ladd r, th r sulting flashlight b am will
mark th location for th c nt ring hol of th flashing unit on th roof.
With a drill bit and appropriat xt nsion rods, drill a pilot hol in th
mark d location on th bottom sid of th roof.
Step 4
On th roof, locat th c nt ring hol and outlin th diam t r of th hol
that th pip will pass through by turning th flashing upsid down and
marking th insid of th flashing unit.
Step 5
IMPORTANT: Th light pip must pass b tw n th roof raft rs. DO
NOT CUT THROUGH ANY FRAMING MEMBER.
With a r ciprocating saw, cut th diam t r of th hol 1” larg r than th
ar a mark d in St p 5.
Step 6
With a razor knif , cut a four inch slit through th shingl s and tar pap r
at th thr and nin o’clock position of th flashing. This allows for th
foot print of th flashing to b ins rt d und r th shingl s.
Step 7 (skip this st p for flat roof applications and proc d to St p 9)
Ins rt th r ciprocating saw blad sid ways at th thr o’clock position
and comm nc cutting th roofing nails up and around to th nin o’clock
position. This proc ss r mov s th nails that will pr v nt th flashing foot
print from sliding up und rn ath th shingl s.
Step 8 (skip this st p for flat roof applications and proc d to St p 9)
Caulk und rsid of flashing with th provid d caulking mat rial. Two
conc ntric rings of caulking mat rial is suffici nt.
NOTE: Installation on til roofs will r quir th us of a skirt.
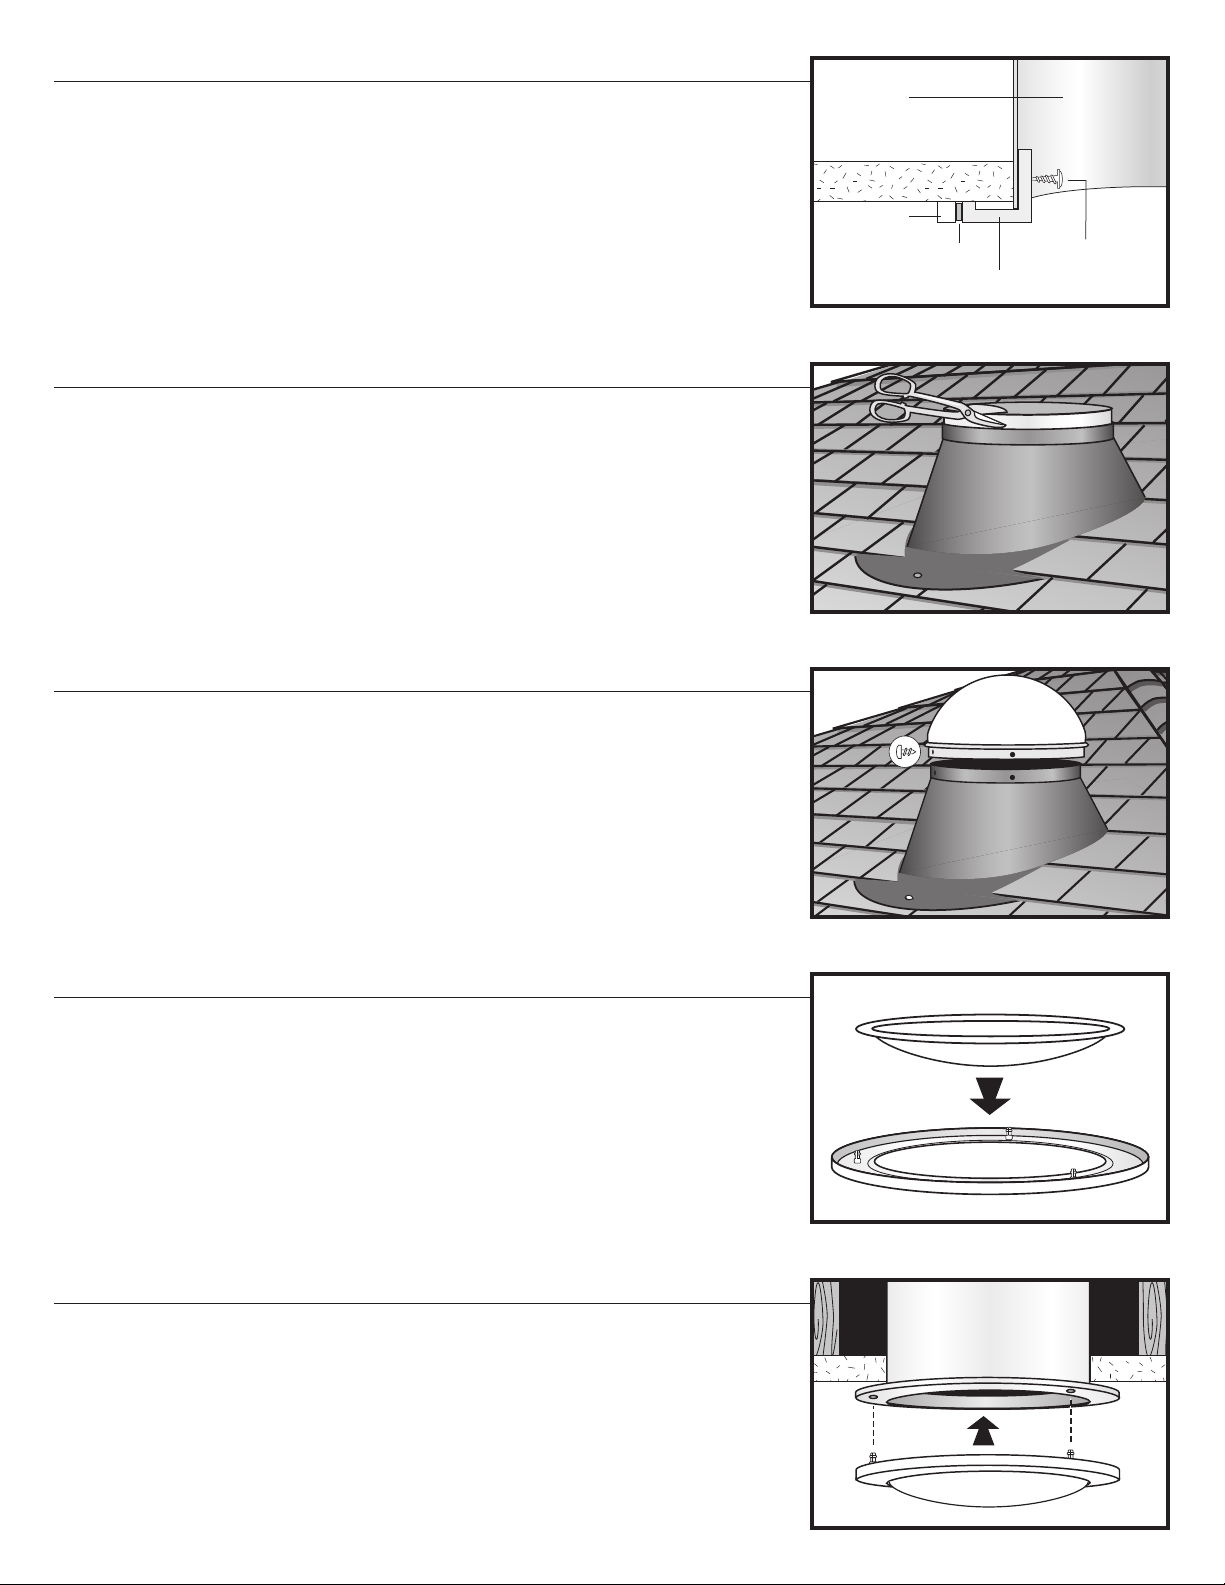
Step 9

Pitch d Roofs: Taking car not to sm ar caulk on th xpos d shingl s,
slid flashing und r tar pap r and shingl s and forc flashing up until th
shingl s com in contact with th rais d portion of th flashing. Th
bottom sid of th flashing will b on top of th shingl s. S cur flashing
with four Phillips h ad scr ws at th 3:00, 6:00, 9:00 and 12:00 positions.
Th 3:00 and 9:00 positions scr ws should go und r th shingl s. Th
6:00 and 12:00 position scr ws should go on top of th shingl s.
Flat Roofs: C nt r flashing ov r th hol cut in St p 6 and attach to roof
with th Phillips scr ws provid d through th pr -drill d hol s.
ROOF RIDGE
Step 10
Pitch d Roofs: At th 6:00 and 12:00 positions, caulk ov r th scr w h ad,
sinc it will b xpos d to th w ath r. Us r maining caulk to s al th
ar as wh r th 4” slits w r mad and around th ar a wh r th shingl s
m t with th rais d ar a of th flashing.
Flat Roofs: Caulk ov r all th scr w h ads sinc th y will b xpos d to th
w ath r.
Step 11
P l th prot ctiv backing off th black hors hair gask t and apply
gask t on th inn r lip of th flashing collar.
Step 12
To ass mbl light pip , p l back th prot ctiv coating that cov rs th
mirror coating about 1” from th opposit dg of th doubl sid d tap ,
r mov pap r cov r ov r doubl sid d tap and ov rlap and s al dg s. Put
pr ssur on both sid s of s al to nsur a good bond. S cur tub using th
(2) t k scr ws provid d. Th n plac foil tap ov r th ntir s am to
str ngth n s al.
protective coating
Step 13
Wh n joining two pip s ctions tog th r, with th crimp d nd down,
plac crimp d nd into th n xt s ction of pip . S cur with a t k scr ws
and s al joints with foil tap .
IMPORTANT: R mov prot ctiv coating that cov rs th mirror finish
insid th tub .
Step 14
PITCHED ROOF
FLAT ROOF
Ins rt pip through th flashing unit and g ntly rock pip back and forth
with slight downward pr ssur until pip t rminat s v nly with th inn r
collar of th c iling ring. S cur bottom of light pip to c iling ring with
two t k scr ws.
light pipe
gasket
trim ring
tek screw
ceiling ring
drywall
Step 15
If th r is xc ss pip sticking out of th flashing, using tin snips, cut from
th top down to th lip of th flashing and trim off th xc ss pip .
Step 16
Plac dom on top of th flashing unit. S cur dom to flashing by
scr wing in four scr ws into th pr -drill d hol s in th dom collar.
Step 17
Plac th diffus r into th whit powd r coat d trim ring.
Step 18
Lin up th 3 st l pins of th whit powd r coat d trim ring with th 3
hol s on th c iling ring. Push up to snap in plac .
Step 19

This Natural Light Tubular Skylight has a 25 year warranty
against manufacturers defects and deterioration.
IMPORTANT: PLEASE COMPLETE AND MAIL THE CARD BELOW AS SOON AS
YOUR TUBULAR SKYLIGHT IS INSTALLED. This card will s rv as proof of your purchas ,
should you misplac your original invoic .
Th manufactur r warrants this product and its compon nts to b fr from
d f cts in mat rial and manufactur r’s workmanship for a p riod of tw nty fiv y ars
from th dat of installation. This warranty is subj ct to prop r installation of th unit in
accordanc with th manufactur r’s writt n installation instructions. Th manufactur r will
not b liabl for any sp cial, incid ntal or cons qu ntial damag s in any way r lat d to,
or arising out of, d f cts in, or damag to, th tubular skylight.
This warranty giv s you sp cific l gal rights, and you may hav oth r rights which vary from
stat to stat conc rning xclusion or limitation of incid ntal or cons qu ntial damag s.
W A R R A N T Y
R E G I S T R A T I O N
Natural Light Tubular Skylight Install r: _________________________________________________________________
Dat of Purchas : ____________________________________________________________________________________
Custom r Nam : ____________________________________________________________________________________
Addr ss: ____________________________________________________________________________________________
City:_________________________________________________ Stat :_________________ Zip: ____________________
Custom r Surv y
Ar you satisfi d with th p rformanc ? Y N
What mad you choos our product?
____________________________________________________________________________________________________
W r you satisfi d with th installation job?
____________________________________________________________________________________________________
Please fill out the form below and mail it to:
Natural Light En rgy Syst ms • 10821 North 23rd Av nu • Pho nix, AZ 85029
Table of contents
Popular Outdoor Light manuals by other brands


HEPER
HEPER DOGO Side LW6048.585-US Installation & maintenance instructions

Maretti
Maretti VIBE S 14.6080.04.A quick start guide

BEGA
BEGA 84 253 Installation and technical information

HEPER
HEPER LW8034.003-US Installation & maintenance instructions

HEPER
HEPER MINIMO Installation & maintenance instructions

LIGMAN
LIGMAN BAMBOO 3 installation manual

Maretti
Maretti TUBE CUBE WALL 14.4998.04 quick start guide

Maxim Lighting
Maxim Lighting Carriage House VX 40428WGOB installation instructions

urban ambiance
urban ambiance UQL1273 installation instructions

TotalPond
TotalPond 52238 instruction manual

Donner & Blitzen
Donner & Blitzen 0-02661479-2 owner's manual

LIGMAN
LIGMAN DE-20023 installation manual