NCE NCE1DBT User manual

NCE1DBT
50Wx4
HIGH POWER
RECEIVER & BLUETOOTH
DVD / MULTIMEDIA PLAYER
Instruction Manual
Bluetooth

1
Safety Precautions
Precautions
• Useonly ina12-voltDCnegative-ground
electricalsystem.
• Whenreplacingthefuse,besuretouseone
withanidenticalamperagerating.Using
afusewithahigheramperagerating may
causeseriousdamagetotheunit.
• DONOTattempttodisassemble theunit.
Laser beams from the optical pickup are
dangeroustotheeyes.
• Makesurethatpinsorotherforeignobjects
donotgetinsidethe unit;theymaycause
malfunctions,orcreatesafetyhazardssuch
aselectricalshockorlaserbeamexposure.
• Ifyouhaveparkedthecarforalongtimein
hot or cold weather,wait until thetempera-
tureinthecarbecomesnormalbeforeoper-
atingtheunit.
• Keepthevolumeatalevelatwhichyoucan
hearoutsidewarningsound(hornssirens,etc.).
• DONOTopencoversanddonotrepairyour-
self.Consultthedealeroranexperiencedtech-
nicianforhelp.
• Inaddition toordinaryCDs, thisunitcanplay-
backCD-RorCD-RW,MP3.
Note:
• Playingadefectiveordustydisccancause
dropoutsinsound.
• Holddiscsasillustrated.
• Donottouchtheunlabeledside.
• Donotattachanyseal,labelordataprotec-
tionsheettoeithersideofadisc.
• Donot exposeadisctodirectsunlightor
excessiveheat.
• Wipea dirtydiscfromthecenteroutward
withacleaningcloth.
• Neverusesolventssuchasbenzineoralco-
hol.
• Thisunitcannotplay3-inch(8cm)discs.
• Neverinserta3-inchdisccontained inthe
adapteroranirregularlyshapeddisc.
Theunitmaynotbeabletoejectit.
Toprovideacleardemonstration and
an al-
ternativeforeasyunderstandingoftheopera-
tionofthisunit,graphicillustrationwasused.
However,thisillustrationis notnecessary
printedastheactualimagefoundontheunit.
SafetyPrecautions.........................................1
PanelControls...............................................2
RemoteControls......................................... 3-4
BehindthePanel............................................4
GeneralOperation...................................... 4-5
RadioMode....................................................6
USB/SD/MMC/MP3Mode..............................7
DiscMode..................................................7-11
BluetoothMode...................................... 12-13
DVDSetup.............................................. 14-15
ElectricalConnections..................................16
Anti-TheftSystem.........................................17
InstallationGuide..........................................18
Troubleshooting............................................19
Specications...............................................20

2
Panel Controls
Power on/off: Press PWR to turn on/off the unit.
1.-Poweron/off(pressmorethan2seconds)
-Mute
2.Sourceswitch:Radio,Disc,USB, SD/MMC
Card,Aux-in
3.-Bandswitch:FM-FM2-FM3-MW1-MW2
(Radiomode)
-Dialpickup/Transferthecall(Bluetooth
mode)
4.-Tofastsearchwithinatrack/skiptonext
orprevioustrack
-Radiotune
5.-Loudness
-FMmono/stereo(Radiomode,press
morethan2seconds)
6.-Rotatetheknobtoadjustvolumelevel.
-Shortpresstoselectaudiomenu,and
rotatetheknobtoadjustlevel.
-Longpresstoenterintosettingmenu,
theneachpresschangesthemode.
7.Radiolocal/distant(Radiomode)
8.-Radiostationautopreset
-Hangupthecall(pressmorethan2
seconds,inBluetoothmode)
9.Button1:Play/Pause
10.Button2:Introplay(10sec)
11.Button3:Trackrepeatplay
12.Button4:Trackrandomplay
13.Button5:-VideosystemNTSC\PAL60\
PAL\AUTO
-Folderdown(MP3)
14.Button6:-DVDaudio/VCDaudioL/R/ST
-Folderup(MP3)
15.utton1~6RadioPreset:
Presstolistentoapresetstation,andhold
formorethan2secondstostorestation.
16.-Shortpresstoswitchtoclockdisplay,
pressagaintoexit.
-Longpresstoenterclocksetting.
17.Remotesensor
18.AUXin
19.USBport
20.Panelopen

3
Power on/off: Press to turn on/
off the unit.
Remote Controls
Replacing the lithium battery of
remote control unit.
Whentherangeofoperationofthecard
remotecontrolbecomesshort ornofunction,
replacethelithiumbatterywith anewone.
Make sure the batterypolarityreplacementis
correct.
1.Pulloutthebatteryholderwhilepressingthe
stopper.
2.Insertthebutton-typelithiumbattery with
the(+)markfacingupward.Insertthebattery
holderintotheremotecontrol.
1 2
(CR 2025)
1.Zoom(DVD/VCDonly)
2.Title(DVDonly)
3.Poweron/off
4.Setup
5.Menucursor
6.Enter
7.Program
8.Digitarea
9.-Shortpresstoselectaudiomenu,androtate
theknobtoadjustlevel.
-Longpresstoenterintosettingmenu,then
eachpresschangesthemode.
10.Volume
11.Mute
12.-Radiotune
-Trackskip/seek
13.Subtitle(DVDonly)
14.-Radio
-Disc(whendiscinserted)
-Card(whenSD/MMCinserted)
-USB(whenUSBinserted)
-Aux-in
15.Repeat
16.RepeatA-B
17.Stop/Return
18.Play/Pause
19.Gotosearch
20.-DVDmenu
-PBC(forVCD2.0orup)
21.-OSD:Onscreendisplay
-AMS:Radiopresetscan/Radioautopreset
22.-DVDaudio
-VCDaudioL/R/ST
23.-Shortpresstoswitchtoclockdisplay,
pressagaintoexit.
-Longpresstoenterclocksetting.
-Returntopreviousmenu(Settingmenu)
24.-Angle(DVDonly)
-Terminatecall(inBTmode)
25.-VideosystemNTSC/PAL60/PAL/AUTO
-Radioband(inRadiomode)
-Dial/Receivecall(inBTmode)

4
Pressthe buttontoopenthepanel.
1.Whenthereisadiscinserted,shortpressto
ejectthedisc,press andholdmorethan2
secondstoejectthediscforcedly.
Whenthere isnotadisc inserted,press
and hold more than 2secondsto resetthe
mechanismcore.
2Resethole
Note:
PressingtheRESETholewillerasetheclock
settingandstoredstations.
3Panelstatusindicator
Lightupwhenyouipthepaneldown;
Twinklewhenyouremovethepanel.
4Discslot,insertthedisc.
5SD/MMCcardslot.
Remote Controls
Remote control operating range
Theremotecontrolcanoperatewithina
distanceof3~5m.
Warning
• Storethe batterywherechildrencannot
reach.Ifachildaccidentallyswallowsthe
battery,consultadoctorimmediately.
• Donotrecharge,short,disassembleorheat
thebatteryordisposeitinare.
• Donotleavethebatterywithothermetallic
materials.Otherwise, thebattery maystart
togiveoffheat,crackorcatchre.
• Whenthrowingawayorsavingthebattery,
wrapitintapeandinsulate.
Behind the Panel General Operation
Switching on and off
1.PressPWRtoturnontheunit.
2. Press SRConceormore toselectyour
desiredfunction:DISC,USB,CARD,Aux(
Aux-in),Tuner(Radio).
3. Pres PWR morethan2seconds topower
off.
4. When you switch off the system or car
ignition,thesettings,tuner presetsandthe
volumelevelwillberetainedintheunit's
memory.
Clock Display
PressDISPonthepanelor ontheremote
controltodisplayclocktime,and pressDISP
againtoexit.
Clock Setting
1.PressDISPmorethan2 seconds,minute
displayblinks, thenrotatethe knob to set
minute.
2.Presstheknobonce,hourdisplay blinks,
thenrotatetheknobtosethour.
3.PressDISPagaintoexit.

5
General Operation
Audio Setting
PresstheVOLknobtoselect audiomenu:
VOL/BAS/TRE/BAL/FAD,androtatetheknob
toadjust.
- VOL
Displayshowsthevolume levelVOLand
numberfrom0to40.
- BAS
DisplayshowstheBASSlevel.
BASSrange:-7to+7.
-TRE
DisplayshowstheTREBLElevel.
TREBLErange:-7to+7.
- BAL
DisplayshowstheBALANCElevel.
BALANCE range: 10 L(full left) to 10R(full
right).
L=leftspeaker,R=rightspeaker.
- FAD
DisplayshowstheFADERlevel.
FADERrange: 10R(fullrear) to10F(full
front).
R=rearspeaker,F=frontspeaker.
Menu Setting
PresstheVOLknob morethan2seconds
toenterintomenumode,theneachpress
changesthemode.
- EQ Mode
TheEqualizerfunctionappliespresetsound
effectstotheunit’saudiooutputsignal.Rotate
theknobtoselectEQsoundeffect:
FLAT-CLASSIC-ROCK-POP-JAZZ-USER
Withtheequalizerfunctionactivated,ifbassor
trebleisadjusted,theEQModewill revertto
“Off”.Whentheequalizerfunctionisactivated,
themostrecentlyselectedbass/treblelevels
cannotbeadjusted.When theequalizer
functionisnotactive,theunitwillreturntothe
mostrecentlyselectedbassandtreblelevels.
- LOUD ON/ OFF
Whenlisteningtomusicatlowvolumes,this
featurewillselectivelyboostcertainbassand
treblefrequencies.
- BEEP ON/ OFF
Thebeeptonefeatureallowstheselectionof
anaudiblebeeptonetobeheardeachtime
themenuisaccessed.
- SUBW ON/ OFF
Rotatetheknobtochoosesubwoofer-outon
oroff.
- 12 /24 HOURS
12 HOURS MODE:
The clock displays in the type of 12 hours such
as 11:18 AM.
24 HOURS MODE:
The clock displays in the type of 24 hours such
as 20:18.
- DX/LOCAL
Selectable when the current source is Radio
mode.
Choose radio distant or local.
DX: Stations with strong and weak
signals can be broadcast.
LOCAL: Only station with strong signal can be
broadcast.
- MONO/STEREO
Selectable when the current source is Radio
mode.
Thisoptionallowsyoutoselect radio FM
mono/stereo.
- AREA SET
Thisoptionallowsyoutoselecttheappropriate
frequencyspacingforyourarea.
RotatetheknobtochooseUSAorEurope.

6
Radio Mode
Selecting a Band
PressBANDonceormoretoselectFM1- FM2
- FM3 - AM1 - AM2.
Displayshowswaveband,frequency,and
presetstationnumberifalreadystored.
Selecting a Station
Pressthe or tuning buttontotuneto
anotherstation.
Tuning
- AUTO SEEK
Pressthe or buttonstoseekthenext/
previousstationautomatically.
- MANUAL SEEK
Pressandholdthe or buttonstoenter
manualtuningmode.Pressthebuttonsagain
tomovetheradiofrequencynumberup or
downonestep.
Note:
• Duringmanualseeking,ifthepause be-
tweentwooperatingsteps islongerthan5
seconds,whenyoucontinue topressthe
or buttons,theunitwillenterauto
seeking.
• Duringmanualseeking,whenyoupressand
holdthe or buttons,theunitwillseek
continuously.
Preset Mode
Sixnumberedpresetbuttonsstoreand recall
stationsforeachband.Thestored stations
(1-6)forthecurrentbandcan beviewedon
thescreen.
Storing Stations
- Auto storing
1.Selectaband(ifneeded).
2.PressAMSbriey tosearchallstations in
theband,the6strongestavailable station
willbeautomaticallysavedinthe preset
button(numbers1-6)
- Manual Storing
1.Selectaband(ifneeded),thenselecta
station.
2.Pressandhold apresetbutton(numbers
1-6)onthefrontpanelorremotecontrol.
3.Thepresetnumberandstationisdisplayed
andhighlighted.
Recalling a Station
1.Selectaband(ifneeded).
2.Pressafrontpanelor remotecontrol
presetbutton(numbers1-6)toselectthe
correspondingstoredstation.

7
4. Take out USB Device
PresstheSRCbuttontonon-USB modeand
takeouttheUSBdevicefromtheUSBjack.
Note:
USBfunctions(ashmemorytype)MP3music
play.
1.SD/MMCcardsupport.
2. USB flash memory 2 in1(SD/MMC)sup-
port.
3.SupportFAT16&FAT32
4.Filename:32byte/dirname:32byte/tag
name:32byte.
5.Tag(id3tagver2.0)
Title/artist/album:32bytesupport.
6.Multicardreadernotsupport.
7.USB1.1support.
Not all kinds of USB devices are compat-
ible with the unit.
USB/SD/MMC/MP3 Mode
1. Load SD/MMC Card
Openthepaneland insertthe SD/MMCcard
intotheslot.Closethepanel,theunitwillread
theleofthecardautomatically.
2. Take out SD/MMC Card
PushSRCbuttontonon-SDmode, pressthe
SD/MMCcardtopopout.
3. Load USB Device
InsertUSBdeviceinto theUSBjack.The
unitwillreadthe fileintheUSBdevice
automatically.
Accessing Disc Mode
Ifadiscisalreadyin thediscslotbutisnot
playing,presstheSRC buttononthefront
panelorontheremotecontroltoswitchtothe
DISCsource.ToplaylesfromanSDorUSB
that is already inserted, choose the CARD
orUSBsource.Thediscplaybackscreen is
indicatedbelow:
1.SourceIndicator
2.CurrentTrack/TotalTrack
3.NameoftheSongDisplay
4.Time/Clock
5.AudioFolder
6.PictureFolder
7.VideoFolder
2 4
5
6
7
1 3
Disc Mode

8
Insert a Disc
Press toipdownthepanel.Insertthedisc
into the slot,andtheunitwillchangetodisc
modeautomatically.
Note:
•Pleaseconrmwhetherthereisadiscin
theunitbeforeyouinsertanotherone.
•Theunitwillexitcurrentplayingsourceand
enterDVDmodewhenonediscisinserted.
Eject the Disc
Press toflipdown thepanel.Press to
ejectthedisc.
Note:
•Afterejectingthedisc,theunitrevertstora-
diomode.
•Youcanejectadiscwiththeunit powered
off.Theunitremainsoffafterthedisc is
ejected.
Disc Playback
1.Whendiscinserted,displayshowsLOAD.
ForMP3ordiscwithmixed files,reading
timemayexceed1minute.
2.ERRORwillbedisplayediferrorfoundin
discoperation.
3.ForVCD/CD,VCD orCDiconwillappear
onthedisplay.
4.WhileMP3/WMAlesplayback,MP3/WMA
iconwillappearonthedisplay.
5.For DVD, DVD icon will appear on the
displayandTITLEappears.PressENTER
or toplay.
File Type Supported
Audio le: MP3(*.mp3), WMA(*.wma)
Video le:
DIVX
MPEG 2 (*.vob)
MPEG 1 (*.dat)
Picture le: JPEG (*.jpg)
MP3 le:
ISO9660or ISO9660+ Joliet format -Max.
30characters.
Max. nested directory is 8 levels.
The max. album number is 99.
The max. length of each track is 99 minutes
59 seconds.
Supported sampling frequency for MP3 disc:
8KHz to 48KHz (44.1KHz preferably).
Supported bit-rates of MP3 disc are: 32 - 320
kbps (128 kbps preferably).
Disc and File NOT Supported
*.AAC, *.DLF, *.M3U, *.PLS, MP3 PRO files
and files with DRM.
Open session discs.
Audio/Picture/Video File Playback
WhenAUDIO/PICTURE/VIDEOle isplayed,
Category/Folder/Filelistwillbedisplayedon
thescreen,andle/foldernamebeingplayed
willbedisplayedontop.Currentselecteditem
willbehighlighted.
Category Select
Use / toselect AUDIO
PICTURE
VIDEO
PressENTERtoconrm.
Folder Select
Use / toenterfolderlistanduse / to
selectdesiredfolder,pressENTERtoconrm.
File Select
Use / to enter file list and use / to
selectdesiredle,pressENTERtoplayback.
ForPICTURE,press to slide show the
pictures,pressPROGto selectpicture
showingstyle.
ForMUSIC,press willenter poweron logo,
thenpress toreturn.
Disc Mode

9
Note:
MP3andWMA(WindowsMediaAudio)music
lesaredigitalaudiolesthatarecompressed
toallowmorefiles tobestored.Thisunit
canplayMP3/WMAandvideodirectlyfrom
filescontainedonaCD-R/RW,DVD-ROM,
DVD+RW, DVD-RW, DVD+R,DVD-Rand
DVD-VIDEO, oranSD card or USB Device.
Manytypesofsoftware areavailableforcon-
vertingaudiofilesinto MP3/WMAformats.
NeroorRoxioEasy CDCreatorarerecom-
mended.Thisunitcanplay MP3(MPEG1,2,
2.5AudioLayer3).However,theMP3record-
ingmediaandacceptedformatsarelimited.
Entering ID3 Tag
ThisunitsupportsID3tagversion2.0.
Forcharactercodes,refertothe tabletothe
below.
Entering File and Folder Names
Namesusingthecode listcharactersarethe
onlyfilenamesandfoldernamesthatcan
beenteredanddisplayed. Usinganyother
characterwillcausethe leandfoldernames
tobedisplayedincorrectly.Theunitrecognizes
andplaysonlyfiles withtheMP3/WMA
extension.
Note:
Alenameenteredwithcharactersnotonthe
codelistmaynotplaycorrectly.
Electronic Shock Protection
•10secondsforCD-DA(CDA)
•>45secondsforMP3recordedat44.1kHz,
128kbps
•>90secondsforWMArecordedat44.1kHz,
128kbps
Bit Rates
Theunitsupportsbitratesfrom32-320kbps.
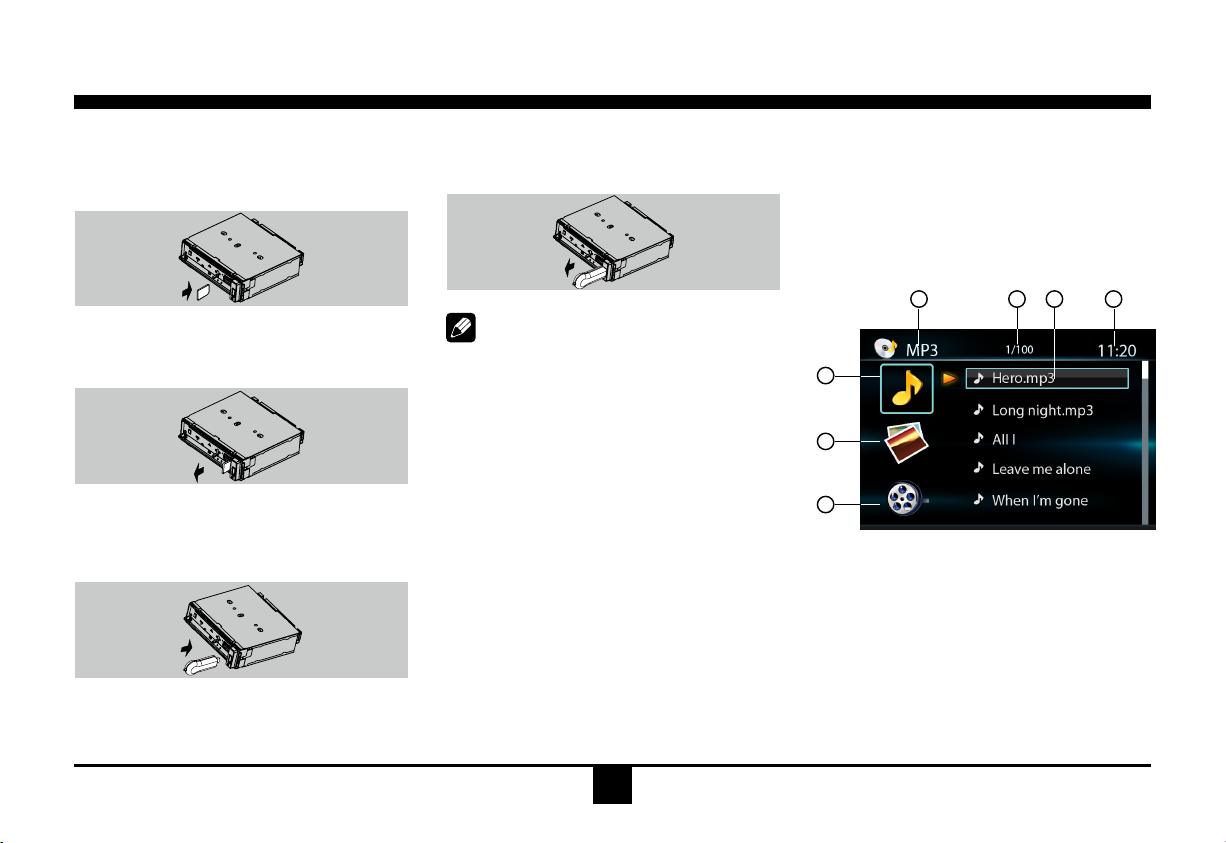
MP3 Playing Order
When selected for play, files and folders
(FolderSearch,FileSearchorFolder Select)
areaccessedinthe orderinwhichthey were
writtentothemedia.Asaresult,the orderin
whichtheyareexpectedtobe playedmay
notmatchtheorderinwhichtheyareactually
played.Youmaybeableto settheorderin
whichMP3/WMA filesaretobeplayed by
assigningfilenamesbeginningwithplay
sequencenumberssuchas"01"to"99".For
example,amediumwith thefollowingfolder/
lehierarchyissubject toFolderSearch,File
SearchorFolderSelectasshownbelow.
()
0
1
2♪①
♪②
5
♪⑧
♪⑦
6
7♪⑨
♪③
3
4
♪④
♪⑤
♪⑥
Layer1 Layer 2 Layer 3 Layer 4 Layer5
○Root Folder
Folder
♪File
Theplayerwillonlyrecognizethreefolder
levelsanddoesnotdisplayfolderscontaining
onlyotherfolders.In theexampleabove,the
unitwilldisplayfolders3,4,6,and8,butnot2
and7sincetheydonotcontainsincetheydo
notcontainanytracks directly.Folder5is not
recognizedatallsinceitisatthefourthlevel.
Disc Mode

10
Disc Mode
Select Desired Track
-Press or toskiptothenexttrack.
-Use1-9and0,10+buttonsontheremote
controltoselectdesiredtracknumber.
Fast Forward/Backward During
Playback
Press or formorethan2secondsonce
ormoretoselectX2, X4,X8,X20tofast
backwardorforwardtrackduringplayback.
-Duringthefast forwardorbackward
operation,press brieytoplaybackagain.
-Duringthefast forwardorbackward
operation,thevolumewillbemuted.
Intro (for CD/VCD only)
Youcanplay thebeginningofevery trackfor
15secondsinsequence.
1.Duringplayback,pressINT once.
INTON/OFFwillappearonthedisplay.
2.PressINTagaintoselectthecurrenttrack.
Random Track Playback (for CD/
VCD/MP3 Only)
Youcanplayallthetracksinrandomorder.
1.Duringplayback,pressRDMonceormore.
-RDMiconwillappearonthedisplay.
2.PressRDMagaintoselectnormalplayback.
Repeat
Duringplayback,pressRPTonceormore.
-RPTiconwillappearonthedisplay.
-ForVCD/CD:DisplayappearsRPTONE
RPTALL RPTOFF
-ForDVD:Display appearsRPTCHAPTER
RPTTITLE RPTOFF
-ForFiledisc:DisplayappearsRPTONE
RPTDIR RPTALL RPTOFF
Note:Ifyoudo notselectRPTon,whenthe
entirediscorTITLEplaybackhasfinished,
thesystemwillstop.Ifnoothercontrol,after5
minutestheunitwillturnintostandbymode.
Repeat A B
Selectdesiredpassagetorepeatplayback.
-PressA Bonceto selectstartingpoint.
DisplayshowsREPEATA.
-PressA Bagaintoselectendingpoint.
DisplayshowsREPEATA B , a n d
selectedpassagestarttoreplay.
-PressA Bonceagaintoexit.
DisplayshowsA BCANCEL.
Pause
- Duringplayback,press to pause
playback.
- Thesoundwillbemuted.
- Display"PAUSE"intheTVscreen,display
andblink"PAUSE"onthepaneldisplay.
Press againtocontinueplayback.
PBC - Playback Control (for VCD only)
1.Ifyou insertaVCDwithPBC,playback
startsfromthebeginning ofthe1sttrack
automatically.
2.Press PBCtoshowmenu,use / or
digitbuttontoselectdesiredtrack.Press
toreturntopoweronlogo.PressPBCagain
toexitmenu.

11
PROGRAM
PROGRAM
GOTO
Gotodesiredtrack/chapterortimepoint
directly.
PressGOTObuttonontheremote control,
trackorDVDTitle/Chapterandtimedisplayon
topofthescreen. Currentitemishighlighted.
Use / to selectdesireditem.Use digit
buttontoselectnumber.PressENTER to
conrm.
Program
- Press PROGtoenterprogramlist.Use
/ or / cursor and digitbuttontoenter
number.
ForDVDandFiledisc,selecttitleand
chapternumber.
ForVCDandCD,selecttracknumber.
- Press toplay,ormove thecursorto
select"PLAY"andpressENTERtoplay.
- Ifyouwanttodeletethelist,movethecursor
to"CLEAR",pressENTERtodeleteallthe
listsetbefore.
- PressPROGagaintoexitprogramplay.
DVD Audio Select
PressAUDIOorR/Ltoselectaudiolanguage
tolisteniftheDVDhasmultipleaudio
languages.
VCD Audio Select
PressR/Ltoselectaudiochanneltolisten.
DVD Subtitle Select
PressSUB.Ttoselect thesubtitlelanguage
toshowiftheDVDhas multiplelanguage
subtitles.
DVD Title Select
PressTITLEtodisplaytitleorchapterlist,use
/ or / cursorordigitnumberto select,
pressENTERtoplay.
DVD Angle Select
PressANGLEtoselectdifferentangletoview
iftheDVDhasmultiple-angleviews.
ZOOM
PressZOOMbutton,thepicturewill be
zoomedaccordingly.
Disc Mode

12
Bluetooth Mode
Note:
Foryoursafety,avoidtalkingonthephoneas
muchaspossiblewhiledriving.
Bluetoothisawirelesstransmissionway for
shortdistance.Thebuilt-inBluetoothcancon-
nectwiththemobilephoneshaving Bluetooth
function.
Afterconnecting,youcan controlyourmobile
phonethroughtheunit.
Pairing
Usethisfunctiontoestablishaconnectionbe-
tweentheunitandyourmobilephone.
1.PressandholdSRCbuttonuntil“PAIRING”
appearsontheLCD.
2.Turnon Bluetoothfunctionofyour mobile
phone,keepphonewithin3meterstothe
unitandstartto searchforBluetoothde-
vices.
3.AfterthenameoftheBluetoothmodule
“SUN-BMA19”appearsonthepairinglistof
yourmobilephone,selectit.Atthis time,a
pairingcodeisrequired. Enterthepairing
code(“1234”bydefault)andthe Bluetooth
pairingwillprocessautomatically.Some
mobilephonesmayinstructyoutoselect
connectordisconnect,please selectcon-
necting.
Exit Pairing
Afterpairsuccessfully, ifyouwantto
disconnect,pressandholdSRC buttonuntil
“PAIROUT“appearsontheLCD.
Make a Call
Afterpairsuccessfully,pressSRC button
repeatedlytoselectBTMUSICmode,press
buttontoselectfrom[DIALNUM].
To dial a number
1. Select [DIAL NUM], then press the VOL
knob.
2. PresstheMENUbuttonrepeatedlytoselect
therstnumber,presstheknobtoconrm.
3. Selectothernumbersasstep2.Ifthenum-
beriswrong,pressthe buttontodelete.
4. Press todialout.
To use a number in call log or directory
1. Selecttheoptionsotherthan[DIALNUM].
2. Presstheknobtoshowthelogordirectory.
Rotatetheknobtoselectanumber.Ifthere
arenorecord,displayshows[NOMATCH].
3. Press todialout.
Receive
1. After pair successfully, if there is a call
incoming,theunitswitch toBTmode
automatically.
2. Press to receive.
3. Presstohangup.
Voice Transfer
During talking, press button to transfer audio
from the unit to your mobile phone.
Note:
Some mobile phones will transfer audio from
the unit to themselves once the incoming call
is answered.
BT Audio
(if the mobile phone has the A2DP & AVRCP
functions)
Afterpairsuccessfully,pressMODEbutton
repeatedly to switch to BT AUDIO mode. In
Bluetoothmainmenuof your mobile phone,
open the audio player and set the transmission
mode to Bluetooth. The audio will be trans-
ferred from the mobile phone to the unit. Some
mobile phones may hint that to connect with
the unit. After found the Bluetooth device name
“SUN-BMA19” on mobile phone, you should
select to connect it, and then input the pairing
code (“1234” by default). When music play-
back, touchto play/pause, and press /
key on the TFT or remote control to previ-
ous/next track (if the options are available).

13
Bluetooth Mode
Auto Connect
PresstheMENUbuttontoenter mainmenu,
andselect[AUTOON]or[AUTOOFF]inthe
menu.
AUTO OFF: After paired OK, if the distance
between mobile phone and the unit is over 10
metres, the connection will exit. The Bluetooth
technology will not automatically establish a
connection.
AUTO ON: After paired OK, if the distance
between mobile phone and the unit is over 10
metres, the connection will exit. The Bluetooth
technology will automatically establish a con-
nection between the unit and the registered
mobile phone when the transmission distance
is 10 metres or shorter.
Whether the automatic connection is ON or
OFF, when power is off then on again, the unit
Bluetooth will connect the mobile phone (if the
Bluetooth function turning on) which is paired
OK last time.
Note:
1.Toconnectautomaticallyasshownabove,
theunitmustconnectthemobilephonesuc-
cessfullybefore.
2.Theunitwilltrytoconnectthemobilephone
pairedwhenon,mostmobilephonewill
connectautomatically,someneedconnect
manuallyduetodifferentsoftwaresetting.
Music Mode
A2DP
A2DP is short for Advanced Audio Distribution
Profile. The mobile phones supporting this
function can transmit stereo audio, whereas
the ones not supporting this function can
transmit mono audio only.
AVRCP
AVRCP is short for Audio/Video Remote
Control Prole. The mobile phones support-
ing this function can control the playback of a
Bluetooth audio player.
In the mode of the music player working, if you
want to make a phone call, disconnect A2DP,
otherwise the LCD will display “BUSY“ when
you dialing out.
General Notes for Bluetooth
1.ForN7X,N9X,PHILIPS,SonyEricssion,
SAMSUNGmobilephones,duringourtest,
afterthemobilephonesappearconnection
successful,theunitstillappear waitingfor
pairing.Atthistimeyoumustndtheunit’s
Bluetoothmodulename“SUN-BMA19”on
thepairinglistonyourmobilephoneand
selectconnectinginthesubmenu,thenthe
unitwillappearpairOK.Otherwise,thereis
novoicecomingoutwhencommunicating,
thoughthemobilephonehasalready
displayedpairOK.Somemobilephones,
suchasPHILIPS,whenitplaybacksA2DP,
youmustndtheunit“SUN-BMA19” inthe
phone’s menuandreconnect (check your
mobilephonewhetherhas theA2DP&
AVRCPfunctions).
2.Whenpairing,sometypesofmobilephone
hintthathowtooperate,forexample,when
youmakeaphonecallbytheunit,ifthe
mobilephonevoicedosn’tbetransferred
totheunit,novoicecomesout.The
SAMSUNGmobilephonehints thatvoice
shouldbetransferredtoBluetoothdevice.
3.Dependingonthemobilephone,ifprivate
modeisselected,when youmakeaphone
callbytheunit,orreceive,the voicewould
betransferredtothe mobilephone.But
sometimethe Bluetooth maybe disconnect
tillthecommunicationends,thenconnects
yourmobilephoneto theunitautomtically.
Somemobilephonesmaybeneed pair
again.
4.For mobile phone, the Bluetooth device
namemustbeprimarysymbolsornumbers.
Otherwise,someunpredictableissues
mayoccurduringtheBluetoothdevices
connectingandmakingphonecall.
5.Afterpaired OK,ifnosoundproduced,
pleasecheckwhetherthe Bluetoothstereo
audioonthephoneswitchedON.

14
DVD Setup
Press SETUP to display setup menu on the
screen.
Use toselectsetupitems:
SYSTEM - LANGUAGE - VIDEO
DVD System Setup
Use , toselectandENTERtoconrm.
- TV SYSTEM: NTSC/PAL 60/PAL/AUTO
SelecttheTVsysteminthesettingmenu.
- TV TYPE: 4:3PS/4:3LB/16:9
SelectTVtypetowatchwidescreenmovies.
4:3PanScan:For4:3TV,leftandrightedges
willbecut.
4:3LetterBox:For4:3TV,blackbarswillap-
pearontopandbottom.
16:9:For16:9widescreenTV.
- PASSWORD
1.Pressnumberbutton"0000"ontheremote
control, then press the ENTER button to
conrm.
2.Pressthedesired4-digitpassword,and
thenpressENTERbuttontoconrm.
3.Recordthepasswordandkeepitina safe
placeforfuturereference.
If you forget the password, please
enter 0000 to reset a new password.
The password : 0000
- RATING:
1 KID SAFE/2 G/3 PG/4 PG13/5 PG-R/6 R/7
NC-17/8 ADULT
Theratingofthediscisfrom1to8:
(1)withthemostlimitswhenplaying.
(8)withtheleastlimitswhenplaying.
Originalsetting:8
Note:
Theratingcanbeselectedonlyunderthe
passwordunlockedstatus,and thelimitscan
beworkedonlyunderthepasswordlocked
status.
- DOWNMIX:
LT(/RT)/STEREO/VSS
Selectcompositeaudiooutputfrom2channel
speakersystem.
- DEFAULT: RESTORE
Ifthisitemisselected,the unitwillreturnto
originalsetting.
DVD Language Setup
Use , toselectandENTERtoconrm.
- OSD LANGUAGE:
English
German
Spanish
French
Portuguese
Selectonelanguagethatyouarefamiliarwith
todisplaysystemmenu.
- AUDIO LANG:
Chinese
English
French
Spanish
Portuguese

15
DVD Setup
German
Selectonedialoguelanguagethatyouare
familiarwithwhenplayingbackDVDdiscs.
Note:
IftheDVDdisc hastheaudiofileinthe
selectedlanguage,thedialogues youlistened
towillbeintheselectedlanguage.
IftheDVDdiscdoesnotcontaintheaudiole
intheselectedlanguage,thedialogues you
listenedtowillbeinthedefaultlanguage.
Youcanchangethelanguagebypressing
[AUDIO]keyoftheremotecontroller.
- SUBTITLE LANG:
Chinese
English
French
Spanish
German
Off
Selectonelanguagethatyouarefamiliarwith
todisplayDVDsubtitles.
IftheDVDdischasthe subtitlefileinthe
selectedlanguage,thesubtitle willbe
displayedintheselectedlanguage.
IftheDVDdiscdoesnotcontainthesubtitle
leintheselectedlanguage,thesubtitlewillbe
displayedinthedefaultlanguage.
- MENU LANG:
Chinese
English
French
Spanish
Portuguese
German
Selectonelanguagethatyouarefamiliarwith
todisplayDVDmenu.
Note:
IftheDVDdisc hastheselectedlanguage,
theDVDMENU/TITLEwillbedisplayedinthe
selectedlanguage.
IftheDVDdisc doesnotcontaintheselected
language,theDVDMENU/TITLE willbe
displayedinthedefaultlanguage.
DVD Video Setup
Use , toselectandENTERtoconrm.
- BRIGHTNESS
Setthebrightnessofthevideooutputwith
from0to12.
- CONTRAST
Setthecontrastof thevideooutputwith
from0to12.
- HUE
Setthehueofthevideooutputwith
from-6
to+6.
- SATURATION
Setthesaturationofthevideooutputwith
from0to12.
- SHARPNESS
Setthesharpnessofthevideooutputwith
from0to8.

Aux in
R (Red)
L (White)
16
Electrical Connections
Wiring Diagram
ISO Connector
Amplifier
Connector
Fuse 15A
Rear Line-out (Gray)
L(White)
R(Red)
Front Line-out (Brown)
L(White)
R(Red)
Video out 1
2
(Yellow)
(Green)
Subwoofer out
(Black)
Antenna Video out (Yellow)
Bluetooth Antenna (Grey)
Bluetooth MIC in (Black) External Mic

17
Anti-Theft System
Thisunitisequippedwithaip-downdetachable
panel.
Panelcanbedetachedandtakenwithyou,
helpingtodetertheft.
Removing the Panel
1.Switchoffthepoweroftheunit.
2.Pressbuttontoipdownthepanel.
3.Atanangleholdthepaneltopullitout.
4.Placethepanel intothecaseand takeit
withyouwhenyouleavethecar.
Installing the Panel
1.Holdthepanelandensurethe panelfaces
towardyou,andset thepanelinthe panel
bracket.
2.Presstherightsideofthepaneluntilitlocks.
Removing the Unit
1.Removethepanelandthetrimplate.
2.Insertbothremovalkeysintohole onthe
frontofthesetuntiltheylock.
3.Pullouttheunit.

18
Installation Guide
Important:Removethesetwoscrewsbeforeinstallation.Otherwise,theplayerwillnotwork.
Installation Procedures
Firstcompletetheelectricalconnections,and
thencheckforcorrectness.
Reset
Press buttontoipdown thepanel.Then
presstheRESETbuttonwithapointedobject
toresettheunittotheoriginalstatus.
Note:PresstheRESETbuttonwill erasethe
clockandstoredstations.
Installation Opening
Thisunitcanbeinstalledinanydashboard
havinganopeningasshownbelow.
Thedashboardshouldbe4.75mm- 5.56mm
thickinordertobeabletosupporttheunit.
52mm
183mm
1. Inset mounting collar into the dashboard, and bend the mounting tabs out with a screw-
driver.
Makesurethatlocklever isushwiththemountingcollar(notprojectingoutward).
2. Secure the rear of the unit.
Afterxingmountingboltandpowerconnector,xtherearoftheunittothecarbodybyrubber
cushion.
3. Insert trim plate.
lock lever

19
Troubleshooting
Ifyoususpectsomethingiswrong,immediately
switchpoweroff.Immediatelystopusingitand
callthestorewhereyoupurchasedit.
Nevertrytorepairtheunityourselfbecauseit
isdangeroustodoso.
General
No power or no sound.
Car'sengineswitchisnoton.
Turn your car's key to ACC or ON.
Cableisnotcorrectlyconnected.
Check connection.
Fuseisblown.
Replace fuse.
Check volume or mute on / off.
Iftheabovesolutionscannothelp.
Press the RESET button.
Disc
Disc is inside but no sound.
Discisupsidedown.
Place disc in the correct direction, and the
label side up.
Discisdirtyordamaged.
Clean disc or change another disc.
Disc sound skips, tone quality is
low.
Discisdirtyordamaged.
Clean CD or change another CD.
Sound skips due to vibration.
Mountingangleisover30o.
Adjust mounting angle to less than 30o.
Unstablemounting.
Mount the unit securely with the mounting
parts.
Radio
Noise in broadcasts.
Stationistoofar,orsignalsaretooweak.
Select other stations of higher signal level.
Preset station lost.
Batterycableisnotcorrectlyconnected.
Connect the battery cable to the terminal
that is always live.
Error Display Messages
Display shows ERROR.
Discisdirty,damagedorupsidedown.
Press to eject the disc.
When video le initializing time is
too long.
Filereaderrororletypenotsupported.
Press SRC to exit. Then press SRC to play
disc again.
Table of contents
Other NCE Car Receiver manuals