NCS Cirrus LT Plus User manual

Computing Innovations.
TZ-251G v1.2 May 16, 2016
Cirrus LT Plus
User Guide

Contents
Icon Glossary .............................................................................................................................................5
Safety Instructions...................................................................................................................................6
Battery Safety and Tips...........................................................................................................................7
Introduction ..............................................................................................................................................8
Chapter 1: Before you start.....................................................................................................................9
Package contents.............................................................................................................................................9
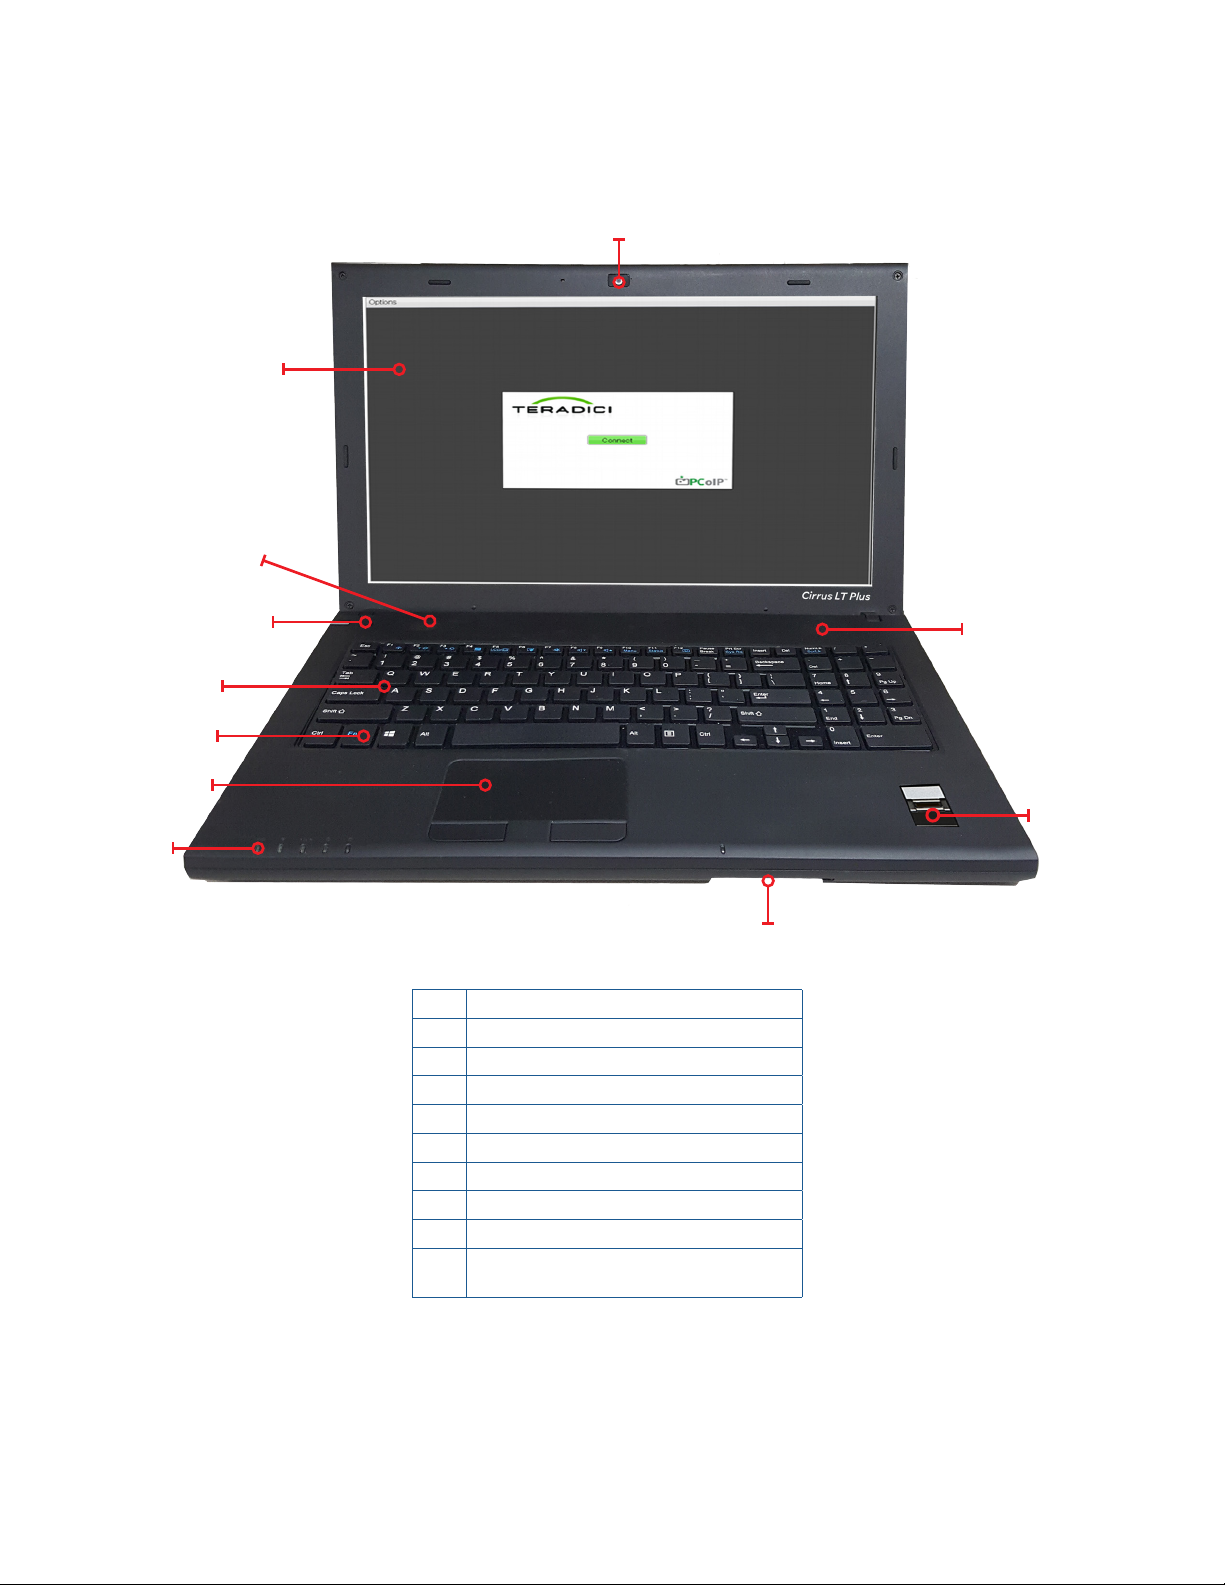
Components....................................................................................................................................................10
Front view ................................................................................................................................................ 11
Right View................................................................................................................................................11
Left view ...................................................................................................................................................11
Bottom view.............................................................................................................................................12
Notebook LEDs........................................................................................................................................12
Docking station rear view......................................................................................................................13
Docking station LEDs ............................................................................................................................13
Laptop and docking station LED status light indicators.................................................................14
Chapter 2: Getting started .....................................................................................................................15
Powering up your notebook ........................................................................................................................15
Connecting the AC adapter ...................................................................................................................15
Removable battery installation............................................................................................................16
Optional dual battery support ..............................................................................................................18
Installing/Removing the SIM card............................................................................................................19
Installing the SIM card..........................................................................................................................19
Removing the SIM card .........................................................................................................................22
Starting your notebook................................................................................................................................ 26
Opening the display panel .....................................................................................................................26
Turning on your notebook .....................................................................................................................27
Using the keyboard........................................................................................................................................27
Function keys...........................................................................................................................................27
Touchpad........................................................................................................................................................ 28
Point ..........................................................................................................................................................28
Click...........................................................................................................................................................28
Double-click .............................................................................................................................................28
Drag...........................................................................................................................................................28
Using the fingerprint reader....................................................................................................................... 29
Chapter 3: Making connections ............................................................................................................30
Connecting external display devices........................................................................................................ 30
Connecting a projector or display monitor.........................................................................................30
Connecting USB devices ..............................................................................................................................31
Connecting to a mouse and keyboard .......................................................................................................32
Connecting headphones...............................................................................................................................33
Audio subsystem......................................................................................................................................33
Connecting an external microphone........................................................................................................ 34
Connecting to the docking station.............................................................................................................35
Connecting the docking station ............................................................................................................35
Disconnecting from the docking station..............................................................................................39

USB port functionality while notebook is docked............................................................................. 40
Hotdocking.............................................................................................................................................. 40
Configuring the audio for remote hosts....................................................................................................41
Connecting to the Teradici host PC......................................................................................................41
Connecting to VMHost ......................................................................................................................... 42
Docking station audio subsystem........................................................................................................ 44
Installing a SFP module .............................................................................................................................. 45
Chapter 4: Navigating the OnScreen Menu........................................................................................47
OnScreen Menu (OSM) structure............................................................................................................. 47
Main Menu..................................................................................................................................................... 48
Network .......................................................................................................................................................... 49
Ethernet ................................................................................................................................................... 49
WiFi...........................................................................................................................................................50
4G...............................................................................................................................................................62
SSL VPN.................................................................................................................................................. 64
Web Portal................................................................................................................................................76
Display Settings .............................................................................................................................................78
Native Display Off ..................................................................................................................................79
Brightness................................................................................................................................................ 80
Status Bar................................................................................................................................................ 80
Display Options.......................................................................................................................................82
Power Management ..................................................................................................................................... 88
Setting the duration of the OnScreen Menu (OSM) Timeout .........................................................89
How the Cirrus LT Plus power management modes are all related ..............................................91
Low power mode.....................................................................................................................................95
Timing preferences .................................................................................................................................99
Device Manager ............................................................................................................................................102
Speakers...................................................................................................................................................102
On Lid Close............................................................................................................................................102
Touchpad/Keyboard settings ...............................................................................................................104
Webcam ...................................................................................................................................................107
Administrator ............................................................................................................................................... 108
Admin login.............................................................................................................................................108
Administrator settings ..........................................................................................................................109
Allow saving WiFi pwassword ............................................................................................................109
Allow web portal ....................................................................................................................................110
Change admin credentials....................................................................................................................110
Change user credentials........................................................................................................................ 111
System info..............................................................................................................................................112
Restore factory defaults ........................................................................................................................112
Admin log off...........................................................................................................................................112
Chapter 5: Opening and configuring the Teradici Firmware menu ............................................. 113
Assigning a Static IP Address.....................................................................................................................115
Chapter 6: Making remote connections............................................................................................ 116
Connecting to remote machines with Teradici host cards..................................................................116

Important Teradici host software settings ........................................................................................ 117
Chapter 7: Using the Cirrus Web Portal............................................................................................. 118
Admin password recovery ..........................................................................................................................118
Updating the NCS Firmware......................................................................................................................120
Chapter 8: Accessing the Cirrus Management Console..................................................................124
Installing the Cirrus Management Console............................................................................................124
Logging onto the Cirrus Management Console.....................................................................................127
Chapter 9: How to load and unload certificates on the Cirrus LT Plus.......................................129
Loading a certificate.....................................................................................................................................129
Unloading a certificate ................................................................................................................................136
Chapter 10: Configuring advanced WiFi roaming............................................................................138
Enabling/disabling Enhanced Roaming via the OSM Main Menu ...................................................138
Enabling Enhanced Roaming...............................................................................................................138
Disabling Enhanced Roaming..............................................................................................................140
Checking WiFi channels that are being scanned/used via the OSM Main Menu .........................142
Configuring Enhanced Roaming via the Management Console (MC).............................................143
Chapter 11: Troubleshooting ................................................................................................................150
General troubleshooting tips .....................................................................................................................150
Conflicts between Teradici and NCS Firmware ....................................................................................153
Chapter 12: Wake-on-LAN (WOL).......................................................................................................154
NCS help ...................................................................................................................................................155
Appendix: Specifications.......................................................................................................................156
Appendix: Regulatory and legal information....................................................................................157
FCC compliance information.....................................................................................................................157
Notice ..............................................................................................................................................................158
Warranty provisions.....................................................................................................................................158
Warning statement .......................................................................................................................................159
FCC Test Report............................................................................................................................................160

5
Cirrus LT Plus User Manual v1.2
Icon Glossary
2

6Cirrus LT Plus User Manual v1.2
Safety Instructions
DO NOT block the opening vents provided for ventilation. Blocking these vents may cause
the computer processor to overheat.
• DO NOT place your notebook on an unstable or uneven surface.
• DO NOT place or drop heavy objects on your notebook.
• DO NOT apply heavy pressure on your notebook.
• DO NOT press or touch the display panel.
• DO NOT use your notebook under harsh conditions.
• DO NOT subject your notebook to magnetic fields.
• DO NOT use or store your notebook in extreme temperatures.
• DO NOT place your notebook near fire or other sources of heat.
• DO NOT expose to dust or corrosive materials.
• DO NOT spray water or any other cleaning fluids directly on the display panel.
• DO NOT expose your notebook to rain or moisture.
• DO NOT tamper with the battery. Keep this away from children.
• DO NOT slam your notebook shut and never pick up or hold your notebook by the
display.
• DO NOT expose your notebook to sudden changes in temperature or humidity. Keep
your notebook away from air conditioners and heating vents.
• DO NOT check your notebook in as baggage. If you are traveling, carry it on instead.

7
Cirrus LT Plus User Manual v1.2
Battery Safety and Tips
There is a risk of explosion if the battery is replaced with an incorrect battery. Dispose of
used battery according to the instructions.
• Do not disassemble, heat, or incinerate.
• Dispose of used battery according to the manufacturer’s instructions.
Do not dispose of battery in a fire. It may explode. Check with local authorities for
disposal instructions.
• Keep away from children.
• Store unused battery in a normal room temperature range.
• To optimize battery life, make sure to let the battery drain before plugging it in to
charge.
• Leaving the notebook constantly plugged in will result in a deteriorating battery
life.
• This product is intended to be supplied by a Listed Information Technology Equip-
ment AC adapter rated 19 VDC, 3.42A.

8Cirrus LT Plus User Manual v1.2
Introduction
The Cirrus LT Plus is a zero client notebook that allows you to securely connect to any
kind of network, remote host, or virtual machine. The Cirrus LT Plus has no local storage,
so there is no vulnerability to viruses or malware, and no files or information will be com-
promised if the notebook is lost or stolen.
The Cirrus LT Plus is based on Teradici’s high performance TERA2321 processor, which
uses the PCoIP protocol. PCoIP compresses, encrypts, and encodes the entire comput-
ing experience at the data center and transmits it as pixels across the IP network to a zero
client. Remote users have effortless access to a fully functional, even HD, computing ex-
perience-- and now secure computing functionality is available for the first time on a zero
client laptop.
Compact, lightweight, and engineered for high performance, Cirrus LT Plus using PCoIP
technology is optimized for VMWare Horizon View for a highly efficient IT administrative
experience and low cost of ownership. Cirrus LT supports copper, fiber, and WiFi. It deliv-
ers state of the security using AES 128/256 bit encryption/decryption and Suite B ciphers.
The Cirrus LT Plus breaks the last security barrier and sets a new performance standard
for computing practicality.
Since the Firmware may be updated at a later date, screenshots contained in
this document of the NCS GUI may be subject to changes without notice.

9
Cirrus LT Plus User Manual v1.2 - Chapter 1
Chapter 1: Before you start
Package contents
• Cirrus LT Plus notebook
• Lithium-ion battery
• 65 Watt power adapter
• Cirrus LT Plus Quick Start Guide
• SIM card insertion tool

10 Cirrus LT Plus User Manual v1.2 - Chapter 1
Components
1
2
9
3
4
6
7
3
5
8
10
1 Optional built-in PC webcam
2 LCD screen
3 Speakers
4 Power button/LED
5 Keyboard
6 Function (Fn) key
7 Touchpad & buttons
8 LED indicators
9 Optional fingerprint reader
10 Smart card reader (CAC) or optional
internal proximity card reader

11
Cirrus LT Plus User Manual v1.2 - Chapter 1
Front view
Smart card reader
Right View
234
1
1 Microphone jack
2 Headphnes/headset jack
3 Dedicated keyboard USB port
4 Dedicated mouse USB port
Left view
6
23456
1
1 Security key lock
2 DC-in jack
3 Mini DisplayPort
4 Charging USB port*
5 RJ-45 LAN jack
6 PCoIP USB ports
*This port is labeled “Local” on the notebook, but it functions as a USB
charging port for certain devices. Devices plugged into this port will not be
seen in the remote session.

12 Cirrus LT Plus User Manual v1.2 - Chapter 1
Bottom view
Battery
Docking
station
connector
The docking station port may be covered with a rubber cover to keep dust
and debris out of the connector when not in the dock
Notebook LEDs
2346
15
1 Battery
2WiFi
3 PCoIP
4 Caps Lock
5 Num Lock
6 Proximity card

13
Cirrus LT Plus User Manual v1.2 - Chapter 1
Docking station rear view
2
67
13 4 5 6 8 9 10 11
1 Fiber SFP port
2 Charging USB port
3 RJ-45 LAN jack
4 DVI-1 port
5 DVI-2 port
6 PCoIP USB 2.0 ports
7 Dedicated mouse USB port
8 Dedicated keyboard USB port
9 Speaker/line out
10 Microphone
11 DC-in jack
Docking station LEDs
2
3
14
5
6
1 CapsLock
2 Battery
3 PCoIP Session Status
4 NumLock
5 WiFi Status LED
6 Power/Connect Button

14 Cirrus LT Plus User Manual v1.2 - Chapter 1
Laptop and docking station LED status light indicators
Power LED
Green LED – Normal Operation – unit is powered on
Amber LED – Wake On LAN is enabled/unit is OFF
No LED – unit is off (Wake on LAN is disabled)
Blinking Green LED – Host PC is in low power (sleep state)
Blinking Green and Amber - unit is in the process of upgrading BIOS (DO NOT
TURN OFF)
Battery LED
Green LED – Battery is full or AC adapter is plugged IN
Blinking Green LED – Battery is charging
Blinking Amber LED - Low Battery, Battery is under 10% charge, or battery is
not present
Amber LED – charging error
NO LED – normal operation, battery discharging
Wireless LED
Green LED – Wireless is enabled/ this can be on when not connected to a
wireless LAN.
NO LED – Wireless is disabled
PCoIP LED Green LED – Connected to a remote host
NO LED – no connection present
Caps Lock LED Green LED – CAPS LOCK Enabled
NO LED – CAPS LOCK Disabled
NumLock LED Green LED – NumLock Enabled
NO LED – NumLock Disabled

15
Cirrus LT Plus User Manual v1.2 - Chapter 2
Chapter 2: Getting started
This chapter will guide you on how to use your notebook.
It covers the following sections:
• Powering up your notebook
• Battery installation
• Installing/uninstalling a SIM card
• Opening the display panel
• Starting your notebook
• Using the keyboard
• Using the touchpad
• Navigating the OnScreen Menu (OSM)
Powering up your notebook
Your notebook can be powered up using the AC adapter, a removable lithium-ion
battery, or an optional factory installed dual battery configuration.
Connecting the AC adapter
The AC adapter powers up your notebook and charges the battery.
• Connect the AC adapter to the DC-in jack of your notebook.
• Connect the AC adapter to the power cord.
• Plug the power cord to an electrical outlet.

16 Cirrus LT Plus User Manual v1.2 - Chapter 2
Removable battery installation
Installing the removable battery
To install the battery, follow the steps below:
1. Align and slide the battery into the battery compartment.
2. Push the battery into the compartment until the battery locks into place,
and make sure the latches are locked into position. The left latch will
automatically go into the locked position when you push the battery in
place, but you must manually lock the right latch, as shown.

17
Cirrus LT Plus User Manual v1.2 - Chapter 2
Charging the removable battery
The removable lithium-ion battery is not fully charged upon purchase. To
charge the battery, follow the steps below:
1. Install the battery to your notebook. See procedure above.
2. Connect the AC adapter to the DC-in jack of your notebook.
3. Connect the AC adapter to the power cord.
4. Plug the power cord into an electrical outlet.
Charging the removable battery while the Cirrus LT Plus is powered off will
shorten the charging time to two hours. If the Cirrus LT Plus is on, it will take
approximately eight hours to charge the unit.
Using battery power
Install the charged battery in the battery compartment by removing the AC
adapter (if plugged in). Your notebook will automatically use the battery power.
Recalibrating the battery
If you notice your removable battery pack is not lasting as long over time, you
may need to recalibrate it. Over time, the 100% charge level can get skewed so
it may only charge to actually 85% or lower. You can fix this by removing the
battery from the notebook, then putting it back in. This will reset its circuitry to
start relearning where the 100% charge level is again.

18 Cirrus LT Plus User Manual v1.2 - Chapter 2
Optional dual battery support
Your Cirrus LT Plus may be equipped with a secondary internal Lithium Poly-
mer battery. This is a factory installed option and isn’t intended to be serviced or
removed by the customer.
Install the removable battery as indicated above.
Charging both the removable and internal batteries while the Cirrus LT Plus is
powered off will shorten the charging time to two hours. If the Cirrus LT Plus is
on, it will take approximately five hours to charge the unit.
If your Cirrus LT Plus is equipped with dual batteries, the external battery can
be changed without powering down, since the internal battery keeps the laptop
running.

19
Cirrus LT Plus User Manual v1.2 - Chapter 2
Installing/Removing the SIM card
For instructions on how to configure 4G functionality via the OnScreen
Menu, refer to Chapter 4.
Installing the SIM card
To install the SIM card into your Cirrus LT Plus, follow the steps below:
1. Make sure you have your SIM card and the insertion tool included with your
Cirrus LT Plus on hand.
2. Remove the Cirrus LT Plus’ external battery from the notebook bottom by
sliding the tabs to the unlocked position.
3. Remove the battery.

20 Cirrus LT Plus User Manual v1.2 - Chapter 2
4. Locate the SIM card slot located inside the notebook battery compartment, as
highlighted below.
5. Using your fingers, carefully line the SIM card (with the chip side facing up
and the clipped corner facing away from you with the slot.
Table of contents
Other NCS Laptop manuals