manuals.online logo
Brands
  1. Home
  2. •
  3. Brands
  4. •
  5. Necchi Elna
  6. •
  7. Sewing Machine
  8. •
  9. Necchi Elna Miracle Knitter automatic User manual

Necchi Elna Miracle Knitter automatic User manual

MTRACLT
KN ITTER
Instructions
i
2;
2
I
I
I
t
i
L
i
t'
Latch nccdlc
Sctting up thc machinc
Care o[ lhe machino
Positions of needlcs
ThreadinS instructions
How to rcgulatc thc stitch teDsion .
Casting on
KnittiDg
Cbsin casting on
Knitted hem
Mocl rib .
Holcs
Dccreases
How to join oll a ncw ball of wool
Dcscription of thc machine
Descdptiotr ol thc cam box
Corrections ,
Holding position
Buttonholcs
3
3
4
5
5
6
6
7
7
8
9
9
t0
t0
t2
13
13
t4
l6
22
24
25
,s
7t
28
29
30
32
Ncck opeDinSE - - 17
Shaping for seat o, knickcrs l8
Heels and to.s 19
Dsrts 19
Pockets. - m
Shoulder shapiDg - - 2l
Krftting with clastic yam 2l
Knitting withoul automatic yarD Suide
Thc knobs on thc cam box
FinishiDg.ofr n sdy
Stitches and paticrn3:
t - 4 with sork book
5 - 7 holding position, with yam goidc
8 - 12 holdiDg positioD, without yarn guidc
13 - 14 usiig ouly oltdnate nccallcs
15 . 21 two colou$ knitted simultaoaoully
22 - 5 two ootours knittcd tcparatcly
L Machine bas€
2. Needle Bed
3. Latch needle!
4- 6ack rail
5. Fronl rail
6. -Index bar for numbering needles, lrom 00 in the centre to 80 at each
side:l6l needles
7. 162 small pins, altamating with the needles, on the edgr of the needlc bed
8. Levers lor fixing machine on 10 the table
9. Yarn stand
10. CaIn which operates the row count.r
ll. Cam box
v
t:
rY
:
,
t2.
13.
14.
15.
t7-
18.
19,
m.
"!.
Auiomatic rory coutrier
Haodle
Sritch regulator
Two Knurled fluts for setting or releasing slilch tensio!.
Three Koobs for IiItiDg rhe cams
Automatic yam guide
Rubber wheds which hold the fabdc against the Eachitrc vhile nceaUes
d
move back aDd lorth.
Upper cross b6r
TVo spring loadcd Eongs
c) b) ,) a) hook ,) htch (open) c ) loot
i
t
ti
lr
ti
{
'i
l
I
I
I
1
I
I
I
I
I
Pull down the two fixing levers and close them again under the edge of the
table; the machine should not overlap the t&ble edge. Jhe edge of the table
should be at least 2/2 inches de€p and not morc than 3 inches thick. If,
however, your Lable hls Do suitable edge. the four rubber pads uJder lhe
machine are sumcient to keep it in place,
Undo the screw which is at the bottom of fte rod so tllal it does not project
beyond tle rod. Insert the end of the rod well into the holder
behind th€ machine base and screw in tightly.
1
I
Slip the front slide and tlrc back castors oI the cam box under the treo rails
of the needle bed (the rubber vrheels should be next to the numbering index
bar). lt may b€ necessary to prcss tlrc upper doss bar down a littl€ 60 that
it does not come into contact with the first piD on the edge of the needle bed.
The row counier is automatically bought into actiotr whenever the cam box
pass€s over thc cam fxed behind the machine base.. This cam can be fixed
ilfoto iliffercnt posltiotls depeEding ort the size oI your work. Holes al.eady
erlst lor this cam opposit€ the needles 60 and 15 on the left aDd 15 ard
60 on the right. To move this cam, unscrew itj having chosen one of thcse
positions, fusefi the two $nall pitrs of the cam into the two small outside
holes and fix the scl€w itrto the central hole, tffi washer between tlc cam
and tle scrcw.
Thc rov counter can slso be worted by hand by pressitrg on thc leve.. To
britrg lhe coutrler back to OO0, tum the screw backwattls.
a) The wooden slide is foi pushing forward needles which wi
to knit wilh or, on the contrary, to tr,ush them back alter use. be used
To push
b)
r/ The sharp point of the work hook is for opening reedle lalches.
the needles iorward hold rhe slide in both hands in a slanting position
behind the f€e1 of the needles (in this way less resislance will be encoun-
lered)i i.o push the needles back hotd it straight in front of rhe feet of rhe
needles (less force will be needed). Needles which are out of use should
be l'cked ight alaillst the back rajt.
The two small selecting combs are used to select needles lor a few rows-
for exanple every 2nd, 4ah or 6th needle-and put them into anolher
position in order to knit fancy stitches.
d) The latch hook is lor correcring a dropped stitch or pickjng up a plain
stitch or the purl side.
fl
The one-eye lransfer bodkin is tor transf€rring a stirch on to the adjacenr
needle (decreases or holes).
Drawnry 4
The rwo-eye lransfer bodkins are for making cable patterr or ior tmns-
ferring two stitches simultaneously when decreasing inside rhe selvealge
I
I
I
i
Brush regularly to rcmove dust and flufi from the needle bed, under the
rails and in the cam box slides.
Oil the rails and slides from time to time with a special oil ior krittirg
machines.
Grease the needle bed very lightly with Parafix whenever commencing a
garment.
If the groov€s on lhe needle b€d become too dirty undo the screws on the
front rail, remove it, with all the needles and the foam rubber and
clean ihe needle bed with a brush dipped in soap and warm water- When
the needle bed is complerely dr),, put the foam rubber into the groove
again, then replace the needles, which must be well oiled. Put the rail back
and screw into position.
Do not leave the cam box on the machine i[ it is not going to be used for
Do not leave the machine in sunlight, near heat or in a damp place.
To avoid the machine getting rusiy when in damp climates, it is recom-
mended that all the metal parts be oiled regularly needles, raiis and cam
box padcularly when the machine is out of use for some time.
I : needles out of action ; the feet of these needles are locked ight against
the back rail.
2i needles in kniiting position; stitches in front of the latches and wool in
the automatic yarn guide.
3: ne€dles in knitting position; stitch€s behind the laiches, wool laid on
the needles by hand. This position is also used when bdnging back
into action needles which were in holding position.
4: needles in holding position; the leet of these needles are brought for-
ward dght up against the front rail. These needles do not knit, even
when the cam box passes over them.
Never slide the cam box on to needles which are not bearing stitches unless
Lhey are against either the back or hoDr rails.
Knitting with the automatic yarn guide
in the larn stand ln the Tarn gaide
a, between discs
6/ in the wire loop
.) ir the ring
/, in the suide
e, under the lcft cross bar bracket
(when the cam box is on the right)
and under the dght one (when the
cam box is on the left).
The number on the stitch regulator o[ the cam box indicates the size of the
stitches. The numbers are lor use with the MIRACLE KNITTER only;
Nos 2 to 4 correspond approximately to hand-knitting needles No. 14
4to 6
6to 8
8tol0
No. 13
No. l0
No. 9
To change ihe stitch tension loosen the two knurlednuts under the left and
right knobs on the cam box ; the stitch regulator can then be set at the ,um_
ber desired. Screw up the two knu{led nuts fixing the tension.
men enlarging thesize of the stitches once the wo.k has been started, it is
necessary to knii the first row in the new tension with the first knob on the
cam box up (the one nearest to ihe work) to avoid the sudden change in
tension breaking the wool. On the other hand, il the stitches are made
smallor during the course of lhe work it is not necessary to lift ihis knob.
A very attraciive pattern can be obtained by knitting in fine wool 8 rows
with tension 3 and 8 rows with tension 10.
Really thick wool should be knitted on alternate needles only, not on all
the needles. Tension 6,7 or 8.
The machine is fixed on to the table, ihe yarn_stand is in position behind
the machine, the cam box is fixed on to the machine at tle extreme dght of
the needle bed and the needles which will be used lor casting on bave beer
brought right up against the front rail. The wool has been thrcaded into
the yam stand and the automatic yarn guide. The stitch regulator deler-
mining the size ol the stiiches has been set, taking into account the wool to
be used (for the first few tries ii is recommended that a fairly flne wool be
used, wiih stitch temion at 6 or 5).
Hold the end of the wool in thc left hand, under tho needles.
Without letting the end go, take up the wool in the dght hand and insert
i[ veriically between the lst and 2nd needles brought iorward on the Ieft (]eft
hand under the needles, right hand over);
pass the wool back over lhe lst needle
and then under the needle (anti-clockwisc).
The first ioop is made.
Hold thh Ioop against ihe machine with the lelt thumb, under the needles
(the loop should be behind the latch)
and pull the wool up between the 2nd and 3rd needles.
Bring the wool back over the 2nd needle
and pull it down between thc 1st and 2nd needles;
. with the left thumb slip this loop bchind the iaich, holding the wool against
the machine, thus helping to lorm the next loop.
. Pull the wool up between ihe 3rd and 4lh Deedles and so on, Iooping it
round €ach needle.
Do not pull the loops too tisht!
When a1l the needles brought lorward hold a casting-on loop, push the
needles back alittle until the end of the orrrr lstches covers the stitches on
the edge of the machine base (position 3).
The wool and the cam box are on ihe right.
Lift the left-haod knob on ihe cam box; the two others are down.
Slide the cam box along urtil the left rubber wheel is in front o[ the first
siitch.
Hold the wool taut by pulling it between the ball and the disc of the yarn
stand.
The wool must be tight between thc yarn guide and the first stitch andpass
behind the left spring loaded prong but in Iront oi tbe small pins at the
edge of the needle bed.
Slide the cam box across from righi to lelt, taking care that the latches rcmain
open;
stop the cam box when the last siitch on the left has been kniited.
Lov,er ihe knob.
Slide the cam box across from left to Iight, taking care ihat the stitches
remain right against the machine, slipping behind the latches when the
needles come lorward (a nd nol coming forward wjlh the needles on to the
the upper cross bar).
Contirue slidiog the cam box smoothly accross the needles, laking it in
e{ch row only far enough to knit the last stilch.
One row is knilled each lime the cam box passes over lhc wotk. Slocking
rtitch is bcing formed-purl side lacing you.
fmportant !
Thc wool must be threaded correcrly in the yarn stand and the aulomalic
yarn guide.
The ball should unwind easiiy.
The stitch tension mLrst correspond to the thickness ol the wool used.
The cam box should nol be laken further than is necessary to knil Ihe last
stitch. Should it be n€cessary to go beyond this poinl the wool should be
given morc play and pulled taul again when bringing thecam boxback on lo
lhc selvedge.
Do not turn brck once r row has been startcd.
Do not Iift the work up to look at the other side: itmight become unhooked.
The lhree knobs should be down (except during the first row, when the lst
knob should be up).
Never lower a knob when the corresponding part oi the cam box is on lhe
worki the leet o[theneedles would prevent ihe cam lrom descending properly.
Please note
How the selvedge stitch is formed:
At the beginning oi a row the yarn should come from underneath the
needle; rhe stitch should slip behind rhe latch Nheo the needle come! for'
ward and ahewool should be stretched tautly on to the needle in tront of the
llLtch.
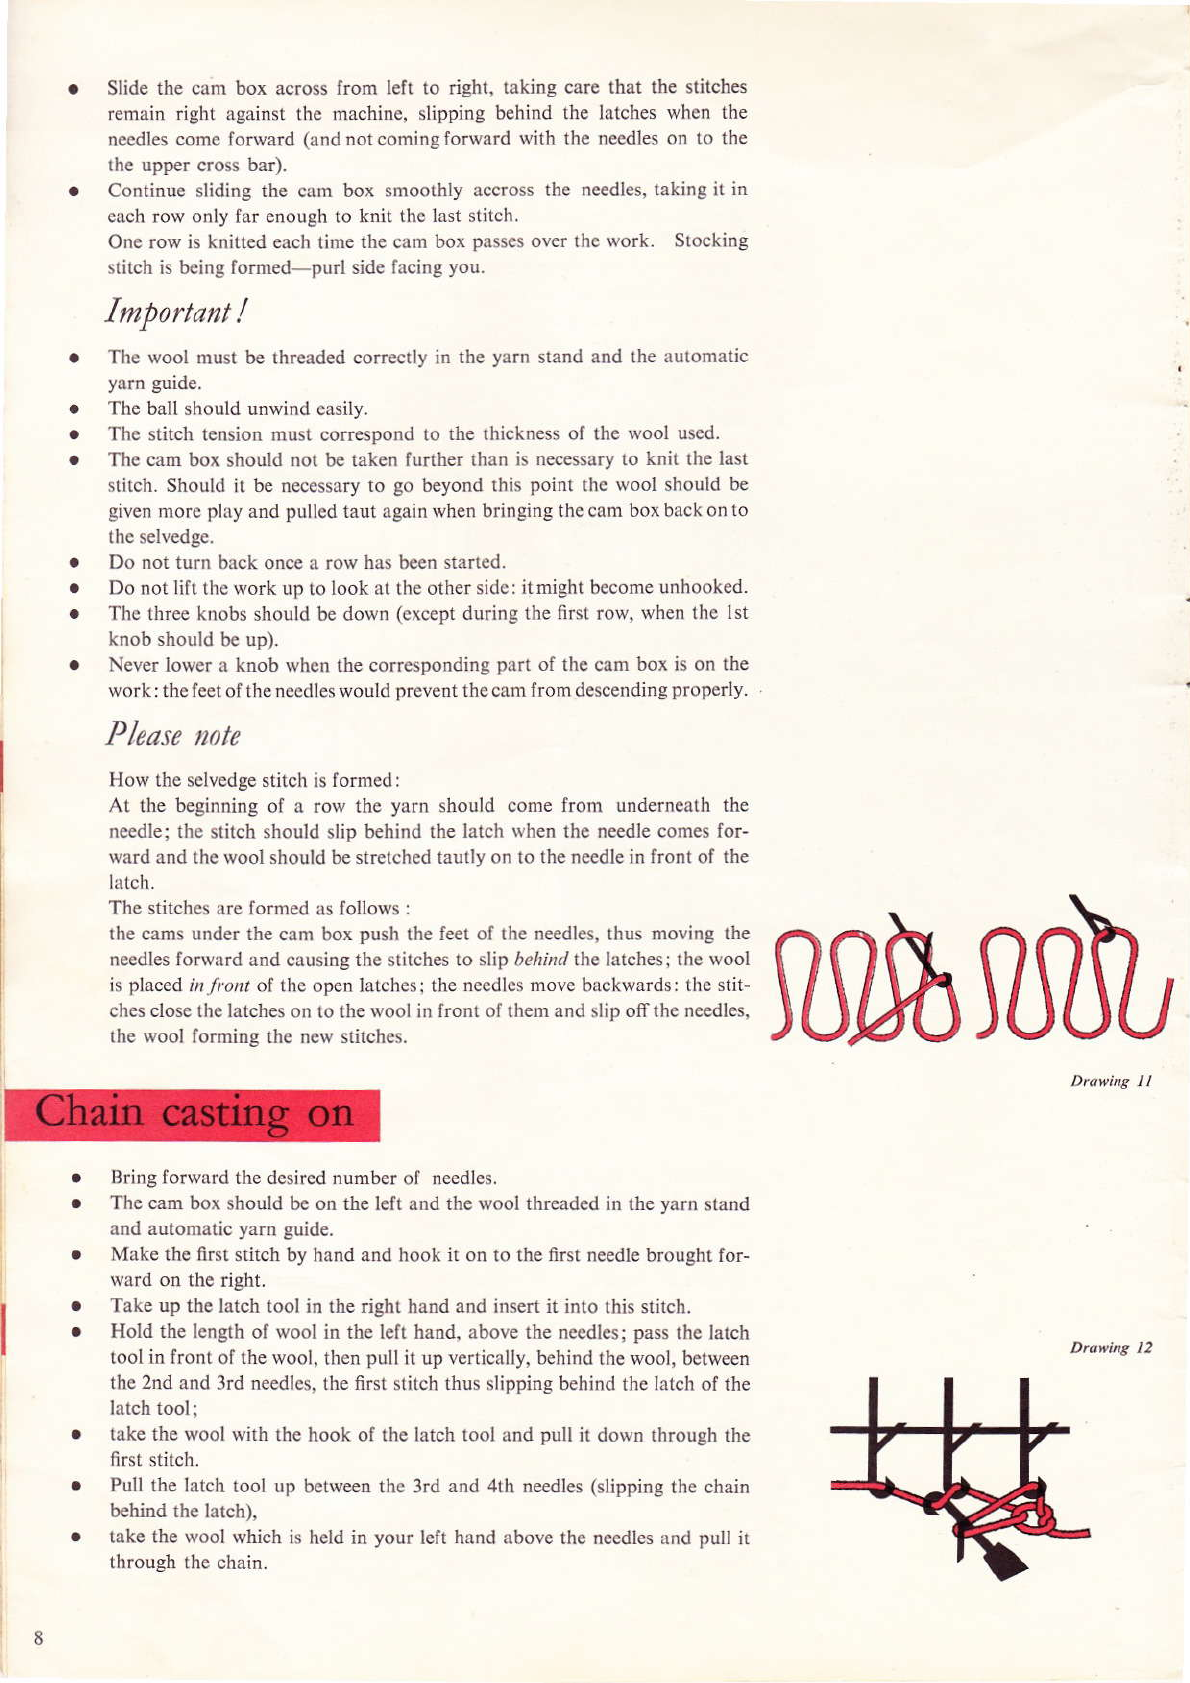
The stitches rre formed as lollows :
the cams under the cam box push rhe leet ol lhe needles, thus moving the
needles forward and causing the st;tches to slip relxrLl the latches; lhe wool
is placed rr l.orr oi the open latchest the needles move brckwards: the stit-
ches close the latches on to the wool in fronl of them and slip offthe needles,
rhe wool lorming the new stitches.
Bring forward the desired number ot n€edles.
The cam box should be on the left and the wool threaded in rhe yarn stand
and automatic yarn guide.
Make the first sritch by hrnd and hook it on to the first needle brought for-
ward on the right.
Take up the latch tool in rhe right hand and irsert it into this slilch.
Hold the length ot wool in the lelt hafld, above the needles; pass the Iatch
tool in front of the wool, then pull it up vertically, brhind Ih€ wool, betw€en
the 2nd and 3rd needlcs, the firsr slitch thus slipping behind the Iatch of the
Iatch tooli
lake the wool with thc hook o[ lhe latch tool nnd puU ir down lhrough rhe
first stilch.
Pull the latch tool up between thc 3rd and 41h ne€dles (slipping the chain
behind the latch),
take the \yool which is held in your left hand nbove the ne€dles.rnd pull it
through the chain.
Proc.€d in this way for each needle and hook the last chain on to the last
ncedle brought forward on the left.
SIip all the loops of the chain behind the latches
and bring the needles into position 3.
Lay another length of the same wool on the needles,
tighten the wool and slide the cam box across with all 3 knobs down.
. Cast on the desired number of stitches (ordinary castiDg on) and knii twice
the numbe. of rows which would be needed to form the depth of the hem
when turned in. t
:'
Usirg ttre wooden slide, push the needles right forward (feer againsl the
front rail), the stitches slipping rer,rd the latches and remaining against the
machine.
Sta ing from the dght (lefi-handed peoplewill start from the lefr), take up
with the one-eye transfer bodkin the ftst stitch oD the right from the first
row and hook it on to the first needle on the right, in fmnt of the latch.
Do likewise with all the stitches lrom the first row.
When allthe saitches from the first row are hooked on to the coresponding
needles, push the Deedles back to position 2 (usual knitting posilion).
The stitches of the last row close the latchcs otr to the stitches transferr€d
from ttre fust row; knit oo.mally (a11 knobs down).
The a(e various ways of making a dbbed border, even without the MIRACt.E
RIBBINC Attachment. The dbbing can, of course, be knitled by hand and
hooked on to the machine. The border may also be knitted itr stocking
stitch for the desired oumber of rows; every 2I1d or 3rd slitch should then
bc dropped and allowed to run down as far as the 2nd row; these slitches
should be picked up plain on the pud side (see page l4).
However, it h also possible to knit automatically imitation rib which is ir
fact only stocking stitch knitted oo alternate needles (see photo). This imi-
tation rib should be knitted double, to make a hem and givea firmerfinhh.
Set the teNion at one or two numbers tighter than for stocking stitch.
Cast on (ordinary castiDg on) leaving each alternate needle completely
locked agaiost the back rail. There should, however, be two adjacent
Dcedles al each side-
Knit double the numbq ol rows necessary,
then bring right up against the lront rail the intermodiate needles which do
trot carry stitches, as wellas the last rcedle on each side.
In the same way as for the knitted hem, hook each stitch from the 6rst
row on to each of the neealles hought lorward (the ne€dles which already
carry stitches remaitr in position 2) and the last stitch on each side on to its
corresponding needle.
When all the stitches from th€ first row have been hooked on to tlrc needles,
push the rc€dles back into position 2, the stitches from the fust row rcmain'
ing in liont of tle latches.
. Set the stitch tensiotr lor stocking stitch, 1 t the first knob lor one row atrd
knit itr the usual way.
Ktrlt a few rows itr stockiDg strtch, then opeD all the latches.
Take up wilh tle onceye transfer bodkiD thc second stitch from the left
and transler it on to the adjacent needle, which already caries a stitch.
Do likowise with every 2nd or 3rd needle.
Wletr the whole row has beetr gone through in this way, put into knittiDg
positiotr (op€n latches) all the empty needles. Knit two row6, Stitches
will form automatically on the empty neealles aDd tlrc row oI holes will be
complete,
An attractive picot edge can be obtained by makhg a row of holes in the
middle oI a knitted hem (trafffeffing each al&rnate stitch).
a) How to decrease one stitch
B€gindng at the side fu hest away ftom the cam box (it will thercfore not
be decesssry to move it out oI the way, take up the selvedge stitch with the
one-eye transfcr bodkin;
TraDsfer it on to the adjacent needle, which a.lready cardes a 6titch,
and push ttre empty rcedle right to the back lail.
b) How to decrease inside the selvedge stitch
Beginning on th€ side fufih€st eway lrom the cam box, take up the last two
stitches *ith the two-eye tansfer bodkiD and move them one needle furtter
itr, so that there is oDe empty rcedle, the selvedge stitch alone otr one rcedle,
and two stitches together on ttre last Deedle but one.
Tlis method can also be used for d€creasing oD the 3rd and 4th stitches,
which will make a neater seam (for raglan sleeyes, for example).
c) How to cast off several stitches
. This time it wil be rcc€ssary to begin on ttre side nearest to the cam box
(wool being needed). Slide the cam bor out of tle way b€yotrd the selvedge
(easing the wool so as not to pull the first lcw shtches).
10
open the latches and, using the one-eye transfer bodkin, hook the selvedge
stitch on the adjacent needle which already carries a stitch (as iI you were
decreasing one stitch).
Slip these iwo stitches behind the latch of the needle, lay the wool by hand
in lront of the Iatch
and push the ne€dle back by its foot until the two stitches close the iatch on
to the wool and slip otr the needle, the wool thus forming a new stitch
which will ther be hooked on to the next adjacert needle and the two
stitches thus obtained knitted together in the same way.
wh€n the desired number of stilches have been cast off, lock the empiy
needles right at the back,
bri[g the cam box back on to the selvedge of the work, tighten the wool and
knit in the usual way.
d) How to cast of a whole row
Using tension 12 and the fust knob up (to counteract the geater iension)
knit the last row.
Breakoffthe wool.
Put all needles into position 3 (slitches behind tle latches).
Starting on the side furthest away from the wool, take up the selvedge stitch
and the next stitch with the latch tool. The selvedge stitch is behind the
latch and the nexi stitch in front.
Pull the latch tool down so that the 2nd stitch slips through the first one.
Then slip this stitch behind the latch of the latch tool,
take up the following stitch iD tont of the laich and slip it in the same way
through the 2nd stitch. Continue in this way until only one stitch remains.
Pull the end of the wool through this stitch.
e) How to decrease within the row
Bring all the Deedles forward, slipping the stitches behind the latches.
Sta(ing at the ght, take all the stitches off the machine on to a fine knit-
ting needle, inserting the needie into each stitch from behind; by pulling
them forward a little the stitches can be slipped ofr the n€€dles; take care
rot to pull the adjacefit stitches off at the same iime.
Put the stitches back on to the machine, decreasing unril the required num-
b€r oI stitches is obtained by hooking two stitches together on to one neealle
When hooking the stitches back on to the needles start at the left and insert
the machine needles into the back of the stitches, slippingthemoff the knit-
ting needle.
Note: If you desirc to increase or dedease within the row, you can use a
broad narrower (obtainable ilr England) which js usedlike afl ordinary trans-
fer lool rnd can move up 10 20 s(itches aL a time.
ll
a) How to increase one stitch
. Starting on the side furtlest away ftom the cam box (it will therefore nor
b€ necessary to move it out of the wa, bring forward one morc needle into
the knitting position (opetr latch)
. and hook the selvedge stitch from tte preceding rcw otr to tlis needle.
. II, whetr knitting tlle next row, the tension seems too tight at tle point
where this stiich has been added, lift the first knob to finish the row aDd lower
it when this has b€en done-
b) How to increase inside the selvedge stitch
Starting on the side furthest away from the cam box, b.ing forward otre more
needle into the knitting position.
Using the one-eye fansler bodki4 move the last stitch one neealle further
along to tlrc outside of the work.
Hook on to the empty needle the stitch from the 2nd needle ol the preceding
c) How to add several stitches
This time it will be necessary to start on the side neatest to the cam box
(the wool beiry needed). Slide the cam box out of the way, easing the wool
so as not to pull the first lew stitches.
Bdng dght forward against the froDi rail the desired trumbq of additioMl
needles (open latches)
and cast one stitch on to each empty needle, as if you were beginning a gar-
ment (see ordinary casting on) beginning by the ne.dle next to the selvedge
stitch.
WleD adding stitches on the left-hand side of ihe work, hold the wool itr
the left ha ard loop it round the rc€dles clockwise, holdiDg each loop
agaiost the machine with the dght thumb.
Whetr each needle brought forward carries a stitch, push these needles back
a litde until tle open latch covels the stiich.
LiIt the frst knob of the cam box.
slide the cam box back on to the selvedge,
tighten ttre wool,
knit one row
and lovrer ttre knob.
d) Increasing within the row
It is not possible to increase a latge Dumber of stitches within a single
row because of the limited tension of the wool forming the stitches of the
last row. If you are following a hand-knitting pattem which necessitates
inoeasing several stitches within the row, it will be necessary to begin the
work at the rorf, followjng these increases. Once the work has been com-
pleted, take up the stitches of the first row (ordinary casting on) and hook
them back oll to the machine, making the necessary /ecrerrer. Knit ttre
pattern backwards down to the beginning of the garment (i. e. decreasing
iDsLead ot increasing).
12
It is however possible to increase withitr the row (in the same way as fot
d€cleasing witlin the row) if only a few stitches have to be added, In tlis
case the roe/ precealing the increases should be knitted with a much slacker
tensiotr.
aThejoin s[ould b€ made at the selvedgp.
Take out oI tle automatic yarn guide the short length of wool \yhich rcmains
and let it hatrg down alo[g tte selvedge,
Tbread the new wool into the yam stadd afld tle automatic yam guide,
let ttre end hang dowtr along the same selvedg€,
hold tle two eDals atrd slide the cam box across ttre rc€dles, Whetr thc
work has be€n completed the two eoals will have to be fastened otrby ttread-
ing lhem through the work with a daming &edle.
a) If a mistake has been made and
one row'needs to be undone
Open the latches,
pull the {sork Iorward a littl€, until the needles project a little beyondthe
machitre (the stitches nrrt remsin intont oI thelarrches,
hold the work, pulling it down slightly
and pull tlrc wool, horizontally, just after tte last stitch which has treeD
knitted; the last row uo.avels and tlrc Eeceditrg row hooks oD to the rc€dles,
If only one row has to be undone it will be found that the cam box is not
oD tte same side as the wool; it will tlerefore be Decessary to push tte rcedles
and the work back agaiost tlrc machine (position 2)
and liIt the middle knob; it will then be possible to sliale the cam box acaoss
the work without briDgiDg lhe needles inro actioo.
Slide the cam box beyond the selvedeE,
lower tle knob agaio,
tighten tle l,ool and koit itr the usual way.
b) How to turn back in the middle
or 2 fow
You arc in tle midalle of a row and find tlat you have maale adirtake;
lilt xhe three knobs on the cam box; the cam box may trow be moved over
to the selvedge withoui brioging the needles i,lto action;
utrdo tlat part of the row which has alrcady been knitted,
open thc latches oI the needles on which the stitches are already betiDd the
latches (these needles were just under the cam box when the knitting was
stopped) ; tlrcse needle€ must be itr positioa 3.
Iower the midaue knob and that furthest away froe lhe vork,
leave tte first knob up,
tighten the wool in the yarn gride and slide the cam box across the work;
the needles which were in position 3 knit up automatically with the otters
Lower the kDob when the rcw is onhhed.
c) How to pick up a stitch which has run ofle ro\r down:
Put the dropped stitch and the unknitted strand on to t]rc ne€dle, the stitch
,errir., the latch and the sl.,land in lront.
Use tlrc foot ol the needle to pull it back until the stitch from the preceding
row, closing tle latch on to the strand, slips off the needle; a new stitch is
thus formed by tIrc sftand.
d) How to pick up a stitch which has run several rows down:
Pick it up frcm behind the work with the latch hook.
Slip it behind the latch of tl€ hook,
take up with tle hook of the tool the first shand to be re-knitted
and, by pulling tlle latch tool down, pull the strand thrcug[ the dropped
stitch.
Slip the new stitch thus fomed behind the latch,
take up the next strand with the hook of the latch tool
and pufl it though the stitch in tle same way.
Pick the stitch up in this vay until the top is rcached; the stitch should
always b€ behind the latch and the strand itr front.
e) Ribbing or patterns can be made by
plcklng W r phin stitch on the purl side.
. Let the stitch run down the number of rows necessary to form the pattern
or the dbbing,
. Take it up from theror, of the work on to the latch tool.
. Slip the stitch behind ihe latch,
. take up, in front of the latch, the strand to be re-knitted
. aDd pull it through the stitch in the sam€ way as for picking up a purl stitch.
Needles in the holding position, that is to say ne€dles which carry shtches
but which do not kflit (shortened rows) arc in position 4; the ne€alles are
brought right forward with their feet against the tont rail. The stitches are
behind the latches, next to the body of the machine. When a few needles
arc brought forward into tlis position the work should be held against the
machine, pufl€d down slightly.
Always begin from the side furthest a ,4! lrcm the cam box whetr putting
needles iDto the holding position or bringlDg back into action needles which
were in the holding position.
t4
Needles in hoklins position
To put blck into thc koittiog position, afler the required number of rows hrye
been kni(ed, necdl€s which were in the holding position :
push them back a litile until the open latches cover the stitches (position 3).
Lift the first knob on the cam box (that near€st to the work)
and knit one row. The needles in posilion I will knit up automatically
with the olhers.
Remember to lowcr the knob atter the first row has been knitted.
The holding position enables the knilting of every kind of shaping: all
variations of neck openings, butloflholes, heels, darts, pockeh, shaping of
seats of knickers, elc.
Needles bruught bsckinto theknitting position
Shaping
a) Vertical
c) Horizont2l 1"ro,.ay
Supposing that thc cam box is on the right, put into the holdiDg position
all needles to the left of the buttonhole and knit only the right-hand needles
until thc desircd height of the buttonhole has been madc; this forms one
side of the buttonhole.
Break ofl the wool.
Now put the right-hand needles also into the holding position,
slide the cam box over to the left-hand selvedge, without knitting,
bring back into action all the neldles to the left ol the buttonhole (position 3,
open latches and tha Erst knob on the cam box up for onc row)
and knit the same number of rows as for the right-hand side.
Bdng back into action the needles to the right of the buttonhole (position 3,
open latches atrd the first knob up for one ro*) aDd knit right across the ro!..
The verlical buttonhole may also b€ knitted without the automatic yam
gnide, by using two balls of wool which would hav,/e to be laid across the
nerdles by hand, one on each side of the buttonhole, thus knitting both
sides sihultaneously (see knitting without thc automatic yarn guide).
t6
b) Horizont2l (op"o)
Bring fofiraid the number of needles lorming the width of the buttonhole
(the stitches slip bchind the latches).
Lay a separate length of wool in lront of the latches of these needles
and push tlrcm back a Iitde until the stitches close the latches on to the
length of wool.
Knit in the usual way: the length of wool will knit up automatically. Once
tlrc garment is 6nished, pull thk length of wool out, making a buttonhole
without caslofr stitches lvhich will have to be finished off by hand with
Make a trial buttonhole in a fabric 20 stitches f,,ide, the buttonhole bcing
made, for examplc, from the 4th to the loth needles on the left. Thc
cam box is on the right.
Put the l0 left-hand needles into the holding position,
knit the l0 right-hand Deedles.
Cast off the following 6 stitchcs (from dght to lcft),
put the 16 dght-hand n€€dles into the holding position,
bring the cam box back to thc riglt,
put thc 4 left-hand needles back into the knitting position and knit them
from right to lcft to finish the row.
Knit them again (from left to dght),
cast on (from left to right) 6 stitches on to the empty needles,
put the l0left-hand needles into the holdirg position,
bring the cam box back to the left,
put the l0 right-hand needl€s into the kDriting positiotr aod knit them from
left to right to finish the row.
Put the l0 left-hand nerdles into action and continue knitting in the usual ivay.
The following cxamples are glven for a total widlh of 120 stitches--4o stitches
Ior each shoulder and 40lor the neck opening, which will be 60-80 rows deep.
The shoulder stitches are cast offin l0 rows (5 times 8 stitches.)
I
I
b) Slit neckline
. Proceed as fo. the V-neck. but without decreasing on thc neck side.
c) Square neck
t7
a) V-neck
The cam box being on the right, put 60 needles into the holding position
on the left-hafld side
and knit the right-hand side of the neck opening, decreasing on the neck
side one stitch every 4 rows (20 times).
Simultaneously, cast-off on the shoulder side during the last l0 rows 8
stirches (5 rimes),
Lock the empty needles right to the back,
slide the cam box over to the left selvedge,
bring back into action the 60lcft-hand nerdles (position 3, open latchc! and
first knob up lor one row)
and knit as for the right-hand side.
It is also possible, by knittirg wirhout the automatic yarll guide, to knit
both sides of a neck opening simultaneously (see chapter on this subject).
Supposing that the cam box is on the right, put the 80lelt-hand needles inlo
the holding position,
knit the 40 rcmaining necdles,
put these also into the holding position,
bring the cam box back to the right selvedge,
cast off40 stitches (in the centre),
lock the empty ne€dles right to the back,
bring back into actiofi the 40 lefl-hand needles (position 3, open latch€s,
first knob up Ior ofie row),
and knit this side only for 60 rows, castiDg off the shoulder stitches oD the
last l0 ros,s.
lvhen this side is finished, lock the empty needles right to the back,
slidc the cam box over to the right selvedge, without knitting,
bring back into action th€ 40 ght-hand needles (position 3, open latches,
6rst knob up for one .ovr),
and knit the right side in the same way as the left on€.
If a neckline as illushated in drawing d) h desired, all that is n€cessary is
to cast ofr20 stitches only in the ceDtre and decrease one stitch oD each side
of the neck evcry 6 rows (10 times).
To make the neckline in drawing e) cast off 60 stitches in the centre, then
itrcrease one stitch on each side of the neck every 6 rows (10 times).
f) Round neck
holding position,
knit one row,
Bring back itrto action the 30 necdles on ihe ottrer side,
knit one low with the first knop up,
lower thc kDob and continue koitting nomully across the wholc width.
b) For models with front and back seams
. Just after the waist has been knitted put 40 stitches into the holding posi
tiotr (on the side furthest away from ttre cam box),
. pass the wool under the last needle in the holding position,
Supposing that the cambox is oD the righi, put into the holdingposition
half tlrc needl€s, starting from the left, plus a few more (60+5).
Knit orc side at a time (one sidc of tlrc neck and orc shoulder).
At each alternate row (cam box on the dght) put into thc holding position
on the left (neck side) 3 needles (twice), 2 deedles (3 times) and onc ne€dle
(3 times). When the cam box is next to the neeaUes in t[e holding positioa
&member to pass tl€ wool under the last needle in the holding position.
Simultaneously, ca$ offttre shoulder slitches on tle last last l0 rows.
Lock ihe empty needles right to tte back,
break off the wool,
slide the cam box over to the left selvedge,
leave the 20 needles to thc right of the neck in the holding position, plus
5 neealles:25 needlB;
knit two rows
and proc€€d as for the right side.
Whcn this side is finished lock lhc empty needles ight to the back,
knit one row with the 40 needles of the neck (to knit up the wool looPed
round the n€€dles put into tlrc holding position)
and finish oE xhe neck by a turncd-in hem or by a welt ill imitation rib,
Examples lor a lolal width of 80 stitches.
a) For models with side seams
. Just after the waist has be€tr krdtted put into tlc holding position (on thc
side further away frcm the cam box) the last 10 needles,
. loop the wool routrd the last needle in tlle holdiDg position,
. put l0 needles into tlrc holding position on the other siale also,
. knit one row,
. pass tlrc wool under the last needle in tle holding position,
. put 1O more needles into the holding position on the othel side and so on,
until only the 20 cetrhe needles remain io the knittilg position.
o Then, on the side furthest away lrom the cam box, bring back iDto a.tion
(position 3, opetr latches and first knob up) the 30 needles which wcre io the
knit ona ronr.
Put l0 morc ne€dl€s into the holdiog positioD,
kDit one row,
pass the wool utrdcr rha last Deedlc in the holding positiotr,
knit onc row, and so on, putting 10 more ne€dles into thc holding position
at cach row until only l0 ne€dles are knitt€d.
Then, starting on the side furthest away from t1c cam box, put back 70
trccdlcs into the knitting position (posilion 3, opcn latches and f$t knob
up)'
knit onc row and lower the knob.
Ktrittcd with the sutomatic yaro guide.
Examplc lor 30 stitches.
Knit a short strip oD which to form the. heel (14 rows).
Starting on the side furthest away from the cam box, put the last oeedlc
into tbc holding position,
kllit one row,
pass the wool utrdcf the ne€dle in the holding position,
put the last needb on the other side also into the holding position,
kmt oac rcw,
pass thc wool urder this ncedle,
put a second n€edle into the holding position on tte other sidc,
koit one row,
pass the wool undcr thc 2nd needle in the holding position,
put a sacond needle into thc holding positiod on thc othcr sidc and coDtinuc
in this way until there arc 9 needlcs in the holding position on cach sidc.
Starting ftom the insidc, on tbe side furthest away from the cam box, put
back into thc knitting position the firct needlc in th. holding position (posi-
tion 3, opcn latch, first knob up),
knit one row, lower the knob,
iD the same way, bring a n€edlc bac* inlo aclion on lhc othcr side (positio! 3,
opetr latch, first knob up),
knit one row, lower thc knob.
Continue in thrs way, bringing onc more needle back into action
at each row' until all thc nccdles atE working again.
This is formed in the sam€ way as a h€€l; however, not more than 7 ne€dles
should be put into thc holding positioo on €ach sid€.
Lateral
Example givetr for a half-frcnt (60 stitches)
The cam tox b.ing on lhe lcft, put 8 needles into th€ holdiag positioo on
the side futhest away from it,
knit two rows (remembering to pass thc rvool under thc last needlc in the
holding positiou afler the lst row),
put 8 moro needlas into tha holding positio[,
knit 2 rows,
put 8 morc needles inio the holding position ; only 36 needlcs ftmain in action ;
b) Dto*tns 29
a,)
t9

Popular Sewing Machine manuals by other brands

Pfaff Automatic 362 Instruction book

Pfaff

Pfaff Automatic 362 Instruction book

Janome 3160QOV Service manual

Janome

Janome 3160QOV Service manual

Baby Lock Sofia BL137A2 Instruction and reference guide

Baby Lock

Baby Lock Sofia BL137A2 Instruction and reference guide

Lewis 150-1 PARTS and INSTRUCTIONS

Lewis

Lewis 150-1 PARTS and INSTRUCTIONS

Singer 15K - MANUAL 2 manual

Singer

Singer 15K - MANUAL 2 manual

Janome RSS C30 Getting started guide

Janome

Janome RSS C30 Getting started guide

White 1620 instruction manual

White

White 1620 instruction manual

SWF MAS-12 Assembly guide

SWF

SWF MAS-12 Assembly guide

Singer 82-20 parts list

Singer

Singer 82-20 parts list

SunStar SF 7400 Series user manual

SunStar

SunStar SF 7400 Series user manual

Janome 4618LE Instruction book

Janome

Janome 4618LE Instruction book

Silvercrest 90995 Operation and safety notes

Silvercrest

Silvercrest 90995 Operation and safety notes

handi quilter HQ Pro-Stitcher user manual

handi quilter

handi quilter HQ Pro-Stitcher user manual

Silvercrest KH 4300 operating instructions

Silvercrest

Silvercrest KH 4300 operating instructions

EUROPRO 372 instruction manual

EUROPRO

EUROPRO 372 instruction manual

Silvercrest SNMD 33 A1 Operation manual

Silvercrest

Silvercrest SNMD 33 A1 Operation manual

EUROPRO 6130A LCD instruction manual

EUROPRO

EUROPRO 6130A LCD instruction manual

EUROPRO Shark 7133 instruction manual

EUROPRO

EUROPRO Shark 7133 instruction manual

manuals.online logo
manuals.online logoBrands
  • About & Mission
  • Contact us
  • Privacy Policy
  • Terms and Conditions

Copyright 2025 Manuals.Online. All Rights Reserved.