Nektar Panorama T4 User manual

www.nektartech.com
www.nektartech.com
User Guide

2 Nektar Panorama T4 & T6 User Guide www.nektartech.com
Table of Contents
Introduction 4
Box Content 4
Panorama T4/T6 Features 4
Minimum System Requirements 4
Getting Started 5
Connection and Power 5
Getting Access to Downloads 5
Panorama T4/T6 Functional Overview 6-7
Keyboard, Wheels, Octave and Repeat 8
Keyboard and AfterTouch 8
Pitch Bend and Modulation Wheels 8
Key Repeat & Pad Repeat Buttons 8
Octave Shift 8
Accessing Global Settings Using the Octave Buttons 8
Rear Panel Connectors 9
MIDI Out 9
Foot Switch Socket 9
Expression Pedal Socket 9
Global Settings 10
Octave, Transpose, Global MIDI Channel, MIDI Out and Program/Bank 10
Keyboard, Pads and Encoder Curves, Display and MapLink 10
Pad Setup 11
Panic 11
Backup 11
Controlling a DAW, Plugin Instrument or MIDI Device 12
What is Nektar DAW Integration 12
What is Nektarine 13
Internal Mode Controls & Assignments 14
Performance Controls 14
Presets 14
Mode Buttons 15
Internal Mode Display Button Menus 16
Fader/Encoder 16
Keys - Chord/Repeat/Vel Fix/Hold 16
Pads - Learn/Repeat/Vel Fix/Spread 17
Pads 18
Pads Bank Button 18
Pad Learn 18
Change Octave for All Pad Assignments 18
Load and Save Pad Maps 18
Repeat Functions 19
Key Repeat 19
Pad Repeat 19
Control Edit 20
Message Types 20
Setting Minimum/Maximum Values and Reverse 20
Assigning Controls to MIDI Messages 21
Programming an Encoder to Send a Relative MIDI CC Message 21
Sending Program and Bank Change with an LED Button 21
Controlling AfterTouch with a Pad 21
Loading a Preset Using the Track Buttons 22
Programming a Fader to Adjust Keyboard Fixed Curve Velocity Value 22
Save Preset, Port Setup & Factory Restore 23

www.nektartech.com Nektar Panorama T4 & T6 User Guide 3
Dispose of product securely, avoiding exposure to food sources and ground water. Only use the product in accordance with the instructions.
Note: This equipment has been tested and found to comply with the limits for a Class B digital device, pursuant to part 15 of the FCC Rules. These limits are
designed to provide reasonable protection against harmful interference in a residential installation. This equipment generates, uses and can radiate radio
frequency energy and, if not installed and used in accordance with the instructions, may cause harmful interference to radio communications. However, there
is no guarantee that interference will not occur in a particular installation. If this equipment does cause harmful interference to radio or television reception,
which can be determined by turning the equipment off and on, the user is encouraged to try to correct the interference by one or more of the following mea-
sures:
• Reorient or relocate the receiving antenna.
• Increase the separation between the equipment and receiver.
• Connect the equipment into an outlet on a circuit different from that to which the receiver is connected.
• Consult the dealer or an experienced radio/TV technician for help.
CALIFORNIA PROP65 WARNING: This product contains chemicals known to the State of California to cause cancer and birth defects or other reproductive
harm.
For more information: www.nektartech.com/prop65
Panorama firmware, software and documentation are the property of Nektar Technology, Inc and subject to a License Agreement.
© 2018 Nektar Technology, Inc. All specifications subject to change without notice. Nektar is a trademark of Nektar Technology, Inc.
Panorama T4 & T6

4 Nektar Panorama T4 & T6 User Guide www.nektartech.com
Thank you for buying the Nektar Panorama T4 or T6 MIDI controller keyboard. As functionality is identical on both products, this guide
applies equally to either model.
Panorama T4 & T6 are keyboard controllers with 49 and 61 notes that come with configuration software for many of the most popular
DAWs. So the setup work has largely been done for supported DAWs, and you can focus on expanding your creative horizon with your
new controller. The Nektar DAW Integration adds functionality that makes the user experience more transparent when you combine the
power of your computer with Nektar Panorama T4/T6. In addition, Nektarine is included to give you more extensive control over instrument
plugins. Nektarine can run with or without Nektar DAW integration installed, so even if we don’t offer custom Nektar integration for your
music application, you can still use Nektarine for control.
The Panorama T4/T6 range also allows for complete user configurable MIDI control. So if you prefer to create your own setups, you can do
that too. We hope you will enjoy playing, using and being creative with Panorama T4/T6 as much as we have enjoyed creating it.
Box Content
Your Panorama T4/T6 box contains the following items:
• The Panorama T4/T6 Controller keyboard
• Printed Guide
• A standard USB cable
• Card containing license code for included software
Panorama T4/T6 Features
• 49/61 note 2nd generation synth-action keyboard with velocity
and aftertouch
• 10 user configurable presets
• 5 velocity curves plus adjustable fixed velocity • 8 pad map presets
• 8 velocity and pressure sensitive illuminated LED (green/red/
orange) pads
• Pad Bank button to switch pad assignments 1-8 and 9-16
• Note repeat for keys and pads with built-in timing engine • LCD display with 128x64px and 4 display buttons
• 9 MIDI–assignable 30 mm faders • Focus button displays current parameter line in large font
• 8 MIDI–assignable LED (red) illuminated buttons • MIDI out socket (MIDI cable not included)
• 8 MIDI–assignable encoders • 1/4” jack socket for Foot Switch (optional)
• 4 navigation buttons with shift adding another 4 assignments • 1/4“ TRS jack socket for Expression Pedal (optional)
• 6 transport LED buttons • USB port (back) and USB bus powered
• Pitch Bend and Modulation Wheels (assignable) • MCU (Mackie® Control Universal) support
• Octave up/down buttons • Nektar DAW Integration (user registration required)
• 4 mode buttons: Mixer, Instrument, Multi and Internal • Nektarine VSTi plugin and library manager
(user registration required)
Minimum System Requirements
Panorama T4/T6: USB class compliant (no driver needed) works with Windows XP, Vista, 7, 8, 10 or higher. Mac OS X 10.5 or higher, Linux
(Ubuntu)
Nektar DAW Integration: Windows Vista, 7, 8, 10 or higher. Mac OS X 10.7 or higher. Check Nektar DAW Integration documentation or
marketing information for support of legacy DAW versions.
Nektarine: Windows 7,8,10 or higher. Mac OS X 10.7 or higher.
Introduction

www.nektartech.com Nektar Panorama T4 & T6 User Guide 5
Connection and Power
The Panorama T4/T6 is USB class compliant. This means there is no driver to install to get the keyboard set up with your computer.
Panorama T4/T6 uses the built-in USB MIDI driver which is already part of your operating system on Windows and OS X.
The first steps are simple:
• Locate the included USB cable and plug one end into your computer and the other into the Panorama’s USB socket on the rear panel.
• If you want to connect a foot switch to control sustain, plug it into the 1/4” jack socket on the back of the keyboard labelled “Foot
Switch“ or “FS“. Panorama T4/T6 will automatically detect the polarity of the foot switch.
• Set the power switch on the back of the unit to On
Your computer will now spend a few moments identifying the Panorama T4/T6 and subsequently you will be able to set it up for your
DAW.
Getting Access to Downloads
If your DAW is supported with Nektar DAW integration software or you want to run Nektarine, you’ll need to first create a user account on
our website and subsequently register your product to gain access to the downloadable files applicable to your product.
Start by creating a Nektar user account here: www.nektartech.com/registration
Next follow the instructions given to register your product and finally click on the “My Downloads” tab to access your files.
IMPORTANT: Make sure to read the installation instructions in the PDF guide, included in the downloaded package, to ensure you don’t
miss an important step.
6 Nektar Panorama T4 & T6 User Guide www.nektartech.com
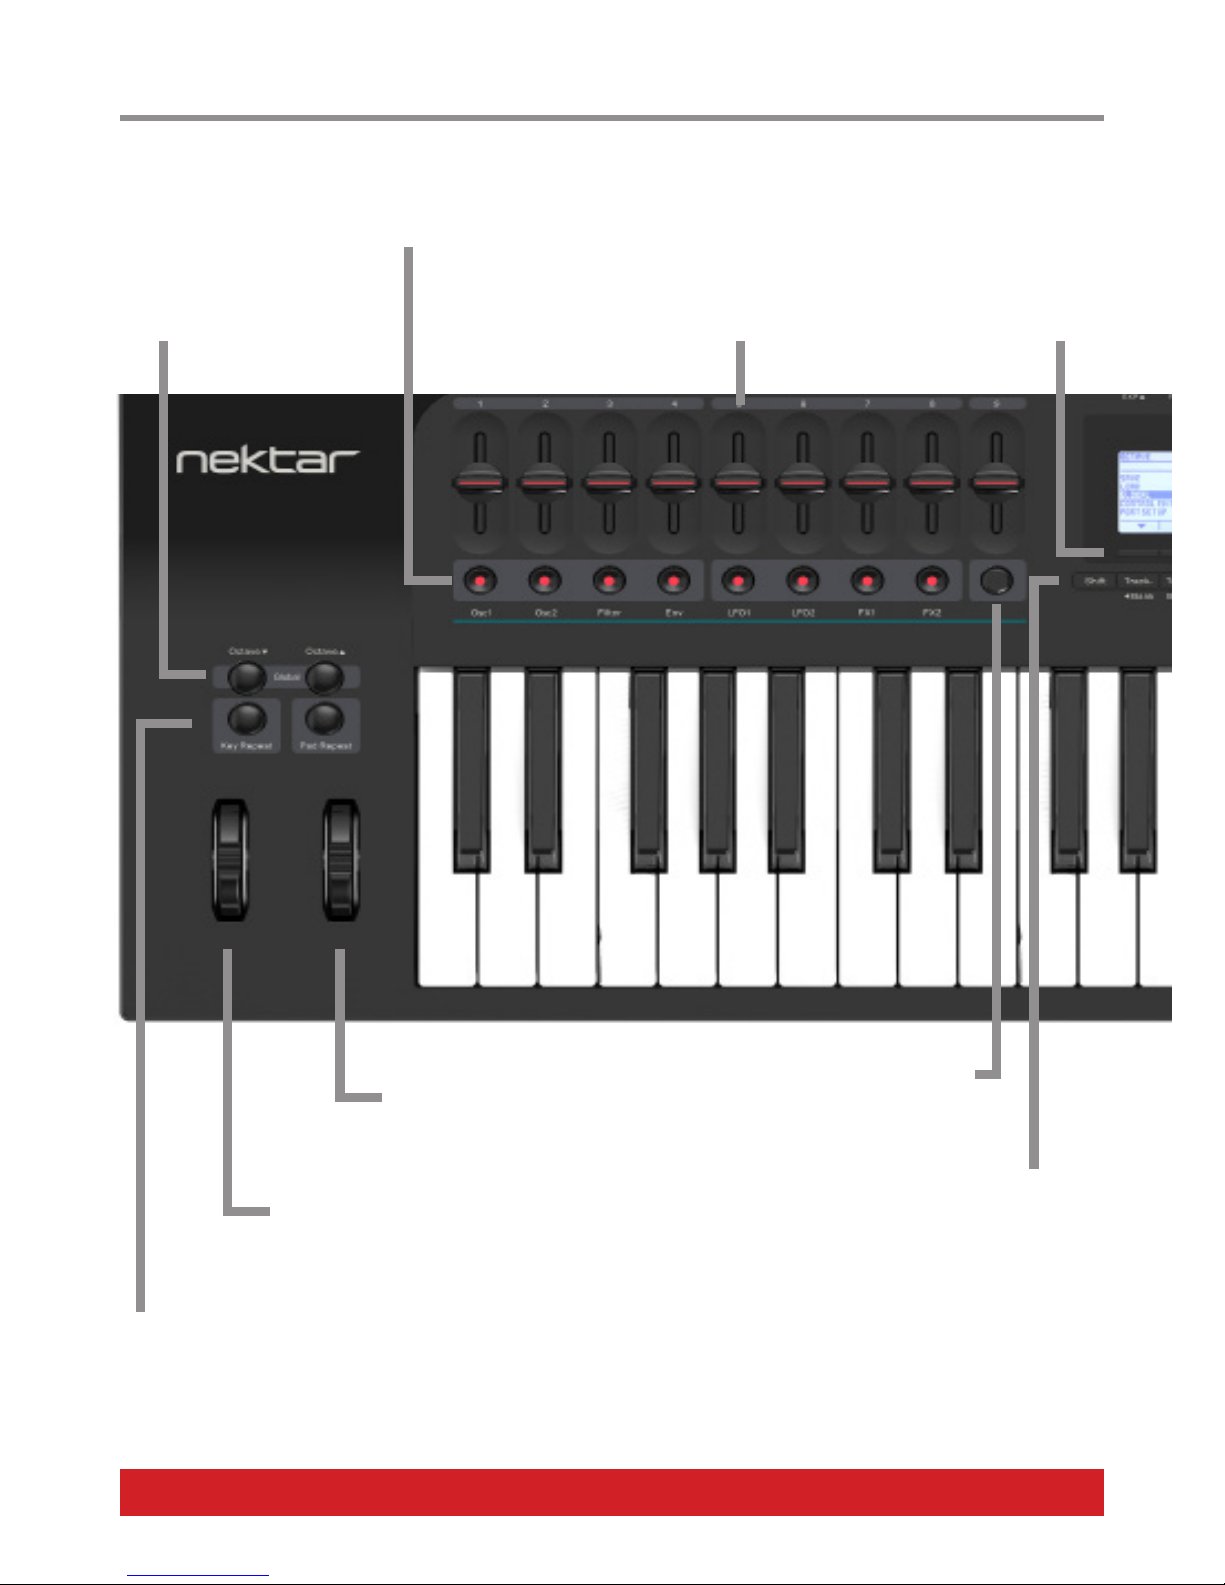
Modulation Wheel
Assignment stored as global
setting.
Pitch Bend Wheel
Assignment stored as global
setting.
Octave Buttons
Shift octave up/down.
Press both buttons at the same
time to open Global Settings.
30mm Faders F1 - F9
Assignable settings stored in
presets 1-10.
Key Repeat and Pad Repeat Buttons
LED Buttons
Assignable settings stored in
presets 1-10.
Display Buttons
Functionality follows the
display labels.
Navigation Buttons
Track -/+, Browse and View are assignable to
any MIDI message when Nektar DAW
Integration is not present.
Pressing [Shift] + any of the 4 buttons provides
another 4 assignable button controls.
Panorama T4/T6 Functional Overview
Fader Mute Button
Mute/unmute output of faders in
Internal Mode.
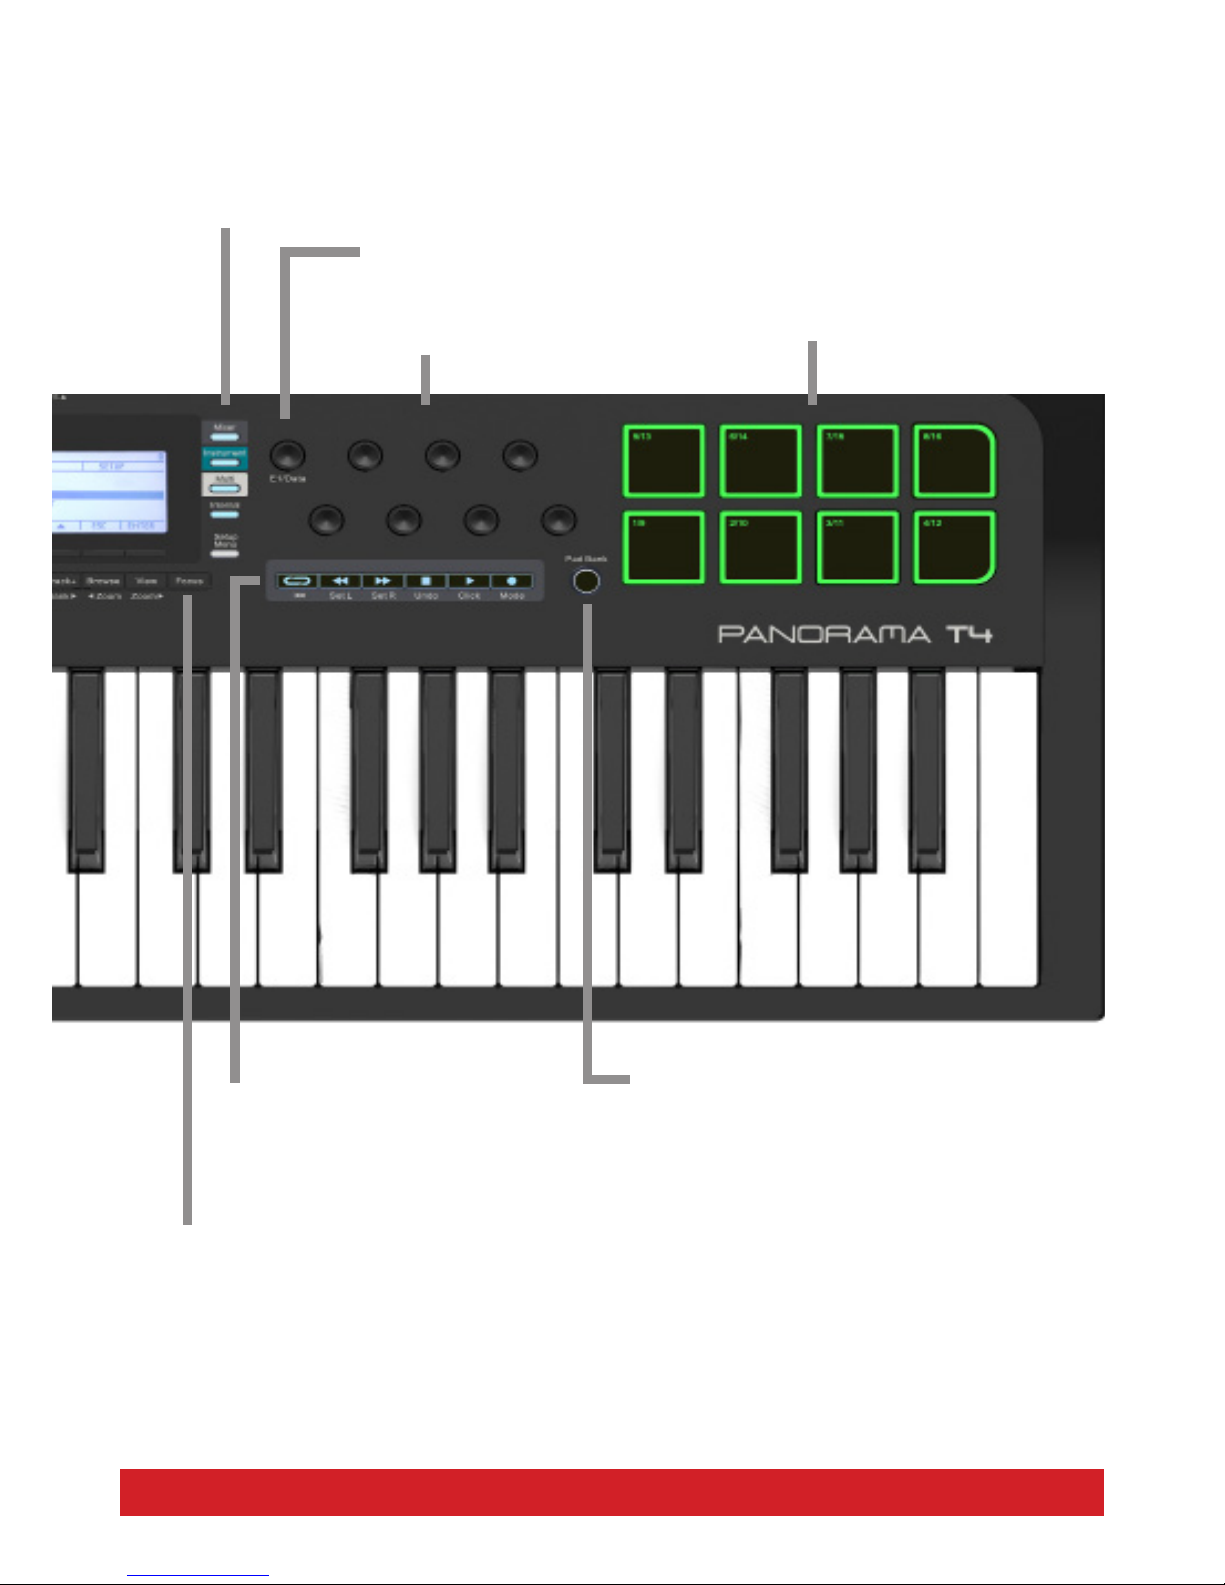
www.nektartech.com Nektar Panorama T4 & T6 User Guide 7
Mode Buttons
Select presets when not used
with Nektar DAW Integration.
Encoders E1 - E8
Assignable settings stored in
presets 1-10.
Transport Buttons
Assigned by default to MMC if Nektar
DAW Integration is not present.
Assignments stored as global settings.
Pads 1 - 8
Velocity and pressure sensitive.
Assignable settings stored in
Pad Maps 1-8.
Pad Banks
Switch the pads between two
assignment banks, giving access
to 16 pad settings per Pad Map.
Focus Button
Displays the current parameter line
in large font, at the center of the display.
E1/Data
Data control when Setup/
Menu is active.

8 Nektar Panorama T4 & T6 User Guide www.nektartech.com
Keyboard and AfterTouch
The Panorama T4/T6 keyboard is velocity sensitive and has an AfterTouch strip, so you can play the instrument expressively for the dura-
tion a note is played. There are 5 different velocity curves to choose from, each with varying dynamics. In addition, there is a fixed velocity
setting.
AfterTouch (AT) enables control of instrument parameters by pressing a key. A Global setting for AfterTouch ramp allows you to set a high-
er value, so AfterTouch doesn’t affect the sound until after the notes have been triggered. If you don’t want the keyboard to continuously
send AfterTouch messages, you can set the Message Type to ‘Off’ in the Control Edit menu (page 20).
We recommend you spend a little time playing with the default velocity curve first and then determine if you need more or less sensitivity.
Global settings for velocity curves and AfterTouch are covered on page 10.
Pitch bend and Modulation Wheels
The Pitch bend and Modulation wheels are intended for performance articulation.
The Pitch bend wheel is spring–loaded and automatically reverts to its center position upon release. It’s ideal to bend notes when you are
playing phrases that require this kind of articulation. The bend range is determined by the receiving instrument.
The Modulation wheel can be freely positioned and is programmed to control modulation by default.
Both the Pitch bend and the Modulation wheel are MIDI–assignable with settings stored over power cycling so you don’t lose them when
you switch the unit off. Pitch bend and Modulation assignments are not part of the Panorama T4/T6 presets. Control message assign-
ments are changed in the Control Edit menu as described on page 21.
Key Repeat & Pad Repeat Buttons
Panorama T4/T6 has a built–in note repeat function that can be used independently for either the pads or the keyboard.
The two buttons labeled [Key Repeat] and [Pad Repeat] switch the repeat function on/off and are conveniently located above the wheels.
The repetitive note behavior can be adjusted independently as well. Go to page 19 to read about how to adjust the Repeat parameters.
Octave Shift
The Octave shift buttons are located above the two repeat buttons.
• The left Octave button will shift the keyboard down one octave with each press.
• The right Octave button will similarly shift the keyboard up one octave at a time, when pressed.
The maximum you can shift the T4 keyboard is 3 octaves down and 4 octaves up. The T6 can be shifted 3 octaves up and 3 octaves down.
This covers the entire MIDI keyboard range of 127 notes.
Accessing Global Settings Using the Octave Buttons
Pressing the [Octave-] + [Octave+] buttons simultaneously opens the Global Settings page. It’s a shortcut to a page that gives you instant
access to changing transpose, sending Bank and Program messages, selecting different velocity curves and more.
Go to page 10 to read more about the Global Settings menu.
Keyboard, Wheels, Octave & Repeat

www.nektartech.com Nektar Panorama T4 & T6 User Guide 9
MIDI Out
The MIDI out connector can be used to:
• Send MIDI data externally to MIDI receiving devices directly from the keyboard and its controls.
• As a USB MIDI Out interface where MIDI data is sent from your DAW or MIDI software to the MIDI Out.
To change the behavior of the MIDI Out, go to the Global menu and change the setting as described on page 10.
Foot Switch Socket
You can connect a foot switch pedal (optional, not included) to the 1/4” jack socket on the back of the Panorama T4/T6 keyboard. The cor-
rect polarity is automatically detected on boot-up, so if you plug in your foot switch after boot-up is complete, you may experience the foot
switch working in reverse. To correct that, do the following:
• Switch the Panorama T4/T6 off.
• Make sure your foot switch is connected.
• Switch the Panorama T4/T6 on.
The polarity of the foot switch should now be automatically detected.
Expression Pedal Socket
Panorama T4/T6 works with any standard expression pedal featuring a 1/4” TRS jack such as Roland EV5, M-audio EXP and of course our
own NX-P pedal.
Connect the pedal to the socket on the rear of Panorama T4/T6. By default, the socket transmits MIDI cc 11 (expression), but you can
change the assignment in the Control Edit menu as described on page 21.
Assignments are stored and retained over power cycling .
Rear Panel Connectors

10 Nektar Panorama T4 & T6 User Guide www.nektartech.com
The Global Settings menu is used to configure Panorama T4/T6 to suit your workflow and playing style. It also contains functions that may
be useful as you perform.
There are two ways you can access this menu:
• Press the two Octave buttons at the same time [Octave Down]+[Octave Up]
• Press the [Menu] button and select “Global“ from the list using E1/Data. Press the display button labeled “Enter“ to confirm.
With the Global menu selected, the encoders E1-E8 can be used to adjust the functions listed on each page. To navigate between pages
press the [Prev] and [Next] display buttons.
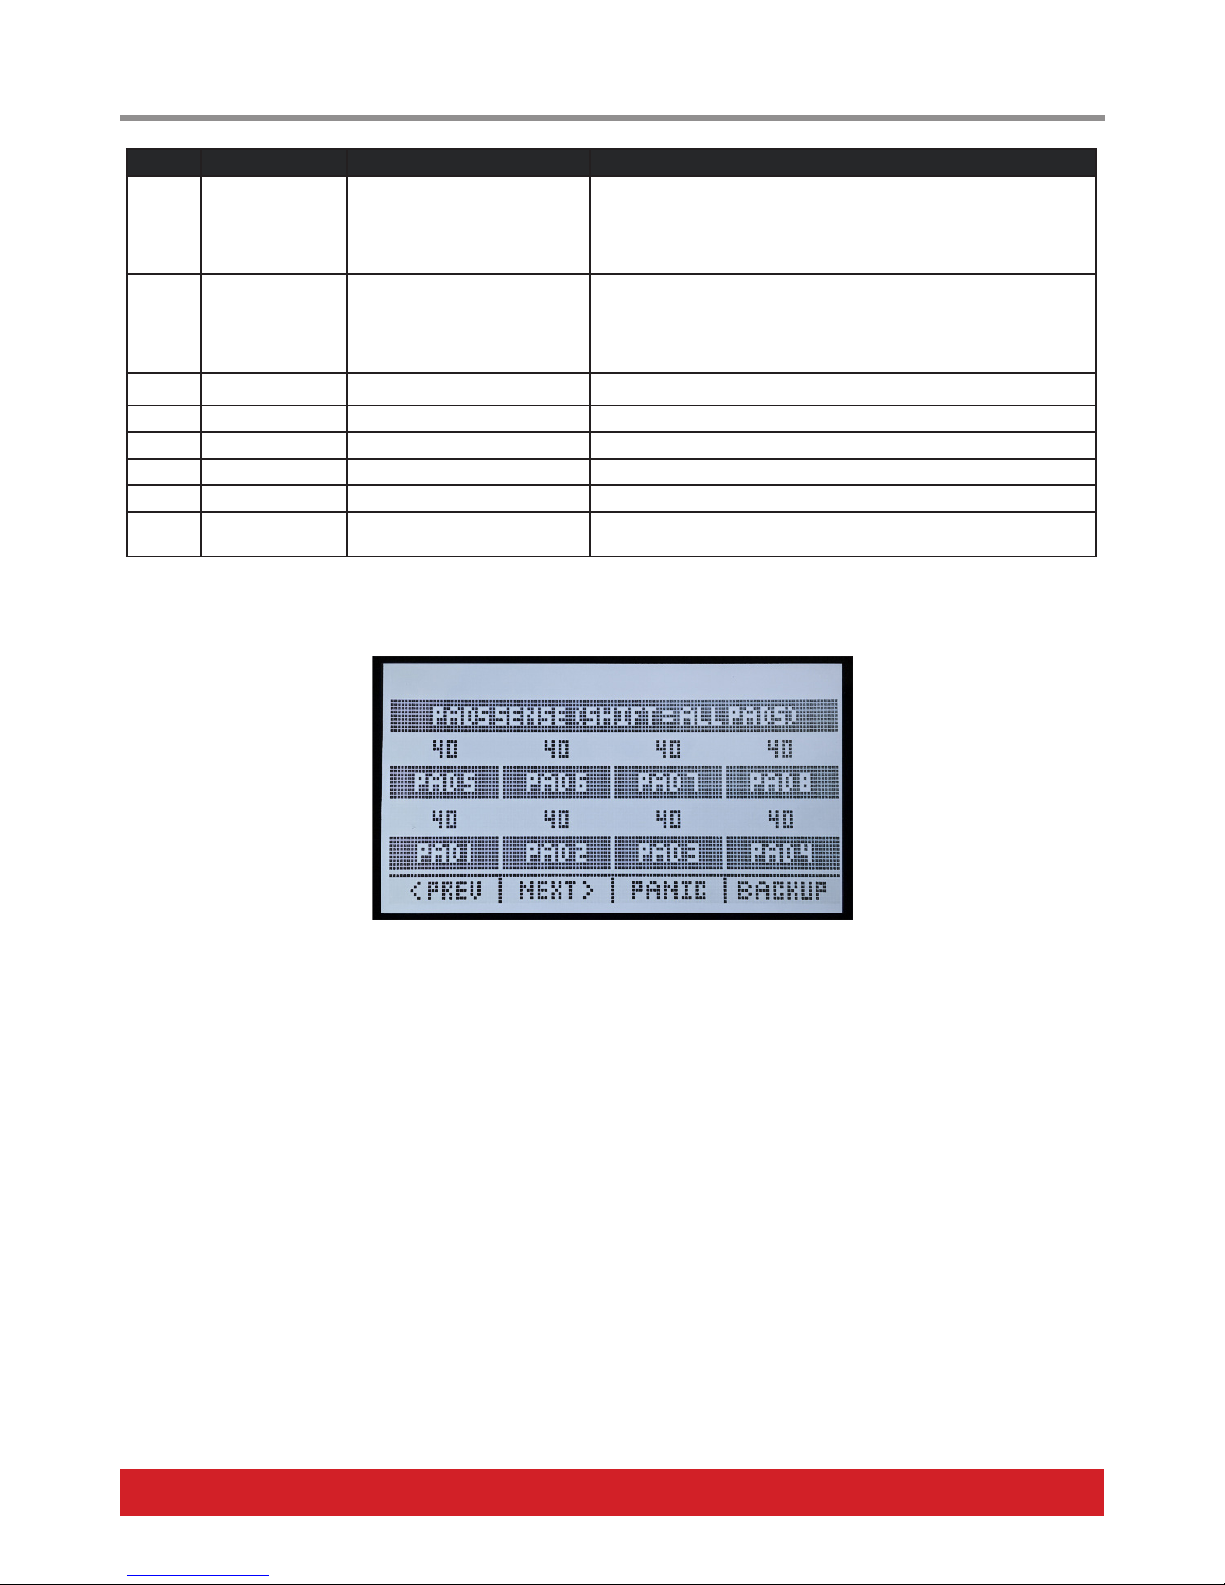
Page 1 - Octave, Transpose, Global MIDI Ch, MIDI Out, Program/Bank, DAW Control
Control Function Value Options Description
E1 Octave -3/+4 (T6: -3/+3) Change the current Octave setting.
E2 Transpose -/+ 12 semitones
E3 Global Channel MIDI Channel 1-16 This is the channel the keyboard sends MIDI notes on. Typically pads will also send on
E4 MIDI Output Internal, USB Select Internal to send MIDI data directly from T4/T6 to the MIDI out.
Select USB to use the MIDI output as a USB MIDI interface.
E5 Program 0-127 Sends MIDI Program change messages as the value is changed.
E6 B LSB 0-127 Sends MIDI Bank LSB change messages as the value is changed.
E7 B MSB 0-127 Sends MIDI Bank MSB change messages as the value is changed.
E8 DAW Control Nektar, MCU,
PTools
This is where you can set the DAW Control mode when no Nektar DAW Integration is
present.
Page 2 - Keyboard, Pad and Encoder Curves, Display, MapLink and Backup
Global Settings
www.nektartech.com Nektar Panorama T4 & T6 User Guide 11
Control Function Options Description
E1 Keyboard Velocity
Curve
Soft 2, Soft 1, Standard, Hard 1,
Hard 2, Fixed
The Soft 1+2 curves emphasize the lower velocity values. Standard is
the default and Hard 1+2 makes it easier to reach the higher velocity
values. If you select Fixed, the default velocity value is 127, but you
can program a control such as a fader or encoder to set the value
dynamically in Internal mode.
E2 Pad Curve Linear, Soft, Standard, Hard,
Fixed
The Soft curve emphasizes the lower velocity values. Standard is the
default and Hard makes it easier to reach the higher velocity values.
If you select Fixed, the default velocity value is 127, but you can pro-
gram a control such as a fader or encoder to set the value dynamically
in Internal mode.
E3 Aftertouch Delay 0-255 Lets you adjust how quickly the Aftertouch sets in.
E4 Encoder Curve Linear Step, Slow, Standard, Fast Adjusts the sensitivity of the encoders.
E5 Expression Pedal TYPE 1 (default), TYPE2
E6 Contrast 20 - 40 (default: 30) Sets the white/dark balance of the display.
E7 Inverse Activating inverse makes white pixels dark and dark pixels white.
E8 MapLink When Maplink is on, Pad Maps 1-8 will load with Presets 1-8. Loading
presets 9 and 10 will load Pad Maps 1 and 2 respectively.
Page 3 - Pad Setup
The Pad Setup page allows you to use the 8 encoders to adjust the trigger threshold independently for each of the 8 pads (default: 40).
If you hold [Shift] while adjusting, you change the setting for all pads simultaneously. The lower the value, the easier the pads will trigger.
Be aware that too low a setting can result in crosstalk and false triggering of pads. Make sure to test your setting changes thoroughly.
If a pad‘s LED is illuminated red continuously or it triggers when other pads are played, raise the threshold for the respective pad until the
undesired behavior stops.
Panic
Pressing this button sends out the all–notes–off message plus reset all control MIDI messages, on all 16 MIDI channels.
Backup
The Backup function can back up your current controller assignment settings, the 10 user presets and 8 pad maps by sending out MIDI
sysex data. The data can be recorded in your DAW or any other application capable of recording sysex data and sent back to your T4/T6
keyboard when you want to reload your settings.
First start recording in your DAW or MIDI data capture app. Then press the display button labeled [Backup] to start data transmission.
Restoring a backup:
on. Make sure the Panorama T4/T6 is the output destination of the MIDI track containing the backup data. Once the data transmission has
been completed, the backup has been restored.
Global Settings

12 Nektar Panorama T4 & T6 User Guide www.nektartech.com
Panorama T4/T6 has incredible flexibility when it comes to controlling a DAW, plugins and other MIDI soft- or hardware. There are 3 main
approaches to set up Panorama T4/T6‘s controls, though it’s not uncommon to use a combination of all three approaches:
1. Install the Nektar DAW Integration files for use with an existing DAW (must be on our list of supported DAWs).
2. Install Nektarine to allow control of instrument plugins in any DAW hosting VST, VST3 or AU plugins.
3. Use Panorama T4/T6’s control and MIDI programming options to control MIDI software or hardware.
To download either Nektar DAW Integration files or Nektarine, you’ll need to follow the process described on page 5 “Getting Access to
Downloads”.
To learn more about MIDI programming options, go to page 14.
What is Nektar DAW Integration?
Panorama T4/T6 can control many of the most popular DAW software applications with functionality that makes it easier to record, per-
form and create music. “Nektar DAW Integration” is what we call the files that make all of this possible, they link the functionality of the
Nektar hardware with that of the supported DAW.
The package contains a PDF–guide that tells you how to set Panorama T4/T6 up with your DAW. The PDF–guide also tells you in more detail
how Nektar DAW Integration works with your DAW, however here is a general outline of what you can expect:
• The two mode buttons labeled [Mixer] and [Instrument] switch control between your DAW‘s Mixer and Instrument plugins.
• The [Multi] mode button is used for Nektarine, so it only works if Nektarine is loaded.
• Change track using the [Track-] and [Track+] buttons and use [View] to open close the window in your DAW that relates to the
currently selected mode.
• Transport buttons directly control your DAW’s Cycle/Loop, Rewind, Forward, Stop, Play and Record functions.
• Press and hold the [Shift] button while pressing one of the 6 transport buttons, to get access to their secondary functions: Goto L
Locator, Set L Locator, Set R Locator, Undo, Click and Mode.
• In Mixer mode, Faders 1-8 are assigned to control volume for 8 mixer channels.
• Fader 9 controls volume for current track or Master volume.
• Press [Shift]+[Track -/+] to change the current bank of 8 mixer channels.
• In Instrument mode, Faders 1-8 typically control amp and filter envelope parameters Attack, Decay, Sustain, Release.
• Fader 9 now controls instrument volume.
• In Mixer mode, Encoders are assigned to control Pan for the currently controlled 8 mixer channels.
• In Instrument mode, Encoders E1-8 control parameters in one of two pages.
Controlling a DAW, Plugin Instrument or MIDI Device

www.nektartech.com Nektar Panorama T4 & T6 User Guide 13
What is Nektarine
Nektarine is a Nektar developed VST/AU plugin that allows expanded control of your plugin instruments with the Panorama T4/T6. This ap-
proach has some clear work-flow benefits that we believe far outweigh potential disadvantages. You can read more about how Nektarine
works in detail, once you have downloaded the installer package as described on page 5 in the section “Getting Access to Downloads”.
Here is a general overview detailing what you can expect from Nektarine:
Nektarine - The Benefits
• Compatible with any DAW that can load VST 2.4, VST3 or AU instrument plugins.
• Once setup, Nektarine allows you to play and control any VST 2.4, VST3 or AU plugin, even if your DAW is not able to host one of these
plugin formats directly.
• Most popular plugins are already pre–mapped for control - so you don’t have to.
• Mapping can be customized or created from scratch for any plugin. Expand the map, change parameter names, add pages etc.
• Use ‘Learn” to quickly reassign controls as you work.
• Nektarine’s browser loads plugin patches and enables you to quickly find the sounds you need.
• Navigate the Nektarine browser from your Panorama T4/T6.
• Using Nektarine, moving from DAW to DAW is easier. Browsing for your sounds always works the same way.
• Works alongside Nektar DAW Integration to expand the power of your Panorama T4/T6.
Nektarine - The Obstacles
• Some initial setup is required to get the best out of Nektarine.
• Nektarine needs to be part of your work-flow. Otherwise it probably won’t work well for you.
We suggest you set up your default song with dedicated Nektarine tracks.
• Legacy projects/songs require setup to work with Nektarine.

14 Nektar Panorama T4 & T6 User Guide www.nektartech.com
Internal Mode Controls & Assignments
Internal mode can be used alongside Nektar DAW Integration and Nektarine. Press the [Internal] button to make sure the mode is
selected (this is the default mode on power-up). In Internal mode, controls can be assigned to MIDI messages and Preset and Pad Maps
can be configured, saved and loaded. There is also a collection of performance controls that are stored outside of Presets and Pad Maps.
Performance Controls
Performance controls are used for real-time performance manipulation, navigation and transport. Assignments are stored over power
cycling but they are not part of a stored Preset or Pad Map.
Performance controls include:
• Pitch bend & Modulation wheels
• AfterTouch
• Foot Switch input
• Expression Pedal input
• Navigation buttons [Track-], [Track+], [Browse], [View]
• An additional 4 navigation button assignments can be accessed by pressing [Shift]+[one of the navigation buttons]
• 6 transport buttons
In total, 19 global control assignments are stored over power cycling.
As Presets or Pad Maps are loaded or adjusted, performance controls remain unchanged.
Presets
Panorama T4/T6 has 10 user configurable presets and each preset stores settings for the following controls:
• Faders (9)
• LED buttons (8)
• Encoders (8)
There are two options to load a preset:
• Press the [Setup] button and select ‘Load‘ using [E1/Data]. Next press [Enter] and select the preset you want to load using [E1/Data].
Press [Enter] to load.
• Press and hold a mode button, such as [Internal] and select a preset using [E1/Data]. Release [Internal]. The preset is loaded instantly
upon release.
See page 15 for more information about mode buttons.
www.nektartech.com Nektar Panorama T4 & T6 User Guide 15
Below is a list of what each of the 10 presets are programmed to by default. Each can be programmed with your own MIDI settings, which
we will cover later.
Preset Description MIDI Channel LED Buttons Encoders
MIDI CC type
1 Learn Friendly 1 Global Toggle value 0
and 127
Absolute
2 Learn Friendly 2 Global Toggle value 0
and 127
Relative
3 GM Instrument preset Global Send Program
message 0-7
Absolute
4 GM Mixer ch 1-8 1-8 Toggle volume
value 0 and 100
Absolute
5 GM Mixer ch 9-16 9-16 Toggle volume
value 0 and 100
Absolute
6 Learn Friendly 3 14 Toggle value 0
and 127
Absolute
7 Learn Friendly 4 14 Toggle value 0
and 127
Absolute
8 Learn Friendly 5 15 Toggle value 0
and 127
Absolute
9 Learn Friendly 6 15 Toggle value 0
and 127
Absolute
10 Learn Friendly 7 16 Toggle value 0
and 127
Absolute
Presets 1, 2 and 3 are set up to transmit on the global MIDI channel. When you change the global MIDI channel in the Global Settings page,
you therefore change the MIDI channel that these presets transmit on. With 16 MIDI channels available it means you can create 16 unique
setups and just change the MIDI channel to switch between them.
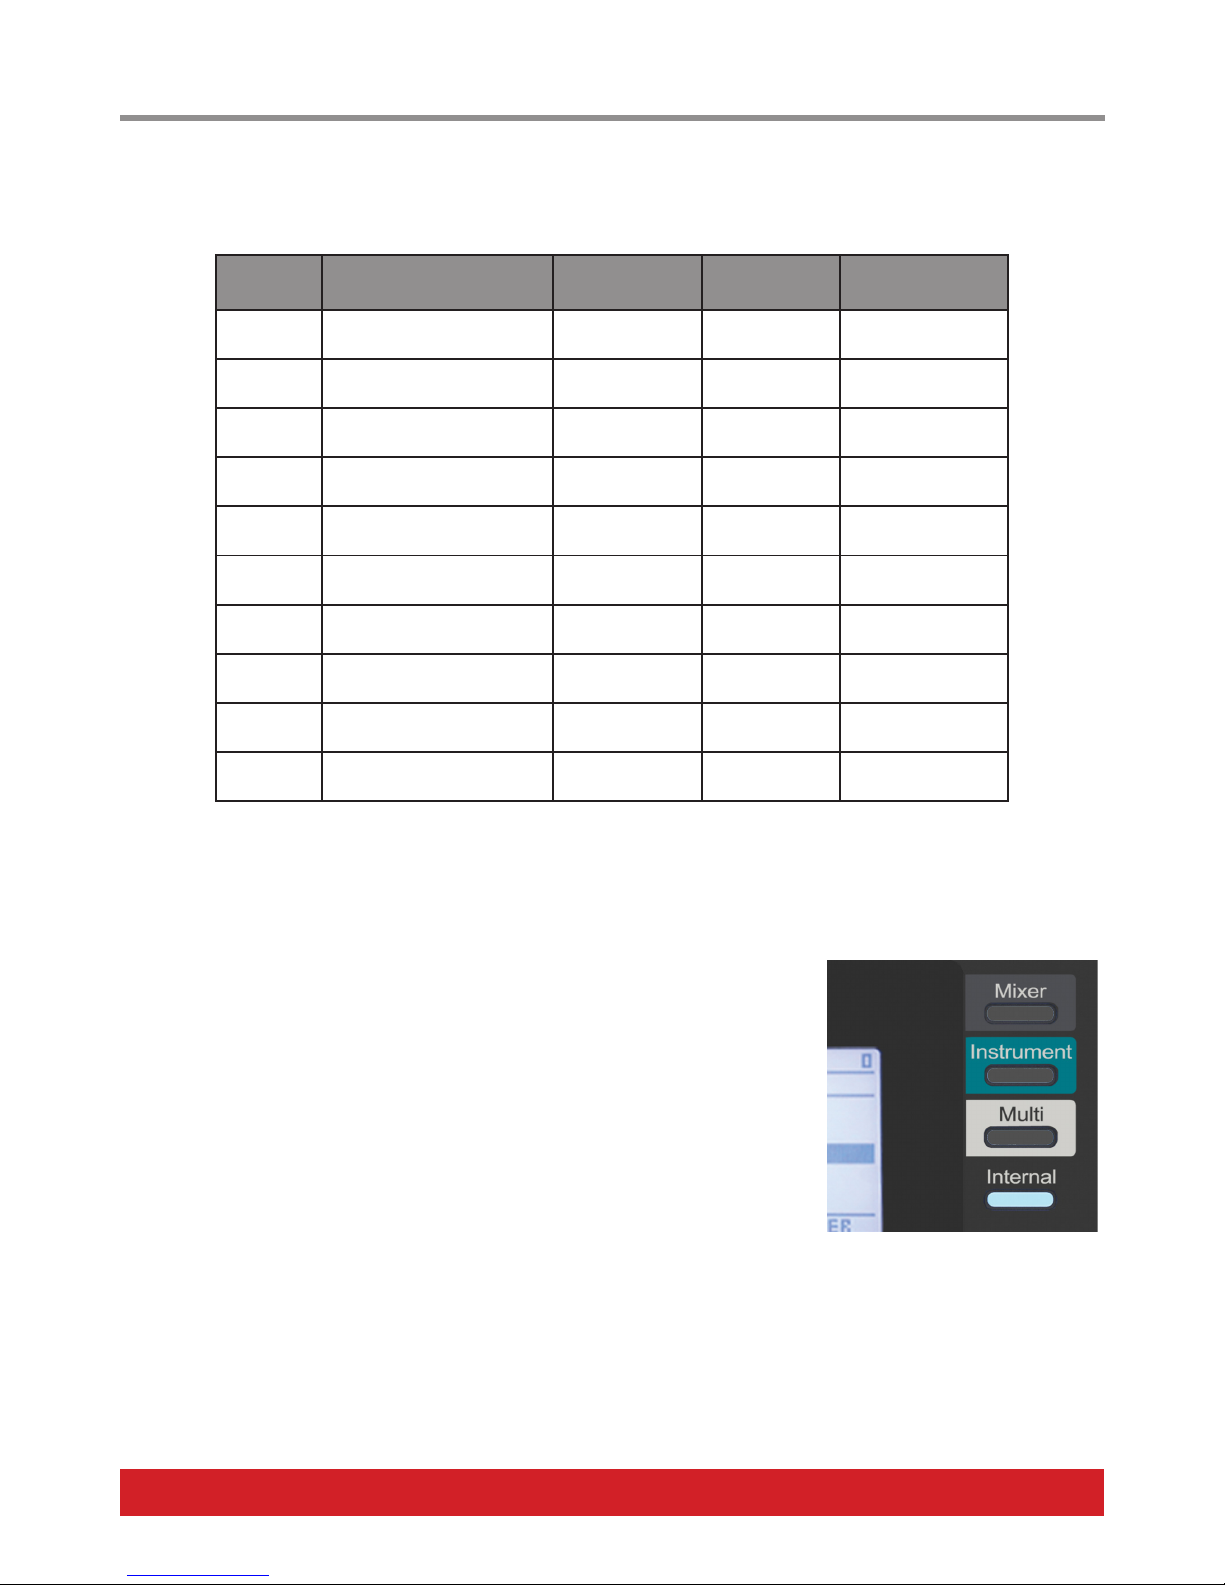
Mode Buttons
The 4 mode buttons are positioned to the right of the display
When you first boot up Panorama T4/T6, [Internal] is the default mode with preset 1 selected.
Each of the 4 mode buttons by default load a preset:
• Press [Mixer] to select preset 4 (GM Mixer ch1-8)
• Press [Instrument] to select preset 3 (GM instrument)
• Press [Multi] to select preset 2 (Learn friendly relative)
• Press [Internal] to select preset 1 (Learn friendly absolute)
To assign a different preset to each of [Mixer], [Instrument], [Multi] or [Internal], press and hold the button you want to change assignment
for and select a preset using [E1/Data]. Now release the button. The preset is loaded instantly upon release.
When Panorama T4/T6 is used with Nektar DAW integration or Nektarine, the mode buttons operate as described in the respective PDF
user guides for each of those installs. It is not possible to use the Mode buttons both for recalling presets as well as controlling Nektar
DAW Integration/Nektarine at the same time.
See page 12-13 for more details about Nektar DAW Integration and Nektarine.
16 Nektar Panorama T4 & T6 User Guide www.nektartech.com
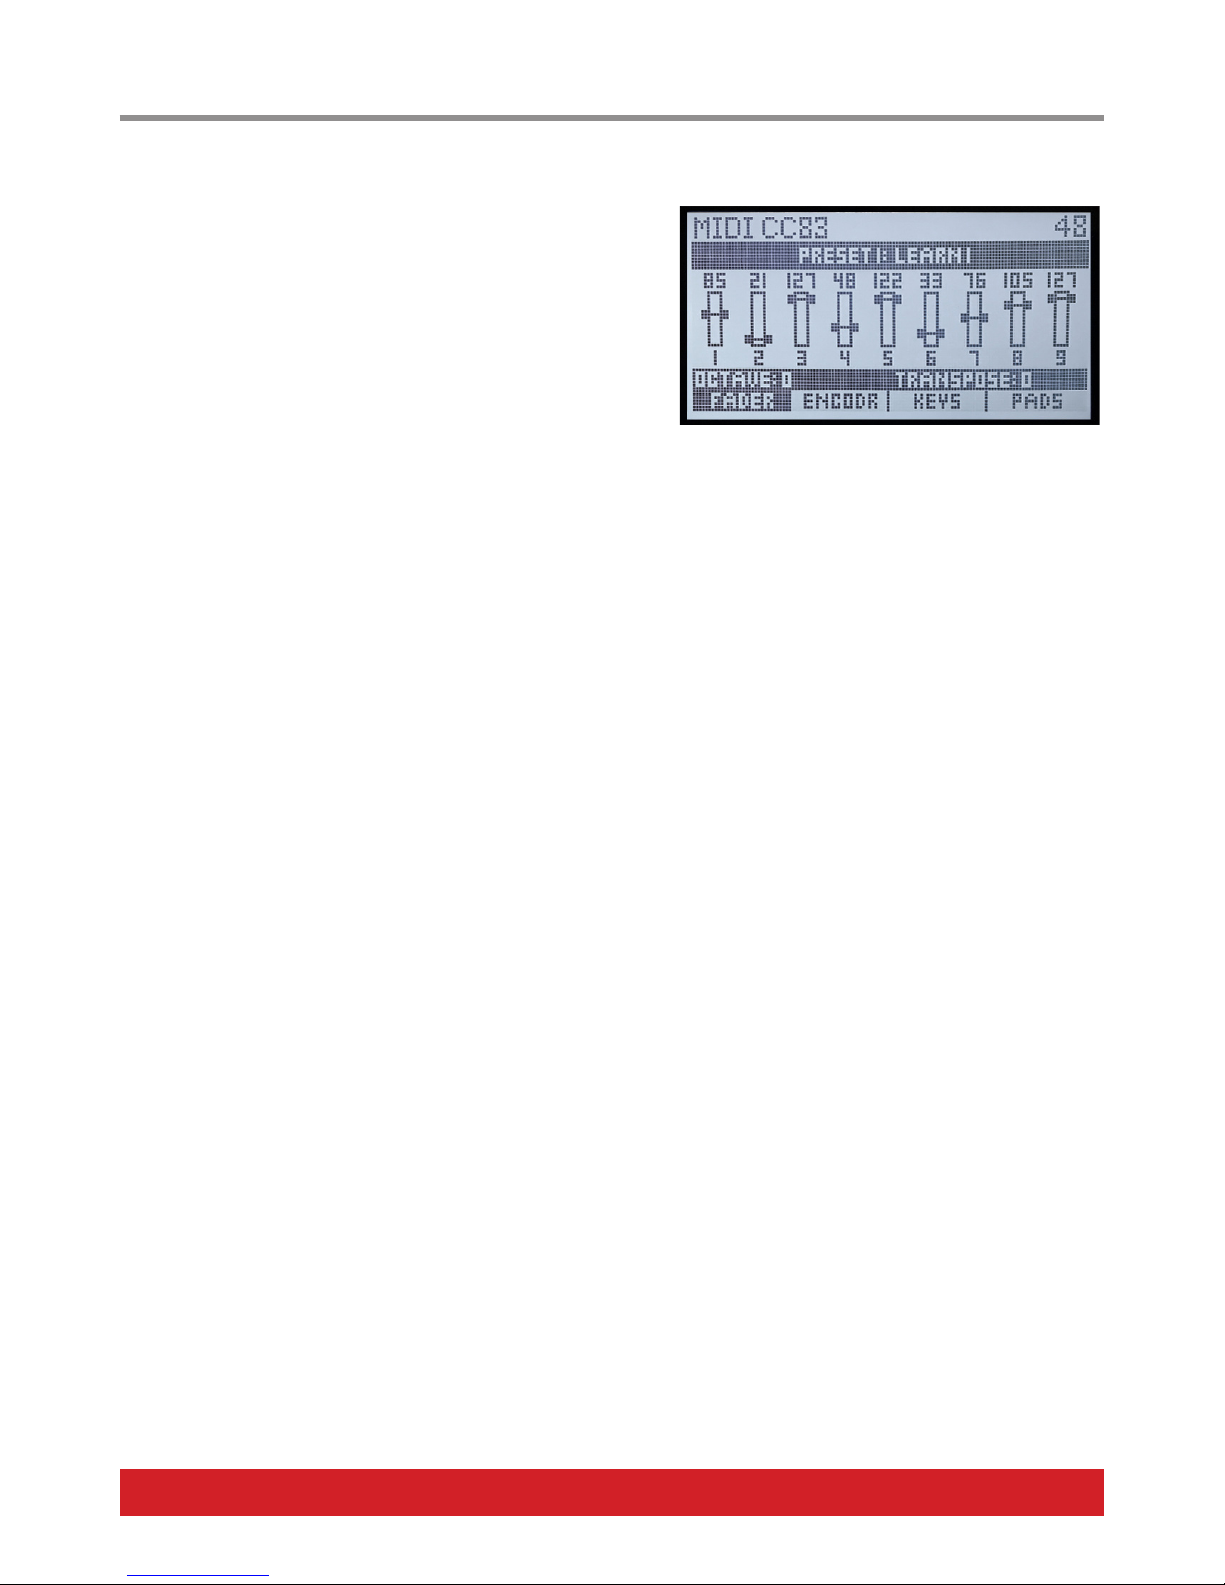
The 4 display buttons function changes with different menus and the display labels above each show what they do.
Fader
The Fader page is displayed by default every time Panorama T4/T6 is
switched on. The display shows current fader positions as well as the status
of Octave and Transpose. To change the Octave value, press the Octave
buttons.
Encoder
Pressing the Encoder display button shows a graphic representation of the 8 encoders’ current value as well as the MIDI message currently
assigned to each of them.
To change MIDI assignments for any of Panorama T4/T6 controls, use the Control Edit menu as described on page 21.
Keys
Activating the [Keys] menu changes the display button options to functions that exclusively affect the keyboard:
Chord
When [Chord] is engaged, playing one note on the keyboard can trigger a chord interval of up to 6 notes.
• To learn an interval, press and hold the [Chord] button.
• Play the root note of the chord on the keyboard, while continuing to hold the [Chord] button.
• Continue to hold the root note and release the [Chord] button.
• Play any other notes you want to be part of the chord/interval. You only need to continue holding one note (not necessarily the root
note at this point), so additional notes can be played one at a time.
• Release all notes when done and play a key on the keyboard to verify the recorded chord/interval.
With [Chord] engaged you can play one or multiple keys on the keyboard to trigger ever more complex intervals. This may result in dupli-
cate notes so use with caution.
Press [Chord] again to disengage the function.
Repeat
Opens the Key [Repeat] menu. See page 19 for details.
Vel Fix
When [Vel Fix] is engaged, the keyboard outputs velocity at a fixed value.
• To set the fixed velocity setting, press and hold [Vel Fix]
• Move [E1/Data] to select a value between 0-127. This is the velocity value that will be output by the keys when [Vel Fix] is engaged.
• Keep moving [E1/Data] past 127 will select ‘MW’. Select this setting if you want to control the fixed velocity value in real time, using the
modulation wheel.
• Release the [Vel Fix] button when done.
Internal Mode Display Button Menus
www.nektartech.com Nektar Panorama T4 & T6 User Guide 17
Hold
This feature allows you to hold played notes after removing your hands from the keyboard.
• Press a key or multiple keys on the keyboard.
• Press [Hold]
• Release the keys on the keyboard
• The notes will continue to play until [Hold] is deactivated.
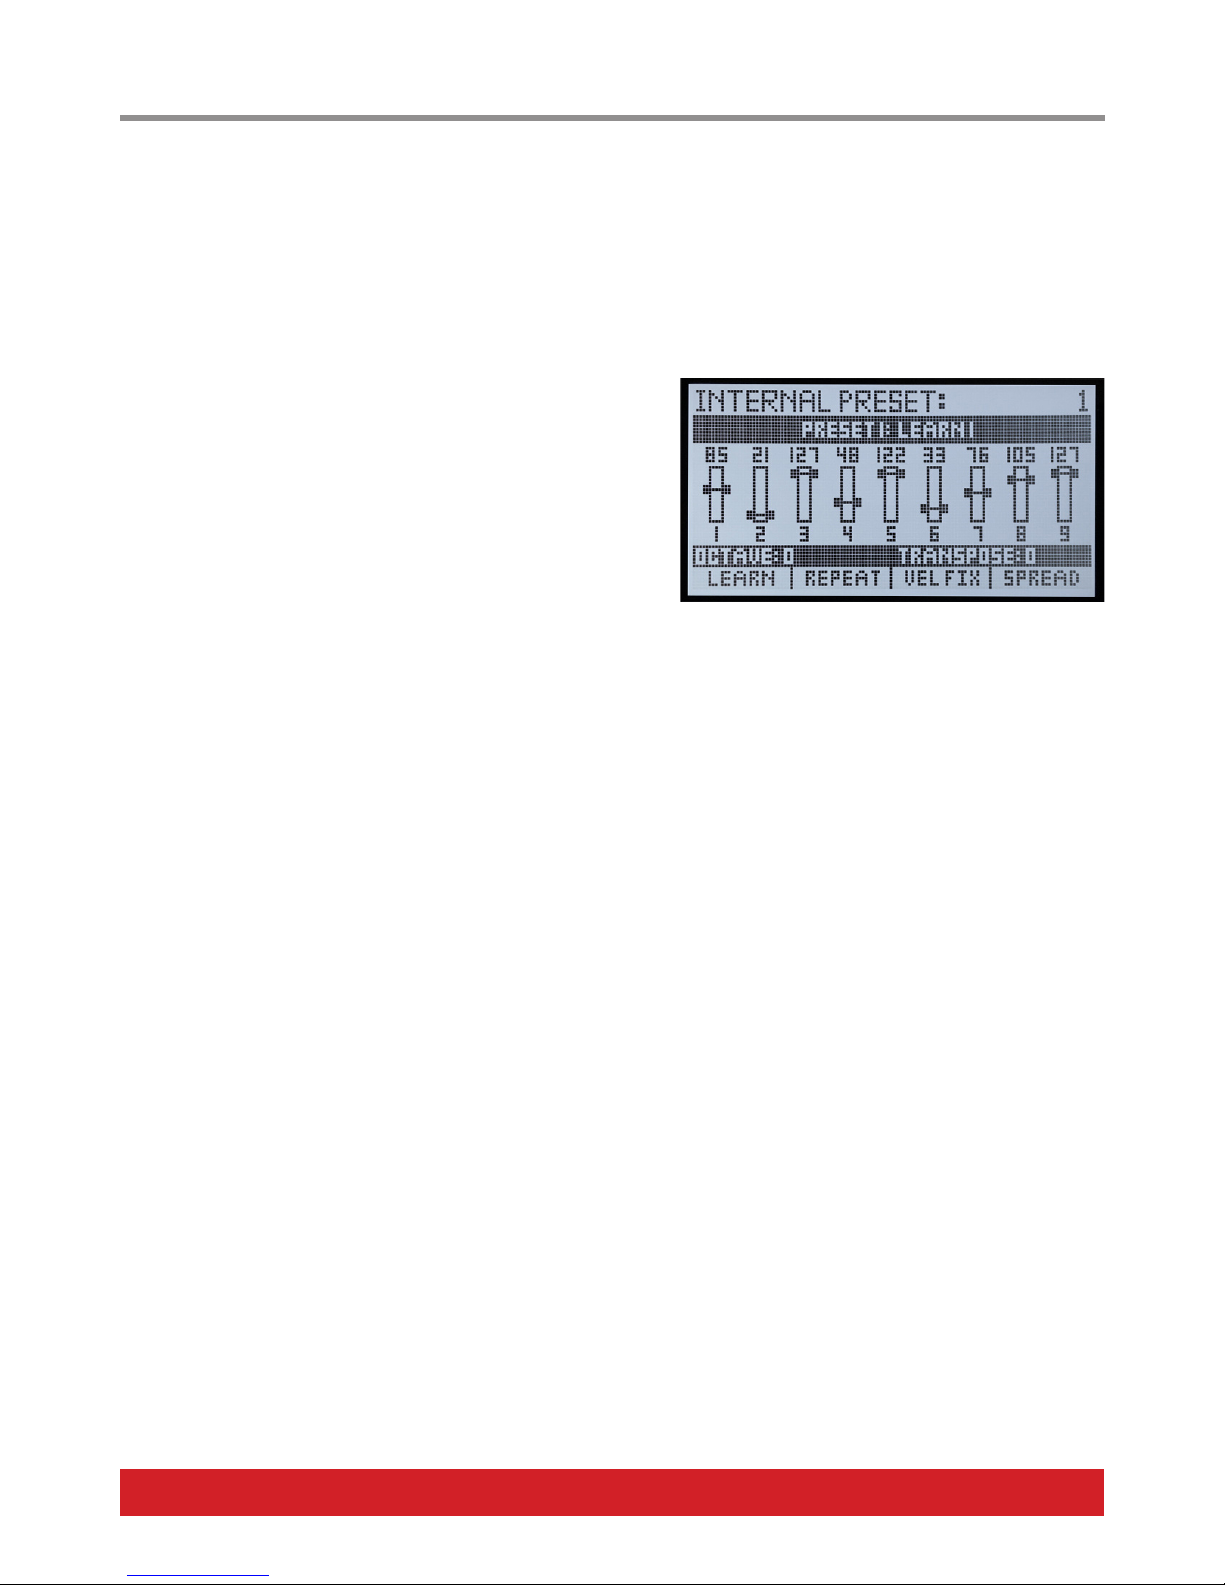
Pads
Activating the [Pads] menu changes the display button options to functions
that exclusively affect the pads.
Learn
It’s easy to change a pad note assignment using the Pad Learn function.
It works as follows:
• Engage [Learn]
• Hit the pad you want to assign a new note value to.
• Press the key on the keyboard that corresponds to the note you want to assign to the pad. You can keep playing notes on the
keyboard until you have found the note you want. You can also assign chords to the pads, by playing notes simultaneously (up to 6).
• Repeat the two previous steps to change more assignments.
• Disengage [Learn] when you are done.
Your settings are stored over power cycling, but make sure you save to a pad map (See page 23) if you want to be sure they are not lost in
the future.
Repeat
Opens the pads’ [Repeat] menu. See page 19 for details.
Vel Fix
When [Vel Fix] is engaged, the pads output velocity at a fixed value.
• To set the fixed velocity setting, press and hold [Vel Fix].
• Move [E1/Data] to select a value between 0-127. This is the velocity value that will be output by the keys when [Vel Fix] is engaged.
• Keep moving [E1/Data] past 127 will select ‘MW’. Select this setting if you want to control the fixed velocity value in real time, using the
modulation wheel.
• Release the [Vel Fix] button when done.
Spread
Velocity Spread assigns the note of the pad last played, across all 8 pads, but at fixed incrementally higher velocity values.
• Hit a pad that you want to play using the velocity spread function.
• Press [Spread] to engage the function.
• Play the 8 pads. Each pad should now play the same note at gradually higher fixed velocity values.
• Press [Spread] again to disengage the function.
The fixed velocity value for each pad can be adjusted. With [Spread] engaged, do the following:
• Hit a pad that you want to adjust the fixed velocity of.
• Press and hold [Spread].
• Move [E1/Data]. The top info line updates the fixed velocity value.
• Release [Spread] when you are done.

18 Nektar Panorama T4 & T6 User Guide www.nektartech.com
The 8 pads are velocity sensitive and programmable with either note, MIDI switch or pressure control messages. This means you can use
them as regular MIDI buttons as well as to punch out your drum beats and percussive melody parts. In addition, you can choose from 4
velocity curves and one fixed velocity option for the pads, depending on what you are doing and your playing style.
Pads Bank Button
The [Pads Bank Button] switches between pad bank 1-8 and pad bank 9-16. When the button is illuminated white, pad bank 1-8 is active.
When it is red, pad bank 9-16 is active.
Pad Learn
If you want to change the note assignment for a pad, you can do that quickly by doing the following:
• Press [Shift]+[Pads Bank] to enter Learn mode.
• Hit the pad you want to assign a note. You can use the [Pad Bank} button to switch between pads 1-8 and 9-16.
• Play a key on the keyboard, representing the note you want assigned. You can keep playing different notes until you have found the
one you want. You can also assign chords to the pads, by playing notes simultaneously (up to 6).
• Hit another pad if you want to keep assigning, followed by playing a note on the keyboard.
• Press [Shift]+[Pads Bank] to exit Learn mode.
Change Octave for all Pad Assignments
If you want to shift all current pad assignments up or down an octave or two, here is how you do that:
• Press [Pads Bank] and hold
• Press the [Octave down] or Octave [Up] key to change the octave. The display’s current parameter line updates to show you how
many octaves the pads have been shifted.
• Release [Pads Bank] when done.
Load and Save Pad Maps
You can load and save up to 8 different pad setups in memory locations called Pad maps. Here is how you load pad maps:
• Press and hold the [Shift] button.
• Press the pad that corresponds to the pad map 1-8 that you want to recall. The display shows the selected map number.
• Release the [Shift] button. The pad map has now been loaded.
Pad maps contain settings for the 2 banks of 8 pad assignments = 16 pads total. Press the [Pad Bank] button to switch between them.
The default pad maps showcase some of the options for programming the pads but there are many more creative ways you could use
them. Try for example using pressure to control parameters or load presets.
Here is a list of the default pad maps:
Pad Map Description Pad Map Description
1 Chromatic scale from C1 to D#2 5 Perfect 4th intervals 1. Play two pads to create chords.
2 Chromatic scale from E2 to G3 6 Perfect 4th intervals 2. Play two pads to create chords.
3 General MIDI drum kit setup 7 One pad = 4 octaves
4 General MIDI percussion kit setup 8 Chords
Pads

www.nektartech.com Nektar Panorama T4 & T6 User Guide 19
difficult to play manually.
• Press the button labeled [Key Repeat] to switch the repeat function on/off for the keyboard.
• Press the button labeled [Key Repeat] to switch the repeat function on/off for the pads.
The behavior for the 2 buttons can be set to either ‘toggle’ or ‘latch’, by default it is set to ‘toggle’. To change the current setting, press
[Shift]+[Key Repeat] or [Shift]+[Pad Repeat]. The setting can also be changed in one of the Repeat settings pages.
To open up the Repeat settings page, in [Internal] mode press either the display button labeled [Keys] or [Pads] depending on which you
want to work with. Then press the display button labeled [Repeat].
Key/Pad Repeat
With the Repeat menu active in the Keys or Pads menu, the encoders control the following parameters:
E1 E2 E3 E4
Tempo Gate/Length Accent Velocity Setup
E5 E6 E7 E8
Repeat Rate Swing Accent Interval Setup Select
Tempo: Sets the tempo between 30 and 240 BPM if the clock source is set to ‘Internal’. If clock source is set to ‘MIDI Clock’ , current tempo
will be displayed but the E1 encoder doesn’t control it.
Repeat Rate: Choose the rate notes are repeated at. Options are 1/4, 1/6, 1/8, 1/12, 1/16, 1/24, 1/32, 1/48, 1/64, 1/80, 1/96.
Gate: Sets the length of the repeated note in a range from 1% to 100%. 100% equals the repeat rate.
Swing: By default the swing value is 50% which means that swing is essentially off. Changing to value < 50% will move every second note
closer to the preceding note and setting the value > 50% will move it further away to the preceding note. Remember to set the value back
to 50% when you want it off.
Accent Velocity: Sets the velocity accent value offset -/+ 50 which means that an accent will play up to 50 velocity values higher than the
originally played velocity value or 50 values below.
Accent Interval: Sets the interval at which an accent should be played (from 2 to 16). Setting the interval to 2 means every second note
will be played with the accent offset value and a setting of 9 means every 9th note will be played with the accent offset value, etc.
Setup: Moving the Setup encoder goes through a selection of menus for each of which a value can be set in Setup Select.
Setup Setup Select Description
Vel Src AfterTouch/Pad Pressure, Exp Pedal, Mod
Selected source controls velocity during
repeat.
Btn Mode Toggle, Latch Switches the [Key Repeat] and [Pad Repeat]
buttons behavior. Can also be done using
[Shift]+[Key Repeat] or [Shift]+[Pad Repeat].
Trig Sync Key 1 Sync Each note plays from point of triggering and
stays in sync with itself.
Key 2 Sync Plays in sync with your original key trigger.
Beat Sync Syncs with the next beat rate step.
Clock Src Internal Clock source is Panorama T4/T6’s internal
clock.
MIDI Clock Clock source is incoming MIDI clock sent via
USB MIDI port 1.
Vel Src Auto Automatically switches to MIDI clock, when
an external clock is present, and back when
it is not..
Repeat Functions

20 Nektar Panorama T4 & T6 User Guide www.nektartech.com
To assign MIDI messages to any of the assignable MIDI controls on Panorama T4/T6, first make sure [Internal] is selected. Next press the
[Setup/Menu] button and use either the [arrow up/down] display buttons or the [E1/Data] to select Control Edit. Press [Enter].
In the Control Edit menu, the display shows the assignment parameters for the currently selected control. To select a different control, ei-
ther move it or press it. As you select different controls, such as for example fader 3 and then press pad 4, the display updates accordingly.
Control Types Message Type Options
Faders
AfterTouch
Pitch Bend Wheel
Mod Wheel
Expression Pedal
• MIDI CC
• Pitch Bend
• Channel Pressure/ (AT)
• NRPN (coarse)
•
• Fixed Velocity Value
Assignable Buttons
Foot Switch Socket
• MIDI CC
• MIDI CC (Toggle)
• MIDI CC (Step)
• Pitch Bend
• Note
• Note (Toggle)
• Program & Bank
• Program (Step)
• NRPN Toggle (coarse)
•
• NRPN Step (coarse)
•
• Load Preset
• Fixed Velocity State
• MIDI Machine Control
• Key Hold
• Key Chord
Encoders • MIDI CC
• Pitch Bend
• Channel Pressure/ (AT)
• NRPN (coarse)
•
• Fixed Velocity Value
• Program
• MIDI CC (Relative)
Pad Pressure • MIDI CC
• Pitch Bend
• Poly AfterTouch
• Channel AfterTouch
• Load Preset
• Load Pad Map
• NRPN Toggle (coarse)
•
• NRPN Step (coarse)
•
• Fixed Velocity Value
Pad Strike • Note
• Chord
Note that the pad strike component can either be assigned a Note or a Chord message type. Both are easier to assign outside Control Edit,
using the Pad Learn or the Chord functions. Chord cannot be set up in Control Edit.
Setting Minimum/Maximum Values and Reverse
For many of the message types you’ll be able to set a minimum and a maximum value, so you can define a narrow control range.
If the minimum value is greater than the maximum value, the control’s behavior is reversed. You may for example want to mimic the
behavior of a drawbar using a fader. Setting the minimum value of a MIDI CC message to 127 and the maximum value to 0 will reverse the
fader’s behavior, so that pulling it towards the player will gradually send out increasing values and pushing it back will gradually push it
towards 0.
Control Edit
This manual suits for next models
1
Table of contents


