thomann SP 5600 User manual

SP 5600
Portable Grand Keyboard
User Manual

Thomann GmbH
Hans-Thomann-Straße 1
96138 Burgebrach
Germany
Telephone: +49 (0) 9546 9223-0
Internet: www.thomann.de
10.10.2023, ID: 378054 (V6)

Table of contents
1 General information.............................................................................................................. 6
1.1 Symbols and signal words........................................................................................... 6
2 Safety instructions................................................................................................................. 7
3 Features....................................................................................................................................... 8
4 Assembly instructions.......................................................................................................... 9
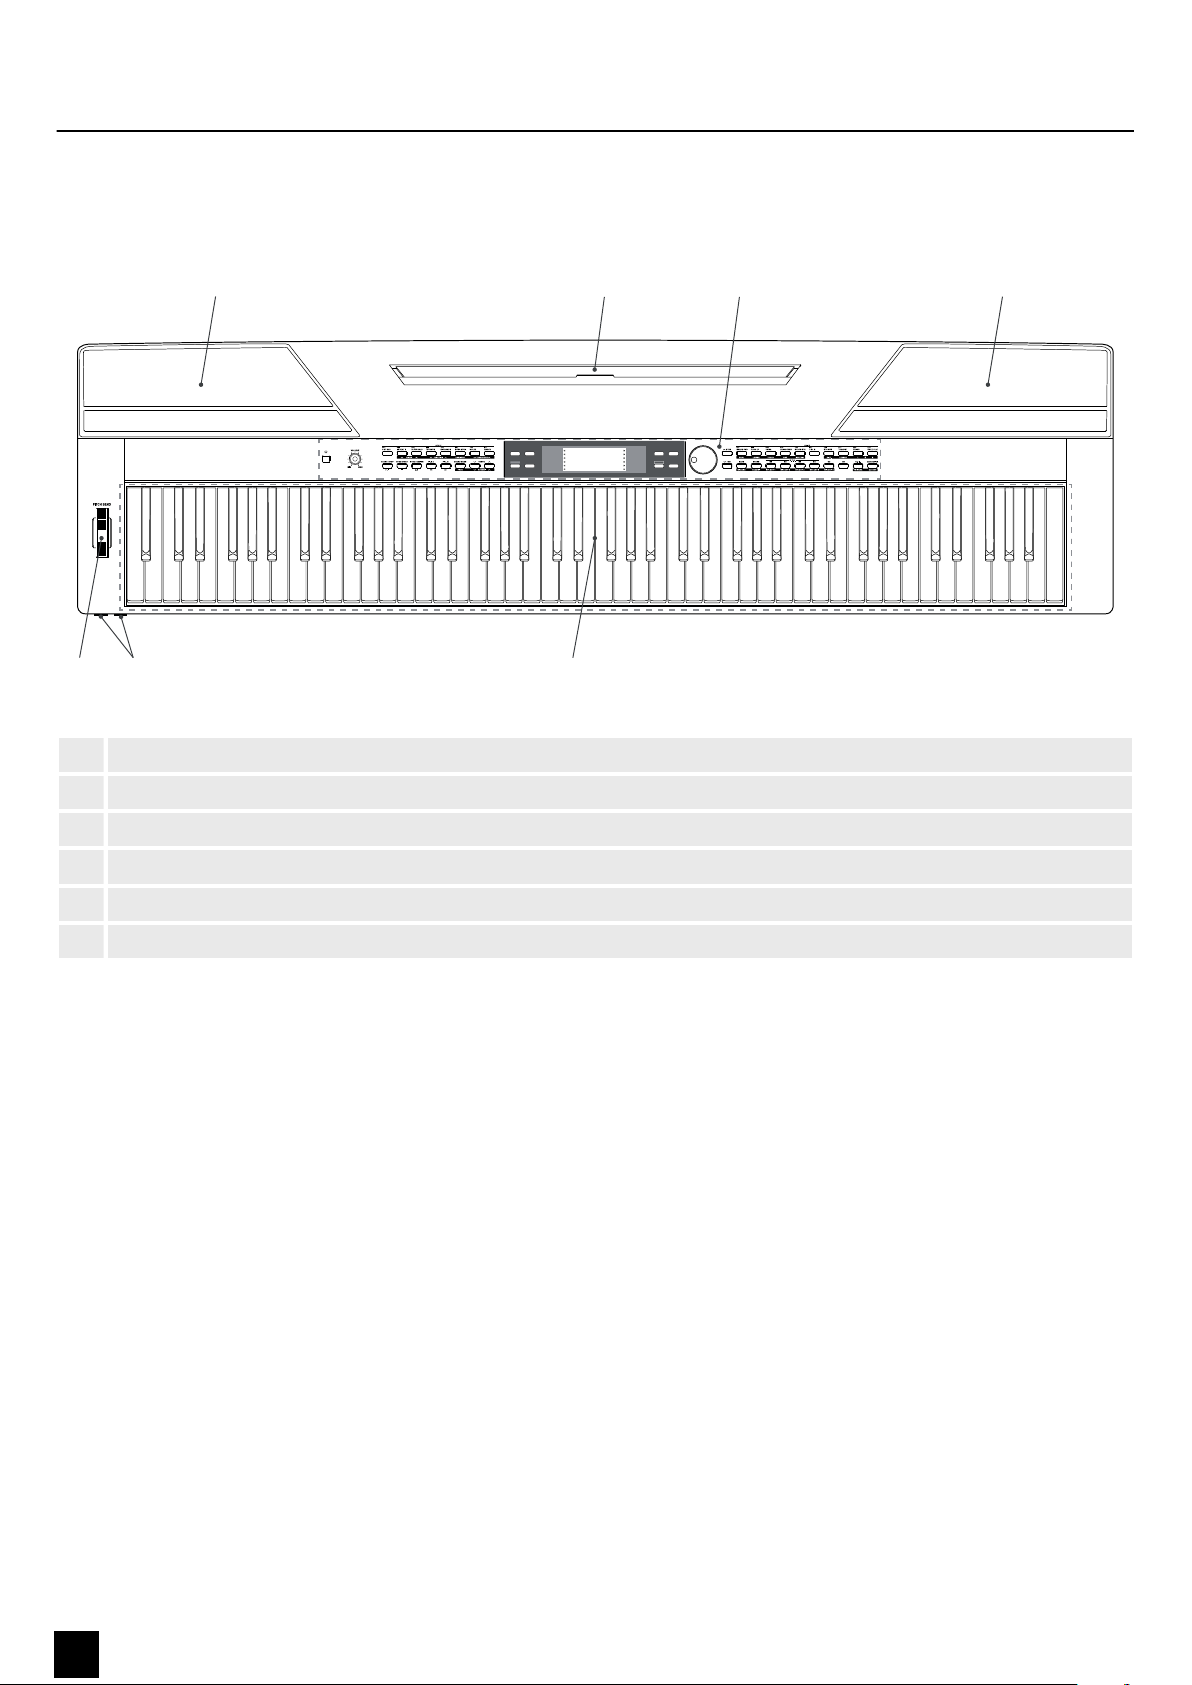
5 Connections and controls................................................................................................ 10
6 Connection options............................................................................................................. 14
7 Quick start guide.................................................................................................................. 16
8 Turning the keyboard on / o, setup.......................................................................... 18
8.1 Turning the keyboard on / o.................................................................................. 18
8.2 Automatic shutdown................................................................................................... 18
8.3 Adjusting the volume.................................................................................................. 18
8.4 Setting the touch sensitivity..................................................................................... 18
8.5 Sustain eect.................................................................................................................. 19
8.6 Digital eects.................................................................................................................. 19
8.7 Setting up the keyboard, Function menu............................................................ 19
8.7.1 Fine tuning................................................................................................................... 20
8.7.2 Time signature............................................................................................................ 20
8.7.3 Split point..................................................................................................................... 21
8.7.4 Pedal function............................................................................................................. 21
8.7.5 Selection Harmony setting.................................................................................... 22
8.7.6 Equalizer....................................................................................................................... 22
8.7.7 Reverb eect............................................................................................................... 23
8.7.8 Reverb volume........................................................................................................... 23
8.7.9 Chorus eect............................................................................................................... 23
8.7.10 Chorus volume......................................................................................................... 24
8.7.11 MIDI receive channel............................................................................................. 24
8.7.12 MIDI send channel.................................................................................................. 24
8.7.13 Automatic shutdown............................................................................................. 24
8.8 Loading / saving user settings................................................................................. 25
8.9 Resetting user settings................................................................................................ 25
8.10 Deleting stored recordings..................................................................................... 25
9 Operating................................................................................................................................. 26
9.1 Piano mode..................................................................................................................... 26
9.2 Transposing..................................................................................................................... 26
9.3 Playing demo sequences........................................................................................... 26
9.4 Style playing................................................................................................................... 27
9.5 Playing songs.................................................................................................................. 27
9.6 Metronome..................................................................................................................... 28
9.7 Tempo............................................................................................................................... 28
9.8 Mixer.................................................................................................................................. 28
9.9 Selecting voices ............................................................................................................ 29
9.10 Dual mode..................................................................................................................... 29
9.11 Split mode..................................................................................................................... 29
9.12 TWINOVA....................................................................................................................... 30
9.13 Harmony mode........................................................................................................... 30
Table of contents
SP 5600 3
Portable Grand Keyboard

9.14 Chord detection.......................................................................................................... 31
9.15 Chord dictionary......................................................................................................... 34
9.16 Auto accompaniment............................................................................................... 35
9.17 Accompaniment track volume, muting............................................................. 36
9.18 Fade in, Fade out........................................................................................................ 36
9.19 One Touch Setting..................................................................................................... 37
9.20 Performance Assistant.............................................................................................. 37
9.20.1 GUITAR mode........................................................................................................... 37
9.20.2 PIANO mode............................................................................................................. 38
9.21 Rehearsal songs........................................................................................................... 38
9.22 Recording function.................................................................................................... 40
9.22.1 Recording preparation.......................................................................................... 40
9.22.2 Recording................................................................................................................... 41
9.22.3 Stopping recording................................................................................................ 41
9.22.4 Playing a recording................................................................................................ 41
9.22.5 Delete recording..................................................................................................... 41
9.23 MIDI functions............................................................................................................. 42
9.24 USB storage medium................................................................................................ 42
9.24.1 USB stick playback.................................................................................................. 42
9.24.2 Loading data from USB stick............................................................................... 43
9.24.3 Save data to USB stick .......................................................................................... 43
9.24.4 Deleting all data on a USB stick......................................................................... 43
9.25 Resetting to factory defaults.................................................................................. 44
10 Technical specications.................................................................................................... 45
11 Plug and connection assignment................................................................................. 47
12 Troubleshooting................................................................................................................... 48
13 Appendix.................................................................................................................................. 49
13.1 Song list.......................................................................................................................... 49
13.2 Styles list........................................................................................................................ 51
13.3 Voice List........................................................................................................................ 55
13.4 Demo list........................................................................................................................ 63
13.5 MIDI implementation chart.................................................................................... 64
14 Protecting the environment........................................................................................... 66
Table of contents
4SP 5600
Portable Grand Keyboard

SP 5600 5
Portable Grand Keyboard

1 General information
This document contains important instructions for the safe operation of the product.
Read and follow the safety instructions and all other instructions. Keep the document
for future reference. Make sure that it is available to all those using the product. If you
sell the product to another user, be sure that they also receive this document.
Our products and documentation are subject to a process of continuous develop‐
ment. They are therefore subject to change. Please refer to the latest version of the
documentation, which is ready for download under www.thomann.de.
1.1 Symbols and signal words
In this section you will nd an overview of the meaning of symbols and signal words
that are used in this document.
Signal word Meaning
DANGER! This combination of symbol and signal word indicates
an immediate dangerous situation that will result in
death or serious injury if it is not avoided.
WARNING! This combination of symbol and signal word indicates
a possible dangerous situation that can result in death
or serious injury if it is not avoided.
NOTICE! This combination of symbol and signal word indicates
a possible dangerous situation that can result in mate‐
rial and environmental damage if it is not avoided.
Warning signs Type of danger
Warning – high-voltage.
Warning – danger zone.
General information
6SP 5600
Portable Grand Keyboard

2 Safety instructions
This device is intended to be used for electronic sound generation using a piano key‐
board. Use the device only as described in this user manual. Any other use or use
under other operating conditions is considered to be improper and may result in per‐
sonal injury or property damage. No liability will be assumed for damages resulting
from improper use.
This device may be used only by persons with sucient physical, sensorial, and intel‐
lectual abilities and having corresponding knowledge and experience. Other persons
may use this device only if they are supervised or instructed by a person who is
responsible for their safety.
Safety
DANGER!
Risk of injury and choking hazard for children!
Children can suocate on packaging material and small parts. Children can injure themselves when handling the device. Never
allow children to play with the packaging material and the device. Always store packaging material out of the reach of babies and
small children. Always dispose of packaging material properly when it is not in use. Never allow children to use the device without
supervision. Keep small parts away from children and make sure that the device does not shed any small parts (such knobs) that
children could play with.
DANGER!
Danger to life due to electric current!
Within the device there are areas where high voltages may be present. Never remove any covers. There are no user-serviceable
parts inside. Do not use the device when covers, safety equipment or optical components are missing or damaged.
WARNING!
Possible hearing damage due to high volumes on speakers or headphones!
With speakers or headphones connected, the device can produce volume levels that may cause temporary or permanent hearing
impairment. Over an extended period of time, even levels that seem to be uncritical can cause hearing damage. Do not operate
the device permanently at a high volume level. Decrease the volume level immediately if you experience ringing in your ears or
hearing impairment.
NOTICE!
Damage to the device if operated in unsuitable ambient conditions!
The device can be damaged if it is operated in unsuitable ambient conditions. Only operate the device indoors within the
ambient conditions specied in the “Technical specications” chapter of this user manual. Avoid operating it in environments
with direct sunlight, heavy dirt and strong vibrations. Avoid operating it in environments with strong temperature uctuations. If
temperature uctuations cannot be avoided (for example after transport in low outside temperatures), do not switch on the
device immediately. Never subject the device to liquids or moisture. Never move the device to another location while it is in oper‐
ation. In environments with increased dirt levels (for example due to dust, smoke, nicotine or mist): Have the device cleaned by
qualied specialists at regular intervals to prevent damage due to overheating and other malfunctions.
NOTICE!
Damage to the external power supply due to high voltages!
The device is powered by an external power supply. The external power supply can be damaged if it is operated with the incor‐
rect voltage or if high voltage peaks occur. In the worst case, excess voltages can also cause a risk of injury and res. Make sure
that the voltage specication on the external power supply matches the local power grid before plugging in the power supply.
Only operate the external power supply from professionally installed mains sockets that are protected by a residual current circuit
breaker (FI). As a precaution, disconnect the power supply from the power grid when storms are approaching or it the device will
not be used for a longer period.
Intended use
Safety instructions
SP 5600 7
Portable Grand Keyboard

3 Features
n88 keys with hammer action
nMultifunction LED display
nPitch bend wheel
n128-voice polyphony
n600 voices
n230 programmed styles, 10 user styles
n120 programmed songs, 5 user songs
n5 demo songs
nReverb, Chorus and Sustain eects
nMaster EQ
nSequencer
nAccompaniment and recording function
nLearning function and chord library
nSplit and duo mode
nMetronome
nTranspose function
nBuilt-in speakers
nUSB port
nAutomatic shuto
nSustain pedal, music stand and 12 V power adapter included
Features
8SP 5600
Portable Grand Keyboard

4 Assembly instructions
Unpack and check carefully there is no transportation damage before using the unit.
Keep the equipment packaging. To fully protect the product against vibration, dust
and moisture during transportation or storage use the original packaging or your
own packaging material suitable for transport or storage, respectively.
Set up the device in the desired location.
The unit is powered by the included 12 V power supply. Make sure that the device is
turned o before you connect it to the power supply or disconnect it.
Turn the volume control counter-clockwise to minimum before connecting the
device to the power supply or to other devices. This is to protect the speakers from
damage.
Connect the cable from the power adapter outlet to the input socket [DC IN] on the
rear panel of the device. Plug the plug of the power cord into a properly wired and
earthed mains wall outlet.
Power supply
DC IN
Assembly instructions
SP 5600 9
Portable Grand Keyboard

5 Connections and controls
PERFORM. METRONOME ACCOMP
MELODY 1
MELODY 2
MELODY 3
MELODY 4
MELODY 5
TWINOVA
SUSTAIN
TOUCH
PERFORM
PERFORM.H
PIANO
VOICE STYLE
SONG
SHIFT DEMO
ö # $ ö
'& %
1 Built-in speakers
2 Music stand holder
3 Control panel with function keys and display
4 Claviature with 88 keys
5 2 × connection sockets for headphones
6 Pitch bend wheel for changing the pitch
Overview
Connections and controls
10 SP 5600
Portable Grand Keyboard

PERFORM. METRONOME ACCOMP
MELODY 1
MELODY 2
MELODY 3
MELODY 4
MELODY 5
PIANO
SHIFT
()*2 3 6
+, - . / 0 1 4 5
TWINOVA
SUSTAIN
TOUCH
PERFORM
PERFORM.H
VOICE STYLE
SONGDEMO
;7 86
9: > ? A B C
< = D
7| Button to turn the device on and o
8[VOLUME] | Rotary control to adjust the volume
9[STYLE] | Simple button function: direct style selection
Button function when the [SHIFT] button is pressed:
n[MIXER] | Opens the mixer menu
n[FUNCTION] | Opens the function menu
n[HARMONY] | Enables/disables harmony mode
n[TRANSPOSE] | Transposes the piano keys in semitone steps
10 [START/STOP] | Starts/stops the playback of demo songs or styles
11 [SYNC START] | Enables and disables the sync start function in the accompaniment and recording mode
12 [INTRO/ENDING] | Inserts an intro / ending in accompaniment mode.
13 [FILL A] | Inserts lls in accompaniment mode
14 [FILL B] | Inserts lls in accompaniment mode
15 [CHORD MODE]/[FADE] | Simple button function: Enables/disables chord mode
Button function when the [SHIFT] button is pressed: Enables/disables the fade function in accompaniment mode
16 [TEMPO]/[ACCOMP] | Simple button function: Increases/decreases playback tempo
Button function when the [SHIFT] button is pressed: Setting the accompaniment track volume.
17 [PERFORM] | Enables/disables the performance assistant
18 [METRONOME] | Activates/deactivates the metronome
19 [SHIFT] | Enables the second function of dual function buttons
20 [PIANO] | Calls up piano mode
21 Display
Control panel
Connections and controls
SP 5600 11
Portable Grand Keyboard

22 [VOICE] | Calls up voice mode
23 [STYLE] | Calls up style mode
24 [DEMO] | Calls up demo mode
25 [SONG] | Calls up song mode
26 Jog dial for selecting functions, parameters and values
27 /[YES] | Parameter selection and increasing displayed value by one.
/[NO] | Parameter selection and decreasing displayed value by one.
28 [VOICES] | Simple button function: direct voice selection
Button function when the [SHIFT] button is pressed:
n[DUAL] | Enables/disables dual mode (layer function)
n[LOWER] | Enables/disables lower mode (split function)
n[TOUCH] | Opens the menu for adjusting the touch sensitivity of the claviature
n[DSP] | Turns digital eects on/o
n[SUSTAIN] | Enables/disables the sustain function
n[DICT] | Opens the chord library
n[LESSON] | Enables/disables lesson mode
n[L] | Selects the left hand voice in lesson mode
n[R] | Selects the right hand voice in lesson mode
29 [BANK]/[RECORD] | Simple button function: Selecting memory bank
Button function when the [SHIFT] button is pressed: Enabling / disabling the Recording mode.
30 [STORE]/[ACCOMP] | Simple button function: Saves current values as user setting.
Button function when the [SHIFT] button is pressed: Record enabling accompaniment track.
31 [M1] … [M6]/[MELODY 1] … [MELODY 5] | Simple button function: Calls up user settings M1 … M5 (in O.T.S. mode
M1 … M4)
Button function when the [SHIFT] button is pressed: Selects melody tracks 1 … 5 for the recording.
32 [O.T.S]/[TWINOVA] | Simple button function: Enables/disables single-nger mode (One Touch Setting)
Button function when the [SHIFT] button is pressed: Enabling / disabling the TWINOVA mode.
33 [USB DEVICE]/[OCTAVE] | Simple button function: Opens the menu for adjusting the USB functions
Button function when the [SHIFT] button is pressed: Octaving the keyboard in TWINOVA mode.
34 USB interface for connecting a USB device.
Connections and controls
12 SP 5600
Portable Grand Keyboard

DC IN
E F G HIJK L
35 [USB] | USB interface to connect a computer
36 [MIDI OUT] | MIDI out for connecting an external MIDI device
37 [MIDI IN] | MIDI in for connecting an external MIDI device
38 [SUSTAIN] | Pedal connecting socket (6.35 mm jack)
39 [AUX OUT] | Output socket for connecting the device to an amplier, stereo system, mixer or recording device (6.35 mm
jack)
40 [AUX IN] | Input socket for connecting an external audio device (e.g. MP3 or CD player, 6.35 mm jack).
41 [MIC] | Input socket for connecting a microphone (6.35 mm jack)
42 [DC IN] | Connection for power supply
-Connections on the back
Connections and controls
SP 5600 13
Portable Grand Keyboard

6 Connection options
To the left beneath the keyboard you nd the headphones outlets 1 and 2.
Connecting headphones (not supplied) to outlet 2 mutes the speakers.
When using output 1 You hear the sound through headphones and speakers.
Use the [AUX OUT] socket to connect the keyboard to an amplier, stereo device,
mixing console or recording device. Plug one end of the audio cable into the
[AUX OUT] socket on the rear panel of the keyboard and the other end into the input
of the respective audio device.
NOTICE!
To prevent damage to the speakers, turn the volume down to ‘Mini‐
mum’ before you connect other devices to the keyboard.
Use the [AUX IN] socket to connect a, for example, CD or MP3 player to the keyboard.
So you can playback music through the internal speakers of the keyboard and simul‐
taneously play along to it. Plug one end of the audio cable into the [AUX IN] socket on
the rear panel of the keyboard and the other end into the output of the respective
audio device.
You can connect the keyboard to exchange data with a PC via the USB port. This also
allows the transfer of MIDI les.
NOTICE!
Do not set the USB interface as the in and output at the same time in the
computer software. Otherwise, there will be overlap when playing the
keyboard.
Use the MIDI interface [MIDI IN] to receive MIDI data from an external MIDI device.
Headphones
External audio devices via AUX OUT
DC IN
External audio devices via AUX IN
DC IN
Computer via USB
DC IN
MIDI device via MIDI IN
MIDI IN MIDI OUT
PERFORM. METRONOME ACCOMP
MELODY1
MELODY2
MELODY3
MELODY4
MELODY5
TWINOVA
SUSTAIN
TOUCH
PERFORM
PERFORM.H
PIANO
VOICE STYLE
SONG
SHIFT DEMO
Connection options
14 SP 5600
Portable Grand Keyboard

Use the MIDI interface [MIDI OUT] to send MIDI data to an external MIDI device.
Use the connection socket [SUSTAIN] to connect a sustain pedal to the keyboard.
Use the connection socket [MIC] to connect a dynamic microphone (1/4" jack) to the
device.
Use the connection socket on the bottom of the keyboard to connect the triple-pedal
(Sustain, Sostenuto and Soft) of the optional Thomann original stand (item no.
352262).
MIDI device via MIDI OUT
MIDI IN MIDI OUT
PERFORM. METRONOME ACCOMP
MELODY1
MELODY2
MELODY3
MELODY4
MELODY5
TWINOVA
SUSTAIN
TOUCH
PERFORM
PERFORM.H
PIANO
VOICE STYLE
SONG
SHIFT DEMO
Sustain pedal
DC IN
Microphone
DC IN
Pedalry
Connection options
SP 5600 15
Portable Grand Keyboard

7 Quick start guide
In order to provide you with a quick introduction, the main functions of the keyboard
are described in brief in this chapter. A detailed description of the setting options can
be found in the chapters
Ä
Chapter 9 ‘Operating’ on page 26 and
Ä
Chapter 8
‘Turning the keyboard on / o, setup’ on page 18.
Press the power button on the left of the operating panel to turn the device on and
o. The display shows ‘Loading!’ . The keyboard is immediately operational.
Adjust the rotary control [VOLUME] for a pleasant volume for playback and practising.
Turn this control clockwise to increase the volume. Turn it counter-clockwise to
reduce volume.
The demo sequences stored in the device show the sound and the pitch range of the
keyboard.
1. Press [DEMO] to start playing the demo sequences in a continuous loop.
2. Use [YES] and [NO] to toggle between the ve demo sequences (see
Ä
Chapter
13.4 ‘Demo list’ on page 63).
3. Press [DEMO] again or [START/STOP] to stop playing the demo sequences.
The keyboard features a selection of 600 authentic voices, see
Ä
Chapter 13.3 ‘Voice
List’ on page 55.
1. Press [VOICE] or one of the direct selection buttons to activate the last set or a
desired voice directly.
ðThe display shows the name and number of the rst right hand voice (main
voice), e.g. ‘VOICE R1’ , ‘001’ , ‘GrandPno’ .
2. Use [YES] and [NO], the jog dial or a direct select button to assign another
voice.
Press the [VOICE] button repeatedly to toggle between the upper and lower
voice of a direct selection button.
In dual and split mode, you toggle between the rst and second right hand voice and
the left hand voice by repeatedly pressing the [VOICE] button: ‘VOICE R1’ , ‘VOICE R2’
and ‘VOICE L’ , see the following chapters for Dual and Split mode.
Turning the keyboard on / o
Adjusting the volume
Playing demo sequences
Playing voices
Quick start guide
16 SP 5600
Portable Grand Keyboard

The styles stored in the keyboard are used to support your own playing at perform‐
ances, while practising and recording.
1. Press [STYLE] to activate the Style mode.
2. Use [YES] and [NO], the jog wheel or a direct select button to enable the
desired style directly (see
Ä
Chapter 13.2 ‘Styles list’ on page 51).
3. Press [START/STOP] to start or stop style playback.
The keyboard oers a choice of 120 songs to accompany your playing at perform‐
ances, while practising and recording. In addition, ve tracks for your own recordings
are available.
1. Press [SONG] to start playing the songs in a continuous loop.
2. Use [YES] and [NO] to toggle between the stored songs (see
Ä
Chapter 13.1
‘Song list’ on page 49).
3. Press [START/STOP] to start or stop song playback.
4. Press [STYLE] or [VOICE] to exit the song mode.
You can record up to ve own tracks with the keyboard and store them in the
internal memory.
1. Hold down [SHIFT] and press [RECORD] to enable the recording mode.
2. Use [YES] and [NO] or the jog dial to select a free memory location for the
recording.
3. Hold down [SHIFT] and press [RECORD] again to record-enable the keyboard.
4. The recording starts as soon as you play the rst tone or chord or press
[START/STOP].
5. Hold down [SHIFT] and press [RECORD] again to end the recording and to play
the recorded sequence in an endless loop.
6. To disable the recording mode, hold down [SHIFT] and press [RECORD].
Style playing
Playing songs
Recording songs
Quick start guide
SP 5600 17
Portable Grand Keyboard

8 Turning the keyboard on / o, setup
8.1 Turning the keyboard on / o
Press the power button on the left of the operating panel to turn the device on and
o. The display shows ‘Loading!’ . The keyboard is immediately operational.
If the display does not light up after switching on the keyboard, check the
power supply.
If you hear nothing coming from the speakers, the volume may be set to
‘minimum’.
8.2 Automatic shutdown
If the keyboard is not in use, it shuts o automatically after 30 minutes. To adjust or
deactivate the automatic shutdown, press [SHIFT] and [FUNCTION] twice. The time
window can then be set via [YES] and [NO].
To turn the device on again after an automatic shutdown, press the on / o switch to
the left of the panel.
8.3 Adjusting the volume
Adjust the rotary control [VOLUME] for a pleasant volume for playback and practising.
Turn this control clockwise to increase the volume. Turn it counter-clockwise to
reduce volume.
8.4 Setting the touch sensitivity
With this function you can adjust the touch response of the keyboard at four levels.
1. Hold down [SHIFT] and press [TOUCH] to open the menu for adjusting the
touch sensitivity.
2. Adjust the touch sensitivity with [YES] and [NO] or with the jog dial.
3. Press [YES] and [NO] simultaneously to restore the default setting ‘002’ .
Parameter Meaning
‘OFF’ Touch sensitivity is o.
‘001’ Soft
In this setting, the volume is lower than usual even when playing
with a soft touch.
Turning the keyboard on / o, setup
18 SP 5600
Portable Grand Keyboard

Parameter Meaning
‘002’ Normal
This setting corresponds to the usual touch response of a clavia‐
ture.
‘003’ Hard
In this setting, the volume is higher than usual even when playing
with a hard touch.
8.5 Sustain eect
This feature allows you to assign a general Sustain to the keyboard. When the Sustain
function is turned on, all tones played on the keyboard linger.
1. Hold down [SHIFT] and press [RECORD] to add the eect.
2. Hold down [SHIFT] and press [RECORD] again to disable the eect.
8.6 Digital eects
The DSP functions let you simulate the acoustic eects under dierent environ‐
mental conditions.
1. Hold down [SHIFT] and press [DSP] to enable the function.
ðThe icon ‘DSP’ appears on the display.
2. Hold down [SHIFT] and press [FUNCTION] or [FUNCTION] until the display
shows ‘GM Chr2’ .
3. Turn the jog dial within 3 seconds to select the desired eect.
4. Hold down [SHIFT] and press [FUNCTION] or [FUNCTION] until the display
shows ‘Chr Lev’ .
5. Select with the jog dial the desired eect strength between 000…127.
6. Hold down [SHIFT] and press [DSP] again to disable the function.
ðThe ‘DSP’ icon goes out.
8.7 Setting up the keyboard, Function menu
Hold down [SHIFT] and press [FUNCTION] or [FUNCTION] to open the Function
menu. Select the desired sub menu using the buttons [FUNCTION] or
[FUNCTION] . You can then change the following parameters using the jog dial or
[YES] and [NO].
Turning the keyboard on / o, setup
SP 5600 19
Portable Grand Keyboard

Option LCD Control range Default value
Fine tuning ‘Tune’ –50 … 50 000
Time signature ‘Beat’ 0, 2 … 9 004
Split point ‘Split Pt’ 1 … 88 034
Pedal function ‘SPd’ SUST, SOFT, St/T, MEM SUST
‘UPd’ SOFT, St/T, MEM SOFT
Selection Harmony
setting
‘HAR TYPE’ Duet, Standard Trio, Full Chord, Rock Duet, Country Duet,
Country Trio, Block, 4 Close 1, 4 Close 2, 4 Open, 1+5, Octave1,
Octave2, Strum, Echo1, Echo2, Echo3, Echo4, Tremolo1,
Tremolo2, Tremolo3, Tremolo4, Trill1, Trill2, Trill3, Trill4
Duet
Equalizer ‘EQ TYPE’ Pop, Rock, Class, Jazz, Dance, Reset Reset
Reverb eect ‘Rev TYPE’ Room1, Room2, Room3, Hall1, Hall2, Hall3, Chr1, Chr2, Del,
PanD
Hall1
Reverb volume ‘Rev Lev’ 0 … 127 depending on the
selected voice
Chorus eect ‘Chr TYPE’ Chorus1, Chorus2, GM Chr1, GM Chr2, Flanger1, Flanger2,
Rotary2
GM Chr2
Chorus volume ‘Chr Lev’ 0 … 127 depending on the
selected voice
MIDI receive channel ‘Midi In’ 1 … 16, ALL ALL
MIDI send channel ‘Midi Out’ 1 … 16 001
Automatic shuto ‘POWER OFF’ 030, 060, OFF 030
If you don't press any key within ve seconds after entering the function
menu, the menu is automatically closed.
8.7.1 Fine tuning
With this function you can ne tune the entire claviature in cent steps.
1. Use [FUNCTION] or [FUNCTION] to change into the ‘Tune’ menu. The cur‐
rent setting appears on the display.
2. Adjust the pitch using [YES] and [NO] or the jog dial in a range from –50 to +50
cents. Each time a key is pressed, the value changes by 1 cent.
3. Press [YES] and [NO] simultaneously to restore the default pitch.
8.7.2 Time signature
With this function you can set the time signature in a range from 0 to 9.
1. Use [FUNCTION] or [FUNCTION] to change into the ‘Beat’ menu. The cur‐
rent setting appears on the display.
2. Adjust the time signature with [YES] and [NO] or with the jog dial.
3. Press [YES] and [NO] simultaneously to restore the time signature standard
value ‘004’ .
Turning the keyboard on / o, setup
20 SP 5600
Portable Grand Keyboard
Other manuals for SP 5600
1
Table of contents
Other thomann Keyboard manuals
Popular Keyboard manuals by other brands

Logitech
Logitech MK120 quick start guide

MISTEL
MISTEL Barocco MD600 user manual

Logitech
Logitech Keyboard Folio Getting started guide

Snakebyte
Snakebyte KEY:BOARD ULTRA instruction manual

CH Products
CH Products Multi Function Panel USB quick start guide

Genesis
Genesis Thor 200 RGB Quick installation guide