Nelson SRA150 BIG GUN Troubleshooting guide

SR/SRA150 BIG GUN®OPERATION AND MAINTENANCE INSTRUCTIONS
Nelson Irrigation Corporation 848 Airport Rd. Walla Walla, WA 99362 USA Tel: 509.525.7660 Fax: 509.525.7907 E-mail: [email protected] Web site: www.nelsonirrigation.com
SR/SRA150 BIG GUN®
SET UP FOR OPERATION:
1. Install nozzle. If using ring nozzle set,
or taper ring nozzle, install desired ring
size in ring nozzle cap. Assure the ring
is centered. The ring nozzle cap can
be sufficiently tightened by hand.
2. Adjust location of arc stops to give
desired arc of coverage. Stops must
be mounted so that arrows point toward
each other and the trip lever is located
between arrows. If the stops are set
incorrectly on the wrong end of the
arc, the sprinkler will fail to reverse.
3. The SR150 and SRA150 are factory
set for normal rotation speed. If a
faster or slower speed is desired,
move arm weight backward for
faster operation or forward for slower
operation.
4. To vary the trajectory angle of the
SRA150 simply adjust the turn-buckle
and dial in the desired trajectory
using the calibrated scale. Varying
trajectory angle is simple, and can
be used to increase wind-fighting
ability or to avoid obstacles such
as power lines in the field.
OM-SR/SRA150-4
WARRANTY AND DISCLAIMER
Nelson Big Gun®Sprinklers are warranted for one year from date of original sale to be free of defective materials and workmanship when used within
the working specifications for which the product was designed an under normal use and service. The manufacturer assumes no responsibility for
installation, is limited solely to replacement or repair of defective parts, and the manufactures will not be liable for any crops or other consequential
damages resulting from any defects or breach of warranty. THIS WARRANTY IS EXPRESSLY IN LIEU OF ALL OTHER WARRANTIES, EXPRESS OR
IMPLIED, INCLUDING THE WARRANTIES OF MERCHANTABILITY AND FITNESS FOR PARTICULAR PURPOSES AND OF ALL OTHER OBLIGATIONS
OR LIABILITIES OF MANUFACTURER. No agent, employee or representative of the manufacturer has authority to waive, alter or add to the provision
of the warranty, nor to make any representations or warranty not contained herein.
NOTE ON LUBRICATION: The SR/SRA150 sprinkler is lifetime lubricated and does not require periodic lubrication.
The ball bearings in the H.D. lower bearing operate in a water resistant lubricant that is packed in the housing cavities
and retained by seals. If repair of the lower bearing is done, it is recommended to use Nelson #6143 lubricant or a
good grade of water resistant lubricant such as Lubriplate 130-AA.
BE CAREFUL: Read operating instructions before operating sprinkler or making any adjustments. Never make
adjustments or perform service while sprinkler is in operation. Stand clear of operating sprinkler. Stand clear of high
velocity water stream. Never direct water stream onto roadway or electrical transmission lines.
Drive Vane
The SR150 is available in fixed trajectory angles of 21°,24°, 27° and 43°.
A trajectory modification using a 12° wedge kit #11237 is available.
Drive Arm
Nozzle
Arm Weight
Shift Lever
Trip Lever
HD Lower Bearing
Stops
The SRA150 is a variable trajectory model with adjustability from 15-45°.
Drive Vane
Drive Arm
Nozzle
Arm Weight
Shift Lever
Trip Lever
HD Lower Bearing
Stops
Turn-Buckle (for trajectory adjustment)
Calibrated Scale (not shown)

Nelson Irrigation Corporation 848 Airport Rd. Walla Walla, WA 99362 USA Tel: 509.525.7660 Fax: 509.525.7907 E-mail: [email protected] Web site: www.nelsonirrigation.com
2/14
SR/SRA150 MAINTENANCE
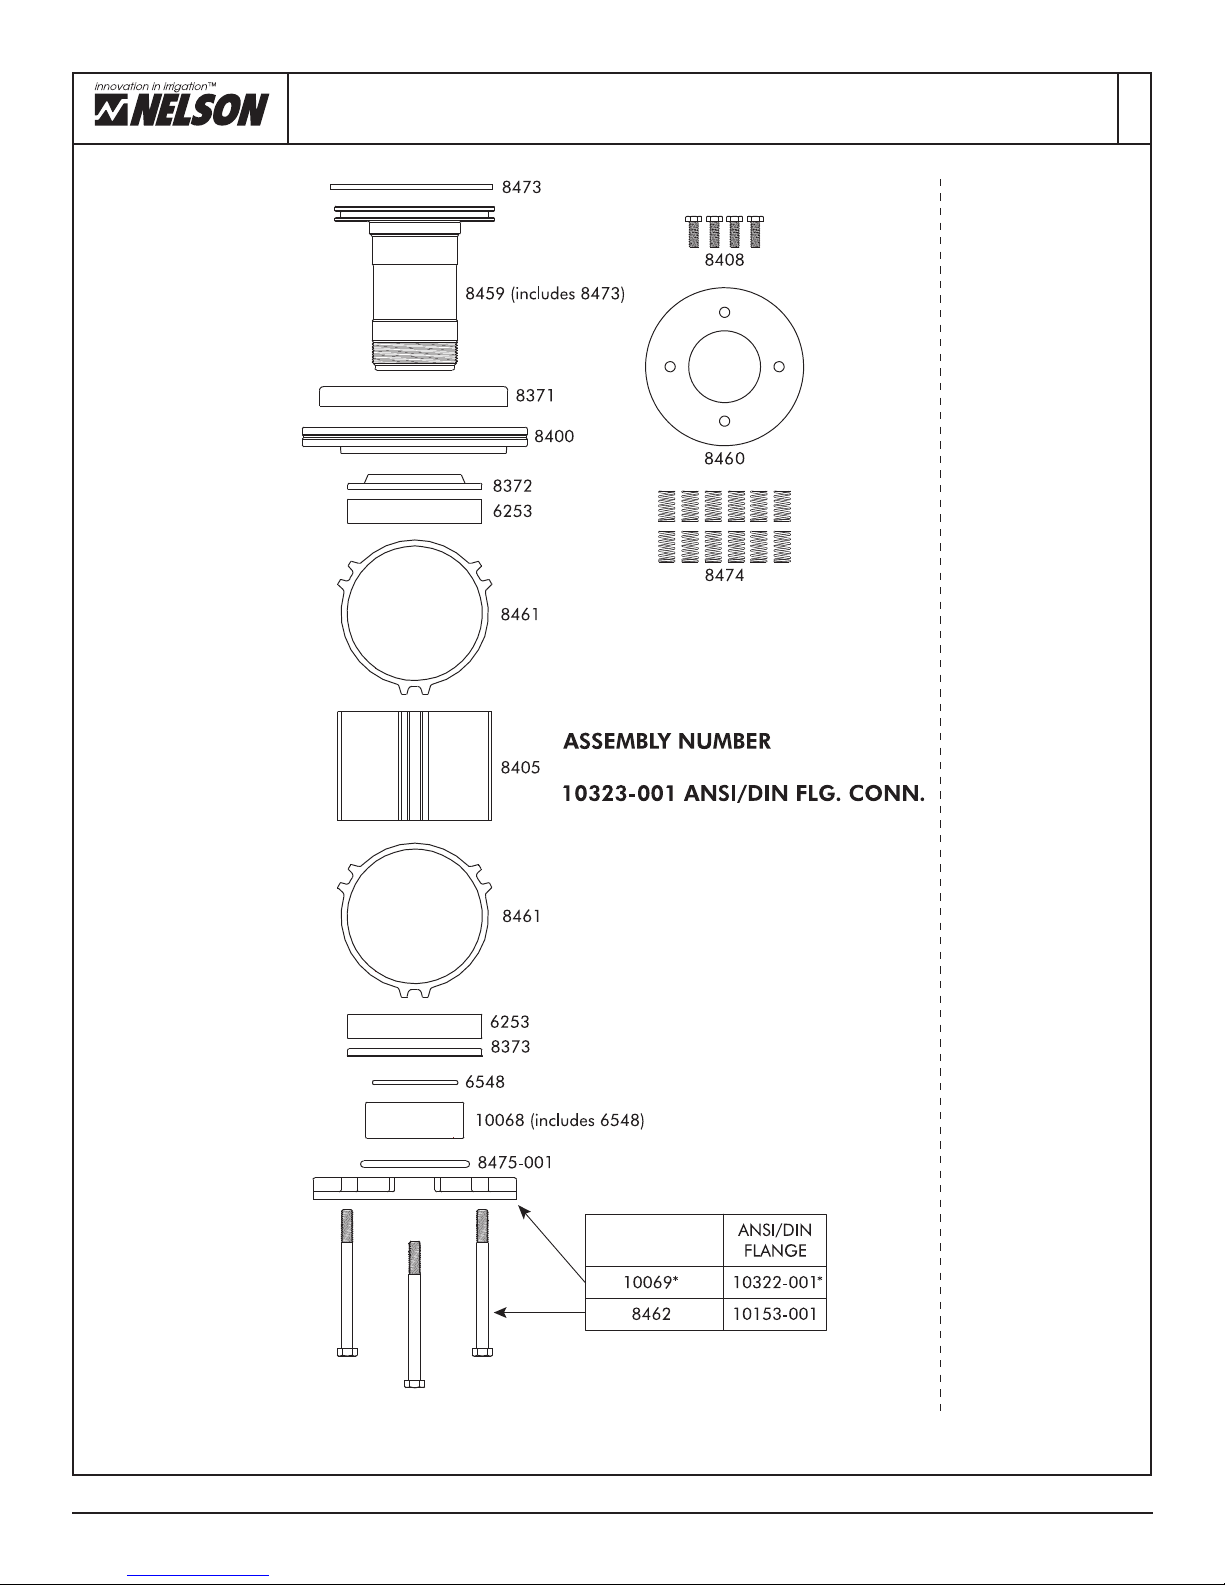
SEE SR/SRA150 PARTS LISTS FOR COMPLETE PARTS LIST AND DESCRIPTION
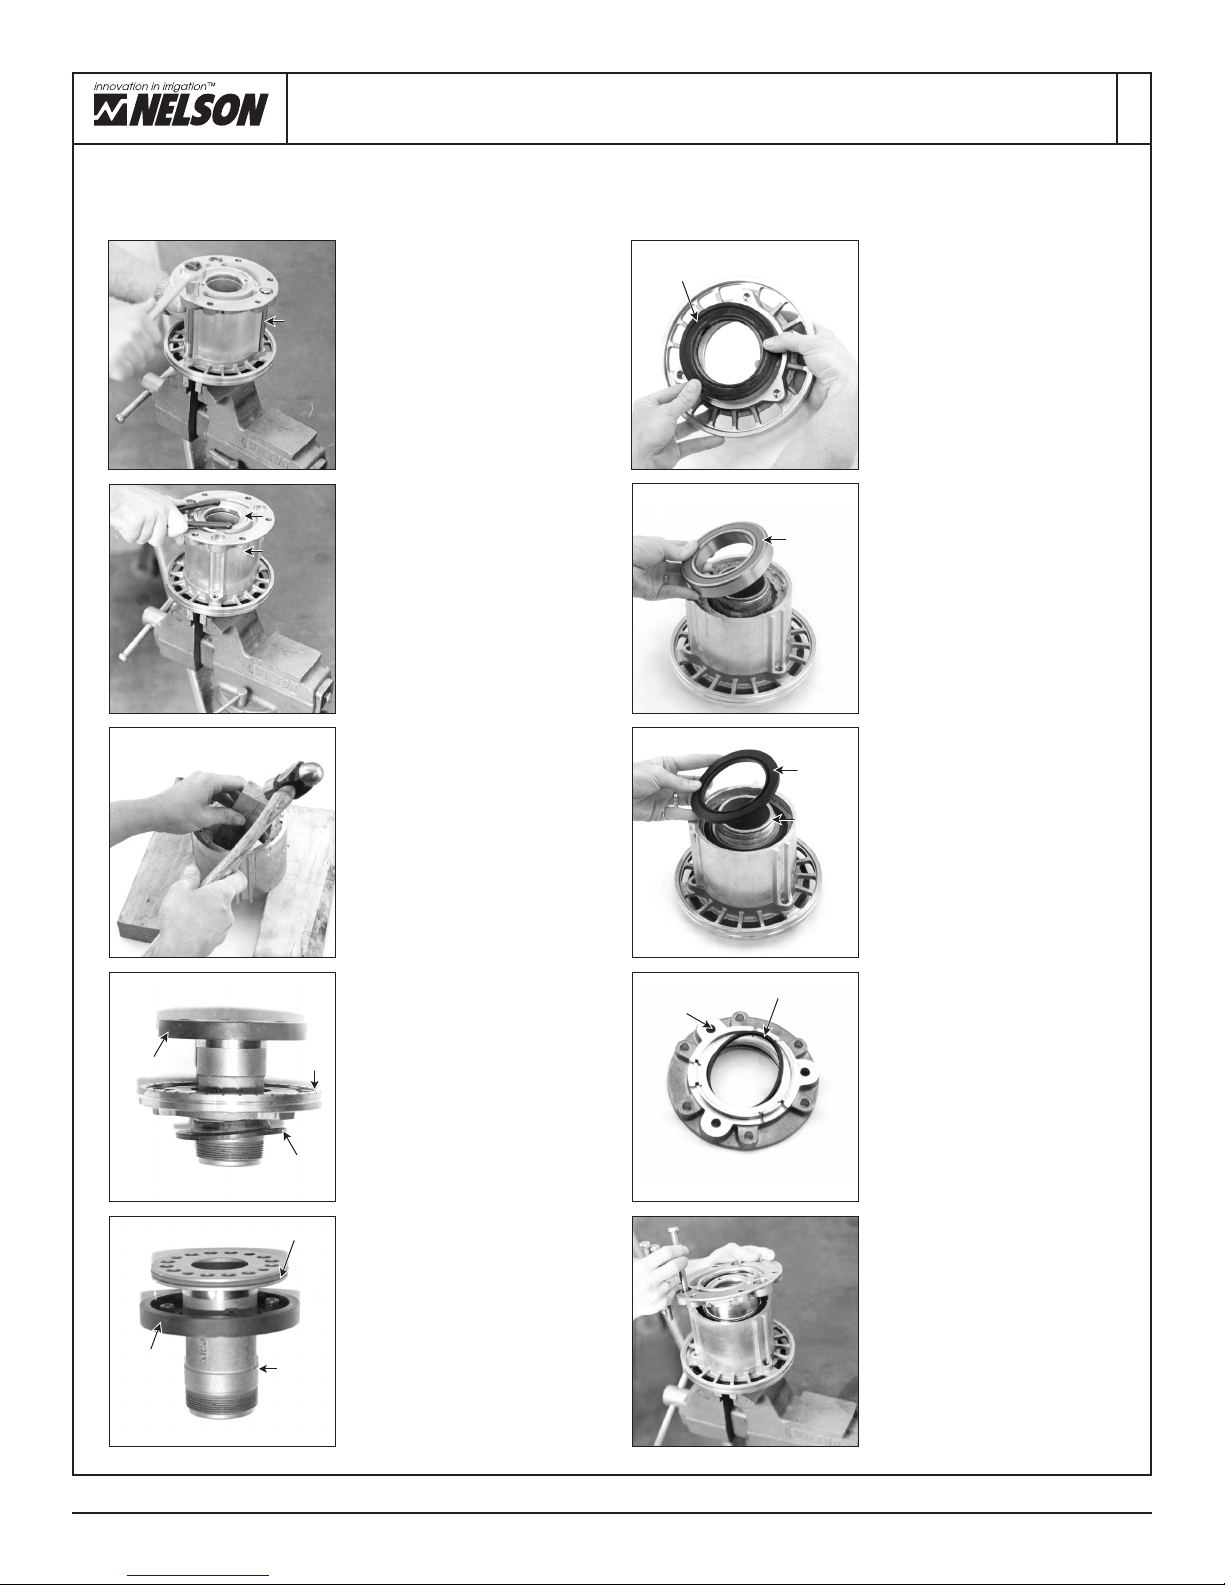
DISASSEMBLY REASSEMBLY
STEP 4
Inspect seal spacer and counter-
weight spacer for wear. If spacers
show excessive wear, replace both
spacers and #6600 Seals. To
remove seals, drive thin-bladed
screwdriver under lip of seal and
pry seal out. To replace seals, use
block of wood over seal making
sure lip is to the outside, and secure
by lightly tapping on wooden block
until seal lip is flush with hub.
STEP 5
Remove #10070-001 Cap
Assem-bly. Using external retaining
ring pliers, remove #8323-017
Retaining Ring. Pull Shift lever from
mount. A gear puller will help in
removing the lever.
STEP 9
Snap in two #10067-001 Arm
Cap Assemblies. Install two
#6565 Retaining Rings. Arm
must have free movement at this
point. If arm feels sticky, assure
that lip seals at counterweight and
right arm hub are not rubbing on
each other.
STEP 10
Mount trip lever assembly along
with spring guide onto their
respective pins. Install #8323-04
Retaining Ring. Install #8263 Cap
using two #8311 Screws making
sure #8265 gasket is in place.
Install #8409 Washer and #7814
Cotter Pin onto spring guide.
STEP 3
Using a thin-bladed screwdriver,
push #8327-001 Spacer back
into arm hub. Holding onto
counterweight, remove arm and
weight. Be careful not to damage
seals.
STEP 8
Holding counterweight in place on
the left side of shift lever, roll drive arm
into position shown by pushing on the
left arm bearing. Work #8327-001
Spacer into seal on counterweight.
Be sure spacer is correctly positioned
in counterweight to prevent cutting
of the seal lip. Push shaft through
the bearings and spacers and
assemble #6603 Nut. Torque to 25
ft. lbs. using two 11/16” sockets.
STEP 2 (Drive Arm)
Using internal retaining ring pliers,
remove two #6565 Retaining
Rings from both arm hubs. Remove
two #10067-001 Arm Caps. Using
two 11/16” sockets, loosen and
remove one #6603 Nut from left
side of arm. Holding the opposite
#6603 Nut, pull shaft free from hub.
STEP 7 (Drive Arm)
Lubricate #6600 Seal lips with
#9673 Silicone Grease. Install
#8327-001 Spacer flush with
#6600 Seal in left arm hub. Insert
#6607-001 (coated spacer) in right
arm hub and #6607 (uncoated
spacer) in left counterweight seal
(or a second #6607-001 coated
spacer). Start #8297 Shaft into right
arm hub.
STEP 1 (Trip Lever)
Remove #6714 Cotter Pin from
#8197 Pin. Remove two #8311
Screws and #8263 Cap. Using
small retaining ring pliers, remove
#8323-004 Retaining Ring. Pull
entire trip lever assembly and
spring guide from gun. At this time
inspect wear on #8282 Follower.
Replace if worn.
STEP 6 (Shift Lever)
At the upper portion of the gun,
inspect the mount shaft for wear.
Press the #8589 Shift Lever
assembly onto the mount. With
external retaining ring pliers,
snap the #8323-017 Retaining
Ring on. Be sure #8272 Cap
Gasket is in place and in good
condition. Replace #10070-001
Cap Assembly
Spring
Guide
#8197
#8282
#8323-004
#6600
Counterweight
#8323-017
Mount Shaft
#10070-001
#8589
Left Hub
Right Hub
#8327-001
#8465
#10067-001

Nelson Irrigation Corporation 848 Airport Rd. Walla Walla, WA 99362 USA Tel: 509.525.7660 Fax: 509.525.7907 E-mail: [email protected] Web site: www.nelsonirrigation.com
LOWER BEARING MAINTENANCE
DISASSEMBLY (LOWER UNIT) REASSEMBLY (LOWER UNIT)
STEP 14
Remove #8400 Cover from shaft.
Remove #8372 Seal from cover.
Remove #8371 brake ring and
#8473 dust seal from shaft.
Inspect all parts for wear and
replace as required.
STEP 15
Assemble #8473 Dust Seal onto
#8459 Shaft Assembly. Slide
#8371 Brake Ring onto shaft.
Locate the four studs of the brake
ring in the center holes between
the smaller threaded holes.
STEP 19
Assemble #8461 Gasket. Install
#8475-001 O-Ring in #8401
Flange and mount onto assembly
using three #8462 Bolts. Torque
bolts to 130-150 in. lbs.
SEE BACK PAGE FOR PARTS LIST
STEP 13
Remove the #8373 Seal. To remove
the two #6253 Bearings use a
hammer and three blocks of
wood. Lightly tap uniformly
around inner race of bearing until
removed. Bearings are removed
from opposite sides of the #8405
Housing.
STEP 18
Install #6548 O-Ring in #8402
Retainer and assemble retainer on
shaft. Using method described in
disassembly (Lower Unit) instruct-
ions Step 12, secure bearing shaft
from rotating. Torque on #10068
Retainer Assembly to 100-120 ft.
lbs. Assemble #8373 Lip Seal.
Orient with lip side out.
STEP 12
The #10068 Retainer Assembly
is removed by using a spanner
wrench with unit still bolted into
vise. NOTE: An extension handle
on the spanner wrench may be
needed to loosen the retainer.
Remove retainer and flange,
and slide #8405 Housing from
bearing shaft.
STEP 17
Assemble #8461 Gasket. Press
on #8405 Housing. Fully pack
housing with #6143 Lubricant.
Assemble #6253 Bearing into
housing.
STEP 11
After removing bearing from gun,
insert two 5/16-18” #8408 Bolts
into shaft top. Clamp bolt heads
into a vise securely. Remove three
#8462 Bolts (or #10153-001 for
ANSI/DIN).
STEP 16
Place #8372 Lip Seal into #8400
cover as shown with Nelson name
toward ball bearing. Pack #6253
Bearing with #6143 lubricant
or equivalent. (See “Notes on
Lubrication” on the front cover.)
Press bearing into #8400 Cover.
Slide cover assembly onto bearing
shaft. CAUTION: Do not get
grease on brake surface.
2/14
#8462
#10068
#8405
#8400
#8372
#8371
#8459
#8371
#8473
#8372
#6253
#8373
#8402
#8475-001
#8401
10069 Flange Assembly

Nelson Irrigation Corporation 848 Airport Rd. Walla Walla, WA 99362 USA Tel: 509.525.7660 Fax: 509.525.7907 E-mail: [email protected] Web site: www.nelsonirrigation.com
LOWER BEARING ASSEMBLY PARTS LIST
2/14
SEE SR150/SRA150 PARTS LISTS FOR DETAILS ON OTHER PARTS
NELSON/EURO
FLANGE
*Flange assembly includes 8475-001
8458 NELSON/EURO FLG. CONN.
This manual suits for next models
1
Other Nelson Industrial Electrical manuals
Popular Industrial Electrical manuals by other brands

Murata
Murata GRM216R71H392KA01 Series Reference sheet

Murata
Murata GQM1555C2D7R6WB01 Series Reference sheet

Murata
Murata GRM185R60J225KE26 Series Reference sheet

Murata
Murata GRM185R61E105MA12 Series Reference sheet

Murata
Murata GRM1885C1H6R8CA01 Series Reference sheet

Murata
Murata GJM0335C1E6R3CB01 Series Reference sheet

Murata
Murata GRM1555C2AR80BA01 Series Reference sheet

Fuji Electric
Fuji Electric DB C Series instruction manual

Murata
Murata GRM1555C1HR20WA01 Series Reference sheet

hager
hager univers N UK21LH0 Mounting instructions

M-system
M-system KF instruction manual

Murata
Murata GJM0335C1HR27WB01 Series Reference sheet