Nemco 6470 User manual


NEMCO FOOD EQUIPMENT 301 Meuse Argonne, Hicksville, OH 43526
1-800-782-6761 Toll Free 419-542-6690 Fax
www.nemcofoodequip.com 49206
2
NEMCO 3 SHELF HUMIDIFIED MERCHANDISER
MODEL NUMBER: 6470
OPERATING INSTRUCTIONS
IMPORTANT:
The use of distilled water in the water reservoir of the humidified unit is recommended to maintain the
life of electrical and mechanical components. Unit failure due to lime or mineral deposits is not
covered under warranty.
INTRODUCTION
1. Read These Operating Instructions thoroughly before installing or using this Equipment. Improper installation or use
can result in equipment or property damage, electric shock or personal injury.
2. The Nemco 3-Shelf Humidified Merchandiser is heavy duty and is designed for commercial use.
3. Only trained personnel should operate this equipment.
4. The Nemco 3-Shelf Humidified Merchandiser is designed to maintain the safe serving temperature of precooked food
items. It is not designed for cooking.
5. The Nemco 3-Shelf Humidified Merchandiser is designed with slow close front doors, DO NOT manually force the
doors close as this will dramatically reduce the life of the slow close door dampener.
SAFETY INSTRUCTIONS
1. IMPORTANT: Incoming power MUST be the same as the equipment’s rating. Refer to the Electrical Ratings listed
on the equipment’s Data Tag Located on the rear panel of the merchandiser.
2. CAUTION: This unit’s power cord is equipped with a GROUNDED, 3-prong power cord. Plug only into a matching,
grounded outlet. DO NOT cut or break off the third prong. Operating this equipment without proper grounding may
result in electric shock.
3. CAUTION: Always disconnect Power when not in use and before cleaning or servicing.
4. CAUTION: Do not operate with a damaged cord or plug or after the machine malfunctions, has been dropped or
damaged. Use authorized service for examination, electrical or mechanical adjustment or repair.
5. CAUTION: Position the merchandiser near a power outlet. DO NOT use an extension cord to plug into a power
outlet. Do not run cord under carpeting or cover with runners or the like. Arrange cord where it will not be tripped
over.
6. CAUTION: Equipment surfaces are HOT during use and a short time after disconnecting the power. Allow to cool
before moving or servicing.
7. WARNING: DO NOT immerse in water or other liquid. DO NOT clean with water jet. SEVERE personal injury or
death can result.
8. CAUTION: Replace fluorescent light bulb only with a shatter-resistant bulb to avoid contamination of food and/or
personal injury.
ELECTRICAL REQUIREMENTS
1. The electrical ratings are listed on the equipment’s Data Tag located on the rear panel of this merchandiser.
2. Plug the merchandiser into a certified electrical outlet a corresponding voltage rating as listed on the Data Tag.
3. This equipment must be properly GROUNDED.

NEMCO FOOD EQUIPMENT 301 Meuse Argonne, Hicksville, OH 43526
1-800-782-6761 Toll Free 419-542-6690 Fax
www.nemcofoodequip.com 49206
3
INSTALLATION INSTRUCTIONS
IMPORTANT: The 3 Shelf Humidified Merchandiser must be installed on a clean, flat surface capable of supporting
the merchandiser. The approximate weight of the merchandiser is 205 pounds when completely filled with water.
IMPORTANT: The 3 Shelf Humidified Merchandiser MUST BE used with 4” leg or sealed directly to countertop using
the supplied gasket and/or an NSF 51 listed silicone to countertop as required by local Health Department. The
merchandiser MUST BE sealed to the surface using an NSF 51 listed silicone if food product is being prepped on the
same surface as the merchandiser is installed onto.
IMPORTANT: When the merchandiser is turned on for the first time, allow the unit to run for approximately an hour to
allow the elements to burn off. If the unit is plugged into a GFCI, it may reset the GFCI during this time.
1. Remove all the packaging from the exterior of the merchandiser.
2. Set the merchandiser on a clean, flat surface capable of properly supporting the merchandiser weight. IMPORTANT:
Do not slide the merchandiser as it may damage the gasket.
3. Remove the fluorescent light bulb from the box and install into the top of the unit.
4. Remove the racks from the box and place into the unit as marked on the packaging. NOTE: The dip in the front of the
top two racks is to be located at the front of the merchandiser.
5. Install the drain tube kit onto the rear drain tube on the back of the merchandiser using a ¾” wrench. (Figure #1)
Note: All male threads will need thread tape applied to seal the connection.
6. Install the drain tube holder by removing the (2) Phillips head screws mounting the rear sign bracket in place above
the drain (Figure #2 –A). Place the drain tube holder between the rear sign bracket and the rear panel align the
holes in the tube holder and the sign bracket (Figure #2 –B). Re-install the (2) Phillips head screw back into the
original holes (Figure #2 –A).
7. Clean thoroughly using a mild detergent and warm water before first use.
8. Plug the merchandiser into a certified electrical outlet with a corresponding voltage rating as listed on the Data Tag
and turn the merchandiser on.
9. Fill the merchandiser with approximately 2-1/2 gallons (10 quarts) of water until the green fill light turns on.
10. Allow the merchandiser to preheat and run for approximately one hour to allow the elements to burn off prior to first use. NOTE: If the unit is
plugged into a GFCI outlet, it may reset the GFCI during this time.
11. If unit fails to work properly when first operated, call NEMCO customer service at 1-800-782-6761.
B
A
A
FIGURE #1
FIGURE #2

NEMCO FOOD EQUIPMENT 301 Meuse Argonne, Hicksville, OH 43526
1-800-782-6761 Toll Free 419-542-6690 Fax
www.nemcofoodequip.com 49206
4
OPERATION
WARNING: DURING NORMAL OPERATION, THE EXTERIOR OF THE UNIT IS HOT.
1. Plug the unit into the power supply.
2. Lower the control cover and turn the rocker switch on so that the merchandiser’s display board lights up and
fluorescent bulb is on.
3. Verify that the merchandiser is filled with water. If the Red low water light is flashing add water (up to 10 quarts) until
the green water full light is on. Note: It is normal during operation for neither the red low water light nor the green
water full to be on.
4. Allow the unit to preheat, for at least 30 minutes prior to adding preheated food product to the merchandiser. Once
the merchandiser has preheated, food product can be added as required.
5. To disconnect appliance, turn controls to off and remove plug from outlet.
ADJUSTING THE AIR TEMPERATURE / HUMIDITY
Note: The merchandiser comes programmed with the factory default setting of 165°F for the air temperature and 0.90
(90%) for the humidity power setting for optimal food quality.
1. With the merchandiser on, press and hold “SETTINGS” button until the current programmed air temperature is
displayed and the cabinet LED begins to blink.
2. Once the current programmed temperature is displayed, press the “UP” or “DOWN” arrow to adjust the air
temperature to the desired temperature. To advance to the next setting and save the new air temperature setting
press the “SETTINGS” button.
3. The next setting is the humidity setting and the water level LED will now begin to blink.
4. Press the “UP” or “DOWN” adjust the humidity power to the desired power setting.
5. Press the “SETTINGS” button once more to exit the settings menu and save the program.
CLEANING
IMPORTANT:
The use of distilled water in the water reservoir of the humidified unit is recommended to maintain the life of electrical and
mechanical components. Unit failure due to lime or mineral deposits is not covered under warranty.
NOTE: Proper maintenance plays an important part in the life span and functioning of the unit.
Exterior of the Merchandiser
1. Shut the merchandiser off at the rocker switch. Unplug the power cord.
2. Allow the unit to completely cool down.
3. Wipe down the merchandiser using a damp cloth or sponge and hot detergent water.
4. Rinse by wiping with a clean damp cloth.
5. Wipe dry.
6. Do not immerse in water or other liquids.
Removing the Water Tank Lime and Mineral Deposits
IMPORTANT: The water tank needs to be cleaned out on a regular basis to prevent hard water, lime, and mineral
build-up so that the merchandiser performs properly.
NOTE: The content of lime and minerals in the tap water will determine the schedule in which the water tanks will
need to be cleaned. Begin by cleaning the water tank on a weekly basis to determine proper schedule for cleaning.
1. Turn the unit off and unplug the power cord. Allow the merchandiser to completely cool down.

NEMCO FOOD EQUIPMENT 301 Meuse Argonne, Hicksville, OH 43526
1-800-782-6761 Toll Free 419-542-6690 Fax
www.nemcofoodequip.com 49206
5
2. Drain the water tank by opening the valve at the rear of the unit or at the end of the drain tube.
3. Close the drain valve and fill the water tank with a mixture of 75% water and 25% white vinegar. NOTE: Do not use
flavored vinegar.
4. Plug the merchandiser back into the outlet and turn the merchandiser back on.
5. Allow the unit to run for 30 minutes.
6. Turn off and unplug the merchandiser and allow it to completely cool.
7. Drain the water tank by opening the valve at the rear of the merchandiser or at the end of the drain tube.
8. Continue to fill and drain the merchandiser’s water tank with clean water until the deliming solution is rinsed out of the
water tank.
9. Plug the merchandiser back into the outlet and fill the reservoir with clean water for daily operation.
SERVICE INSTRUCTIONS, 6470 THREE SHELF HUMIDIFIED MERCHANDISER
If the unit fails to operate properly, call NEMCO customer service toll free at 1-800-782-6761.
Replacing the Front Door Dampeners
1. Begin by turning the merchandiser off, unplugging it from the receptacle, and letting it completely cool down.
2. Starting at the top front door. Remove the Shoulder Bolt from the left side of the door using a #2 Phillips Head
Screwdriver. With the Shoulder Bolt removed, pivot the door outward and remove the door from the dampener on
the right side. Place the shoulder bolt, washer, and door aside. Repeat for the process for the next (2) doors.
3. Replace the (3) dampeners by sliding them out of the mount and discard the old dampeners. Insert new
dampeners in place of the old dampeners.
4. Reverse the steps above to re-install the (3) doors starting with the bottom door.
Error Codes
1. Err1 –Communication error with temperature / humidity sensor.
a. Solution: Check the connection between sensor and the board to be sure the sensor it securely connected. If
the connection is secure and still displaying Err1, replace the sensor and / or board.
2. Err2 –Sensor temperature exceeding 185°F limit.
a. Solution: Check the setting on the board verify that they are correct. If the setting are correct, check the
power supply board and verify it is cycling.
3. Err3 –Temperature sensor data error.
a. Solution: Power down the merchandiser for 15 seconds and restart unit. If error re appears, replace sensor.
4. Err4 –Humidity sensor data error.
a. Solution: Power down the merchandiser for 15 seconds and restart unit. If error re appears, replace sensor.
5. Err5 –Checksum Error.
a. Solution: With the unit on, press and hold the settings button for 5 seconds to reset the unit’s settings. Cycle
through all the settings to reset program parameters.

NEMCO FOOD EQUIPMENT 301 Meuse Argonne, Hicksville, OH 43526
1-800-782-6761 Toll Free 419-542-6690 Fax
www.nemcofoodequip.com 49206
7
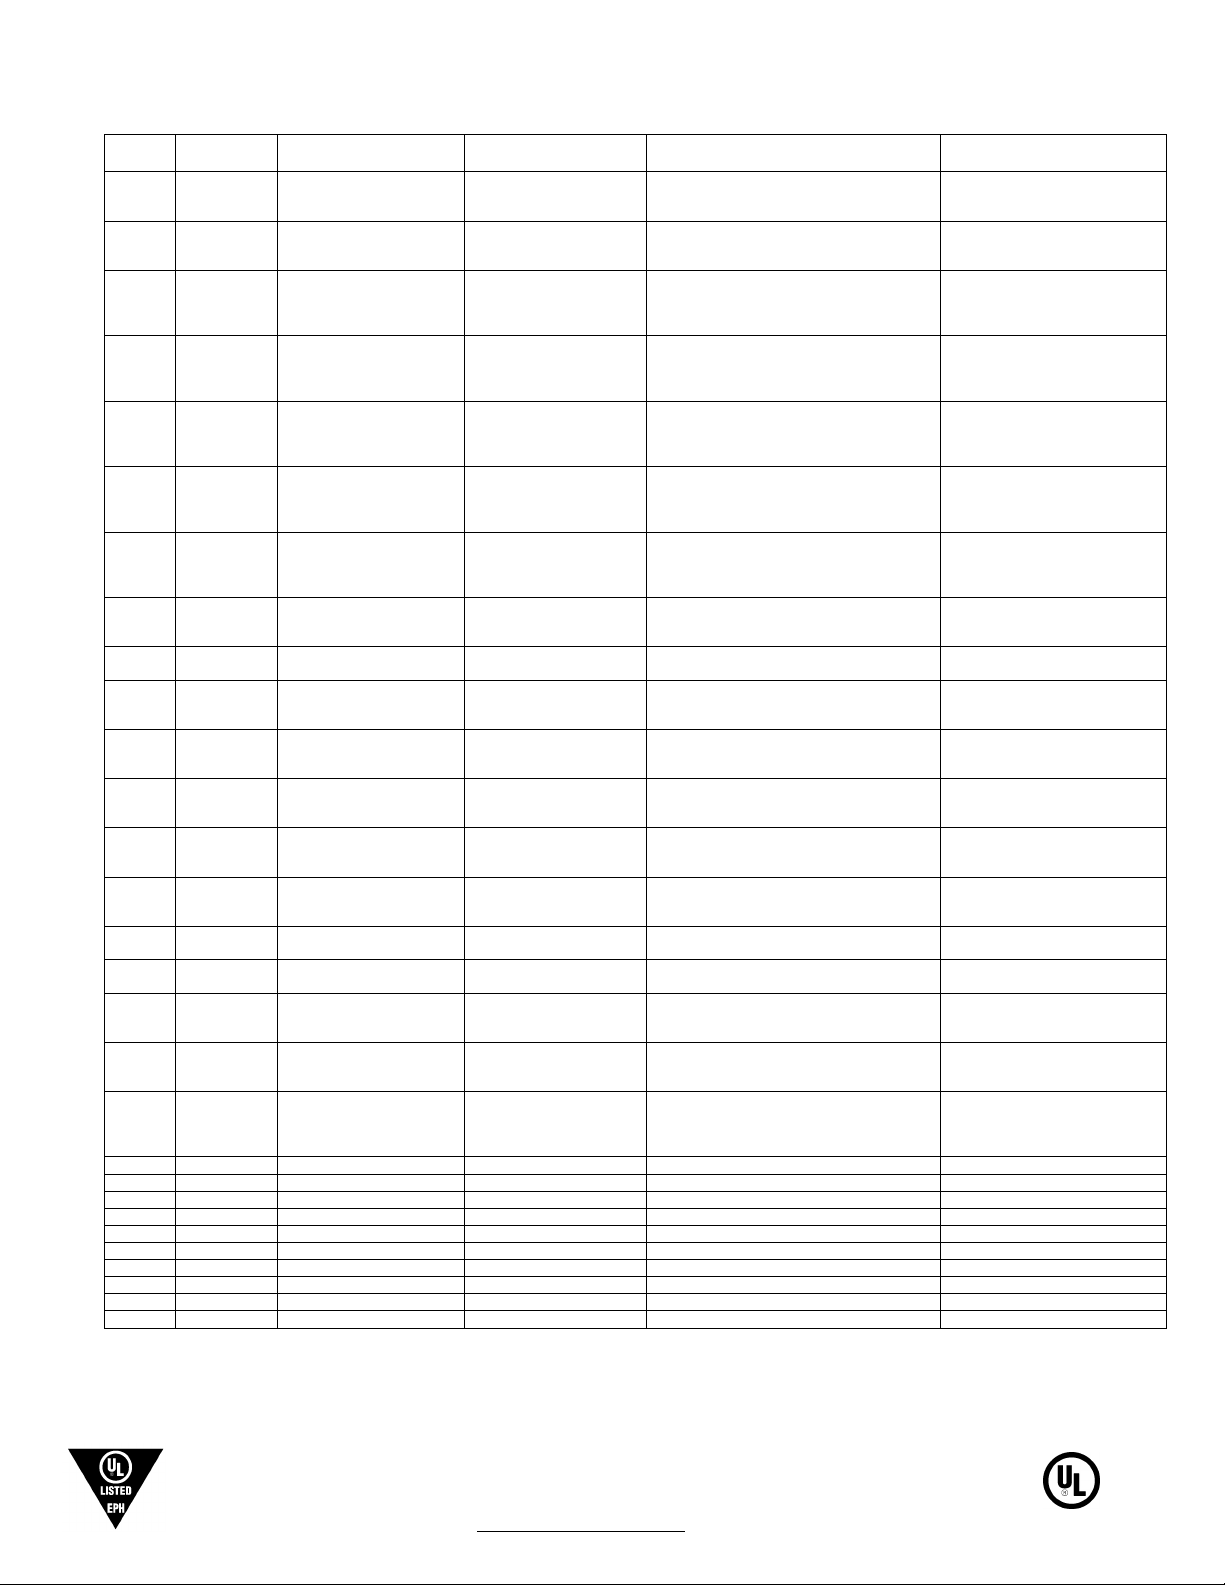
Item #
Nemco
P/N
Description
(Location)
Component
Rating
How to
Check
Special
Notes
1
47420
Rocker Switch
(Control Panel)
15A, 125vac
Check for continuity between the upper and
lower terminals on both sides
independently.
Install with the terminals to the
bottom of the unit.
2
48708
Element, Top
(Upper Deck)
500W, 120VAC
Check for continuity terminal to terminal.
Resistance should be approximately 28
ohms.
3
48709
Element, Side
(Right Upright)
750W, 120VAC
Check for continuity terminal to terminal.
Resistance should be approximately 19
ohms.
4
48710
Element, Water Tank
(Water Tank Housing
Assembly)
400W, 120VAC
Check for continuity terminal to terminal.
Resistance should be approximately 36
ohms.
5
47207-1
Foil Heater
(Bottom Deck)
20W, 120VAC
Check for continuity terminal to terminal.
Resistance should be approximately 720
ohms.
6
47370-1
Ballast
0.5A, 120VAC
Check for voltage between the red and blue
wire on the ballast.
Install with the line and neutral
wires to the front of the unit.
Keep the red and blue wires
from the ballast away the relay.
7
48705
Flash Relay
(Bottom Deck)
1A, 115VAC
Empty the water tans.
Verify continuity in the liquid level switch.
Check voltage across terminals #1 & #4
Install with the terminal facing
the center of the unit.
Keep the red and blue wires
from the ballast away the relay.
8
48707-1
Fan, Dampener
0.185A, 115VAC
Verify air flow.
Install with the air flowing up into
the upright.
Do not over tighten.
9
48706
Fan, Top Assembly
(Bottom Deck)
12W, 115VAC
Verify air flow.
Installed with the air flowing
down into the cabinet.
10
47397-1
Fan, Water Tank
(Water Tank Housing
Assembly)
0.18A, 115VAC
Verify air flow.
Install with the air flowing across
the water tank.
11
48703
Control Board
(Control Panel)
N/A
Verify the control board is properly
controlling the setting by adjusting the
setting.
12
48704
Sensor, RH / Temp
(Left Upright)
N/A
Control board will display “Err1”
Check connection between
sensor and board prior to
replacing when display “Err1”
13
80482
Power Supply
(Bottom Deck)
120VAC
Check for voltage on both the rear and front
output with the control board calling for
heat.
Install with the terminal to the
center of the unit.
14
47876-1
Liquid Level Switch
(Water Tank Housing
Assembly)
0.08A, 120VAC
Check for continuity terminal to terminal
with the switch both opened and closed.
Do not over tighten the float
switch as it will damage it.
NS
47876-3
Liquid Level Switch (3
Pack)
15
48711
Fluorescent Bulb
(Upper Deck)
14W
Verify voltage from ballast in socket.
Only replace with shatter
resistant bulb.
16
45380-1
Indicator Light, Red
(Control Panel / Rear
Panel)
1/2W, 120VAC
Empty water tank. If it does not illuminate,
check Flash Relay and bottom Liquid Level
Switch.
17
45380-2
Indicator Light, Green
(Control Panel / Rear
Panel)
1/2W, VAC
Fill water tank. If it does not illuminate,
check the top Liquid Level Switch
18
48317-B
Silicone Tubing, ¾”ID
Fill Tank to Secondary Tank –
17”
Secondary Tank to Main Tank –
11”
19
48319-B
Silicone Tubing, 5/16”ID
60”
20
48323
Elbow, 3/8” to 3/8”
Connected directly to main tank.
21
48320
Barbed Fitting, Male
Connected to drain valve.
22
48321
Barbed Fitting, Female
Connect to 48323 Elbow
23
48322
Hose Clamp, Drain
Located on drain tube.
24
48764
Hose Clamp
Located in inside unit.
25
48310
Drain Valve
Located on drain tube.
26
48765
Front Door Dampener
Located on Front Doors.
NS
69426
Bottom Panel Kit
NS
69425
Water Tank Guard
Component Parts List

Table of contents
Other Nemco Merchandiser manuals


Popular Merchandiser manuals by other brands

frost-trol
frost-trol EYRE PM0000143343ND20 Installation and maintenance manual

Silver King
Silver King SKCTMDI Technical manual and replacement parts list

Hatco
Hatco FLAV-R-FRESH FDW-1 Installation & operating manual

BKI
BKI HSS Series Service manual

Hussmann
Hussmann IMPACT M1CIMP-4B datasheet

Hoshizaki
Hoshizaki RM-10 instruction manual


