Neostar NRHD-D331IR User manual

HD-SDI CAMERA
MANUAL
www.balter.de
NRHD-D331IR NRHD-2101IR NR-D21IR

www.balter.de
1.Notes.......................................................................................2
2. Product Introduction................................................................3
3.ProductStructure.....................................................................4
4. Technical Parameters...............................................................5
5. OSD Menu Instruction..............................................................6
7. Product Installation...............................................................12
Appendix: FAQ...........................................................................13
1

HD-SDI CAMERA MANUAL NRHD-D331IR / NRHD-2101IR / NRHD-D21IR
www.balter.de
Read this manual carefully before use
A. To reduce the risk of electric shock, do not open the machine and maintain by yourself,
please consult a professional service person.
B. To prevent re or shock hazard, use the power after safety certication, the input voltage,
current, voltage polarity and operating temperature must meet the requirements of
this camera.
C. Please note the operating temperature and environmental requirements of the camera,
avoid too low or too high temperature. General operating temperature range of -30°C
~ +60°C. Avoid flooding and rain, minimize dust and moisture erosion, otherwise
camera would be damaged.
D. Cameras in use should avoid direct sunlight, glare, otherwise the sensor will be
damaged. .
E. Do not touch the sensor surface, if any foreign objects exits, a cotton swab or lens
paper can be used to wipe, if it is difcult to remove, a neutral detergent diluted with
water would be useful. Do not use corrosive solution.
F. In order to make the camera work smoothly and obtain a satisfactory image, the
power cord and video connection can not be too long, otherwise the increase of line
loss will lead to the inadequate magnitude of the operating voltage of the camera or
video signal Inadequate.
G. In order to prevent the camera from falling, please do not place the camera on an
unstable bracket, base or other unstable objects. Otherwise it will lead to injury, at the
same time, the camera will be damaged.
H. The camera can not be placed near the radiator or heating resistor.
2

HD-SDI CAMERA MANUAL NRHD-D331IR / NRHD-2101IR / NRHD-D21IR
www.balter.de
This series of HD-SDI cameras is the cutting-edge model among video surveillance
system. Advanced circuit design is used; it has characteristics of high quality image, low
noise and etc, which is good for monitoring systems and image processing systems.
More features are: High resolution 1080p, sharp images, vivid color, stable and reliable
performance etc. Followings are the main features:
▪ 1/2.8’’ 2MP Exmor CMOS sensor
▪ Full HD Resolution:1080p 30fps / 720p 60fps
▪ Wide Dynamic Range 100dB
▪ Night View distance of 25m (NRHD-D21IR / NRHD-2101IR)
▪ Night View distance of 35m (NRHD-D331IR)
▪ Supports 2D/3D DNR to provide ne image
▪ Supports 8X digital zoom
▪ Auto defog to improve image quality
▪Supports privacy mask and motion detection
▪Smart IR control
▪ Supports HD-SDI / CVBS output
▪ 12V DC
3
HD-SDI CAMERA MANUAL NRHD-D331IR / NRHD-2101IR / NRHD-D21IR
www.balter.de
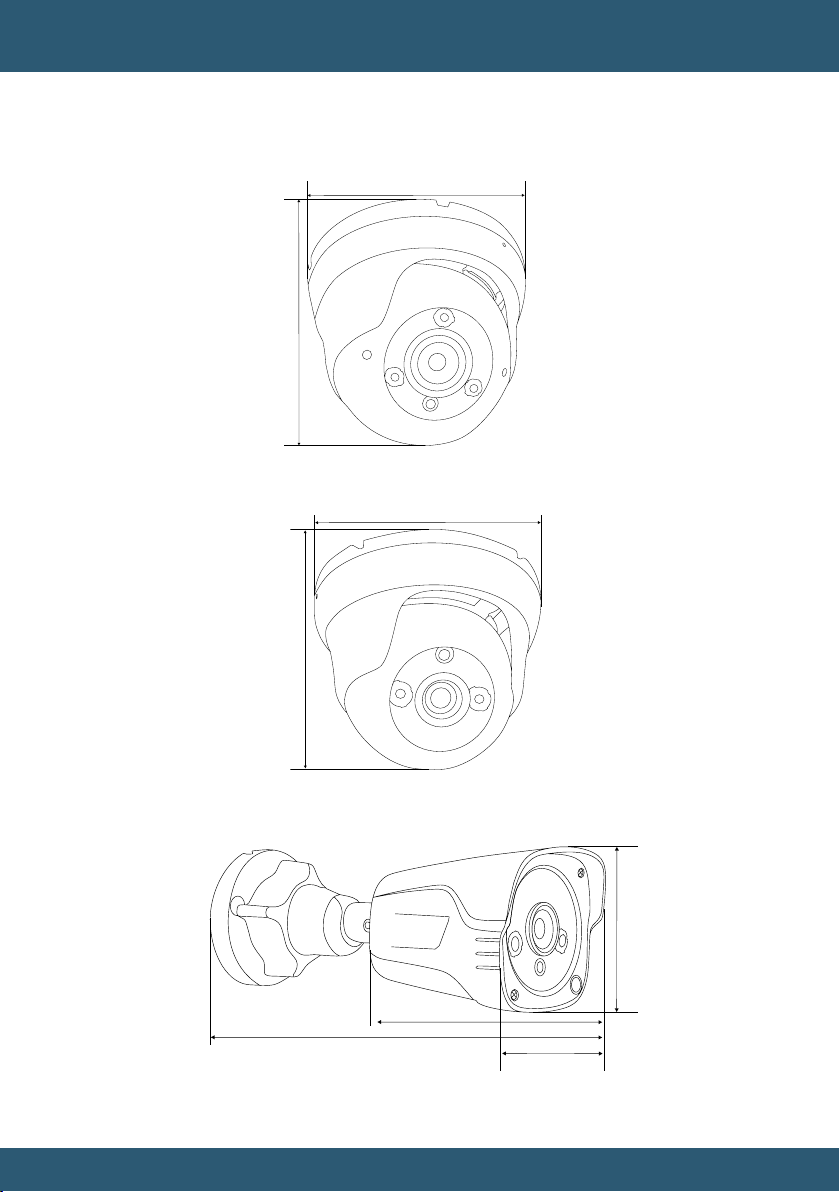
The followings are the dimensions of some products. No further notice for the
upgraded version.
120 mm
112 mm
NRHD-D331IR
85 mm
93.5 mm
NRHD-D21IR
69 mm
176 mm
89 mm
70 mm
NRHD-2101IR
4

HD-SDI CAMERA MANUAL NRHD-D331IR / NRHD-2101IR / NRHD-D21IR
www.balter.de
Image Sensor 1/2.8’’ 2MP Exmor CMOS
Image
Resolution HD-SDI: 1080p/30fps; 720p/60fps CVBS: 700TVL
Effective Pixels 1920 (H) × 1080 (V)
Scanning System Progressive Scan
Video Output HD-SDI: HD-SDI(1080P, 720P);
CVBS:1.0Vp-p/75Ω (BNC)
Min. Illumination 0.1Lux/F1.2 (0Lux IR ON)
Function
Day&Night EXTERN / COLOR / B&W / AUTO
SMART-IR LEVEL OFF / LEVEL 1 to 20
White Balance AUTO / AUTOext / HOLD / MANUAL
DNR OFF / LOW / MIDDLE / HIGH
Backlight OFF / HLC / BLC
Wide Dynamic Range OFF / LOW / MIDDLE / HIGH
ACE OFF / LOW / MIDDLE / HIGH
Defog OFF / ON
ZOOM IN 1.0X~8.0X
PRIVACY MASK ON / OFF (16Zones)
MOTION DET ON / OFF (4Zones)
DEFECT DET SUPPORT
FOCUS ADJ OFF / ON
HD-SDI Transmission up to 140m (RG59) / 200m (RG6)
Power Supply 12V DC
Operating temperature -30°С~+60°С
Operating humidity <90%RH (Non-condensation)
5

HD-SDI CAMERA MANUAL NRHD-D331IR / NRHD-2101IR / NRHD-D21IR
www.balter.de
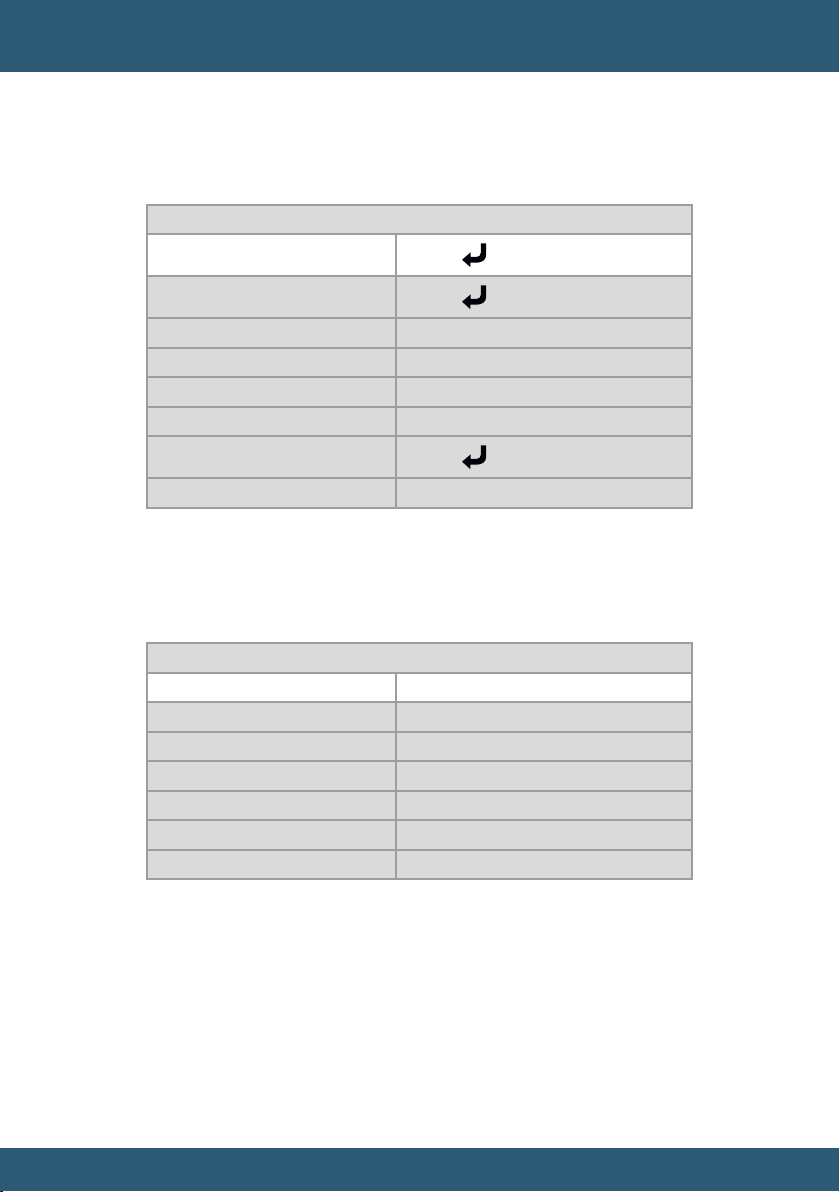
Click the “MENU” key and enter the main menu selection, click the “UP” and “DOWN”
key to select the menu, click “LEFT” and “RIGHT” to select or set the function, click
“MENU” key and enter the sub-menu. Select “RETURN” and save the setting after
nishing setting. Main menu options are as below:
THE CAMERA SETTINGS MENU
MENU
LENS ELC
EXPOSURE
WHITE BAL AUTO
BACKLIGHT OFF
DNR MIDDLE
DAY & NIGHT
IMAGE
SPECIAL
RESET ON
EXIT
▪EXPOSURE Settings
Click “MENU” and enter the sub-menu, click “UP” and “DOWN” for menu selection,
click “LEFT” and “RIGHT” for function selection or setting.
EXPOSURE
BRIGHTNESS 10 (0-20)
SHUTTER AUTO
SENS-UP OFF
AGC 20 (0-20)
RETURN
6

HD-SDI CAMERA MANUAL NRHD-D331IR / NRHD-2101IR / NRHD-D21IR
www.balter.de
▪Day & Night Settings
Click “MENU” and enter the sub-menu, click “UP” and “DOWN” for menu selection,
click “LEFT” and “RIGHT” for function selection or setting.
DAY & NIGHT
BRIGHTNESS AUTO
D→N LEVEL 5 (0-20)
N←D LEVEL 15 (0-20)
IR LED OFF
SMART-IR-L VL ---(0-20)
RETURN
▪IMAGE Settings Click
“MENU” and enter the sub-menu, click “UP” and “DOWN” for menu selection, click
“LEFT” and “RIGHT” for function selection or setting.
IMAGE
SHARPNESS 5 (0-20)
COLOR GAIN 10 (0-20)
FREEZE OFF
FLIP OFF
D-ZOOM 1X(1X-8X)
ACE OFF
GAMMA 0,55
DEFOG OFF
RETURN
7
HD-SDI CAMERA MANUAL NRHD-D331IR / NRHD-2101IR / NRHD-D21IR
www.balter.de
▪SPECIAL Settings
Click “MENU” and enter the sub-menu, click “UP” and “DOWN” for menu selection,
click “ LEFT” and “RIGHT” for function selection or setting
SPECIAL
SYSTEM
COMM ADJ
LANGUAGE ENG
ZOOM DIS OFF
PRIVACY OFF
SHADING OFF
ADJUST
RETURN
▪SPECIAL - SYSTEM Settings
Click “MENU” and enter the sub-menu, click “ UP” and “DOWN” for menu selection,
click “ LEFT” and “RIGHT” for function selection or setting.
SYSTEM
OUTPUT MODE 1080P
COLOR SPACE HD-CbCr
FRAME RATE 30 FPS
CVBS NTSC
BLACK LEVEL FULL
VERSION V0.0.1
RETURN
8

HD-SDI CAMERA MANUAL NRHD-D331IR / NRHD-2101IR / NRHD-D21IR
www.balter.de
▪SPECIAL - COMM ADJ Settings
Click “MENU” and enter the sub-menu, click “UP” and “DOWN” for menu selection,
click “ LEFT” and “RIGHT” for function selection or setting.
COMM ADJ
CAM ID 1(0~255)
BAUDRATE 9600
RETURN
▪SPECIAL – PRIVACY settings
Click “MENU” and enter the sub-menu, click “UP” and “DOWN” for menu selection,
click “ LEFT” and “RIGHT” for function selection or setting.
SYSTEM
ZONE NUM 0 (0-15)
ZONE DISP ON
H-POS 12 (0-60)
V-POS 2 (0-40)
H-SIZE 3 (0-40)
V-SIZE 3 (0-40)
Y LEVEL 10 (0-20)
CR LEVEL 10 (0-20)
CB LEVEL 10 (0-20)
RETURN
▪SPECIAL – MOTION Settings
Click “MENU” and enter the sub-menu, click “UP” and “DOWN” for menu selection,
click “LEFT” and “RIGHT” for function selection or setting.
9

HD-SDI CAMERA MANUAL NRHD-D331IR / NRHD-2101IR / NRHD-D21IR
www.balter.de
MOTION
SENSITIVITY 0 (0-20)
WINDOW TONE 0 (0-6)
WINDOW USE 0 (0-3)
WINDOW ZONE OFF
DET H-POS 0 (0-60)
DET V-POS 0 (0-40)
DET H-SIZE 28 (0-60)
DET V-SIZE 15 (0-24)
ALARM OFF
RETURN
▪SPECIAL – PRIVACY settings
Click “MENU” and enter the sub-menu, click “UP” and “DOWN” for menu selection,
click “LEFT” and “RIGHT” for function selection or setting.
SHADING
WEIGHT 100%
RETURN
▪SPECIAL – MOTION Settings
Click “MENU” and enter the sub-menu, click “UP” and “DOWN” for menu selection,
click “LEFT” and “RIGHT” for function selection or setting.
ADJUST
FOCUS ADJ OFF
DEFECT DET
SHADING DET ON
COLORBAR OFF
RETURN
10

HD-SDI CAMERA MANUAL NRHD-D331IR / NRHD-2101IR / NRHD-D21IR
www.balter.de
Table 2 Interface Specication
No. Description
1Analog output BNC connector (yellow)
2Power connector (red)
3HD SDI connector (green)
11

HD-SDI CAMERA MANUAL NRHD-D331IR / NRHD-2101IR / NRHD-D21IR
www.balter.de
7.1 Note
1. Make sure the unit is powered off before installation.
2. Check power supply voltage consistent with the electric voltage to prevent
voltage unworthy, resulting in damage to the device.
3. Do not use in the environment beyond the boundaries of the temperature, and
maintain good ventilation to prevent the rain in order to reduce the risk of re or
electric shock.
4. The installation and maintenance of this product should be professional, please
do not in any way to remove or modify the equipment; can only use the required
accessories of manufacturers. Problems caused by unauthorized repair are at
your own risk.
7.2 Installation Tools and Information
Prepare the required engineering data and instructions. Before installation please
prepare the following tools and instrumentation:
A straight or a Phillips-head screwdriver, multi-meter, scissors, needle nose
pliers, tape measure, pencil and so on.
7.3 Installation Method
1. Check the equipment whether it is damaged.
2. Mounting bracket or base.
▪If the cement wall, install the expansion screws (expansion screw holes need
stand or base hole), and then mount bracket or base.
▪If the wooden wall, use self-tapping screws to mount.
3. Mounting the camera
a. Dome Camera
Adjust the lens position and make it aim at the monitoring points and present
a clear picture, manually x lens location and adjust the hemisphere cover. Re-
examine the screen whether the character meets the requirement. Tighten the
hemisphere cover.
b. Box Camera
Adjust the body so that the lens aims at the monitoring points and presents a
clear picture. Tighten the screws, to ensure that it does not move.
be kind.
Note: The wall needs to bear at least 3X weight of bracket (base) and camera.
12

HD-SDI CAMERA MANUAL NRHD-D331IR / NRHD-2101IR / NRHD-D21IR
Q: No picture with power on
A: It may result from abnormal power supply. Please check if the power supply
voltage and its polarity are correct. Besides, please conrm if wires connection
and monitors are normal.
Q: Unclear image output
A: It is caused by incomplete adjustment of the lens back focus. Loose the xed
screw of the lens until it turns clear. If not, please check if the lens is in good
condition, or the lens surface and sensor surface exits foreign objects. If exits, it
can be wiped by degreasing cotton swab or lens paper.
Q: Horizontal interference fringes on image
A: This phenomenon is generally caused by too strong hum bar of power supply,
which needs to be ltered out. It may also be related to the used monitor or
peripheral devices.
Q: Constantly change of the ground color of image
A: This phenomenon is caused by color scrolling, which is mainly due to alternating
electromagnetic eld of fluorescent lamp, and the inherent phenomenon of
camera. It can be weakened with two methods: one is to reduce the usage
of fluorescent lamp. The other is to enlarge the distance with the camera. To
overcome it thoroughly, please select LL synchronization camera.
www.balter.de
13
Balter Security GmbH
Elisabeth-Selbert-Str. 19
40764 Langenfeld
Webseite: www.balter.de
Email: support@balter.de

www.balter.de
This manual suits for next models
2
Table of contents
Other Neostar Security Camera manuals


Popular Security Camera manuals by other brands


Youngkook
Youngkook YK-EP2014-EX Series user manual

D-Link
D-Link SECURICAM DCS-7110 Quick installation guide

Ubiquiti
Ubiquiti airCam MINI quick start guide

Ikegami
Ikegami ICD-505 Specifications

Hanwha Vision
Hanwha Vision PNV-A6081R-E1T quick guide

Panasonic
Panasonic WV-CL920A Series operating instructions