Neptune Suffolk User manual

Contents
1
2
3
4
5
6
7
Suolk Kitchen Concept
Cabinet Installation
Osetting
Levelling
Attachment
Skirting
Larders
Section
2
2
5
6
7
7
8
Page
Welcome to your Suolk Kitchen Instructions & Fitting Guide.
Please read through the whole tting guide thoroughly prior to tting.
This guide is designed to help you plan and t your Suolk Kitchen easily and accurately.
Suolk Kitchen Cabinets are often very heavy. For your own Safety please do not attempt to lift them by yourself.
8
9
10
11
12
13
14
Appliance Cabinets
Lighting
Drawer Removal and Adjustment
Handles
Re painting
Care & Maintenance
Contact Information
Section
9
10
10
11
12
12
12
Page
Welcome
Suolk Kitchen Instructions & Fitting Guide
By Neptune
Tools needed
lLong Spirit levels lTape measure lMitre saw lGeneral hand tools lWood adhesive lPin gun
www.neptune.com
1

2
1. Suolk Kitchen Concept
The Suolk Kitchen is designed to combine the benets of a modular kitchen with the look and feel of an individually sized and
crafted bespoke kitchen. The concept allows individual cabinets to be precisely levelled and joined giving a straightforward
installation. The skirting and cornice detailing allows a seamless built-in look to be achieved.
1. Before you begin the oor surface should be fully nished. This is the most reliable way of achieving a good t.
2. Level cabinets & set height to 890mm from the oor at the lowest point in the room. (see Levelling, page 6)
3. The front face of the cabinet should be 600mm from the wall in most installations. (There is a void behind cabinets to
allow for services and 560 - 600mm tting.) This distance may change depending on pipework or the worktop depth
that will be tted. A good method of doing this is to mark a line where the front face of the cabinets should be, and
then working to that Datum.
600mm
600mm
4. Decide on whether any cabinets will be oset. (see Osetting, page 5)
5. Join neighbouring cabinets together using the supplied ttings. (see Attachment, page 7)
6. Attach cabinets to wall using the supplied brackets and suitable wall xings. (see Diagram 2)
7. Fit Base End Panels at the end of run where the carcase can be seen. (see Base Panels, page 4)
2. Cabinet Installation
Base Cabinets
www.neptune.com
Diagram 1.
Diagram 2.

8. Cut Skirting Board to length and attach to the cabinets at regular intervals. For uneven oors it may be necessary to scribe
the skirting board.
9. Mitre join skirting boards on corners.
3
www.neptune.com
1. Wall cabinets are designed to be screwed directly to the wall using a suitable xing for your type of wall. To position
the cabinets on the wall a batten should rst be tted to the wall, 2060mm from the oor for the cabinets to hang on.
The nal height of the wall cabinets without cornice should be 2160mm if you would like the cornice height to match
full height cabinets.
2. A second batten 1420mm from the oor may be used with or instead of the top batten. This is to allow greater tting
exibility.
3. Individually hang each cabinet on the batten.
4. Attach the cabinet to the wall by screwing the back panel through the top and bottom recess.
5. Attach neighbouring cabinets to each other using suitable woodscrews through the side panel at the top and bottom
recess.
Wall Cabinets
Diagram 4.
2160
2060
1420
Diagram 3.

www.neptune.com
The Base End Panel should be attached to cabinets at the end of a run where the carcass can be seen. The panel should be cut
to length (and width if necessary), positioned behind the frame of the cabinet and pinned, glued or screwed in place.
End Panel
1. Position, level and attach in the same way as base cabinets.
2. The front face of the cabinet can be placed 600-700mm from the wall depending on your worktop and kitchen design.
3. The cornice should be attached to the cabinets in the same way as for wall cabinets.
Full Height Cabinets
700
Diagram 5.
2160
Diagram 6.
4

www.neptune.com
1. Cornice should be tted to all wall cabinets and full height cabinets.
2. Sections should be joined using an equal mitre joint.
3. The cornice can be glued or screwed to the cabinet. The cabinet must be pre-driled before screwing the cornice, to
prevent the carcass wood splitting.
4. The cornice mitre joints should be xed with wood glue. Care should be taken to remove any excess adhesive.
Cornice
Diagram 7.
5
To make a feature of a particular kitchen cabinet it can be stepped out within a run. This is one of the unique features of a
Suolk Kitchen and allows for an individual kitchen design. This is often done with Sink cabinets but can be done using any
base cabinet.
To o-set a cabinet simply bring it forward and bring the adjoining cabinets to the walls of the o-set cabinet. This will mean
that the o-set cabinet is 25mm further from the wall, and the gap between cabinets is 12mm less.
12
25mm
3. Osetting
Diagram 8.
5

www.neptune.com
6
4. Levelling
It is very important to ensure that all cabinets are level and true. Time spent levelling is critical to a successful kitchen t.
All base cabinets are supplied with height adjustable feet that can be used in two ways;
1. Using the supplied Allen key the adjustable feet can be turned from within the cabinet. (Drawers & hardware may need
to be removed for some cabinets, see section 10 for drawer removal) Turning the Allen Key socket clockwise will
extend the foot. (see Diagram 9)
2. The feet can also be adjusted directly by hand from the exterior of the cabinet. This is easiest if the cabinet is on its side
or back. (see Diagram 10)
The Process;
1. Place the cabinet as near to its nal location as possible.
2. Raise the entire cabinet & set height to 890mm from the oor at the lowest point in the room.
3. Continue to raise and lower each foot until the cabinet is completely level. This will need to be checked with a spirit
level as shown in diagram 9.
4. You may nd that you have to go back and forth between legs several times.
5. Levelling each cabinet fully is key to ensuring doors and drawers open and close freely throughout the life of the
kitchen.
Diagram 9. Diagram 10.
Diagram 11.

www.neptune.com
5. Attachment
Hardware is supplied to attach cabinets to each other. This enables the cabinet to be accurately and securely positioned
allowing the join to be expanded or contracted. The front bolt is usually used to tighten the gap between cabinets. The rear
bolt and the Spacing Block is usually used to ensure that the cabinets are parallel and that the front faces are straight.
6. Skirting Board
Skirting should be used at the end of all kitchen runs where there is a return to wall, unless a ush nish is required. (shown on
page 7). Optional Skirting board can also be used on longer lengths depending on the desired look of the kitchen.
Where skirting board joins together at a 90° corner, they should be cut at 45° each, as shown below. It’s far too easy to cut the
corners the wrong way around, so sketch out how you plan to t the skirting board, and measure the lengths that are needed
rst.
Spacing Block
Diagram 12.
90°
45°
Diagram 13.
7

8
8. Appliances
The Suolk kitchen is fully framed and so the cavities have been carefully designed to t appliances precisely, without any
adjustment in most cases. For this reason Neptune recommends Ne, Bosch, & Siemens appliances.
7. Larders
All Suolk larders are supplied with a space to allow for a worktop to be installed inside the cabinet. This is set at the same
height as the rest of your worktop to give a great seamless look throughout the kitchen. Your worktop supplier will be able to
t this.
www.neptune.com
8

9
www.neptune.com
This cabinet is designed to hold appliances in 3 dierent congurations:
1. 600 Single Oven & 450 Compact appliance (including coee machine)
above.
2. Single warming drawer & Double oven above.
3. 600 Single Oven & Microwave above.
In order to use the same cabinet for dierent congurations the shelves are
interchangeable.
An extra baton is attached to one of the shelves. This is to allow for a slightly
dierent sized appliance. The extra baton can be planed to the correct size if
required giving an adjustment of + 10 or - 20mm from the standard aperture
height.
1050 Full Height Appliance Cabinet
This cabinet is designed to hold appliances in 2 dierent congurations:
1. 600 Single Oven.
2. Single warming drawer & 450 Compact appliance.
An extra baton is attached to the top shelf. This is to allow for a slightly
dierent sized appliance. The extra baton can be planed to the correct size if
required giving an adjustment of + 10 or - 20mm from the standard aperture
height.
600 Full Height Appliance Cabinet
We recommend that under-counter appliances(washing machine, dishwasher, fridges, freezers) are tted mid-run in
accordance with manufacturer’s instructions. Fitting at the end of a run is possible, but will require some extra support which
will need to be constructed by the kitchen tter. Often an Island foot is used at the end of a kitchen run next to an appliance to
increase stability. Speak to your Neptune kitchen designer for advice on possible options.
Under-counter appliances
1. 2.
1. 2.
Diagram 14.
Diagram 15.
3.
9
10
www.neptune.com
9. Lighting
Glazed wall cabinets are supplied with tted downlights. The lights supplied are 12V MR11 down lights. When replacing bulbs
the rating should not exceed 35W. Connect the Suolk lighting to a dimmable switched circuit for the best result.
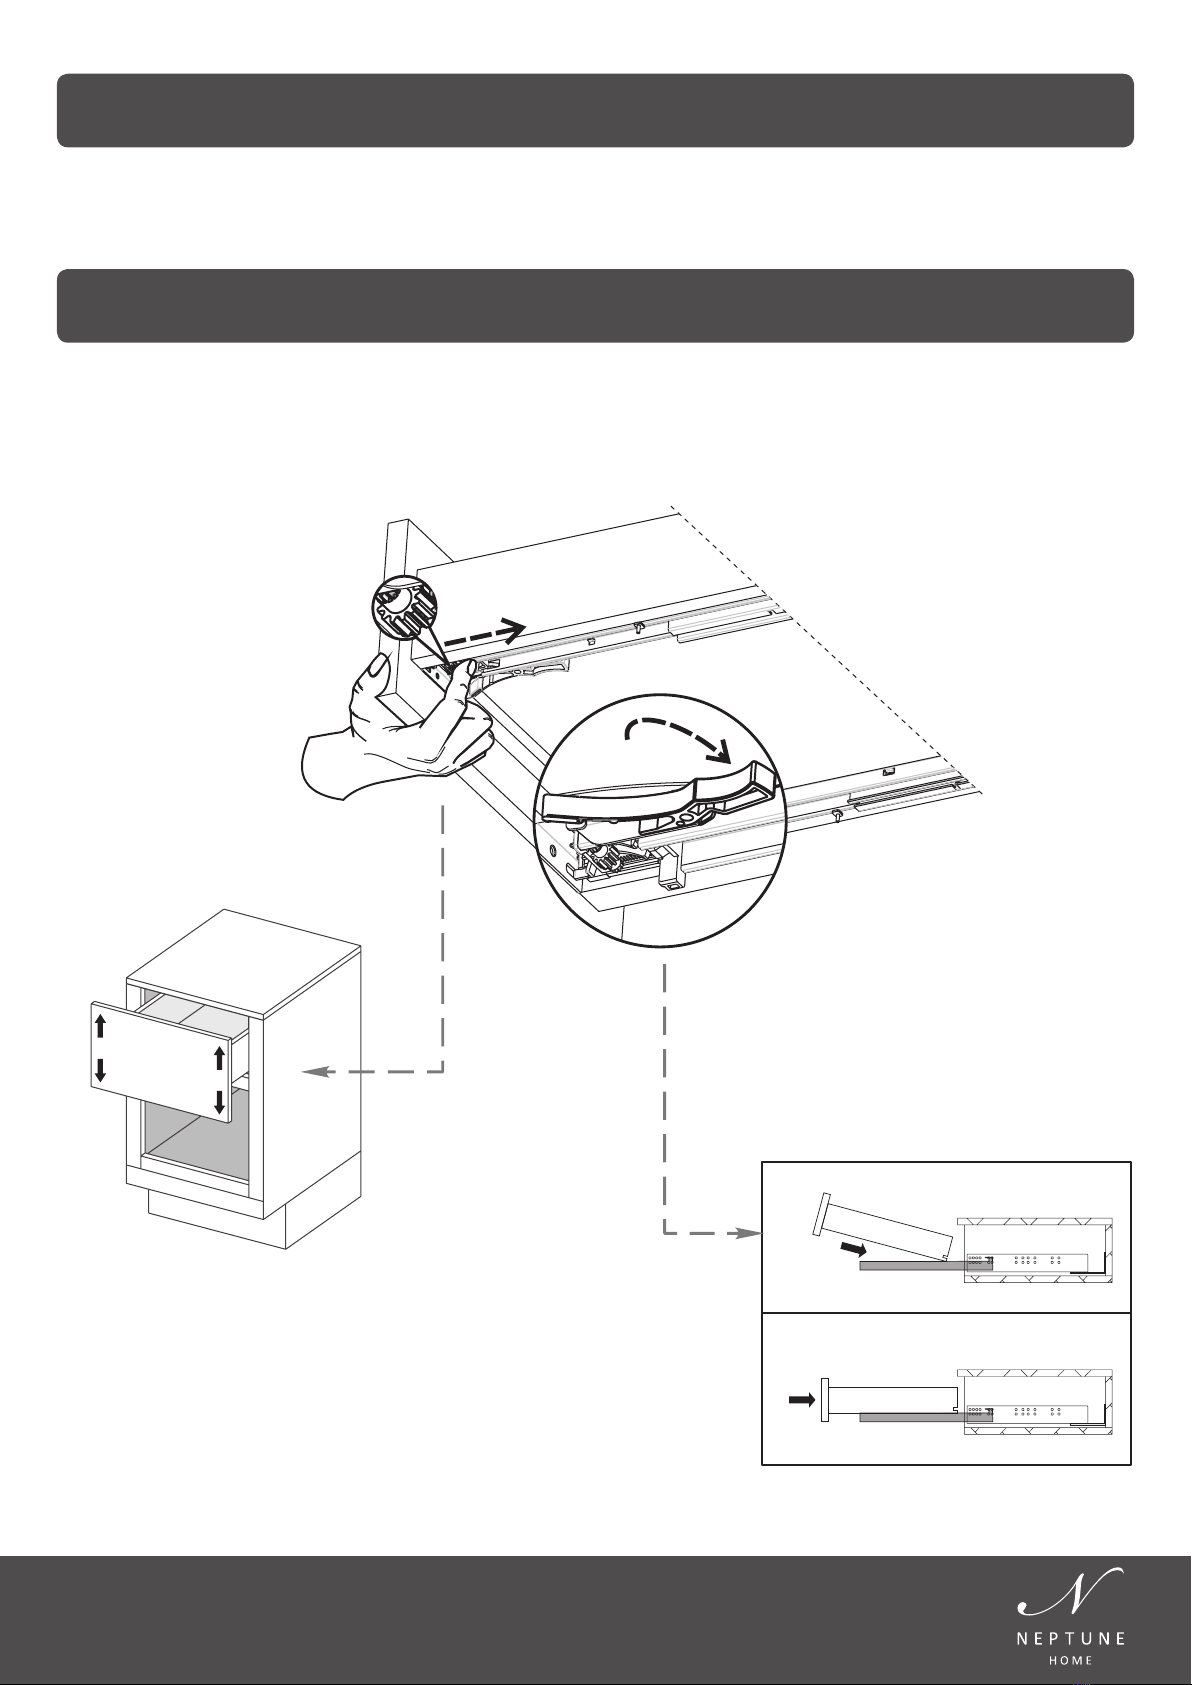
10. Drawer Removal & Adjustment
Suolk Kitchen drawers are supplied with double extension soft close Kingslide drawer runners that support up to 30Kgs.
These runners enable the removal of the drawer box via quick release red toggles found on the underside of each drawer at
the front corner. The drawer box can also be adjusted in height to ensure perfect running and correct gap between carcass and
drawer front.
Step. 1
Step. 2
Drawer Installation
Roll
Height Adjustment
Roll the gear to lift up the
drawer front.
Drawer removal
Open the drawer.
Press the red handles of the
locking devices underneath.
Place the drawer on the slides and close the drawer.
Then the locking devices will click and engage with
the slides automatically. Open the drawer completely,
check if the locking devices have engaged.
10

www.neptune.com
11
11. Handles
Fitting the handles is a key step in nishing the look of a Neptune cabinet. It is very important that they are tted correctly as it
is very hard to correct poor positioning. Below are recommendations for positioning handles for the classic look.
Single handle drawers
Neptune recommends handles to be placed in the vertical and horizontal centre of solid fronted drawers.
Handle Positioning
Handles should be tted after the kitchen cabinets have been installed. The rst drawer handle position should be measured
and tted as above. Subsequent drawer handles should be tted relative to the rst drawer. The vertical position of the
handles should be made using a spirit level or measured depending on the particular layout of handles.
When drilling the drawer front for the handle screw, care should be taken to use a suitable drill bit and speed so the wood is
not damaged at the back of the hole. For a perfect result hold a piece of sacricial wood onto the back of the drawer front
while drilling to avoid breakout.
Handle Fitting
Doors
Neptune recommends that the handle is placed in the
vertical centre of doors, and in the centre of the frame.
Double handle drawers
Two handles should be vertically positioned in
the centre of the drawer panel and following the
quarter, half, quarter horizontal rule.
Suolk cabinets are tted with Neptune Chrome door hinges. A matching Suolk handle has also been designed in the same
nish to complement the Suolk range colour.
Diagram 16.
Diagram 17.
Diagram 18.
Diagram 19.

If you have any questions regarding the tting of your kitchen please feel free to contact us.
Neptune Blagrove, Swindon, Wiltshire SN5 8YG
t : 01793 427 300
f : 01793 427 399
e : info@neptune.com
w : www.neptune.com
Painted Cabinets
Your Suolk painted furniture is manufactured from a combination of solid Bass wood and Birch veneered ply. This gives
the cabinets great strength and stability. Over time the cabinets moisture content will adjust to suit the ambient humidity of
the room they are placed in. This means that the cabinet may move with some minor hairline cracking as it stabilises in this
environment. This will not aect the structure of your furniture in any way.
The cabinets are hand painted with 3 coats of water based eggshell paint. The hand painting process is used to give the natural
feel of the brush strokes in the surface of the paint. This water based paint is manufactured using organic pigments, which give
a very natural deep colour. These natural paint batches can vary slightly in tone from one batch to the next. For over-painting
any WATER BASED eggshell paint may be used.
All Suolk furniture is designed to last the test of time, and give years of enjoyable use. However in extreme household
environments where hairline cracks have appeared on some joints due to very low humidity, it can occasionally be necessary to
over-paint after 6 months to ensure a long term perfect nish.
13. Care and Maintenance
12
www.neptune.com
12. Re-Painting
Please note that it is necessary to remove the cabinet doors and all hardware before you begin painting.
In order to get a perfect nish to your kitchen, we recommend a nal topcoat to the outside of your kitchen. This is easily
achieved and should take 1 to 2 days depending on the size of your kitchen or your choice of paint colour.
Even if you choose to retain our wonderful Dove Grey nish it is likely that you will need a nal topcoat. This may be because
during nal tting some bespoke panels are included or during the tting process detailed scribing is required. It is also
possible that the production of your cabinets has come from separate batches and therefore the nal nish may be from
dierent colour batches. These minor variations are unnoticeable on freestanding items, but may not be perfect on your tted
kitchen. All that is needed is a light rubdown on the outsides of the cabinets only followed by a light topcoat.
14. Contact Information
Table of contents
Popular Indoor Furnishing manuals by other brands

Regency
Regency LWMS3015 Assembly instructions

Furniture of America
Furniture of America CM7751C Assembly instructions

Safavieh Furniture
Safavieh Furniture Estella CNS5731 manual

PLACES OF STYLE
PLACES OF STYLE Ovalfuss Assembly instruction

Trasman
Trasman 1138 Bo1 Assembly manual

Costway
Costway JV10856 manual


