Nesco CR-1000 Series User manual
Coffee Bean Roaster
NEVER LEAVE ROASTER UNATTENDED WHILE IN OPERATION!
Use/Care Guide
Model CR-1000 Series

2 www.nesco.com
CONGRATULATIONS!
Congratulations on the purchase of your new NESCO® Coffee Bean Roaster!
Please spen a few minutes reviewing this booklet. By oing so, you will learn
how to get the most out of your NESCO® Coffee Bean Roaster. Enjoy your
roasting with our compliments.
TABLE OF CONTENTS:
IMPORTANT SAFEGUARDS . . . . . . . . . . . . . . . . . . . . . . . 3
SAVE THESE INSTRUCTIONS . . . . . . . . . . . . . . . . . . . . 3
WELCOME TO COFFEE BEAN ROASTING . . . . . . . . 4
GET TO KNOW YOUR COFFEE BEAN ROASTER . . 5
CONTROL PANEL . . . . . . . . . . . . . . . . . . . . . . . . . . . . . . . . . . 6
BEFORE YOU BEGIN . . . . . . . . . . . . . . . . . . . .. . . . . . . . . . . . 7
ROASTING INSTRUCTIONS . . . . . . . . . . . . . . . . . . . . . . . 7- 0
CARING FOR YOUR ROASTER . . . . . . . . . . . . . . . . . . . . 0-
HANDLING/STORAGE OF ROASTED COFFEE . . . - 2
TROUBLESHOOTING . . . . . . . . . . . . . . . . . . . . . . . . . . . . . 2- 4
WARRANTY . . . . . . . . . . . . . . . . . . . . . . . . . . . . . . . . . . . . . . . . 5
NESCO® is a registere tra emark of The Metal Ware Corporation.
The Metal Ware Corporation
1700 Monroe St., P.O. Box 237
Two Rivers, WI 54241-0237
Phone: (800) 288-4545
FAX: (920) 794-3164
Visit our website at http://www.nes o. om
2007 ©The Metal Ware Corporation
Printe in U.S.A.
U
L
R
USC
LISTED

3CR-1000 Series Coffee Bean Roaster
IMPORTANT SAFEGUARDS
When using electrical appliances, basic safety precautions shoul always be
followe inclu ing the following:
READ ALL INSTRUCTIONS.
Do not touch hot surfaces.
Do not place on or near hot electric or gas burners, or in a heate oven.
To protect against electric hazar s, o not immerse cor , plug, or base of this appliance in water
or other liqui .
This appliance shoul not be use by chil ren. Close supervision is necessary when any
appliance is use near chil ren.
Unplug unit when not in use an before cleaning. Allow to cool before putting on or removing
parts.
Do not operate any appliance with amage cor or plug, or after appliance malfunctions, or has
been amage in any manner. Return the appliance to the nearest authorize service facility for
examination, repair or a justment.
Do not let the cor hang over the e ge of a table or touch hot surfaces.
Do not leave the appliance unatten e while in use.
Do not remove bottom cover. There are no serviceable parts insi e. Only authorize service
personnel shoul attempt repair.
Do not move the appliance while it is running.
Do not use out oors.
Do not use the appliance for other than inten e use.
This appliance is for househol use only, esigne to process normal househol quantities. It is
not suitable for continuous operation.
Only roast green coffee beans or coffee beans that have gone through a ecaffeinate process.
Do not set hot roasting vessel on a wet or col surface.
Do not remove top cover while appliance is in operation.
Throw away roasting vessel if glass becomes cracke or broken.
Prior to starting appliance, make sure all seals, Chaff Cup an Cover are in place an seate
correctly.
Use plastic han le when han ling the roasting vessel.
Do not operate appliance without the roasting vessel in place an seate .
The use of an accessory not evaluate for use with this appliance or sol by the manufacturer
may cause injuries, fi re or electric shock.
Do not clean plastic parts with abrasive cleaning materials.
SAVE THESE INSTRUCTIONS
THIS APPLIANCE IS INTENDED FOR HOUSEHOLD USE ONLY
Short Cord Instru tions
CAUTION: A short power supply cor is provi e to re uce the risk resulting from becoming
entangle in or tripping over a long cor . Longer extension cor s are available an may be use if care
is exercise in their use. If an extension cor is use , the marke electrical rating shoul be at least as
great as the electrical rating of the appliance, an the cor shoul be arrange so that it will not rape
over the counter top or tabletop where it can be pulle on by chil ren or trippe over unintentionally.
Polarized Plug
This appliance has a polarize plug (one bla e is wi er than the other). To re uce the risk of electric
shock, this plug is inten e to fi t into a polarize outlet only one way. If the plug oes not fi t fully
into the outlet, reverse the plug. If it still oes not fi t, contact a qualifi e electrician. Do not attempt
to mo ify the plug in any way.
1.
2.
3.
4.
5.
6.
7.
8.
9.
10.
11.
12.
13.
14.
15.
16.
17.
18.
19.
20.
21.
22.
23.

4 www.nesco.com
Wel ome to the
World of Home Coffee Bean Roasting!
Congratulations on your purchase of a new NESCO® Professional Coffee Bean
Roaster! You will be able to create the greatest tasting cup of coffee in the worl
at a fraction of the price you’ pay in a gourmet coffee shop.
WARNING
NEVER LEAVE ROASTER UNATTENDED WHILE IN OPERATION.
With the NESCO® name, you can be assure of a quality appliance, an we’ll
provi e tips an suggestions on how to roast your own coffee beans to perfection
in your own home. We provi e easy to un erstan instructions on how to roast
an store your coffee beans, all in the comfort of your own home kitchen. Un-
like many other coffee bean roasters, your NESCO®Professional Coffee Bean
Roaster is one of the quietest machines on the market to ay, an features a
unique Catalytic Converter an ceramic fi lter system that re uces the o or an
smoke associate with coffee roasters.
Roasting coffee beans at home allows you to roast coffee beans exactly as
you like them... light or ark, an with your own special blen of beans if you
choose. YOU have complete control of the freshness an fl avor of your cup of
coffee.
Five Reasons to Roast Your Own Coffee Beans:
Freshness - If you use store-bought coffee, chances are it will be stale by the
time you brew it. Imagine what it’s like to rink a cup of coffee ma e with
beans roaste a few minutes ago, not weeks ago.
Flavor - You’ll be able to select a number of istinct fl avors an aromas from
genuine fresh coffee.
Fun - NESCO® makes roasting coffee beans fun an convenient – as easy as
popping a bowl of popcorn.
Creative - Roasting at home allows you to create your own special blen s.
Create your own favorite ‘signature’ blen of coffee beans.
Savings - Home roasting can save you up to 50% on every poun of gourmet
coffee you rink.
With your NESCO® Professional Coffee Bean Roaster, you’ve taken the fi rst
step towar s a truly fresh cup of coffee. Get rea y to enjoy the best cup of
coffee you ever taste !
5CR-1000 Series Coffee Bean Roaster
Get to Know Your NESCO®
Professional Coffee Bean Roaster
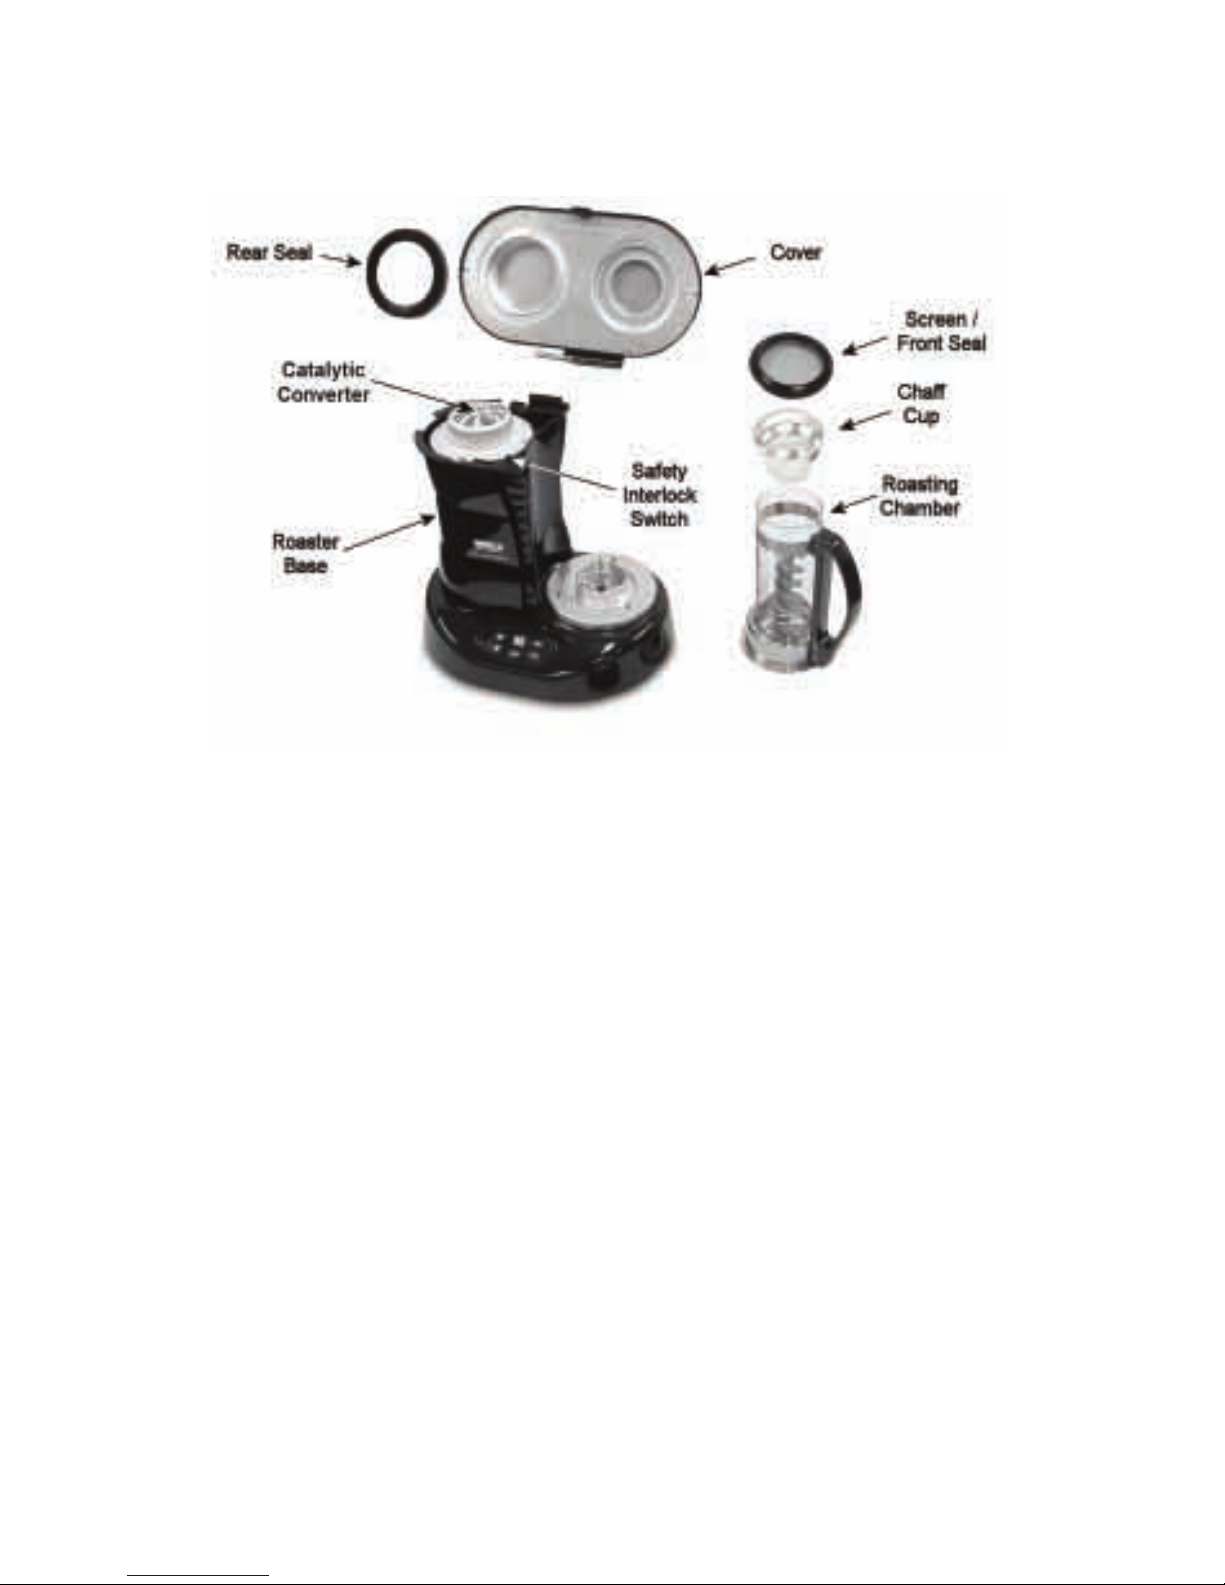
Fig. 1
Roaster Base contains the control panel, heating elements, Catalytic Converter
an mounting base for roasting chamber. A two-spee fan irects the heate air
through the green coffee beans in the ‘roast’ cycle an blows cool air through the
roaste beans, uring the ‘cooling’ cycle, to stop the roasting process.
Roaster Chamber hol s up to 5 oz. of green coffee beans an features a unique
auger rive mechanism that mixes the coffee beans so they roast evenly.
Chaff Cup collects the ‘fl uffy’ chaff generate when roasting coffee beans.
S reen / Front Seal: The stainless steel Screen fi ts insi e the Front Seal an
prevents fi ne chaff particles from entering the Catalytic Converter. The Front
Seal keeps smoke an o or insi e the machine.
Rear Seal prevents smoke an o or from leaking out at the Catalytic Converter.
Cover irects the smoke an o or from the Roasting Chamber to the Catalytic
Converter where it is virtually eliminate . It is conveniently hinge to the
Roaster Base an activates the Safety Cutoff Switch when the Cover is latche .
Safety Cutoff Swit h allows the roaster to operate only when the Cover is
properly latche . It will turn the roaster off if the Cover is acci entally opene
uring a roast cycle.
A patente Catalyti Converter removes the smoke an most of the o or
associate with roasting coffee. No other home coffee roaster has this feature.

6 www.nesco.com
Control Panel
Your NESCO® Professional Coffee Bean Roaster features an easy to use Control
Panel that inclu es fi ve large keypa s, large igital isplay an two in icator
lights.
Fig. 2
NOTE: The screen must be cleane between EVERY use to ensure proper an
safe operation of your roaster (see Caring For Your Roaster).
CAUTION: Failure to lean the fi lter s reen or operating the applian e
without proper installation of the fi lter s reen may ause your roaster to
malfun tion. Roaster issues aused by leaving out the s reen will NOT be
overed by the warranty.
IMPORTANT: Make sure the Chaff Cup is inserte in the glass cylin er of
Roasting Chamber before the Front Seal / Screen is installe . Remember, all
metal surfaces become EXTREMELY HOT uring the roasting process an
shoul never be han le or touche uring or irectly following a roasting cycle.

7CR-1000 Series Coffee Bean Roaster
Before You Begin
Before using your NESCO® Professional Coffee Bean Roaster the fi rst time:
Unpack your new coffee bean roaster completely. Remove all packing
materials an make sure all parts are inclu e . (Fig 1).
Wash Cover, Chaff Cup an Roasting Chamber in hot soapy water to
eliminate any resi ue from the packing that will affect the fl avor of your
fi rst roast. Rinse in clean water an ry thoroughly. All removable parts
are ishwasher safe.CAUTION: NEVER IMMERSE THE ROASTER
BASE IN WATER OR ANY OTHER LIQUID, AND NEVER PLACE
IT IN A DISHWASHER.
Make sure all parts are completely ry before reassembling your roaster.
NOTE: Set Cover on en to allow excess water to rain.
Select your favorite green coffee beans an get rea y to roast your fi rst
batch!
Operating Instru tions
Place Roasting Chamber on Drive Shaft an lower it onto heat shiel .
Align the Gui e Slots with Locator Pins, an Roasting Chamber will rop
into position on Heat Shiel (Fig. 3).
Fill Roasting Chamber up to either “FILL LINE” or “DARK ROAST”
line with your choice of green coffee beans. NOTE: Do not over fi ll the
Roasting Chamber, as this could damage the roaster.
Insert Chaff Cup into top of Roasting Chamber.
Sli e the Screen / Front Seal on top of Roaster Chamber an Chaff Cup,
making sure the ribbe -en of seal fi ts over en of the glass cylin er.
1.
2.
3.
4.
1.
2.
3.
4.
8 www.nesco.com
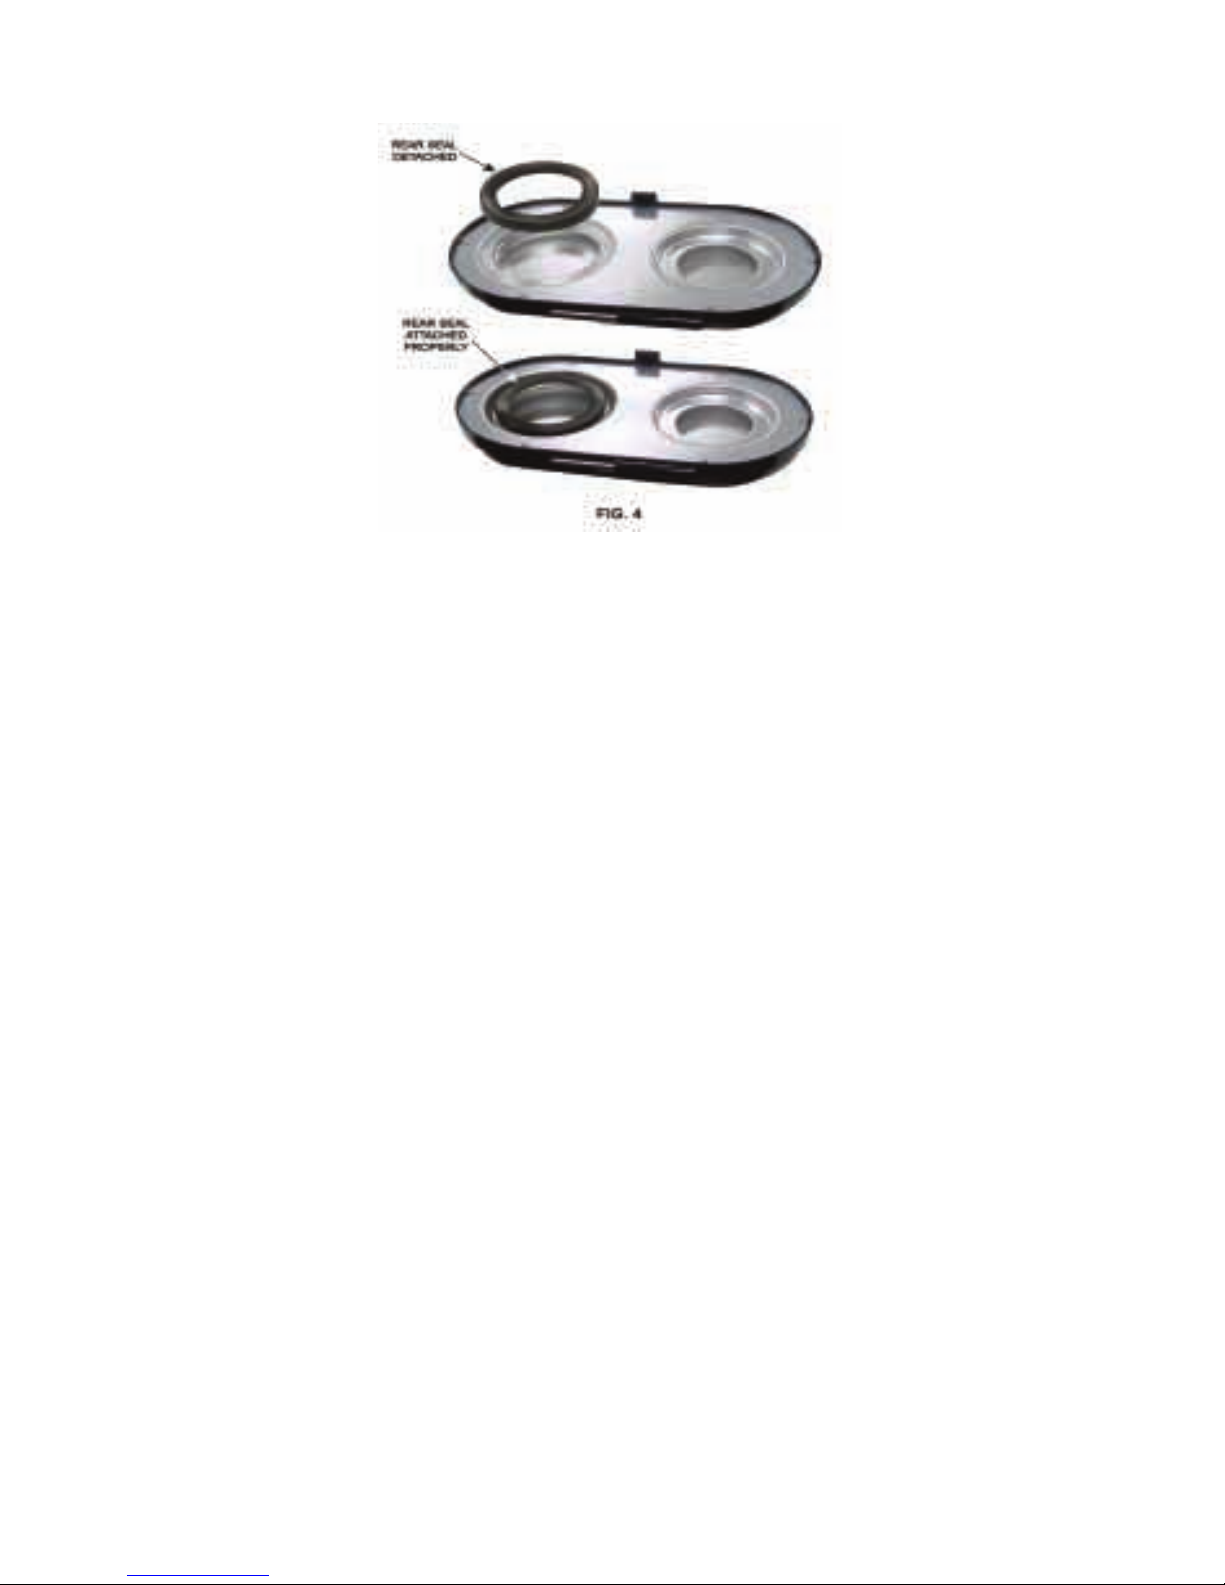
Make sure Rear Seal fi ts securely over metal rim of larger opening in Cover
(Fig. 4).
Align the metal hinge pin of Cover with the matching hole in the Roaster
Bo y an sli e together until the pin is fully seate .
Gently press Cover own until it latches in place. NOTE: If the cover is
not securely latche , the Safety Cutoff Switch will not allow the roaster to
operate.
Plug roaster into a stan ar 120-volt outlet. The isplay will show 20
minutes the fi rst time your roaster is use . This is a efault setting an
will pro uce a ‘light’ roast. We on’t recommen roasting less than 20
minutes. We suggest a roast time of 25 minutes minimum as a starting point.
Experiment with roasting times an have fun!
A just roast time using the “UP” arrow (on Control Panel) to a minutes
or “DOWN” arrow to subtract minutes from the roast cycle. The longer
roast time, the arker the roaste beans will be.
Note: The maximum roast time is 30 minutes. However, during a roasting cycle, you may add
u to 5 additional roasting minutes by ressing the UP Arrow while the red light is ‘on’ and the
remaining roast time is between 6 and 24 minutes. The roaster will not allow you to add more
than 5 minutes to a roast cycle, so the maximum allowable roasting time is 35 minutes. Once
the 5-minute ‘cooling’ cycle has started and the green light turns ‘on’, you can no longer add
more roasting time.
Press the RECALL button to isplay the previous ‘roast time’ use when
the START button was presse . Your roaster stores this number even if the
roaster is unplugge between roast cycles. This feature helps you roast
coffee beans more consistently.
NOTE: The RECALL button will not remember additional minutes added
after the START button is ressed.
5.
6.
7.
8.
9.
10.

9CR-1000 Series Coffee Bean Roaster
After you select the time for the roasting cycle, press the START button.
The auger will begin to turn the coffee beans an the fan will start.
The re light will glow, in icating the heating element is turne ‘ON’
an the roasting cycle starte .
CAUTION: If the auger oes not begin rotating after the START button is
presse , a small coffee bean may be trappe un er the auger insi e the Roast
Chamber. STOP THE ROASTING CYCLE IMMEDIATELY by unplugging
the roaster. Allow the roaster to cool if it is hot. Open the Cover an empty
the beans from the Roasting Chamber, making sure none are un er the auger.
Rotate the auger by han to make sure it is free to turn. Install the Roasting
Chamber with the Heat Shiel an lower chamber in place. Reloa the beans
an start the roast cycle again.
WARNING! NEVER LEAVE ROASTER UNATTENDED WHILE OPERATING
Note: If you roast consecutive batches of coffee beans, they may roast faster after the fi rst cycle,
because the roaster may still be hot. Adjust roast time settings accordingly.
Roasting Guidelines
Light Roast 20 - 22 minutes
Me ium Roast 23 - 26 minutes
Dark Roast 27 - 30+ minutes
Note: Roast times may vary due to ambient room tem erature, ower/voltage, bean
variety or amounts used in each batch. Adjust time settings accordingly.
As the roasting cycle continues, you will notice the beans increase in size
an gra ually change from a pale green to a chocolate brown color. You
also notice the pleasant aroma of the beans as they begin to roast.
Five minutes before the en of the roast cycle, the ‘cooling’ cycle will
automatically start an begin blowing cool air over the roaste beans. The
re light will turn ‘OFF’, the green light will glow an the fan switches to
a higher (faster) spee .Note: Pressing the COOL button at any time during
a roasting cycle will sto the roasting and begin the 5 minute ‘cooling’
rocess.
When your roaster has complete the roasting/cooling cycle, the appliance
will turn itself off automatically. Note: We recommend you let the a liance
cool down for 10 minutes before removing the freshly roasted coffee beans.
CAUTION: Metal parts of your roaster WILL STILL BE VERY HOT.
Use caution when han ling this appliance.
Unplug the roaster from the outlet.
11.
12.
13.
14.
15.

10 www.nesco.com
After the roaster has coole for 10 minutes, open the roaster Cover by
pulling the plastic tab towar s you while lifting up. CAUTION: Please use
aution when opening or removing Cover, as all metal parts may still be
hot after the roasting y le.
Remove Screen/Front Seal an brush chaff particles from Screen into the
trash. Slowly remove Chaff Cup an iscar chaff into the trash.
Grasp the plastic han le of the Roasting Chamber an remove from Roaster.
CAUTION: Do not touch glass or metal base of Roasting Chamber as these
parts may still be hot after the roasting cycle.
Pour the fresh-roaste beans into an airtight container or coffee grin er.
Allow the roaste beans to ‘rest’ (see p. 12) for a few hours before grin ing.
Grin your fresh roaste beans in a bla e or burr grin er.
Brew and enjoy the best up of offee you’ve ever tasted!
Caring for Your Roaster
Your coffee bean roaster must be cleane after every use. This will ensure
the safe operation of the appliance, longevity an assure optimal roasting
results. WARNING: It is very important that the screen be in place before
you start the roaster. If the screen is not in place it will cause your roaster to
malfunction. Roaster issues cause by leaving out the screen will NOT be
covere by the warranty.
Make sure the roaster has coole before removing parts.
Empty the Chaff Cup in the trash. Brush or rinse the chaff fl akes off the
Chaff Cup an Screen/ Front Seal. To facilitate cleaning, the Screen can be
easily remove by stretching back the top ‘lip’ of the rubber seal an pulling
it out.
Wash Chaff Cup, Screen/Front Seal, Roasting Chamber an Cover with
warm soapy water an rinse. Set parts asi e to rain an let them air ry
thoroughly before re-assembling roaster. NOTE: The Cover, Roasting
Chamber, Screen/Front Seal an Rear Seal are all ishwasher safe.
When rie , insert Screen into groove provi e at the top of the Front Seal.
CAUTION: Not leaning these parts or operating the applian e without proper installation
will shorten the life expe tan y of the roaster and an reate a ondition where the roaster may
overheat and malfun tion. Make sure all washable omponents are ompletely dry before using.
Set Cover on en , after washing, to allow excess water to rain out.
Wipe Roaster Bo y with a amp cloth or sponge an set asi e to ry. DO
NOT IMMERSE ROASTER BASE IN WATER OR OTHER LIQUID.
16.
17.
18.
19.
20.
21.
1.
2.
3.
4.
5.
6.
7.

11CR-1000 Series Coffee Bean Roaster
Examine the slots surroun ing the ‘Drive Shaft’ (Fig. 3) an remove any
ebris with a amp towel or small brush. This surface must be free of ebris
before beginning the next roast cycle.
The screen of the Screen/Front Seal is a very fi ne mesh stainless steel an
requires special attention after every roast cycle. Fine particles of chaff
lo ge in the fi ne screen of the fi lter. Remove particles of chaff with a brush
an running water. If necessary, the screen can be separate from the rubber
seal for easier cleaning.
NOTE: A standard oven cleaner may be used to remove heavy build u of
coffee oil residue from the screen that may accumulate after several months of
steady use. Use caution when using oven cleaners. READ DIRECTIONS ON
CONTAINER BEFORE USING.
To remove stains on inside of Cover, our equal amounts of water and household
ammonia into the o ening of Cover and let stand for several minutes. Wash
arts normally, then rinse and dry thoroughly.
It may be helpful to recor the results of ‘roasts’ for future reference. This
will help you learn about the many an varie coffee types, fl avors, blen s
an roast colors.
Have fun with your NESCO® Professional Coffee Bean Roaster
an enjoy the experience!
Handling and Storage of Roasted Coffee Beans
Since the primary reason for roasting coffee at home is to experience the aroma
of truly fresh coffee, you nee to han le an store your freshly roaste coffee
beans with care. Green coffee beans keep very well, but after roasting begin a
slow ecline an lose their freshness an fl avor rapi ly.
Coffee beans reach their peak fl avor a few hours to a ay after roasting. Two
ays after roasting, a goo part of the aroma starts to eteriorate ue the affect of
the oxygen in the air (staling). After one week the taste is compromise , an in
two weeks the aroma has virtually vanishe an the taste has lost its istinctive
characteristics.
Here are some steps to take to preserve an maximize the fragrance of your
home-roaste coffee:
Roast small quantities of coffee more often.
Allow freshly roaste beans to rest for a ay, uncovere . Then transfer them
to a suitable, air-tight container an store in a cool, ry place, away from
irect sunlight. Caution: Do not fi ll a tight-sealing canister or jar more than
halfway with just-roaste coffee beans that have not been reste for a ay or
so. Freshly roaste beans generate gases that will exert consi erable pressure
on the walls an li of the fi lle , tightly seale container.
Allow roaste coffee beans to ‘rest’ for a few hours to a ay before grin ing.
This will assure peak fl avor an aroma.
8.
9.
10.
•
•
•

12 www.nesco.com
Resist the urge to refrigerate roaste beans. Don’t store coffee in a refrigerator;
it is amp insi e an ampness compromises the fl avor an aroma.
Grin your coffee imme iately before brewing. The purpose of grin ing
coffee is to break open the coffee bean an make the fl avor oils available
to hot water an then to our palates. Unfortunately, breaking open the bean
also exposes fl avor oils to oxygen or “staling.” Grin ing shoul be one
only moments before brewing to maximize the fl avor an aroma.
Freeze coffee only when you have an oversupply of roaste coffee beans you
can’t consume within a week. Put the beans in a ‘zip lock’ freezer bag an
squeeze as much air out as possible before sealing. If you own a vacuum
sealing machine, this is an excellent way to preserve excess roaste beans in
bags provi e or in plastic storage containers supplie by the manufacturer.
Drink your coffee imme iately after brewing. It oes little goo to roast,
grin an brew a superb fresh cup of coffee, only to let it stan in the pot
on a hot plate where the aroma an fl avor evaporate away in the air. If you
can’t rink the freshly brewe coffee, transfer it to a pre-heate , insulate
carafe, which will preserve the taste an aroma for later consumption.
Troubleshooting
Problem Cause and Solution
Digital isplay is blank. Roaster not plugge in. Plug into wall outlet.•
Unit will not turn on. The Safety Cutoff Switch will turn off
power to the roaster if the cover is open or
not properly close . Make sure the Roasting
Chamber is correctly seate on the Roaster
Base an the Cover properly aligne an
latch close .
•
The roasting times are not
consistent.
The househol voltage changing - this
changes roast characteristics.
Different varieties of green coffee beans
require ifferent roasting times.
Similar green coffee beans from other countries
contain ifferent amounts of moisture an
require ifferent roasting times.
Decaffeinate beans take less time to roast
than regular beans. Trial an error are the rule
of thumb when roasting coffee beans. It may
be helpful to keep notes about roasting times
for specifi c types of coffee beans.
•
•
•
•
•
•
•
•

13CR-1000 Series Coffee Bean Roaster
Problem Cause and Solution
Smoke is emitte an auger
is turning.
The Screen/Front Seal or Rear Seal not
properly installe , amage or missing.
Reposition as nee e .
Screen is blocke . Make sure screen is
cleane an open before operating.
•
•
Smoke is emitte but auger
is NOT turning.
OR
Unit is operating with
correct amount of green
beans but the auger is NOT
turning.
There may ebris lo ge un er auger.
Unplug the roaster imme iately. ALLOW
UNIT TO COOL BEFORE REMOVING
PARTS. Remove beans. Inspect auger an
remove all ebris un erneath.
Roasting Chamber not seate correctly.
Unplug roaster from outlet. Open Cover,
make sure Roasting Chamber is fully seate
on heat shiel of Roaster Base.
•
•
Unit spee s up with fi ve
minutes remaining in roast
cycle
This con ition is normal. The roaster
automatically shifts to a 5-minute cool- own
perio at the en of each roasting cycle.
•
Roaste coffee beans are
not ark enough after going
through the maximum 30-
minute roasting cycle.
Roasting time is too short. A extra minutes
to roast time after roasting cycle has starte
an before the cooling cycle has starte .
Each press of the ‘UP’ arrow a s 1 minute
to the roast cycle. Up to 5 extra minutes can
be a e .
For arker roasts use less than the
recommen e 5 oz. loa of beans for each
cycle.
•
•
Excessive amount of chaff
escaping near top of roaster.
Screen/Front Seal is not installe correctly,
amage or missing. Replace or install seal
correctly onto top of Roasting Chamber.
Make sure Screen is inserte into groove of
Front Seal.
•
Auger turns but beans are
not circulating.
Roasting Chamber is very irty an nee s
to be cleane . See ‘Caring for your Roaster’
section. The oily resi ue on the glass prevents
the beans from circulating when the auger
is turning.
Roasting chamber may be wet on the insi e.
The water roplets create a rag on the beans
preventing them from circulating. Dry the
Roasting Chamber thoroughly before a ing
green coffee beans.
•
•

14 www.nesco.com
Problem Cause and Solution
With Roasting Chamber
clean an empty, auger
oes not turn after pressing
START button.
Roasting Chamber not seate correctly. Unplug
roaster from outlet. Open Cover, make sure
Roasting chamber is fully seate on the heat
shiel of Roaster Base.
Auger rive mechanism may be amage .
Return to our factory for servicing (see One
Year Limite Warranty).
•
•
When roaster is running,
the keypa s o not work.
This is a normal con ition when roasting or
cooling. Only two buttons are active while the
roaster is running. These are the ‘UP’ arrow
button (increases roasting time) an COOL
button.
You have alrea y a e 5 extra minutes,
so the ‘UP’ an ‘DOWN’ arrows will not
function. Only the COOL button functions at
this time.
•
•
The roaste beans are too
ark.
This may be normal. Different varieties
of beans may roast arker than others.
Try grin ing some an brew a pot of coffee.
They may taste better than they look.
Roasting time is too long. Decrease roasting
time (press ‘DOWN’ arrow).
Make sure you’ve roaste the recommen e
amount of beans per loa . Fill Roasting
Chamber up to the FILL LINE (5 oz.).
•
•
•
I want to stop the roasting
process when the beans
change color.
If you are watching the roast cycle an the
color of the beans is correct, press the COOL
button to stop the roasting cycle. The roasting
stage will stop an cooling stage will begin
imme iately. The machine will turn off
automatically after the 5-minute cooling
cycle.
•
NOTE: If this troubleshooting chart oes not provi e a solution to a problem
you’re experiencing with your roaster, contact our Customer Satisfaction
Department at 1-800-288-4545 for assistance. Rea the Limite Warranty
section for etails.
15CR-1000 Series Coffee Bean Roaster
ONE YEAR LIMITED WARRANTY
This appliance is warrante for one year from ate of original purchase against efects in material
an workmanship. This warranty oes not cover transportation amage, misuse, acci ent or similar
inci ent. This warranty gives you specifi c legal rights an you may have other rights, which vary
from state to state. This pro uct is inten e for househol use only, not for commercial use.
Warranty does not over ommer ial use.
Your new NESCO® appliance comes equippe with numerous safety features. Any attempt to
interfere with the operation of these safety features makes this warranty null an voi . In the event
we receive an appliance for service that has been tampere with, we reserve the right to restore it to
its original state an charge for the repair.
Defective pro ucts may be returne , postage prepai , with a escription of the efect to: The Metal
Ware Corporation, 1700 Monroe Street, Two Rivers, Wisconsin 54241, for no-charge repair or
replacement at our option. Must in lude proof of pur hase or opy of original bill of sale when
returning pro uct for warranty service.
Please all Customer Satisfa tion at 1-800-288-4545 to obtain a Return Authorization before
shipping.
For service in warranty, follow instructions set forth in warranty. When or ering new parts, make
sure that you always mention the mo el number of the pro uct.
Call us on our toll free number, 1-800-288-4545 an tell us about your problem.
If we instruct you to sen all or part of your appliance to us for repair or replacement, the
Customer Satisfaction representative will provi e a Return Authorization number (this number
notifi es our receiving epartment to expe ite your repair). Pack your unit carefully in a stur y
carton with suffi cient pa ing to prevent amage because any amage cause in shipping is not
covere by the warranty.
Print your name, a ress an Return Authorization number on the carton.
Write a letter explaining the problem. Inclu e the following: your name, a ress an telephone
number an a copy of the original bill of sale.
Attach the seale envelope containing the letter insi e the carton. Insure the package for the
value of the NESCO® appliance an ship prepai to:
Attn: Factory Service Dept.
The Metal Ware Corporation
1700 Monroe Street
Two Rivers, WI 54241
1.
2.
3.
4.
5.

©2007, e Metal Ware C rp rati n #64902
WEBSITE: www.nesco.com
Other manuals for CR-1000 Series
2
Table of contents
Other Nesco Coffee Grinder manuals


