HeyCafe H5 User manual

H5
Domestic Professional Coffee Grinder
1
©HeyCafé Co., Ltd.
Version 2.0, August 2016
WARNINGS
•This grinder is not intended for use by persons (including children) with reduced physical, sensory or mental
capabilities, or lack of experience and knowledge, unless they have been given supervision or instruction
concerning use of the grinder by a person responsible for their safety.
•Children should be supervised to ensure that they do not play with the grinder.
•Care is needed when handling cutting blades during cleaning.
•If the supply cord is damaged, it must be replaced by the manufacturer or its service agent or a similarly
qualified person in order to avoid the risk of electric shock.
Correct Disposal of this product
This marking indicates that this product should not be disposed with other household wastes throughout the EU.
To prevent possible harm to the environment or human health from uncontrolled waste disposal, recycle it
responsibly to promote the sustainable reuse of material resources. To return your used device, please use the
return and collection systems or contact the retailer where the product was purchased. They can take this product
for environmental safe recycling.
Warranty Information
The manufacturer provides warranty in accordance with the legislation of the customer's own country of residence,
with a minimum of 1 year (Germany: 2 years), starting from the date on which the grinder is sold to the end user.
The warranty only covers defects in material or workmanship.
The repairs under warranty may only be carried out by an authorized service centre.
When making a claim under the warranty, the original bill of purchase (with purchase date) must be submitted.
The warranty will not apply in cases of:
Normal wear and tear Incorrect use, overloading of the grinder, use of non approved accessories, use of force,
damage caused by external influences, damage caused by nonobservance of the user manual, connection to a nun
suitable mains supply or non compliance with the installation instructions. Partially or completely dismantled
grinders
2
©HeyCafé Co., Ltd.
Version 2.0, August 2016

TABLE of CONTENTS
1) Preface……………………………………………………………………………………………….4.
2) Technical Specifications …….………………………………………………………………4.
3) General Description ……………………………………………………………………..……4.
4) Unpacking and installation ………………………………………………………………..5.
5) Operation……………………………………………………………………………………………6.
6) Safety devices…………………………………………………………………………………….7.
7) Safety instructions………………………………………………………………………….….8.
8) Maintenance and service…………………………………….……….…………………….8.
9) Cleaning…………………….……………………………………………………….……………….9.
10) Remarks and important details………………….…………………….……………….10.
3
©HeyCafé Co., Ltd.
Version 2.0, August 2016

1) PREFACE
Congratulations for purchasing the H5 coffee grinder. The H5 is a professional coffee grinder that can be used as a
commercial grinder in small coffee shops; espresso bars etc. and as a domestic coffee grinder.
The H5 coffee grinder features:
•Belt drive system that separates motor heat from the grinding chamber
•Aluminum grinding housing with cooling ribs
•BottomSetting® grinding setting mechanism
•64mm flat burrs
•Unique body design that allows using the grinder for different coffee brewing systems
Read this manual from cover to cover before using the grinder as it contains important instructions for the safety,
operation, and maintenance for the grinder. Keep the manual in a safe place for future use and reference. The
manufacturer reserves the right to modify the grinder and the manual accordingly. This manual can also be
downloaded at www.heycafe.com
2) TECHNICAL SPECIFICATIONS H5
3) General Description
Dimensions: (view picture on right)
Height: 390mm
Width: 135mm
Length:260mm
Weight: 4.5Kg
Burrs diameter: 64mm (flat type)
Hopper capacity: 250gr/750gr. Coffee beans
Electrical Specifications:
Voltage: 110V/ 230V 50Hz/60Hz
Power: 350w
Duty Cycle: 25%
Grinding capacities: 2-3g/second
Mode selectors (3 modes)
Dosing adjust trimmers (2)
Main screen Logo light
Demand positioning screw
Porta filter handle support/demand
switch
Residue tray
Beans’ hopper’s lid
Beans’ hopper (inside)
Grinding setting
Grinder’s body
Main power switch
Grinder’s base
260
390
135
120
4
©HeyCafé Co., Ltd.
Version 2.0, August 2016
4) UNPACKING AND INSTALLATION:
•After opening the box, make sure that the grinder is intact and that there is no visible damage. If there is any
doubt, DONOT use the grinder and call your local dealer for further assistance.
•Unpack the carton box carefully. For your convenience we suggest storing all packaging materials where they
can be used in the future, whenever the grinder’s transportation is necessary.
•Place the grinder on a stable flat counter in a dry area away from water or water splashes.
•Position the coffee residue tray inside the grinder’s base frame and cover it with the stainless steel lid.
•NEVER OPERATE THE GRINDER IF THE BEAN HOPPER IS NOT LIDDED.
•Before plugging in the electrical cord, make sure:
oThe grinder voltage rating (according to the label on bottom base) is the same as the supply mains.
oThe wall socket is fitted with an efficient ground (Earth) contact. Plug in the grinder into the supply
mains ONLY after the ground system was checked and verified to be in compliance with your
country’s safety rules. IT IS COMPULSORY TO GROUND THE GRINDER. The manufacturer can not be
held responsible in the event that this regulation was not complied with.
oThe power consumption of the grinder (according to the bottom label) is consistent with the relevant
wall socket capacity.
oThe wall socket is protected against short cuts and power surges.
oDo not use extension cables, plug adapters for multiple sockets, or make shift connections.
•Plug in the grinder
•Turn on the back main switch. When ON the front screen LOGO should be lighted and the grinder is ready to
be started
5) OPERATION
General description of the H5 grinding modes
•The grinder is equipped with 3 grinding modes’ touch switches. 2 timed intervals modes, and one continues
mode
•The way the H5 grinder is operating on each one of the grinding modes can be changed by changing the
position of the internal mode switch (for instructions how to change factory setting of the G1/G2 switch
please refer to section “G1/G2 grinding function changing”)
•G1 mode was designed for users that wish to visually control the grinded quantity and using the porta filter
handle or other small container to collect the coffee powder.
•G2 mode was designed for users that grind longer batches of coffee in irregular containers that are not using
the bump switch to demand the coffee.
G1 mode [factory setting]
G2 mode [user selectable]
mode
Single dose
Double dose
continues
Single dose
Double dose
continues
Pressing
the
demand
switch
Grind coffee
while pressing
the demand
switch or time
elapsed
Grind coffee
while pressing
the demand
switch or time
elapsed
Grind coffee
while
pressing the
demand
switch
Grind coffee
continuously till
time elapsed or
exit the grinding
mode
Grind coffee
continuously
till time
elapsed or exit
grinding mode
Grind contin
uously while
in continues
mode
Touching
the mode
selector
for over 3
seconds
Grind coffee
continuously
till time
elapsed or exit
the grinding
mode
Grind coffee
continuously
till time
elapsed or exit
grinding mode
Grind
continuously
while in
continues
mode
Same as
pressing the
demand switch
Same as
pressing the
demand switch
Same as
pressing the
demand
switch
5
©HeyCafé Co., Ltd.
Version 2.0, August 2016

Grinding coffee with the H5:
•Turn the grinder to ON (main switch is placed on the back of the grinder above the power cable socket), when
ON the main screen’s HeyCafé logo light should turn on.
•Open the beans lid and introduce the suitable amount of coffee beans into the hopper. Maximum capacity is
250gr. At first grinding it is recommended to introduce small amount of beans first.
Safety Note: the hopper lid must be closed before using the grinder. A safety device is preventing any grinding if
hopper’s lid is open (When lid is open the front screen LEDs are blinking)
•Set the desired grinding coarseness by turning the setting knob according the graphic instructions (Fine –>
right, Coarse –> left). The grinder is factory set to meet Espresso coarseness.
•Select any of the 3 possible grinding modes by touching each of the icons on the main screen. When selected
the icon LED will be lighted. Disable the selection by touching the selected icon or by selecting a different
grinding mode icon.
•In Single and double modes, use the provided crossed head tinny screw driver to set the desired grinding time.
•Place a porta filter handle or any collecting container under the outlet chute and use the demand switch to
operate the grinder (refer to table 5-1 for operational grinding modes)
Adjusting coffee grind
•The grinding blades’ distance was factory pre adjusted to satisfy different common coffee grinds (from super
fine to coarse) corresponding gap distance from 0.05mm to 0.65mm.
•Turning the grinding dial incrementally to the right direction will make the grind finer and turning it to the left
will make the grind coarser.
•Grind a small amount of coffee and test its coarseness with your espresso machine.
•As coffee beans’ qualities and characteristics are changing from time to time it is recommended repeating this
adjustment once in a while.
Fig5.1
Operating intervals:
•The manufacturer is not recommending grinding continuously for a period of time exceeding 60seconds
•The H5 grinder’s duty cycle is 25%(1/4 of the time grinding; 3/4 of the time resting)
•It is a normal occurrence that during a long grinding period the grinding chamber will heat up. In order to
achieve best grinding results, it is recommended to grind coffee in short intervals of a few seconds each.
6
©HeyCafé Co., Ltd.
Version 2.0, August 2016
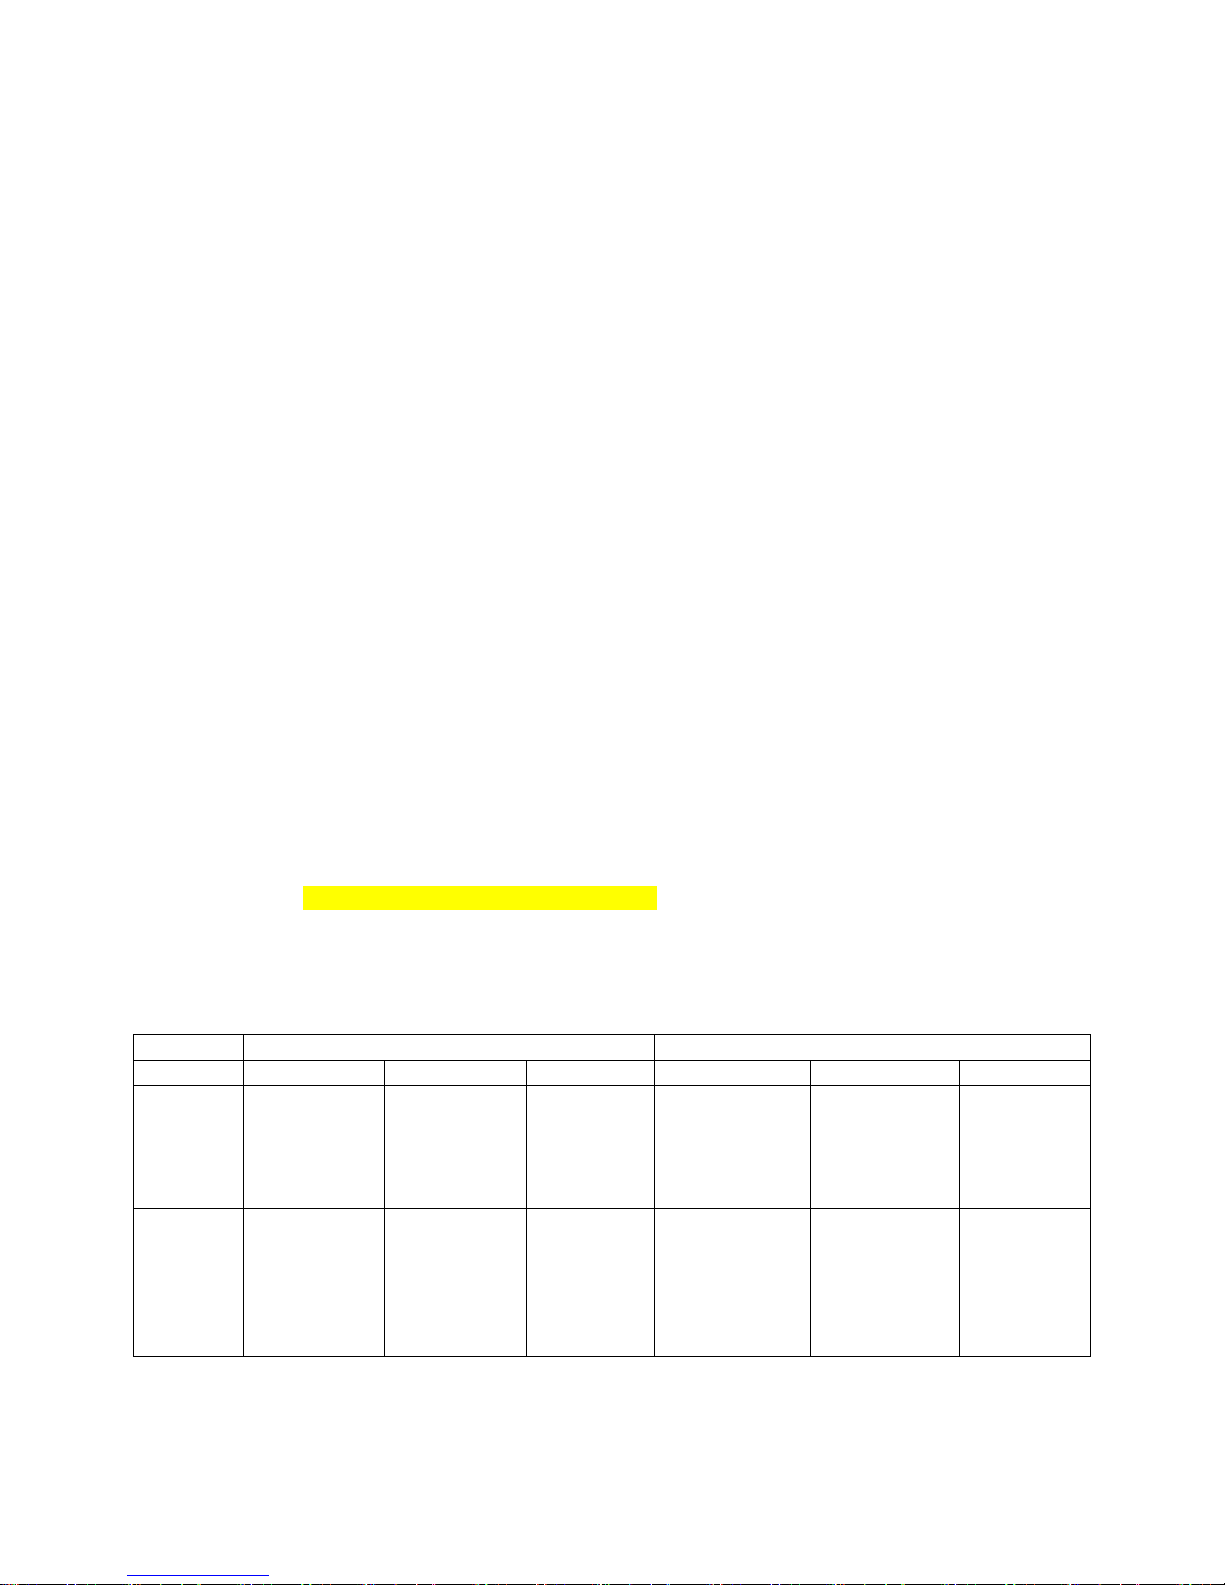
Adjusting demand switch position
•The demand switch was designed to fit different porta filters or containers. In order to change the setting of
the demand switch, use the provided Allen Key to turn the switch shaft.
•Clockwise turning will advance the demand-fork forward.
•Counter clockwise turning will advance the demand-fork backward.
Fig5.2
6) SAFETY DEVICES
A) Over current fuse protector
In order to eliminate the risk of fire the grinder is equipped with a protection fuse that is limiting the current
consumption of to the grinder.
•In the event that the over current fuse was tripped as a result of malfunction (e.g.: jammed blades, worn out
bearings, foreign object in grinding chamber, etc.) the main power plug must be disconnected.
oSet the grinder’s setting to most coarse
oEntirely empty the beans hopper into a container by turning the grinder upside down
oManually release any obstacle from the grinding chamber till you can freely turn the grinder’s shaft
oVisually inspect the driving belt and the disks blades. In case any of them require replacement Refer
to section “Belt replacement instructions” and “Disks blades replacement”.
oAlways replace the tripped fuse with the same size and capacity fuse (the grinder is originally
equipped with one spare fuse use the tripped fuse to get an identical replacement).
oIf after all the above steps were provided and the fuse is still tripping then for further handling of the
grinder contact your local dealer.
•In the event that the fuse was tripped as a result of a long continuous grinding operation (read section 5, for
operating intervals) allow the grinder to cool down and replace the fuse protection with an identical new one.
B) Beans hopper lid
The grinding chamber can be a hazardous area if the proper precautions aren’t observed.
NEVER OPERATE THE GRINDER WITH OPEN BEANS’ LID
The grinder is equipped with safety switch that preventing grinding operation when beans lid is open. When beans’
lid is open the mode selector’s LED will blink.
In case the safety switch is malfunction don’t continue using the grinder and send the grinder for service with
your local dealer.
7) SAFETY INSTRUCTIONS
•NEVER OPERATE THE GRINDER WITH OPEN BEANS’ LID. BEFORE REMOVING THE BEANS HOPPER (FOR ANY
REASON) MAKE SURE TO DISCONNECT THE POWER SUPPLY.
•BEFORE CLEANING OR SERVICING THE GRINDING CHAMBER OR THE BEANS HOPPER, DISCONNECT THE
POWER PLUG FROM THE POWER SOCKET.
•Never attempt to insert your fingers or any foreign objects into the grinding chamber or blades.
•Be aware that grinding blades continue rotating for a short while after the grinding operation has ended.
•Never bypass or tamper with the Lid safety switch or the grinder
•Do not use the grinder barefoot or if your hands or feet are damp
7
©HeyCafé Co., Ltd.
Version 2.0, August 2016

•Do not use the cable wire to pull and disconnect the power plug
•Always keep the grinder dry (internally and externally)
•Never put grinded coffee into the hopper or try to regrind coffee powder
•The H5 is a COFFEE GRINDER, never attempt grinding anything else other than roasted coffee beans.
8) MAINTENANCE AND SERVICE
Warning: grinder’s maintenance and repair should be performed by certified personnel or by your
local dealer. The procedures described below are the only user-level allowed maintenance
procedures.
Be aware of the grinder’s noise level. In case the noise level is higher than normal or irregular noises are coming
from within the grinder, get certified personnel to perform an overall check of the grinder.
A) Fuse replacement
1. Turn OFF main switch and disconnect the power cable from the socket
2. Open the fuse house (with in main switch and plug housing at the back of the grinder) by pulling it out like a
drawer.
3. Replace the tripped fuse with an identical size and rating fuse
4. Close the fuse housing, connect the grinder to the power socket and turn ON the grinder
B) G1/G2 grinding function changing
1. Turn OFF main switch and disconnect the power cable from the socket
2. Set the grinding setting to most fine till the dial knob reach the stopper
3. Empty the grinder from coffee beans and grind empty any residues of semi-grinded coffee
4. Remove the beans hopper lid and beans hopper (without the silicone rubber ring)
5. Use a cross head screwdriver to open the front screen housing screws
6. Gently pull out the front screen housing
7. observe the G1/G2 switch and change its position
8. Repeat the steps above backward to close the grinder
C) Grinding blades replacement:
Check the state of the grinding blades periodically (approximately every 50kg of grinded coffee) Good condition
blades will result in a high quality grind and prevent the Grinder’s overheating. Replace grinding blades every
500KG of grinded coffee (when using original replacement parts)
Warning: The replacement and assembly of a new set of blades is a delicate task. Perform blade removal and
assembly only if you are confident with your technical skills and after reading and understanding the entire
instructions below.
•Follow steps B)1 to B)6 above
•After releasing the front screen housing (step B)5 above), release the dial knob screw (for the entire following
operation make sure to keep the knob at most fine grinding position, don’t change it)
•Remove the 6 upper body screws and disconnect (pull upward) the upper body from bottom body
•Use the provided Allen Key to open the top grinding blade holder (3 screws)
•Use a crossed head screwdriver to release the grinding blades (bottom and top)
•Clean the blades holding surface (on the grinder) using a brush and vacuum cleaner to avoid any old deposits
on the blades sittings
•Use original replacements’ parts to assemble the new blades on the blades sitting and secure them with new
stainless steel screws
8
©HeyCafé Co., Ltd.
Version 2.0, August 2016

•Assemble the grinder following backward the above steps.
Note: return the dial knob to the same position (knob against the finest grinding setting stopper)
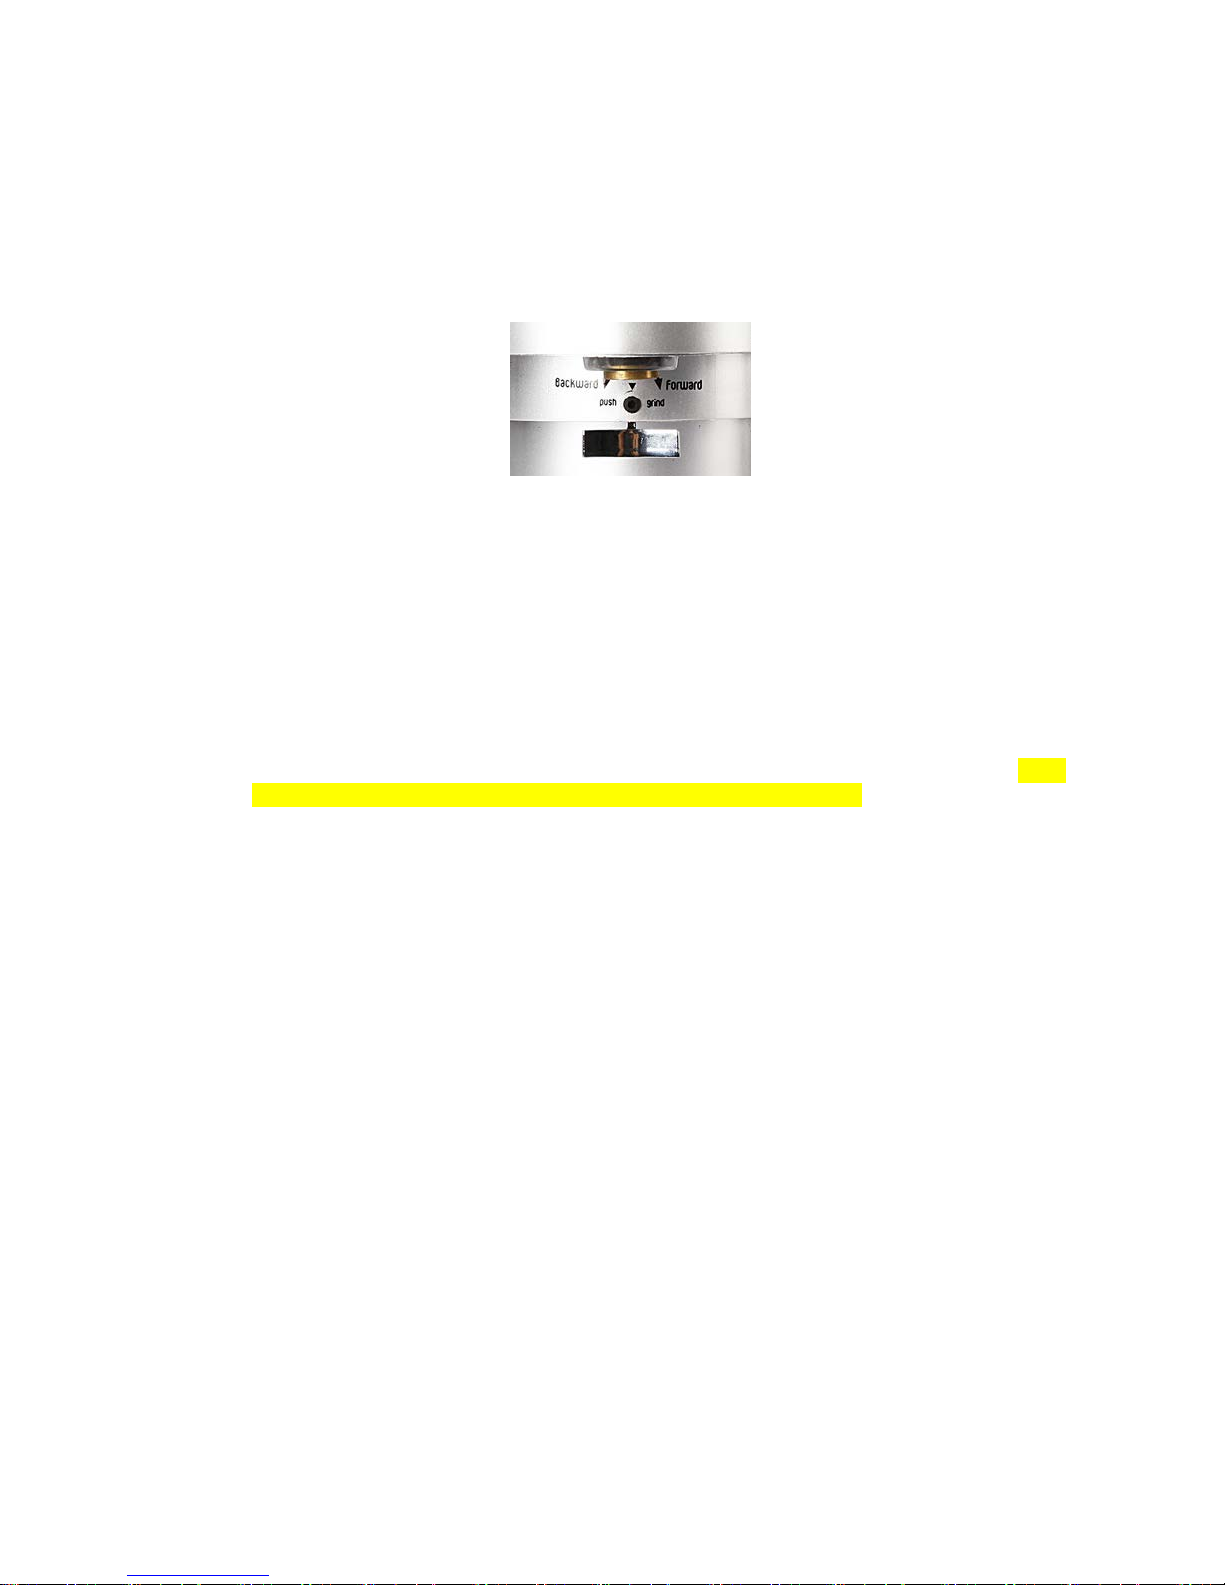
D) Driving belt replacement
The H5 grinder is equipped with a Lifetime warrantied belt (for normal usage of the grinder). Yet, it may happen
that jammed blades or improper grinded substance will result an abnormal wear of the belt and the need to
replace it. Always use an original HeyCafé belt as a replacement part. Follow the steps below to replace the belt:
•Repeat steps C)1 to C)3 above
•Disconnect the main control board (note the different plugs positions)
•Open the 4 motor screws and take out the core grinder from the bottom housing
•Release the motor tensioning screw to remove the drive belt
•Replace the drive belt and tension back the motor (make sure to tension the belt not too tight and not too
loose)
•Place the motor back to its original position make sure to assemble the outlet rubber ring
•Connect main control board cables and plugs
•Repeat the steps above backwards to back assemble the grinder
9) CLEANING
PRIOR TO ANY CLEANING PROCEDURE GRIND COMPLETELY EMPTY (OR EMPTY THE BEANS’ HOPPER) AND
DISCONNECT THE GRINDER’S POWER SUPPLY.
NEVER USE RUNNING WATER TO CLEAN THE MAIN BODY.
USE ONLY PERFECTLY CLEAN CLOTHS OR SOFT BRUSHES TO CLEAN THE GRINDER.
Wipe the external body with wet cloth or wiper
DO NOT USE ABRASIVE CLEANING PRODUCTS AS THEY MAY SCRATCH THE GRINDER’S COATING.
Cleaning the beans’ hopper
Pull out the bean hopper (make sure to leave the silicone rubber ring on the grinder) and rinse it thoroughly with
water and soap. As the bean hopper is made of clear polymer, use only liquid detergent (free of abrasive
components) and soft sponge. Before reinstalling the beans hopper back to its position, make sure it is dried
thoroughly. To ensure great coffee taste, clean the bean hopper periodically.
Cleaning the grinding chamber
In order to clean the grinding chamber HeyCafé is recommending the usage of commercially provided cleaning pills.
Follow manufacturer instructions. In any case
•Do not use sharp objects to scrape coffee deposits off of the blades.
After all cleaning and replacing tasks are through make sure to assemble all the parts the same way as they were
disconnected. If anything does not fit back together or there are some leftover parts, do not attempt to operate
the grinder, call for the assistance of your local dealer.
To ensure long lasting grinder and great fresh taste of coffee, the cleaning procedure
as described above should be repeated periodically and at least once per month or as necessary
according the grinder’s usage and quality of beans.
9
©HeyCafé Co., Ltd.
Version 2.0, August 2016

END
10
©HeyCafé Co., Ltd.
Version 2.0, August 2016

Add your remarks here
#
Date
Event Remark
Purchasing
Important details and telephone numbers:
Local dealer
Address: ________________________________________________________________
Telephone number: ____________________Fax number:_______________________
Technician mobile number: ____________________name: __________________
Coffee beans supplier details:_________________________________________________________________
Telephone number: ____________________Fax number:_______________________
11
©HeyCafé Co., Ltd.
Version 2.0, August 2016

Opening the H5 for different service needs:
1. ing the grinding house:
Set the grinding coarseness
to most fine
Open the beans lid and
empty the beans hopper
Pull out the beans hopper
by pulling the side ribs
While holding the dial knob
use the provided screw
driver to release the dial’s
screw
Identify the 2 screen
holder’s screws and
release them
Pull out the screen
holder
Pull out the screen holder
G1/G2 switch Changing to
G1 and G2 modes
Disconnect the safety
sensor cable and LCD cable

Identify the 2 screws
under the screen
holder and release
them
Identify the 4 screws under
the hopper area (6 screws
including previous step)
Pull up to apart the upper
body from bottom body
Remove the top body
from the bottom body
and expose the grinder
Use the provided Allen
key to unscrew the top
burr holder
Remove 3 screws and
top burr holder
Clean the grinding
chamber with the
provided brush
Use the provided brush to
clean the top burr holder
Remove 3 screws of burr
in order to replace the
burr

Opening the H5 for different service needs:
1. ing the grinding house:
Cut the wires’strapping
along the grinder’s core
Disconnect the controller
card (2 screws)
Pull out the main controller
and disconnect the cables
Open grinder’s 4 holding screws
Pull out the grinder with the motor
In order to get the motor and grinder outside
cut the wire straps
And get the entire core grinder out
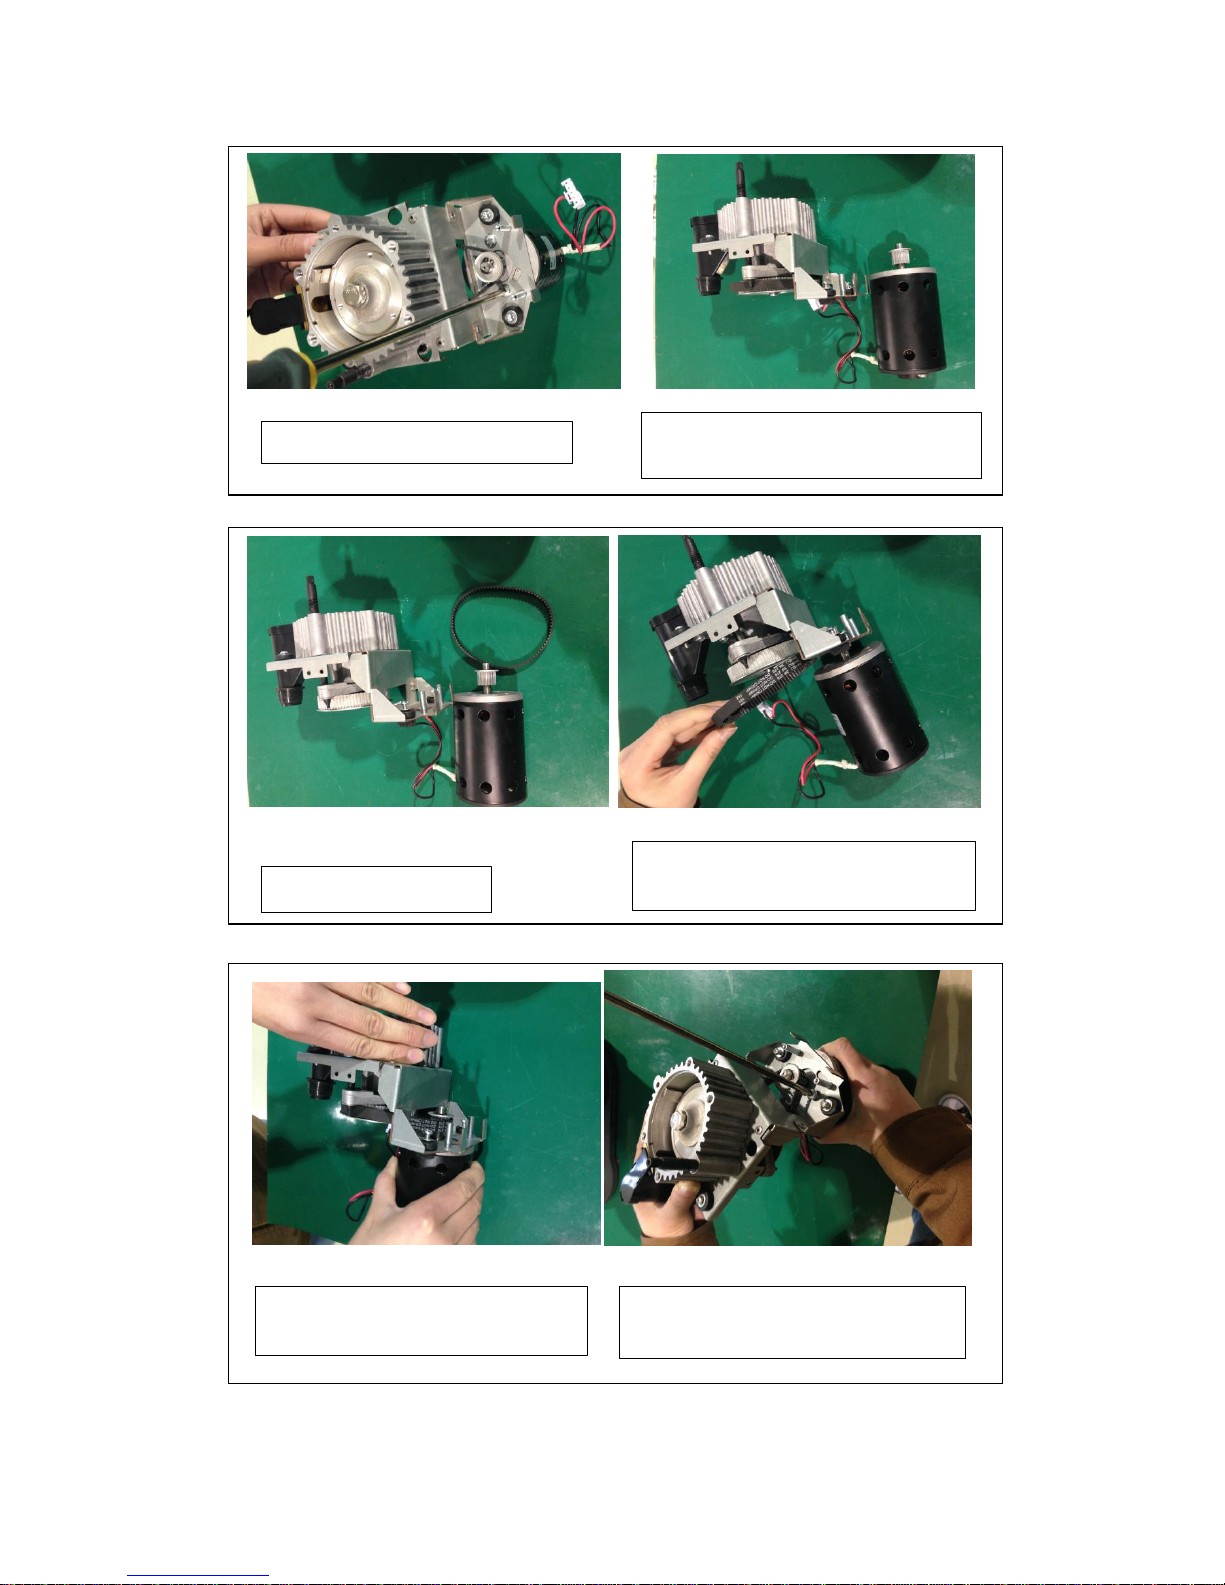
Remove motor’s screws (2)
Separate the motor from the grinding
frame
Remove the worn out belt
Install the new replacement belt (always
use the original part from HeyCafé
Screw in the 2 motors’screws and
allow for motor swivelling
Lightly (!!) tight the belt and close the
tightening screw and pivot screw
Table of contents
Other HeyCafe Coffee Grinder manuals

HeyCafe
HeyCafe HC-880 LAB Instruction and safety manual

HeyCafe
HeyCafe Buddy User manual

HeyCafe
HeyCafe AROMA II S User manual

HeyCafe
HeyCafe HC-880 Instruction and safety manual

HeyCafe
HeyCafe HC-880 Operating instructions

HeyCafe
HeyCafe HC-600 User manual

HeyCafe
HeyCafe H1 User manual

HeyCafe
HeyCafe TITAN II S User manual
Popular Coffee Grinder manuals by other brands


Vitek
Vitek VT-1543 Manual instruction

Obel
Obel Mito Base Installation, use and maintenance

Santos
Santos SHOP COFFEE GRINDER Instruction and maintenance manual

Gastroback
Gastroback Design Coffee Grinder Advanced Plus operating instructions

SEVERIN
SEVERIN KM 3878 Dimensions

Graef
Graef CM500 Series operating instructions