Neuvana Xen User manual

NeuvanaLife.com
USER MANUAL
BY

NeuvanaLife.com
03 INTRODUCTION
04 IMPORTANT SAFETY INFORMATION
• Warnings
• Adverse Reactions
• Precautions
07 YOUR XEN BOX SET
08 YOUR XEN UNIT
• Ports
• Powering On/Off
• Charging
11 YOUR XEN HEADPHONES
• Selecting Earbuds
• Installing Earbuds
15 YOUR NEUVANA APP
• System Requirements
• Installing the Neuvana App
• Updating the Neuvana App
TABLE OF CONTENTS
Neuvana’s logos are trademarks or registered trademarks of Neuvana LLC in the United States and other countries. Apple, the Apple logo, iPhone, iPad, iPod touch, and iOS are registered trademarks
of Apple, Inc. in the U.S. and other countries. AppStore is a Service mark of Apple, Inc. Android and Google Play are trademarks of Google, LLC. Bluetooth®word mark and logo are trademarks of Blue-
tooth SIG. All other trademarks are trademarks of their respective owners. © 2019 Neuvana LLC. All rights reserved.
18 BLUETOOTH CONNECTIONS
23 SESSIONS
• Modes
• Settings
• Setting Up a Sync Session
• Setting Up a Sensation Pattern Session
• Setting Up an Ambient Session
• Adjusting Your Session Levels
• Saving Your Session
• Pausing Your Session
32 MICRO-DROP SALINE SPRAYER
34 CARE AND MAINTENANCE
35 HELPFUL TIPS

NeuvanaLife.com
Dear Customer:
Thank you for purchasing the revolutionary Xen by Neuvana wellness product and platform!
We recognize that, in this connected world, each of us is busy, overly stressed and digitally distracted.
At Neuvana, we designed Xen to address these challenges and more. Xen delivers multiple lifestyle
and wellness benefits through ear-based Vagus Nerve Stimulation. By using Xen, you may experience
reduced stress and anxiety, better sleep and improved focus – all contributing to balance in your
daily life!
Xen by Neuvana provides an easy, safe and customized wellness experience, offering multiple
waveforms within the easy-to-use Neuvana app. By simply by pairing it with your music library,
Apple Music®, Spotify®, and/or other streaming apps, the experience becomes truly
personalized. Your music selection drives the signal itself, syncing to the pace and harmony of
each song for stimulation patterns that match your style. In addition, Xen’s signals can sync to
ambient sounds, driving optimal vagus nerve stimulation based on the environment around
you. With Xen by Neuvana, you can also choose pre-programmed signal patterns, Sensations,
that deliver stimulation independent of music or environment.
We recommend that you take the time to explore this User Guide as it will provide instructions
and techniques that will enhance your Xen experience.
We welcome you to the Neuvana family. We are confident that you will see tangible benefits
to your wellness and health with regular use, which is why we offer a money back guarantee.
If you need additional assistance with Xen or have any questions or comments, please call our
customer experience team at 1.844.NEUVANA (844.638.8262) or email us at
The Neuvana Team

NeuvanaLife.com
WARNINGS
DO NOT USE this product if you have a cardiac pacemaker, implanted defibrillator, or other implanted or
metallic electronic device. Doing so could cause electric shock, burns, electrical interference, or death.
DO NOT USE this product while using any other external electrical stimulating devices.
DO NOT USE during pregnancy or if you are breastfeeding.
DO NOT USE this product if you have epilepsy or a history of seizures.
DO NOT USE this product if you have Temperomandibular Joint Disorder, Bell’s Palsy, impaired cranial
nerve function, or facial pain.
DO NOT USE this product while driving, operating machinery, or during any activity in which distraction
or electrical stimulation can put you at risk for injury.
DO NOT USE this product while in a shower, bath, pool, or any other body of water.
DO NOT USE this product if the housing has been damaged.
DO NOT USE this product in the presence of strong electromagnetic fields, such as MRI scanners.
Do not place Xen earbuds anywhere in or on the body, other than the ear canal.
Do not place Xen earbuds on skin that has open wounds, sores, or rashes; or skin that is swollen, infected,
inflamed, or has skin eruptions. If you experience an adverse skin reaction, discontinue use immediately.
If you are under directed medical care, consult your physician before using this product.
This product is not intended for use by individuals under the age of 18. Keep this system out of reach
of children.
ADVERSE REACTIONS
Users with sensitive skin may experience skin irritation in the area where Xen earbuds are applied. If you
experience skin irritation or other adverse reactions, stop using the product. If irritation persists after
discontinuing use, consult your physician.
IMPORTANT SAFETY INFORMATION
NOTE:
For the best experience, read this User Guide
before using your Xen. Be sure to follow all
warnings and precautions. Failure to do so can
cause harm to you or your unit.
NOTE:
This product is for healthy users interested in
potentially improving their general wellness. It
is not a medical device and is not intended to
diagnose, treat, cure, or prevent any disease
or condition.

NeuvanaLife.com
PRECAUTIONS
The left earbud carries the Xen signal and should only be used in the left ear.
Use caution if using in an ear canal that lacks normal sensation.
Use of accessories not supplied by the manufacturer, Neuvana, may cause harm or injury.
Do not attempt to open or disassemble the Xen unit or headphones.
Operation in close proximity to shortwave or microwave equipment may produce instability in the
product output.
If using music, be sure to set the volume of your music first, and then adjust the intensity of your session,
as an increase in volume may increase the intensity of the electrical stimulation.
CHOKING HAZARD: Keep the headphones, earbuds, and micro-drop saline spray bottle away from
small children.
FOR BEST RESULTS: Clean outer ear canals and ensure they are free from excess wax before using
Xen earbuds.
IMPORTANT SAFETY INFORMATION

NeuvanaLife.com
YOUR XEN BOX SET
Micro-drop
saline sprayer
Xen unit Quick Start Guide
Important Safety
Information
Xen
headphones
Replacement
earbuds
USB charging
cable
USB wall
adapter
Display
stand
The items shown here are included in your Xen box set:
NeuvanaLife.com
YOUR XEN UNIT Your Xen unit is designed to apply electrical stimulation through the Xen headphones. Your Xen unit
analyzes audio input--which it receives from your smartphone, laptop, or tablet--and generates a signal
that it sends to the headphones.
PORTS
There is one USB port on the bottom of your Xen unit. This port is where you:
Connect your Xen headphones to your Xen unit.
Connect the charging cable to your Xen unit.
NOTE:
Your Xen unit will not work properly with non-Xen
headphones or devices.
CAUTION:
Be sure the Xen headphones cable is securely
attached to your Xen unit.
NeuvanaLife.com
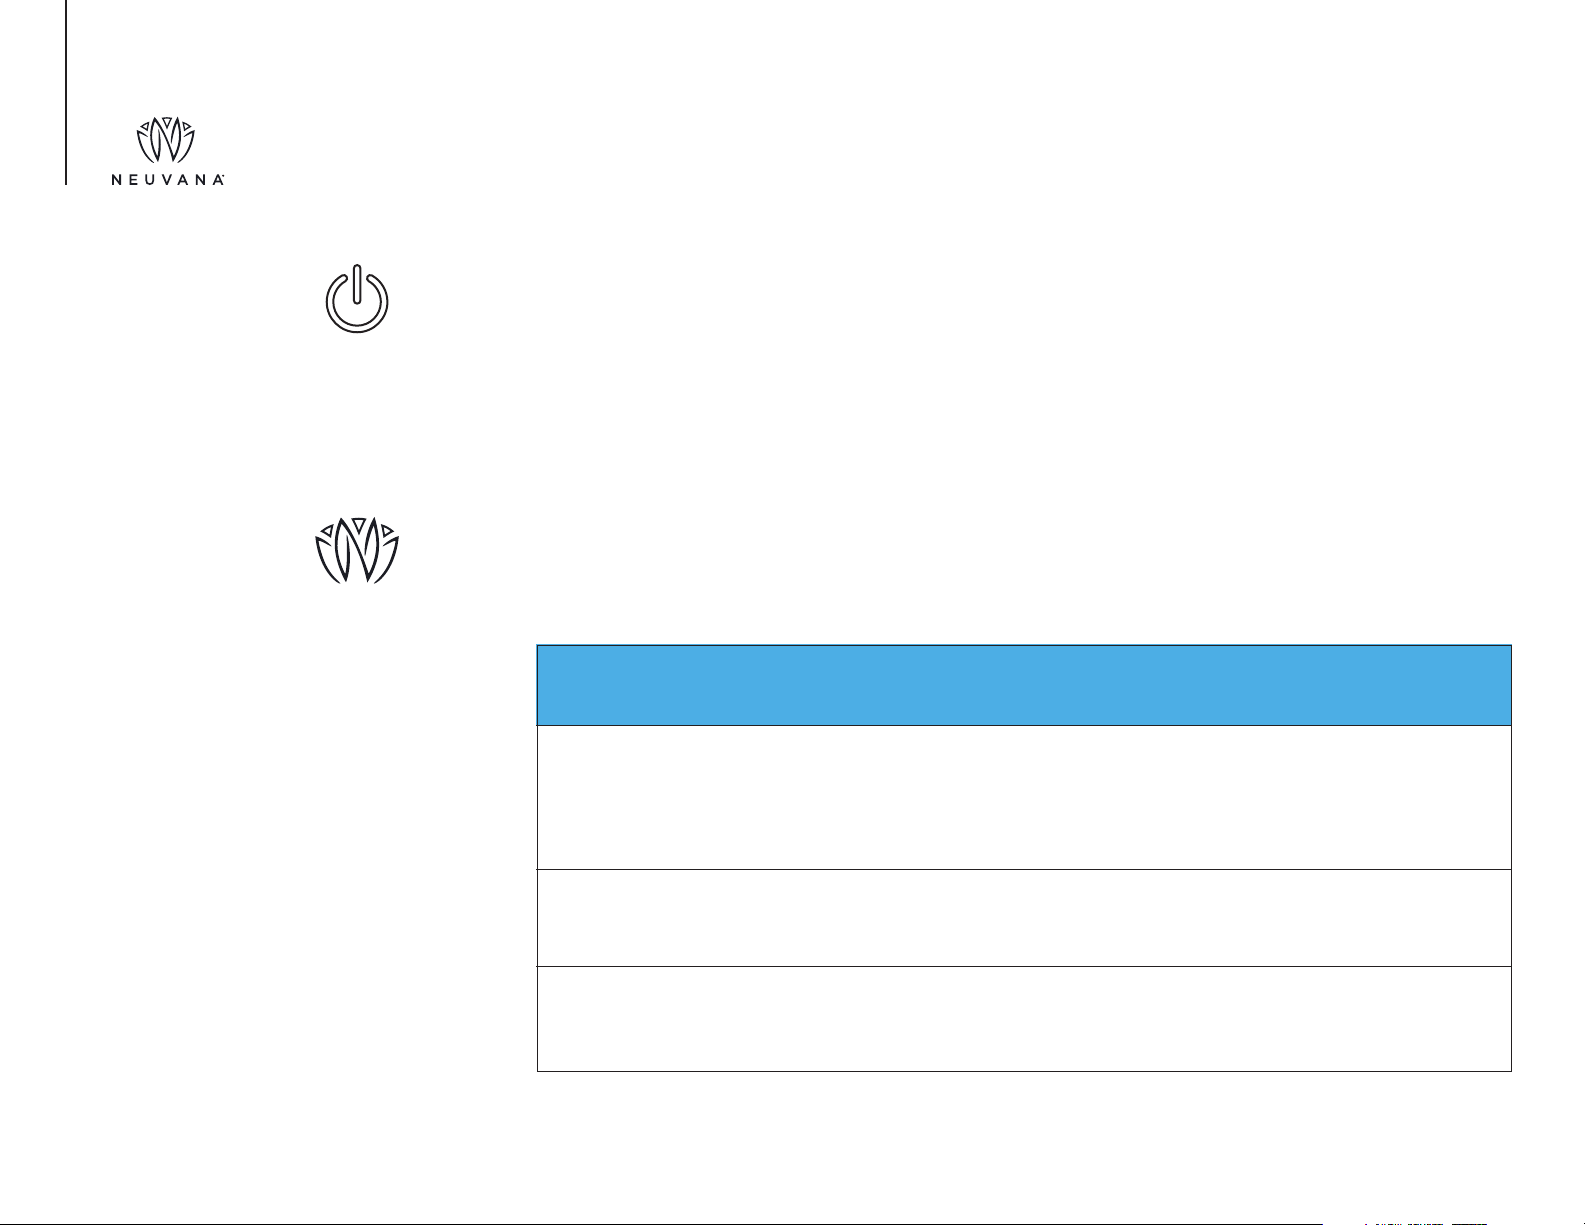
YOUR XEN UNIT The Power button is located on the top of the unit and has two functions:
It puts the unit into Bluetooth pairing mode.
It turns the Xen unit on or off.
The Neuvana logo and surrounding area on the top of your Xen unit are where the LEDs are located.
The LEDs indicate whether your unit is turned on and your unit’s Bluetooth status.
COLOR DESCRIPTION
Green Indicates power is being supplied to your Xen unit when you turn it
on and that power is being shut down when you turn it off. When
connected to the charger, green indicates your Xen unit is charged
and ready to begin a session.
Blue When flashing, your Xen unit is searching for Bluetooth connection.
After a connection is established, the LEDs turn solid blue and fade.
Red When connected to the charger, red Indicates your Xen unit battery is
low and not fully charged.
POWER
LEDs

NeuvanaLife.com
YOUR XEN UNIT POWERING ON/OFF
To turn on your Xen unit, press the Power button. The LEDs briefly turn green to indicate that there is
power being supplied to your unit. When your unit is searching for a Bluetooth connection, the LEDs flash
blue. After a connection is established, the LEDs turn solid blue and then fade away.
To turn off your Xen unit, press the Power button for 1 second. The LEDs turn solid green and then fade
away to indicate that power is no longer being supplied to your unit.
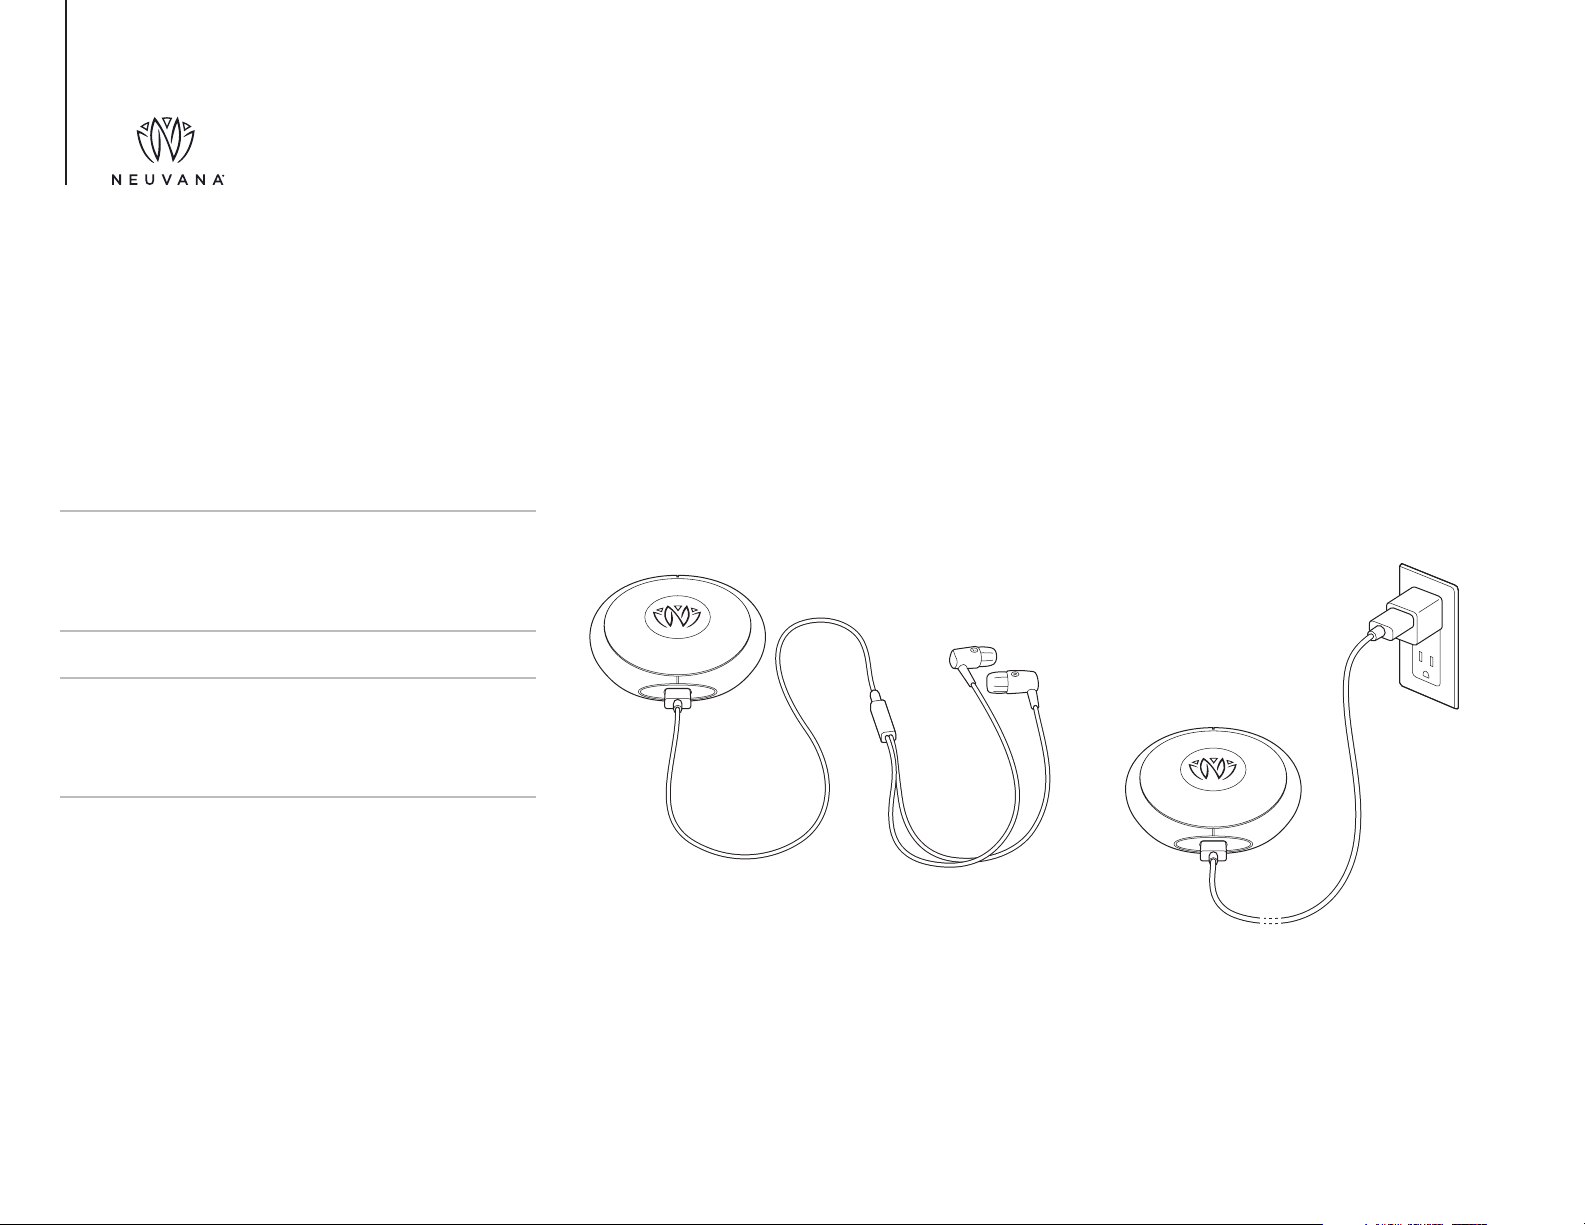
CHARGING
Be sure to fully charge your Xen unit before using your Xen.
To charge your Xen unit:
1. Plug the large end of the USB cable into the USB wall adapter.
2. Plug the USB wall adapter into a wall outlet.
3. Plug the small end of the USB cable into the USB port on your Xen unit. When your Xen unit is
charging, the LEDs turn red if the battery is low.
4. Wait for the LEDs to turn solid green, which indicates that your Xen unit battery is fully charged and
ready to use.
TIP:
A full charge lasts for up to 2.5 hours of use.
NeuvanaLife.com
YOUR XEN
HEADPHONES
The Xen headphones are the only ones that can be used with the Xen unit to supply an electrical stimulation signal. Assembly and
placement of the right and left headphones is very important.
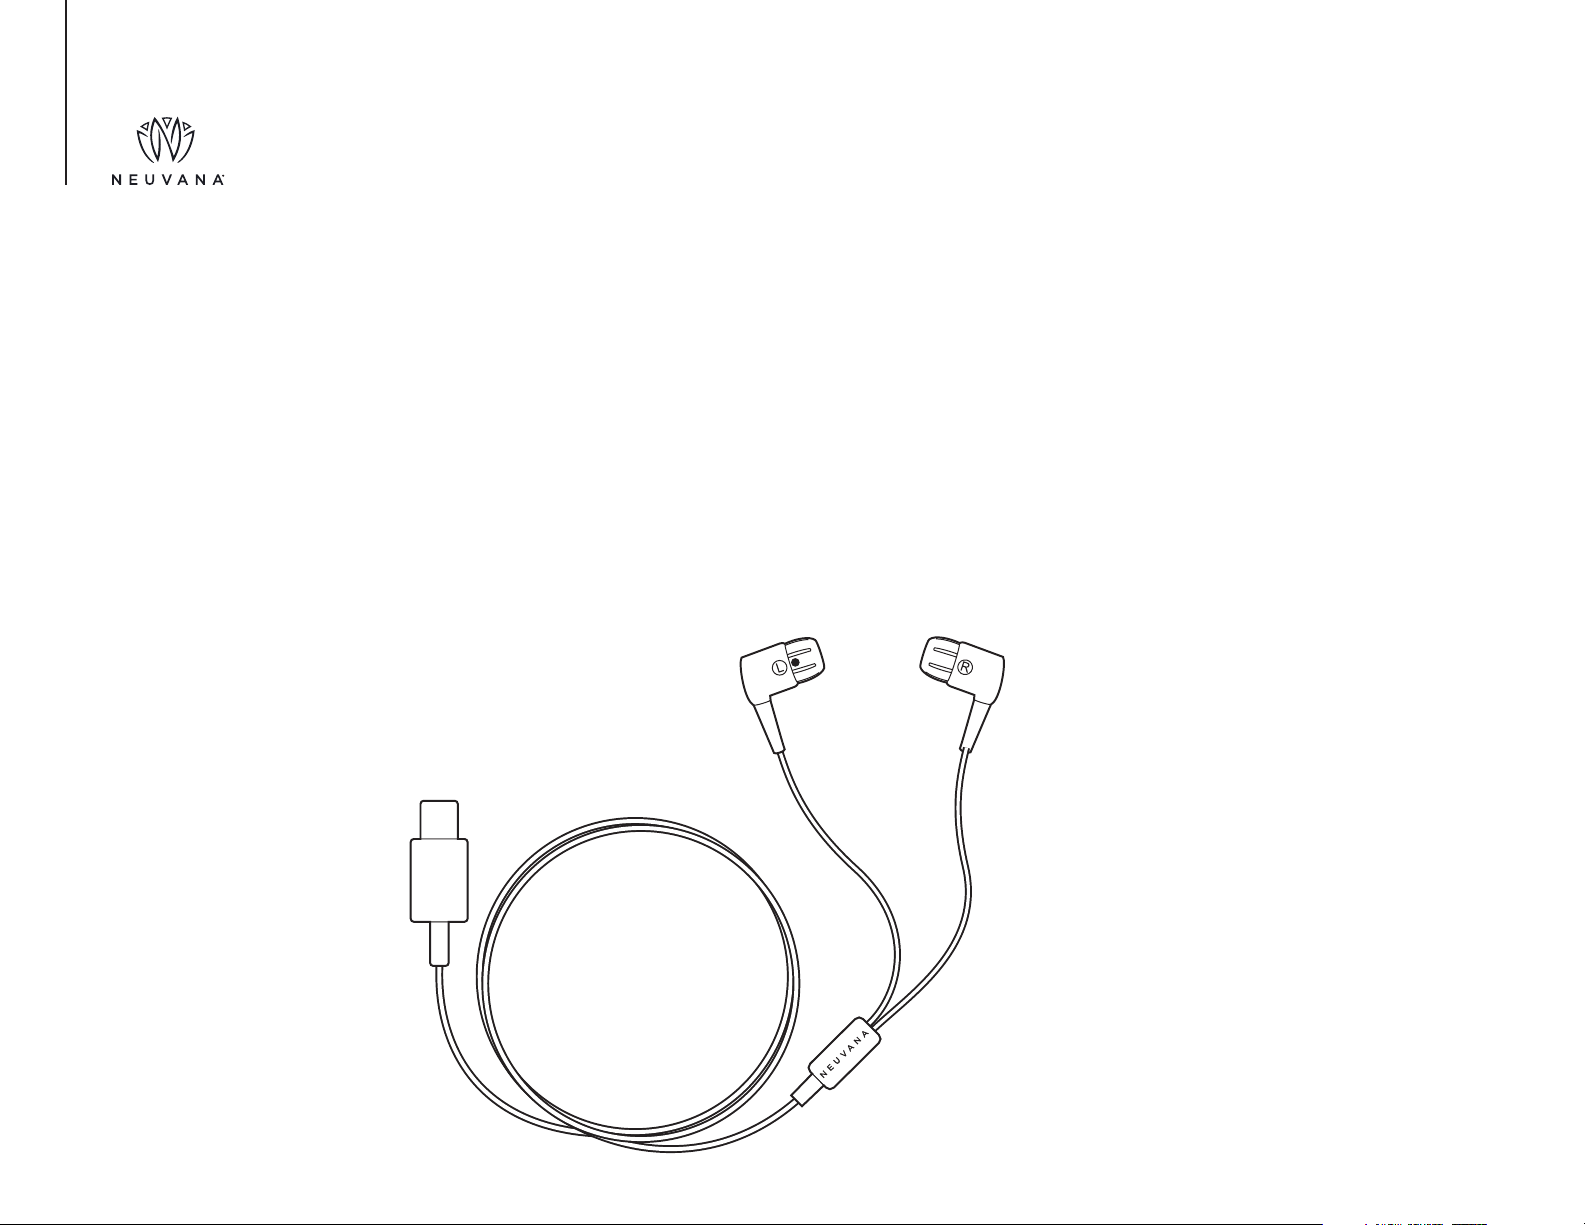
At one end of the Xen headphones is the USB connector, which you plug into the Xen unit. At the opposite end are the speaker
assemblies, which are installed within the right and left earpieces.
The headphones come with medium size replaceable silicone earbuds installed on the earpieces. The left earpiece (connected to the
white cable), delivers the electrical stimulation and should only be used in the left ear.
Right
earpiece
Left and right earbuds
Left
earpiece
USB plug

NeuvanaLife.com
YOUR XEN
HEADPHONES
SELECTING EARBUDS
Your Xen headphones come already assembled with a set of replaceable silicone earbuds. These
replaceable earbuds are size Medium (M). Your Xen box set includes three additional pairs of earbuds
ranging from size Small (S) to Extra Large (XL).
The earbuds should be snug and muffle most noise when you have them in. Try the different earbud sizes
until you find a comfortable fit. Choosing the proper size earbuds provides an optimal Xen experience.
The best transmission of signal occurs when the earbud has good contact with the skin in the ear canal.
INSTALLING EARBUDS
Each pair of earbuds consists of a left and right earbud. The left earbud is marked with a white dot.
In order to conduct the signal, the left earbud is active and conducts electricity. The right earbud is
passive and does not conduct electricity.
The earpiece housings and cables are also unique to the left and right side. The white cable is the left
conducting cable, and it is connected to the earpiece labeled with the letter “L”. The right cable is black
and connected to the earpiece labeled with the
letter “R.”

NeuvanaLife.com
YOUR XEN
HEADPHONES
Be sure to assemble the left earbud (marked with a white dot) onto the left earpiece and the right earbud
onto the right earpiece. This is VERY IMPORTANT because the electrical signal is intended to be supplied
only within the left ear. If the incorrect earbud is placed on the left earpiece, the Xen unit will not work.
Use the summary below to identify the right and left earbuds:
Left Headphone:
The left earpiece is marked with a white circle and
the letter “(L)”.
The left earpiece has a white
connecting cable.
The back of the left earpiece is white.
Each left replaceable earbud is marked with a
white circle.
An indexing feature inside the left earbud match-
es the same shaped indexing feature on the left
earpiece.
Right Headphone:
The right earpiece is marked with the
letter “(R)”.
The right earpiece has a black
connecting cable.
Each right replaceable earbud is
not marked.
The back of the right earpiece is black.
An indexing feature inside the right
earbud matches the same shaped indexing feature
on the right earpiece.
CAUTION:
DO NOT USE the left earbud in the right ear.
NeuvanaLife.com
YOUR XEN
HEADPHONES
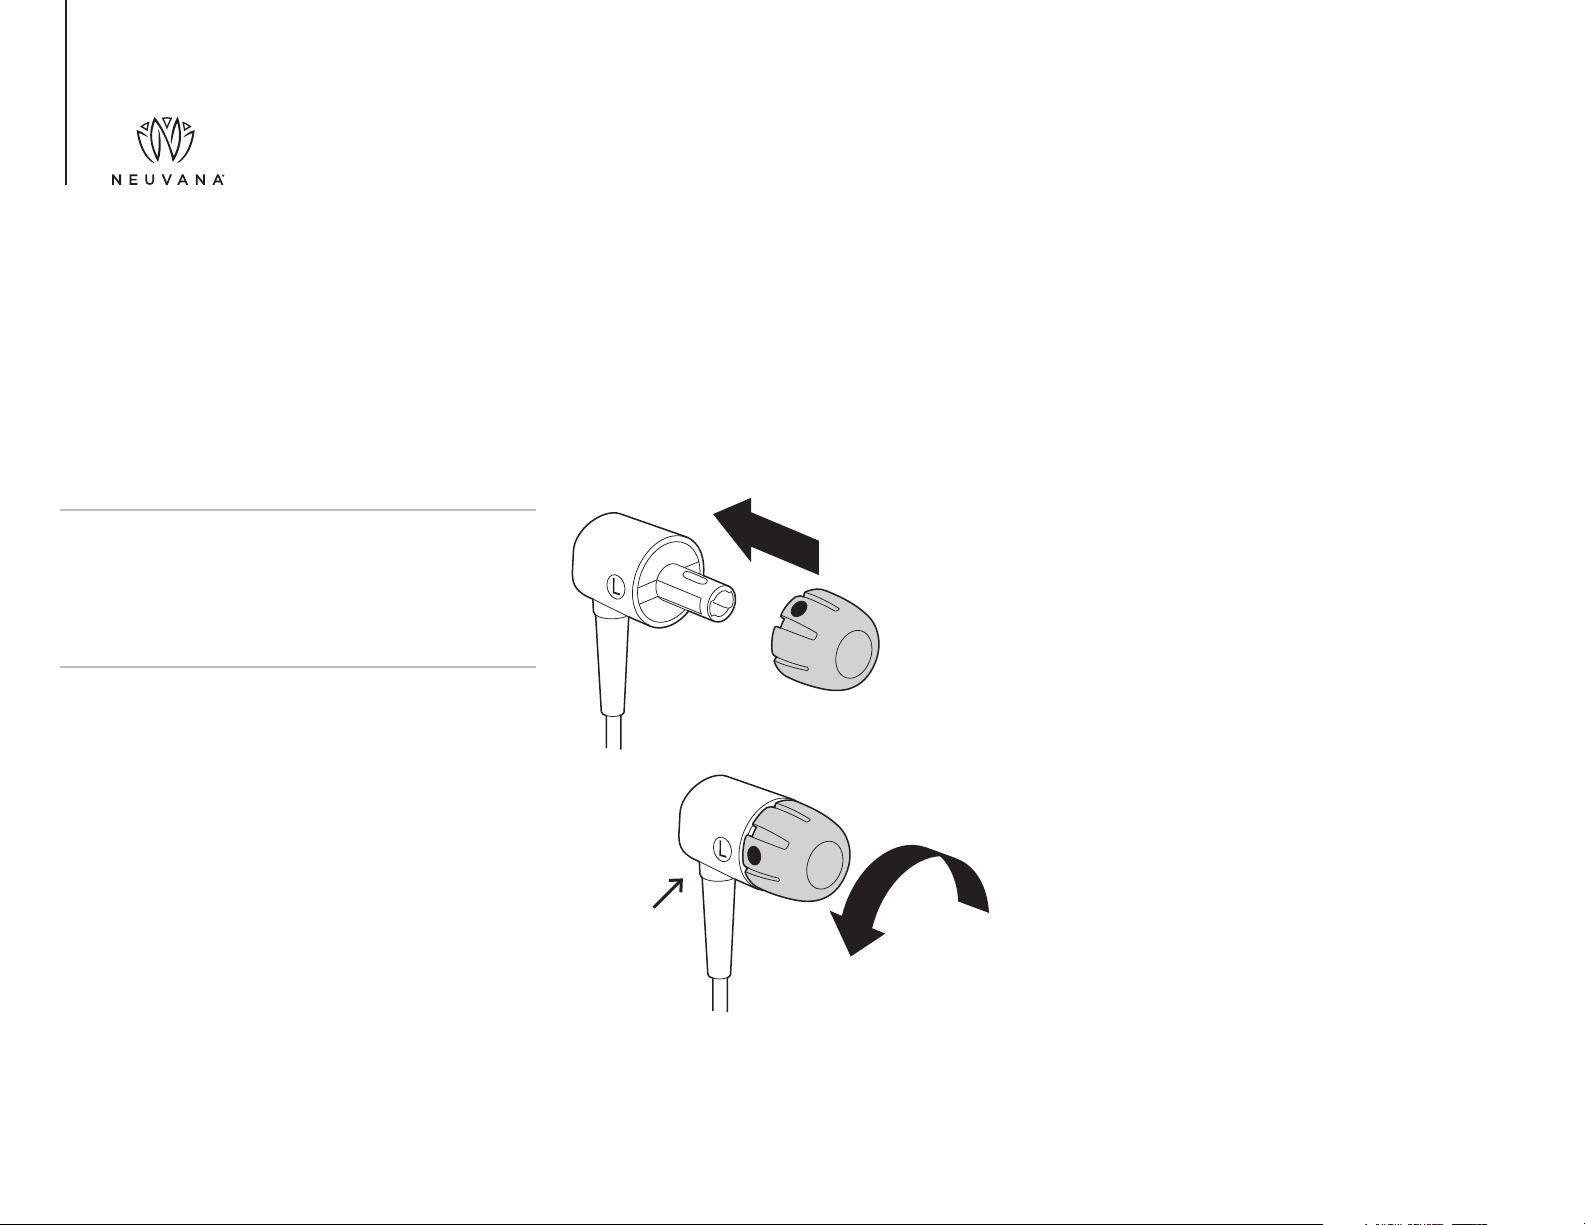
NOTE:
If the white dot is not lined up with the “L” on
the left earpiece, the electrical stimulation will
not work.
If the medium size earbuds do not fit snugly, attach a different set of earbuds:
1. Press and twist the left earbud (which has a white dot) onto the left earpiece.
2. Align the white dot on the left earbud with the “L” on the left earpiece.
3. Press and twist the right earbud onto the right earpiece.
Align dots

NeuvanaLife.com
YOUR NEUVANA APP The Neuvana app enables your iOS or Android smartphone, laptop, or tablet to communicate with your
Xen and customize the stimulation that your Xen unit provides. The communication between your
Neuvana app and your Xen takes place via Bluetooth connections, which are discussed later in this guide.
SYSTEM REQUIREMENTS
The Neuvana app requires a smartphone, laptop, or tablet that uses ONE of the following
operating systems:
iOS 11 or higher
Android OS 5.0 or higher (also known as Lollipop)
INSTALLING THE NEUVANA APP
To use the Neuvana app, you must first install the app on the device you want to use with your Xen.
The steps vary based on whether you are using an iOS or an Android device.
Follow the appropriate steps below to install the app on your compatible device.

NeuvanaLife.com
iOS Devices
1. From the iOS device you want to use with your Xen, go to the App Store.
2. Search for the Neuvana app.
3. Tap Get.
4. When the install is complete, tap Open to open the app.
Android Devices
1. From the Android device you want to use with your Xen, go to your home screen, tap Apps, and then
tap Play Store.
2. Search for the Neuvana app.
3. Tap Install.
4. When the install is complete, tap Open to open the app.
Your Neuvana App

NeuvanaLife.com
UPDATING THE NEUVANA APP
You can expect the Neuvana app to be updated periodically. The steps to install updates vary based
on whether you use an iOS or Android device. Follow the appropriate steps below to install the
updates on your compatible device:
iOS Devices
1. Open the App Store.
2. Tap Updates at the bottom of the screen.
3. Under Available Updates, find the Neuvana app.
4. Tap Update.
Android Devices
1. Open the Play Store.
2. Under Previously Installed Apps, tap the Neuvana app.
3. Tap Update.
Your Neuvana App

NeuvanaLife.com
Your Neuvana app uses TWO Bluetooth connections to communicate with your Xen--one connection for
your headphones and a second connection for your Xen unit.
The process you use to establish these Bluetooth connections is often referred to as pairing. The pairing
steps vary based on whether you are using an iOS or an Android device.
Follow the appropriate steps below to create these TWO Bluetooth connections:
iOS Devices
1. To enter Bluetooth pairing mode, press the Power button once on your Xen unit.
2. While the LEDs on the front of the Xen unit blink blue, go to your smartphone’s Settings panel and
select Bluetooth.
3. Select your Xen headphones.
4. To confirm this first connection:
• Make sure the LEDs on your Xen unit turn solid blue and fade.
• Make sure your Bluetooth Settings panel shows your Xen headphones as “Connected.”
NOTE:
You may need to repeat both pairing processes
each time you start a new session.
NOTE:
Your Xen appears as Xen-xxxxxx where xxxxxx is
a mix of letters and numbers that are unique to
your Xen unit.
BLUETOOTH CONNECTIONS

NeuvanaLife.com
BLUETOOTH CONNECTIONS
5. Open the Neuvana app.
6. Tap the white Bluetooth icon in the upper-right corner and follow any onscreen prompts to scan for
your Xen unit.
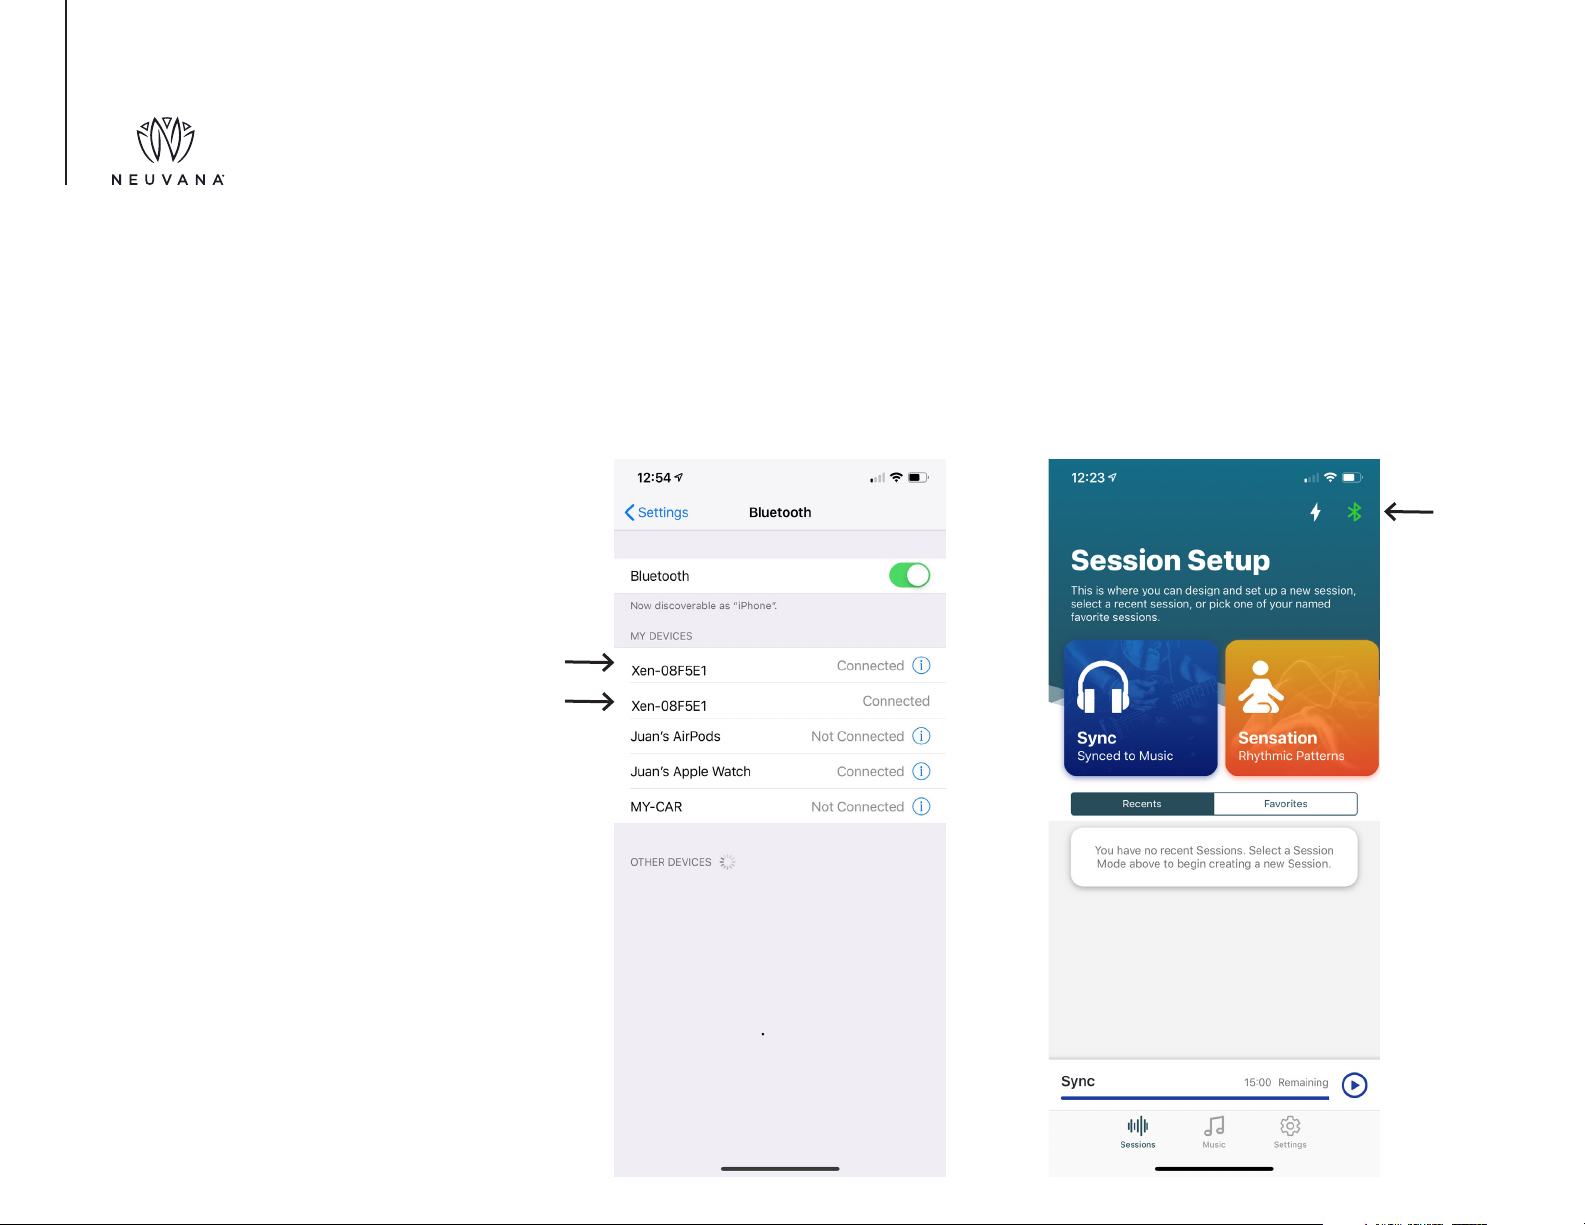
NeuvanaLife.com
7. Confirm your Bluetooth connections by doing both of the following:
Check your smartphone’s Bluetooth Settings to confirm that you see TWO identical connections to
Xen-xxxxxx.
Confirm that the Bluetooth icon in the upper-right corner of the Neuvana app is green (versus white).
BLUETOOTH CONNECTIONS

NeuvanaLife.com
BLUETOOTH CONNECTIONS Android Devices
1. Go to your smartphone’s Settings panel and tap Bluetooth.
2. Tap Pair new device.
3. Press the Power button once on your Xen unit. (The LEDs on the front of the Xen unit blink blue.)
4. While the LEDs on the front of your Xen unit are blinking blue, go to your smartphone’s Bluetooth
panel and select your Xen headphones.
5. To confirm this first connection, make sure the LEDs on your Xen unit turn solid blue and fade.
6. Open the Neuvana app and tap the Bluetooth icon in the upper-right corner to establish the
sensation link.
NOTE:
Your Xen appears as Xen-xxxxxx where xxxxxx is a
mix of letters and numbers that are unique to your
Xen unit, and there is a headphone icon next to
this entry.
Table of contents


