New Cosmos USA DeNova Detect 807NIT User manual

New Cosmos USA, Inc.
Natural Gas Alarm
807NIT
User’s Manual
This manual has been prepared for the 807NIT Gas Alarm
(“Gas Alarm”). If you have a Gas Alarm installed in your
house or building, you should read and understand the
important instructions and warnings contained in this
manual and retain a copy for future reference.
When natural gas, which consists primarily of methane, is
present at concentrations of 10% or greater of the lower
explosive limit (LEL) for methane, the Gas Alarm is
designed to activate a gas leak alarm. The gas leak alarm
consists of a flashing red LED light, an audible warning
sound (a loud beep), and a recorded message.
The Gas Alarm is equipped with an Itron Network Solutions
(INS) communications module designed to automatically
send information directly to your gas utility. including
information associated with gas leak alarm activation, Gas
Alarm error, low battery, and end-of-service-life.
DANGER: EXPLOSION, FIRE AND
ASPHYXIATION
Natural gas leak alarm indicates an emergency
situation and risk of explosion.
•
EVACUATE IMMEDIATELY and take others with
you.
•
Do NOT use a phone, light a match, or turn on or
off any light switches, flashlights, or appliances.
Doing so could IGNITE a FIRE or EXPLOSION.
•
CALL 911 once you are safely outside the
premises.
•
Do NOT re-enter until told to do so by
authorities.
DANGER: ELECTROCUTION
Do not subject the Gas Alarm to water or liquid by
submerging it, spraying liquid on it or otherwise.
Do not disassemble.
DANGER: EXPLOSION
This Gas Alarm is designed to act as a continuous
monitor of natural gas that reaches the sensor.
This Gas Alarm should not be used as a short-
term testing device to perform a onetime check
for the presence of natural gas, as plugging the
battery into the device in the presence of natural
gas may cause an explosion.
DANGER: FIRE AND EXPLOSION
Improper disposal may result in fire or explosion.
Contact your gas utility to arrange for disposal.
DANGER: HAZARDOUS CONDITIONS
Follow these instructions completely. Failure to
do so may result in an undetected natural gas leak
or other hazardous conditions that may cause
serious injury or death.
DANGER: HEARING DAMAGE
Do not place your ear directly against or in close
proximity to the Gas Alarm when it is alarming.
Such exposure to the audible gas leak alarm may
damage your hearing.
WARNING
•
Do not change the Gas Alarm’s installation position,
relocate it from where it is installed, or tamper with the
Gas Alarm or its battery.
•
Do not block, cover, obstruct or paint over the Gas Alarm
or its sensor. The Gas Alarm can only detect natural gas
that reaches its sensor.
•
Network or power outages may prevent your gas utility
from receiving or processing automated notifications from
your Gas Alarm, including notifications related to gas leak
alarms. Always follow these instructions, without relying
on such automated notifications.
•
This Gas Alarm will reach its end-of-service-life in
approximately 7 years from the date of installation.
Contact your gas utility for replacement if you observe the
end-of-service-life alarm indicator LED.
•
Do not modify, disassemble, submerge, strike, crush, or
expose the Gas Alarm to high levels of volatile organic
compounds. Doing so may cause the Gas Alarm to
malfunction.
•
Commercially available batteries will not work with the
Gas Alarm. Contact your gas utility to arrange for
replacement.
•
Keep out of reach of children.
•
For indoor use only.
NOTICE
•
The Gas Alarm must only be installed by your gas utility
or an authorized gas utility contractor.
•
The Gas Alarm only detects natural gas. It does not
detect carbon monoxide, fire, heat, smoke, flames,
propane or any other gas.
•
The Gas Alarm is not a substitute for proper installation,
use, and maintenance of natural gas appliances and
piping systems. The Gas Alarm does not prevent natural
gas leaks from occurring, nor can it eliminate any existing
natural gas leaks or problems.
General Description and Intended Use
DANGER
If you smell natural gas, evacuate the area
immediately, then call 911. Do not wait for the gas
leak alarm to sound or for your gas utility to
receive an automated notification.
This Gas Alarm is designed to detect natural gas. Natural
gas is a fossil fuel that is primarily made up of methane. It is
commonly used for cooking, home heating and water
heating. Natural gas is typically supplied through a gas
main and utility service line connected to your home.
Natural gas is odorless and colorless, but has a chemical
odorant (mercaptan) added to it to give it a distinct “rotten
eggs” smell. Even odorized natural gas may not be
detected by smell in an unoccupied space, by an individual
with reduced sensitivity to smell, or in other situations.
Natural gas is a highly flammable chemical compound.
Although it happens rarely, a natural gas leak can occur
inside a house or building. This can be dangerous because
it increases risk of explosion and fire. The Gas Alarm is
designed to activate a gas leak alarm when it detects 10%
or greater of the LEL for methane, which is 0.5% or greater
of methane in air. When the gas leak alarm activates, the
Gas Alarm will beep 4 times and state “Danger – gas leak
explosion risk – evacuate, then call 911.”
In the event of a gas leak, you may smell natural gas before
the gas leak alarm is activated. If you smell natural gas at
any time, do not wait for the gas leak alarm to sound or
check for Gas Alarm malfunction. Evacuate immediately,

then call 911.
Using the INS communications module, the Gas Alarm is
designed to automatically send Gas Alarm-related
information to your gas utility. When natural gas is detected
at or above the gas leak alarm threshold, the Gas Alarm is
designed to transmit a gas leak alarm notification to your
gas utility. The Gas Alarm is also designed to send
information about device health to your gas utility during
automated health checks performed every 8 hours.
The Gas Alarm is not guaranteed to prevent personal
injuries or property damage associated with a gas leak. For
example, an error may occur that prevents detection of
natural gas, including gas leaks. Network or power outages
may prevent your gas utility from receiving or processing
automated notifications from your Gas Alarm, including
notifications related to gas leak alarms. Some people may
sleep through and not hear the audible gas leak alarm. You
should ensure that your natural gas appliances and piping
systems are properly installed, used, and maintained to
reduce the likelihood of a natural gas leak.
Gas Alarm parts
Gas Alarm functions
The Gas Alarm is designed to activate an audible gas leak
alarm in the event of a natural gas leak, and a silent alarm
with visual LED indicators in the event of a Gas Alarm error,
a low-battery condition, and when the Gas Alarm reaches
its end-of-service-life. The INS communications module is
also designed to send an automated notification to your gas
utility when any of these alarms activate.
Natural gas leak alarm activation
The Gas Alarm is designed to activate a gas leak alarm
when it detects natural gas at a concentration that reaches
or exceeds 10% of the LEL for methane. When activated,
the gas leak alarm is designed to:
Beep 4 times and state “Danger –gas leakexplosion
risk –evacuate, then call 911.” This notification will
repeat every 6 seconds for 4 minutes, and then every 1
minute thereafter.
Send a gas leak alarm notification to your gas utility via
the INS communications module every 30 seconds.
Flash the Red LED light once every 2 seconds.
DANGER: EXPLOSION, FIRE AND
ASPHYXIATION
Follow these instructions carefully in the event
that the natural gas leak alarm activates. Never
ignore any natural gas leak alarms.
EVACUATE IMMEDIATELY and take others
with you.
Do NOT use a phone, light a match, or turn on or
off any light switches, flashlights, or appliances.
Doing so could IGNITE a FIRE or EXPLOSION.
CALL 911 once you are safely outside the
premises.
Do NOT re-enter until told to do so by
authorities.
DANGER: EXPLOSION RISK
Do not reset the Gas Alarm after the gas leak
alarm goes off, unless instructed to do so by
emergency personnel. Resetting process can
cause an explosion if conducted in an area with
high concentrations of natural gas.
Emergency responders or trained personnel may reset or
instruct you to reset the Gas Alarm by removing and
reinstalling the battery. After removing the battery, hold the
test button for at least 10 seconds and leave the battery
unplugged for at least 2 minutes. This will reset the device
by turning off auditory and visual notifications.
Error alarm activation
An alarm indicates a Gas Alarm error by flashing the Yellow LED
light (trouble) three times every 10 seconds, and an alarm will
sound every 60 seconds, beep 3 times and state "Detector Error"
followed by 3 additional beeps and state "Error del detector". When
this alarm activates, a Gas Alarm error notification is transmitted to
your gas utility during the every-8-hour device health check.
Low-battery alarm activation
NOTICE
The Gas Alarm uses a specialized battery not
available at retail. Contact your gas utility to arrange
for replacement.
An alarm indicates low battery by flashing the Yellow LED light
(trouble) once every ten seconds, and an alarm will sound every 60
seconds, beep 1 time and state "low battery" followed by an
additional beep and state "Batería baja". If you observe the low-
battery alarm indicator LED, contact your gas utility to arrange for
replacement.
When this alarm activates, a low-battery notification is transmitted
to your gas utility during the every-8-hour device health check.
30 seconds.
Red LED (gas leak alarm)
Flashes once every 2 seconds
An alarm sounds every 6 seconds
stating “Beep Beep Beep Beep
Danger – gas leak explosion risk –
evacuate, then call 911.”
Transmits gas leak alarm signals every
Transmits Gas Alarm error
notifications during the health
checks performed every 8 hours.
Yellow LED (trouble)
Flashes 3 times every 10 seconds
Transmits a low battery
notification during the health
checks performed every 8 hours.
The battery in this device is not
available in retail.
Contact your gas utility to
arrange for replacement.
Yellow LED (trouble)
Flashes once every 10 seconds
● Internal gas sensor
● Green LED (Power)
This LED flashes
when the test button
is pressed.
● Alarm speaker
Sounds an
alarm when
natural gas is
present.
● Red LED
(Gas leak alarm)
This LED flashes
when gas is detected.
● Production serial number label
● Yellow LED (trouble)
This LED flashes
when trouble
occurs, when the
battery is low, or
when the end of
service life has
been reached.
● Test button
● MACID label

End-of-service-life alarm activation
An alarm indicates the end of the Gas Alarm’s service life by
flashing the Yellow LED light (trouble) twice every ten seconds, and
an alarm will sound every 60 seconds, beep 2 times and state
"Please Replace Detector" followed by 2 additional beeps and state
"Por favor, reemplace el detector". If you observe the end-of-
service-life alarm indicator LED, contact your gas utility to arrange
for replacement.
When this alarm activates, an end-of-service-life notification is
transmitted to your gas utility during the every-8-hour device health
check.
Cleaning
WARNING
Dirt and dust can cause the Gas Alarm to malfunction.
Follow these instructions to maintain proper operation.
If you observe dirt or dust accumulating on the Gas Alarm,
contact your gas utility to arrange for the Gas Alarm to be
cleaned. As an alternative, you can clean the Gas Alarm, as
needed, by gently vacuuming the exterior of the unit
including all slotted openings using a household vacuum’s
soft brush attachment.
Never use water, cleaners or solvents since they may
damage the unit.
Do not use spray cleaning chemicals, pesticides, or insect
sprays directly on or near the Gas Alarm. Do not use any
household cleaning agents, ammonia-based cleaners,
paints, varnishes, aerosol sprays (including compressed
gas dusters), or any other chemical on or near this Gas
Alarm.
Specifications
Contact Details
New Cosmos USA, Inc.
650 Warrenville Rd, Suite 101
Lisle, IL 60532
Tel: (847) 749-3064
Conforming
standards
UL standard (UL1484),
FCC Certified
Detection
principle
MEMS hot wire
semiconductor sensor
Target gas
Methane gas (natural gas)
Sensor
immunity
Acetone, ethanol, bleach
solution, among others
Operating
temperature
range
32°F (0°C) to 122°F
(50°C)
Operating
humidity range
5% to 95%, no
condensation
Power supply
3V Lithium Battery
Alarm level
10%LEL
Sound Output
85dB at 10 feet
Initial power-up
timer
Approx. 30 seconds
(green LED flashes once
every second)
Weight and
dimensions
Approx. 170g, W 85 x H
115 x D 28mm (excluding
protrusions)
FCC
Compliance
This device complies with
Part 15 of the FCC Rules.
Operation is subject to the
following two conditions:
(1) This device may not
cause harmful interference
and (2) this device must
accept any interference
received, including
interference that may
cause undesired
operation.
Transmits an end-of-service-life
notification during the health
checks performed every 8 hours.
Yellow LED (trouble)
Flashes twice every 10 seconds

New Cosmos USA, Inc.
Natural Gas Alarm
807NIT
Troubleshooting Guide
This Gas Alarm is designed to be
troubleshot exclusively by authorized
professionals. This guide is intended for
professional use only.
Testing the detector
•CAUTION
If the Gas Alarm does not operate properly,
it cannot alert the presence of natural gas.
Take immediate action if the Gas Alarm fails
a test.
Testing power
Press test button until you hear a “Beep” sound, then
quickly release (within 3 seconds after pressing the test
button). If the device is properly powered, the green LED
will flash twice every second (for 3 seconds) to indicate that
the power is on.
Testing gas leak alarm notifications
Press test button until you hear a “Beep” sound, then
continue to hold until you hear a “Beep Beep” sound
approximately 5 seconds later. Release within 10 seconds
of pressing the test button.
If the Gas Alarm is operating properly, the red LED will flash
once every 2 seconds for a 12 second period, and the
following alarm message will sound twice: “Beep Beep
Beep Beep Danger – gas leak explosion risk – evacuate,
then call 911.”
Testing automated communications
Press and hold test button for at least 10 seconds, until you
have heard a single “Beep” followed by a double beep
(“Beep Beep”) followed by a triple beep (“Beep Beep
Beep”). This will enable communications test mode, and
the green LED will flash 3 times per second for as long as
you are in communications test mode.
Once in communications test mode, press the test button
additional times to test whether the detector is
communicating normally with your gas utility’s systems,
able to properly transmit detector error signals, and able to
properly transmit a low battery signal. Success will be
indicated as follows:
Green LED
Yellow LED
Communications test
mode activated
Flashes 3x
per second
Off
1st press: normal
communication
Flashes 2x
per second
Off
2nd press: proper
transmission of device
error signal
Flashes 2x
per second
Flashes 3x
per second
3rd press: proper
transmission of low battery
signal
Flashes 2x
per second
Flashes 2x
per second
If the red LED light activates or the alarm sounds
during any of these tests, the detector’s
communication functions are not working properly.
Additional presses will cycle you back through these three
tests for as long as you are in communications test
mode. Communications test mode will automatically end
after 5 minutes.
Troubleshooting
Symptom
Cause
Action
The green LED does
not flash even when
the switch is pressed
Battery connector
not plugged in
completely
Plug in the
battery
connector
completely
Battery is low
Replace the
battery
The yellow LED is
flashing.
Flashes twice
every 10 seconds:
End of service life
Replace the
detector
Flashes once every
10 seconds:
Low battery
Replace the
battery
Flashes 3 times
every 10 seconds:
Gas alarm trouble
Replace the
detector
Green LED (power)
Flashes twice every
second(for 3seconds)
”Beep”
Red LED (alarm)
Flashes once every
2second
”Beep”
”Beep Beep”
When the button is
Released “Beep Beep
BeepBeep Danger –
Gas leak explosion risk -
evacuate, the call 911.”
Will sound twice.
Green LED (power)
Flashes 3 times every
second
“Beep”
“Beep Beep”
“Beep Beep Beep”
The signals in the
following table are
transmitted
New Cosmos USA, Inc.
Natural Gas Alarm
807NIT
Professional Installation
Guide
This Gas Alarm is designed to
be installed and cleaned
exclusively by authorized
professionals. Users should
not install or clean the gas
alarm themselves. This guide is
intended for professional use
only.
Selecting location for
installation
NOTICE
•
Installation in an improper location
can affect the sensitive electronic
components in this Gas Alarm.
•
Improper placement can prevent
detection of methane.
•
Place out of reach of children.
Gas Alarm should be installed by attaching it
to a pipe or, if a suitable pipe is unavailable,
to a location on a wall that is:
•Between 4 to 12 inches (0.1 to 0.3
meters) from the ceiling.
•In an area where it will not be impeded
by items hanging from or near the
ceiling such as curtains, drapes, ceiling
fans.
•At least 5 feet (1.5 meters) from cooking
appliance or cooktop hood.
•At least 10 feet (3 meters) from gas
appliances.
Gas Alarm should NOT be installed:
•In the peak of a cathedral ceiling.
•Directly above or near sources of water
or humidity such as a sink, cooktop,
dishwasher or a shower.
•Next to a door or window.
•Next to a ventilation fan.
•Near a room return or HVAC duct.
•In an area where the temperature will
drop below 32°F (0°C) or exceed 122°F
(50°C).
•In an area that is dusty or dirty.
•In an area where organic solvents exist
or silicone vapors.
•In a damp or very humid location, such
as a bathroom.
•Outside.
Installing the battery
DANGER –SHOCK
Do NOT remove the plastic wrap
surrounding the battery pack. Doing
so may cause electrical short or
shock.
NOTICE
Gas Alarm uses type of battery that
is not available in retail. Contact
your gas utility if replacement
battery needed.
After installing battery, test the Gas
Alarm following instructions in
Troubleshooting Guide.
To reinstall the included battery or
install a new battery you received from
your gas utility:
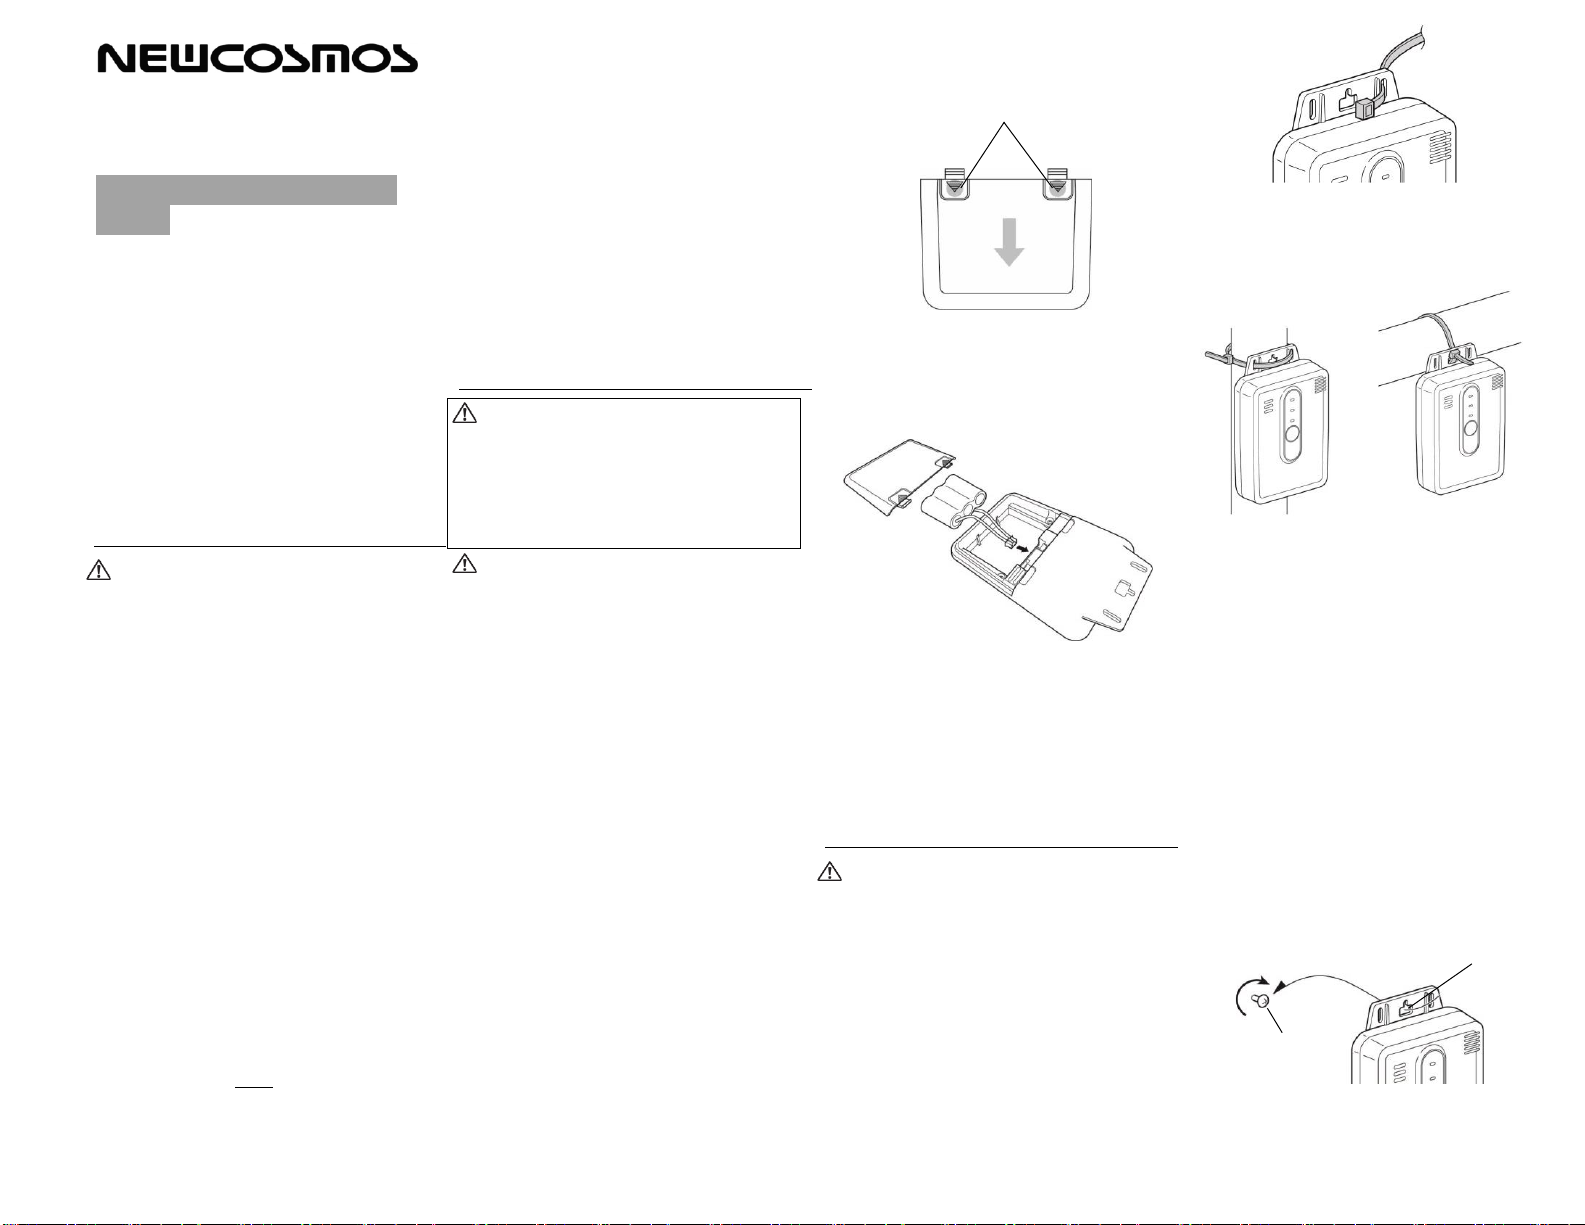
•Open the battery cover on the back of
the detector. This cover slides out of
place. To open, place both thumbs on
the back of the battery cover where the
battery cover hooks snap into place.
•Push down where the battery cover
snaps into place with your thumbs and
slide the cover out. Some force is
required.
•Connect the included lithium battery by
inserting the battery harness connector
into the product as shown in the diagram
below. Do NOT remove the plastic wrap
surrounding the battery pack.
•The battery connector has a large notch
on it that faces up when installed
correctly. There is only one way in which
the connector can be installed. A small
portion of the connector will be exposed
when connected properly.
Mounting the Gas Alarm
NOTICE
After mounting the Gas Alarm, test it
following instructions in
Troubleshooting Guide.
If possible, mount the Gas Alarm to a
pipe meeting the criteria discussed in the
“Selecting location for installation”
section. To mount to a pipe:
(1) Pass a cable tie through the hole at
the top of the Gas Alarm.
(2) Wrap the cable tie around the pipe
and tie off.
If mounting to a pipe is not feasible, mount
the detector to a wall.
(1) Choose a location on the wall
between 4 inches (0.1 meters) to 12
inches (0.3 meters) from the ceiling.
Make a mark in the Mounting Tab of
the Gas Alarm where you will drill
the mounting hole.
(2) Use a 3/16” (5 mm) drill bit to drill
the mounting hole and insert
included anchor.
(3) Tighten the screw into the anchor
until the screwhead is about 3/16
inch (5 mm) away from the wall,
leaving enough space for the
Mounting Tab.
(4) Hang the Mounting Tab on the
screw.
(5) Lightly tighten the screw to secure
the Gas Alarm.
To remove the battery cover, push
down at the indicated points with
your thumbs and side the cover in
the direction of the arrow.
Mounting Tab
screw
This manual suits for next models
1
Table of contents
Other New Cosmos USA Security System manuals


Popular Security System manuals by other brands

American Dynamics
American Dynamics AD1273 CobraDome Installation and operation instructions

Philips
Philips VSS7374/D4T user manual

ZKTeco
ZKTeco ProFace X quick start guide

Guardian
Guardian FA168C user guide

Motorola
Motorola MOC4600i Installation and programming instructions

NAPCO
NAPCO XP-400 Using instruction


