New Image FITT RIDER User manual

ASSEMBLY AND USER GUIDE
To help you get started visit:
newimagefitness.co.uk
DOWNLOAD THE
NEW IMAGE FITNESS
APP TODAY
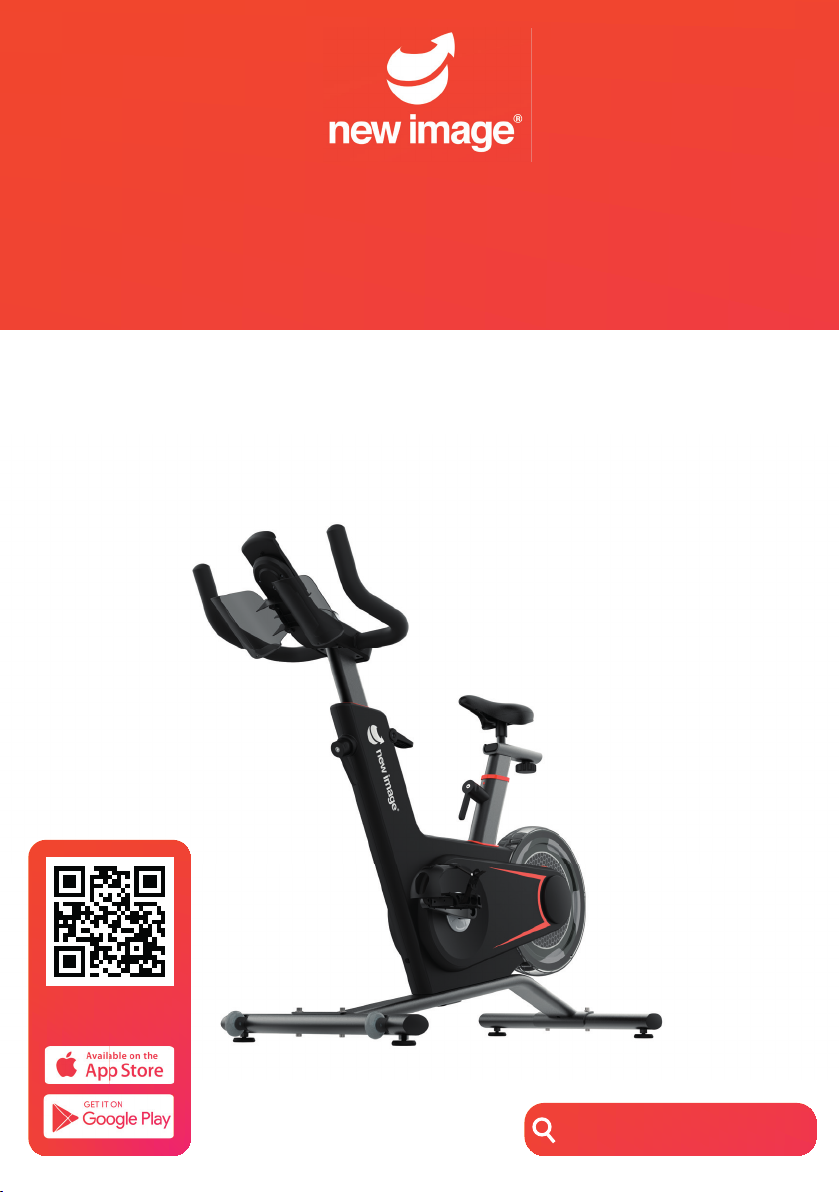
COMPACT HOME EXERCISE BIKE
FITT RIDER

We’re passionate about helping you be fit, strong and active!
Whatever your fitness goal, New Image has a range of unique
and easy-to-use fitness solutions to help you be your best.
We know getting started is sometimes the hardest part so we
design all our products to be simple, fun to use and effective.
We hope you enjoy your new FITT RIDER and would love to hear
your experiences. Check out our social channels and take a look
at YouTube for videos, tips and workouts.
to New Image
WELCOME
• Watch exclusive workout videos
• Ask questions to our thriving community
• Check out our nutritional tips and tricks
To find out more about the New Image range of fitness
equipment, tools and accessories to help you achieve your
goals, visit newimagefitness.co.uk
Join the conversation...
Track your fitness & access all your
workout videos for our New Image range
wherever & whenever you want!
Download the app...


Congratulations on purchasing
your new FITT RIDER!
ASSEMBLY INSTRUCTIONS:
Fixing tools
What’s in the box
A12 A06
A01
A03
A02
C27 R
C27 L
D
(D10) M8 Bolt 8pcs
B18 Multi Wrench
B19 Allen Key
Fixing tools
(D04) Screw 4pcs

First, attach the front leg (A02) using 2 of the M8 bolts (D10). Fix through the
corresponding holes on the main frame (A01) and tighten using the Allen key (B19)
provided. Repeat this process for the rear leg (A03).
Connect the corresponding wires as housed in A06 & A05. Place the constructed
handle (A06 & A12), onto the upright post of the main frame (A05). Using the
remaining M8 bolts (D10), secure the handle in place on top of the square frame
using Allen Key (B19).
Next, take the respective pedals (C27 L&R) and insert in to the cranks on each side.
Note, the right pedal will tighten clockwise and the left pedal will tighten anti-
clockwise. Use (B18) to secure these.
The main unit it is now assembled.
Step 1
Step 2
A03
D10
A01
A02
D10
A06
C27 L
C27 R
A05
D10
A01

Take the dual bottle holder (A12) and align the holes with those on the rear side of the
handle frame (A06). Using the screws (D04), tighten these into position, ensuring they
are located to the correct highlighted fixing holes. Use the screwdriver on the multi
wrench (B19) as provided to do this, ensuring they are securely fastened.
To power the unit, insert the power cable into the front outlet as highlighted in
orange, followed by a mains power outlet. Ensure the cable is then positioned out of
the way of the pedals to avoid interference.
Step 3
Step 4
D04
A12
A06

FUNCTIONS & FIXINGS
• Please read this user guide before first using your FITT RIDER. It is important
to keep these instructions for future reference.
• Assemble and operate the equipment on a level surface.
• Ensure the equipment is stable before use.
• Always ensure you have adequate space on all sides when performing
exercises, at least 100cm on each side.
SAFETY INFORMATION
100 CM 100 CM
100 CM
100 CM

• The safety level of the equipment can only be maintained if it is regularly
examined for wear and tear e.g ropes, pulleys, handles and connections.
• Replace defective components immediately and keep the equipment out of
use until it is required.
• Use only the adjustment setting as described in the instructions. Always use
the correct adjustment plug / fixing.
• Keep hair, fingers and loose clothing away from hinges and other moving
parts to avoid serious injury.
• Always consult your GP before undertaking any exercise programme.
• Always wear suitable clothing and footwear e,g. tracksuit, shorts and training
shoes.
• Remove all personal jewellery before exercising.
• Ensure you warm up well before using the equipment as this will help to
reduce muscle strain.
• After eating, allow 1-2 hours before exercising as this help to prevent strain.
• Never overload the equipment: MAX USER WEIGHT 120kgs.
• Never use the equipment in any other manner other than the ways explained
in these instructions.
• If you feel faint, stop exercising immediately.
• Injuries to health may result from incorrect form / technique or excessive
training.
• Care should be taken at all times when getting on and off the equipment.
Falling off the equipment could result in injury.
• Children should not be allowed on or around the equipment, especially when
it is not in use and unsupervised.
• Parents and others in charge of children should be aware of their
responsibility because the natural play instinct and the fondness of
experimenting of children can lead to situations and behaviour for which the
training equipment is not intended.
• This product is not intended for use by persons with reduced physical,
sensory or mental capabilities, or lack of experience and knowledge, unless
they have been given supervision or instructions concerning the use of the
appliance by a person responsible for their safety.
• This product is not suitable for therapeutic purposes.
• This product is intended for home use only.
• Only use accessory items recommended by the manufacturer.
• CAUTION the instructions must be followed carefully in the assembly, use
and maintenance of the equipment.
• Assembly: It is important you assemble the product in a clean and
uncluttered space.
• Keep away from fire.

• This product is not a toy. Do not stand or jump on it.
• Product weight: 31.5Kg.
• Product dimensions: Length 1210mm x Width 510mm x Height 1020mm.
• Please note the bike will slow down when you slow down, in case of
emergency or discomfort push down the STOP lever.
• To dismount safely from the bike climb down either to the left or right. Do
not climb off the back of the saddle.
• Do not leave the FITT RIDER unattended when it is connected to the power
supply.
• The FITT RIDER is only to be used with the power supply unit supplied.
• If the power supply unit cord is damaged , it must be replaced. Please
contact Customer Services.
• WARNING — This stationary training equipment is not suitable for high
accuracy purposes.
• WARNING – Heart rate monitoring systems may be inaccurate. If you feel
faint stop exercising immediately.
MAINTENANCE AND STORAGE
• Wipe clean only with a clean, damp cloth. DO NOT use detergents. Always
disconnect from the power supply before cleaning.
• This equipment should not be stored outside, in a garage or outbuilding.
Keep the equipment in a dry place with as little temperature variation as
possible.
• We recommend placing a mat beneath the equipment to protect both
the equipment and flooring. New Image mat can be purchased at
newimagefitness.co.uk
• The safety level of the equipment can only be maintained if it is regularly
examined for wear and tear. This includes any ropes, pulleys, handles, nuts,
bolts, moving parts, bushes, chains, wheels, bearings and connections.
Made in China
Please read all instructions carefully and retain for future reference.
Model number: SP106F
Class: HC
OPERATING THE STOP LEVER
In an emergency, depress the STOP lever to
bring the flywheel to an abrupt stop. To lock the
pedals and flywheel, push down the STOP lever
and tighten the screw in a clockwise direction. To

OPERATING THE UNIT
SYMBOL ANNOTATION
Start/stop workout:
A. Whilst under standby mode, press the console once to activate the monitor; then
enter resistance level selection; rotate the outer ring of the monitor in a clockwise
direction to increase the resistance value between levels 1 to 16. Rotate the monitor
in a counter-clockwise direction to decrease resistance value between levels 16 to 1
level. The monitor default setting will always start at level 1.
B. During use, press the console once to pause the a workout. To restart the unit,
press console once again to continue operation.
C. To change settings whilst in paused mode, press console and hold for 3 seconds.
This will reset all values to zero.
Connecting the New Image Heart Rate Monitor:
With your FITT RIDER powered on, simply turn on your New Image Heart Rate
Monitor and ensure it is flashing. Wait for approximately 30 seconds for the device
to calculate your heart rate reading and then begin workout. The display will scan
through stats and display your heart rate in turn.
In any instance this does not display, power off and on both devices and repeat the
first steps.
Resistance
Level
Pulse
Speed
Distance
Time
Calories
In any instance this does not display, power off and on both devices and repeat the

Distance
Displays distance
covered during workout
session. The range
displays between 0.0 to
99.9KMH
Speed
Displays current speed
during workout session.
The range displays
between 0.0 to 72.0 KMH
Heart Rate
Displays current heart rate.
This will only activate when a
compatible heart rate monitor
is connected via Bluetooth. The
range for this will then display
between 50-200BPM. This
reading is not advised to be
used for medical use.
Resistance level
Working range is
between levels 1 to 16
Kcal count
Displays current calorie
count for the workout
session. Range count is
between 0-999.9
Time
Displays time elapsed for the
workout session. The display
time is between 00:00 and
99:59 sec.
OPTIONAL APP CONNECTION
This product can be used with a range of fitness Apps including Kinomap & Zwift.
To connect, download and install the chosen app on iOS or Google play. Then open the
Bluetooth preferences and locate device. This will begin with ‘FS’ and will be followed by
the unique model number.
E.G. FS-XXXXX-A
Time


connected tness
NEW IMAGE FITNESS APP
DOWNLOAD THE NEW
IMAGE FITNESS APP TODAY
Track your fitness & access all your
workout videos for our New Image range
wherever & whenever you want!

Distributed by:
High Street TV, PO Box 7903,
CORBY, NN17 9HY
Version V1 06/22
newimagefitness.co.uk
DOWNLOAD THE NEW IMAGE
FITNESS APP TODAY!
To access all your workout videos
wherever & whenever you want!
Table of contents