New World Vision 100E Firmware update

New World
Range Ei UK Part No 083454701 Date 15/15/2014
Users Guide & Installation
Handbook

CONTENTS & INTRODUCTION
This books covers the following:
• Safety
• Using The Appliance
• Cleaning
• Installation Instructions
• Technical Data
• Customer Care
Introduction
Thank you for buying this British-built appliance from us.
Shouldyoundsomethingmissing,ornotcovered,pleasecontactour
Customer Care team. Their number is located on the back page of this book.
ForcustomersoutsidetheUKandNorthernIreland,pleasecontactyourlocalsupplier.
Alternatively,generalinformation,sparesandserviceinformationisavailablefromour
website. The address is located on the back page of this book.
Warranty
Yournewappliancecomeswithour12monthguarantee,protectingyouagainst
electrical and mechanical breakdown. To register your appliance please call 0844 481
0182,completetheregistrationformincludedorregisteronlineatthewebaddress
located on the back page of this book.
Forfullterms&conditionsofthemanufacturer’sguarantee,refertothewebsiteonthe
back of this book.
Inaddition,youmaywishtopurchaseanextendedwarranty.Aleaetexplaininghow
to do this is included with your appliance.
Ourpolicyisoneofconstantdevelopmentandimprovement,thereforewecannot
guaranteethestrictaccuracyofallofourillustrationsandspecications-changesmay
have been made subsequent to publishing.
European Directives
As a producer and a supplier of cooking appliances we are committed to the protec-
tion of the environment and are in the compliance with the WEEE directive. All our
electric products are labelled accordingly with the crossed out wheeled bin symbol. This

CONTENTS & INTRODUCTION
indicates,fordisposalpurposesatendoflife,thattheseproductsmustbetakentoa
recognisedcollectionpoints,suchaslocalauthoritysites/localrecyclingcentres.
This appliance Complies with European Community Directives (CE) for household and
similar electrical appliances and Gas appliances where applicable.
This appliance conforms to European Directive 2009/125/EC regarding Eco design re-
quirementsforenergy-relatedproducts.

SAFETY
Ensure you have removed all packaging and wrapping. Some of the items inside this
appliance may have additional wrapping.
WARNING! - The appliance and its accessible parts
become hot during use. Care should be taken to
avoid touching heating elements. Children less than
8yearsofageshallbekeptaway,unlesscontinously
supervised.This appliance can be used by children
aged from 8 years and above and persons with re-
duced physical sensory or mental capabilities or lack
ofexperienceandknowledge,iftheyhavebeen
given supervision or instruction concerning the use
of the appliance in a safe way and understand the
hazards involved. Children shall not play with the ap-
pliance. Cleaning and user maintenance shall not be
made by children without supervision.
WARNING! - Unattended cooking on a hob with
fatoroilcanbedangerousandmayresultinre.
NEVERtrytoextinguisharewithwater,butswitch
offtheapplianceandthencovertheamewithalid
or damp cloth.
WARNING! - Dangerofre:Donotstoreitemson
the cooking surfaces.

SAFETY
WARNING!-Ifthesurfaceiscracked,switchoff
the appliance to avoid the possibility of electric
shock.
WARNING! During use the appliance becomes
hot. Care shoulf be taken to avoid touching heating
elements inside the oven.
WARNING!-Donotuseasteamcleaneronany
cookingranges,hobsandovenappliances.
WARNING! -Ensurethattheapplianceisswitchoff
before replacing the lamp to avoid the possibility of
an electric shock.
WARNING!-Theapplianceisnotintendedtobe
operatedbymeansofanexternaltimerorseperate
remote control system.
WARNING!-Useonlyhobguardsdesignedby
the manafacturer of the cooking appliance or
indicated by the manufacturer of the appliance
in the instructions for use as suitable or hob
guards incorporated in the appliance. The use of
inappropiate guards can cause accidents.

SAFETY
WARNING! - Do not use harsh abrasive cleaners
or sharp metal scrapers to clean the oven door glass
sincetheycanscratchthesurface,whichmay
result in shattering of the glass.
WARNING! - Accessible parts may become hot
when the grill is in use. Children should be kept
away.
Induction Only
WARNING!-Metallicobjectssuchasknives,forks
spoonsandlids,shouldnotbeplacedonthehob
surface since they can get hot
WARNING!-Afteruse,switchoffthehobelement
by its control and do not rely on the pan detector.

USING THE HOB - INDUCTION
Feature Symbol Description
Eco Power Inductionpoweristhemostenergyefcientmeansofcookingfoodona
hob,providingfastheatupandboilingtimes.
Slide Control
Slideyourngeralongthegraphicorsimplytouchthegraphicatthepower
level you require.
Activating a cook zone: Select a zone use the slider control by sliding
yourngeracrossthegraphicortouchingthegraphicatthedesiredpower
level(0-9).
Digital Display Secret till “lit” hob display
No. of Power Levels 9Precise and repeatable control settings
Central On/Off Switch The central on/off switch enables all of the cooking zones to be switched off
simultaneously
Power Boost Temporarily boost the power to a cook zone by a massive 60%
Pause This button pauses cooking with one touch (cuts power)
Pan Detection Lets you know if the correct pans are being used and helps to save energy.
Whenapanisliftedoffthezone,thepowerisautomaticallycut.
Residual Heat
Indictions
Warns you against hot surfaces but also indicates that the residual heat
which can be used as a temporary warm zone
Additonal functions
Feature Description
Overheat Pan Detection Helps prevent cookware from overheating providing an additional level of safety not
available on other types of hobs
Holiday Shutdown Nooperationisrequired-thehobwillturnitsselfoffifleft
Hob Operation
• Turn the hob on by using the Central On/Off Switch.
• The Digital Display will then illuminate. Press and hold the desired number to
selct the zone.
• Thehobwillautomaticallyswitchoffifnocookingisstartedwithintherst20
seconds.
Turning off individual cooking zones
• Decrease the power setting until the display shows 0.
• Ifthecookzonesurfaceishottotouch,Hwill replace 0in the display.

The FUNCTION button in the centre is
used for setting the minute minder
• Use the and buttons to set
the time while the ‘dot’ is still
ashing.
To Select An Alarm Tone
• Press and hold the button for a
fewseconds,tolistentorsttone.
• Repeat this for the second and third
tone. Releasing the button after the
tone has sounded will automatically
select that tone.
Setting The Minute Minder
• Press and release the function button
andbellsymbolwillappearandash
on the display.
• Use the and buttons to set
the desired alarm time.
• OncetheMinuteMinderisset,the
display will show the time of day and
thebellsymbolwillstopashing.
Pressing the FUNCTION button will
display the minutes remaining.
• The tone will sound at the end of
thecookingtime.Tocancelthetone,
press the FUNCTION button.
APPLIANCE FUNCTIONS
Functions
The charts below details all of the functions which are available. Your oven may not
have all of the functions shown here.
Feature Symbol Description
Defrost
Todefrostfoods,suchascreamcakes/gateaux,usewiththeovendoorclosed.
Forcoolingdishespriortorefrigeration,leavethedooropen.
Dual Grill
Turnanti-clockwise:Low-MediumHeat
Turnclockwise:Medium-HighHeat
Slow cooking
Setting or 100°C
Slow cooking times will be about 3 times as long as conventional cooking
times.
‘Off’ Position Turns off the appliance
Power Setting 1, 2, 3, 4... Increase / Decrease cooking temperature
Oven & Grill Functions
Main Oven Function Recommended Uses
Base Heat Only Used to finish off the bases of food following cooking using the conventional
or fanned modes. The base heat can be used to provide additional
browning for pizzas, pies and quiche. Use this function towards the end of
cooking.
Top Heat Only The heat is ideal from browning off the tops of food as it is not as fierce as
the grill following conventional or fanned cooking. Provides additional
browning for dishes like Lasagna or Cauliflower cheese. Use this function
towards the end of
cooking.
Conventional Oven This function is ideal for traditional roasting. The meat is placed in the
middle of the oven, roast potatoes towards the top.
Intensive Bake Suitable for food with a high moisture content, such as quiche, bread and
cheesecake. It also eliminates the need for baking pastry blind.
Fanned Grill The fan allows the heat to circulate around the food. Ideal for thinner foods
such as bacon, fish and gammon steaks. Foods do not require turning. Use
with the oven door closed.
Fanned Oven The even temperature in the oven makes this function suitable for batch
baking, or batch cooking foods.
Defrost To defrost foods, such as cream cakes/gateaux, use with the oven door
closed. For cooling dishes prior to refrigeration, leave the door open.
Dual Grill This function cooks food from the top and is ideal for a range of food from
toast to steaks. As the whole grill is working, you can cook larger quantities
of food.
Single Grill For smaller quantities of food, but is still ideal for
anything from toast to steaks.
Base Heat with Fan Used to cook open pies (such as mince pies) the base element ensures that
the base is cooked while the fan allows the air to circulate around the filling
- without being too intensive.
Lights only Use when the oven is switched off and cold to aid cleaning the oven cavity.
The chart below details all of the functions which are available. Your oven may
not have all of the functions shown here.
27
Minute Minder
FUNCTION
Use to set the desired time
Press & release to set the time

CLEANING
General
• Always switch off your appliance and allow it to cool down before you clean any
part of it.
• Donotuseundilutedbleaches,productscontainingchlorides,wirewoolorabrasive
cleanersonaluminium,stainlesssteel,orplastic/paintedpartsastheycandamage
the appliance. Nylon pads can also be unsuitable.
• Onlyuseacleanclothwrungoutinhotsoapywater,anddrywithasoftcloth.For
stubbornstains,youcanuseamildcreamcleaner.
• Somefoodsarecorrosiveeg;vinegar,fruitjuicesandespeciallysalt-theycan
markordamagethemetalorpaintwork,iftheyareleftonthesurface.
Stainless steel & Aluminium surfaces
• Babyoilcanbeusedtorestorestainlesssteelnishes-butonlyuseafewdrops.
Chrome plated parts
• Useamoistsoaplledpad,orplaceinadishwasher
INSTALLATION INSTRUCTIONS RANGE ELECTRIC
Moving the cooker
Take care if the appliance needs to be
liftedduringinstallation-alwaysusean
appropriate method of lifting.
Do not attempt to move the cooker by
pulling on the doors or handles. Open the
doorandgrasptheframeofthecooker,
taking care that the door does not shut on
yourngers.
Take care to avoid damage to soft or
unevenoorcoveringswhenmovingthe
appliance.Somecushionedvinyloor
coverings may not be designed to
withstand sliding appliances without
marking or damage.
Important: Ensure that you route all
mainscableswellclearofanyadjacent
heat source.
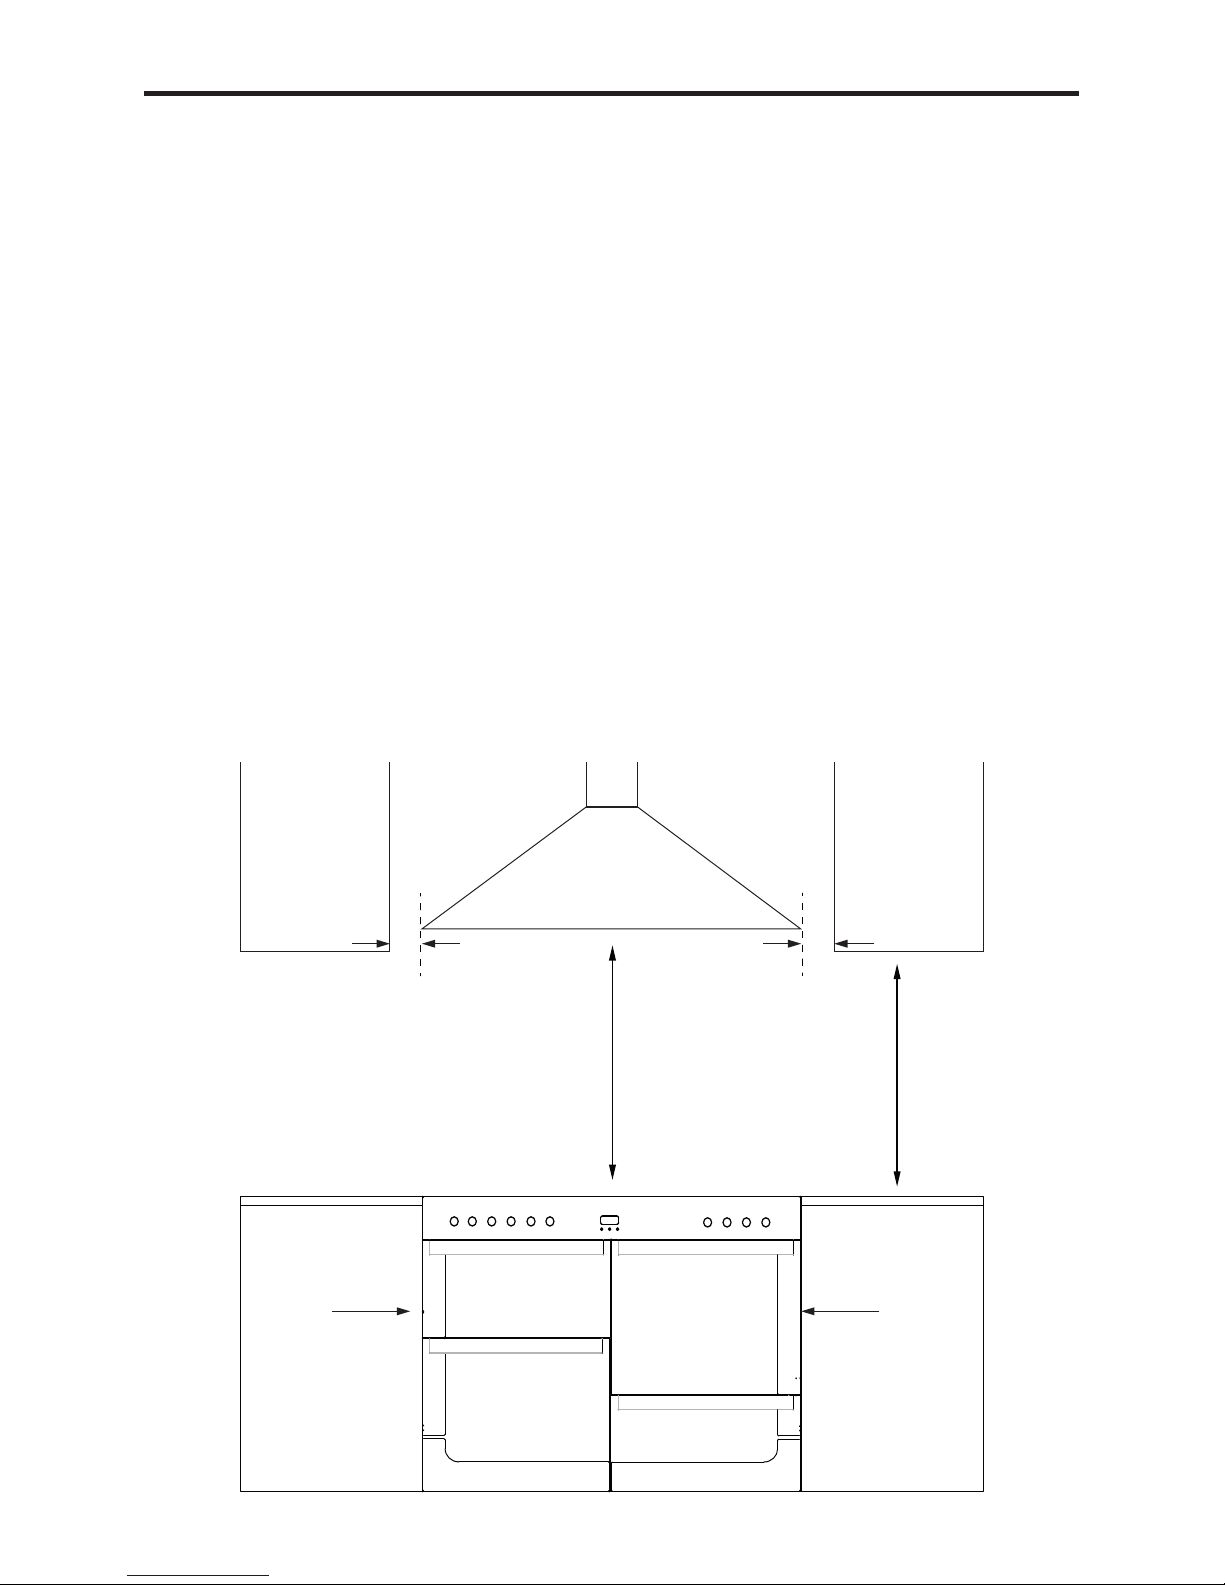
Clearances
Thiscookermaybettedushtothe
base units of your kitchen.
• Noshelf,overhang,cupboard,or
cooker hood should be less than
650mmabovethehobtop,but
please check this with the hood
manufacturers instructions.
• If your appliance has a side opening
door,werecommendasideclearance
of 60mm to allow the oven door to
fully open.
• The cooker must have a side clear-
ance above hob level of 90mm up to
a height of 400mm.
The important dimensions are those
around the appliance.
For all appliance size:
900 mm
1000 mm
Flush t to
base units
Flush t to
base units
90
mm
90
mm
650 mm
minimum
450 mm
clearance
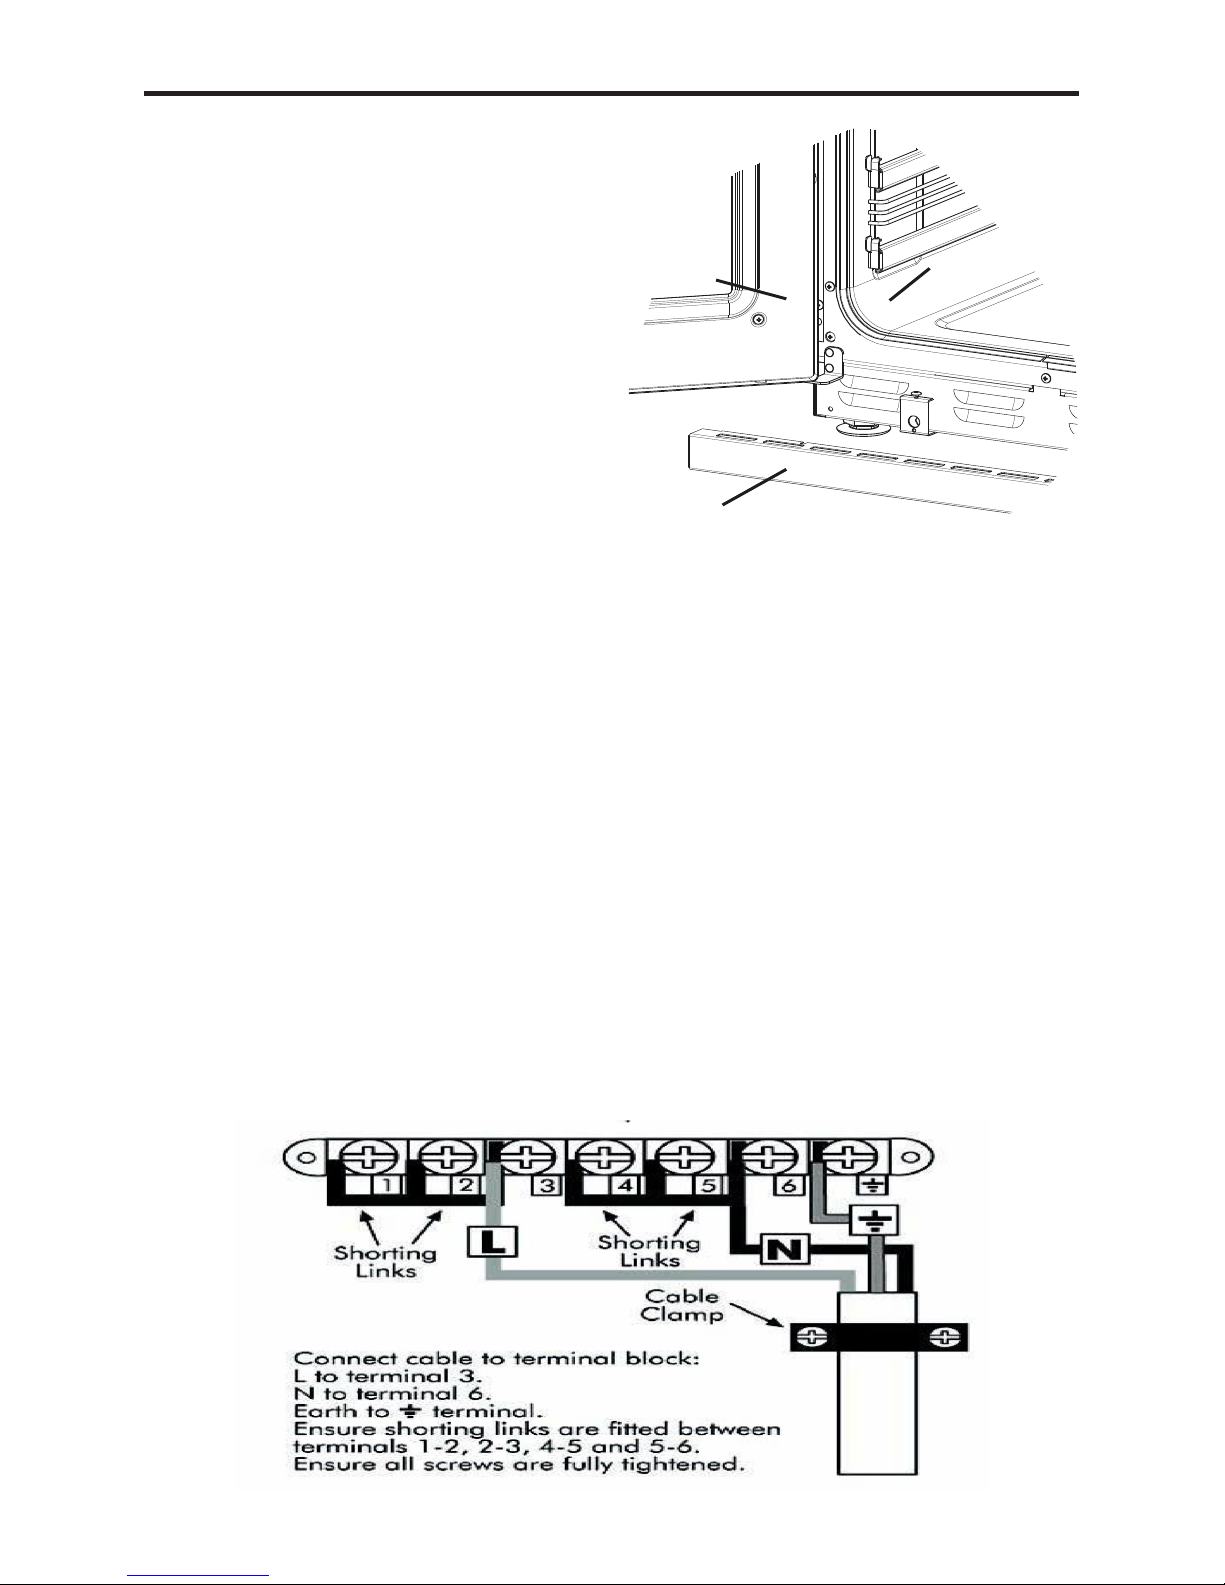
INSTALLATION INSTRUCTIONS RANGE ELECTRIC
Fitting the plinth (if applicable)
• Ensure the appliance is raised to a
height of 915mm or above using
adjustingfeet(A)beforebeginning.
• Open the appliance doors and loosen
screw(C),donotremovethescrew
entirely. If your appliance has a stor-
agedraweratthebottom,youaccess
the screws through holes located at the
base of the drawer after lifting the mat.
• Fit plinth (B) and secure using screw
(C).
DOOR
PLINTH
OVEN CAVITY
B
A
C
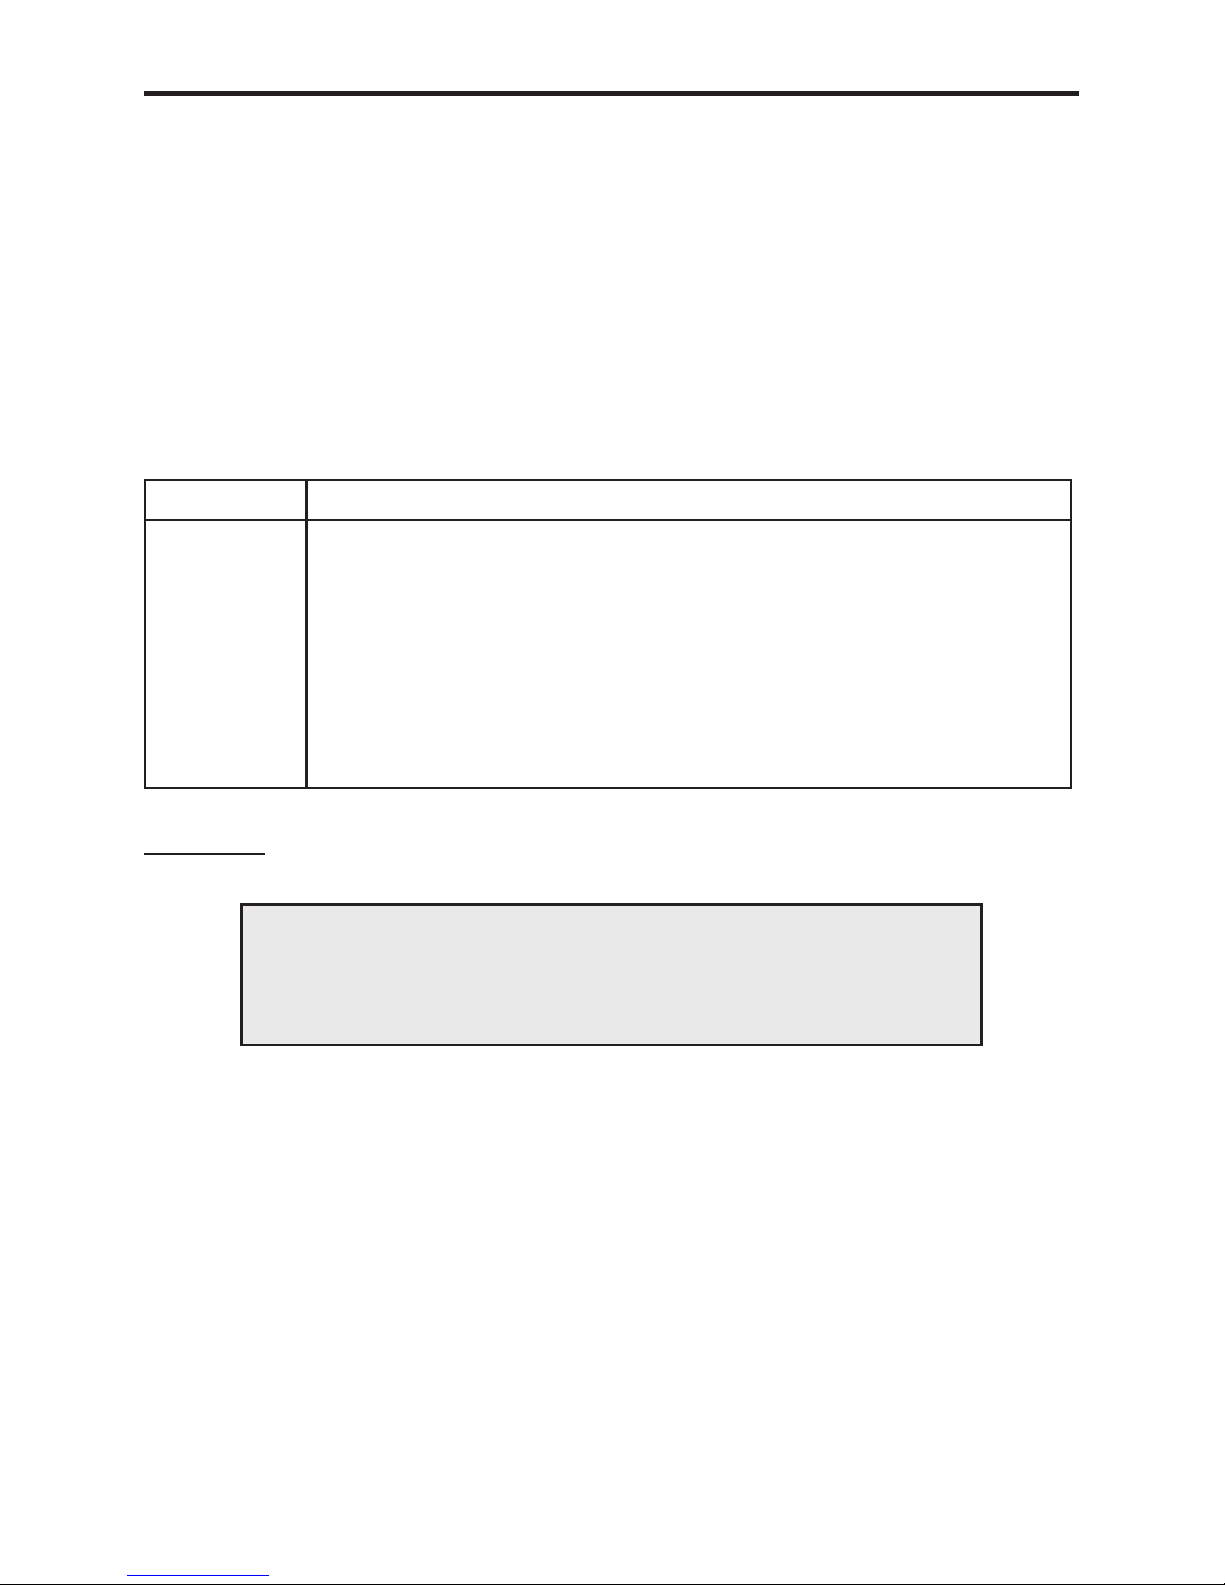
CONNECTING THE ELECTRICITY SUPPLY - TERMINAL BLOCK
• Theappliancemustbettedtoaswitchprovidingallpoledisconnectionwitha
minimum contact separation of 3mm.
• Access to the mains terminal is gained by removing the terminal block cover at the
rear of the appliance.
• Connectionshouldbemadewithasuitableexiblecable.
• First strip the wires then push the cable through the cable clamp.
• Connectthecabletotheterminalblockandtightenthecableclampscrews-see
diagram.
• Rettheterminalboxcover.
• Sufcientcableshouldbeusedtoallowthecookertobepulledout,butmusthang
clearoftheoorsoitdoesnotbecometwistedortrappedwhenthecookeris
pushed back.
Pleaseensurethattheuserhasthiscopyofthehandbook,andtheapplianceisin
place.

TECHNICAL DATA
Pan Sizes
Note -Safetemperaturecontrolofthepansisonlypossiblewithqualityatbottomed
pans suitable for induction cooking. Poor quality pans can create air gaps between the
glassandthepan,whichaffectstheaccuracyofthetemperaturecontrol.
Countries of Destination:
GB-GreatBritain,IE-Ireland,DE-Germany
kW Rating @ 240v ~ 50 Hz
Induction Hob 90cm 100cm Cook
Zone
Pan
Diameter
Left Front
Left Back
Middle
Right Front
Right Back
1.40
1.40 boost to 2.00
n / a
1.90 boost to 2.30
1.40
1.85 boost to 3.00
1.85 boost to 3.00
2.3 boost to 3.7
1.40 boost to 2.20
1.85 boost to 3.00
LHF
LHR
M
RHF
RHR
145 mm
145 mm
225 mm
180 mm
145 mm
Maximum
Load kW
@240v ~ 50Hz
7.4 7.4
Maximum Load 240v ~ 50Hz
Size 220 - 240V ~ 50 Hz
90cm
100cm
14.72
14.27
kW Rating 220 - 240v ~ 50 Hz
90cm 100cm
Conventional Oven -2.07
Fanned Oven 2.0 2.0
Tall Oven 2.5 -
Dual Variable Grill 2.7 2.7
Oven Lamps 2x0.025 2x0.025
Fans 0.07 0.04
CUSTOMER CARE
CUSTOMER CARE
CHANGING LIGHT BULBS
(where tted)
Not all appliances have the same number and type of bulbs. Before replacing your
bulb,opentheovendoorandseewhichtypeyouhave.Thenusethetabletohelpyou
change your bulb correctly.
Bulbs can be purchased from hardware stores (always take the old bulb with you).
Please remember that bulbs are not covered by your warranty.
Accessories
Handle-082283705
Handlegrip-082469100
Completegrillpanpack-012635666
No of Lamps Instructions
1 Remove the oven shelves.
Remove the loose oven back by unscrewing the 4 securing screws
(oneateachcorner)andremove(Wheretted).
Unscrew the lens cover by turning anticlockwise.
Remove the bulb and replace.
Replace the lens cover and oven back.

Pleasekeepthishandbookforfuturereference,orforanyoneelse
who may use the appliance.

Pleasekeepthishandbookforfuturereference,orforanyoneelse
who may use the appliance.

Pleasekeepthishandbookforfuturereference,orforanyoneelse
who may use the appliance.

CUSTOMER CARE
TocontactNewworldaboutyourappliance,pleasecall
Warranty Registration
0844 481 0182
to register your appliance
Customer Care Helpline
0844 815 3747
incaseofdifcultywithintheUK
Alternativelygeneral,sparesandserviceinformationisavailablefromourwebsiteat
www.newworld.co.uk
Please ensure that you have the product’s model no and serial no available when you
call. These can be found on the silver data label on your product which is located:
Ovens Openthedoor;adjacenttotheovencavity
High-levelgrillproducts Insidethebasecompartment
Hobs On the underside of the product
Enter appliance numbers here for future reference:
ModelNo
Serial No
SERVICE RECORD
Date of purchase Installed by Installation Date
Place of purchase:
Date Part(s) replaced Engineer’s name
ForcustomersoutsidetheUKandNorthernIreland,pleasecontactyourlocalsupplier.
GlenDimplexHomeAppliances,StoneyLane,Prescot,Merseyside,L352XW
Table of contents
Popular Cooktop manuals by other brands


KitchenAid
KitchenAid KECC501BAL0 parts list

Lotus
Lotus CWK-94ET Instructions for installation and use

Bertazzoni
Bertazzoni P34 5 00 X Installation, service and user instructions

GE
GE JGP637 Owner's manual and installation instructions

Kenmore
Kenmore 318201433 installation instructions

Fisher & Paykel
Fisher & Paykel MINIMAL CID834DTB4 installation guide

Jenn-Air
Jenn-Air A106 Series use and care manual

Bosch
Bosch NIT5665UC - Strips 500 36" Induction Cooktop use and care manual

Costway
Costway EP24891US user manual

St George
St George 5537400 Operation, care and installation leaflet

Kenmore
Kenmore 790 Use and care guide

GE
GE 36 ELECTRIC RADIANT COOKTOP ZEU36R Important service information