Newcont NTP-3422 User manual

Operation Instructions
NEWCONT
NTP-3422
NEWCONT AUDIO-PHONE


24
Congratulations on your selection of a quality NEWCONT product.
This unique fashion designed Music System combined with 2.4GHz Digital
Cordless Phone willprovide you withbest quality communicationservice and auto
-type CD Player and Alarmed Radio for powerful and realistic sound experience.
With proper care, and by following the Operation Instructions, you can enjoy all
the advantages fromthis unit.
This package includes BASE UNIT, HANDSET, ACPOWER ADAPTOR, PHONE LINE
CORD, HANDSET BATTERY PACK, RADIO ANTENNA,and OPERATION
INSTRUCTIONS. Please contact the store/dealer immediately if anything damaged
or missing.
1.Base
def 3abc 2
ghi 4mno6
tuv89
pqrs
7
*oper0#
mute
R/P
SPK OK
5jkl
1
2.Handset
4.7-foot line
cord for deskuse 5.Ni-MH battery pack
3.AC power adapter
6.Radio ANT
MUTE
M5
M4
M3
M2
M1
ALM-1 ALM-2
1
PARTS CHECKLIST
FCC REGULATIONS
This equipment complies with FCC REGULATIONS 15 and 68 of the Federal
Communications commission (FCC) rules for the United States. A label is
loc ated on the unders ide of the base unitcontaining the FCCregistration number and
RingerEquivalence Number (REN).Youmust, upon request,provide this information
to your local telephone company.
This equipment is compatible with inductively coupled hearing aids.
1.This equipment has been tested and found tocomply with thelimits for a class B
digital device, pursuant to part 15 of FCCRules. These limits are designed to provide
reasonable protection against harmful interference in a residentialinstallation. This
equipment generates, uses andcan radiate radio frequency energy and,if not installe d
and used in accordancewith the instructions,maycause harmful interference to radio
communications. However, there is no guarantee that interference will not occur in a
particular installation. If this equipment does cause harmful Interferenceto radio or
television reception, which can be determined by turning theequipment off and on,
the us er is encourage d to try to correctthe interference by one or moreof the fol lowing
measures:
- Reorient or relocate the receiving antenna.
- Increase the separation between the equipment and receiver.
- Connect the equipment intoan outlet on a circuit differentfrom that to which the
receiver is connected.
- Consult the dealer or an experienced radio/TV technician for help.
2.Changes or modifications not expressly approved by theparty responsible for
compliance could void theuser's authority to operate the equipment.
3.Privacy of communications may not be ensured whenusing this phone.
4.The FCC requires that you connect you cordlesstelephone to the nationwide tele
-phone network through a modular telephone jack(USOCRJ11C or RJ11W).
5.You telephone company may discontinue you service if your equipment cause
s harm to the telephone network. They will notify you in advanceof disconnectio n,
if possible. During notification, you will be informed of your right to file a complaint
with the FCC.
6.If it is determined that your telephone equipmentis malfunctioning, the FCC
requ ires that it not be used and that itbe unplugged from the modular jackuntil the
problem ha s been corrected. Repairs to thistelephone equipment canonl y be made
b y the ma nufacturer or its authorizedagents or by others who maybe authorized by
t he FCC. For repair procedures, follow the instructions outlinedunder our Warran ty.
The REN isuseful in determining the number or devices you may connect to your
telephone line and stillenable the devices to ring when you receive acall. The
general ru le is that theREN value shouldnot exceed 5.0total; however, conta ct y our
local telephone company forthe specific number in your area.

Transferring A Call From One Handset To Another
When you want to transfer the call you are receiving to the other handset, follow the
steps below:
Ø Transferring
1. Press [ intercom ]to display 'CALL ON HOLD' on LCD, which will hold the call.
2. Use to select the handset youwant to transfer to and press .
u In case that there areonly two handsets, then you do not have to
select. The press of [ intercom] will directly page the other handset.
u Before the invitedhandset answering, press[ intercom ] again for
canceling.
3. Press to hang up. The call is still hold before the transfer handset
answers.
Ø Answering
Press or .
u If the pagedhandset does not answer or hangs up by pressing ,
the call willgo back to the handset thattransfers the call.
Ø Hanging up
Press .
OK
SPK
Multihandset Functions
23
1. Read Instructions - All thesafety and operating instruction should beread before
the product is operated.
2. Retain Instructions - The safety and operating instruction should be retained for
future reference.
3. Heed Warnings - All warningon the product and in the operating instructions
should be adhered to.
4. Follow instructions - All operating and use instructions should be followed.
5. Cleaning -Unplug this product from the walloutlet before cleaning. Do not use
liquid cleaners or aerosol cleaners. Use a damp cloth for cleaning.
6. Attachments - Donot use attachments not recommended bythe product
manufacturer as theymay cause hazards.
7. Water and Moisture - Do not use this product near water - for example, near a
bath tub, wash bowl, kitchen sink, or laundry tub; in a wet basement, or near a
swimming pool, and the like.
8. Acce sso ries - Do not p lac e this pro duct on an unstable cart, stand tripod, bracket,
or table. The product may fall, causing serious injury to a child or adult, and
serious damage to the product. Use only with a cart, stand, tripod, bracket, or
table recommended by the manufacturer, or sold with the product. Any mounting
of the product should follow the manufacturer instructions,and should use a
mounting accessory recommended by the manufacturer.
9. Aproduct and cartcombination should be moved with care.Quick stops,
excessive force, and uneven surfaces may cause theappliance and cart
combination to overturn.
10.Ventilation - Slots and openings in the cabinet are provided for ven tilat ion an d to
ensure reliable operation of the product and to protect it from overheating, and
these openingsmust not be blocked or covered. The openings should never be
blocked by placing the product on a bed, sofa, rug, or other similar surface. This
product should notbe placed in a built-in installation such as a bookcase orrack
unless proper ventilation is provided or the manufacturer instruction have been
adhered to.
11. Power Sources - This product should be operated only from the type of power
source indicated on the marking label. If you are not sure of the type of power
supply to your home, consult your product dealer or local power company. For
products intended to operate from battery power, or other sources, refer to the
operating instruction.
12. Grounding or Polarization - This product may be equipped with a polarized
alt ernat ing-current line plug (a plug having oneblade wider than the oth er). Th is
plug will fitinto the poweroutlet only one way. Thisisa safety feature. If you are
unable to insert the plug fully into the outlet, try reversing the plug. If the plug
should still failto fit, contact your electricianto replace yourobsoleteoutlet. Do
not defeat the safety purpose of the polarizes plug.
Alt ernate Warnings- Thisproduct is equipped witha three-wire groundi ng- type pl ug,
a plug having a third (grounding) pin. This plugwillonlyfitinto a grounding-type
po wer outlet. This is a safety feature. If you are unable to insert the plug into the
outlet, contact your electrician to replace your obsolete outlet. Do not defeat the
safety purpose of the grounding-type plug.
13. Power-Cord Protection- Power supply cords should berouted so that they are
not likely tobe walked on or pinched byitems placed upon or against them,
paying particular attention to cords at plugs, convenience receptacles, and
point where theyexit from the product.
14.Protective Attachment Plug - The product is equipped with an attachment plug
having overload protection. This is a safety feature. See Instruction Manual for
2
IMPORTANT SAFETY INSTRUCTIONS

replacement or resetting of protective device. If replacement of the plug is required,
be sure the service technician has used a replacement plug specified by the
manufacturer that has the same overload protection as the original plug.
15.Outdoor Antenna Grounding - If an outside antenna is connected to the receiver,
be sure theantenna system is grounded so asto provide some protection against
voltage surges and built-up static charges. Article 810 of the National Electrical
Code, ANSI/NFPA70, provides information with regard to proper grounding of
the mast and supporting struc ture, grounding of the mast and supportingstructure,
grounding of thelead-in wire toan antenna-discharge unit,size of groundingconductors,
location of antenna-discharge unit, connection to grounding electrodes, and
requirements for the grounding electrode.
16.Lightning - For added protection for this product during a lightning storm, or when
it is left unattended and unused for long periods of time, unplug it from the wall
outlet and disconnectthe antenna or cable system. This will preventdamage to
the product dueto lightning and power-line surges.
17.Power Lines - An outside antenna system should not be located in the vicinity of
overhead power lines or other electric light or power circuits, or where it can fall
into such powerlines or circuits. When installing anoutside antenna system,
extreme care shouldbe taken to keep from touchingsuch power lines or circuits
as contact with them might be fatal.
18.Overloading - Do not overload walloutlets, extension cords,or integral convenience
receptacles as thiscan result in a risk offire or electricshock.
19. Object and Liquid Entry - Never push objects of any kind into this product through
openings as they may touch dangerous voltage points or short-out parts that could
result in afire or electric shock. Never spillliquid of anykind on the product.
20. Servicing - Do not attempt to service this product yourself as opening or removing
covers may expose you to dangerous voltage or other hazards. Refer all servicing
to qualified service personnel.
21. Damage Requiring Service - Unplug this product from the wall outlet and refer
servicing to qualifiedservice personnel underthe following conditions:
a) When the power-supply cord or plug is damaged,
b) If liquidhas been spilled, or objects havefallen into theproduct,
c) If the product has been exposed to rain or water,
d) If the product does not operate normallyby following the operating instructions.
Adjust only those controls that are covered by the operating instructions as
an improper adjustment of other controls may result in damage and will of
ten require extensive work by a qualified technician to restore the product to
its normal operation.
e) If the product has been dropped or damaged in any way, and
f) When the product exhibits a distinct change in performance - this indicates
a need for service.
22.Replacement Parts -When replacement parts are required, besure the service
technician has used replacement parts specified by the manufacturer or have the
same characteristics as the original part. Unauthorized substitutions may result in
fire, electric shock,or other hazards.
23.Safety Check - Upon completion of any service or repairs to this product, ask the
service technician toperform safety checks to determine thatthe product is in
proper operating condition.
24.Wall or Ceiling Mounting - The product should be mounted to a wall or ceiling
only as recommended by the manufacturer.
25.Heat - The product shouldbe situated awayfrom heat sourcessuch as radiators,
heat registers, stoves,or other products (including amplifiers) thatproduce heat.
3
IMPORTANT SAFETY INSTRUCTIONS
You may register 4HANDSETS totally to your BASE unit.The expanded handsets
(chargers) no need connect phone lines. You can place them wherever you like.
When you haveseveral handsets atyour hand, you can follow belowfunctions.
Conference Call
When one handsetis in phone,all the other handsets will display'LINE IN USE'.
When another handsetjoins in thetalk, all the other handsets willdisplay 'ON
CONFERENCE'
Ø Inviting
1. Press [ intercom ]to display 'CALL ON HOLD' on the screen to hold the call.
2. Press to select the handset you wouldlike to invite and then press.
u In case that there areonly two handsets, then you do not have to
select. The press of [ intercom] will directly page the other handset.
u Before the invitedhandset answering, press[ intercom ] again for
canceling.
3. When the screen is displaying 'ON INTERCOM', which means the invited
handset already has joined in, press again.
4. 'ON CONFERENCE' displayed on the screen showsthat the conference
call is beginning.
Ø Join in
Press or .
Ø Quit
Any handset can quit the conference call by pressing .
u At most twohandsets to beON CONFERENCE CALLwith the
incoming caller.
u One handset hangingup for quitCONFERENCE CALL; once the
second handset hangingup will finish the talking.
Handset To Handset Intercom
Ø Paging
1. Press [ intercom ];
2. Press to select the handset you want to call or select all, and the
press .
u In case that there are only two handsets, then you do not have
to select. The press of [ intercom] will directly page the other
handset.
u Before the invitedhandset answering, press [ intercom ]again
for canceling.
3. When the invited handset answer and display 'ON INTERCOM' on LCD,
the talking can begin.
Ø Answering
Press or .
Ø Hanging up
Press .
Multihandset Functions
SPK
OK
SPK
22

IF YOUR PRODUCT UTILIZES BATTERIES, THE FOLLOWING ADDITIONAL
PRECAUTIONS SHOULD BE OBSERVED:
1. Use only the type and size of batteries specified in the users manual.
2. Do not dispose of batteries in a fire. The cells may explode. Check with local
codes for possiblespecial disposal instructions.
3. Do not open or mutilate the batteries. Released electrolyte is corrosive and
may cause damage to the eyes or skin. It may be toxic if swallowed.
4. Exercise care in handling batteries in order not to short the battery with condu
-cting materials such as rings, bracelets and keys. The battery or conductor
may overheat andcause burns.
5. Do not attempt to recharge the batterieswith or identifiedfor use withthis product.
The batteries may leak corrosive electrolyte or explode.
6. Do notattempt to rejuvenate the batteries provided with oridentified for use
with this productby heating them. Sudden release ofthe battery electrolyte
may occur causing burns or irritation to eyes or skin.
7. When replacing batteries, all batteries should be replaced at the same time.
Mixing fresh and dischargedbatteries could increase internal cell pressure and
rupture the dischargedbatteries.
8. When inserting the batteries into this product, the proper polarity or direction
must be observed.Reverse insertion of batteries can causecharging, which
may result in leakage or explosion. If a battery is installed incorrectly it may
explode.
9. Remove the batteries from this product if the product will not be used for a long
period of time (several months or more) since during this time the batteries
could leak, damagingthe product.
10. Discard "dead" batteries as soon as possible since they are more likely to leak
in a product.
11. Do not storethis product, orthe batteries providedwith or foridentified use
with this product,in high temperature areas.
12. If your product uses a rechargeable battery, charge the battery(ies) only in
accordance with the instructions and limitation specified in the User Manual.
- SAVE THESE INSTRUCTIONS -
SPECIFICATIONS
POWER SOURCES................AC 120V, 60Hz
SPEAKER .............................L32mm*W32mm, 3W*2, 4Ù
POWER OUTPUT...................DC 12V, 1000Ma
CD PLAYER ..........................CD,CDR
RADIO ..................................FM 88 108MHz; AM 530 1700KHz
IMPORTANT SAFETY INSTRUCTIONS
4
PLAYING/RECORDING OGM:
Ø Press [ OGM ] to play OGM.
Ø Press and hold[ OGM ]to erase the original OGM andto activate OGM
recording.
Note: The maximum OGM Recording time is 30seconds and OGM
automatically replays the recorded voice right after the recording.
Ø Press on the ANSWER MACHINE or press [ STANDBY ] to stop.
LINE REMOTE CONTROL:
ANSWER NACHINE can be controlled by an incoming call from outline to set
up answering mode,listen to voice messages and makerecording etc.
Ø Make a callfrom outlines.
Enter the passwords when the phone automatically answers the call with r ecording.
Refer to 'Setting LINE REMOTE CONTROLSECURITY ID' (P12) of section
'Setting Handset' forpassword setting.Follow thevoice instructions.
Note: ANSWERMACHINE automatically disconnects when if failsto receive
REMOTE CONTROL password for 8Seconds.
th
Note: Hang up the phone at 4 rings when listen to the recorded incoming
message if AUTO ANSWER RING is set up to TS Mode.
Ø Hang up toexit.
Voice instructions:
For help menu, press 7;
To turn answer Off/On, press 4
To playback, press 2;
To stop, press 2 again;
During playback;
To skip to next, press 3;
To skip to the previous, press 1;
To delete, press zero
GUIDANCE FOR ADVANCED OPERATIONS
21
MEMO
MEMO Recording
ØPress [ MEMO] on ANSWER MACHINE to start recording.
Listening to theMEMO:
Ø Press onANSWER MACHINE toplay MEMO.
Ø Press or on ANSWER MACHINE during the MEMO playing to play
previous or nextMEMO
Ø Press onANSWER MACHINE to stop or press[ STANDBY ].
Deleting the MEMO:
Ø Press [ DEL ] to delete the current MEMO during the MEMO playing.
Ø Press and hold [ DEL ] to delete all the old MEMO together all old massages
during the MEMO playing.
Note: The maximum recording time is 1 minute for each MEMO.Recording
automatically stops if the memory is full with 'MEMORY IS FULL' displayed on
the screen.There are total 59 messages in the memory include the ICM and
MEMO.

Guidance For QuickOperations .6-11
Prior To Use ................................6
Basic Operations.............................6
Cordless phone...........................6
CD Player...................................7
FM/AM Radio..............................7
Answer machine........................... 7
Alarm clock..................................8
Other Important Features................8
AutoMute...................................8
Auto Pause..................................9
Page button /Searchhandset........9
STAN DBY But to n..............................9
SNOOZE/MUTE Button................9
Guidance For Advanced Setting
...........................................11-15
Setting Up Handset........ .....11-13
Registering handset ..................11
Naming handset................ .. .. ...11
Chart of letterfor keyboard .........11
Choosing language ....................12
Choosing dial tone Tone/Pulse
....................... .... ... .................12
Setting Date & Time....... ....... .....12
Setting area code............... ........12
Choosing ringer tone & Adjusting
ringer volume.............................12
Setting Answer ON/OFF........ .. ...13
Setting Line remote control
secrity ID ..... ............................13
Setting Up BaseUnit ...........14-15
Setting auto answer ring times.....14
Setting Date & Time............ .......15
Setting loudness........................15
Setting bass..............................15
Setting treble........... ......... ........15
Setting alarm....... ... ..................15
Quickly setting alarm mode
& duration ........... .....................16
Guidance of Advanced Operations
.......................................17-21
Handset/Phone book....... ....17
Saving numbers to phone book..17
Saving incoming numbers to
phone book...........................17
Dialing From Phone Book.......17
Editing Phone Book...............17
Deleting From Phone Book.....17
Handset/Caller ID &Call waiting
........ ....................................18
Checking caller ID..................18
Deleting caller ID........ ... ... ....1 8
Deleting all caller ID...............18
Call waiting...........................18
Handset/Answer machine
remote control.....................18
CD Player & Radio .................19
Sleep timer for CD player
or Radio................................19
Repeat CD player ........ .. .......19
Alarm & Snooze....................19
Canceling alarm... . ... ... ... ... ..19
Stopping alarm.... ..................20
Pause alarm .............................20
Answering Machine...... ..... ..20
Setting answer machineON/OFF
.......... .................. .............20
Incoming calla auto answer.....20
Stopping auto answer........ ... .20
Playing/Recording OGM..... .. .21
MEMO recording......... ..... .....21
Line remote control..... .. ... .....21
Multihandset Functions........22-23
Conference call......................22
Handset to handset Intercom...22
Transferring Acall from one
handset to another.................23
....... .. .. ..........24
FCC REGULATIONS
NTP-3422 TABLE OF CONTENTS
5
STOPPING ALARM:
Ø Press [ ALM1 ] or [ ALM 2 ] to stop ALARM.
Ø Press [ STANDBY ] to stop ALARM.
uAlarm will resumes at preset time next day.
PAUSING ALARM (SNOOZE):
Press [ SNOOZE/MUTE ]to pause ALARM, which rings again after 7
minutes until ALARM DURATION has expired
Note: ALARMautomatically pauses duringINCOMING CALL or AUTO
ANSWERING.
ANSWER MACHINE
SETTING ANSWERMACHINE ON/OFF:
Press [ ANS ON/OFF ] to switch between Answer On or Answer Off., And
'Answer On' or 'Answer Off' will be displayed on the screen with the corres
ponding voice prompt .
Note: AnswerOn/Off can be selected viaHANDSET remote control or LINE
remote control, too.
INCOMING CALL AUTO ANSWER (RECORDICM):
Ø ANSWER MACHINE will automatically answer the incoming call after
the pre-set rings (3 rings or 5 rings or TS)and play the voice instruction
'Please leave yourmessage after the tone'.
Note: ANSWER MACHINE will response after 10 ringing, but make no
recording on 'ANSWER OFF' mode.
Ø The buzzer will beep to indicate the recording is to start following the
voice instruction..
Note: The maximum recording time is 1 minute for each massage.
Ø [ CHARGE/IN USE] indication light flashes every one second to remind
you that there are new messages.
Ø The number of total messages and that of new messages will display
separately on the screen.
uNote:
The phone can save upto 59 messagesin the memory.
Recording automatically stops if the memory is full with 'MEMORY IS FULL'
displayed on the screen.
ANSWER MACHINE will stop recording and hang up when there is a
7-second silence in the recording process to avoid any unimportant
messages and tosave the memory capacity.
STOPPING AHTO ANSWER:
The AUTO ANSWER stops underone of thefollowing circumstances:
Ø Press or [ SPK ]on the HANDSET during answering.
OR: Other HANDSET answers the call.
OR: Press onANSWER MACHINE or press [STANDBY ].
GUIDANCE FOR ADVANCED OPERATIONS
20
CONTENT
Note: Duringthe AUTOANSWER, pressingtheAlarm clock,or pressing for CDplayer,
or pressing[ RADIO,AM/FM] ,allcan startworking, but the AUTOANSWERwill notstop
at thesame time.

PRIOR TO USE
1) Connect the PHONE LINE CORD to the "TEL LINE" jack on the bottom of BASE
UNIT and to a telephoneoutlet.
2) Connect theAC Power Adaptor tothe 12V DCjack on the bottom of BASEUNIT
and to thewall power outlet.
3) Plug theRADIO ANTENNAto the terminal on the bottomof BASE UNIT.
Note:Be sure toinsert the RADIO ANTENAto ensure betterreception ofAM
radio signal.
4) Install the battery pack into the battery compartment of HANDSET and be
sure to charge the battery Packfor 12 hours before the initial use, otherwise the
lasting time will be reduced and the battery life will be shortened.
Note: Properly-charged battery pack can last 5 days in STANFBY Mode,
and about 4 hours of continuous use.
BASIC OPERATIONS
CORDLESS PHONE
Making a Phone Call:
Ø Pick up HANDSET and press , dial the phone number when the dial tone
Is heard.
Ø OR: Pick up HANDSET and dial the phone number,then press .
Ø OR: Press on HANDSET and dial the phone number when the dial tone
is heard.
Note: [ SPK ]will be displayed on the screen of BASE UNIT in SPEAKER mode.
Terminating a Phone Call:
Ø Place HANDSET back to the charger.
Ø OR: Press on HANDSET to hang up.
Answering a Call:
Ø Pick up HANDSETand press
Ø OR: Press [ SPK ]and connect the call on SPEAKERPHONE mode.
Redialing:
Press or [ SPK ]and then press [ redial ] to dial the last-dialed call.
Adjusting the Phone Volume:
Press or onHANDSET to adjust the phonevolume..
Switching Between HANDSET& SPEAKERPHONE:
Press [ SPK ]during the call in use to switch between HANDSET and
SPEAKERPHONE.
Mute:
Press [ mute ] on HANDSET to activate mute and press again to cancel.
Note: When [ mut e ] is activate, the callee cannot hear you.
GUIDANCE FOR QUICK OPERATIONS
SPK
6
Ø Press 'MUTE' again to exit from REMOTE CONTROL mode.
Note: The voice instructions include:
For help menu, press 7;
To turn answer Off/On, press 4
To playback, press 2;
To stop, press 2 again;
During playback;
To skip to next, press 3;
To skip to the previous, press 1;
To delete, press zero
CD PLAYER & RADIO
SLEEP TIMER FOR CD PALAYER OR RADIO:
Press [ SLEEP ] during CD or RADIO playing toset up timer, and CD PLAYER
or RADIO will automatically be turned off at the previously-set time.Options of
30 / 60 / 90 /120 minutes and OFF can be chosen from, with the corresponding
Icon displayed on the screen.
30 60 90 120 OFF
Ø Press [ SLEEP ] to display the remaining time.
ØPress [ SLEEP ] to adjust the timer when the remaining time is still displayed
on the screen.
Note: The corresponding Icon [ SLEEP ] will displayed on the screen after
selection.Can not set the sleep time during the CD playeras Alarm.
REPEATING CD PLAY:
ALARM & SNOOZE
CANCELLING ALARM:
Ø Press [ SET ] to cancel the alarm. Refer to the 'SETTING ALARM' (P 14)
for details.
Ø OR: Press [ ALM1] /[ ALM2 ]to quickly cancel the alarm. Refer to the
' QUICK SETTING ALARM MODE &DURATION' (P 15) for details.
Note:
NO ALARM Icon, such as <CD>, <RADIO> or <BUZZER> displays on the
screen once cancelled.
NO ALARMavailable once cancelled until ALARMto be re-set.
u
u
GUIDANCE FOR ADVANCED OPERATIONS
19
Press [ REP ] to switch REPEAT modes when CD is playing with the
corresponding Icons displayed on the screen. There are three REPEATmodes:
repeat all songs
repeat the current song
Shuffle mode randomly rearranges the track order. If you want to play
the tracks in a randomorder, selectShuffle mode, that means ifyou didn't
select the Shuffle mode ,you will play your tracks in a particular order.
1
SHUF

GUIDANCE FOR QUICK OPERATIONS
CD PLAYER
Playing CD:
Ø Insert the CD into the CD slot and the CD will automatically play, with correspond
-ing Icon appearing on the screen.
Ø OR: Press on CD/RADION Operation Panel with a CD already loaded.
Ø Press to replay the currentsong, or press at the first second willback
to the last song, and Press to skip to the next song.
Ø Press [ VOL ] / [VOL ] to adjust the volume.
Ø Press on CD/RADIOOPERATION PANEL during playing to make a pause.
Ø Press [ MUTE ]on BASE UNIT to switch between pause and playing.
Ø Press or press[ STANDBY ] to stop playing.
Ø Press to releasethe CD fromCD Slot.
Fast Forwarding & Backwarding:
Press and hold or for fast forwarding or fast backwarding.
FM/AM RADIO
Listening to RADIO:
Ø Press [ RADIO,AM/FM ]to turn onthe RADIO
Ø Press [ RADIO, AM/FM ] during broadcasting to switch over RADIO between
AM and FM.
Ø Press [ VOL ] / [VOL ] to adjust the volume.
Ø Press on CD/RADIOOPERATION PANELto turn off RADIO.
Searching for Stations:
Ø Press or for the tuner to search for a station.
Ø Press and hold or for fast automatic channel searching.
Presetting Stations:
Ø Press [ M1 ]~[ M5 ] to turn in to the correspondingpreset radio stations with
corresponding Icon appearing on the screen.
Ø Press and hold [ M1 ] ~[ M5] during radio playing until corresponding Icon
displayed on the screen to save the preset station as the corresponding preset
station.
Total of 10 stations can bepreset, 5 stations each forAM andPM.
The preset stations will notbe lost in memory with thepower-off.
ANSWER MACHINE
Listening to the Voice Message:
Ø Press on ANSWER MACHINE to play messages. It will play new messages
when there are new ones .
Ø Press or on ANSWER MACHINE during the message playing to play
previous or next message
Ø Press onANSWER MACHINE tostop or press[ STANDBY ].
7
Ø Edit the nameand press for deleting thewrongly entered numbers
before the cursor.
Note: Please refer toNAMING HANSET (P. 10) about how to entering character.
Ø Press to 'PHONEBOOK'.
Ø Change the number.
Ø Press to save.
DELETING FROM PHONE BOOK:
Ø Press to access PHONE BOOK under STANDBY mode .
Ø Scroll to thenumber to bedeleted..
Ø Press AND with 'DELETED?' displayed on the screen.
Ø Press to confirm.
HANDSET/CALLER ID &CALL WAITING:
CALLER'S NAMEAND PHONE:
HANDSET automatically displays an incomingcaller's nameand phone number,
together with date and time of the call. It records and stores up to 80 calls
and has CALL WAITING service.
Attention: CALLER ID & CALL WATING Service must be subscribed from the
local telephone company.
CHECKING CALLER ID:
Ø Press to access 'INCOMING CALL LIST' under STANDBY mode.
Ø Scroll to roll up and down.
DELETING CALLER ID:
Ø Press to access PHONE BOOK under STANDBY mode.
Ø Scroll to the number to be deleted.
Ø Press and with 'DELETED?' displayed on the screen.
Ø Press to confirm
DELETING ALLCALLER IDS:
Ø Press and hold until 'DELETE ALL?' displayed on then screen.
Ø Press to confirm.
CALL WAITING:
nd st
Ø Press to listen to 2 Caller When talking with 1 Caller, and
st
press again to return to the 1 Caller.
Note: Available for both talking by HANDSETor with SPEAKERPHONE.
HANDSET/ANSWER MACHINE REMOTECONTROL
HANDSET can be used asa Remote Controlto set upANSWER MACHINE
mode, to listen to messages and to makerecording etc.
Ø Press 'MUTE' underSTANDBY mode to access REMOTE CONTROL
mode and thescreen will display'ANSWERER REMOTE'.Operate
according to thevoice instructions.
GUIDANCE FOR ADVANCED OPERATIONS
18

Deleting the Voice Message:
Ø Press [ DEL ] to delete the current message during the message playing.
Ø Press and hold [ DEL ] to delete all the old messages during the message
playing.
ALARM CLOCK
There are two alarms as [ ALM1 ] and [ ALM2 ].
Ø Press [ SET ] and the text 'SET TIME?' willbe displayed on the screen, scroll
[ VOL ] / [VOL ] to 'ET ALARM1?'.
Ø Press [ SET ] again to display 'SET AL1 HOUR', scroll [ VOL ] / [VOL ] to
select.
Ø Press [ SET ] to confirm, and set the 'MINUTE' in the same way. And the
'SET AL1 MODE' appears on the screen,And scroll [ VOL ] / [VOL ] to
select the alarm mode in the following order.
OFF CD RADIO BUZZER .
Note: mode Once on OFF mode,no CD, or RADIO, or BUZZER icon displayed
on the screen;
Ø Press [ SET ] to confirm the mode, then 'SET AL1 VOLUME' appears on the
screen.And scroll [ VOL ] / [VOL ] to adjust the volume.
Note: The volume of the alarm increases gradually when it rings. The setting
is for the maximum volume (no less than5).
Ø Press [ SET ] to confirm the Volume, then 'SET AL1-DURATION' display on
the screen.And scroll [ VOL ] / [VOL ] to select the duration.
Note: Minimum duration is 10MIN,maximum duration is 120MIN for CD
/RADIO and 30MIN for BUZZER.
Ø Press [ SET ] to confirm andquit.
Note: Directly press [ ALM1 ] to view the time and durationof ALM1, once
'ALARM1 XXMIN' and corresponding Icon appear on thescreen , here
" XXMIN"means the duration of the ALARM. Follow the same instructions
for ALARM 2.
OTHER IMPORTANT FEATURES
Auto Mute:
RADIO or CD PLAYER will automatically become mute under one of the
following circumstances and the Icon <MUTE> will flash on the screen
Ø When the phone is ringing
Ø OR: When the phone is in use.
Ø OR: When HANDSET is under REMOTE CONTROL mode.
Auto Mute will be automatically cancelled
Ø When the phonecall is finishedor the ringstops;
Ø OR: Press [ SNOOZE/MUTE ]on BASE UNIT;.
GUIDANCE FOR QUICK OPERATIONS
8
GUIDANCE FOR ADVANCED OPERATIONS
HANDSET/PHONE BOOK
SAVING NUMBERS TO PHONE BOOK:
PHONE BOOK can save up to 64 numbers,frequently used for easy and quick
access.
Saving a NewNumber to PHONEBOOK:
Ø Press to access PHONE BOOK under STANDBY mode.
Ø Scroll to 'NEWENTRY' and press .
Ø Enter the name (maximum 11 characters). Press to delete the wrongly
entered characters before the cursor.
Note: Please refer to NAMING HANDSET(P.10) about how to entering character.
Ø Press to confirm.
Ø Enter the phonenumber (maximum 24characters). Press to delete
the wrongly entered numbers before the cursor.
Ø Press to save.
Ø Scroll to 'PHONEBOOK'
Save the RecentlyDialed Number to PHONE BOOK:
Ø Press [ redial ] to show the recently dialed numbers on the screen.
Ø Press .
Ø Enter the name (maximum 11 characters). Press for deleting the
wrongly entered characters before the cursor.
Note: Please referto NAMING HANSET (P. 10) about how to entering character.
Ø Scroll to 'PHONE BOOK', where the phone number is displayed and edited
if necessary.
Ø Press to save.
Saving INCOMING CALLNumbers To PHONE BOOK:
Ø Press to show INCOMING CALLLIST.
Ø Scroll to the number to be saved.
Ø Press FORMAT to select the desired redial format 7-digit
10-digit or 11-digit .
Ø Press to display and edit the caller's name shown on the screen.
Note: Please refer to NAMING HANSET (P. 10) about how to entering character.
Ø Scroll to 'PHONEBOOK', where the phone number is displayed and
edited if necessary.
Ø Press to save.
DIALING FROM PHONE BOOK:
Ø Press to access PHONE BOOK under STANDBY mode.
Ø Scroll to the number to be dialed.
Ø Press or [ SPK ] to dial.
EDITING PHONE BOOK:
Ø Press to access PHONE BOOK under STANDBY mode
Ø Scroll to the number to be edited andpress to confirm.
Ø Press to go to 'EDIT' and press .
OK
#
OK
OK
17
Auto Pause
RADIO or CD PLAYER will automatically pause under one of the following
circumstances:
Ø When AutoANSWERING ofANSWER MACHINE responds the INCOMING
CALLS.
Ø OR: Press to listen to the voice message or OGM;
Ø OR: Press torecord OGM orMEMO.
Auto Pause will automatically cease and RADIO or CD PLAYERER resumes under
one of the following circumstances
Ø When auto answering has finished;
Ø OR: When voice message or OGM has stopped;
Ø OR: When the recording is finished;
Ø OR: Press [ RADIO, AM/FM ] or with theCD in theCD slot.
[ PAGE ] Button/Search HANDSET :
Ø Press the [ PAGE ] on BASE UNIT. CHARGER/IN USE indication light will
illuminate if HANDSETis within the range of communication.And HANDSET
will buzz continuouslyfor 2 minutes.
Ø Press [ PAGE ] on BASE UNIT again or press on HANDSET to stop PAGE.
NOTE: HANDSET will buzz for alarming if it is too far from BASE UNIT and the
connection may berebuilt under such circumstances. BASEUNITwillauto
matically disconnect the phone when it detects HANDSETto be out of range
continuously for morethan 20 seconds.
[ STANDBY ] Button:
Press [ STANDBY ] to stop all the functions exceptthe phone calls and REMOTE
CONTROL function.
[ SNOOZE/MUTE ]Button:
Ø Press [ SNOOZE/MUTE ]to temporarily stop the alarm, and the alarm will
resume in 7minutes.
Ø Press [ SNOOZE/MUTE ]anytime during Radioor CD PLAYER to putBASE UNIT
in MUTE mode, with the corresponding Icon flashing on the screen,
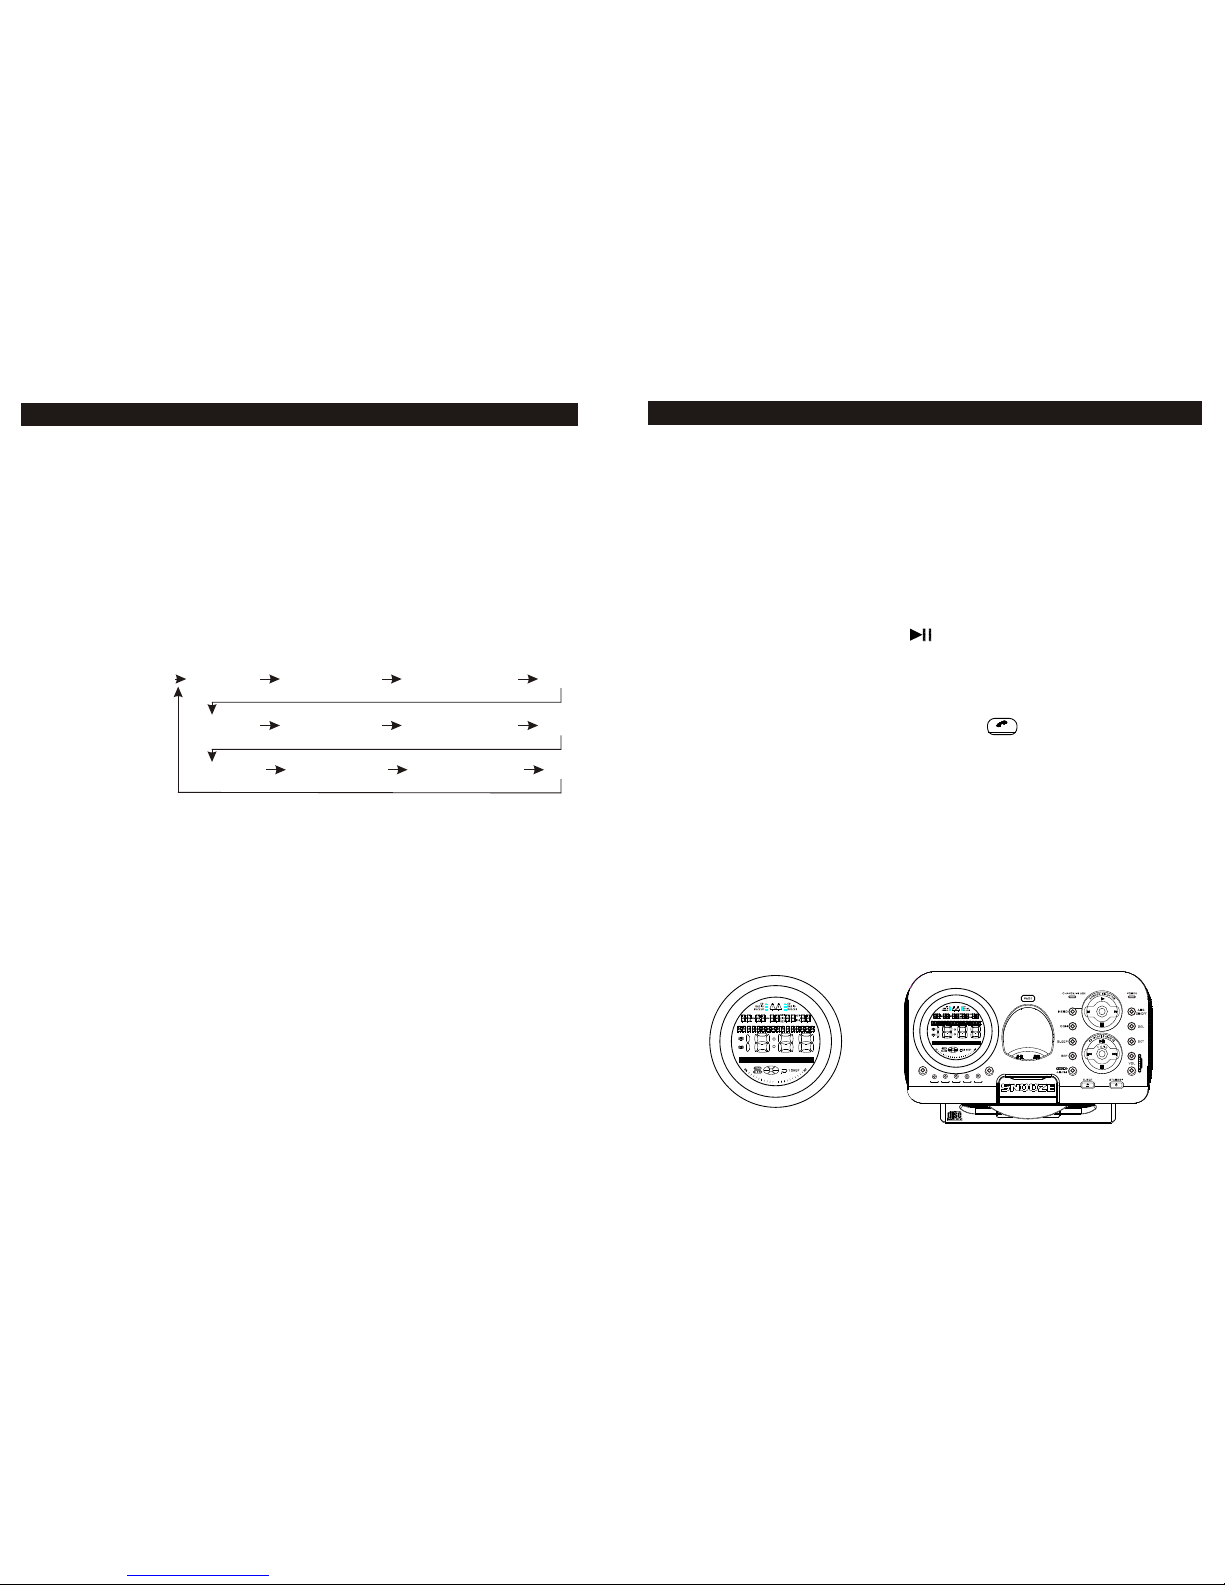
MUTE
M5
M4
M3
M2
M1
ALM-1 ALM-2
BASE UNIT DISPLAY
(DISPLAY IN STANDBY MODE) BASE UNIT PANEL
GUIDANCE FOR QUICK OPERATIONS
9
Ø Press [ SET ] to confirm andquit.
Note: Directly press [ ALM1 ] to view thetime and duration of ALM1, once
'ALARM1 XXMIN' and corresponding Icon appear on thescreen , here
" XXMIN"means the duration of the ALARM. Follow the same instruc
-tions for ALARM 2.
QUICK SETTINGALARM MODE &DURATION:
Directly Press [ ALM1 ] or [ ALM 2 ] for quick setting alarm mode and
duration.
e.g. [ALM1 ]:
Ø Directly press [ ALM1 ] to view thetime and duration of ALM1
Ø Press [ ALM1 ] to scroll to adjust the mode and duration.
View Alarm CD 30MIN RADIO 30MIN BUZZER10MIN OFF
CD 60MIN RADIO60MIN BUZZER 20MIN OFF
CD120MIN RADIO120MIN BUZZER30MIN OFF
Ø Press and hold [ ALM1 ]to skip to the setting of
ALM1 directly. The same applies to ALM2.
GUIDANCE FOR ADVANCED SETTINGS
16

GUIDANCE FOR QUICK OPERATIONS
def 3abc 2
ghi 4mno6
tuv89
pqrs
7
*oper0#
mute
R/P
SPK OK
5jkl
1
HANDSET DISPLAY(DISPLAY IN STANDBY MODE)
HANDSET PANEL
10
SETTING LOUDNESS:
Press [ SET ] and the text 'SET TIME?' will be displayed on the screen.
Scroll [ VOL ] / [VOL ] to 'SET LOUDNESS ?'.
Press [ SET ] to confirm and scroll [ VOL ] / [VOL ] to select ONor OFF.
Press [ SET ] to confirm and quit.
Note: This setting is onlyfor CD and RADIO.
SETTING BASS:
Press [ SET ] and the text 'SET TIME?' will be displayed on the screen.
Scroll [ VOL ] / [VOL ] to 'SET BASS?'.
Press [ SET ] to confirm and scroll [ VOL ] / [VOL ] to adjust.
Press [ SET ] to confirm and quit.
Note: This setting is onlyfor CD and RADIO.
SETTING TREBLE:
Press [ SET ] and the text 'SET TIME?' will be displayed on the screen.
Scroll [ VOL ] / [VOL ] to 'SET TREBLE?'.
Press [ SET ] to confirm and scroll [ VOL ] / [VOL ] to adjust.
Press [ SET ] to confirm and quit.
Note: This setting is onlyfor CD and RADIO
SETTING ALARM:
Ø Press [ SET ] and the text 'SET TIME?' will be displayed on the screen.
Scroll [ VOL ] / [VOL ] to “SET ALARM1?'.
Ø Press [ SET ] again to display 'SET AL1 HOUR', scroll [ VOL ]
/ [VOL ] to select.
Ø Press [ SET ] to confirm and set the 'MINUTE' in the same way, then
'SET AL1 MODE' appears on the screen. And scroll [ VOL ] / [VOL ]
to select the alarm mode in the following order
OFF CD RADIO BUZZER .
Note: It means OFF mode once there is no CD, or RADIO, or BUZZER icon
displayed on the screen
Ø Press [ SET ] to confirm the mode, then 'SET AL1 VOLUME' appears on
the screen.
And scroll [ VOL ] / [VOL ] to adjust the volume.
Note: The volume of the alarm increases gradually when it rings. The
setting is for the maximum volume (noless than 5).
Ø Press [ SET ] to confirm the Volume, then 'SET AL1-DURATION' display
on the screen.
And scroll [ VOL ] / [VOL ] to select the duration.
Note: Minimum duration is 10MIN,maximum duration is 120MIN for
CD/RADIO and 30MIN for BUZZER.
GUIDANCE FOR ADVANCED SETTINGS
15

SETTING UP HANDSET
REGISGTERING HANDSET::
Ø Press to enter MENU.
Ø Scroll to 'REGISTER', then press to confirm.
Ø Press and hold [PAGE] on BASE UNIT until CHARGE/IN USE indicator
blinks or a long buzzing is heard with HANDSET name, such as Handset(2),
appearing on the screen.
Ø Press to return to STANDBY mode.
Note: HANDSET in the packageis pre-registered, three more HANDSETS
can be purchased and registered to BASE UNIT in the same way
described above.:
Please deregister HANDSETas follows if the previous registrationfails:
Ø Press and hold [PAGE] on BASE UNIT until CHARGER/IN USE indicator
blinks.
Ø Press and hold [PAGE] again until CHARGER/IN USE indicator blinks faster.
Ø Press and hold [PAGE] and ALL HANDSETS have been deregistered.
Register HANDSETS once again in the same way as described.
Note: Deregistration is NOT recommended except in case of absolutenecessity.
NAMING HANDSET:
Ø Press to access MENU.
Ø Scroll to 'NAMEHANDSET' and press .
Ø Enter the name with KEYBOARD, with maximum of 11 letters (see the
Ch arter) or numbers.Use to deletethe letter before the cursor.Press
to save.
Note: The name created in the registration will be part of the new name.
Press to return to STANDBYmode or go to other options of MENU.
CHARTER FOR LETTER FOR KEYBOARD
Note: Example: Press"3" Key on KEYBOARD four timesto enter theletter"F".
GUIDANCE FOR ADVANCED SETTINGS
OK
OK
OK
OK
Key
Press Press Press Press Press Press Press Press
1 Space
& ' Space
2 A B C
3 D E
4 G H
5 J K
6 M N
7 P Q
8 T U
9 W X
0 0 0
1st 2nd 3rd 4th 5th 6th 7th 8th
F
I
L
O
R
V
Y
0
d
g
j
m
S
t
Z
0
(
a
e
h
k
n
p
u
w
0
)
b
.
c
f
i
l
o
q
v
x
0
2
D
G
J
M
s
T
z
0
A
Press
9th
0
1
B
E
H
K
N
7
U
9
1
3
4
5
6
r
8
y
0
*
#*
#*
#*
#*
#*
#*
#*
#*
#*
#
11
SETTING UP BASE UNIT:
SETTING AUTOANSWER RING TIMES:
The ring times can be set with atoggle switch on the bottom ofBASE UNIT with
three selections: 3rings, 5 ringsand TS TollSaver 3/5 :
Setting rings enablesANSWER MACHINEto automatically answer INCOMING
CALLS with thecorresponding rings.
3 rings: ANSWER MACHINE will automatically answer the incoming calls
after rings 3 times.
5 rings: ANSWER MACHINE will automatically answer the incoming calls
after rings 5 times.
TS (Toll Saver 3/5):
1) When there are new messages existing, theanswerer will automa
-tically answer theincoming calls after it rings 3 times.
2) When there are not new messages, the answerer will automatically
answer the incoming calls after it rings 5 times.
Hereby, when you need to listen to the messages with line remote control
th
mode, you can hang up after the 4 ring because it means there are no new
messages.
When the answerer is set at ANSWER OFF, it will not answer the incoming
calls as abovedescribed but will answer after ringingfor 10 times.
SETING DATE & TIME:
Ø Press [ SET ] and the text 'SET TIME?' will be displayed on the screen.
Ø Press [ SET ] again to display'SET TIME-YEAR' and the 'YEAR'will flashes.
Ø Scroll [ VOL ] / [VOL ] to select.
Ø Press [ SET ] for the third time to confirm YEAR.
And set 'MONTH', 'DATE', 'HOUR' and 'MINUET' in the same way.
The time displayed on the screen will be automatically updated with the
confirmation of 'MINUTE',and will automatically update the WEEK.
Note:
The WEEK only be accurate basing on the right YEAR.
Every INCOMING CALL message from ANSWER MACHING reecording will
will have week/time information.
GUIDANCE FOR ADVANCED SETTINGS
14

GUIDANCE FOR ADVANCED SETTINGSGUIDANCE FOR ADVANCED SETTINGS
CHOOSING LANGUAGE:
Ø Press to access MENU.
Ø Scroll to 'LANGUAGE'and press .
Ø Scroll to the desired language (English, French, Spanish) and
press to save.
Ø Press to return to STANDBY mode or go toother options of MENU.
CHOOSING DIAL TONE (TONE/PILSE):
Ø Press to access MENU.
Ø Scroll to 'TONE/PUSE' and press .
Ø Scroll to the desired mode and press to save.
Press to return to STANDBY mode or go toother options of MENU.
SETTING DATE & TIME
SETTING TIME:
Ø Press to access MENU.
Ø Scroll to 'DATE/TIME' and press .
Ø Scroll to time format (12hours or 24hours) and press .
Ø Scroll to AM or PM if 12 hour format is chosen.
Ø Use KEYBOARD to enter TIME and press to save.
Ø Press to return to STANDBYmode or go toother optionsof MENU.
SETTING DATE:
Ø Press to access MENU.
Ø Scroll to 'DATE/TIME' an press .
Ø Scroll to the date format (either MM/DDor DD/MM) and press .
Ø Use the KEYBOARD to enter the DATE and press to save.
Ø Press to return toSTANDBY mode or goto other options of MENU.
SETTING AREA CODE:
Attention: The function explainedin this sectionmust work with Caller ID
Service, which requires subscription from the local telephone company.
Ø Press to access MENU.
Ø Scroll to 'LOCAREA CODES' and press .
Ø Use KEYBOARD to enter the area code and press to save.
Ø Press to return to STANDBY mode or go toother options ofMENU.
Note: Setting of AREA CODE is helpful when dialing from INCOMING CALL
List, and the Three Area Codeformats are asfollows:
7-digit: Phone Number without Area Code
10- digit: Area Cod + Phone Number
11-digit: 1 + Area Code+ Phone Number
CHOOSING RINGER TONE & ADJUSTING RINGERVOLUME:
Press to access MENU.
Scroll to 'RINGER' and press .
Press when 'RINGERVOLUME' appears.
OK
OK
OK
OK
OK
OK
OK
OK
OK
OK
OK
OK
Scroll to select the desired volume OFF, LOW, MEDIUM, HIGH and the
ringer will sound with each selection.
Press to save.
Scroll down to'RINGER TONE' and press .
Scroll to select from 6 ringer tones andthe ringer will sound with each
selection.
Press to save.
Press to return to STANDBY status or go toother options of MENU.
SETTING ANSWER ON/OFF:
Ø Press to access MENU.
Ø Scroll to 'ANSMACH SETUP' and press .
Ø Use to select"ANSWERON/OFF"and press .
Ø Use to select and press to save.
Ø Press to return to STANDBY mode or to otheroptions of MENU.
SETTING LINE REMOTECONTROL SECURITY ID:
Ø Press to access MENU.
Ø Scroll to 'ANSMACH SETUP' and press .
Ø Use to go to 'SECURITYID' and press .
Ø Use the keyboard to enter the password with less than THREE letters and
press to save.
Ø Press to return to STANDBY mode or go toother options of MENU.
OK
OK
OK
OK
OK
OK
OK
OK
OK
OK
13
12
Table of contents
Other Newcont Cordless Telephone manuals


