Newcont NTP-6451 User manual

OWNER'S MANUAL
INSTALLATION AND
OPERATING
INSTRUCTIONS
PLEASE READ THIS
MANUAL CAREFULLY
BEFORE USE.
KEEP FOR
YOUR REFERENCE.
Digital 2.4GHz
Expandable Cordless Telephone System
NTP-6451
NEWCONTNEWCONT
1.This equipment has been tested and found to comply
with the limits for a class B digital device, pursuant
to part 15 of FCC Rules. These limitsare designed to
provide reasonable protection against harmful inter
-ference in a residential installation. This equipment
generates, uses and can radiate radio frequency ener
-gy and, if not installed and used in accordance with
the instructions, may cause harmful interference to
radio communications. However, there is no guar
-antee that interference will not occur in a particular
installation. If this equipment dose cause harmful in
-terference to radio or television reception, which
-can be determined by turning the equipment off
and on, the user is encouraged to try to correct the
interference by one or more of the following measures:
-Reorient or relocate thereceiving antenna.
-Increase the separation between the equipment
and receiver.
-Connect the equipment into an outlet on a circuit
different from that to which the receiver is connected.
-Consult the dealer oran experienced radio/TV
technician for help.
2.Changes or modifications not expressly approved
by the party responsible for compliancecould void
the user's authority to operate the equipment.
3.Privacy of communications may not be ensured
when using this phone.
NOTE

Contents
Getting Started.........................................................................................1
Connecting your phone....................................................................1
Preparing for use .............................................. ..............................4
Using the Handset Display
Using the soft keys
................................. .... .... .....................5
..........................................................................5
Using the Navigation Keys..............................................................5
Setting up your Handset...........................................................................6
Registering a handset......................................................................6
Setting the Ring Tone and Ring Volume .........................................6
Naming a Handset............................................................................6
Entering Text on the Handset..........................................................7
Setting the language........................................................................7
Setting Tone/Pulse Dialing...............................................................7
Setting the Date and Time...............................................................7
Setting the Area Code for caller ID................................ .................8
Using the Handset............................................................ ... .... .................9
Placing calls.................... .........9
Making a call using the speakerphone
........................................................
.............................................9
Switching Between the Handset and speakerphone......................9
Muting a call.....................................................................................9
Redialing a Number............................................................. .............9
Using the handset finder..................................................................9
Storing number in the phonebook..................................................10
Storing a caller ID number in the phonebook................................10
Calling a Numberfrom the phonebook........................... ...............10
Editting a phonebook Entry...........................................................11
Deleting a phonebook Entry..........................................................11
Using Caller ID...............................................................................11
Reviewing the List of Calls............................................................11
Deleting Caller ID Calls..................................................................12
Multihandset Functions............................................................................13
Conference Calling ....................13
Using the Intercom
......................................................
.........................................................................13
Transfering a call from one Handset to Another............................13
Unanounced Transfer.............................................................13
Announced Transfer...............................................................13
Using the Intercom
1.Press Intercom.
2.From the list of handsets, press until points to the handset you want to page,
or to SelectAll topage all handsets.
Note: If there are only 2 handsets registeredto the base, pressingthe Intercom
button will automaticallypage the otherhandset.
3.Press ( ).
4.To answer the page, press TALK ( ).The first handset to respondis connected.
If no one answers the page after 2minutes, or if theperson you are paging presses
EXIT ( ), No Answer displayson your handsetand paging stops.
5.When someone answersthe page, talkinto the handset.
6.Toend the intercom session, press EXIT( ).
Transferring a Call from One Handset toAnother
Unannounced Transfer
1.Press ( ).
2.Press Intercom.
3.Scroll to the handset youwant to transfer the callto and press( ).
Note: If there are only 2 handsets registeredto the base, pressingthe Intercom
button will automaticallypage the otherhandset.
3.Press to hang up.The call is transferred tothe other handset.
Announced Transfer
1.Follow steps 1 through 3 above.
2.To answer thepage on theother handset, press( ).
3.Tell the personon the otherhandset that youare transferring acall, then press
( ) button again.The call is transferred to the otherhandset and all three
individuals are on the call.
4.Press ( )to hang up the second handset.
Volume
OK
C
OK
OK
C
C
C
OK
OK
13
Multihandset Functions
C
Multihandset Functions
Youcan have up to 4 handsetsregistered to a basestation. Expansion handsets do
not require connectionto a phoneline. You can placethe handset andits
charging base anywhere a standard electrical outlet is available.
With multiple handsets, you can:
Conference call
Handset to handset intercom
Set uphandsets to automatically answer intercom calls
Transfercalls from one handset to another
Conference Calling
If one handset is already on a call, the display on other handsets registered to the
same base station shows Line in use
Once a second handset is added to the call, the displays on all handsets shows
On conference. Amaximum of 2 handsets can be on a conference call at the same time.
1.To connect a second handset to a call,press or on thesecond handset.
2.To disconnect fromthe conference call,press on either or bothhandsets.
Connecting Your Phone
This section is a reference guide to the basic functions and operations of your
cordless telephone. For more detailed descriptions of the operations and features
of this telephone, refer to the Content on page 1.
1.Carefully removeyour cordless telephonefrom its shipping carton. Ifthere is
any visible damage, donot attempt to operate this equipment. Return it to the
place of purchase.
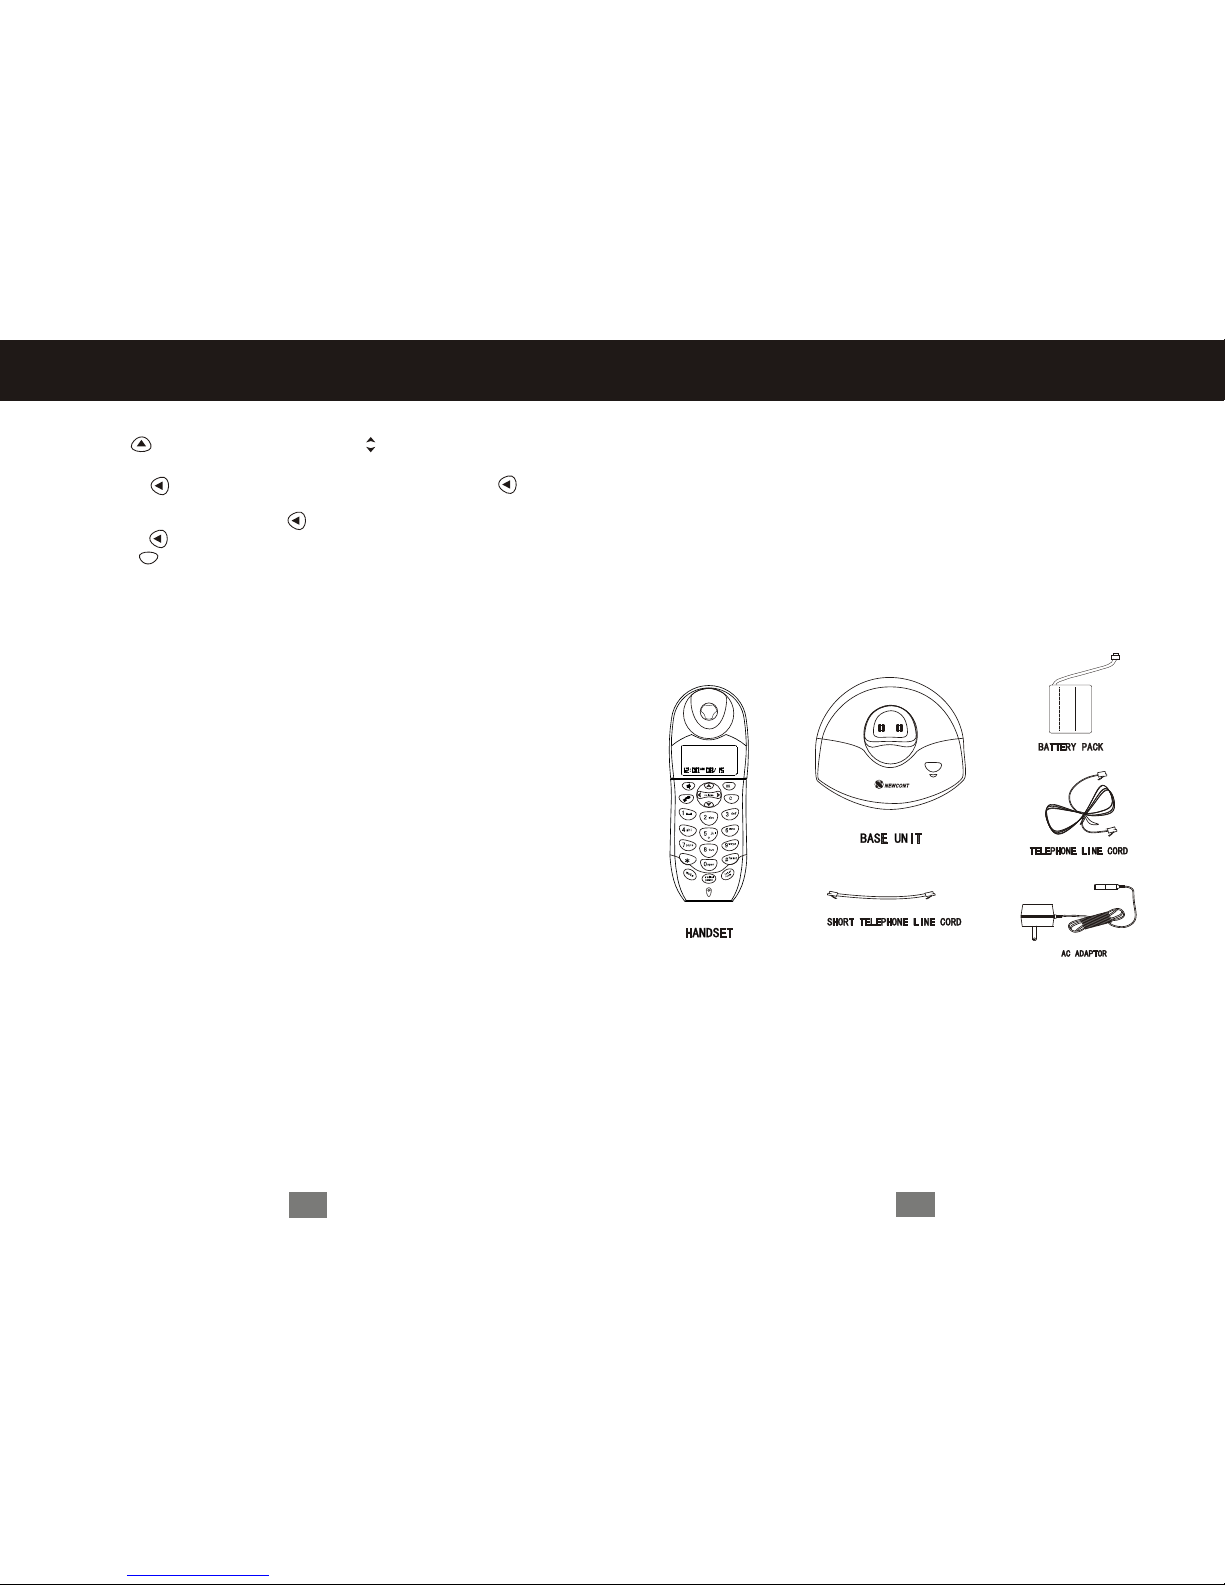
2.Check to be sure you have all items that come with this cordless telephone
system. Youshould have aHANDSET,BASE UNIT,AC ADAPTOR,TELEP
HONE LINE CORD, SHORTTELEPHONE LINECORD,BATTERYPACK,
BELT CLIPand Owner's Manual.
Getting Started
3.Insert the small plugon end ofthe ACADAPTOR into the POWERIN CONNEC
-TION JACK at theback of theBASE UNIT.
4.Plug theACADAPTOR into a 120V AC wall outlet.
USE ONLYWITH CLASS 2 POWER SOURCE 9V DC,500 mA.
5.Insert oneplug of theTELEPHONE LINE CORD into thehouse TELEPHONE
JACK and the otherend into theTELEPHONE LINE CONNECTION JACK
on the back ofthe BASE UNIT.
6.We recommend not placing this unit next to appliances. Doing so may cause
interference.
7.Install theHANDSET BATTERY PACK by pluggingit into theBATTERY
1
PAGEPAGE
Deleting Caller IDCalls
1. Press CID( ) to enter into caller ID list.Press to select the number/name
which you want to delete.
2.Press Delete( ),the display shows DELETED? .PRress Delete( )again
to delete the number/name.
3.If deleting all calls,Press and hold( ).the display shows DELETE ALL?
Press DELETE( )to delete all calls.
4.Press EXIT( )to return to standby mode.
""
""
C
12
Using the Handset

CONNECTOR inside theBATTERY COMPART
-MENT.
8.Place the BATTERY PACK inside the
BATTERY COMPARTMENT.
9.Slide theHANDSET BATTERY COMPART
-MENT COVER firmly into place in its clos
-ed position.
10.IMPORTANT: Before initial use,
charge the HANDSET for 12hours.
120VWALL
OUTLET
AC ADAPTOR
TELEPHONE
JACK
TELEPHONE LINE
CONNECTION
JACK
Getting Started
2
BATTERY
CONNECTOR
BATTERY
COMPARTMENT
COVER
BATTERY PACK
Editting a Phonebook Entry
1.Press PHONEBK( ).
2.Press until points to theentry you wantto edit.
3.Press SELECT( ).
4.Scroll to Editand press SELECT( ).
5.Tomodify the name,press DELETE ( ) to backspaceand erase charactersto
the left ofthe blinking cursor. See page7 for informationon entering text.
6.Scroll down ( )to move to thephone number field.
7.Modify the number.
8.Press SAVE ( ).
Deleting a Phonebook Entry
1.Press PHONEBK ( ).
2.Press until points to the entry you want to delete.
3.Press DELETE ( ).The Display shows
5.Press EXIT ( ).
Using Caller ID
Note: You must subscribe to caller ID service from your local telephone company
to use the caller ID features of your phone.
If you subscribe to caller ID service, the caller's name and number are displayed
when you receive an incoming call. If no caller ID information was sent from the
phone company, or you do not subscribe to caller ID service, the display shows
Incoming Call.
Reviewing the Listof Caller IDCalls
The handset canhold up to80 caller IDrecords.
1.Press to enter the recentcall list. The most recentcall is listedfirst.
2.Press to review more calls.
3.To call the number, press TALK( ) or Handsfree .
"DELETED?".
4.Press DELETE( )again.
Volume
OK
OK
Volume
Volume
C
11
Using the Handset

Getting Started
3
Handsfree/FlashHandsfree/Flash
DeleteDelete
TalkTalk
MuteMute
MicrophoneMicrophone
CIDCID
SaveSave
MenuMenu
ExitExit
PhonebookPhonebook
FormatFormat
IntercomIntercom
Redial/pauseRedial/pause
10
Using the Handset
4.Scroll down ( ).
5.Enter the phone number ( up to 24 digits).Press Cancel( )to backspace and
erase characters to the left of the blinking cursor.
6.Press SAVE ( ).
Tostore a recentlycalled number inthe phonebook:
1.Press Redial. The display shows the most recent number at the top.
2.Press SAVE ( ).
3.Enter the name(up to 11 characters). PressCancel( ) to backspace and erase
characters to the left of the blinking cursor. See page 7 for information on
entering text.
4.Scroll down( ).
5.The phone numberdisplays in thenumber field. Tomodify the number, press
DELETE ( )to backspace and erase characters to the left of the blinking cursor.
6.When the phonenumber is correctas you wantto store it, press SAVE ( ).
Storing a CallerID Number inthe Phonebook
1.Press CID( ) to enter intocaller ID list.
2.Scroll up and down to select the call you want to store.
3.Press FORMAT( ) to changethe dialing formatof the number(7-digit,
10-digit or 11-digit).
4.Press SAVE( ).The caller s name displays in the name field.You can
modify the namebefore storing it.
5.When the name is correct as you want to store it,press to scroll down.
6.the caller s phone number displays in the number field.You can modify the nu
-mber before storingit.
7.When number iscorrect as you want tostore it,press SAVE( ).
8.Press EXIT( )return to standby Mode.
Calling a Numberfrom the Phonebook
1.Press Directory( ).
2.Press until points to the entry you want to call.
3.Press TALK or Handsfree.
Volume
Volume
C
OK
Storing numbers inthe phonebook
Storing numbers in the phonebook makes it easy to dial numbers you can frequently.
Youcan enter numbers directly into the phonebook or add them from the caller
ID . The phonebook can hold 64names and numbers.
1 Press Directory( )
2.Scroll to (NewEntry) and pressSELECT ( ).
3.Enter the name (up to 11 characters). Press Cancel( ) to backspace and
erase characters tothe left of the blinking cursor. See page 6 for information on
entering text.

Preparing for Use
Before you can use your cordless telephone, you must charge the HANDSET for
12 hours. Failureto do sowill require rechargingof the BATTERYPACK more
often.
1.Place theHANDSET inthe BASE Cradle for 12 hours.
2.After 12hours, remove theHANDSET fromthe BASE UNIT.
NOTE:
Depending on the frequency of use, once the HANDSET is fully charged, it
remains functional for approximately 4 hours of continuous use and approxim
-ately 5 days when the HANDSET is off the BASE UNIT in STANDBY mode.
Using the Handset Display
When the handset is not in use, the display shows the standby screen.
4
Getting Started
Switching Between theHandset and Speakerphone
Press Handsfree( ).
Muting a Call
Press MUTE( ). Tounmute the call, press MUTE again.
Redialing a Number
To redial themost recently dialednumber:
1.Press TALK( ).
2.Press Redial.
If a number in the redial list matches a number in your phonebook, the phonebook
name and number display in the redial list instead of just the phone number.
Using the handset finder(PAGE)
1.Press PAGE on the base station. The charge LED will light if the handset is
within range.A seriesof beeps willsound for approximately15 seconds.
2.Place the handset back into the base or press the TALK buttonto stop the
page/find feature.
Out of Range Warning
If you venture too far from the base the handset will beep. Reverse your direction
to re-establish connectionwith the baseor the callwill be dropped.When the base
detects that the handset has been out of range for 20 continuous seconds it will
release the engaged line.
OK
9
Using the Handset
C
C
Using the Handset
Placing Calls( )
Press the Talk button. When you hear the dial tone, dial the number. Or enter the
phone number,then press TALK( ). The phone number is displayed on the
screen before the number is dialed.
During a call, a timer on the display shows the amount of time on the call.
When you are finished talking, press ( )to hang up.
Press Handsfree to answer using the speakerphone.
If you have call waiting service, press TALK to answer the second call.
Making a CallUsing the Speakerphone
Press Handsfree and dial the number.When the speakerphone on the handset is
on, appears on the display.
When you arefinished talking, press( ) to hang upand turn thespeakerphone off.
When pressing Handsfree in the caller ID list, redial list, or phonebook turns
the speakerphone on and ( )dials the number.
Press Handsfree( ).
If you have call waiting service, press TALK ( )to answer thesecond call.

Volume
Note: Caller IDinformation is suppliedonly if yousubscribe to callerID service
from your local phone company.
When the handset speakerphone is on, appears on the display.
Using the Soft Keys
-Directory button,Press to enter into PHONEBK.
-CID button.Press to enterinto caller ID list.
-SAVE & Volume(+)button.
-DELETE & Volume (-)button.
-MENU& SELECT button,Press to enter into MENU.Then press again
to select.
-Handsfree.
-EXIT/OFF button.
-TALK & Flash button.
Using the Navigation Key
is used toscroll up anddown through menuitems, a listof settings, callerID
and redial lists, and the phonebook. Points to the currently selected item, and
indicates there aremore items aboveand below thecurrently selected item.
Press to scroll up or down on the display.
Volume
C
OK OK
5
OK
Getting Started
For example, if you store212in 10-digit format, when you receive a call from
that area code, the phone number is stored in your call list with all 10 digits. The
number will thenbe in thecorrect format for you todial directly fromthe call list
without any reformatting.
1.Press MENU( )
2.Scroll to Loc area codes and press SELECT( ).
3.Enter the first area code.
4.Press SAVE( ).
5.Press EXIT ( )to return to the standby screen, or to scroll to a different menu
option.
OK
OK
C
10-digit format
Youhave to dial the 3-digit area code+7-digit phone number to call numbers in
this area.
11-digit format
Youhave to dialthe 1+3-digit areacode+7-digit phone numberto call numbers
in this area code.
8
Volume
Volume
C
OK
6.Scroll down ( ) to move the next field.
7.Press SELECT( ) to select date format(MM/DD or DD/MM).
8.Scroll down ( ) to move the next field.
9. Enter the current date.
10.Press SAVE( ).
11.Press EXIT( ) to return to the standby screen, or to scroll to a different
menu option.
Setting AreaCode for CallerID
Note: This section applies only if you subscribe to caller ID service from your
local phone company.
Youcan store one area code to makeit easy todial numbers fromyour list
of caller ID calls. Each area code can be:
7-digit format
Youdo not have to dial the area code to call numbers in this area code.
Setting up your Handset

5.Scroll down ( ) to advance to the Ring Tone. This is the ring sound for
incoming calls.
6 Press SELECT ( )to scroll through the ring tones. Each tone plays as you
Press ( ). Stop at the ring toneyou want toset.
7.Press SAVE ( ).
10.Press EXIT ( )to return to the standby screen, or to scroll to a different
menu option.
Volume
OK
Naming a Handset
When you register a handset, you can change the name to something more useful,
for example a location (Bedroom) or someone's name ( Mary). Naming a handset
makes it easy to select the handset from a list( for example, to intercom another
handset).
If you name a handset, the handset number remains part of the name, for example,
Bedroom(2)
1.Press MENU ( ).
2.Scroll to Namehandset and pressSELECT ( ).
3.Use the keypad to enter the handset name (up to 11 characters). The flashing
underline shows the input cursor position. Press DELETE ( )to backspace and
erase characters to the left of the input cursor.
4.Press SAVE ( ).
5.Press EXIT ( ) to return to the standby screen, or to scrollto a different menu
option.
OK
C
OK
C
6
Setting up your Handset
OK
OK
OK
C
OK
Telephone Setting
Registering a handset
Youcan have up to 4 handsets registered to a base station. To register a new
expansion handset that has never been registered to a base station before:
1.Press MENU( )
2.Scroll up and down to select REGIST-ER.
3.Press and hold PAGE on the base station for at least 6 seconds or until you
hear a longbeep and seethe handset name,for example, Handset(2).
4.Press EXIT ( )to return to the standby screen.
Setting the RingTone and Ring Volume
Youcan set ringVolume leveland a ring tone for incoming calls.
1.Press MENU ( ).
2.Scroll to Ringerand press SELECT( ).
3.The ringer Volume displays .Press SELECT ( ) to scroll through the settings
( off, low, medium, high ). Each volume level plays as you press Stop at the
volume level you want to set.
4. Press SAVE ( ).
7
Setting up your Handset
Setting the Language
1.Press MENU ( ).
2.Scroll to Language and press SELECT( ).
3.Press until points to thelanguage you wantto set.
4.Press SAVE( ).
5.Press EXIT ( ) to return to the standby screen, or to scroll to a different
menu option.
Setting Tone/Pulse Dialing
1.Press MENU ( ).
2.Scroll to Tone/Pulse and press SELECT( ).
3.Press until points to the dialing mode.
4.Press SAVE( ).
5.Press EXIT ( ) to return to the standby screen, or to scroll to a different
menu option.
Setting the Date and Time
1.Press MENU( )
2.Scroll to Date/Time and press SELECT( ).
3.Press to select the time format(12-or 24-hour clock).
4.Enter the time(2digits are requiredfor the hourand 2 digitsfor the minutes,
so use aleading 0 for 1-digit values).
5.Press to select AM/PM..
Note: This applies only ifusing a 12-hour clock.
OK
OK
OK
OK
C
OK
OK
C
Entering Text on the Handset
Press each button on the handset the indicated number of times to enter text
numbers, and other characters. For example, to enter E, press the 3 button
two times.
Press Key
1
2
3
4
5
6
7
8
9
0
*
#
1st
Space
A
D
G
J
M
P
T
W
0
*
#
2nd
1
B
E
H
K
N
Q
U
X
0
*
#
3rd
&
C
F
I
L
O
R
V
Y
0
*
#
4th
a
d
g
j
m
s
t
z
0
*
#
5th
b
e
h
k
n
p
u
w
0
*
#
6th
)
c
f
i
l
o
q
v
x
0
*
#
7th
.
2
3
4
5
6
r
8
y
0
*
#
8th
A
D
G
J
M
s
T
z
0
*
#
Space
(
9th
1
B
E
H
K
N
7
U
9
0
*
#
Other Newcont Cordless Telephone manuals


