NewTec Design Audio CONO CANTO WIFI User manual

User Manual
NewTec Wireless Audio Soluon
Setup Guide
English .………………………………………………………………………… 3
Deutsch ……………………………………………………………………….. 7
Italiano …………………………………………………………………………. 11

2

3
NewTec Wireless Audio Soluon
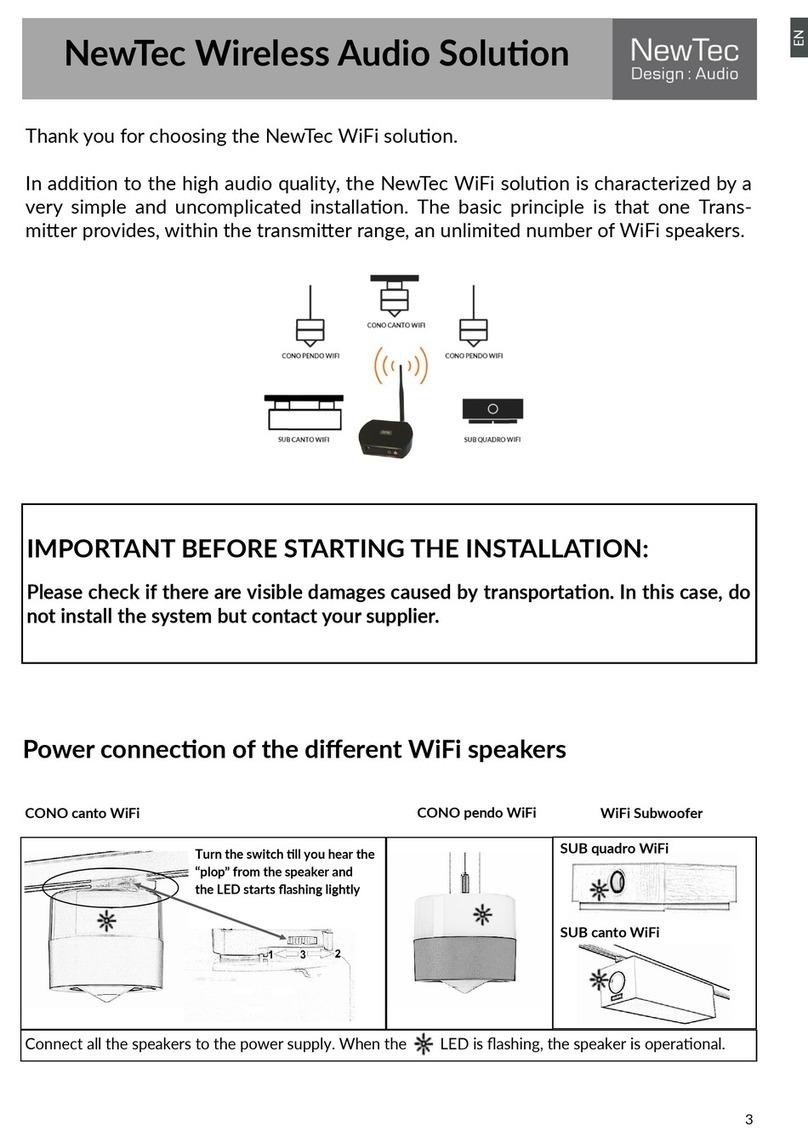
Power connecon of the dierent WiFi speakers
Turn the switch ll you hear the
“plop” from the speaker and it
the LED starts ashing lightly
Thank you for choosing the NewTec WiFi soluon.
In addion to the high audio quality, the NewTec WiFi soluon is characterized by a
very simple and uncomplicated installaon. The basic principle is that one Trans-
mier provides, within the transmier range, an unlimited number of WiFi speakers.
IMPORTANT BEFORE STARTING THE INSTALLATION:
Please check if there are visible damages caused by transportaon. In this case, do
not install the system but contact your supplier.
Connect all the speakers to the power supply. When the LED is ashing, the speaker is operaonal.
CONO canto WiFi CONO pendo WiFi
SUB quadro WiFi
WiFi Subwoofer
SUB canto WiFi
EN

4
Posion of the NewTec WiFi Transmier:
The best posion for the WiFi transmier is in the middle of the room. For best
coverage you should place the transmier at the height level of the speakers. Keep it
at least 5 meters away from any other wireless devices (WiFi router, WiFi phones,
WiFi POS systems, etc) which could inuence each other.
Unfold in any case the antenna and mount the transmier, so that the antenna is al-
ways in a vercal posion (see examples below). Avoid operang with folded anten-
na or in a horizontal posion.
Restart
Mute
NewTec Remote
NEWTEC REMOTE CONTROL
Status-LED
Restart
Connect
Volume Up/Down
Factory Sengs
Mute
NEWTEC TRANSMITTER
Speaker Transmier
Status-LED
Start Pairing
Master Volume
End Pairing
IMPORTANT: The remote is used to con-
trol the transmier, as well as the indivi-
dual speakers .
Front
Back
Power Supply
5V DC (1A)
Audio In
Cinch RCA
SMA-RP
Antenna
IR Receiver
Status LEDs
EN

5
Installaon guide WiFi speakers
CONO canto WiFi:
Clip the CONO canto WiFi speaker into the 3 phase lighng track. If you hear a
“plop” from the speaker and the Led is ashing, you are on the correct phase
and the speaker is connected to power. If not, turn the phase switch ll you
hear the “plop” sound => see rst page
CONO pendo WiFi:
Install and connect the CONO pendo WiFi to the power supply
SUB quadro WiFi:
Install the SUB quadro WiFi, connect to the power supply and turn the switch
on the backside to “ON”
SUB canto WiFi:
Clip the SUB canto WiFi speaker into the 3 phase lighng track. If you hear a
“plop” from the subwoofer and the Led is ashing, you are on the correct phase
and the subwoofer is connected to power. If not, turn the phase switch ll you
hear the “plop” sound
Repeat the procedure with all WiFi speakers and control if the LEDs on all
speakers are ashing.
Connect the transmier to an electrical outlet using the supplied AC adapter.
Check that the green and orange LEDs on the transmier are ashing (if not,
check that the power adapter is properly connected and the outlet is supplying
power).
Connect a player to the Cinch jacks using the supplied audio cable and start
playback. When the orange LED is connuously lit, the music is sent wirelessly
to the speakers.
The sll ashing green LED conrms the correct funconing of the internal
sound processor.
CONNECT: Use the supplied remote control to aim at the orange LED of the
transmier and press the arrow key upwards. As soon as orange and green
LEDs ash alternately, the transmier is in pairing mode.
Pairing mode: The transmier acvates the pairing mode to connect all
speakers. Every 15 seconds the transmier plays the connected music signal
for 5 seconds to check a successful connecon. This will be repeated unl you
disable the pairing mode on the transmier. (see point 6)
Now go with the remote control from speaker to speaker and aim at the orange
LED of the speaker and press the arrow key upwards. The speaker conrms a
successful pairing aer a short me with a long beep tone.
Deacvate the pairing mode on the transmier by using the remote control to
aim at the orange LED of the transmier and press the arrow key downwards.
Aer a few seconds, the transmier will switch to normal operaon and all
connected speakers will output the connected music signal. You can start now
playing music.
1
2
3
4
5
6
EN

6
SUB quadro WiFi Fine Tuning:
=====================================================================================
Customer support:
NewTec Design Audio GmbH www.newtec-audio.com
Via Negrelli 13/C Tel. +39 0471 058065
39100 Bolzano – ITALY support@newtec-audio.com
You can control the volume and transient frequen-
cy at the control buons on the back of the sub-
woofer. Recommended transion frequency: ~
100 Hz
You can also adjust the volume of each SINGLE
subwoofer in proporon to the others even aer
wall mounng. Use the remote control to aim the
subwoofer's bass reex tube and press the Vol +/- buons (note that the "master
volume" in the store is controlled by your audio device or by the WiFi transmier.).
SUB canto WiFi Fine Tuning:
While using the SUB canto, we recommend seng
the satellite speakers to 80% of the volume using
FACTORY SETTINGS on the remote control. This
will help generate a balanced sound.
Of course, you can also adjust the volume of the
subwoofer. To do so, use the remote control to aim
the subwoofer's bass reex tube and press the Vol
+/- buons (note that the "master volume" in the store is controlled by your audio
device or by the WiFi transmier.).
You can adjust the volume of each SINGLE loudspeaker in relaon to the other
speakers (for example, changing rooms, checkout areas, etc.). Use the remote
control to aim at the LED of each speaker. (Note that the "master volume" in
the store is controlled by your audio device or via the transmier).
Aer the setup of all the speakers and Subwoofers with the transmier, check
the best possible transmion locaon (see previous page).
7
8
EN

7
NewTec Wireless Audio Soluon
Hinweise zur Stromverbindung der verschiedenen Modelle
Drehen Sie am Phasenrad bis Sie
das “Plop-Geräusch hören und
die LED zu Blinken beginnt
Vielen Dank, dass Sie sich für die NewTec WiFi Lösung entschieden haben.
Neben der hohen Audioqualität, zeichnet sich die NewTec WiFi Lösung durch eine
sehr einfache und unkomplizierte Installaon aus. Das Grundprinzip ist, dass Sie mit
einem NewTec WiFi Audio Transmier eine unbegrenzte Anzahl von WiFi
Lautsprechern innerhalb der Senderreichweite versorgen können.
WICHTIG VOR BEGINN DER INSTALLATION:
Bie überprüfen Sie, ob sichtbare Transportschäden vorliegen. In diesem Fall neh-
men Sie das System nicht in Betrieb und setzen sich mit Ihrem Lieferanten in
Verbindung.
Schließen Sie alle Lautsprecher ans Netz. Sobald die LED blinkt, ist der Lautsprecher betriebsbereit.
CONO canto WiFi CONO pendo WiFi
SUB quadro WiFi
WiFi Subwoofer
SUB canto WiFi
DE

8
Posion des NewTec WiFi Transmier:
Die beste Posion für den WiFi Transmier ist in der Mie des Raumes. Für beste
Reichweiten sollte man den Sender in Höhe der Lautsprecher anbringen. Halten Sie
mit mindestens 5 Meter genügend Abstand zu anderen WLAN Geräten (WLan Rout-
er, WLan Telefone, WLan Kassensysteme u.s.w.), die sich gegenseig beeinussen
könnten.
Klappen Sie in jedem Fall die Antenne aus und moneren Sie den Transmier so,
dass die Antenne immer in verkaler Posion steht (siehe Beispiele unten). Vermei-
den Sie den Betrieb mit eingeklappter Antenne oder mit der Antenne in horizontaler
Posion.
NEWTEC FERNBEDIENUNG
Status-LED
Restart
Connect
Volume Up/Down
Factory Sengs
Mute
NEWTEC TRANSMITTER
Vorderseite
Hinterseite
Netzgerät
5V DC (1A)
Audio In
Cinch RCA
SMA-RP
Antenne
IR-Empfänger
Status LEDS
Lautsprecher Transmier
Status-LED
Start Pairing
Master Volume
End Pairing
WICHTIG: Die Fernbedienung dient zur
Steuerung des Transmiers, sowie der
einzelnen Lautsprecher.
DE

9
Installaonsablauf WiFi Modelle
CONO canto WiFi:
Hängen Sie den CONO canto Wi in die 3 Phasen Stromschiene ein. Wenn Sie
ein “Plop-Geräusch” vom Lautsprecher hören und die LED blinkt, sind Sie auf
der richgen Phase und der Lautsprecher hat Strom. Falls nicht, drehen Sie am
Phasenrad (siehe erste Seite) bis Sie das “Plop-Geräusch” hören.
CONO pendo WiFi:
Moneren Sie den CONO pendo WiFi und verbinden ihn mit dem Stromnetz.
SUB quadro WiFi:
Moneren Sie den WiFi Subwoofer und schalten Sie auf der Hinterseite den
Regler auf “ON”.
SUB canto WiFi:
Hängen Sie den SUB canto WiFi in die 3 Phasen Stromschiene ein. Wenn Sie
ein “Plop-Geräusch” vom Subwoofer hören, sind Sie auf der richgen Phase
und der Subwoofer hat Strom. Falls nicht, drehen Sie am Phasenrad bis Sie das
“Plop-Geräusch” hören.
Wiederholen Sie den Vorgang mit allen WiFi Lautsprechern und vergwissern
Sie sich, dass bei allen Lautsprechern die LED blinkt.
Schließen Sie den Transmier miels mitgelieferten Netzteil an eine Steckdose
an. Kontrollieren Sie ob die grüne und orange LED am Transmier blinken
(wenn nicht, kontrollieren Sie ob das Netzteil ordnungsgemäß angeschlossen
wurde und die Steckdose stromführend ist).
Schließen Sie ein Abspielgerät an die Cinch Buchsen miels mitgelieferten Au-
diokabel an und starten Sie die Wiedergabe. Wenn die orange LED durchge-
hend leuchtet, wird die Musik drahtlos an die Lautsprecher gesendet.
Die weiterhin blinkende grüne LED bestägt das korrekte Funkonieren des
internen Soundprozessors.
CONNECT: Zielen Sie mit der Fernbedienung auf die orange LED des Trans-
miers und drücken Sie die Pfeiltaste nach oben. Sobald orange und grüne
LED abwechselnd blinken, bendet sich der Transmier im Pairing-Modus.
Pairing Modus: Der Transmier akviert den Pairing-Modus um alle Lautspre-
cher zu verbinden. Alle 15 Sekunden spielt der Transmier für 5 Sekunden das
angeschlossene Musiksignal ab, um eine erfolgreiche Verbindung zu überprü-
fen. Dies wird solange wiederholt, bis Sie den Pairing-Modus am Transmier
deakvieren. (siehe Punkt 6)
Gehen Sie nun mit der Fernbedienung von Lautsprecher zu Lautsprecher und
zielen Sie auf die orange LED des Lautsprechers und drücken Sie die Pfeiltaste
nach oben. Der Lautsprecher bestägt ein erfolgreiches Pairing nach kurzer
Zeit mit einem langen Beep-Ton.
Deakvieren Sie den Pairing-Modus am Transmier indem Sie miels der Fern-
bedienung auf die orange LED des Transmiers zielen und die Pfeiltaste nach
unten drücken. Nach einigen Sekunden wechselt der Transmier in den Nor-
malbetrieb und auf allen verbundenen Lautsprechern wird das angeschlossene
Musiksignal ausgegeben. Sie können die Musikwiedergabe nun starten.
1
2
3
4
5
6
DE

10
SUB quadro WiFi Feinabsmmung:
===============================================================================
Kundenservice:
NewTec Design Audio GmbH www.newtec-audio.com
Via Negrelli 13/C Tel. +39 0471 058065
39100 Bozen – ITALIEN support@newtec-audio.com
Sie können an den Regelknöpfen auf der Rückseite
des Subwoofers dessen Volumen und Über-
gangsfrequenz regeln. Empfohlene Übergangsfre-
quenz: ~100 Hz
Sie können die Lautstärke jedes EINZELNEN Sub-
woofers zusätzlich im Verhältnis zu den anderen
auch nach erfolgter Wandmontage nachregeln.
Zielen Sie dazu mit der Fernbedienung ins Bassreexrohr des Subwoofers und
drücken die Vol +/- Tasten (Beachten Sie, dass die “Master-Lautstärke” im Store
durch Ihr Audiogerät geregelt wird oder durch den WiFi Sender.).
SUB canto WiFi Feinabsmmung:
Bei Verwendung des SUB canto empfehlen wir die
Satellitenlautsprecher auf 80% Lautstärke zu stel-
len miels FACTORY SETTINGS auf der Fernbe-
dienung. Dadurch wird ein ausgewogenes Klang-
bild erzeugt. Sie können natürlich auch die
Lautstärke des Subwoofers nachregeln.
Zielen Sie dazu mit der Fernbedienung ins Bassre-
exrohr des Subwoofers und drücken die Vol +/- Tasten (Beachten Sie, dass die
“Master-Lautstärke” im Store durch Ihr Audiogerät geregelt wird oder durch den
WiFi Sender.).
Sie können die Lautstärke jedes EINZELNEN Lautsprechers im Verhältnis zu
den anderen regeln (z.B. für Umkleiden, Kassenbereiche, o.ä.). Zielen Sie dazu
mit der Fernbedienung auf die LED jedes einzelnen Lautsprechers. (Beachten
Sie, dass die “Master-Lautstärke” im Store durch Ihr Audiogerät oder am Trans-
mier geregelt wird ).
Nach erfolgter Verbindung aller Lautsprecher und Subwoofer, überprüfen Sie
den bestmöglichen Sendeort (siehe vorherige Seite).
8
7
DE

11
NewTec Wireless Audio Soluon
Indicazioni per il collegamento elerico dei vari modelli
Ruotare la rotella delle fasi, nché
non si sente un suono ("plop") e il
LED inizia a lampeggiare
Grazie per aver scelto la soluzione WiFi di NewTec.
Oltre all'alta qualità dell'audio, la soluzione WiFi di NewTec si disngue per l'installa-
zione semplice e intuiva. Il principio alla base è che con il trasmetore audio WiFi
NewTec si può collegare un numero illimitato di altoparlan WiFi all'interno del suo
raggio d'azione.
IMPORTANTE PRIMA DELL'INSTALLAZIONE:
Controllare se sono presen danni causa dal trasporto. In tal caso, non meere in
funzione il sistema e contaare il proprio fornitore.
Collegare tu gli altoparlan alla rete. Non appena il LED lampeggia, l'altoparlante è pronto per l'uso.
CONO canto WiFi CONO pendo WiFi
SUB quadro WiFi
WiFi Subwoofer
SUB canto WiFi
IT

12
Posizione del trasmetore WiFi di NewTec:
La migliore posizione per il trasmetore WiFi è al centro della stanza. Per un raggio
d'azione omale posizionare il trasmetore all'altezza degli altoparlan. Tenere una
distanza minima di 5 metri da altri disposivi WiFi (router WiFi, telefoni VoIP, sistemi
WiFi per casse ecc.), poiché potrebbero interferirsi a vicenda.
Ad ogni modo aprire l'antenna e montare il trasmetore in modo tale che l'antenna
sia sempre in posizione vercale (vedi imagine soo). Evitare l'uso con l'antenna chi-
usa o in posizione orizzontale.
TELECOMANDO NEWTEC
Status-LED
Restart
Connect
Volume Up/Down
Factory Sengs
Mute
TRASMETTITORE NEWTEC
Fronte
Retro
Alimentatore
5V DC (1A)
Audio In
Cinch RCA
SMA-RP
Antenna
Ricevitore IR
Status LEDS
Altoparlante Trasmetore
Status-LED
Start Pairing
Master Volume
End Pairing
IMPORTANTE: Il telecomando si ulizza
per comandare sia il trasmetore che gli
altoparlan.
IT

13
Procedura per l'installazione dei modelli WiFi
CONO canto WiFi: Agganciare il CONO canto WiFi al binario elericato trifa-
se. Quando si sente un suono "plop" e il LED lampeggia, la fase è giusta e l'alto-
parlante è alimentato. In caso contrario, ruotare la rotella delle fasi (vedi prima
pagina), nché non si sente il suono "plop".
CONO pendo WiFi: Montare il CONO pendo WiFi e collegarlo alla rete elerica.
SUB quadro WiFi: Montare il SUB quadro WiFi e accenderlo spostando l'inter-
ruore posteriore su "ON".
SUB canto WiFi: Agganciare il SUB canto WiFi al binario elericato trifase.
Quando si sente un suono "plop" e il LED lampeggia, la fase è giusta e il sub-
woofer è alimentato. In caso contrario, ruotare la rotella delle fasi (vedi prima pa-
gina), nché non si sente il suono "plop".
Ripetere questa procedura per tu gli altoparlan WiFi e assicurarsi che su
tu gli altoparlan il LED sia acceso.
Collegare il trasmettitore con l’alimentatore fornito ad una presa di corrente.
Controllare che il LED verde ed arancione sul trasmettitore lampeggino (in caso
contrario controllare se l'alimentatore è stato collegato in modo regolare e se la
presa è sotto corrente).
Collegare un dispositivo audio al connettore Cinch tramite il cavo audio fornito e
far partire la musica. L’illuminazione del LED arancione indica la trasmissione di
musica a tutti gli altoparlanti.
CONNECT: Puntare con il telecomando sul lato posteriore del trasmettitore
(dove si trovano i LED) e premere il tasto “freccia in alto”. Appena i LED (verde e
arancione) lampeggiano a turno, il trasmettitore è in fase di pairing.
Fase di pairing: Il trasmettitore attiva la fase di pairing per connettersi con tutti
gli altoparlanti. Ogni 15 secondi viene verificata la connessione tramite la ripro-
duzione della musica. Questo processo si ripete fino a quando non si termina la
fase di pairing manualmente sul trasmettitore (vedi punto 6).
Avvicinarsi ad ogni altoparlante uno ad uno e puntare con il telecomando verso il
LED lampeggiante dell'altoparlante da collegare, premendo il tasto “freccia in al-
to”. L’altoparlante conferma l'avvenuto collegamento con un segnale acustico
“beep”.
La fase di pairing al trasmettitore viene disattivata puntando il telecomando ver-
so il LED arancione e premendo il tasto “freccia in basso”. Dopo alcuni secondi il
trasmetore passa allo stato di funzione e tu gli altoparlan sono pron per
l'uso e per la riproduzione di musica.
1
2
3
4
5
6
IT

14
8
Adaamento nale del volume - SUB quadro WiFi:
=================================================================================
Servizio clien:
NewTec Design Audio GmbH www.newtec-audio.com
Via Negrelli 13/C Tel. +39 0471 058065
39100 Bolzano – ITALIA support@newtec-audio.com
È possibile regolare il volume e la frequenza del
crossover con la manopola sul retro del subwoofer.
Frequenza di crossover consigliata: ~100 Hz.
Dopo il montaggio é possibile regolare il volume di
ogni singolo subwoofer in relazione agli altri al-
toparlan con il telecomando NewTec.
Puntare con il telecomando verso il tubo reex del
subwoofer e premere il tasto Vol +/-. (NB: Il “Volume Master” del negozio viene
regolato tramite il disposivo audio o via del trasmetore WiFi).
Adaamento nale del volume - SUB canto WiFi:
Quando si ulizza il SUB canto, si consiglia di im-
postare gli altoparlan satellitari su un volume
dell'80% ulizzando il boone FACTORY SET-
TINGS sul telecomando. In questo modo si crea un
suono bilanciato tra suoni bassi del Subwoofer ed
acu dei satelli. Naturalmente è anche possibile
regolare il volume del subwoofer.
Puntare con il telecomando verso il tubo reex del subwoofer e premere il tasto Vol
+/-. (NB: Il “Volume Master” del negozio viene regolato tramite il disposivo audio o
via del trasmetore WiFi).
Il volume di ogni SINGOLO altoparlante può essere regolato rispeo agli altri
(per es. per i camerini, l'area cassa o simili). Puntare l'occhio ad infrarossi verso
il LED dell'altoparlante o alternava puntare con il telecomando NewTec verso
il LED dell´altoparlante. (N.B.: il "volume master" nello store viene regolato dal
disposivo audio o dal trasmetore).
Quando tu gli altoparlan e subwoofer sono sta collega con successo,
posizionare il trasmetore in un punto ideale (vedi pagina precedente) e colle-
garlo alla rete elerica.
7
IT

15
This manual suits for next models
4
Table of contents
Languages:
Other NewTec Design Audio Stereo System manuals

