NewTek TriCaster Mini HD-4 User manual

Ready. Set. Go make your show.
Your guide to creating your rst video program with

TriCaster Mini Go Make Your Show Guide 01
Table of Contents
Part 1: Ready.
1) Power, Monitoring and Control 04
2) Bringing in Video and Audio 05
3) Displaying Video and Hearing Audio 06
4) Initial Startup and Registration 07
Part 2: Set.
1) Starting a New Production Session 12
2) Setting Up Your Camcorders 14
3) Selecting Your Sources 14
4) Switching Between Sources 15
5) Mastering Multi-Camera Production 18
Part 3: Go.
1) Video Clips 20
2) Overlays 23
3) Buffers 27
4) Preparing Network Video Sources 30
5) Connecting Network Video Sources 31
6) Live Streaming Video 32
Part 4: Further.
1) Mix Effects 36
2) Keying with LiveMatte 43
3) Using Virtual Sets 47
Part 5: Turbo.
1) Recording 51
2) Publishing to Social Media 53
3) Macro Shortcuts 56
TriCaster Mini Go Make Your Show Guide 2
Part 1: Ready.
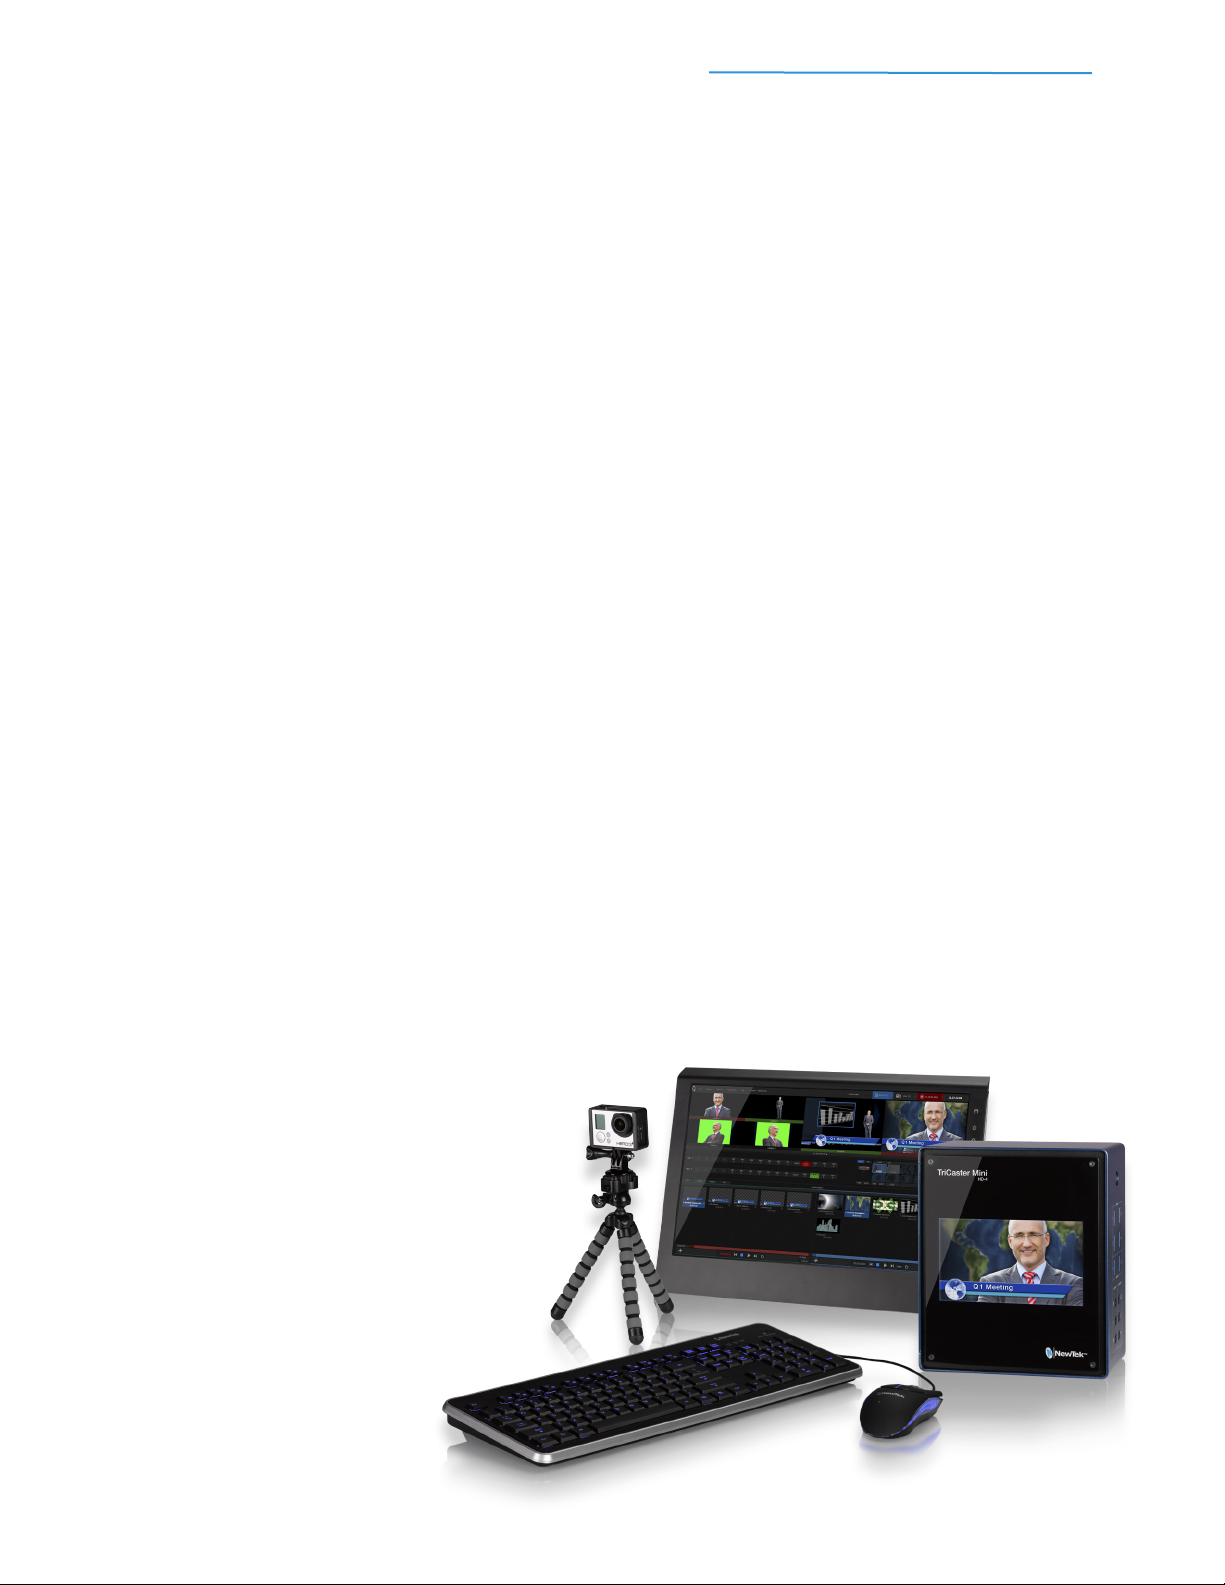
Anyone can create professional-looking, TV-style video fast—
and make your ordinary presentation extraordinary—with TriCaster Mini,
the most-complete, compact multimedia production solution on the planet.
This Go Make Your Show guide, designed just for people working with
professional video for the rst time, will walk you through all the basics
to get you on your way to creating your rst program.

TriCaster Mini Go Make Your Show Guide 3
While most professional video systems can be rather daunting because they’re built for experts, setting up
TriCaster Mini is actually pretty simple—not much different from getting a home stereo or video game console
up and running. In fact, if you’ve read the Quick Start Guide that came with your TriCaster Mini, then many of
these steps will already be familiar (or completed!) and you’ll move very quickly to the next section.
So let’s gather everything you need to get through the basics—and Go Make Your Show.
List A: What you’ll NEED:
Essentials – the absolute minimum gear required to
execute simple one-camera video functions
1. TriCaster Mini system
with its included power cable, keyboard,
and mouse
2. DVI computer monitor
(1600 x 1050 minimum resolution) and
accessory cables, to access the
User Interface
3. Ethernet cable
long enough to get the TriCaster Mini
plugged into the Internet
4. Live network connection or router
5. Camcorder with HDMI output terminal, and
the manufacturer’s suggested
HDMI cable
Be sure to get the right length of camera
cable for the production and location
6. Power outlets or surge protectors to handle
the gear in this list
7. Registration card from your TriCaster box
if you haven’t registered yet
List B: What you should also consider:
Typical – the most practical add-ons to ensure you
have access to every capability
• HDMI display and accessory cables to view
your live program or show it to others:
think projector, big-screen TV, or video
monitor.
This display is optional for streaming if
your TriCaster Mini includes the built-in
case display, but mandatory if you’re
presenting video to an in-person
audience or don’t have the built-in
display
• 3 more HDMI camcorders (and their cables)
so you can switch between angles or
shots
• A microphone with ¼” connector if you want
more than just the camera’s audio
• An HDMI computer monitor
(1600 x 1050 minimum resolution) and
cable, for multiview monitoring of all
live sources
• Second HDMI display and accessory cables
to view your live program or present it
for larger audiences
• More microphones and an audio mixer with
¼” mono or stereo out.
This will allow you to expand the
number of microphones, but you won’t
need to add an audio operator during
production
• Speakers or a sound system so you can hear
the production, or amplify it for others
to hear
• Headphones with a ¼” connector so you can
monitor audio during production
Got what you need from both lists? Great. Now let’s get them connected. Connections for power, monitoring
and control are all on the rear of the TriCaster Mini; for video and audio, in front.
IMPORTANT: While add-ons from LIST B are designated as Optional in the following steps, they may
be required for certain setups or applications. If an add-on and Optional step does not apply to your
production, you can skip that step.
TriCaster Mini Go Make Your Show Guide 4
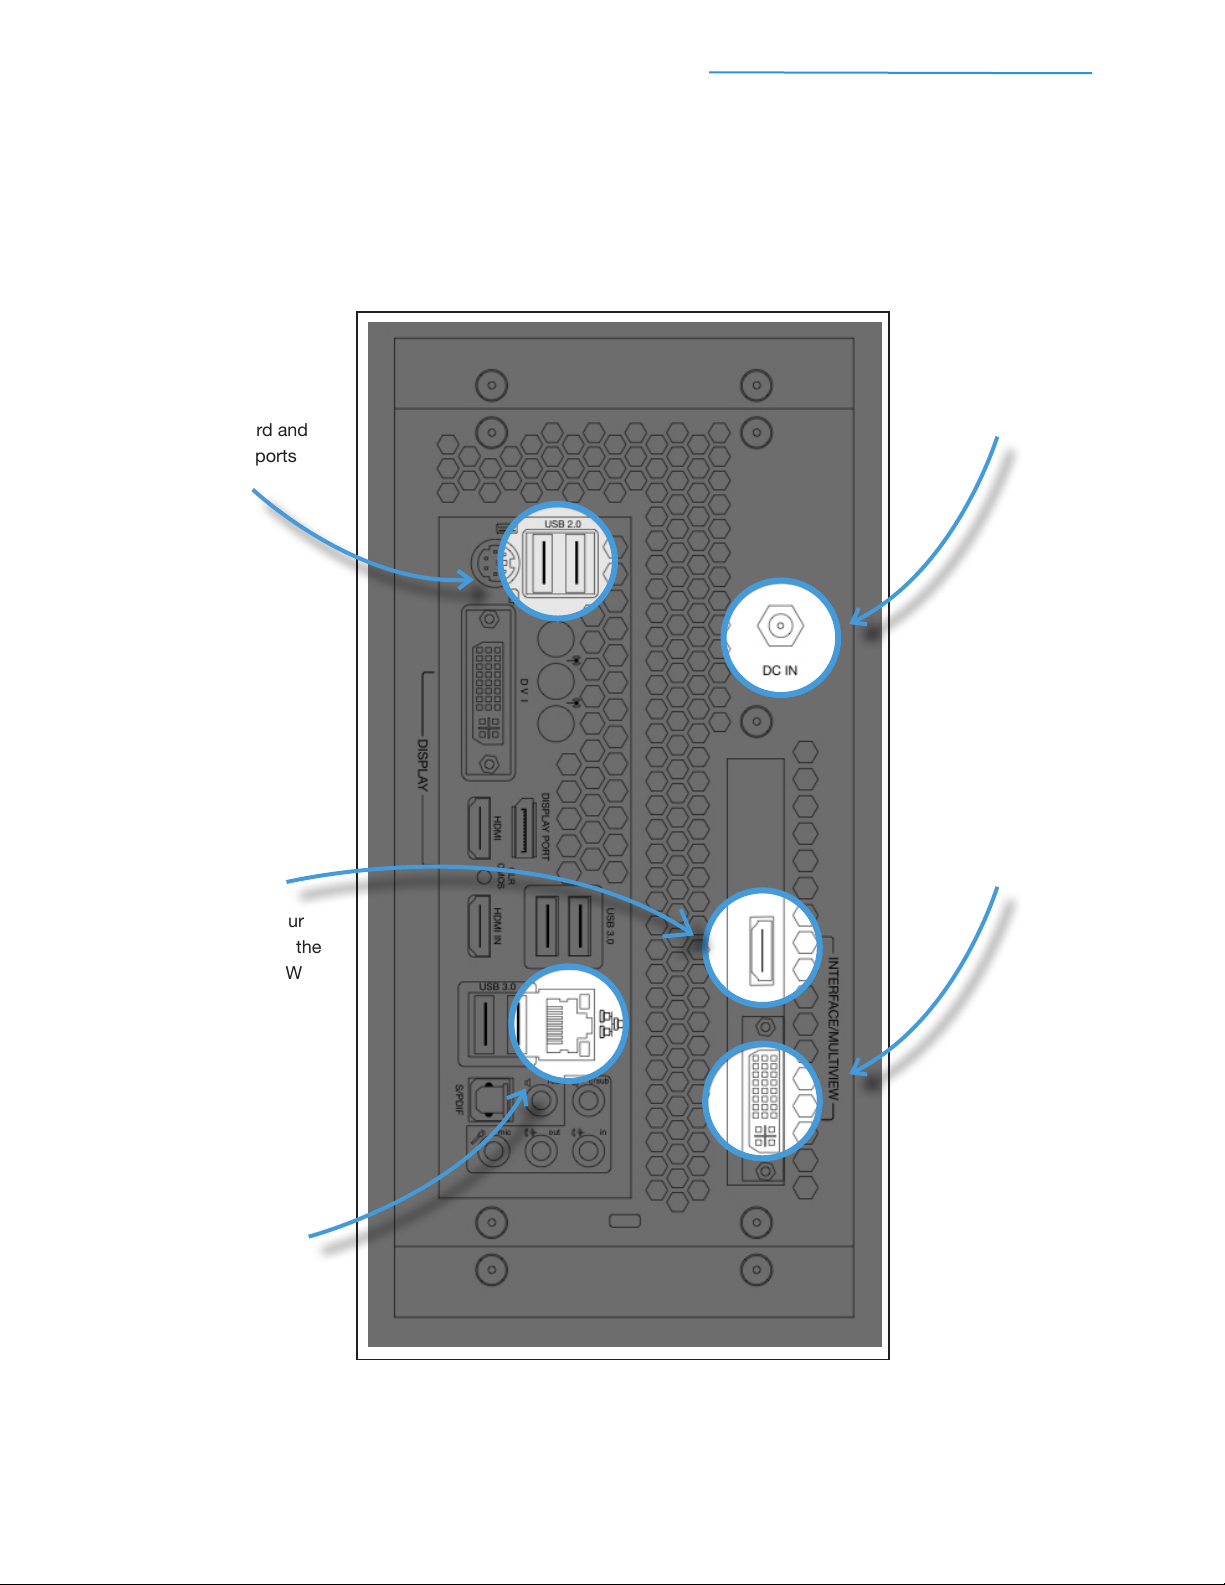
1) Power, Monitoring And Control
#1
Connect the TriCaster
power cable to the DC IN
port and plug in
#3
Connect your DVI
computer monitor to the
INTERFACE / MULTIVIEW
DVI port
#4
OPTIONAL: Connect your
HDMI computer monitor to the
INTERFACE / MULTIVIEW
HDMI port
#5
Plug the Ethernet cable
into the TriCaster Ethernet port
and connect to an active
local network
#2
Connect the keyboard and
mouse using USB ports
BACK PANEL DRAWING

TriCaster Mini Go Make Your Show Guide 5
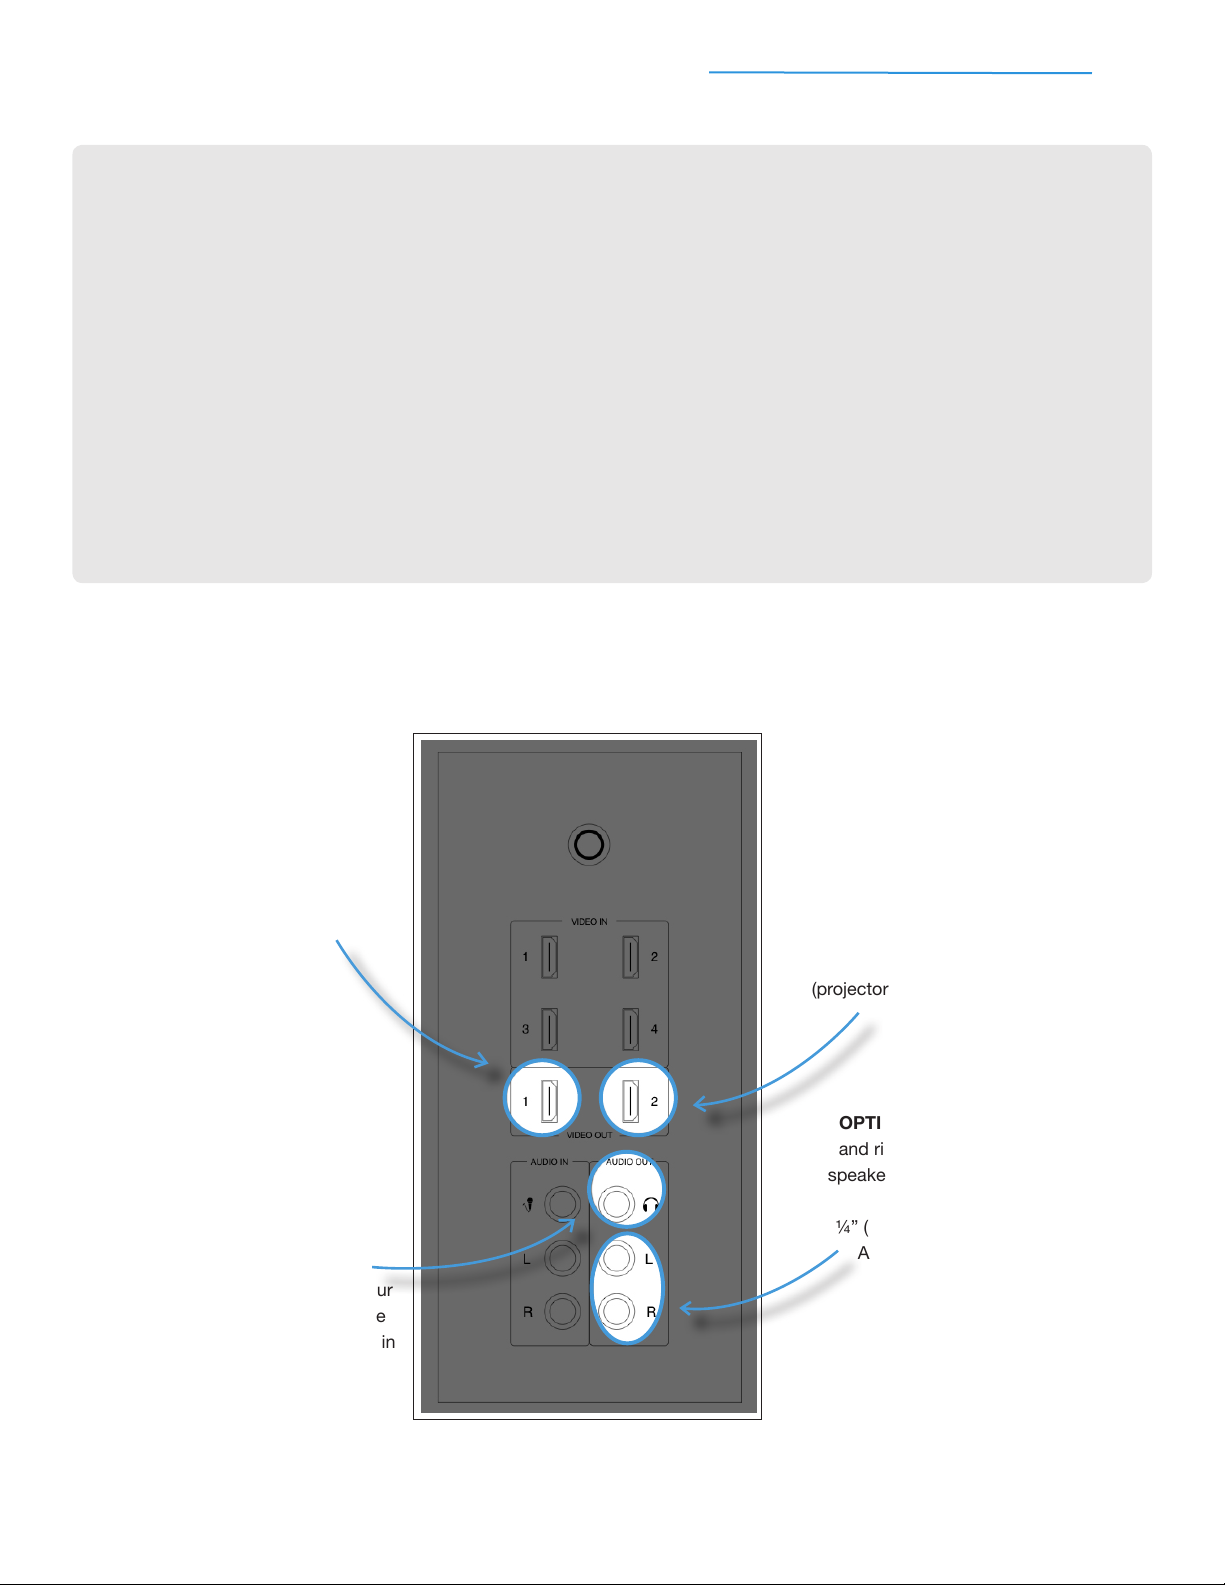
2) Bringing In Video And Audio
#1
Connect the HDMI
cable to the camcorder
and plug into TriCaster using
VIDEO IN port 1
#3
OPTIONAL: Plug the
microphone into TriCaster
using the designated ¼” jack
in the AUDIO IN section #4
OPTIONAL: Plug the left and
right channels of the
audio mixer into TriCaster
using the ¼” (L) and (R) jacks
in the AUDIO IN section
#2
OPTIONAL: Repeat using
VIDEO IN ports 2-4 for each of
your other HDMI camcorders
FRONT PANEL DRAWING
IMPORTANT: TriCaster Mini comes with a cable retention bracket that you can attach to provide
additional cable security (see step 6 in your TriCaster Mini Quick Start Guide). Mounting and fastening
the bracket to TriCaster Mini is optional. The cable retention bracket also doubles as a handle. If you
intend to use the bracket as a handle, please mount and fasten the bracket securely to prevent
damage to TriCaster Mini.
TriCaster Mini Go Make Your Show Guide 6
3) Displaying Video And Hearing Audio
#1
OPTIONAL: Connect the
HDMI display (projector,
TV, or monitor) to VIDEO
OUT port 1
#3
OPTIONAL: Plug the left
and right channels of the
speakers (or sound system)
into TriCaster using the
¼” (L) and (R) jacks in the
AUDIO OUT section
#4
OPTIONAL: Plug your
headphones into the
designated 1/4” jack in
the AUDIO OUT section
#2
OPTIONAL: Repeat using
VIDEO OUT port 2 for your
second HDMI display
(projector, TV, or monitor)
FRONT PANEL DRAWING
The next step is registration – you have register TriCaster Mini
before you use it for the rst time. After that, the real fun starts!
EXPANDING AUDIO BEYOND ONE MICROPHONE
If your program requires more than one on-camera talent, you will need to add a microphone for each
person who speaks and plug each microphone into a hardware audio mixer. This will allow you to bring all
of the microphones into TriCaster.
Generally, when microphones are plugged directly into a hardware audio mixer, you would use it to adjust
and equalize audio levels. Start by reading the instructions that accompany your audio mixer.
When you’ve got your microphones plugged in and your audio mixer working, test the mixer’s audio
output on a speaker or amplier to ensure that it’s providing sound at a quality to your satisfaction before
plugging it into TriCaster.
To plug your audio mixer into TriCaster, connect cables from the AUDIO OUT jacks on the audio mixer to
the ¼” (L) and (R) AUDIO IN jacks on TriCaster (see step 4 under BRINGING IN VIDEO AND AUDIO).
TriCaster Mini Go Make Your Show Guide 7
What You’ll Need to Register...
1. TriCaster Mini – connected to a local network
If you don’t have a network connection for TriCaster Mini, you’ll need access to a Web browser
on some other device (computer, tablet, smartphone, etc.)
2. Valid email address and a way to get email
3. Your 15-digit Serial Number, labeled “S/N” on the sticker attached to your TriCaster (the same
sticker is also applied to your registration card)
4. A pen
5. Your registration card to document and store your registration information
If you don’t have your registration card handy, you can record your registration information on
paper or on your device
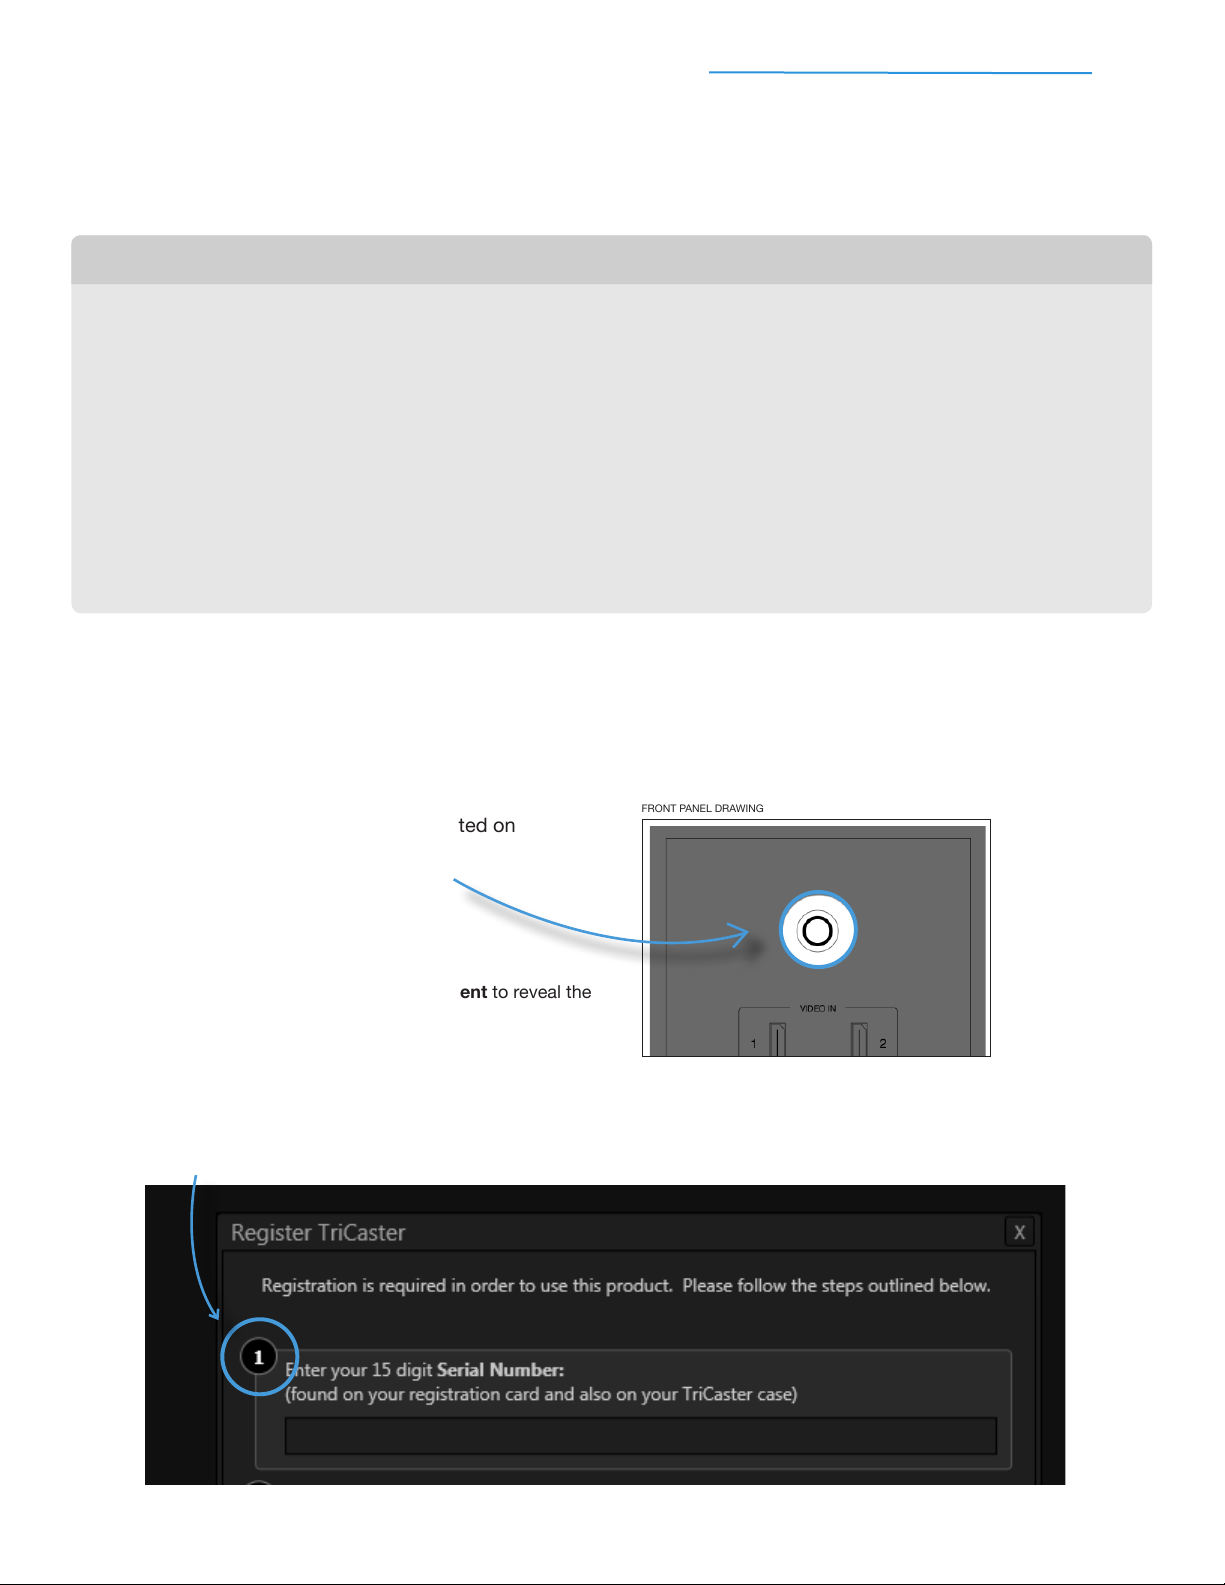
4) Initial Startup And Registration
IMPORTANT: Be sure to leave yourself plenty of time to register, because you won’t be able to use your
TriCaster until you complete the registration process. Don’t add stress by waiting until you’re about to
start your production. We recommend you register immediately. Besides…why wait?
FRONT PANEL DRAWING
#1 Press the power button located on
the front of your system
#2
Accept the End User License Agreement to reveal the
Register TriCaster dialog box
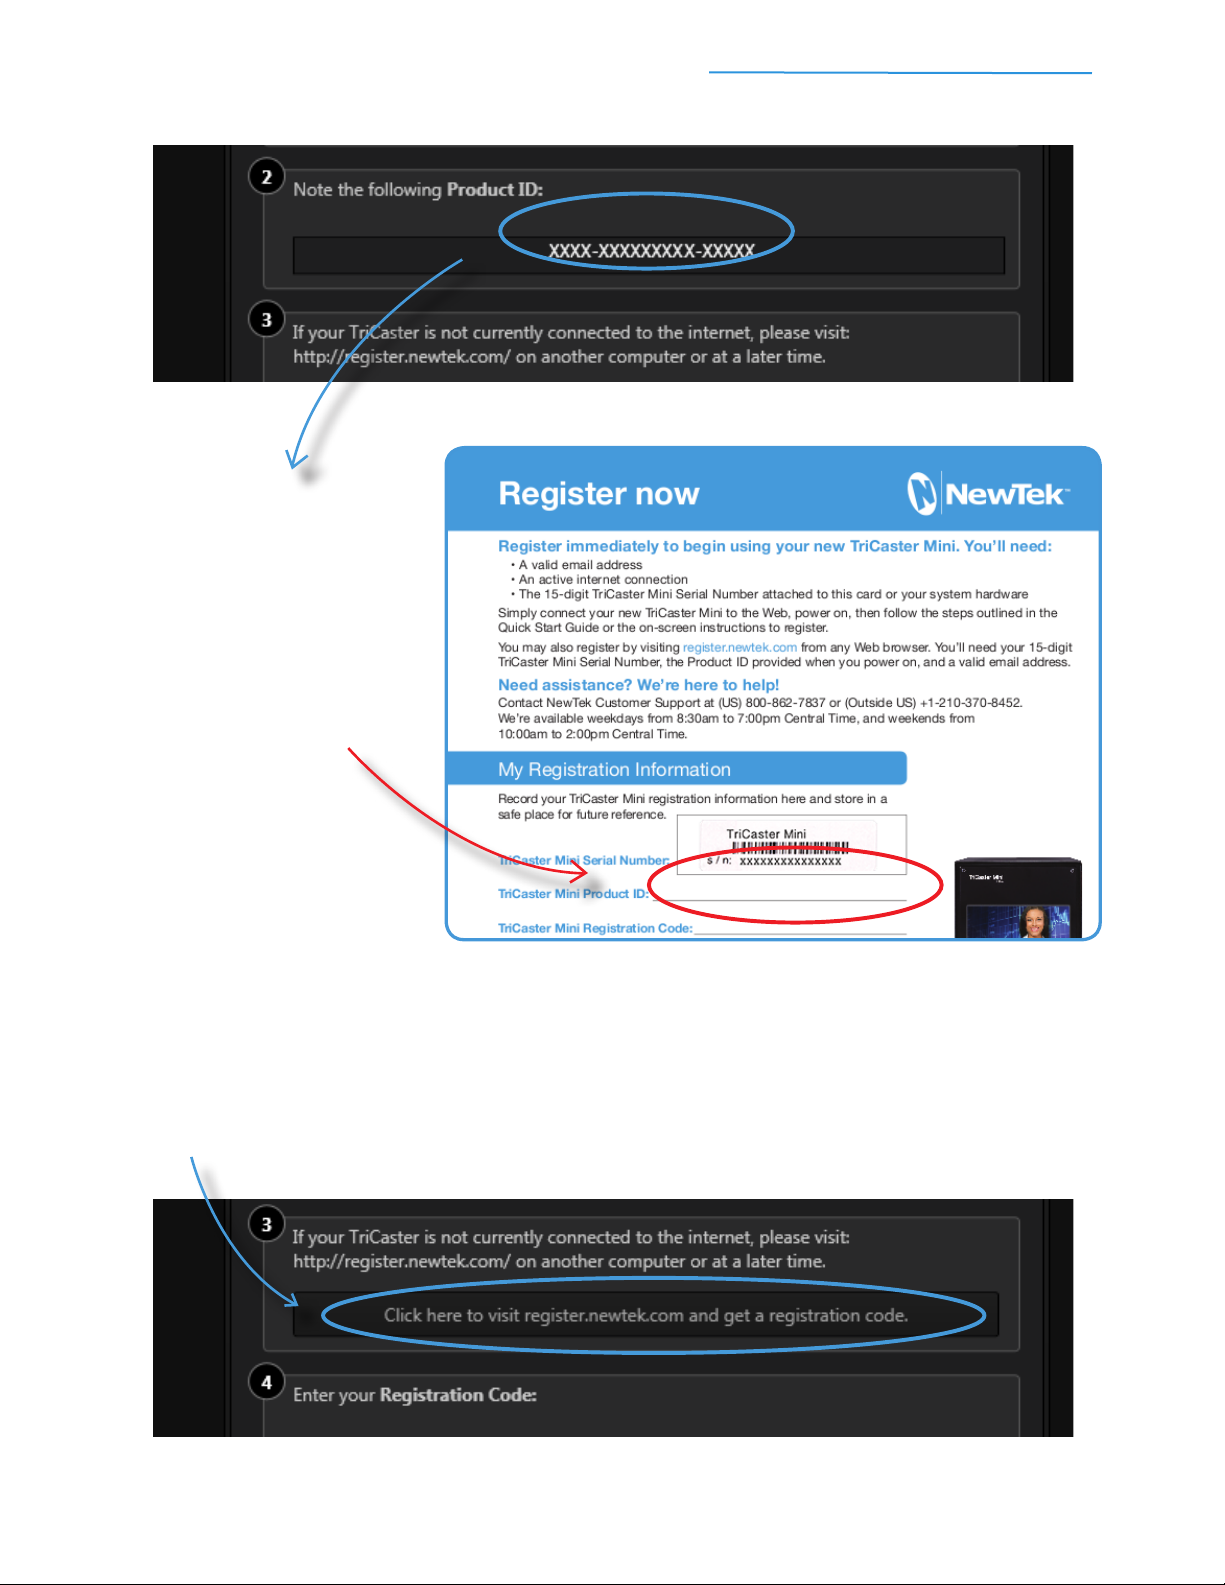
#3
Enter your 15-digit Serial Number (from the sticker) in the dialog box
TriCaster Mini Go Make Your Show Guide 8
#4
Write down the Product ID (from the
dialog box) on your registration card for
future reference (or otherwise record and
save for your records)
#5a
If your TriCaster is connected to a local network:
Click the button as directed in the dialog box. This will
submit your Serial Number and Product ID, and take you
to the NewTek Registration site
#5b
If your TriCaster is not connected to a local network:
use a device that is to open any Web browser and visit
http://register.newtek.com
(have your Serial Number and Product ID handy)
TriCaster Mini Go Make Your Show Guide 9
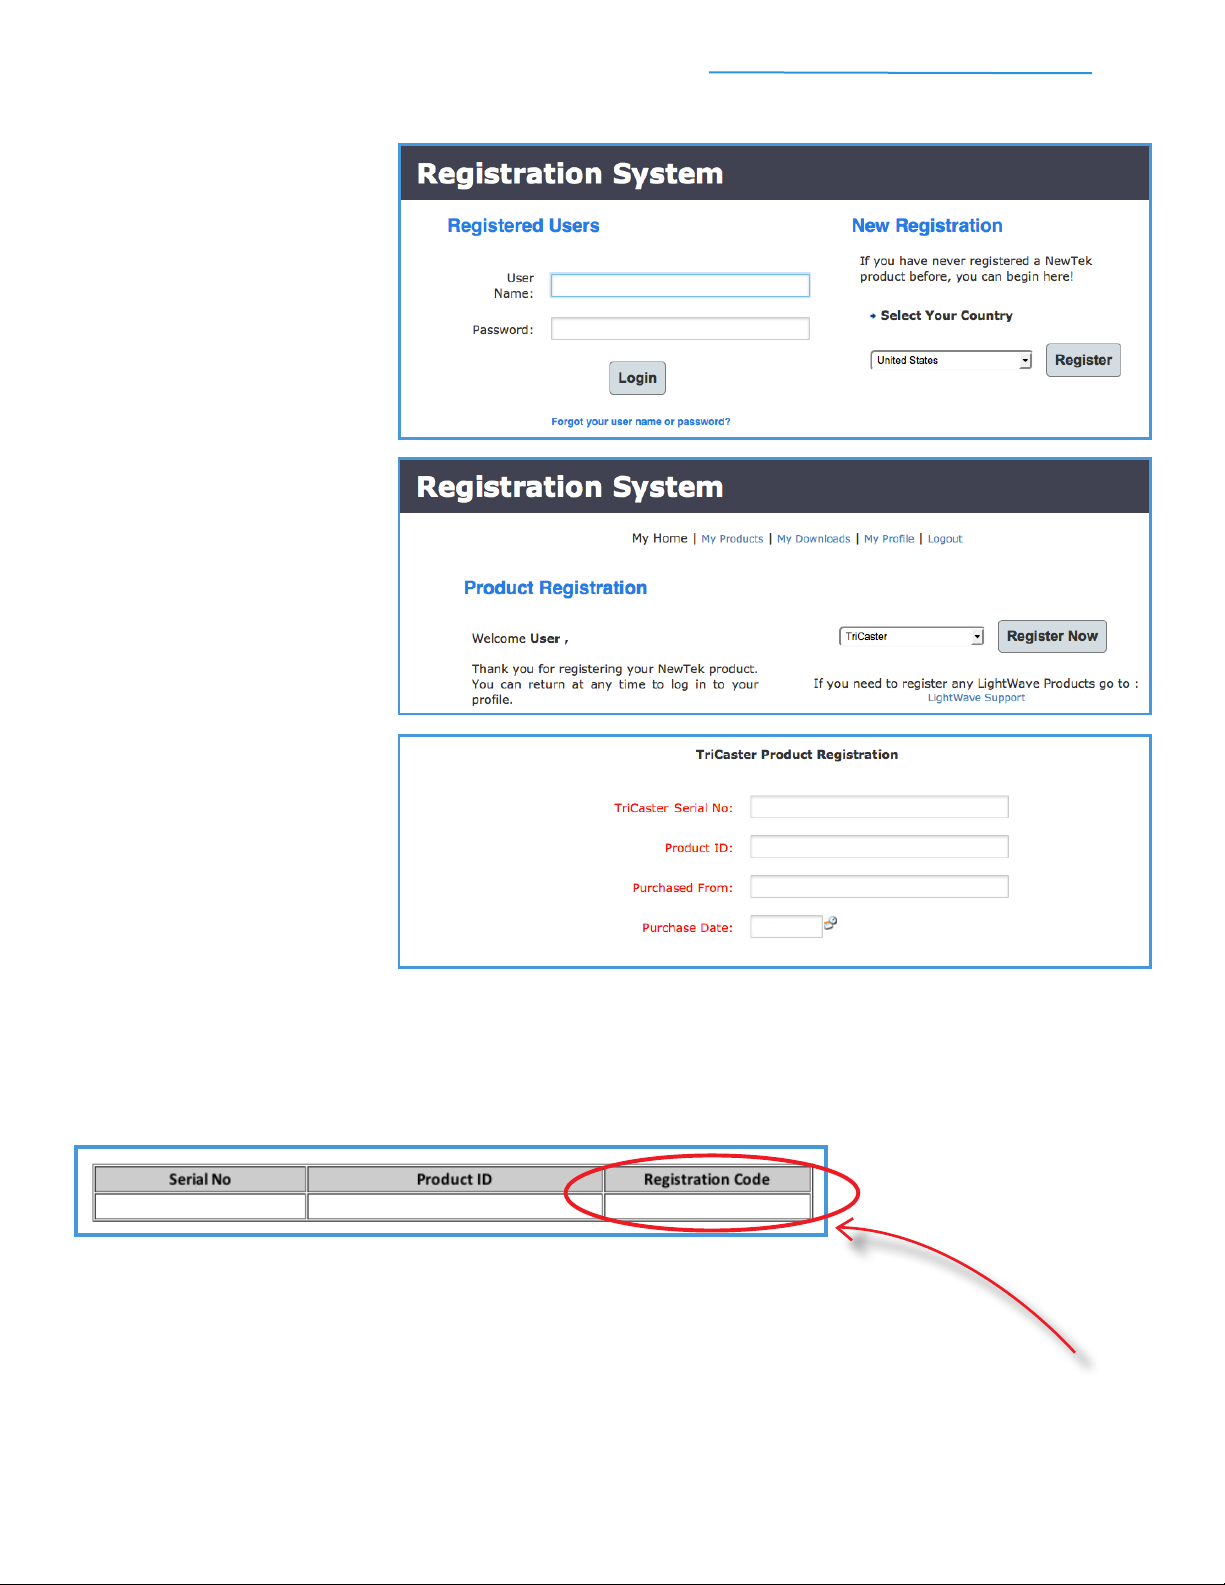
#6
Create (or log into) your User
Account in the NewTek Registration
System using a valid e-mail address
#8
Enter your Serial Number,
Product ID and additional
information as required, then
click the Register button
#9
Check your email for your Registration Code
#7
Select TriCaster Mini from the
drop-down menu and click the
Register Now button

TriCaster Mini Go Make Your Show Guide 10
IMPORTANT: Be sure to record your Serial Number, Product ID, Registration Code and NewTek
Registration user account login on the included Registration Card (or otherwise save for your records),
and store in a safe place. You’ll need this information to access software updates, contact Customer
Support, or perform a system restore.
That’s it. You are ready to begin using TriCaster Mini. Now, get SET to make your show.
#10
Write the Registration Code on your registration card
and on the registration sticker applied to your TriCaster
for future reference
#11
Enter the Registration code in the Register TriCaster dialog box as directed, then click Continue to complete registration
BACK PANEL DRAWING
TriCaster Mini Go Make Your Show Guide 11
Part 2: Set.
You’ve got everything plugged in, connected, registered, and ready to start.
Now it’s time to start up the TriCaster software,
tell it what to do with those devices, and start creating with them!

TriCaster Mini Go Make Your Show Guide 12
1) Starting A New Production Session
Just one step remains between you and the TriCaster user interface: you have to create a session. Just like
opening a blank document or worksheet on your computer, or a new le in an image-editing program,
you dene basic settings for your video production, too.
A TriCaster session stores all of the attributes of your specic production: technical requirements, multimedia
assets, settings, layouts, and user preferences. Sessions can be even be customized and saved into
templates for a specic user or a particular show. Follow these steps to create and start your session.
Once you’ve powered on for the rst time and registered, you’ll see the Home screen on your monitor.
The next time you power on TriCaster Mini (and any time after that), you’ll see this screen.
This will be your starting point for every production.
#1
At the Home screen, click on the New icon in the icon ring
#3
Choose a High Denition (1080 or 720) or Standard Denition
(480i) Resolution for your show
#4
Click the button for Start Session to proceed to the Session screen
#5
Click the button for Start Live Production to enter the TriCaster user interface
#2
Enter a Session Name to title your production

TriCaster Mini Go Make Your Show Guide 13
The dashboard is the menu bar at the top of the screen. It is home to various settings and controls,
Including live streaming and recording buttons.
The multiviewer is the collection of video windows that show the sources available for your production.
a. The smaller windows show the content of the input sources, such as live cameras, network feeds,
and stored sources.
b. The larger windows show output video from the switcher rows. The Program window is what
viewers see live, and the Preview window is what’s cued up for them to see next. “Now” and “next” is
an easy way to think of these.
The video switcher includes two rows of buttons for making Program and Preview selections for your live
show, transition controls for creatively mixing switcher sources, DSK overlay channels for layering graphics or
other visual elements over your live video, and M/E controls (which are currently hidden) for introducing more
advanced, composite effects and virtual sets.
The control panel is the series of tabbed panes for managing stored media sources, the multi-channel
audio mixer, and robotic Pan-Tilt-Zoom (PTZ) cameras.
Now that you’ve gotten to know your tools, let’s continue setting up for your rst show –
starting with your camcorders.
You’ll now see the TriCaster user interface on your monitor, which is also called the Live Desktop. Think of it
as your palette for creating television! Let’s take a moment to explore the layout to see how the most essential
controls are organized.
1
2
3
4
1
2
3
4
TriCaster Mini Go Make Your Show Guide 14
2) Setting Up Your Camcorders
Each HDMI camcorder that is on and connected properly will be automatically detected by TriCaster Mini.
You should see the live feed(s) in the video windows in the upper left of the screen. Wasn’t that easy?
IMPORTANT: If you don’t see the live feed(s) from your camcorders in the Live Desktop, be sure that
each camcorder is on and connected properly.
3) Selecting Your Sources
The video switcher is where you switch, or select, the video sources to create your show. It includes two
identical rows of buttons that allow you to access all of the video sources you’ve gathered to create your
program—including camcorders, video clips, network sources, titles and graphics.
Even though they look the same, there is a big difference between the two rows—the most important
distinction you’ll need to make in your entire production:
PROGRAM and PREVIEW
The top row of your switcher is the Program row. Any source you click in this row will immediately show
up on-air. When a source is selected on Program, its button will turn red and its video will appear in the
large Program window, which has a red bar underneath.
The bottom row of your switcher is the Preview row, where you will choose, check and cue up the video
source you want to show next on-air. When a source is selected on Preview, its button will turn green
and its video will appear in the large Preview window, which has a green bar underneath.
IMPORTANT: Professional producers always preview video sources before putting them on-air,
so that they can make sure on-camera talent is ready to be seen, camera angles are ready to be
shown, and stored sources are properly cued up. This helps minimize on-air errors (and
potentially embarrassing mistakes).
LOOK HERE TO SEE LIVE CAMERA FEEDS.
PROGRAM
PREVIEW

TriCaster Mini Go Make Your Show Guide 15
The rst four numbered buttons on each row of the switcher are dedicated to up to four connected cameras.
For the next few steps, these are the only video sources you need. Don’t worry—we’ll get to the other sources
soon. Let’s get you switching cameras rst.
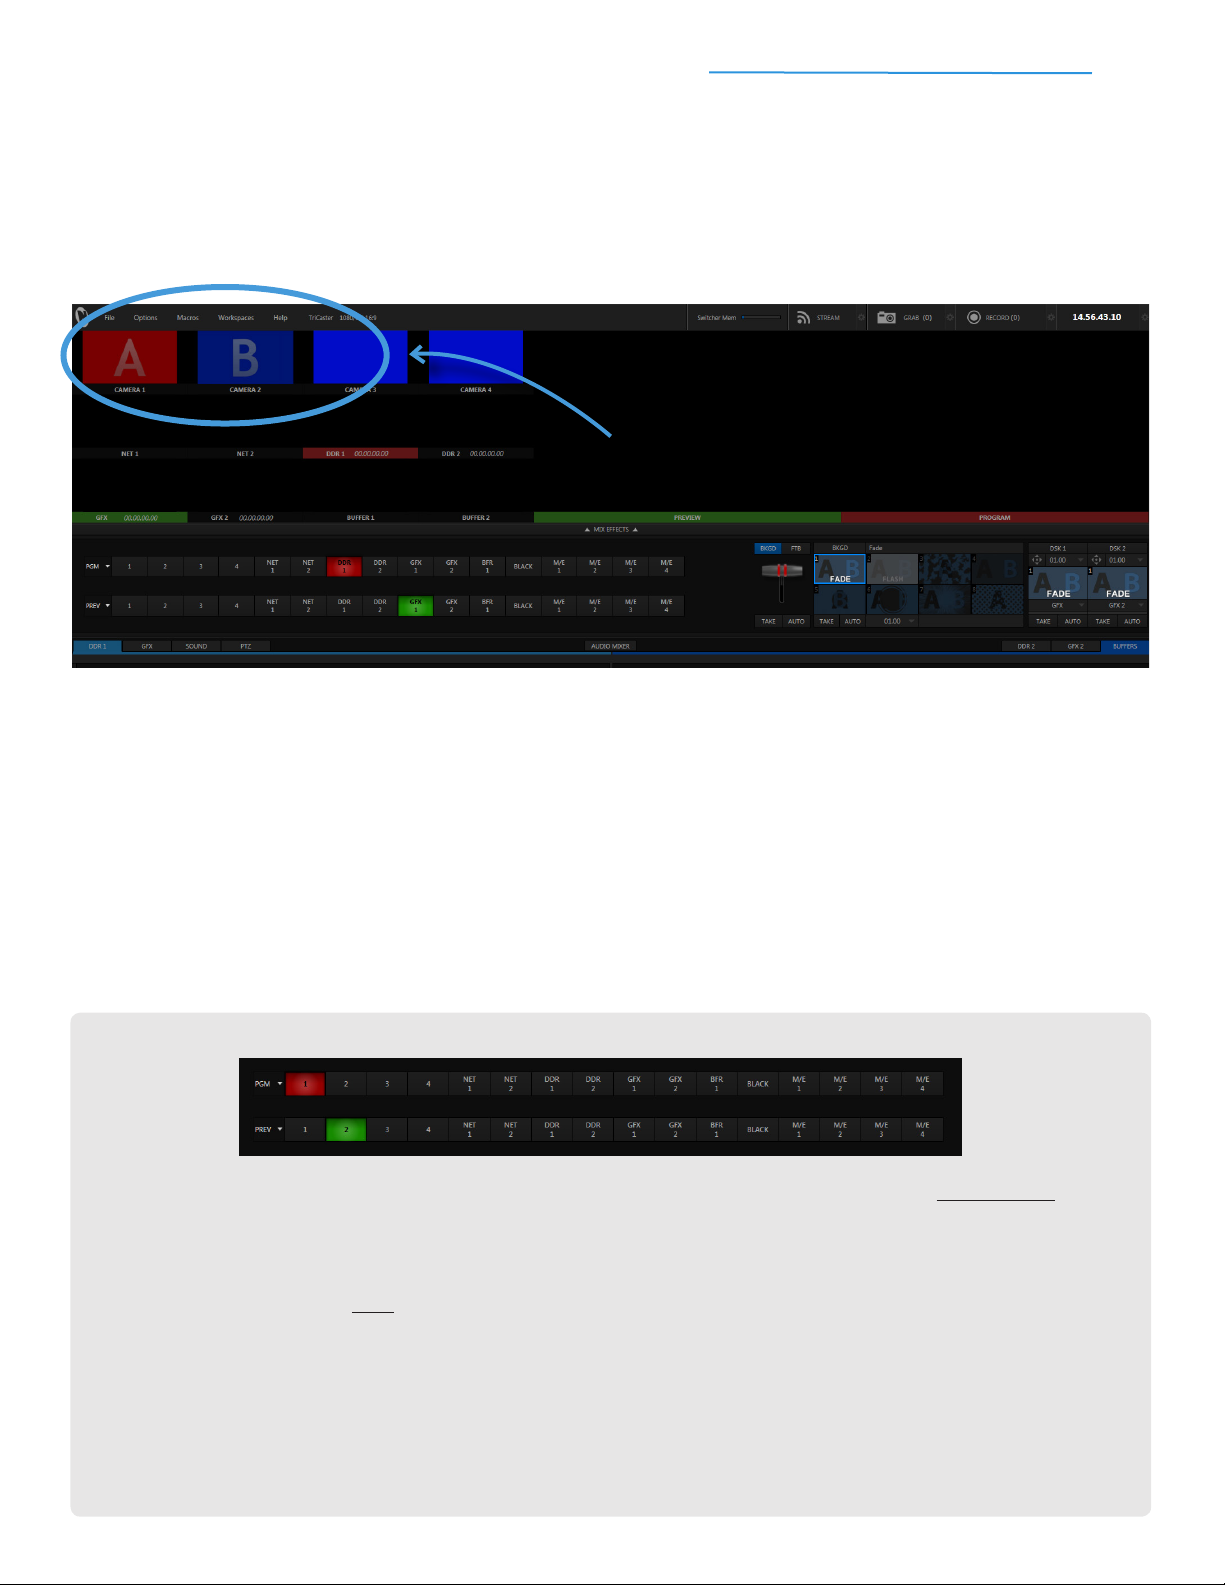
4) Switching Between Sources
In these steps, you’ll learn to use both rows—with transitions, timing, and mouse movements (and with lots
more sources later on)—but more importantly, by learning this step, you’ll know how to switch a show.
TAKE
The TAKE button does two things—it makes the source on Preview become the new, live source on Program;
and it takes what was on Program and switches it down to Preview. These two changes occur instantly and
simultaneously.
That means the Program row 1 button should now be in red and the Preview row Black button in green.
Likewise, you should now see the video from Camera 1 in the large Program window and black video in the
large Preview window. It also means you’ve made your rst camera switch.
#1
Click the
Program row
Black button so
that you’re starting
out from black (you
should only see
black appear in
the large Program
window)
#3
To the right of the
switcher, locate
the TAKE button
beneath the T-Bar
#4
Now click the
TAKE button to
instantly cut from
Black to Camera 1
#2
Click the
Preview row 1
button to cue up
Camera 1 (you
should now see
the video from
Camera 1 in the
large Preview
window)

TriCaster Mini Go Make Your Show Guide 16
Now, if you had clicked the Program row 1 button with your mouse instead of TAKE, you would still have
made Camera 1 the new, live source on Program. However, people make fewer on-air mistakes when they
use TAKE, because they only have to move their mouse around on the Preview row—and they don’t have to
worry about hitting the wrong button on Program!
Also, if you were to only click buttons on Program, you might be tempted to ignore Preview—but Preview is a
powerful tool for staying on top of your sources and setting up what you want to show next.
AUTO
You’ve used a TAKE – which is just a cut. Now use the AUTO button to transition to Camera 2 (if you don’t
have a second camera, that’s okay – you can still do this exercise).
#1
Click the Preview row 2 button
to cue up Camera 2 and use the
large Preview window to make
sure it’s ready for air
#2
To the right of the
switcher, locate the AUTO
button beneath the T-Bar
#3
Click the AUTO button to
perform a Fade
between
Camera 1 and Camera 2
TriCaster Mini Go Make Your Show Guide 17
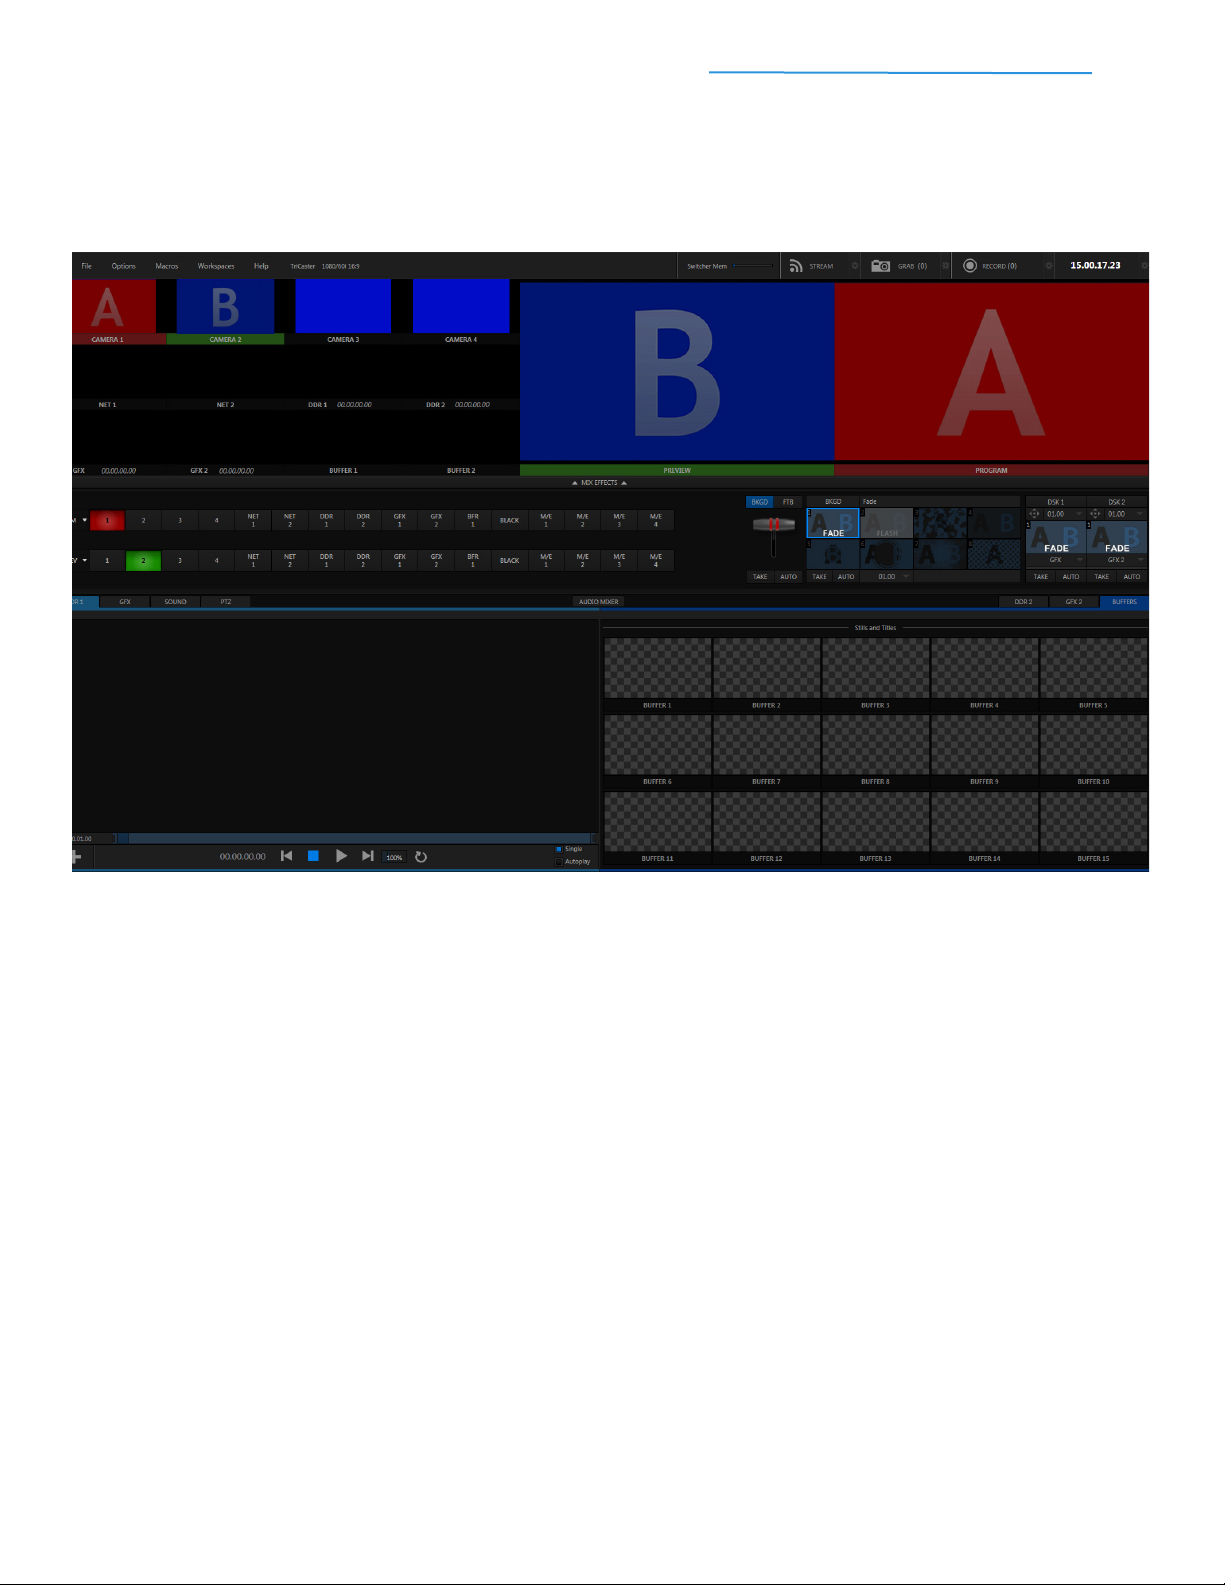
Instead of an instant swap like TAKE, AUTO performs a smooth, timed transition between the two
sources (by default, the Fade transition takes a full second to complete).
Once the transition is complete, the Program row 2 button should be in red and the Preview row 1
button in green. Likewise, you should now see the video from Camera 2 in the large Program
window and the video from Camera 1 in the large Preview window.
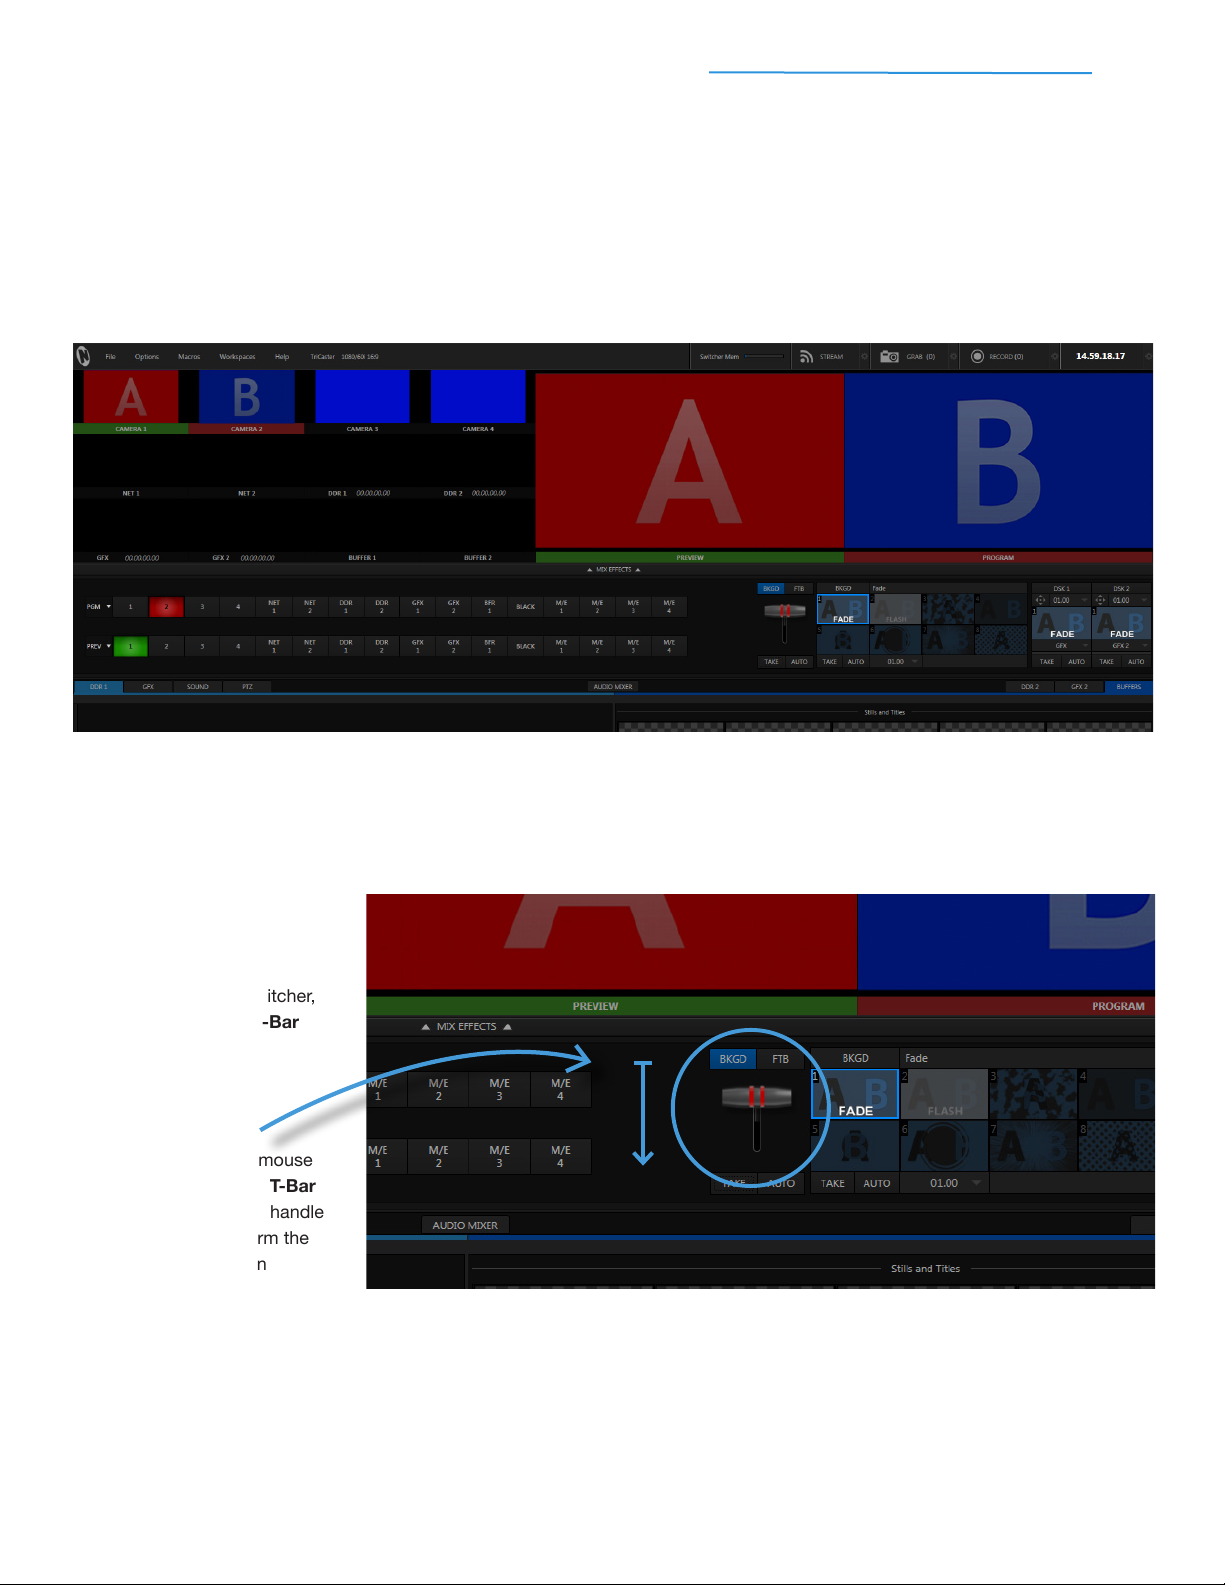
T-BAR
You’ve now used TAKE and AUTO. Now, try a manual Fade transition using the T-Bar to switch back to
Camera 1.
#1
To the right of the switcher,
mouse over the T-Bar
#2
Click and hold the mouse
button to “grab” the T-Bar
handle, then drag the handle
downward to perform the
Fade transition
#3
Once you have pulled the T-Bar handle down as far as it will go to complete the Fade transition,
release the mouse button (the T-Bar returns to its starting point automatically)
TriCaster Mini Go Make Your Show Guide 18
Practice each way to see if you prefer TAKE, AUTO or the T-BAR for switching. Your comfort level and the way
it looks during your specic production will help you decide.
This time, instead of taking a full second to complete, the transition takes the same amount of time you took
to pull the T-Bar all the way down. But once again, the Program and Preview sources switch, swapping
positions both in the switcher and in the large windows.
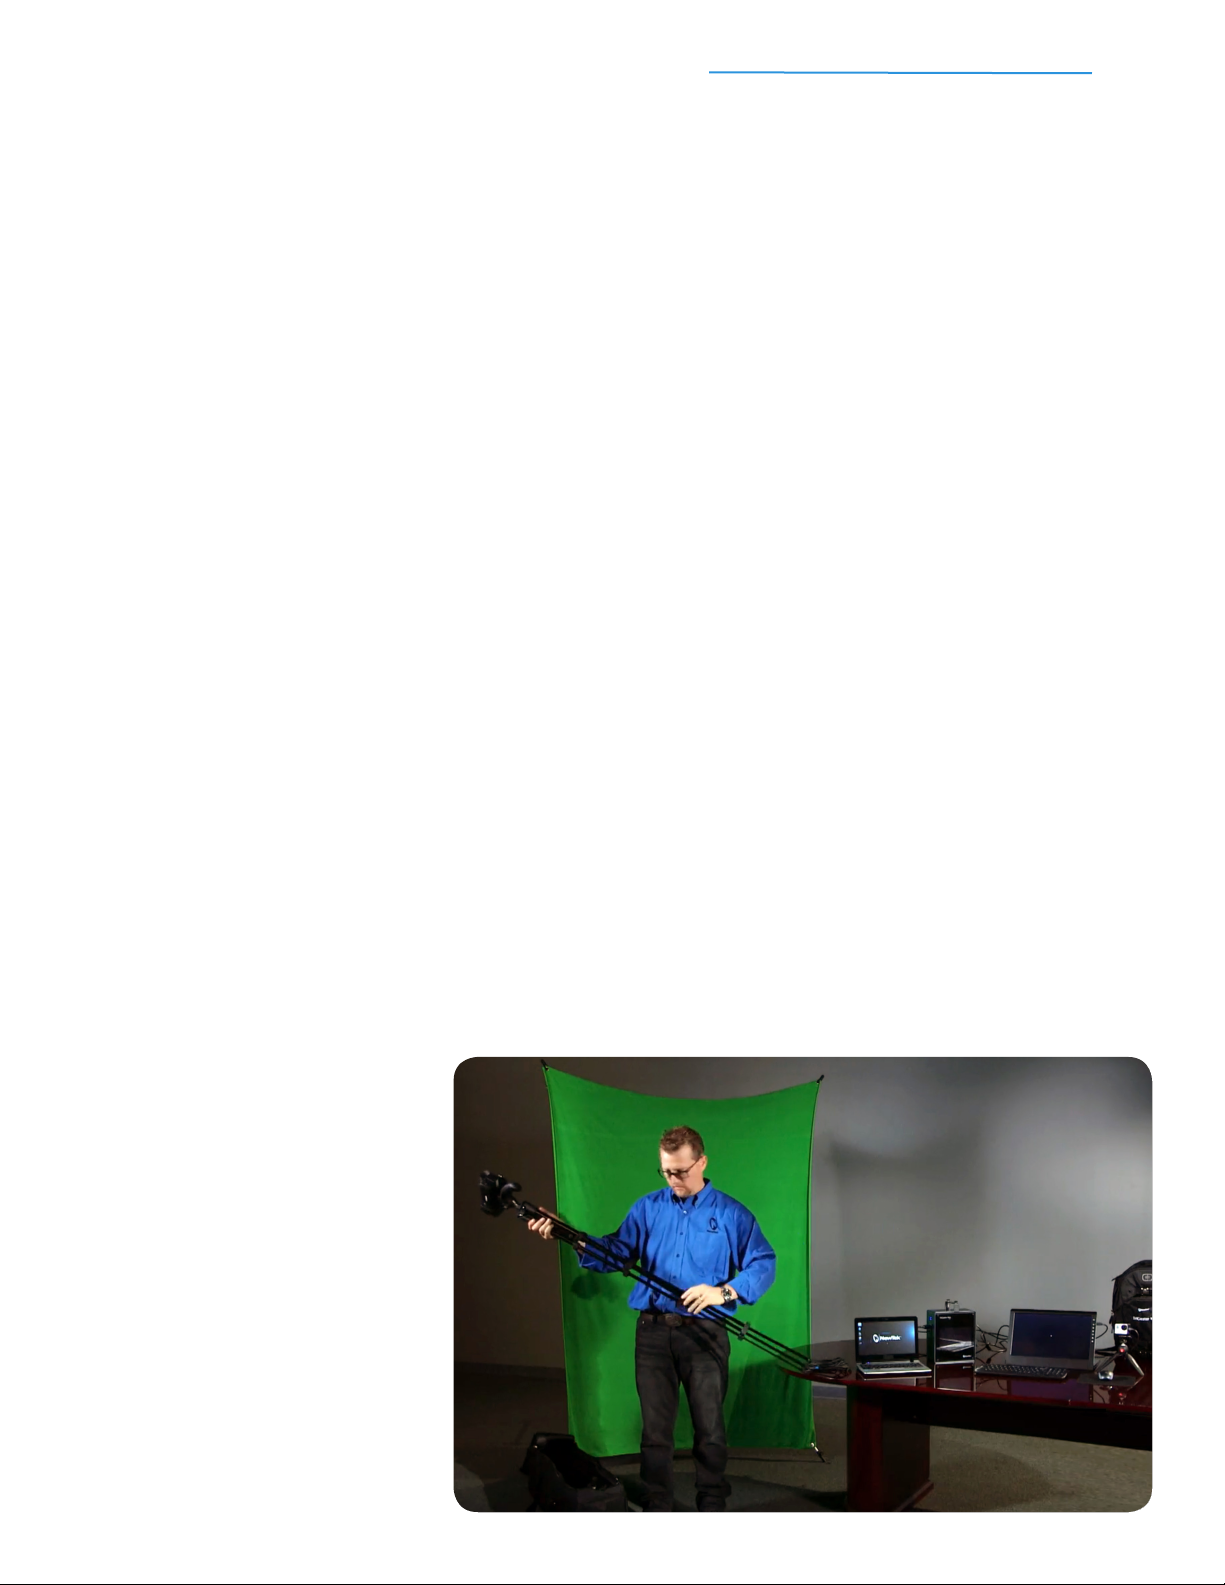
5) Mastering Multi-Camera Production
Guess what? You now know how to switch cameras—the very basis of multi-camera production. Take some
time to become more familiar with the controls, experiment with cuts and fades, and practice using the Pre-
view window to set up your shots.
It’s just as easy to add other sources, like video clips, graphics, and even screen shares, and mix them into
your production as well. That’s what you’ll do next, in the GO section.

TriCaster Mini Go Make Your Show Guide 19
Part 3: Go.
This section is where you learn to make your live program look even more
professional by adding multimedia elements like video clips, on-screen text and
graphics, and network sources (such as a screenshare, camera roll or Web page)
into your production. It’s the most in-depth section of the guide, because it takes
you to a whole new level of visuals.
Best of all, when you reach the end, you’ll know how to pull everything together in
your TriCaster Mini and stream your rst live show.
This manual suits for next models
1
Table of contents
Other NewTek Switch manuals


Popular Switch manuals by other brands


Huawei
Huawei Enterprise S2700 Series Configuration guide

SMC Networks
SMC Networks SMC-EZ1026DT Specification sheet

KYLAND Technology
KYLAND Technology SICOM3028GPT Series Hardware installation manual

Lenovo
Lenovo ThinkSystem NE2552E Application guide

TP-Link
TP-Link JetStream L2+ installation guide

D-Link
D-Link DSS-16+ reference guide


