Nextar NCU101 User manual

6
4
5
1
3
2
P
O
W
E
R
M
U
T
E
C
L
K
A
.
P
-
+
S
E
L
D
N
U
P
S
T
L
O
C
L
O
U
D
S
C
N
M
O
D
E
B
A
N
D
T
O
P
/
R
P
T
I
N
T
R
D
M
REL
SEL
3
RPT
2
INT
5 6
MU
4
RDM
1
VOL
M
O
D
S
C
N
A.P
BND
LOU
ST
LOC
CLK
MUTE LOUD INTRDMRPT MP3
MUSIC ALBUMARTIST ESP45 FLASH
TRACK
POP ROCK CLASS FLAT
COMPACT
DIGITALAUDIO
OPEN
SUB
W
SD
MMC
NCU101

DEAR CUSTOMER:
Selectingfine audio equipment such as the unit you have just purchased is onlythe start
of your musical enjoyment. Now it is time to consider how you can maximize the fun and
excitement your equipment offers.
We hope you get the most out of your equipment byplayingit at a safe level.
One that lets the sound come through loud and clear without annoyingblare or distortion,
and, more important, without affectingyour sensitive hearing.
Sound can be misled. Over time your hearing" comfort level " adapts to higher volumes
of sound. So what sounds " normal " can actuallybe loud and harmful to your hearing.
Guard against this bysettingyour equipment at a safe level BEFORE your hearingadapts.
To establish a safe level:
Start your volume controlat the lowest setting,then slowlyincrease the sound until you
can hear it comfortablyand clearly,and without distortion we want youlisteningfor a
lifetime.
Once you have established a comfortable sound level:
Set the dial and leave it there.
Takinga minute to do this now will help to prevent hearingdamage or loss in the
future. After all, we want you listeningfor a lifetime.
ABOUT THIS MANUAL
This product features a number of sophisticated functions ensuringsuperior reception and
operation. All are designed for the easiest possible use, but manyare not self-explanatory.
This operation manual is intended to help you benefit fullyfrom their potential and to
maximize your listeningenjoyment.
We recommend that you familiarize yourself with the functions and their operation by
readingthrough the manual before you begin usingthis product. In this operation manual,
the Basic Operation for each sound source is outlined at the beginningof its explanation,
coveringsimple operation for that source, such as merelyplayingmusic.
Remark:
In addition to normal audio CD, this unit can playCD-R and CD-R/Wdisc that contain
audio tracks as well; however, dependingon the conditions of the recordingequipment,
recordingprogram or the CD-R as well as CD-R/Wdisc itself, some CD-R or CD-R/W
maynot play.
When makingmusic CD with CD-R or CD-R/Wdisc, too high recordingspeed may
result in poor signal qualityand therefore, it is recommendable to select 24xor lower
speed for CD-R recordingand 4xor lower speed for CD-R/Wrecording.
E 1

21
1 3
5 6
10
9
8
12
13
4
7
2
11
14
15
16 18
19 17
20
REL
SEL
3
RPT
2
INT
5 6
MU
4
RDM
1
VOL
MMC
SD
M
O
D
S
C
N
A.P
BND
LOU
ST
LOC
CLK
MUTELOUD INTRDM RPT MP3
MUSIC ALBUMARTISTESP45 FLASH
TRACK
POP ROCK CLASS FLAT
COMPACT
DIGITAL AUDIO
SUB
W
OPEN
SD
MMC
LOCATIONAND FUNCTION OFCONTROLS
1. SEL(AUDIO MODE SELECT)/ROTARY ENCODER
(1) Press SELbutton shortlyand repeatedlyto change the mode in the sequence as
follows: --> VOL --> BAS --> TRE --> BAL --> FAD -->
1) VOLUME CONTROL
A. The volume level can be adjusted at anytime byrotatingthe VOLknob as select
mode has been initiallydefaulted at volume mode.
B. The volume level is also obtained bysteppingthrough the SELbutton until the
function VOLis displayed and then rotate the VOLknob to adjust the sound level.
2) BASS CONTROL
A. Press the SELbutton to select the bass mode until BAS appears on the display.
B. Rotate the VOLknob to adjust the bass effect.
3) TREBLE CONTROL
A. Press the SELbutton to select the treble mode until TRE appears on the display.
B. Rotate the VOLknob to adjust the treble effect.
4) BALANCE CONTROL
A. Press the SELbutton to select the balance mode until BALappears on the display.
B. Rotate the VOLknob to increase or decrease the sound level of left/ right speaker.
E 2

5) FADER CONTROL
A. Press the SELbutton to select the fader mode until FAD appears on the display.
B. Rotate the VOLknob to increase or decrease the sound level of front / rear speaker.
(2) When pressed longer 2 seconds, it is activated as cyclical mode of following
functions for user s selection.
->BEEP(2nd/ALL/OFF) ->SEEK1/ 2 -> DSP(OFF/POP/ROCK/CLASSIC/FLAT)
->SUBWON/OFF - > VOLLAST/VOL ADJ -> ESP 40/10 seconds mode.
After selectingthe desired mode, rotate the VOLknob to select one setup item of
the desired mode.
BEEP2ND, BEEPALL, BEEPOFF MODE
The situation of beep sound is selected. The 3 mode is selected as also rotatingthe
VOL knob.
-Beep 2nd mode:
The beep is onlygenerated when an allotted double keyis pressed long(1 second).
-Beep all mode:
The beep is generated when everykeyis pressed.
-Beep off mode:
The beep sound is disabled when a keyis pressed.
SEEK 1/SEEK 2 mode:( Onlyavailable duringradio operation)
SEEK 1: Press and hold the >>|or |<< button to seek up or down for a station with a
strong signal. The seek stops when a station is reached .
SEEK 2: Press and hold the >>|or |<< button to seek up or down for a station with a
strong signal. The seek does not stop until the >>|or |<< button is released.
VOLLAST/VOL ADJ:
VOLLAST:The radio switches on at the actual volume it had when it was last
switched off.
VOL ADJ: Rotatingthe VOLknob you can pre-select a constant switch-on volume
after enteringinto this mode.
ESP 40 seconds/10 seconds:
In ESPmode, you can select 10 seconds or 40 seconds electronic shock protection
mode by rotatingthe VOLknob.
The default settingis at 40 seconds of anti-shock protection.
Using10 seconds ESPwill slightlyimprove the audio performance, while 40
seconds ESPwill be effective when the vehicle is driven on a rough road.
2. COVER of MMC/SD and USB SOCKET
When needingto do MMC/SD or USB operation, open the cover, then insert the
MMC/SD card or USB bar into MMC/SD compartment or USB socket.
When no needingto do MMC/SD or USB operation, cover it with the cover after
pullingthem out of the MMC/SD compartment or the USB socket.
E 3

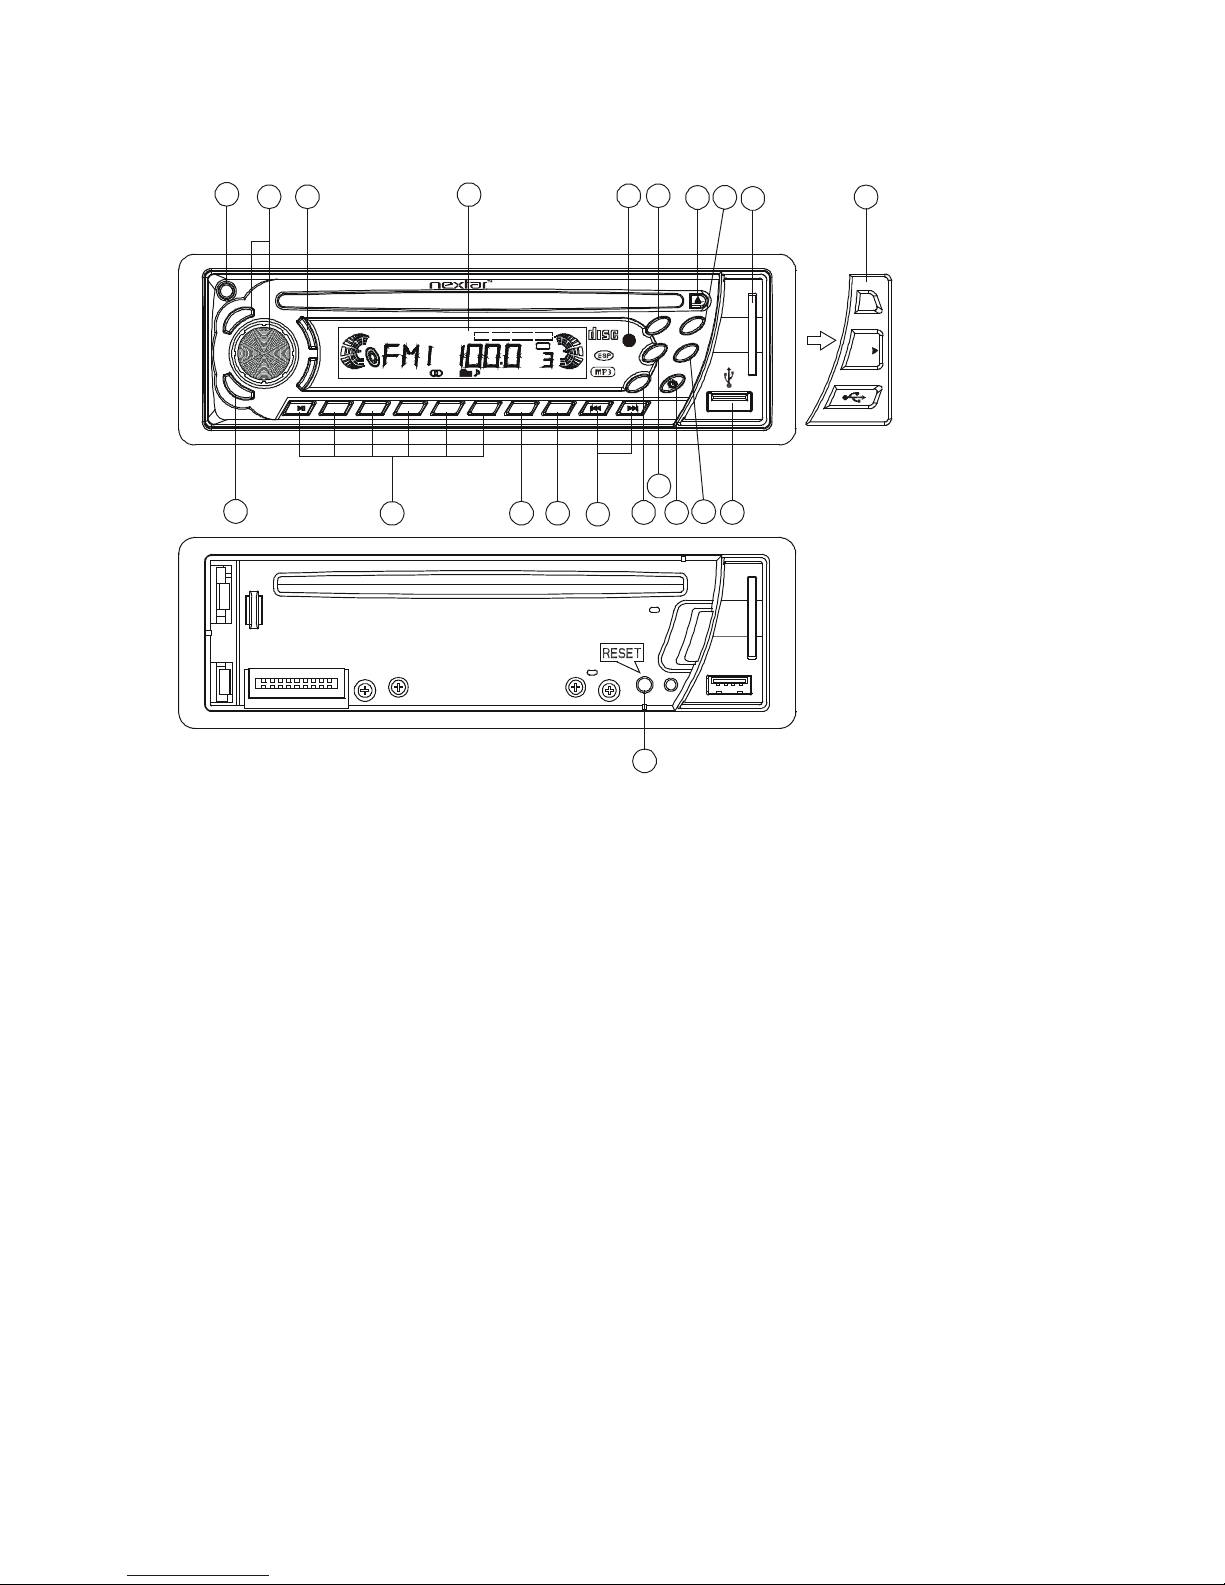
3. LCD (LIQUID CRYSTALDISPLAY)
4. TUNE, SEEK, TRACK, SKIPUP/ DOWN BUTTONS
1) In RADIO mode, press >>|or |<< button shortlyand repeatedlyto manuallytune
up or down for the desired radio station with step bystep. Press >>|or |<< button
hold for more than 0.5 seconds to automaticallytune up or down for the radio station
of strongsignal.
2) In MMC/SD, USB or DISC mode, press >>|button to playnext track. Press |<<
button once to playthe current track from the beginningof the current track, press
|<< button twice continuouslyto playthe last track. Press >>|or |<< button hold to
skip forward or backward.
5.AUTO-STORAGE/PRESETMEMORY SCAN BUTTON
1) In radio mode, press it to perform all stations memoryfor 5 seconds each time,
while memorydigital and frequencywill flash on LCD. If the button is pressed for
more than 2 seconds, it will seek station on current band, then write to the preset
memories. When the auto-storage operation is completed, it will automatically
perform for 5 seconds each time. After finishing1 loop of memoryscan, it will
listen to the first memorystation in the current band.
2) In MMC/SD or USB mode, press A.Pbutton repeatedlyto select TRACK
SEARCH or DIRECTORYSEARCH mode.
In MP3/WMAdisc mode, press A.Pbutton repeatedlyto select TRACK SEARCH,
FIRST CHARACTER SEARCH or DIRECTORYSEARCH mode.
3) InTRACK SEARCH mode of MMC/SD, USB or MP3/WMAdisc, the LCD will
displayMP3/WMA T 000 and flash the biggest digit 0 that the MMC/SD card,
USB bar or MP3/WMAdisc contain. Then rotate the VOLknob to select the
number of the flashingdigit from 0 ~ 9. Then press SELbutton to confirm the
number and flash next smaller digit 0. With the same means, select the number of
the flashingdigit. After finishingselectingthe number of all flashingdigit, press
SELbutton to playthe track of the selected serial number.
In FIRSTCHARACTER SEARCH mode of MP3/WMAdisc, the LCD will
displayA--......, If there are files names its first character are A , the ......is the first
file name its first character is A bythe order of A~Zand 0~9; otherwise, the ......is
NONE. Rotate the VOLknob to select file s first character bythe order ofA~Z
and 0~9. Then press >>|or |<< button to select one file its first characters is the
selected one. Finallypress SELbutton to playthe selected file.
In DIRECTORYSEARCH mode of MMC/SD, USB or MP3/WMAdisc, the
LCD will displaythe root folder(if there is not the root folder, it will found a root
folder named ROOT). Then rotate the VOLknob to select your desired folder and
then press >>| or |<< button to select your desired track in the folder. Finallypress
SELbutton to playthe selected track.
E 4

6. BAND BUTTON
Press it repeatedlyto select your desired radio band duringRADIO mode.
InMMC/SD, USB or MP3/WMAdisc mode, if you press BAND button repeatedly,
the file name, folder name, song s title, artist and album information will be
scrollingon the LCD display.
As longas the current playingMP3/WMAmusic contains relevant ID3 tag
information in version 1.0/2.0 format, the 3 items underlined above will be
scrollingon the LCD display; otherwise, theywill not.
In CD/MP3/WMAformat-mixed disc playback mode, longpress BND button, it
will change from CD mode to MP3/WMAmode(the defaulted mode is CD).
7. LOUDNESS BUTTON
When press shortly, the LOUD mode is turned on, its to enhance the bass sound
effect when the volume level is low. Press again to cancel the loudness effect.
8. LOCAL/DISTANCE BUTTON
Radio station search mode is divided bythis LOC/DX switch, this button can be
used to control an attenuator in the tuner duringsearch. Thedetectinglevel of seek,
scan, auto-memorywill be reduced as much as the attenuated level of the tuner. In
radio mode, press the LOC button to change local reception or distance reception.
Note: This button is onlyfor FM reception. InAM mode, LOC is void.
9. POWER BUTTON
Press anybutton except the EJECTand RELEASE button to turn on the unit.
It also can turn on the unit to insert disc, MMC/SD card or USB bar into their
compartment or socket. Press PWR button hold for more than 0.5 seconds to turn
off the unit.
10. STEREO/MONO BUTTON
Press the button to select STEREO or MONO sound mode.
11. MUTE BUTTON
This button serves to switch the MUTED state on/off.
Press the MUTE button to suppress the loudspeaker temporarily, and press
again to resume listening.The muted state will be also released when the
MODE, BAND, SELbutton is pressed and VOLknob on the front panel is used.
12. PRESETSTATION [ 1-6 ] AND TOP/CDP, INT, RPT, RDM BUTTONS
A) RADIO MODE
When pressed short, these keys select a preset station directly,
When pressed longer than one seconds, current station is stored in preset
memorybank.
B) In MMC/SD, USB or disc mode, press TOP/CDPbutton to pause MMC/SD,
USB or discplayback, press it again to resume MMC/SD, USB or disc playback.
Press it hold for more than about 0.5 seconds to playthe first track of the
MMC/SD, USB or disc. E 5

C) In MMC/SD, USB mode, press INTbutton shortlyto displayM-INTand play
the first 10 seconds part of each track of all.
In CD/MP3/WMAdisc mode, press INTbutton shortlyto displayS-INTand
playthe first 10 seconds part of each track of all.
In MMC/SD, USB or MP3/WMAdisc mode, Press INTbutton longto display
D-INTand playthe first 10 seconds part of each in current folder.
DuringINTmode, press INTbutton again to stop INTmode and retain playing
the track currentlyselected.
D) In MMC/SD, USB mode, press RPTbutton shortlyto displayM-RPTand play
the current track repeatedly.
In CD/MP3/WMAdisc mode, press RPTbutton shortlyto displayS-RPTand
playthe current track repeatedly.
In MMC/SD, USB or MP3/WMAdisc mode, Press RPTbutton longto display
D-RPTand play the current folder repeatedly.
DuringRPTmode, Press RPTbutton again to cancel RPTmode.
E) In MMC/SD, USB mode, press RDM button shortlyto displayM-RDM and
playthe track of all in random order.
In CD/MP3/WMAdisc mode, press RDM button shortlyto displayS-RDM
and playthe track of all in random order.
In MMC/SD, USB or MP3/WMAdisc mode, Press RDM button longto
displayD-RDM playthe track in the current folder in random order.
DuringRDM mode, Press RDM button again to cancel RDM mode.
F) In MMC/SD, USB or MP3/WMAdisc mode, M6 and M5 is assigned as 10
TRACK up/down when normal play.
13. MODE BUTTON
Press it to select RADIO, DISC, CARD(after insertingMMC/SD card), USB(after
inserting USB bar) and auxiliaryinput playingmode.
14&15. MMC/SD COMPARTMENTand USB SOCKETand theiroperation
When needingto do MMC/SD or USB playing, insert the MMC/SD card or USB
bar into MMC/SD compartment or USB socket. Then the playingmode will be
changed into MMC/SD or USB mode and displayCARD or USB on LCD(When
MMC/SD card and USB bar are both inserted into their compartment or socket, the
playingmode will be changed into the mode of the latter one), and then playthe
first track of MMC/SD or USB.
16. RELEASE BUTTON
Press it to release the front panel from the unit chassis. Then remove awaythe
front panel from the player.And then you can press the RESETbutton to resume
the distorted program when the LCD displays wronglyor the buttons are not
available.
E 6

17. INFRARED REMOTE CONTROLSENSOR
18. EJECTBUTTON
Press this key, a loaded disc can be to ejected.
19. CLOCK BUTTON
Press the CLK button brieflyto displaytime for 5 seconds on the display, and then
returns to its previous displayunless the button is pressed again.
Then press the CLK button and hold for more than 1 second until the real time
flashes on the display.Then you can adjust HOUR or MINUTE byrotatingthe
VOLknob.
20. SCAN BUTTON
Press it to scan up byone channel step with station detection. If a valid signal has
detected, the current frequencyis blinked within 5 seconds, then press it again to
stop scan and remain the current frequency; otherwise, the unit continue to scan up
byone channel step with station detection 5 seconds later.
21. RESETBUTTON
Before operatingthe unit for the first time, or after replacingthe car batteryor
changingthe connections. You must reset the unit.
Press this button with a cuspidal object. This operation will erase the clock setting
and some stored contents.
E 7

DISC MAINTENANCE:
1. Before playing, clean the disc with a clean, lint-free cloth.
Wipe the disc in the direction of the arrow.
Do not use solvents such as benzine, thinners. Commerciallyavailable cleaners or anti
static spraywill damage the unit.
2. Do not insert a disc with the label surface down. Doingso maydamage the unit.
Do not tryto insert another disc when one has been alreadyinserted.
Doingso maydamage the unit.
3. Handle the disc byits edge. And to keep the disc clean, do not touch the surface.
Do not stick paper or tape on the disc.
Do not expose the disc to direct sunlight or heat sources such as hot air vents.
Or leave it in a car parked in direct sunlight where there can be aconsiderable rise
in temperature.
PRECAUTIONSAND MAINTENANCE
1. If the car interior is extremelyhot, as after beingparked in the sun, do
not use the player until the car has been driven for a while to cool off
the interior.
2. The protective case is to safelykeep the front panel.
3. The unit is designed for negative terminal of the batterywhich is connected
to the vehicle metal. Please confirm it before installation.
4. Do not allow the speaker wires to be shorted together when the unit is
switched on. Otherwise it mayoverload or burn out the power amplifier.
5. Do not install the detachable panel before connectingthe wire.
E 8

+ sideup
B
A
4Ohm
4Ohm
4Ohm
4Ohm
0.5A
MAINTENANCE OFREMOTE CONTROLLER
Before usingthe remote control, pull out the insulatingpatch. This
patch was installed to insulate the batteryfrom draininguntil readyto use.
BATTERY INFORMATION:
Lithium Battery: CR2025 3V
BatteryLife: Approximately6 months.
Replacing the Battery fromthe Remote Controller:
1) Remove the batteryholder bypressingthe lockingtab with your thumb
and pullingit out.
2) Replace the batterywith the same type and the “+ ”side facingup.
3) Gentlypush in the holder until securelylocked into place.
WARNING:
• Do not recharge, disassemble or dispose of in fire.
• Batteryleakage maycause damage to the unit.
• To avoid the risk of accident, keep batteries out of reach of children.
WIRINGDIAGRAM
Note:
1.Make sure use a speaker with 4 ohm load impedance.
2.Do not make the auto antenna wire and ground touch each other.
E 9

Thisisananti-theftinstallationmethod.
Themainunit wears aMETAL MOUNTING SLEEVE.
Pleaseconnectthe wiring,eg,thePowerSupply,the Speakers andtheAntenna
accordingtotherequirements of thisInstruction Manual, then installthemetal
mounting sleeve intothe carasper the diagram illustratedbelow.
METALSUPPORTSTRAP
METALMOUNTINGSLEEVE
DASHBOARD
FRONT PANEL
PLASTICTRIMRING
UNITCHASSIS
NOTE
Remove thetwoscrewsthat
protecttheCDplayerduring
transportationbeforeoperating
theplayer.
Toattach the removablefaceplate,insertthe
rightside ofthe faceplateintothe leftofthe
CDplayer chassisfirst. Then pushthe leftside
ofthe faceplateintothe chassisuntil.
Pushthis resetbuttonwitha
cuspidalobjecttorenovatethe
distortedprogramonce theprogram
isdistorted.
INSTALLATIONMETHOD
Toproperlyfix themetal mounting
sleeve, bendthetabsof the sleeve
againsttheDASHBOARD witha
screwdriver.
Toraise theanti-skipcapabilityof theunit
please ensure themetal supportstrapis
connectedfirmlyto thecarchassis.
To removethe CD player fromthe Cage insertthe
supplied keysintothe LeftandRightside slotsofthe
chassis then pull the chassisoutofthe cage as shown.
RESET BUTTON
NOTE:
Whenneeding toinsert MMC/SD card
intothe MMC/SDcardcompartmentor
toinsertUSBbarintotheUSBsocket,
pulltheplastic coverrightwardaway
fromtheplayerand thenstoreit forsafety.
Whennoneeding todo MMC/SD orUSB
operation,pleasemake theplasticcover
match itsrightpositionin thefrontpanel
andthen push it fromrighttolefttillgetto
therightpositionofthefrontpanel.
To removethefrontpanel fromthe unit chassis,
presstheRELkeytoreleasethe frontpanelfrom
theunit chassis,then pull itupa littleto takeout
fromthe unit chassis.
E 10

TROUBLE SHOOTING
Before usingthe check list please make all the connections first.
If you still have questions after goingthrough the checklist, please consult
your local customer service representative.
Common Symptoms Cause Solution
The car ignition is switched off.
Ifthe power supplyis properly
connected to the car accessory,
switch the ignition keyto " ON " or
"ACC " .
There is no power.
The fuse has blown. Replace the fuse according to the
wiring diagram.
CD will not load Another CD is alreadyin the
player Remove the disc before inserting the
newone.
The CDs are loaded
onlyhalfway into
the CD tray.
The transport screws have not
been removed. Remove the transport screws before
using.
Inserting the disc in upside
down Insert the compact disc with the
label facing upward
The surface ofCD is extremely
dirty or it is damaged.
Clean the CD or tryanother CD, if
this works correctly, the first CD is
probablydamaged.
The device does
not work correctly
(EJECT, LOAD,
PLAY) Temperature inside the car is
too high.
Run the Air Cond etc until the
ambient temperature returns to
normal
The volume control is set too
low. Turn up the volume properly.
There is no sound. The device has not been
correctly connected.
Check the power and earth
connection according to the wiring
diagram.
The operation keys
do not work
1.The built-in microcomputer is
not
operating properlydue to noise
2.Front panel is not properly
installed.
1. Switch the device offand on
again. Or press the RESETbutton to
resume the program.
2. Reinstall the front panel
The installation angle is more
than 30 degrees Adjust the installation angle to less
than 30 degrees
The surface ofthe road is very
rough/ uneven.
Wait until the road becomes
smoother before playing the CD.
The sound ofthe CD
player skips
The surface ofCD is extremely
dirty or it is damaged.
Clean the CD or tryanother CD, if
this works correctly, the first CD is
probablydamaged.
No radio reception. The antenna cable is not
connected. Insert the antenna cable firmlyinto
the antenna socket ofthe device.
In automatic search mode
the radio does not stop at a
transmitting station.
The transmission signals are
too weak. Tune in to a radio station manually.
E 11

SPECIFICATION
GENERAL
SupplyVoltage DC 14.4 V. Negative Ground
Current Consumption Max.15A
Maximum Power Output 40Watts X 4
Number of channels 2 STEREO channels.
Unit Dimensions 178[W] X 164[D] X 50[H] mm.
FM SECTION
Frequencyrange 87.5MHz -107.9MHz
Effective sensitivity 3uV.
I.F Frequency 10.7MHz.
AM SECTION
Frequencyrange 530KHz - 1710KHz
Effective sensitivity 40dB.
I.F Frequency 450KHz
RCALINE OUT(OPTION)
Output 1200mV@ CD MAX.
CD PLAYER
System MP3 Audio System.
Suitable CDs MP3, WMA, CD, CD-R, CD-RWDisc
Frequencycharacteristics
20Hz-100Hz ≤5dB
10KHz-20KHz ≤5dB.
S/N Ratio to CD 50dB [1KHz]
E 12
Table of contents
Other Nextar Car Receiver manuals