Nextiva AudioCodes Mediant 500 User manual

1 | Page
nextiva.com/support
AudioCodes
Installation Guide

1 |Page
© Nextiva, All Rights Reserved
Contents
Installation ............................................................................................................................................................... 2
Box Contents.................................................................................................................................................... 2
Mounting the Mediant 500 on a server rack ................................................................................................. 2
Installing the Mediant Series SBC ................................................................................................................... 3
Status Lights ..................................................................................................................................................... 5
Logging in to the Web Interface from a connected computer ..................................................................... 5
Provisioning the Device........................................................................................................................................... 6
Factory Reset ........................................................................................................................................................... 9

2 |Page
© Nextiva, All Rights Reserved
Installation
Box Contents
The AudioCodes Mediant 500 device includes:
•AudioCodes Mediant Series SBC (session border controller)
•1 AC power cable
•4 rubber bumpers for desktop mounting
•19 in. Rack Mounting Kit
Mounting the AudioCodes Mediant 500 on a Server Rack
You can install the Mediant 500 on to a standard server rack using the supplied 19 in. Rack Mounting Kit,
which consists of two mounting brackets, one left and one right mounting bracket, and screws.
1. Attach the two mounting brackets (supplied) to each side of the device's chassis using the
supplied screws (Figure 1-1).
Figure 1-1: Attaching the Mounting Brackets
•1 – Left mounting rracket
•2 – Attached screws
•3 – Right Mounting Bracket
2. Place the device on a pre-installed shelf in the rack.
3. Attach the ends of the mounting brackets (that you installed in Step 1) to the vertical track of
the rack's frame using standard 19-inch rack bolts (not supplied).

3 |Page
© Nextiva, All Rights Reserved
Installing the AudioCodes Mediant Series SBC
Before plugging the Mediant Series SBC into a power source, the device must be properly grounded.
This may be done already if the device will be installed into a properly grounded Rack Mount system
using the supplied 19 in. Rack Mounting Kit. If not, you must attach a grounding line to the washer
behind the grounding screw that is visible on the back panel of the Mediant SBC.
NOTE: You will need at least one more Ethernet cable than the number of devices you will plug
into the Mediant SBC.
Follow the steps below to install the Mediant Series SBC into your network hierarchy (Figure 1-2):
Figure 1-2: Standard Network Diagram
1. Connect one end of an Ethernet cable to the LAN 1 port on the front of the Mediant 500.
Connect the other end of the cable to your network switch behind your firewall.
2. Connect one end of a second Ethernet cable to one of the other LAN ports on the front of the
Mediant 500. Connect the other end of the cable to the computer you are using to configure the
device.

4 |Page
© Nextiva, All Rights Reserved
NOTE: LAN Ports 1-4 are Gigabit Ethernet ports. If you are connecting a PBX with a PRI
Connection to the Mediant 500, one of the Gigabit Ethernet ports will be configured as a PRI
Connection (Figure 1-3).
Figure 1-3: PBX with a PRI Connection Network Diagram
3. Connect one end of the AC power cable to the back of the Mediant 500 and the other end to a
three-pronged power source.

5 |Page
© Nextiva, All Rights Reserved
Status Lights
Power Light
•Solid Green: The device has power.
•No Light: The device has no power.
Status Light
•Solid Green: The device is operational and in Standalone mode (not part of a High Availability
redundancy system).
•Flashing Green: The device is going through its boot cycle or powering down due to a reboot.
•Slowly Flashing Green: The device is the active device in a High Availability redundant system.
•Alternating Slow/Fast Flashing Green: The device is the redundant device in a High Availability
redundant system.
•Solid Red: Boot failure.
LAN Ports
•Solid Green: Ethernet link is active.
•Flashing Green: Data is being transmitted to or received from the attached device.
•No Light: No recognizable link, the device may not have power, or the Ethernet cable may not be
providing any data.
Logging In to the Web Interface from a Connected Computer
1. Ensure the computer you are using is connected into a LAN port on the front of the Mediant
500.
2. Open a web browser on your computer, and navigate to 192.168.0.2. The AudioCodes login
page appears.
NOTE: If you have already provisioned the Mediant 500, you will have to enter 192.168.1.1 as
the IP Address to access it.
3. Log in with Admin as the Username and Admin as the Password.

6 |Page
© Nextiva, All Rights Reserved
Provisioning the Device
By default, the AudioCodes Mediant 500 should be prepared to auto-provision before you receive it. But
if the device should ever be reset to factory defaults, then provisioning the device may become
necessary.
The Mediant 500 auto-provisions using a Command Line Interface (CLI) script file. This file contains a list
of commands executed one at a time, which together configure the Mediant 500.
For the Mediant 500 to download its CLI script file, a basic configuration file (known as a skinny config
file) needs to be uploaded to the Mediant 500. This skinny config file contains the server address where
the CLI script resides (Figure 2-1). You can download the skinny config at the following URL: (“Insert URL
as it becomes known”).
Figure 2-1: The Skinny Config File
NOTE: Nextiva Support cannot remote in to your computer to perform the steps below because
your computer must be connected to the Mediant 500 which will not have an Internet connection.
1. Connect an Ethernet cable from your computer to one of the yellow LAN ports on the front of
the Mediant 500.
2. Connect the power cord to the back of the Mediant 500. The device will power on.
3. Open a web browser on your computer, and navigate to 192.168.0.2. The Audio Codes login
page appears.
4. Log in with Admin as the Username and Admin as the Password.
5. Click Maintenance at the top-left of the screen.
6. Click Software Update on the left side of the screen.
7. Click Configuration File on the left side of the screen.
7 |Page
© Nextiva, All Rights Reserved
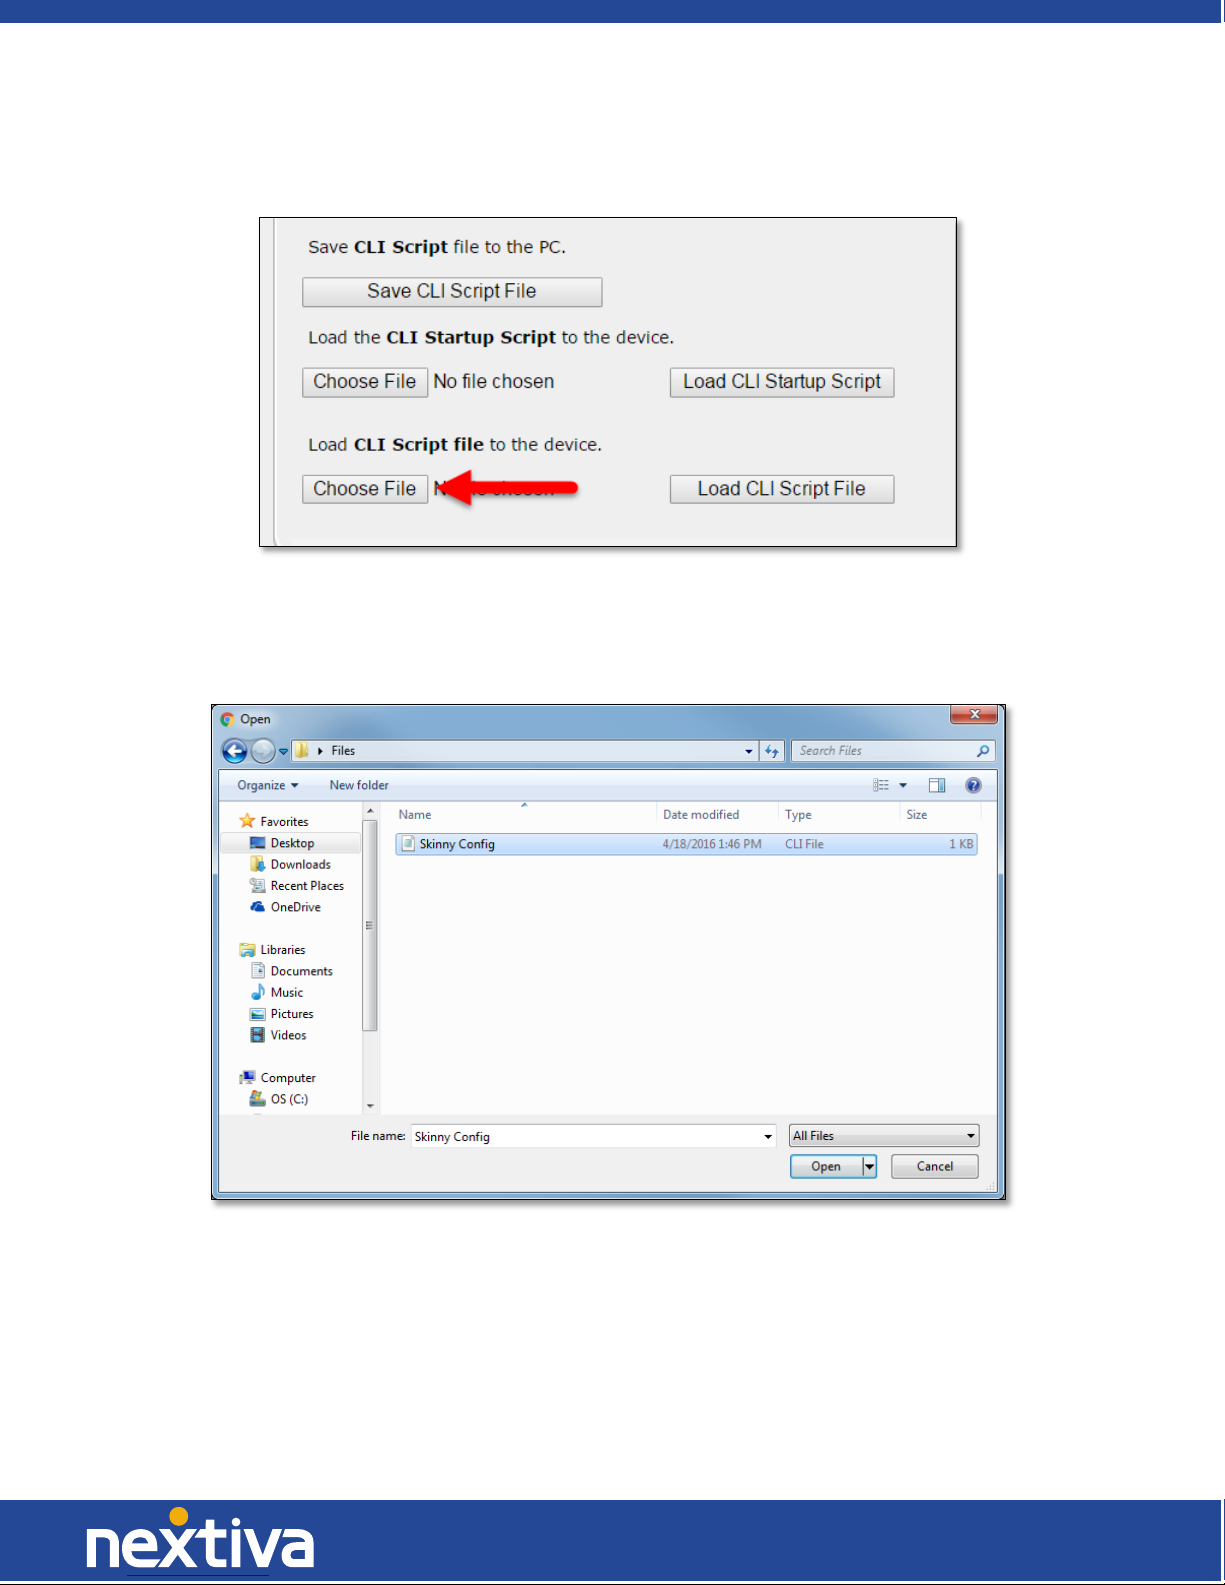
8. Click the Choose File button under Load CLI Script file to the device (Figure 2-2).
Figure 2-2: The Configuration File Screen
9. Find the skinny config file on your computer, and click Open (Figure 2-3).
Figure 2-3: The Open Window
10. Click Load CLI Script File to the right of Choose File, and then click OK when the pop-up message
appears saying the device will reset. After a few seconds, the Mediant 500 restarts. Proceed to
the next step quickly to avoid having to reboot the Mediant 500 again.

8 |Page
© Nextiva, All Rights Reserved
11. Disconnect the computer from the LAN1 port on the front of the Mediant 500, and then connect
an Ethernet cable from the LAN1 port on the front of the Mediant 500 to the network switch.
The Mediant 500 then downloads its CLI script.
NOTE: If the Mediant 500 has fully booted up before it is connected to the network switch,
another reboot will be needed. To do this, turn the power off on the back of the Mediant 500,
and then turn the power back on.
You can check that the Mediant 500 is properly provisioned at any time by following the steps below:
1. Connect a computer to the same network switch the Mediant 500 is connected to.
2. Navigate to the static IP Address of the Mediant 500 in a web browser on the computer. If you
do not know this IP Address, please coordinate with your Network Administrator to verify the IP
Address of the Mediant 500 using the ARP table present in your network routing device.
3. Log in with Admin as the Username and v01p4f@n as the Password.
4. Click Status & Diagnostics at the top-left of the screen.
5. Click VoIP Status on the left side of the screen.
6. Click Call Routing Status on the left side of the screen. If the Mediant 500 is properly
provisioned, Proxy Set ID 2 should display bt.voipdnsservers.com (208.73.144.74) in the IP
Address column and OK in the State column (Figure 2-4).
Figure 2-4: The Call Routing Status Screen

9 |Page
© Nextiva, All Rights Reserved
Factory Reset
Using the Web Configuration Utility
NOTE: Restoring the Mediant 500 to factory defaults will remove any configuration performed as
part of the provisioning process, as well as any custom configuration done after provisioning. This
means you will need to have a computer connected to the LAN1 port on the front of the Mediant
500 to access the web configuration utility.
1. Open a web browser on the computer, and navigate to the static IP address of the Mediant 500.
The AudioCodes login page appears.
2. Log in with Admin as the Username and v01p4f@n as the Password.
3. Click Maintenance in the upper-left corner of the screen.
4. Click Software Update on the far-left side of the screen.
5. Click Configuration File on the far-left side of the screen.
6. Click Restore Defaults in the middle of the screen (Figure 3-1). A pop-up message appears
warning you that you may lose connection to the device. Click OK to confirm you want to
restore the default settings.
Figure 3-1: The Configuration File Screen

10 |Page
© Nextiva, All Rights Reserved
Using the Reset Button
NOTE: Restoring the Mediant 500 to factory defaults will remove any configuration performed as
part of the provisioning process, as well as any custom configuration done after provisioning. This
means you will need to have a computer connected to the LAN1 port on the front of the Mediant
500 to access the web configuration utility.
1. Insert a pin or paper clip into the small hole with the // symbol above it on the front of the
Mediant 500. The lights on the Mediant 500 turn red. Continue to hold the pin or paper clip in
the hole for at least 12 seconds, but no more than 25 seconds, and then remove it.
2. Wait until all the red lights on the Mediant 500 turn off, and then connect an Ethernet cable
from the LAN1 port on the front of the Mediant 500 to the computer.
NOTE: After connecting the Ethernet cable, wait until the network status icon in the system tray
of the computer no longer shows any errors before proceeding (Figure 3-2).
Figure 3-2: The Network Status Icon
3. Navigate to 192.168.0.2 in a web browser on the computer.
4. Attempt to log in with Admin as the username and Admin as the password. If you are able to
access the web configuration utility and log in with these credentials, the factory reset was
successful.
After the Mediant 500 has been restored to factory defaults, please contact Nextiva Support to make
sure the custom tags in your Nextiva account are correct, and then upload the skinny config file using
the instructions in the Provisioning section.
Table of contents
Popular Network Router manuals by other brands


Lucent Technologies
Lucent Technologies 20H Specifications

Robustel
Robustel R5020 Hardware manual

xG Technology
xG Technology CN3200-PS-2500-900-1-EXT installation guide

Cambium Networks
Cambium Networks cnPilot Home R200 Series user guide

Cisco
Cisco 4451-X Hardware installation guide

Case Communications
Case Communications 6904 user manual