Nexxt Smart WI-Fi photo frame User manual

WARRANTY
nexxtsolutions.com/warranty
YEAR
1
Smart Wi-Fi photo frame

English
User guide
Thank you for purchasing the Smart Wi-Fi photo frame
from Nexxt Solutions. We are excited to be part of making
your life easier, safer and bringing peace of mind inside and
outside your home.
Carefully read this manual prior to setting up and using this
product
Package content
• Smart Wi-Fi photo frame (1)
• Detachable stand (1)
• AC power adapter (1)
• Quick start guide (1)
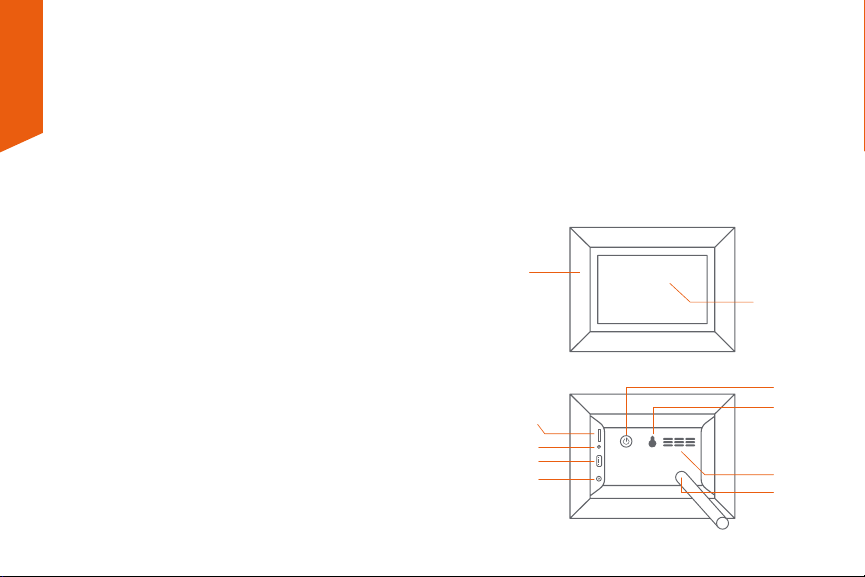
Product overview
1. Frame: features a classic wood nish border
2. LCD screen: for the high-resolution display of your
digital images
3. SD™ card slot: use it to upload images or videos locally
stored in a memory card
4. 3.5mm stereo connector: plug an earphone to listen to
recorded audio
5. USB port: use it to upload images or videos locally
stored in a ash drive
6. DC power input: insert the supplied power adapter in
this jack
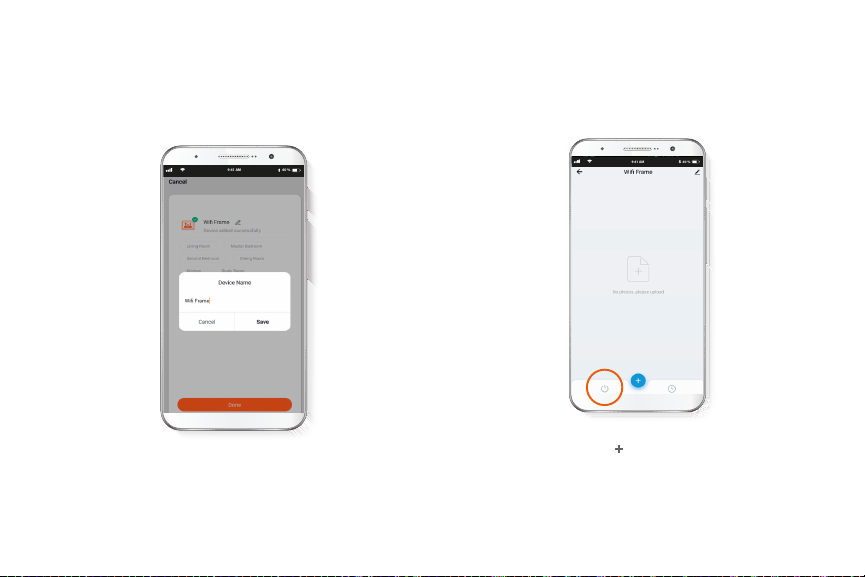
7. Power button: turns the frame on and o
8. Eyelet: for wall installation
9. Built-in speaker: for audio playback
10. Stand: screw it in for desktop placement
1
2
Front view
Back view
3
4
5
69
7
8
10

Initial setup
Tap on the Setting button on the display to congure the
Wi-Fi network.
Plug the adaptor into a standard wall outlet.
You must connect to a 2.4GHz Wi-Fi network. Enter your
network password.
1
2

Step 1
Register by email. If you want to register by phone, select
Register by phone on the upper right-hand corner of the
screen.
Installing the Nexxt Solutions
Home App
Download Nexxt Home app from Google Play or Apple App
Store.
60 %
9:41 AM
Register by phone
Register by email
United States of America
Email
Get authentication code
60 %
9:41 AM
Nexxt Home
Nexxt Solutions Home App
Cancel
GET
Accvent LLC
Login with existing account
Create New Account
SOLUTIONS
Iniciarsesión con cuenta existente
Crear Cuenta Nueva
SOLUTIONS
60 %
9:41 AM
Nexxt Home
Nexxt Solutions Home App
Cancel
INSTALL
Accvent LLC

Step 3
Create a new password and then select Completed.
Step 2
Enter the verication code you received.
60 %
9:41 AM
Enter verication code
Verication code has been sent to your
60 %
9:41 AM
Set Password
Completed
6-20 characters, including letters and numbers

Step 4
The Nexxt Solutions Home account has been successfully
set up.
Step 5
Assign a Home Name and Family Location.
Select Add another room and name each room as needed.
Select Save to store your settings.

Add device
Step 1
Select Add device, followed by the smart photo frame.
60 %
9:41 AM
60 %
9:41 AM
60 %
9:41 AM
Step 2
Use your phone to scan the QR code on the frame screen.

Step 3
Important: During this process, make sure to maintain the
router and the frame as close as possible, and free from any
obstructions not to degrade the quality of the signal.
60 %
9:41 AM
Step 4
Device added successfully will be displayed. Click on
Done.
60 %
9:41 AM

Device name
It allows the user to rename the device. To change the
default name, click on Device name.
60 %
9:41 AM
Main frame interface
Step 1
To add pictures, touch the +icon on the bottom of the
screen.
Power button: use to turn on/o the frame through the
app.
60 %
9:41 AM

This screen will be displayed to indicate that the image
upload has been completed successfully.
Important: only 9 images can be transferred at a time.
60 %
9:41 AM
Step 2
From your phone gallery, choose the images you want to
send to the frame.
60 %
9:41 AM

This screen keeps a record of all your uploaded images into
the frame.
60 %
9:41 AM
When an individual image is selected, a new screen will be
displayed with the options to Delete it, Download it to
your mobile device, or to Close the current menu.
60 %
9:41 AM

Schedule setup
Step 1
Click on the schedule icon to access the Add schedule
screen.
60 %
9:41 AM
Step 2
Set the time you wish to schedule. Select Repeat to set
days of the week. Select Switch to schedule on/o status.
Enable the Notication button to receive an alert on a
scheduled activity of the frame.
Click on Save on the upper right-hand corner to save a
schedule.
60 %
9:41 AM
60 %
9:41 AM
60 %
9:41 AM

Delete setup
To remove a schedule on iOS, slide item to the left, and for
Android, press and hold on the selected Schedule,
followed by Delete.
60 %
9:41 AM
Settings
Click on the pencil icon on the upper right-hand corner.
Device name: changes the name of the Wi-Fi photo frame.
60 %
9:41 AM

Device information: will show the data related to the Wi-Fi
photo frame.
Tap-To-Run and Automation: links the Wi-Fi photo frame
with other smart products to automatically control them
through a customized command.
Oine notication: selection button designed to
enable/disable this feature.
Share device: allows sharing the Wi-Fi photo frame with
family and friends.
Create group: makes management of devices easier by
selecting and arranging multiple components under a
single group.
Feedback: let us know if you have any issues setting up the
product.
Check network: test your network to make sure you have a
good signal.
Check for rmware upgrade: we will sometimes add new
features or provide updates with a new rmware upgrade.
Remove device: allows you to delete the Wi-Fi photo frame
from the application.
Share device
Click on Share devices then tap Add sharing. Enter the
mobile number/e-mail address of family and friends. Tap on
Done. The newly congured users will now have access to
your smart frame.
Note: family or friends will need their own Nexxt Solutions
Home Account to access the device.
60 %
9:41 AM
60 %
9:41 AM

Nexxt Solutions® is a registered trademark. All rights reserved.
Amazon, Alexa and all related logos are trademarks of Amazon.com,
Inc. or its aliates. Google, Android and Google Play are trademarks
of Google Inc. All other brand names and trademarks are the
property of their respective owners. Made in China.
FCC ID#: X4YHASP600
Delete user
To remove a user, on Android press and hold the name you
want to eliminate. On iOs slide to the left the user you want
to remove. Click on Delete. A notication conrming you
don’t want to share the device with this user will be
displayed. Click on Conrm to nish.
60 %
9:41 AM
60 %
9:41 AM

Español
5. Puerto USB: se utiliza para cargar imágenes o vídeos
almacenados locamente en dispositivo de memoria
compatible
6. Entrada de CC: inserte en este conjuntor el adaptador
de corriente que se incluye con la unidad
7. Botón de conexión: se utiliza para encender y apagar el
portarretrato
8. Oricio: para montar el marco en la pared
9. Parlante integrado: para la reproducción de audio
10. Soporte: atorníllelo si desea colocarlo sobre el
escritorio
1
2
Vista frontal
Vista posterior
3
4
5
69
7
8
10
Guía del usuario
Gracias por adquirir el Portarretrato inteligente con
conexión Wi-Fi de Nexxt Solutions. Nos complace ser parte
de la solución destinada no sólo a simplicar su vida, sino
que además poder brindar más seguridad y tranquilidad al
interior de su hogar.
Lea detenidamente este manual antes de instalar y utilizar
el producto.
Contenido del empaque
• Portarretrato inteligente con conexión Wi-Fi (1)
• Soporte desmontable (1)
• Adaptador de CA (1)
• Guía de conguración rápida (1)
Descripción del producto
1. Marco: ostenta un clásico borde con acabado en color
madera
2. Pantalla de LCD: permite la proyección en alta
denición de sus imágenes digitales
3. Ranura para tarjeta SD™ : se utiliza para cargar
imágenes o vídeos almacenados locamente en una
tarjeta de memoria
4. Conector estéreo de 3,5mm: inserte un audífono para
escuchar el audio grabado

Configuración inicial
Pulse el botón de Conguración en la pantalla con el n de
integrarlo a la red Wi-Fi.
Enchufe el adaptador en un tomacorriente estándar de la
pared.
Debe conectarse a una red Wi-Fi de 2.4GHz. Ingrese la
contraseña de su red.
1
2

60 %
9:41 AM
Register by phone
Register by email
United States of America
Email
Get authentication code
60 %
9:41 AM
Nexxt Home
Nexxt Solutions Home App
Cancel
GET
Accvent LLC
Login with existing account
Create New Account
SOLUTIONS
Iniciarsesión con cuenta existente
Crear Cuenta Nueva
SOLUTIONS
60 %
9:41 AM
Nexxt Home
Nexxt Solutions Home App
Cancel
INSTALL
Accvent LLC
Instalación de la aplicación
Nexxt Solutions Home App
Descargue directamente la aplicación
Nexxt Home de Google Play o de Apple App Store.
Paso 1
Registro por email. Si desea registrarse por teléfono,
seleccione Registro por teléfono en el borde superior
derecho de la pantalla.

60 %
9:41 AM
Enter verication code
Verication code has been sent to your
60 %
9:41 AM
Set Password
Completed
6-20 characters, including letters and numbers
Paso 3
Cree una contraseña nueva y seleccione Completo a
continuación.
Paso 2
Ingrese el código de vericación que recibió.

Paso 5
Asigne un Nombre a la casa y la Ubicación del dispositivo
en su interior. Seleccione Agregar otra habitación e
identique los puntos de instalación respectivos. Seleccione
Guardar para almacenar su conguración.
Paso 4
La cuenta Nexxt Solutions Home ha sido congurada
satisfactoriamente.
Other manuals for Smart WI-Fi photo frame
1
Table of contents
Languages: