NIBELS HSMM 65 IX User manual

Built-In Electric Oven
User Manual
110000A0210
GB
GB: Please read these instructions carefully before installing and operating the oven..
21
22
23

24

25
The removable carrying handle in the product is mounted in the
holes on the right and left side walls of the product. (The
mounting is as seen in the Picture)

Min.570
600
Min.560
20
598
565
595
558
578
80
100 250
Ölçü mm. / Measure mm.
26

27
28
29

30
USING DIGITAL CLOCK ( Three Button Model )
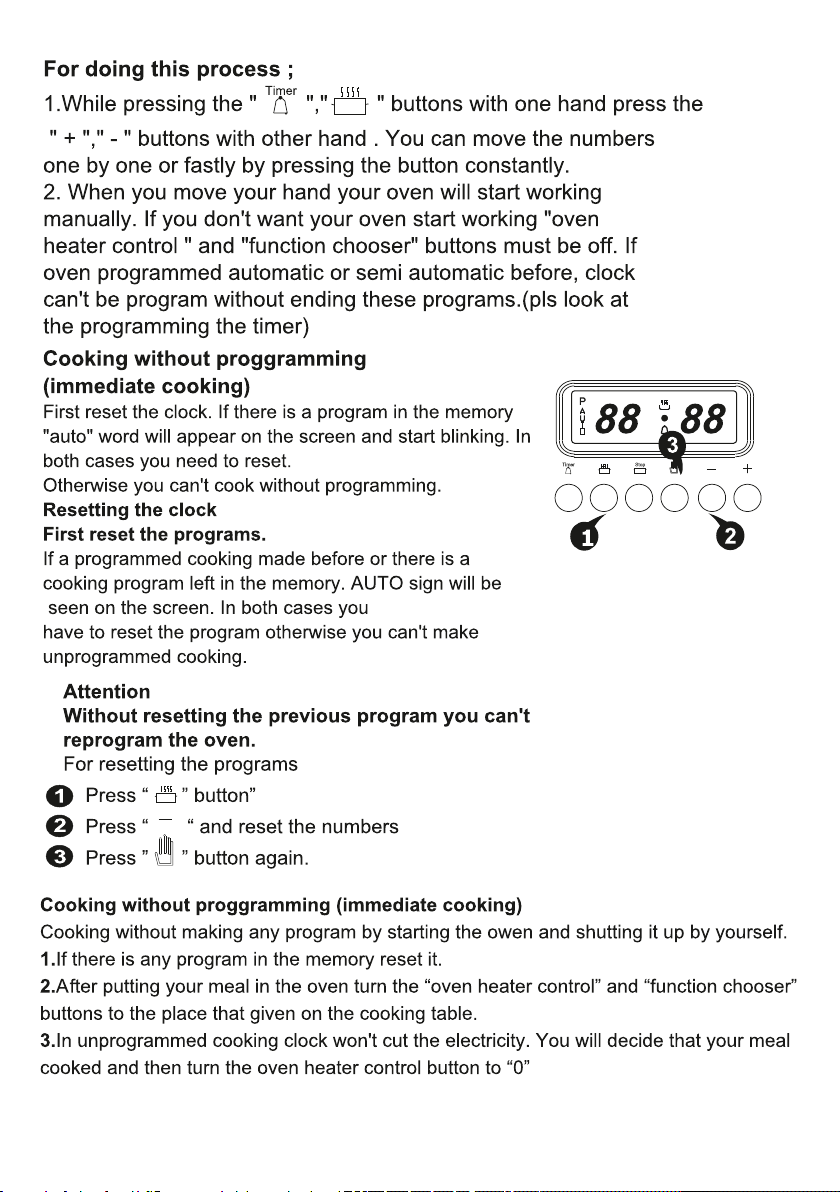
For operating oven and adjust cooking implement; Please click once menu button
of the digital clock to activate the minutes section. The buttons of (+) and (-) is used
to adjust required time interval. For activating second line, please press menu botton
once a more. The buttons of (+) and (-) is used to adjust required time interval.
Digital clock will start as time clock (for models that have time clock). After timing
system is done, please pres menu button. The buttons of (+) and (-) is used to adjust
required time interval. Clock start to count down from adjusted time. When time
(before time adjust), Please press menu button after adjusting time as 00:00 for cooking/baking.
to operate.

31
LED-TL
TOUCH CONTROL OVEN TIMER
OVERVIEW:
ADJUSTING TIME OF DAY
2) Adjust the time using 3) After a few seconds,1) Switch into time
adjustment mode. the or buttons. screen will stabilize.
LED, is an electronic timer, which enables your oven to get the food ready to serve at the desired time.
The only thing to be done is to program the cooking time and ready time. It can also be used as an alarm
clock, where you just give in the amount of time after which it should remind you by a buzzer tone.
POWER UP:
Upon power up, flashing digits and AUTO icon, the oven is inoperative. Press Mto return to manual
mode and adjust the time of day using up and down buttons.
MANUAL MODE:
Touching & M at the same time, manual mode is
entered. Any previous cooking program will be cancelled.
Time of day adjustment is only allowed, when no cooking program is in progress. First enter
manual mode as described above. The point between the hours and minutes display flashes.

32
2) Using or give in the
duration in minutes
BUZZER ALARM:
3)After a few seconds,
screen will return to clock
mode
CANCELLING THE BUZZER SOUND
After the programmed duration is elapsed, buzzer will
sound. Any button touch will cancel the buzzer.
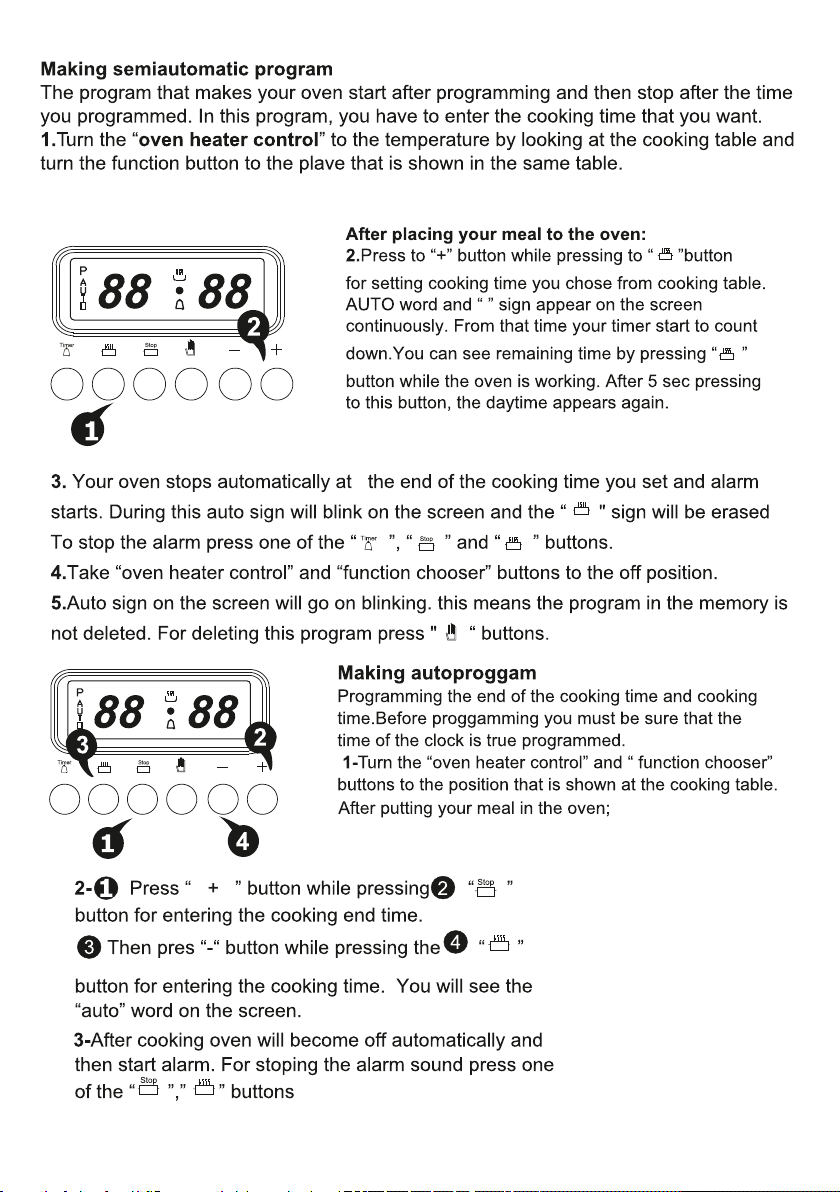
AUTOMATIC COOKING PROGRAM
If you want to start cooking immediately, you just have to give in the cooking time.
Example: We placed our food into the oven and want it to be cooked for 2 hours and
15 minutes
1) Current time is 18:30. 3) Adjust the cooking time2) Switch into cooking time
mode. using the or buttons.
Now, you have programmed your oven to
cookthe food for 2 hours and 15 minutes.
Please do not forget to bring the function
and/or temperature knobs of your oven to
appropriate position .
4) After a few seconds, the screen
will indicate that cooking has
started and showthe current time
Note: You may cancel the automatic cooking mode anytime by go manuel mode
With this feature, you can program after how much elapsed time you should be warned by a buzzer
sound.
1) Touching Mtwice, enter
buzzer alarm mode
33
3) In a few seconds, screen
switches to clock mode.
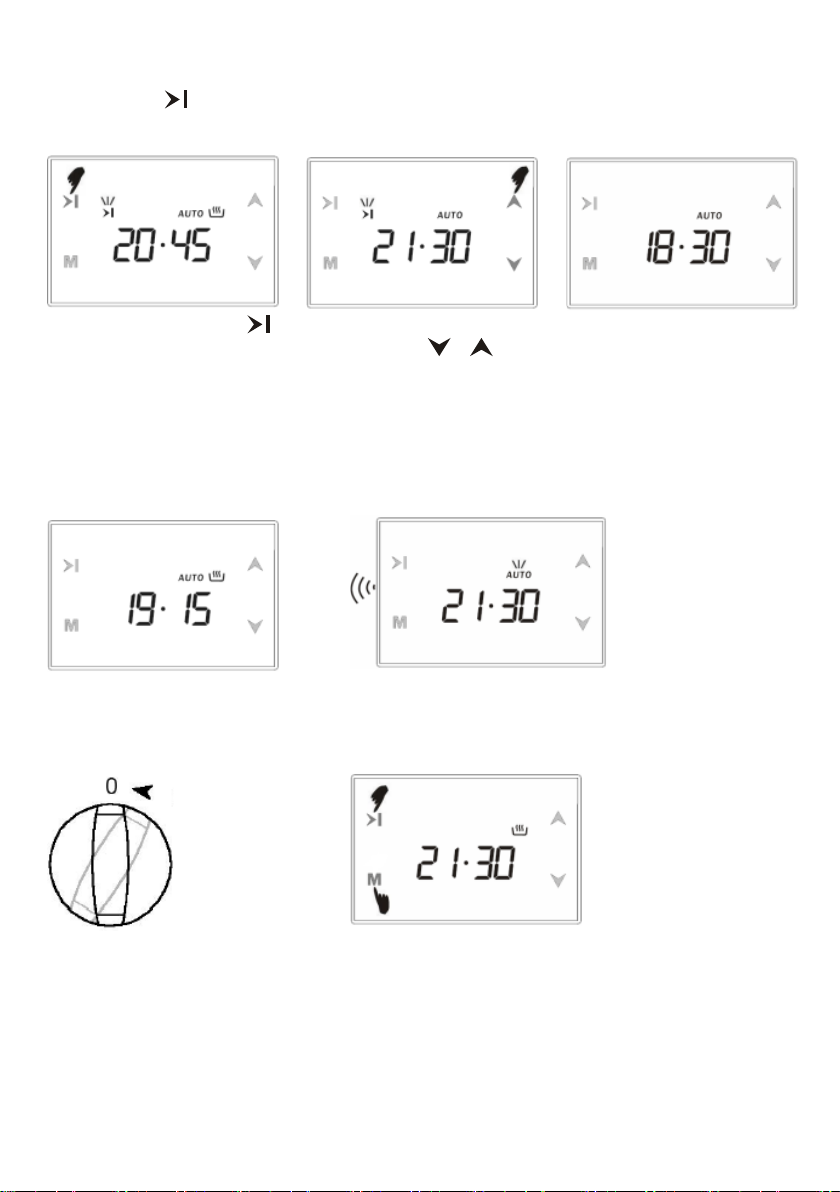
1) Displayed is the ready
time 18:30+2:15=20:45.
2) Set it to the desired time
by using the or buttons
We now have programmed our oven to get the food ready at 21:30. Since the cooking
time was preprogrammed as 2 hours 15 minutes, your oven will start cooking at 19:15,
so that the food is ready at 21:30.
Screen just when cooking starts Screen just when cooking ends
When automatic cooking is completed, a buzzer alarm is heared and will sound, if not
stopped, for 7 minutes.
1) Switch your oven OFF 2) Reset the timer
Note: Your oven will be inoperative until you reset the timer.
In the example shown, cooking time has been programmed first the ready time was
calculated automatically and was edited by us. It is also possible first to program the
ready time, in that case the cooking time will be calculated automatically and should be
edited thereafter.
In the above example, cooking immediately started after giving in the cooking period.
By pressing the button, you can see the ready time, ie. The time when the food will
be ready to serve, and if you want, you can also change it. In the example below, the
ready time will be changed to 21:30.

34
CHILDLOCK:
When activated in manual mode, your oven and the timer keys are blocked.
When activated as a cooking program is in progress, just the keys are blocked.
1) Touch and at the same time
for 1 seconds until 2 beep tones heard.
2) The key symbol appears on the
screen, child lock is active.
USER PROGRAMMABLE OPTIONS:
3- Screen Brightness Adjustment:
2- Touch tones
1- Time ofday display 12h / 24h
To deactivate the child lock, touch and until key symbol disappears.
Exception: A buzzer tone during child lock can be cancelled touching any button.
Factory setting is 24 h display. Touching for 5 seconds, a double beep tone
will be heard, the display mode toggles to 12 h mode (am / pm indication) Doing
this again will toggle back to 24 h
As a factory setting, touching buttons are accompanied by beep tones. Touching
the button for 5 seconds, a double beep tone will be heard and nt , which
stays for no tone, will appear on the screen. Now, no touch tones will be produced
any more. Doing the same until bt appears on the screen, which stays for button
tone, brings you back totouch tones.
Touching button for 1 second, until you hear a double beep tone, brings you
into the display brightness mode. Display shows br 0x (x =1 to 8). Now every
consecutive touch of the same button will reduce the brightness. There are 8
levels, thereafter the brightness starts to increase upon every touch. The same
effect is also seen by holding this button touched. In 5 seconds after releasing the
button, the brightness level is stored. Factory setting is maximum brightness.
4- Buzzer Tone Selection:
Touch button for 1 second, until you hear a double beep tone. Upon
every touch of this button within 5 seconds, you will hear a different tone.
There are 3 different tones available. The tone last heard will be stored in
5 seconds.
Note: Programmed options are nonvolatile. They will not be erased upon a
power interrupt.
35
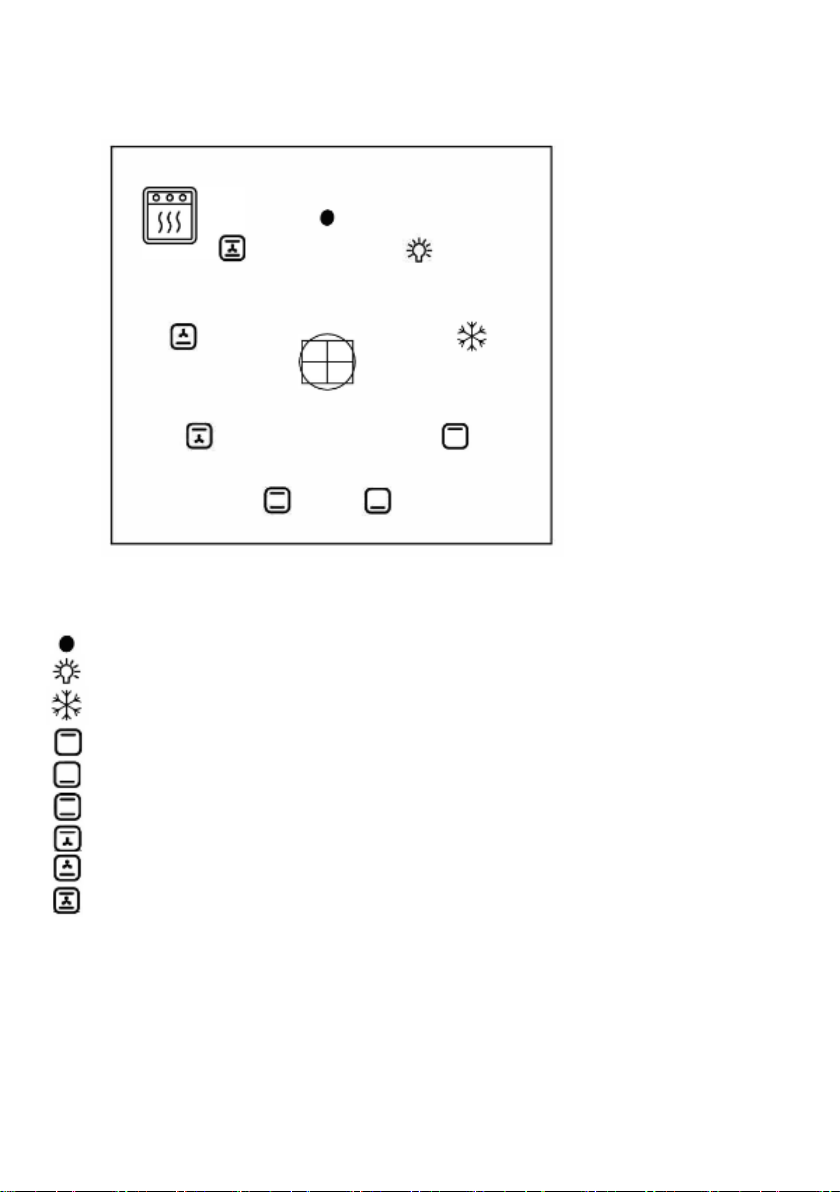
OFF
INTERIORLIGHTING LAMP
UNFREEZING +INTERIOR LIGHTING LAMP
UPPERRESISTANCE +INTERIOR LIGHTING LAMP
LOWERRESISTANCE +INTERIORLIGHTING LAMP
LOWER+UPPERRESISTANCE +INTERIORLIGHTING LAMP
UPPERRESISTANCE +FAN +INTERIOR LIGHTING LAMP
LOWERRESISTANCE +FAN +INTERIORLIGHTING LAMP
LOWER+UPPERRESISTANCE +FAN +INTERIOR LIGHTING LAMP
36

37
38
Table of contents
Popular Oven manuals by other brands

Caple
Caple C2231 instruction manual

Hotpoint Ariston
Hotpoint Ariston FA2 841 JH IX HA manual

ACP
ACP MSO Series Quick start & reference guide

SUN OVEN
SUN OVEN All American Sun Oven quick start guide

Middleby Marshall
Middleby Marshall PS300 Series Owner's operating and installation manual

AEG
AEG BH 8.30 operating instructions


