NICEDAY 701ML User manual
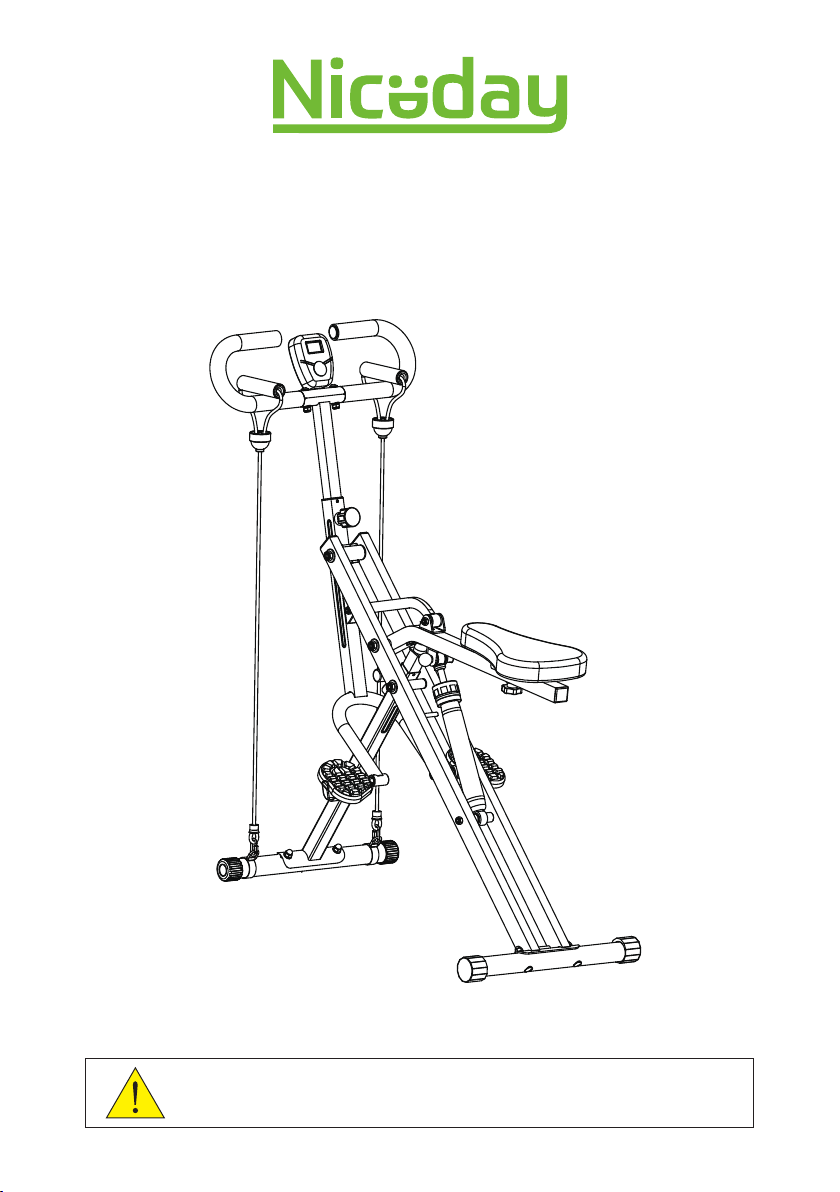
UPRIGHT ROW-N-RIDE EXERCISER
701ML USER MANUAL
Please read all the instructions in the manual carefully before installing
and using the equipment.

CATALOG
Important Safety Information ------------------------------------------------------------- 2
Exploded Diagram ----------------------------------------------------------------------------3
Parts List ---------------------------------------------------------------------------------------- 4
Assembly Instructions ------------------------------------------------------------------- 5-9
Machine Use Adjustment ------------------------------------------------------------ 10-13
Exercise Monitor ---------------------------------------------------------------------------- 14
Warm Up --------------------------------------------------------------------------------------- 15
CUSTOMER SERVICE
If you have any needs, please feel free to contact our customer service
Contact us via Amazon: Login your Amazon account > choose"Your
orders" > find the order ID > click "Contact seller"
Our online customer service will reply you within 24 hours.
1

IMPORTANT SAFETY INFORMATION
We thank you for choosing our product. To ensure your safety and health, please use this
equipment correctly. It is important to read this entire manual before assembling and using the
equipment. Safe and effective use can only be achieved if the equipment is assembled,
maintained, and used properly.
It is your responsibility to ensure that all users of the equipment are informed of all warnings and
precautions.
1. Before starting any exercise program, you should consult your physician to determine if you have
any medical or physical conditions that could put your health and safety at risk or prevent you from
using the equipment properly. Your physician’s advice is essential if you are taking medication that
affects your heart rate, blood pressure, or cholesterol level.
2. Be aware of your body’s signals. Incorrect or excessive exercise can damage your health. Stop
exercising if you experience any of the following symptoms: pain, tightness in your chest, irregular
heartbeat, shortness of breath, lightheadedness, dizziness, or feelings of nausea. If you do
experience any of these conditions, you should consult your physician before continuing with your
exercise program.
3. Keep children and pets away from the equipment. The equipment is designed for adult use only.
4. Use the equipment on a solid, flat level surface with a protective cover for your floor or carpet. To
ensure safety, the equipment should have at least 2 feet (60 CM) of free space all around it.
5. Ensure that all nuts and bolts are securely tightened before using the equipment. The safety of
the equipment can only be maintained if it is regularly examined for damage and/or wear and tear.
6. Always use the equipment as indicated. If you find any defective components while assembling
or checking the equipment, or if you hear any unusual noises coming from the equipment during
exercise, discontinue use of the equipment immediately and do not use until the problem has been
rectified.
7. Wear suitable clothing while using the equipment. Avoid wearing loose clothing that may become
entangled in the equipment.
8. Do not place fingers or objects into the moving parts of the equipment.
9. The maximum weight capacity of this unit is 220 pounds (100 kg).
10. The equipment is not suitable for therapeutic use.
11. To avoid bodily injury and/or damage to the product or property, proper lifting and moving are
required.
12. Your product is intended for use in cool and dry conditions. You should avoid storage in extreme
cold, hot or damp areas as this may lead to corrosion and other related problems.
13. This equipment is designed for indoor and home use only; it is not intended for commercial use.
2
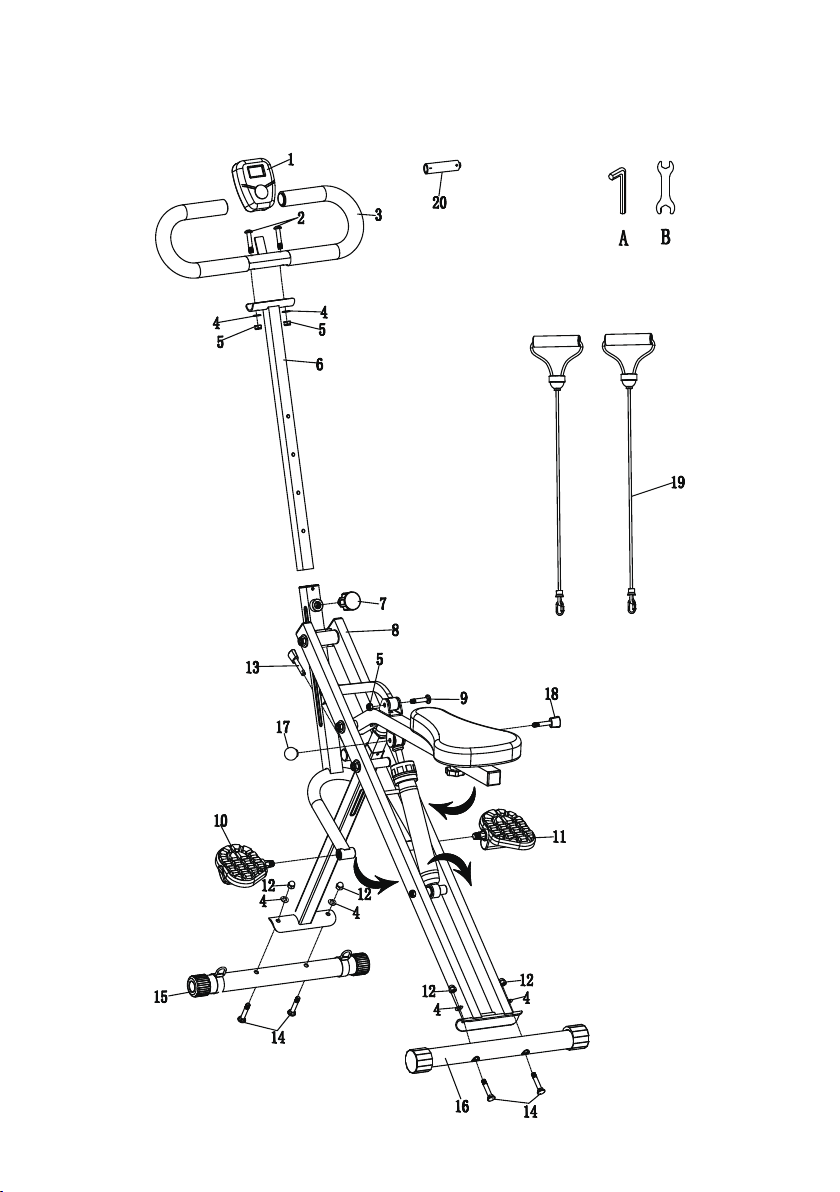
EXPLODED DIAGRAM
3
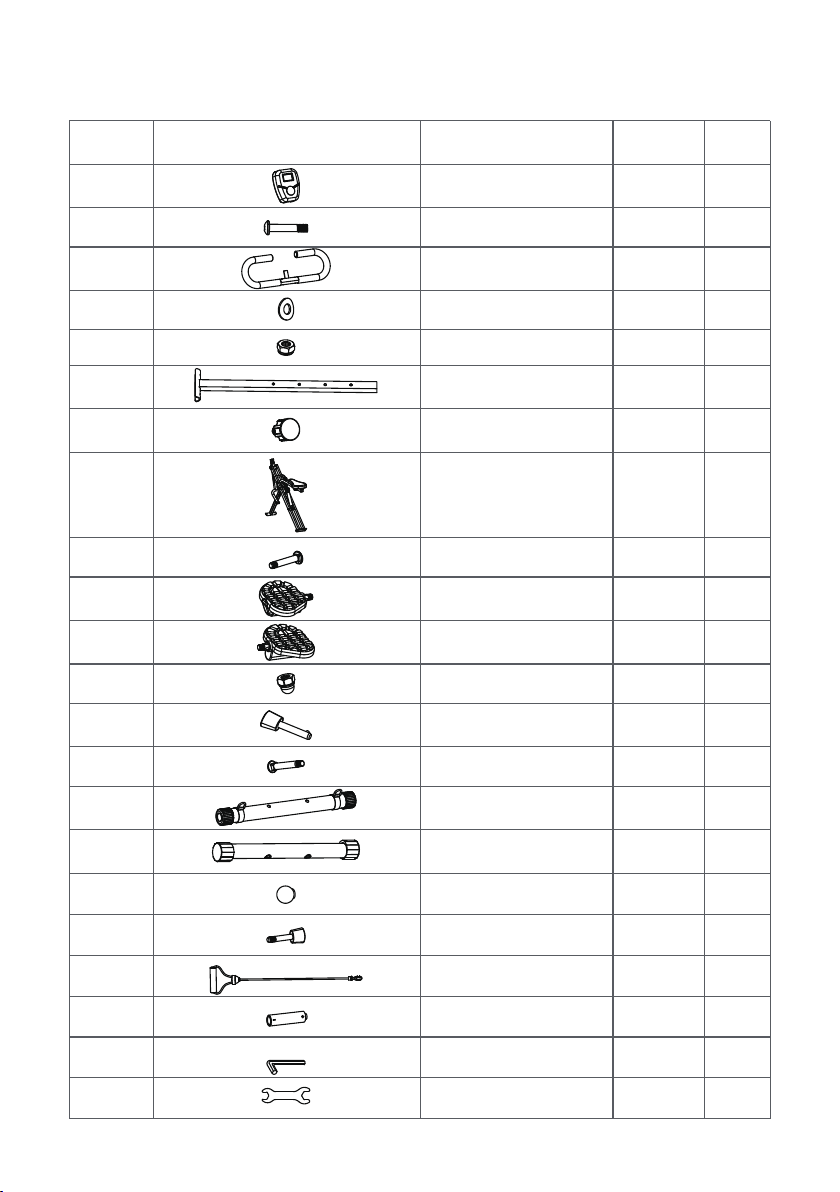
PARTS LIST
Qty.
1
2
1
6
3
1
1
1
1
1
1
4
1
4
1
1
1
1
2
1
1
1
Spec.
M8*42
M8
M16
M8*40
M8
M8*45
S6
13-15
Description
Monitor
Screw
Handlebar
Washer
Nut
Handlebar Tube
Knob
Screw
Pedal(L)
Pedal(R)
Nut
Plug
Screw
Front Stabilizer
Rear Stabilizer
Pin Ball
Pin
Resistance Bands
Allen Wrench
Open-end Wrench
Main Frame
No. Parts
1
2
3
4
5
6
7
8
9
10
11
12
13
14
15
16
17
18
19
20 Battery
A
B
4
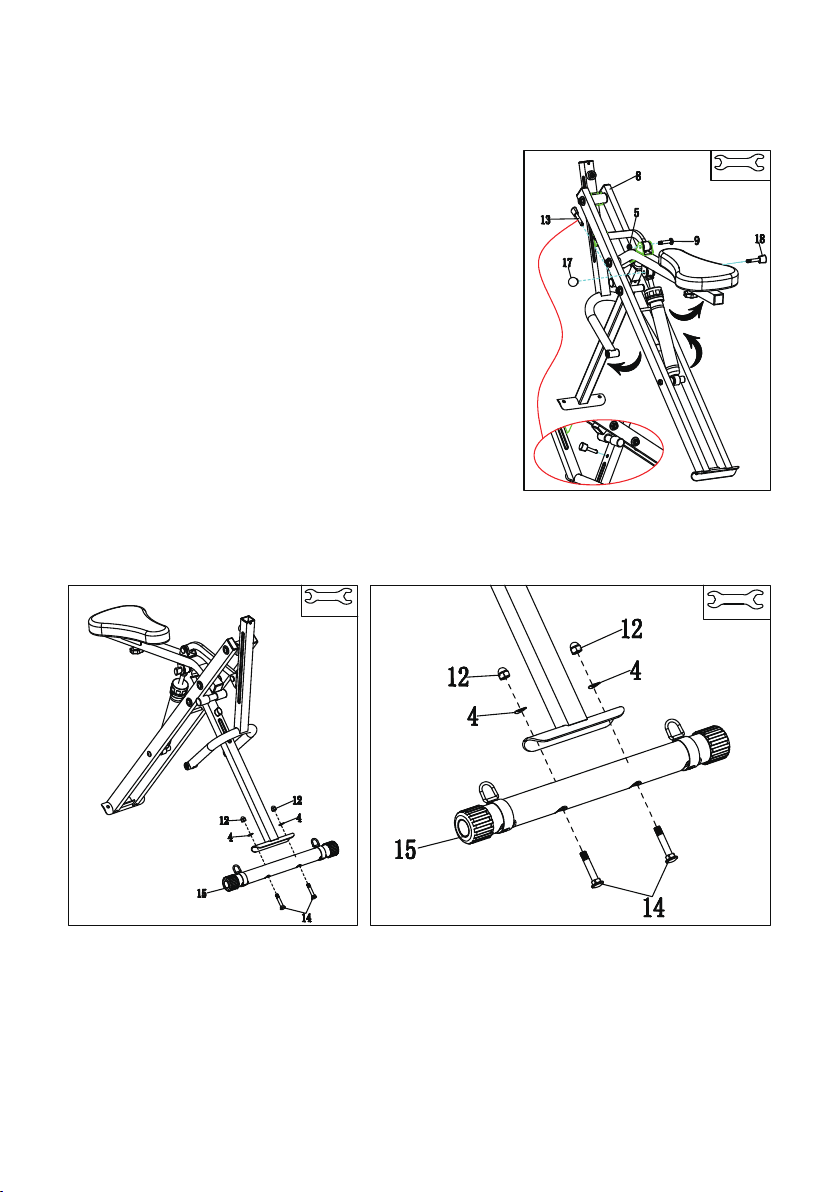
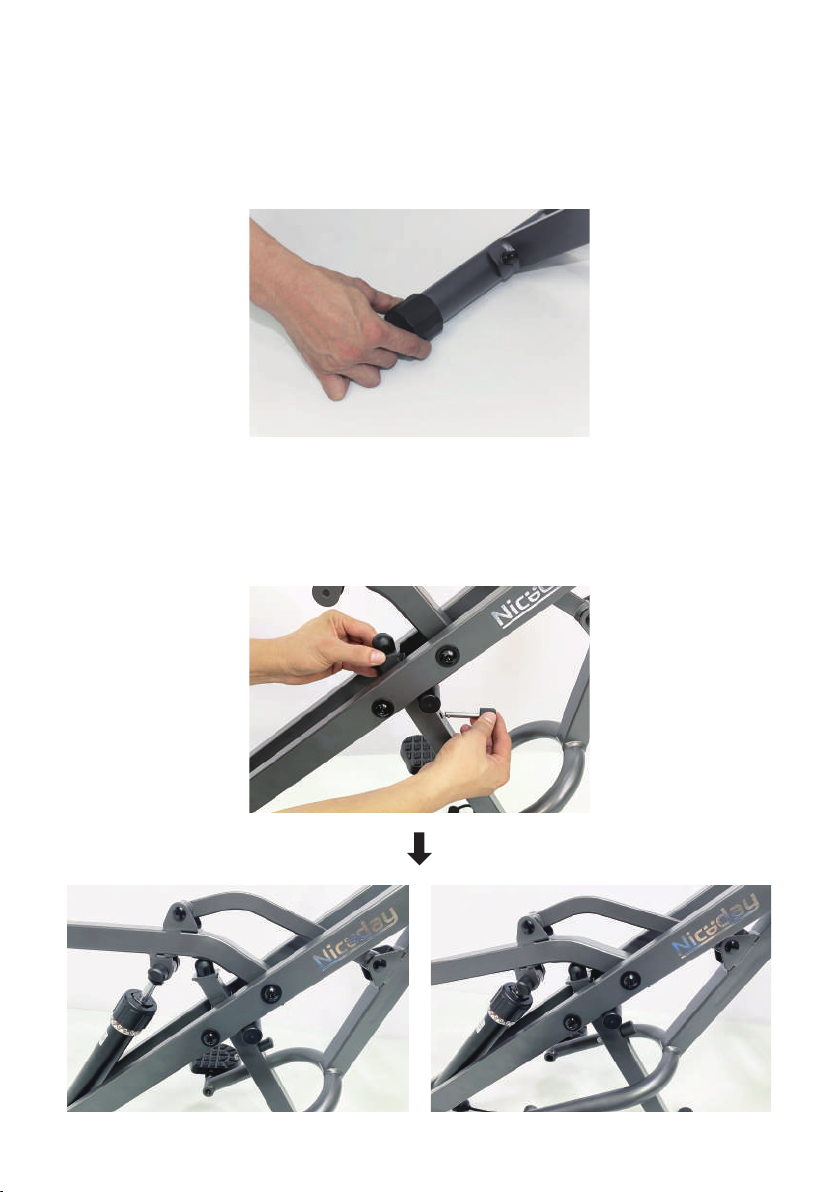
ASSEMBLY INSTRUCTIONS
First, pull out the Plug (NO.13) fixed on the Main Frame(NO. 8), then
open the Main Frame(NO. 8) as shown in the figure, and insert the
Plug (NO.13) to fix it. Take out the Screw (NO.9) and Nut (NO.5) from
the toolkit, insert the Screw (NO.9) into the main frame hole as shown
in the figure, lock the Nut (NO.5), and then use the Open-end Wrench
(B) to tighten it. Then install the hydraulic cylinder, lift the hydraulic
cylinder to the position as shown in the figure, and fix it with Pin Ball
(NO.17) & Pin (NO.18).
STEP 1
Take out the Screws (NO.14)*2, Nuts (NO.12)*2, Washers (NO.4)*2 from the toolkit. Install the Front Stabilizer
(NO.15) as shown in figure below, and fix it with Open-end Wrench (B).
STEP 2
B
BB
5
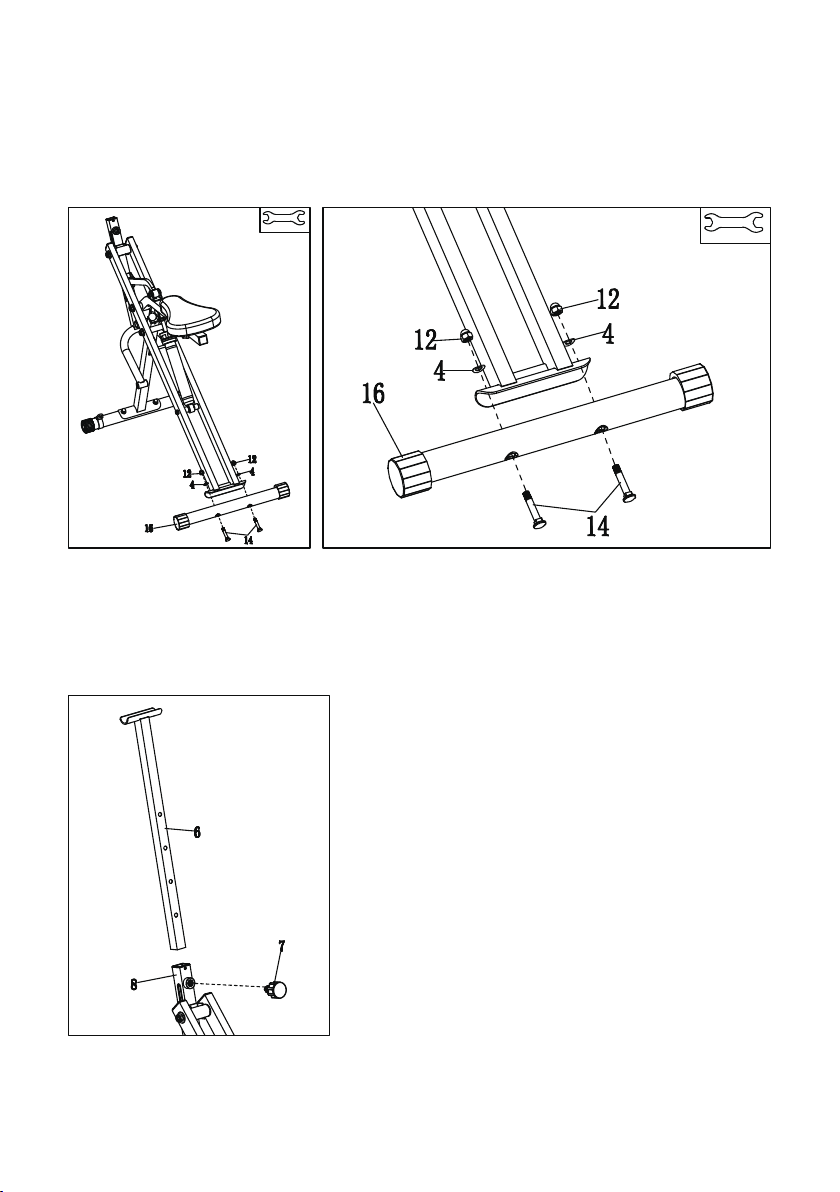
Take out the Screws (NO.14)*2, Nuts (NO.12)*2, Washers (NO.4)*2 from the toolkit. Install the Rear Stabilizer
(NO.16) as shown in figure below, and fix it with Open-end Wrench (B)
STEP 3
Take out the Handlebar Tube (NO.6), insert it into the hole of the Main Frame(NO. 8) as shown, lock the Knob
(NO.7) and tighten it.
STEP 4
BB
6
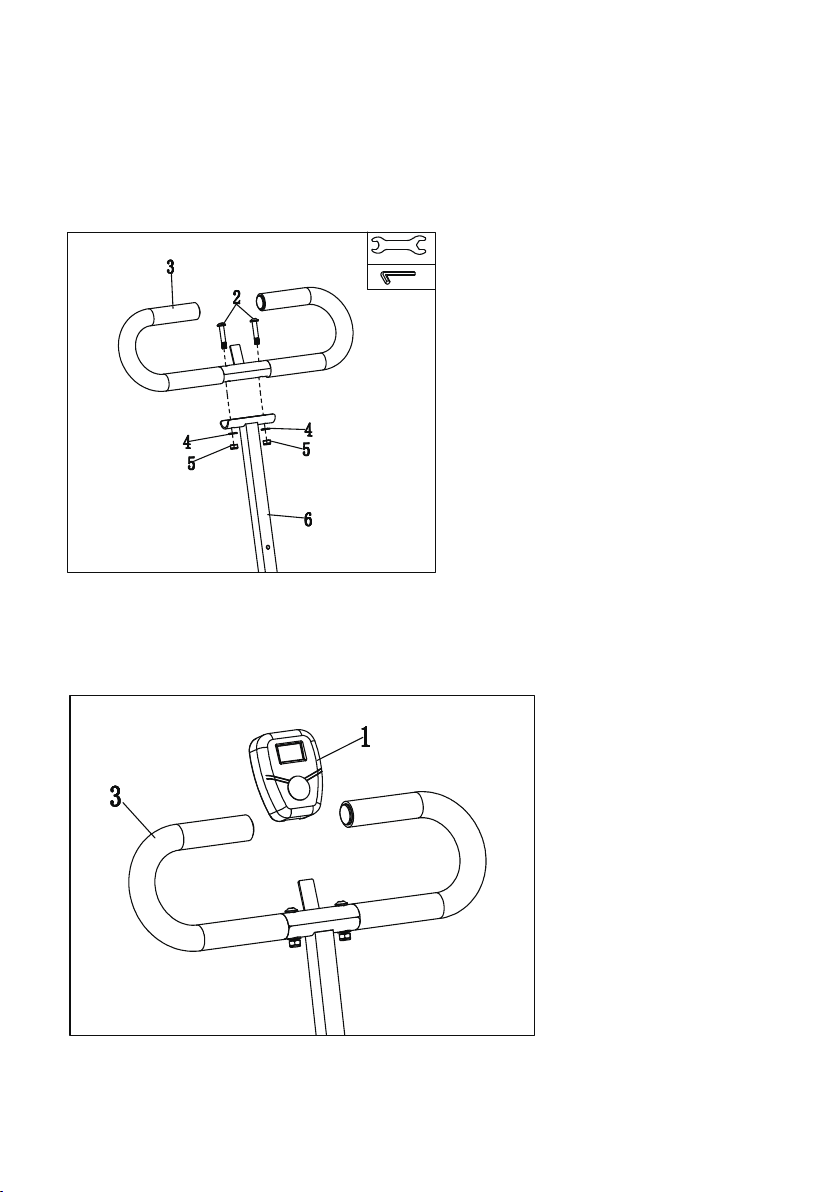
Take out the Screws (NO.2)*2, Nuts (NO.5)*2, Washers (NO.4)*2 from the toolkit. Align the holes of the
Handlebar (NO.3) and Handlebar Tube (NO.6) as shown in the figure, install them in turn, lock the Nut (NO.5),
and then use Allen Wrench (A) and Open-end Wrench (B) to lock the screws and nuts at the same time.
STEP 5
Install the Monitor (NO.1) into the monitor tab on the Handlebar (NO.3) tube as shown in the figure.
STEP 6
B
A
7
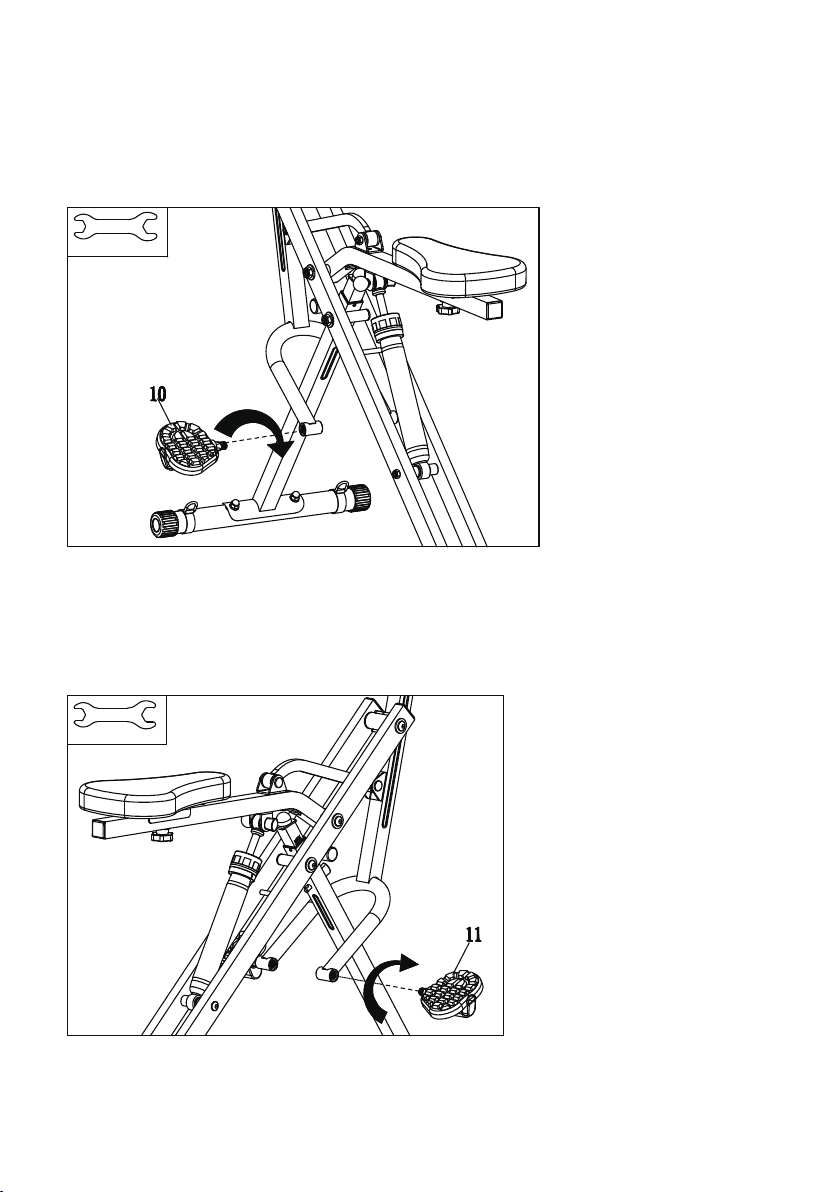
STEP 8
Attach the Right Pedal (NO.11) to the Pedal Connecting Tube and follow the direction as shown, tighten the
Right Pedal (NO.11) clockwise with Open-end Wrench (B).
STEP 7
Attach the Left Pedal (No. 10) to the Pedal Connecting Tube and follow the direction as shown to tighten the
Left Pedal (NO.10) clockwise with Open-end Wrench (B).
B
B
8
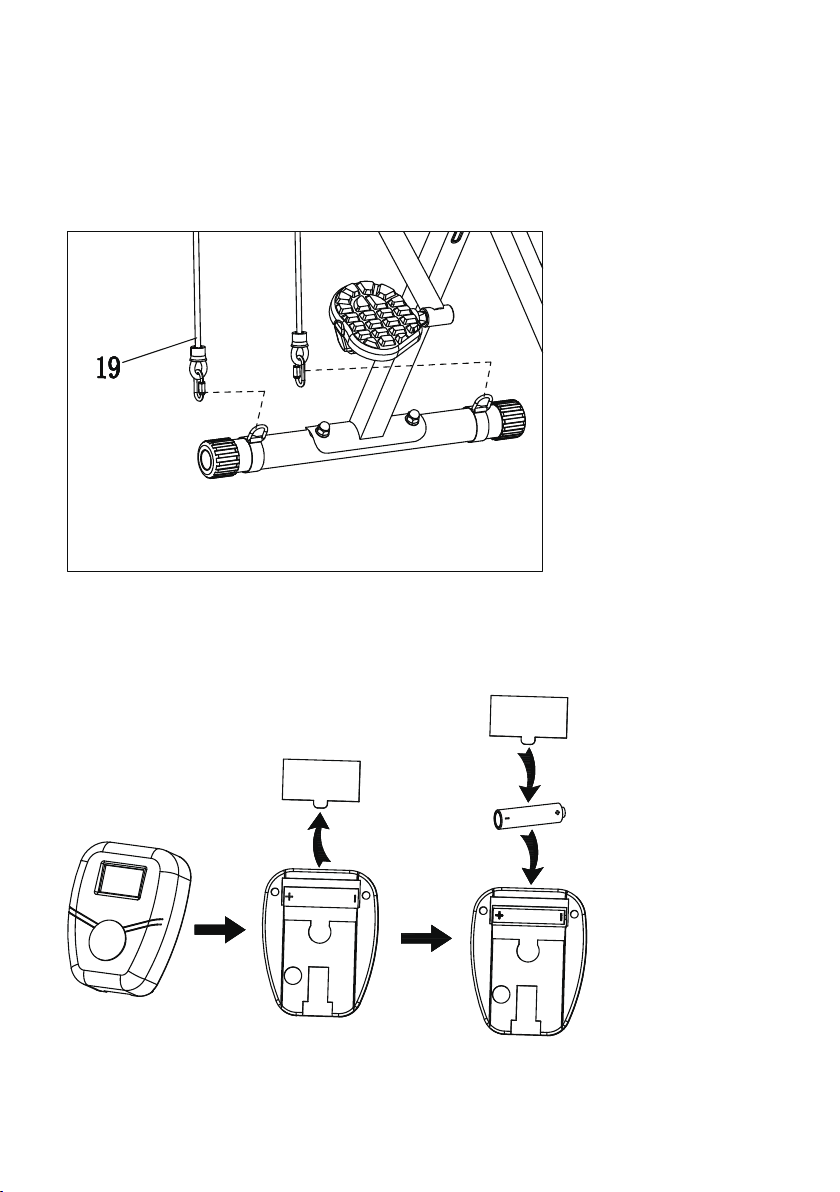
STEP 9
Install the Monitor battery as shown in the figure.
STEP 10
Install the Resistance Bands (NO.19) as shown in the figure, unscrew the Resistance Bands (NO.19) connecting
ring button, connect it with the D-type buckle of the webbing on the Front Stabilizer(NO.15), and tighten the
button, make sure it is fixed before use.
9
MACHINE USE ADJUSTMENT
If you notice that the machine is unbalanced during use, you should adjust the End Cap located on the Rear
Adjusting the balance
Stabilizer (NO.16) until the machine becomes level with the floor surface.
Lift the front support and connect the upper tube to the use gear as shown in the figure
Align the hole and insert the pull Plug (NO.13)
2: Adjusted the Seat Tube(2 position optional)
1:
10
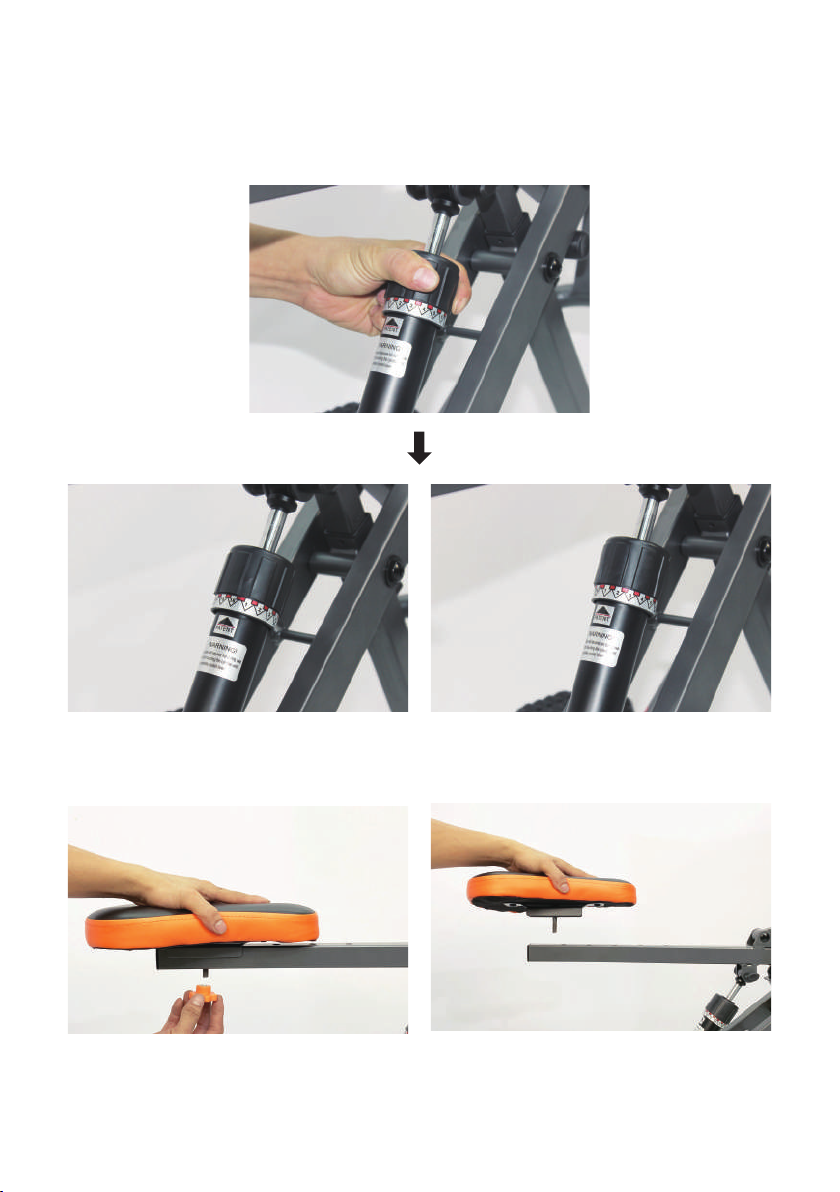
Rotate the hydraulic cylinder to the desired level.
3: Resistance adjustment(16 level optional)
Seat cushion installation, Choose the desired position Lock the knob
4: Seat position adjustment(5 position optional)
11
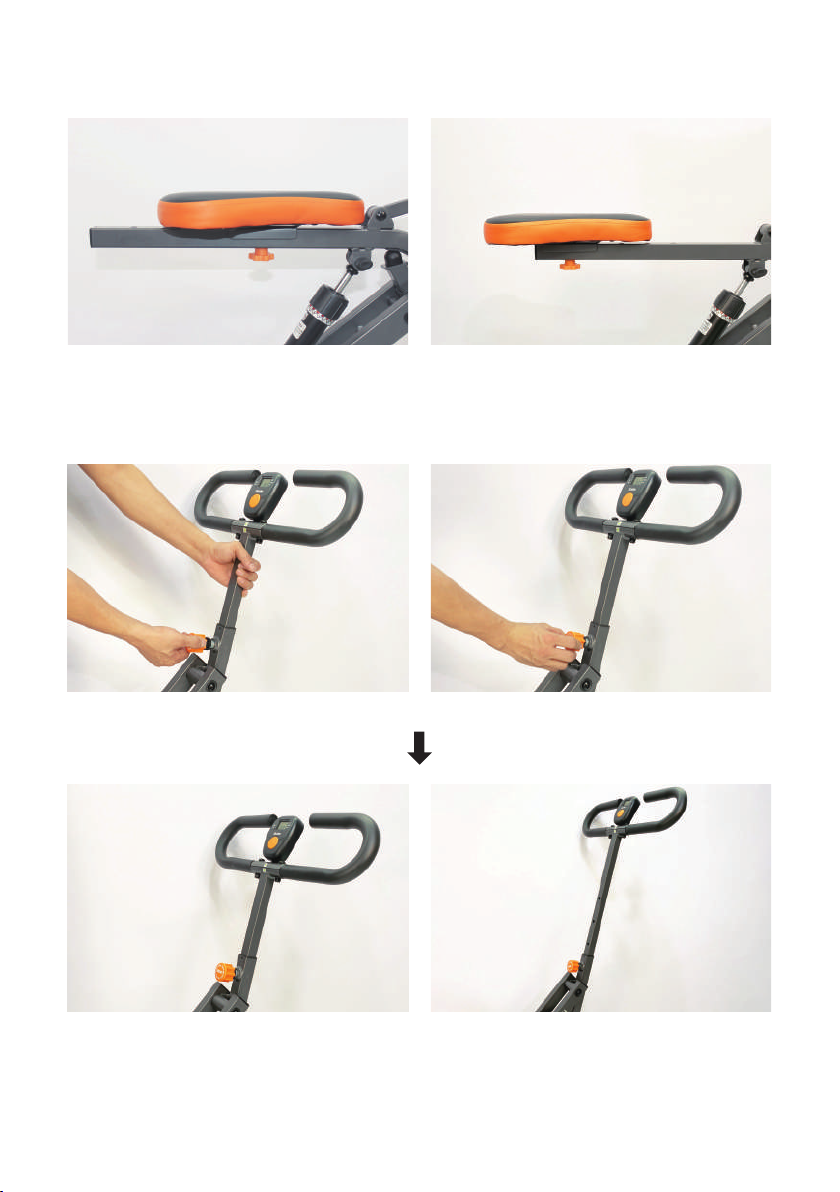
First position state Fifth position state
5: ADJUSTING THE HANDLEBAR(5 position optional)
Unscrew and pull the knob Adjust to a suitable height and lock the knob
Adjust to the lowest height Adjust to the highest height
12
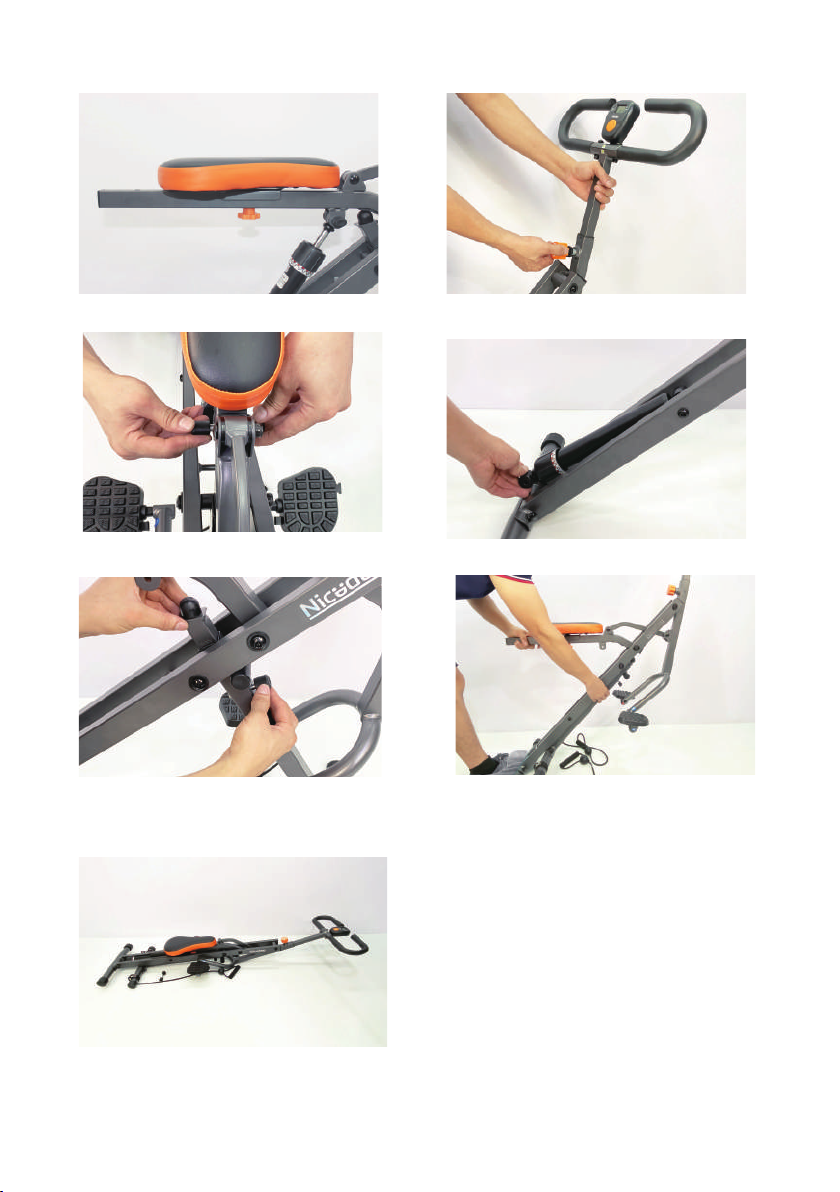
6: Folding instruction
Adjust the seat cushion to the first position
Remove the pull pin NO.18, pin ball NO.17
Adjust handlebar to lowest height, and lock it
Set hydraulic cylinder to 1 and put it down
Lift the Seat Connecting Tube, remove the Pin from
Front Connecting Tube, and lower the Seat Tube to
the lowest position. Re-insert the pin to secure.
Fold the mainframe and place it parallel to the ground.
13
The state after folding and storage is as shown in the figure.
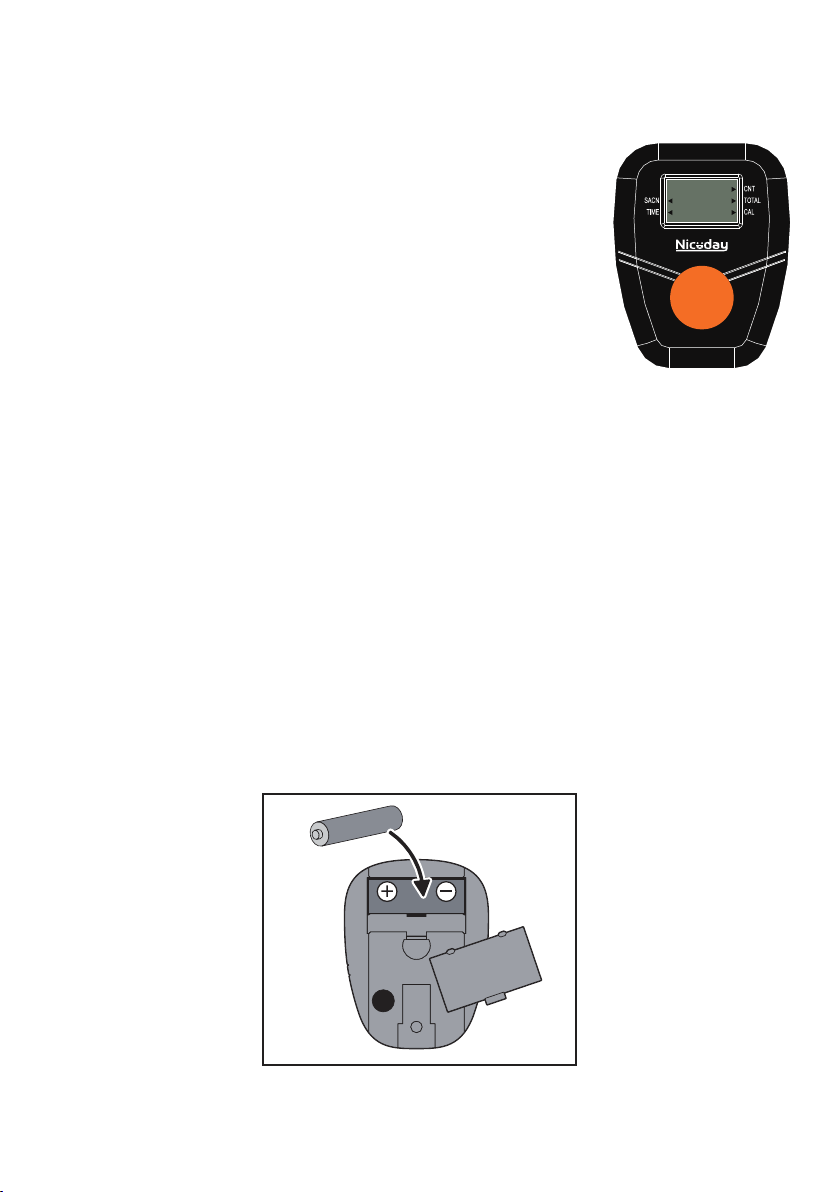
EXERCISE MONITOR
SPECIFICATIONS:
14
TIME .........................................................................00:00-99:59 MIN/SEC.
COUNT ...........................................................................0-9999 STROKES
CALORIES… .......................................................................... 0-9999 KCAL
TOTAL CNT................................................................ ….0-9999 STROKES
FUNCTIONS:
TIME: Displays the workout time while exercising.
COUNT(CNT): Accumulate the strokes while exercising.
CALORIES(CAL): Displays calories amount burned while exercising.
TOTAL CNT(TOT.CNT): Displays the total number of strokes since batteries installed.
SCAN: Automatically scan through each function between ①TIME ②CAL ③TOT.CNT.
KEY FUNCTION:
MODE/SELECT: Press to select the function you want. Hold the key for 4 seconds to reset all values.
OPERATION PROCEDURES:
AUTO ON/OFF: The meter will turn on when start exercise or when press MODE.
The meter will shut off automatically after there is no activity for 4 minutes.
NOTE
BATTERY: This meter uses one “AA” battery. If there is a problem with the meter display, replace the
battery first. Dispose old battery according to your regional guidelines
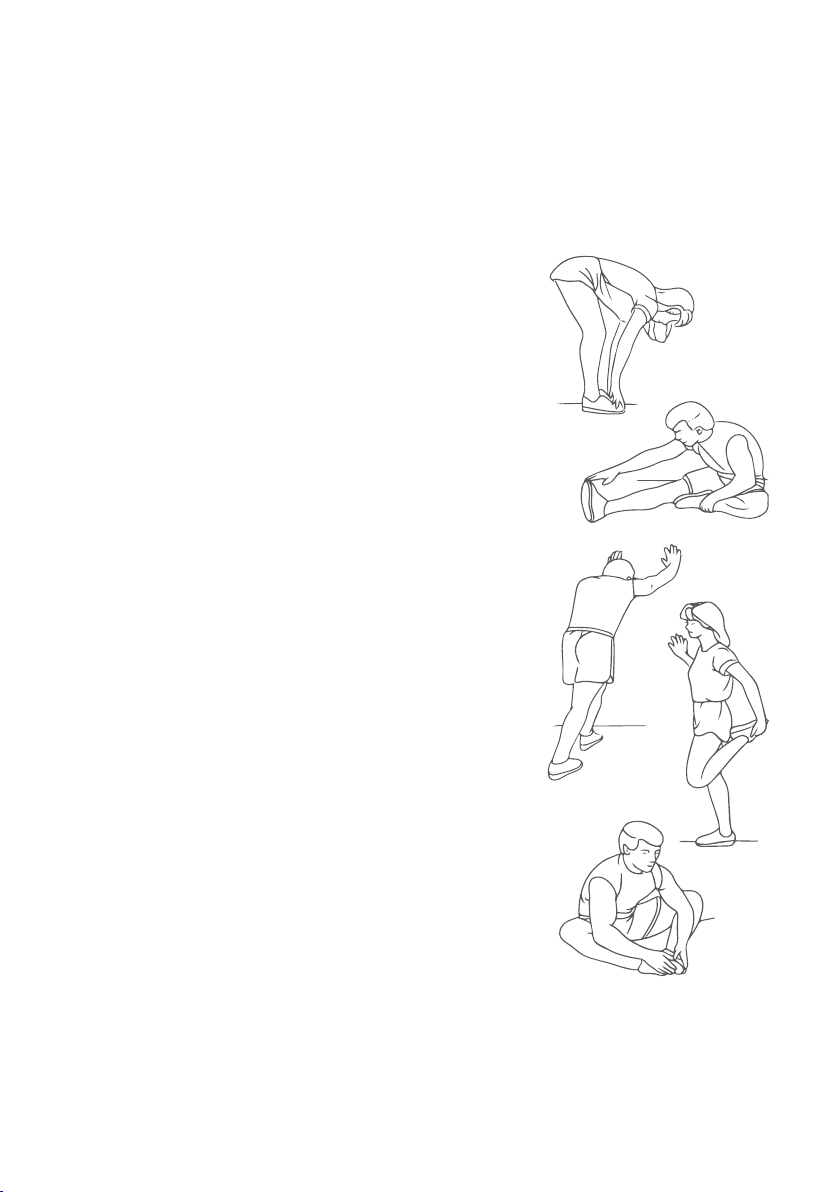
WARM UP
Before exercise, it is better Warm muscles stretch more easily, so the first of 5 ~ 10 minutes to warm up. Then in
accordance with the following methods to stop and do stretching exercises - do five times, each leg every time 10
seconds or more time to do it again after the end of the exercise.
Down the stretch: knees slightly curved, the body bent forward
slowly, so that the back and shoulders relaxed, hands try to touch
your toes. Maintain 10 to 15 seconds, and then relax. Repeat
three times to do (see Figure 1).
Hamstring stretch: sitting on the clean seat, put one leg straight.
Inward close to the other leg to make it close to the inside leg
straight. Hands try to touch the toes. Maintain 10 to 15 seconds,
and then relax. Repeat for each leg do three times (see Figure 2).
Legs and feet tendon stretch: two on the Rotary wall or tree
stand, one foot in the post. Keep legs straight and heel to tilt the
direction of the wall or tree. Maintain 10 to 15 seconds, and then
relax. Repeat for each leg do three times (see Figure 3).
Quadriceps stretch: the left hand wall or table Cu master balance,
and then stretched his right hand back to seize the right foot to
the buttocks with slowly pull until you feel the front thigh muscles
tense. Maintain 10 to 15 seconds, then relax. Repeat for each leg
to do three times (see Figure 4).
Sartorial muscle (inner thigh muscles) stretch: Foot In contrast,
the knee outward to sit down. The hands grasp the feet to the
groin pull. Maintain 10 to 15 seconds, and then relax. Repeat
three times (see Figure 5)
1
2
3
4
5
15
Table of contents
Popular Fitness Equipment manuals by other brands


Life Fitness
Life Fitness INTEGRITY SERIES M051-00K61-A137 Operation manual

Life Span
Life Span CORTEX PR-3 user manual

Life Fitness
Life Fitness WATTRATE TFT COMPUTER 2.0 manual

Active Ideas
Active Ideas HOVR quick start guide

Pro-Form
Pro-Form CROSSWALK PERFORMANCE owner's manual

Exerfly
Exerfly PORTABLE instruction manual


