Nierbo UT300 User manual

USER’S GUIDE

User Manual of Digital Projector

1
FCC Statement
The equipment has been verified upon test to meet the requirements for restrictions on grade-B
digital equipment in Part 15 of FCC Rules. Such restrictions aim to provide reasonable protection in
the installation in residential area to prevent harmful interference. The failure of installation and use
by the instructions may cause harmful interference to wireless communication. However, the
Company does not guarantee no interference in particular installation conditions. If the equipment
do imposes harmful interference on radio or television receiving (determined through shutdown and
then starting of the equipment with doubt), it is suggested that users try to take one or several
measures as below to eliminate the interference:
•Adjust the direction or position of receiving antenna
•Increase the distance between the equipment and the receiver
•Connect the equipment and the received with different circuit sockets
•Consult the distributor or experienced professional radio/television technicians for help.
The equipment meets the requirements of Part 15 of FCC Rules. The operation meets the two
conditions as below:
1. The equipment shall not cause harmful interference.
2. The equipment shall be capable of bearing any interference, including the interference which may
cause unexpected operation.

2
Safety Instructions
Before the use of the projector, please read and take good care of all the guidance and instructions
for future reference.
1. Instructions for reading guidance
Please read all the guidance and instructions for safety and use before using the equipment.
2. Notice and warning
Please follow all the notices and warnings in the guidance and instructions for use.
3. Cleaning
Pull out power plug of the projector from wall-mounted power socket before cleaning. Wipe
projector shell with wet cloth. Please do not use liquid or spray detergent.
4. Accessory
Do not put the project on unstable cart, rack or desk. The product may drop down to cause
serious damage.
Put plastic wrappage (of the projector, accessories and optional parts) out of reach by children
to prevent death by suffocation. Please pay special attention for infants.
5. Ventilation
The projector is equipped with intake and exhaust holes. Please do not block the openings or
put any
article near the holes to prevent possible internal heat accumulation, which may cause picture
quality degradation or damage to the projector.
6. Power supply
Please confirm that working pressure of the projector is the same with the voltage of your local
power supply.
7. Repair
Please do not try to repair the projector by yourself. Do entrust professional technicians for
repair.
8. Component replacement.
When necessary to replace components, please do use the components for replacement
designated by the manufacturer. Unauthorized replacement may cause fire accident, electric
shock or other hazards.
9. Steam condensation.
Do not use the projector immediately after moving the projector from a cold place to a warm
place. Moisture may condense at the lens and internal key components in case the projector is
in temperature change. To prevent damage to the projector, please wait for at least 2h before
use in case of sharp or sudden temperature change.
The projector only applies to safe use below altitude 2,000m, and the use above altitude
2,000m may cause safety hazard.

3
Notices for AC Power Wire
AC power wire must meet relevant requirements of the country (region) where you use the project.
Please refer to the figure below to confirm plug type of the AC power wire used and ensure the use
of correct AC power wire. If attached AC power wire is not suitable for the AC power socket used,
please consult the distributor. The projector is equipped with grounded AC power plug. Please
ensure that the plug can be inserted into power socket. Please do not damage safety functions of the
grounded plug. To prevent signal interference caused by voltage fluctuation, it is strongly suggested
that you equip grounded AC power plug for video source equipment.
Australia and Mainland China
U.S.A. and Canada
Continental Europe
U.K.
Grounding
Grounding
Grounding
Grounding

4
Content
Introduction............................................................................................... 5
Projector Characteristics....................................................................................................................5
Projector Overview............................................................................................................................6
Usage.......................................................................................................... 7
Projector.............................................................................................................................................7
Remote controller ..............................................................................................................................8
Battery Installation...........................................................................................................................10
Remote Controller Operation...........................................................................................................11
Connection
................................................................................................ 12
Connection with Computer..............................................................................................................13
Connection with Display .................................................................................................................14
Connection with Video Source Equipment .....................................................................................15
Connection with HDMI Signal Source Equipment ...................................................................15
Connection with Component Video Signal Source Equipment.......................................................16
Operation
.................................................................................................. 17
Starting the Projector.......................................................................................................................17
Shutting Down the Projector............................................................................................................17
Adjusting Projection Angle .............................................................................................................18
Fine adjustment of image definition................................................................................................18
Adjusting Projection Image Size .....................................................................................................19
Menu Operation...............................................................................................................................20
Maintenance
............................................................................................. 27
Lens Cleaning..................................................................................................................................27
Projector Shell Cleaning..................................................................................................................27
Bulb Replacement............................................................................................................................28
Specifications........................................................................................... 31
Overall dimension............................................................................................................................32
Appendix.................................................................................................. 33
LED indicator message....................................................................................................................33
Compatible Mode ............................................................................................................................34
Troubleshooting...............................................................................................................................35
RS-232 Order and Configuration.....................................................................................................36
IR Control Table..............................................................................................................................39
List of Names and Contents of Toxic and Harmful Substances or Elements in the Product ..........41

5
Introduction
Projector Characteristics
The projector is integrated with high-performance optical-engine projection technology and user-
friendly design to provide high reliability and usability.
The projector has the following characteristics:
•2D trapezoidal distortion correction function, which facilitates both horizontal and
vertical trapezoidal distortion correction, enables the projection of rectangular
image from any angle
•Corner adjustment function enables the adjustment of four corners of projection image
•SmartEco™ ( smart and economical) saves energy consumption greatly
•Wall color correction function enables projection on the surface with different preset
colors
•Quick automatic search increases signal detection speed
•3D color management enables color adjustment by personal preference
•Optional quick cooling function shortens projector cooling time
•Demonstration timer facilitates control of demonstration time
•One-key automatic adjustment enables the display of optimal image quality
•Compatible with component HDTV (YPbPr)
•Power consumption is below 0.5W in standby mode
Notes
•
Any change of information in the Manual will not be further noticed.
•It is prohibited to copy, transfer or photocopy all or any part of the document without explicit
written consent.
•

6
Projector Overview
Front overview
1. External control panel
2. Bulb cover
3. Focusing ring
4. Quick support adjusting button
5. Projection lens
6. Front infrared remote-control sensor
7. Safety rod
8. Vent hole (intake hole)
9. Loudspeaker
10. Microphone input jack
11. Audio output jack
12. Audio input jack
13. RGB (PC)/ component video (YPbPr/
YCbCr) signal input port
14. RGB signal output port
15. HDMI input port
16. RS-232 control port
17. USB mini-B interface
18. Kensington anti-theft lock slot
19. Vent hole (exhaust hole)
20. Rear adjustable support
21. Quick-release adjustable support
22. Ceiling mounting hole
23. AC power socket
Front /top
1
3
2
4
9
8
7
6
5
Rear /bottom
11
12
13 14 15
16
17
18
19
10
23
22
21
20

7
Usage
Projector
1. Focusing ring. Adjusting focal length of
projection image.
2. Temperature indicator
The indicator will turn red in case of too high
projector temperature.
3. MENU/EXIT
Opening on-screen display (OSD) menu.
Returning to previous OSD menu, exiting
and saving menu setting.
4. Power/power indicator
Indicating bulb state. In case of bulb
problems
Projector switching between standby mode
and operating mode. The indicator is on or
blinks when the projector is in operation.
5. Eco Blank
Press Eco Blank to close the image for a
while to lower bulb power by 70%.
6. Trapezoidal distortion correction/arrow key
( / up, / down)
Displaying 2D trapezoidal distortion
correction page and adjusting vertical
trapezoidal distortion correction value.
The indicator is turned on or blinks.
7. MODE/ENTER
Selecting available image setting
mode. Activating selected on-screen
display (OSD) menu.
8. SOURCE
Displaying signal source selection
bar.
9. Trapezoidal distortion correction
arrow key ( / left, / right)
Displaying 2D trapezoidal
distortion correction page and
adjusting horizontal trapezoidal
distortion correction value.
In on-screen display (OSD) menu,
#7 and #10 keys serve as direction
arrows to enable the selection of
requiredmenu item and adjustment.
10. Auto
Determining optimal image timing
sequence automatically for the
imagedisplayed.
11. Bulb indicator

9
Remote controller
1. Power supply
Connecting or disconnecting power supply of the projector.
2. Menu
Opening OSD menu.
3. Four-direction selection key / / /
Select function items or adjust item values with up, down, left and right keys.
4. Select Selecting entry items.
5. Signal source
Displaying input signal menu.
6. PC
Switching PC input signal.
7. HDMI
Switching HDMI input signal.
8. Trapezoidal correction +/-
Manual correction of trapezoidal distortion caused by projection angle.
9. Zoom +/-
Zooming in or out the projection image.

9
10. 4:3/16:9
Press the key to switch image ratio between 4:3 and 16:9.
11. Freeze
Press the key to suspend on-screen image, and press the key again to cancel image freezing.
Press again to cancel the display frozen function.
12. Mode
Selecting set mode for the image.
13. 3D
Enabling or disabling 3D function.
14. Exit
Exiting from image setting menu.
15. Automatic
Automatic determination of frequency of displayed image.
16. Volume
Adjusting volume.
17. Mute
Closing sound temporarily.
18. AV mute
Closing AV sound temporarily. Press the AV mute again to enable sound and image output;
19. Blank
Hiding on-screen image.

10
Battery Installation
1. Open battery cover in the direction in the figure.
2. Install batteries in battery case by the figure.
3. Close battery cover to the original position.
Caution
•Incorrect battery type in battery replacement indicates explosion hazard.
•Dispose waste battery by relevant guidance and instructions.
•Ensure correct direction of positive and negative electrodes in battery installation.
Note
•Put the battery out of reach by children.
•Take out the batteries in remote controller in case remote controller is not in use for a long term.
•Please do not charge the battery or put the battery in fire or water.
•Please do not discard and dispose waste battery together with household garbage. Dispose waste battery by
local regulations.
•Improper battery replacement indicates explosion hazard. Do only use the battery of the same type
recommended by the manufacturer in battery replacement.
•Store the battery in cool and dry place away from light, and keep the battery away from fire and water.
•In case of battery leakage, wipe off leakage liquid, and then replace with new battery. In case leakage
liquid is attached to the body or clothes, wash with water promptly.

11
Remote Controller Operation
Point remote controller to infrared remote control inductor, and press one button. Operating the
projector from the front
Note
•
Remote controller may be out of service when remote control inductor is exposed in sunlight, fluorescent
lamp and other high-intensity light sources.
•Operate remote controller at the place where remote control inductor can be seen.
•Please do not shake or drop remote controller.
•Store remote controller in cool and dry place.
•Please do not splash water onto remote controller or put humid articles on remote controller.
•Please do not disassemble remote controller.
12
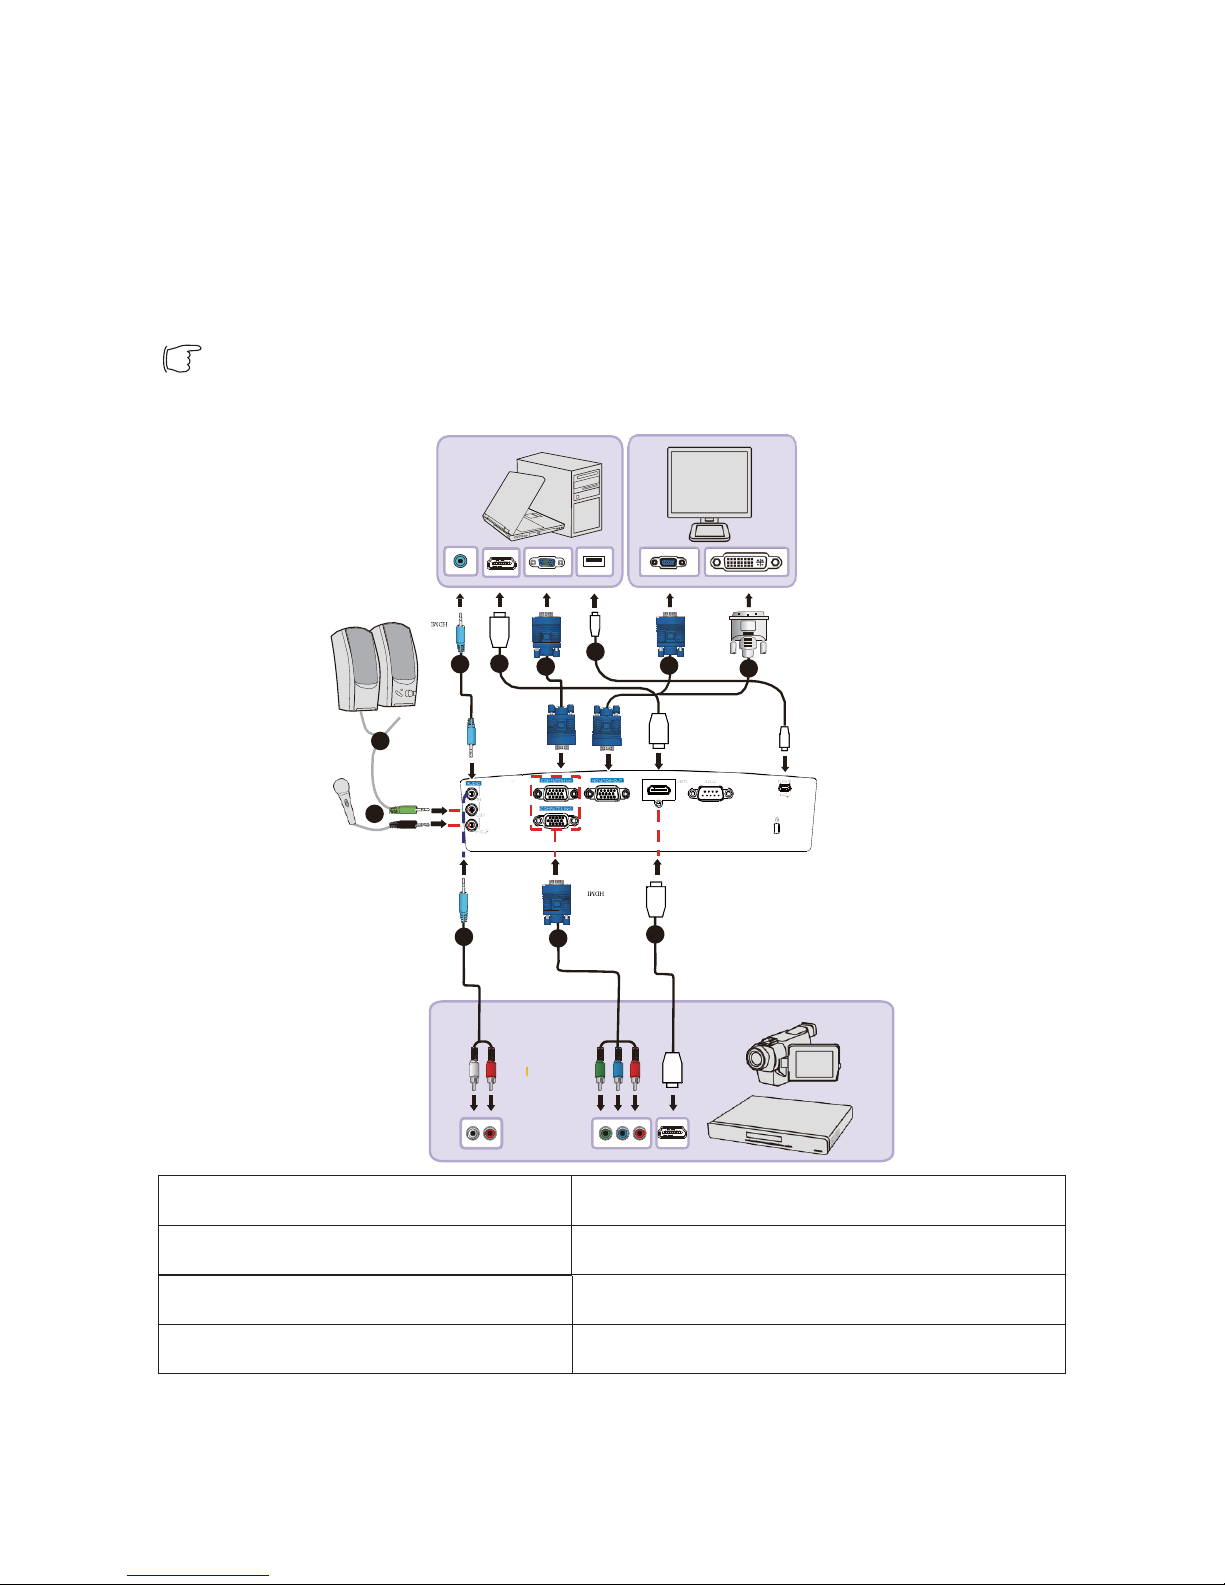
Connection
Please confirm the following before connecting signal source with the projector:
1. Shut down all the equipment before any connection.
2. Use correct signal wire for each signal source.
3. Ensure that signal wire is inserted firmly.
•In the connection as below, some cables may not be included in the package of the
projector, you may buy needed cables in on-line store.
1. Audio cable
5. USB cable (mini-B to A )
2. Microphone 3.5 mini jack cable
6. VGA - DVI-A cable
3. HDMI cable
7. Component video - VGA (DSub) adapter cable
4. VGA cable
2
5
1 3
4
4
6
HDMI
1
2
1
7
3
HDMI
USB

13
Connection with Computer or Display
Connection with Computer
The projector can be connected not only with IBM® compatible computer, but also
Macintosh® computer. Mac adapter is required for the connection with Macintosh
computer in old version. Connection of the project with a laptop or desk computer (with
VGA):
1. Connect one end of attached VGA cable with D-Sub output port of the computer.
2. Connect the other end of VGA cable with COMPUTER input-1 or COMPUTER
input-2 signal input port of the projector.
3. To use the loudspeaker of the projector in demonstration, please prepare a proper
audio cable, connect one end of the audio cable with audio output jack of the
computer, and connect the other end with audio input jack of the projector. For the
connection with audio output signal from the computer, please balance volume
adjusting bar to obtain optimal sound effect.
4. Use another proper audio cable when necessary; connect one end with audio output
jack of the projector, and connect the other end with external loudspeaker (not
provided).
Control audio through on-screen display (OSD) menu of the projector after connection.
Built-in loudspeaker will become mute upon connection with audio output jack.
Connection of the projector with a laptop or desk computer (with HDMI):
1. Prepare a HDMI cable, and connect one end with HDMI port of the computer.
2. Connect the other end of the cable with HDMI port of the projector.
•External video port of many laptops is not enabled in the connection with the projector.
Generally, press FN + F3 orCRT/LCD to enable/disable external display. Find the
function key marked with CRT/LCD or the function key with display symbol from the
laptop. Press FN and the function key at the same time. Please refer to laptop documents
to find out other key combinations.

14
Connection with Display
To realize simulcast of demonstration contents on both the display and the screen, connect
display output signal output port of the projector with external display by the following
instructions:
Connection of the projector with a display:
1. Connect the projector with a computer, as shown in "Connection with Computer" in page
13.
2. Prepare a proper VGA cable (only one cable provided), and connect one end with D-Sub
input port of video display.
Please prepare a VGA - DVI-A cable in case the display has DVI input port, and connect one
end of DVI with DVI input port of video display.
3. Connect the other end of the cable with display output port of the projector.
•Only when input signal is from COMPUTER-1 or COMPUTER-2 port, the output signal
of MONITOR-OUT port can be in service. When the projector is powered on, the output
signal from display output port depends on the input signal from computer input-1 or
computer input-2 ports.
•To use the connection mode with the projector in standby mode, ensure that display output
function in system setting: advanced >standby setting menu has been enabled.

15
Connection with Video Source Equipment
Connect the projector with video signal source equipment by one of the above connection methods,
but each method provides different video quality. Please select matching connection mode from the
ports, which are equipped for both the projector and video source equipment, as shown below:
Terminal name
Interface appearance
Reference
Image
quality
HDMI
HDMII
"Connection with HDMI signal
source equipment” in page 15
Optimal
Component
video
Computer input -1/
Computer input -2
"Connection with component
video signal source equipment"
in page 16
Good
Connection with HDMI Signal Source Equipment
The projector has one HDMI input port to enable connection with HDMI source equipment,
such as DVD player, DTV tuner, display or laptop.
HDMI (High-Definition Multimedia Interface) supports the transmission of uncompressed
video data between compatible equipment, such as DTV tuner, DVD player and display
through a cable. HDMI can provide pure digital visual and audio experience.
Inspect video signal source equipment to confirm whether the equipment has a set of available
HDMI output port not in use:
•If so, please continue the process.
•If not, please re-assess the method for equipment connection.
Connection of the projector with HDMI signal source equipment:
1. Prepare a HDMI cable, and connect one end with HDMI output port of HDMI signal
source equipment.
2. Connect the other end of the cable with HDMI signal input port of the projector. After
connection, control video through on-screen display (OSD) menu of the projector.
•In case of no display of selected video image after starting the projector and selecting
correct video source, please check whether video source equipment has been started and is
in correct operation. Besides, please check whether signal cable is connected correctly.
•In case of color display error of projection image (the condition is rare) after connecting
the projector with DVD player through HDMI input of the projector, please change color
space to YUV.

16
Connection with Component Video Signal Source Equipment
Check video signal source equipment to confirm whether the equipment has a set of available
component video output port not in use:
•If so, please continue the process.
•If not, please re-assess the method for equipment connection.
Connection of the projector with component video signal source equipment:
1. Prepare a component video - VGA (D-Sub) adapter cable, and connect the end with 3
RCA connectors with component video output port of video signal source equipment.
Match the plug color with port color: green to green, blue to blue, and red to red.
2. Connect the other end of component video -VGA (D-Sub) adapter cable (with one D-
Sub connector) with computer input -1 or computer input -2 port of the projector.
3. To use the loudspeaker of the projector in demonstration, please prepare a proper audio
cable, connect one end with audio output jack of the equipment, and connect the other end
with audio (left/right) jack of the projector.
4. Use another proper audio cable when necessary, connect one end with audio output jack of
the projector, and connect the other end with external loudspeaker (not provided).
After connection, control audio through on-screen display (OSD) menu of the projector. Built-
in loudspeaker will become mute upon connection with audio output jack.
In case of no display of selected video image after starting the projector and selecting correct
video source, please check whether video source equipment has been started and is in correct
operation. Besides, please check whether signal cable is connected correctly.

17
Operation
Starting the Projector
1. Insert both ends of power wire into the projector and power
socket respectively. Check whether power indicator of the
projector is in orange after powering on the projector.
•To avoid potential hazard (such as electric shock and fire
accident), please do only use original accessories (such as
power wire) of the equipment.
•The projector will be started automatically after the projector
is connected with power wire and is powered on in case direct starting function is activated
in System Setting: Basic >Operation Setting menu.
•The projector will be started automatically upon detection of VGA signal in case signal
starting function is activated in System Setting: Basic >Operation Setting menu.
2. Press I Power on the projector or power button on remote controller to start the projector.
Power supply starting the projector. When the projector is
connected with power supply,
power indicator will blink at first, and will be in green
stably afterwards.
Starting process is about 10s to 20s. Starting logo will be
displayed in late starting stage. Adjust image definition
with focusing ring when necessary.
In case the projector is not cooled completely from previous operation, cooling fan will be in
operation for about 90s before the bulb of the projector is turned on.
Shutting Down the Projector
1. Press Power on the projector. A confirmation message will
be displayed for prompt. The message will disappear in case of
no response in several seconds. Please press Power Supply on
remote controller to shut down the projector.
2. Press I Power on the projector afterwards. Power. The indicator
will blink in orange, and the bulb of the projector will be off,
and the fan will continue to be in operation to cool the projector.
•In case the projector is not shut down correctly, to protect the bulb, the fan will be in operation for
several minutes for cooling in restarting of the projector. Press Power Supply again to start the
projector after the fan is out of operation and power indicator turns orange.
•Actual service life of the bulb differs from environmental conditions and service
conditions.
Powe
r
Menu
Canc
el
Sele
ct
Auto
Signal
Source
Tra
pez
oid
al
cor
rec
tio
n
Zoo
m
Vol
um
e
Fr
e
ez
e
M
ut
e
Mo
de
Blank AV Mute

18
Adjusting Projection Angle
The projector is equipped with a quick-adjusting support and a rear adjustable support. These
adjustable supports enable the adjustment of image height and projection angle. To adjust the
projector:
1. Press quick support adjusting button to lift front part of the
projector. Release quick support adjusting button after
adjusting image position to lock the support in place.
2. Rotate rear adjustable support to perform fine adjustment of
horizontal angle.
To retract the support, lift the projector and press quick support adjusting button, and then
lower the projector slowly. Rotate rear adjustable support in reversed direction.
The projector is equipped with lifting support for the adjustment of image height. Rotate the
lifting support for fine adjustment of image height.
Fine adjustment of image definition
Make the image clearer with focusing ring.
1
2
Table of contents


