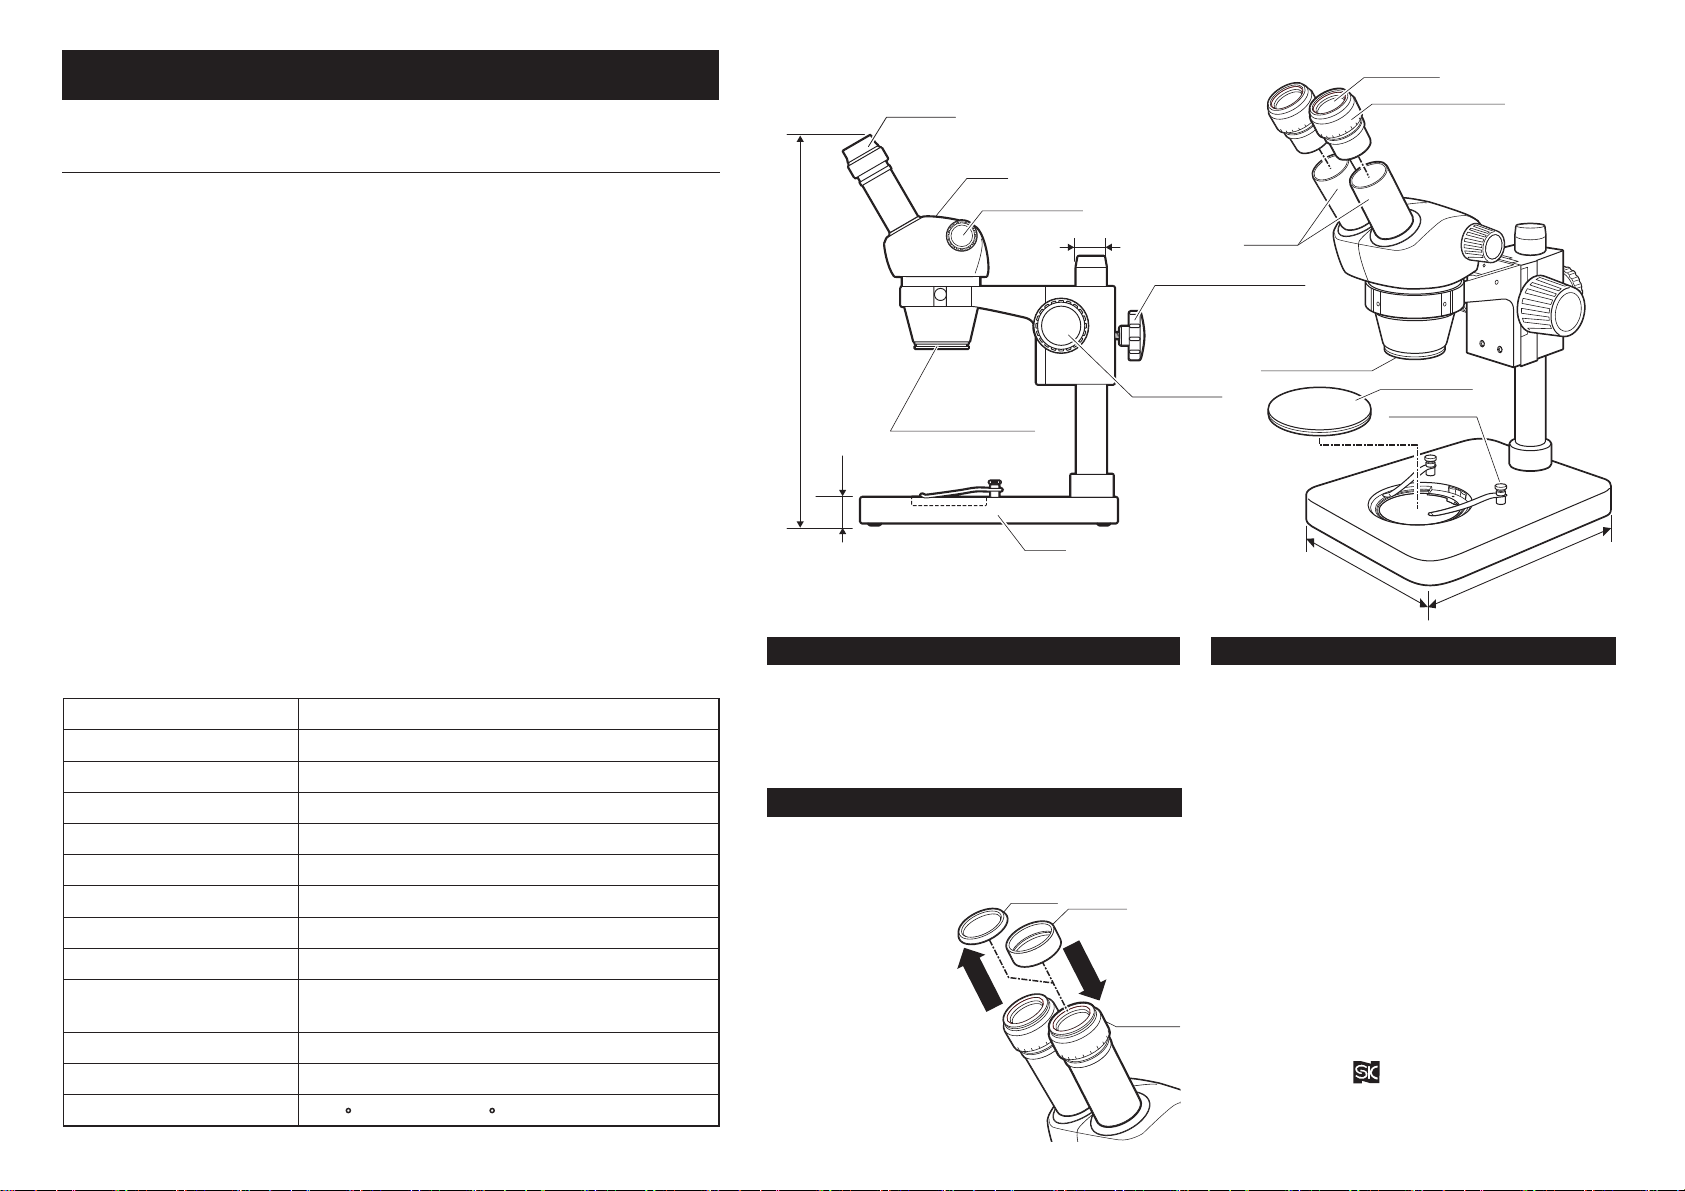
manuals.online logo
Brands
  1. Home
  2. •
  3. Brands
  4. •
  5. Niigata seiki
  6. •
  7. Microscope
  8. •
  9. Niigata seiki XZ-45N User manual

Niigata seiki XZ-45N User manual

■仕様10〜45×1〜4.5×(ズーム比1:4.5)WF10×(視野数20
mm
)97
mm
 60°鏡体上下動式ポールスタンド方式㋡95
mm
黒/白アクリル板±5ディオプターリング照明装置(別売)取付可能照明装置取付部径:㋡53
mm
L255×W200×H25
mm
約3.6kg・アイシェード2個 ・保護カバー ベース接眼レンズスリーブ本体固定ノブズームハンドルアイシェード鏡体視度調整環ステージプレート対物レンズクレンメル■各部の名称と組み立て方
270〜440
mm
(上下動式)25
mm
㋡32
mm
200
mm
255
mm
総合倍率対物レンズ接眼レンズ作動距離接眼部傾斜角焦点調整スタンドステージプレート視度調整範囲照    明ベ ー ス質    量付属品焦点合わせハンドルリング照明装置取付部(㋡53
mm
)■使用方法1.試料のセット3.ピント調整・視度調整①試料をステージプレートの中央にセットします。②試料を必要に応じ、クレンメルで押さえます。2.アイシェードの取り付け※メガネ着用の場合は、アイシェードを使用せずに、ゴムを取り付けたまま観察します。①左右接眼レンズに取り付けてあるゴムを取り外します。②付属のアイシェードを図のように左右の接眼レンズに取り付けます。※アイシェード内側の凸部を、接眼レンズの溝に合わせ、取り付けます。①ズームハンドルを回し、最高倍率にします。②右眼で右接眼レンズを覗き、焦点合わせハンドルを調整し試料に合わせます。③ズームハンドルを回し、最低倍率にします。④ピントが外れた場合、右視度調整環でピントを合わせます。⑤ズームハンドルを回して、再度最高倍率にします。もしピントが外れている場合②〜④の操作を繰り返します。この操作でより精度の高い調整ができます。⑥左接眼レンズも同様に、左視度調整環を回して①〜⑤の調整を行ってください。220420E1134
-
Q1
発売元
〒955-0055
新潟県三条市塚野目5丁目3番14号
(0256)33-5502(代)FAX(0256)33-5528
URL http://www.niigataseiki.co.jp
■ご使用にあたって
STEREO MICROSCOPE
実体顕微鏡ズーム式XZ
-
45N
この度は、実体顕微鏡ズーム式XZ-45Nをお買い上げ頂きまして、誠にありがとうございます。ご使用に際し、本取扱説明書を最後までお読みいただき、正しい使い方で末長く御愛用くださいますようお願い申し上げます。●本器は精密機器ですので、操作中や持ち運びのときに、本体への衝撃や過大な圧力を加えないように、取り扱いには十分注意をしてください。●振動の多い場所、直射日光のあたる場所やほこりの多い場所、高温になる場所は避け、温度変化および湿気の少ないところを選んでください。●レンズ面に汚れ、指紋などをつけないようご注意ください。●
レンズ類の清掃は、レンズ専用布やガーゼで軽く拭く程度にしてください。
●左右のズームハンドルを互いに逆方向にねじったりしないでください。故障の原因となります。●使用しないときは本器に付属の保護カバーなどをし、湿気が少なく、カビが発生しにくい場所に保管してください。
取り付ける
取り外す
ゴム
アイシェード凸部接眼レンズ溝
Eyepiece
Sleeve
Diopter Adj. Ring
Stage Plate
Objective Lens
Stage Clips
200
mm
255
mm
①Rotate the Zoom Control to set for highest
magnification.
②
With right eye, look through the right eyepiece
and adjust the focus using the Focus Knob.
③Rotate the Zoom Control for lowest
magnification.
④Using the Right Diopter Adj.Ring, adjust the
focus if required.
⑤Now rotate the Zoom Control back to highest
magnification and check the focus.
Repeat steps ②to ④to achieve the best
focus accuracy.
⑥Look through the left Eyepiece with the left
eye and adjust focus using the Left Diopter
Adj.Ring similar to steps ①to ⑤.
3.
Focus Adjustment・Diopter Adjustment
①Place the sample in the center of the Stage
Plate.
②If required, use Stage Clips to hold sample in
place.
1. Sample Placement
■OPERATION
■PART IDENTIFICATION and ASSEMBLY
10〜45×1〜4.5×(Zoom Ratio 1:4.5)WF10×(20
mm
Field of View
)97
mm
 60°Movable Body
Pole Type
ȭ95
mm
Black/White Acrylic
±5Diopter
Optional Ring Light (sold separately)
Mounting diameter:ȭ53
mm
L255×W200×H25
mm
approx.3.6kg
・Eyecups…2 ・Protective Cover…1
Magnification
Objective Lens
Eyepiece Lens
Working Distance
Eyepiece Angle
Focus Adjustment
Stand
Stage Plate
Diopter Adj. Range
Illumination
Base Dimensions
Weight
Accessories
■SPECIFICATIONS
●This is a precision instrument – Handle With Care. Use caution to avoid
shock or excessive forces on instrument when in use or transport.
●Avoid direct sunlight or areas with high temperatures or high levels of
dust.
Keep in location where temperate and humidity are stable.
●Keep lens surface clean from dirt and fingerprints.
●Clean the lens gently with lens cleaning cloth or soft cotton cloth.
●Do not turn the left and right Zoom Controls in opposite directions; this
will damage the instrument.
●
When not in use store with protective cover, in location that has low isture
in order to prevent internal mold growth.
■NOTES
Thank you for purchasing the Zoom Stereo Microscope.
Please read this instruction manual thoroughly before use to insure
proper operation and long service.
XZ-45N
ZOOM STEREO MICROSCOPE
INSTRUCTION MANUAL
Base
Head
Head Locking Knob
Zoom Control
270〜440
mm
(Range)
25
mm
32
mm
Focus Knob
Ring Light
Mount(53
mm
)Niigata seiki Co., Ltd.
5-3-14, Tsukanome, Sanjo, Niigata, Japan, 955-0055
Tel. : +81-256-33-5522 Fax. : +81-256-33-5518
MAIL intl.sales@niigataseiki.co.jp
URL http://www.niigataseiki.co.jp
Eyecups
2. Eyecup Use
①
Remove the rubber Guard from the Eyepieces.
②
Install the Eyecups as shown.
※Make sure the
Eyecups are
seated into the
groove on the
Eyepiece.
※When wearing
eyeglasses,
keep the
Guards in place
and do not install
the Eyecups.
Guard Eyecup
Eyepiece
Groove
Remove
Install

Other Niigata seiki Microscope manuals

Niigata seiki XTS-SP2 User manual

Niigata seiki

Niigata seiki XTS-SP2 User manual

Niigata seiki XTDB-SP2N User manual

Niigata seiki

Niigata seiki XTDB-SP2N User manual

Niigata seiki XTS2021 User manual

Niigata seiki

Niigata seiki XTS2021 User manual

Niigata seiki XTS-SP2 User manual

Niigata seiki

Niigata seiki XTS-SP2 User manual

Niigata seiki XZ-45N User manual

Niigata seiki

Niigata seiki XZ-45N User manual

Niigata seiki XTS2021 User manual

Niigata seiki

Niigata seiki XTS2021 User manual

Niigata seiki XTDB-SP2N User manual

Niigata seiki

Niigata seiki XTDB-SP2N User manual

Popular Microscope manuals by other brands

National DC3-163 instructions

National

National DC3-163 instructions

Prior Lux POL operating instructions

Prior

Prior Lux POL operating instructions

Leica DVM5000 Setup manual

Leica

Leica DVM5000 Setup manual

Accu-Scope EXC-500 manual

Accu-Scope

Accu-Scope EXC-500 manual

Nikon ECLIPSE E200 MV Series instruction manual

Nikon

Nikon ECLIPSE E200 MV Series instruction manual

VWR VisiScope 400 Series instruction manual

VWR

VWR VisiScope 400 Series instruction manual

Nikon N-STORM user guide

Nikon

Nikon N-STORM user guide

Vision Engineering Mantis Compact Service manual

Vision Engineering

Vision Engineering Mantis Compact Service manual

Leica PROVEO 8 user manual

Leica

Leica PROVEO 8 user manual

Elikliv DM202 user manual

Elikliv

Elikliv DM202 user manual

Levenhuk DTX 500 Mobi user guide

Levenhuk

Levenhuk DTX 500 Mobi user guide

AmScope PM240 Series user manual

AmScope

AmScope PM240 Series user manual

Huvitz HS-5500 Operator's manual

Huvitz

Huvitz HS-5500 Operator's manual

X-Loupe Primary kit C101 user guide

X-Loupe

X-Loupe Primary kit C101 user guide

Olympus SZX7 instructions

Olympus

Olympus SZX7 instructions

SCANER MD-500 Operation manual

SCANER

SCANER MD-500 Operation manual

Meiji Techno MT-420 Series user manual

Meiji Techno

Meiji Techno MT-420 Series user manual

Ken A Vision Video Flex® except 2000 series manual 

Ken A Vision

Ken A Vision Video Flex® except 2000 series manual 

manuals.online logo
manuals.online logoBrands
  • About & Mission
  • Contact us
  • Privacy Policy
  • Terms and Conditions

Copyright 2025 Manuals.Online. All Rights Reserved.