Nikkai A10HJ User manual

1:1 V1.0
MTK 1389H
Black
148X105MM 32
English
Cover:100g book paper pages:80g book paper
J6349
NIKKAI A10HJ
English IB
Heaven Nov/27.07
000A10HJ.I01.0.01
PDVD109S
,
Owner s Manual
English
Portable Player with DVB-T
Kodak
COMPATIBLE
Read this manualbefore installation anduse.
P4BA10HJ0119

,
Owner s Manual
English
Portable Player with DVB-T
Kodak
COMPATIBLE
Read this manualbefore installation anduse.

SAFETY INFORMATION
TO REDUCE THE RISK OF FIRE AND ELECTRIC SHOCK, DO NOT EXPOSE THIS UNIT TO RAIN OR
MOISTURE.
IMPORTANT SAFEGUARDS
: To reduce the
risk of fire and electric shock, do
not remove the cover (or back) of
the unit. Refer servicing only to qualified service personnel.
The lightning flash with arrowhead symbol, within an equilateral
triangle, is intended to alert the user to the presence of uninsulated
"dangerous voltage" within product's enclosure that may be of
sufficient magnitude to constitute a risk of electric shock.
The exclamation point within an equilateral triangle is intended to
alert the user to the presence of important operation and servicing
instructions in the literature accompanying the appliance.
WARNING: TO REDUCE THE RISK OF FIRE OR ELECTRIC SHOCK, DO
NOT EXPOSE THIS APPLIANCE TO RAIN OR MOISTURE.
CAUTION: TO PREVENT ELECTRIC SHOCK, MATCH WIDE BLADE OF
PLUG TO WIDE SLOT, FULLY INSERT.
In addition to the careful attention devoted to quality standards
in the manufacture of your video product, safety is a major factor
in the design of every instrument. However, safety is your
responsibility, too. This sheet lists important information that will
help to assure your enjoyment and proper use of the video
product and accessory equipment. Please read them carefully
before operation and using your video product.
CAUTION
1.
2.
3.
4.
5.
6.
7.
8.
Read and Follow Instructions- All the safety and operation instructions should be
read before the video product is operated. Follow all operating instructions.
Retain Instructions- The safety and operating instructions should be retained for
future reference.
Heed all Warnings-Comply with all warnings on the video product and in the
operating instructions.
Polarization- Some video products are equipped with a polarized alternating -current
line plug. This plug will fit into the power outlet, try reversing the plug. If the plug still
fails to fit, contact your electrician to replace your obsolete outlet. To prevent
electric shock, do not use this polarized plug with an extension cord, receptacle, or
other outlet unless the blades can be fully inserted without blade exposure. If you
need an extension cord, use a polarized cord.
Power Sources- This video product should be operated only from the type of power
source indicated on the marking label. If you are not sure of the type of power
supply to your home, consult your video dealer or local power company. For video
products intended to operate from battery power, or other sources, refer to the
operating instructions.
Overloading- Do not overload wall outlets or extension cords as this can result in a
risk of fire or electric shock. Overloaded AC outlets, extension cords, frayed power
cords, damaged or cracked wire insulation, and broken plugs are dangerous, They
may result in a shock or fire hazard. Periodically examine the cord, and if its
appearance indicated damage or deteriorated insulation, have it replaced by your
service technician.
Power-Cord Protection- Power-supply cords should be routed so that they are not
likely to be walked on or pinched by items placed upon or against them, paying
particular attention to cords at plugs, convenience receptacles, and the point where
they exit from the video product.
Ventilation- Slots and openings in the case are provided for ventilation to ensure
reliable operation of the video product and to protect it from overheating. These
openings must not the blocked or covered. The openings should never be blocked
by placing the video product on a bed, sofa, rug, or heat register. This video product
should not be placed in a built-in installation such as a book case or rack, unless
proper ventilation is provided or the video product manufacturer's instructions have
been followed.
Installation

9.
10.
11.
11a.
12.
13.
Attachments- Do not use attachments unless recommended by the video product
manufacturer as they may cause hazards.
Water and Moisture- do not use this video product near water for example, near a
bath tub, wash bowl, kitchen sink or laundry tub, in a wet basement, or near a
swimming pool and the like. Caution: Maintain electrical safety. Powerline
operated equipment or accessories connected to this unit should bear safety
certification mark on the accessory itself and should not be modified so as to
defeat the safety features. This will help avoid any and should not be modified so
as to defeat the safety features. This will help avoid any potential hazard from
electrical shock or fire. If in doubt, contact qualified service personnel.
Accessories- Do not place this video product on an unstable cart, stand, tripod,
bracket, or table. The video product may fall, causing serious injury to a child or
adult as well as serious damage to the video product. Use this video product only
with a cart, stand, tripod, bracket, or table recommended by the manufacturer's or
sold with the video product. Any mounting of the product should follow the
manufacturer's instructions and use of a mounting accessory recommended by the
manufacturer.
A video product and cart combination should be moved with care. Quick stops,
excessive force, and uneven surfaces may cause the video product and cart
combination to overturn.
Outdoor Antenna Grounding- If an outside antenna or cable system is connected to
the video product, be sure the antenna or cable system is grounded so as to
provide some protection against voltage surges and built-up static charges.
Section 810 of the National Electrical Code, ANSI/NFPA No.70-1984 (Section 54 of
Canadian Electrical Code, Part1) provides information with respect to proper
grounding of the mast and supporting structure, grounding of the lead-in wire to an
antenna-discharge unit, connection to grounding electrodes, and requirements for
the grounding electrode.
Power Lines-An outside antenna system should not be located in the vicinity of
overhead power lines, other electric light or power circuits, or where it can fall into
such power lines or circuits. When installing an outside antenna system, extreme
care should be taken to keep from touching or approaching such power lines or
circuits, as contact with them might be fatal. Installing an outdoor antenna can be
hazardous and should be left to a professional antenna installer.
Note to CATV system installer
This reminder is provided to call the CATV system installer's attention to
Section 820-40 of the NEC which provides guidelines for proper grounding
and, in particular, specifies that the cable ground shall be connected to the
grounding system of the building, as close to the point of cable entry as
practical.
Installation
SAFETY INFORMATION
Use
Cleaning- Unplug this video product from the wall outlet before cleaning.
Do not use liquid cleaners or aerosol cleaners. Use a damp cloth for cleaning.
Objects that may touch dangerous voltage points or "short-out" parts could result in a fire or
electric shock. Never spill liquid of any kind on the video product.
Lightning-For added protection for this video product during a lightning storm, or when it is left
unattended and unused for long periods of time, unplug it from the wall outlet and disconnect
the antenna or cable system. This will prevent damage to the video product due to lightning and
power line surges.
Service
Servicing-Do not attempt to service this video product yourself, as opening or removing covers
may expose you to dangerous voltage or other hazards. Refer all servicing to qualified service
personnel.
Conditions Requiring Service-Unplug this video product from the wall outlet and refer servicing
to qualified service personnel under the following conditions:
A.When the power-supply cord or plug is damaged.
B.If liquid has been spilled, or objects have fallen into the video product.
C.If the video product has been exposed to rain or water.
D.If the video does not operate normally by following the operating instructions.
Adjust only those controls that are covered by operating instructions.
Improper adjustment of other controls may result in damage and will often
require extensive work by a qualified technician to restore the video product
to its normal operation.
E.If the video product has been dropped or cabinet has been damaged.
F.When the video product exhibits a distinct change in performance-this
indicates a need for service.
Replacement Parts-When replacement parts are required, have the service technician verify
that the replacements he uses have the same safety characteristics as the original parts. Use
of replacements specified by the video product manufacturer can prevent fire, electric shock, or
other hazards.
Safety Check-Upon completion of any service or repairs to this video product, ask the service
technician to perform safety checks recommended by the manufacturer to determine that the
video product is in safe operating condition.
Wall or Ceiling Mounting- The product should be mounted to a wall or ceiling only as
recommended by the manufacturer.
Heat-The product should be situated away from heat sources such as radiators, heat registers,
stoves, or other products (including amplifiers) that products heat.
14.
15.
16.
17.
18.
19.
20.
21.
22.

FEATURES
9" LCD TFT Display
DVD,CD, MPEG 4,Picture CD JPEG compatible
CD-R, CD-RW capable
Swivel Screen with 270-degree Rotation
Polymer rechargeable battery, one fully
charged battery can last for 2.5 hours
Intelligent charge while playing
Earphone output
TV format:
PAL/ NTSC colour system
4:3 / 16:9 screen format select
( when connecting to TV set)
Video output:
Composite Video output
Audio output:
Down-mix stereo output
Digital output(Coaxial)
DVD features:
Multi Subtitle select
Multi Language select
Multi Angle select
Other features:
On screen control menu
Digital zooming
Slow motion forward/backward
Child lock
Auto screen saver
Electronic anti-shock
USB connection
(only support USB flash disk) DVB-T features:
Auto scan
Manual scan
Parental control
Channel protect
Channel remap
Channel reserve
The apparatus and AC/DC adaptor shall not be exposed to dripping or
splashing and that no objects filled with liquids, such as vases, shall
be placed on apparatus.
To be completely disconnect the power input, the mains plug of AC/DC
adaptor shall be disconnected from the mains.
The mains plug of AC/DC adaptor should not be obstructed OR should
be easily accessed during intended use.
The marking plate for apparatus and AC/DC adaptor is located at bottom
enclosure.
Battery shall not be exposed to excessive heat such as sunshine, fire or
the like.
Card format:
SD/MS/MMC card compatible
To avoid damaged the unit,
swivel your display correctly!
CAUTION !

CONTENTS
Page
INTRODUCTION
SYSTEM CONNECTION
GETTING STARTED
About the player
Main body
Side
Remote control
System connection
Connecting to External Power
Connecting to Car Power
Inserting the SD/MS/MMC card
AV mode
Choose mode
DVD mode
DVB mode
USB mode
Card mode
2
3
4
5
6
6
6
7
7-8
8
9-10
11
12
SAFETY INFORMATION
FEATURES
FUNCTION BUTTONS
[ Play/Pause/Stop],[Search],[ Slow ] ,[REP./FAV]
[A-B] ,[ LCD Set Up ],[ Zoom],[GOTO ],
[ Programme ],[INFO],[EPG]
13
14
15-17
SPECIFICATIONS
ON SCREEN DISPLAY
DVD SETUP MENU
TROUBLESHOOTING
DVD mode
CD mode
MPEG 4 mode
Kodak Picture CD mode
General Setup
TV Display/Angle Mark/OSD Lang/Closed Captions
/Screen Saver/last Memory
Speaker Setup
Downmix
Post D.R.C
Video Setup
Quality
Preference Setup
TV Type/PBC/Audio/Subtitle/Disc Menu/
Parental Control/Default
Passward Setup
Password Mode/Password
DVB-T Setup
Area Setting/Time Zone/Parental Age/Channel Setup
18
18
19
19
20
20
20-21
21
22
22-23
24
25-26
,

INTRODUCTION
1
Pull the battery compartment cover.
Load a button battery into the battery compartment.
Remove the battery if the unit will not be used
for a prolonged period of time.
Make sure that the battery has been inserted in
the correct polarities matching to the symbols +, -
marked in the battery compartment. Close the
battery compartment cover.
LOADING BATTERIES INTO THE REMOTE CONTROL
Loading a battery to the remote control
Unpack the unit.
Read through this owner's manual before installation and use.
Take out the protecting plastic film of battery .
Connect the system, make sure the connections are secured.
Danger of explosion if battery is
incorrectly replaced.Replace only
with the same or equivalent type.
CAUTION
LITHIUM BATTERY
CH CH
Battery Power
INTRODUCTION
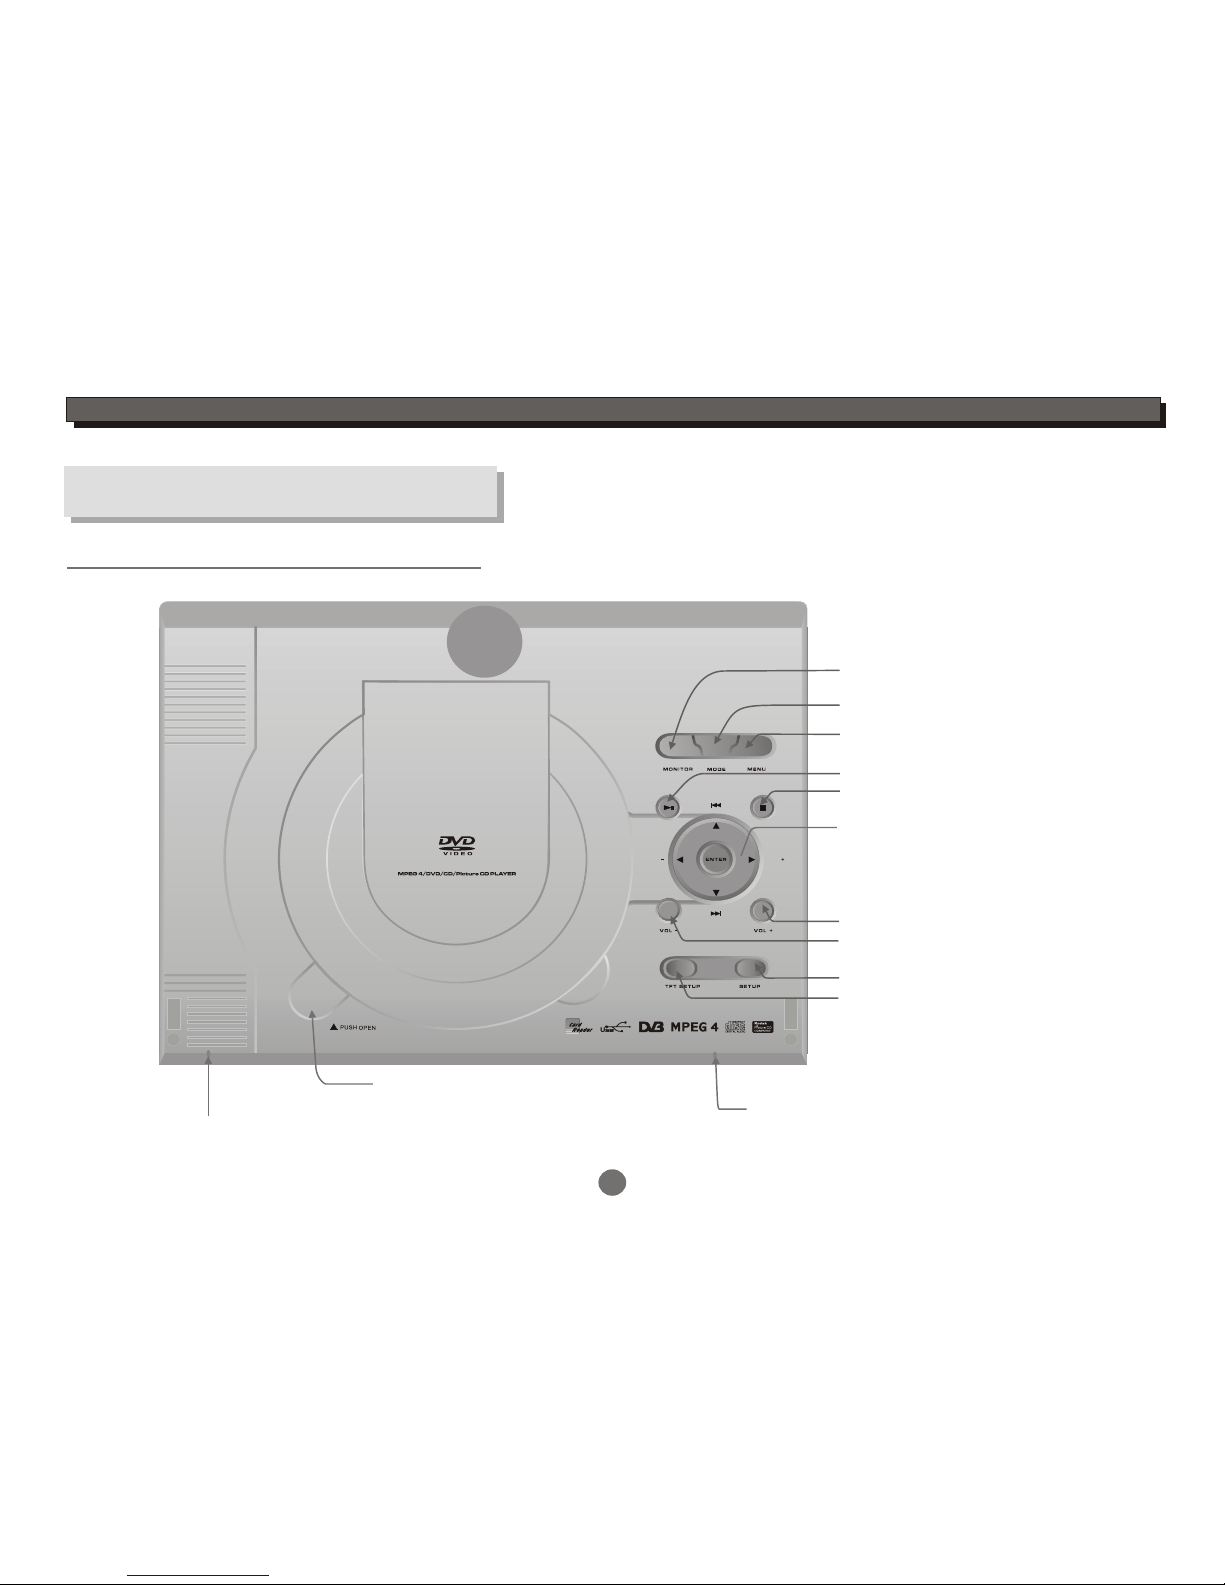
About the player
Mainbody
Select DVD/DVB/Card /USB mode
Setup menu
TFT Setup
Push Open
(press the button to
open the disc lid) Power LED
(It will shine green light when the unit is on)
2
Battery LED
(It will shine green light
when the battery is fully
chargeable)
Menu
Stop
Volume down
Volume UP
Cursor(Up/Down/Left/Right)
In DVD mode:
Up/Down:Skip Forward/Backward
In DVB mode:
Left/Right:Channel Up/Down
Play/Pause
Monitor
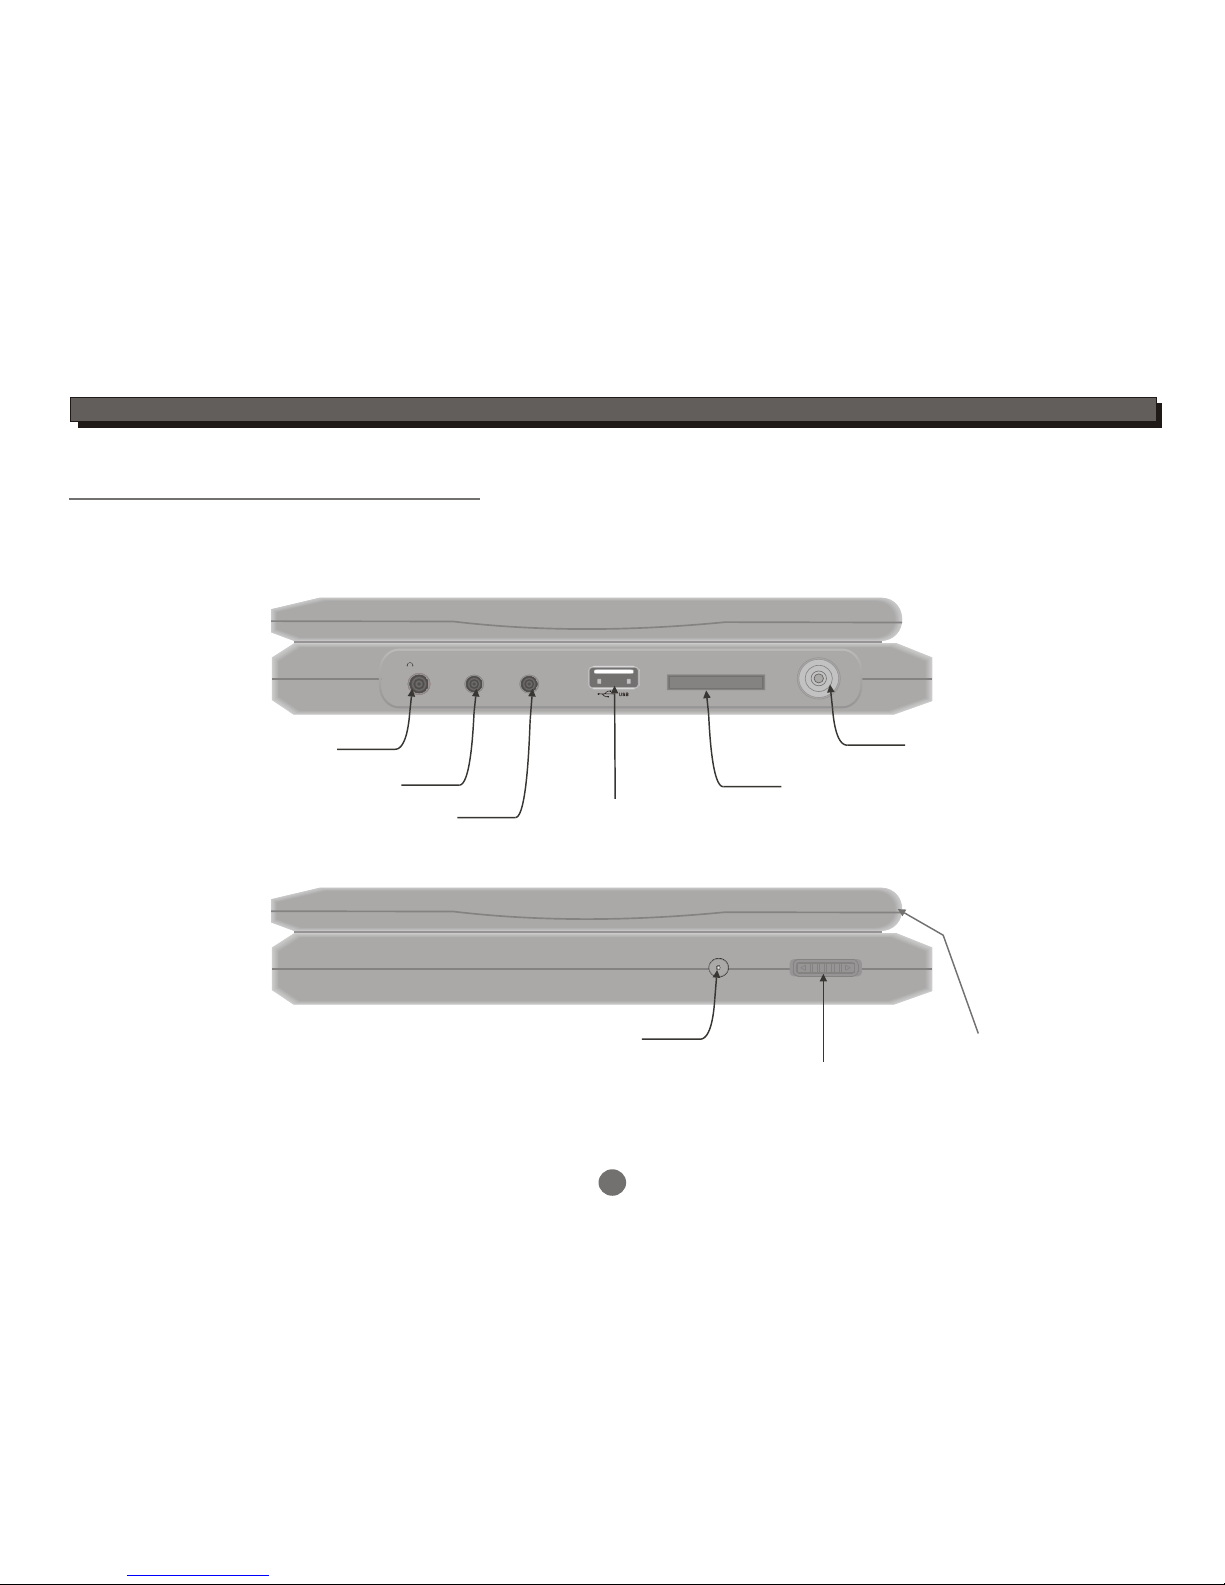
DC IN 12V ON OFF
RF IN
SD / MS / MMC CARD
AV IN/OUTPHONE COAXIAL
Earphone Output
AV Input/Output
Coaxial Output
DC input Open
3
Side
INTRODUCTION
Power Switch (In working mode, push
the button to the right to turn off the unit)
USB Slot
R INF
SD/MS/MMC Card Slot
1 2 34
5678
9
GOTO 0
ENTER
LCD ON/OFF SETUP
LCD SETUP
SLOW
ANGLE
PROGRAM
TITLE
A-B
MUTE
MENU
RETURN
AUDIO
AV IN/OUT
CLEAR
MODE
SUBTITLE
VOL+
CH+
CH-
VOL-
INFO
EPG
TTX TV/RADIO
ROTATION
ZOOM REP./FAV
4
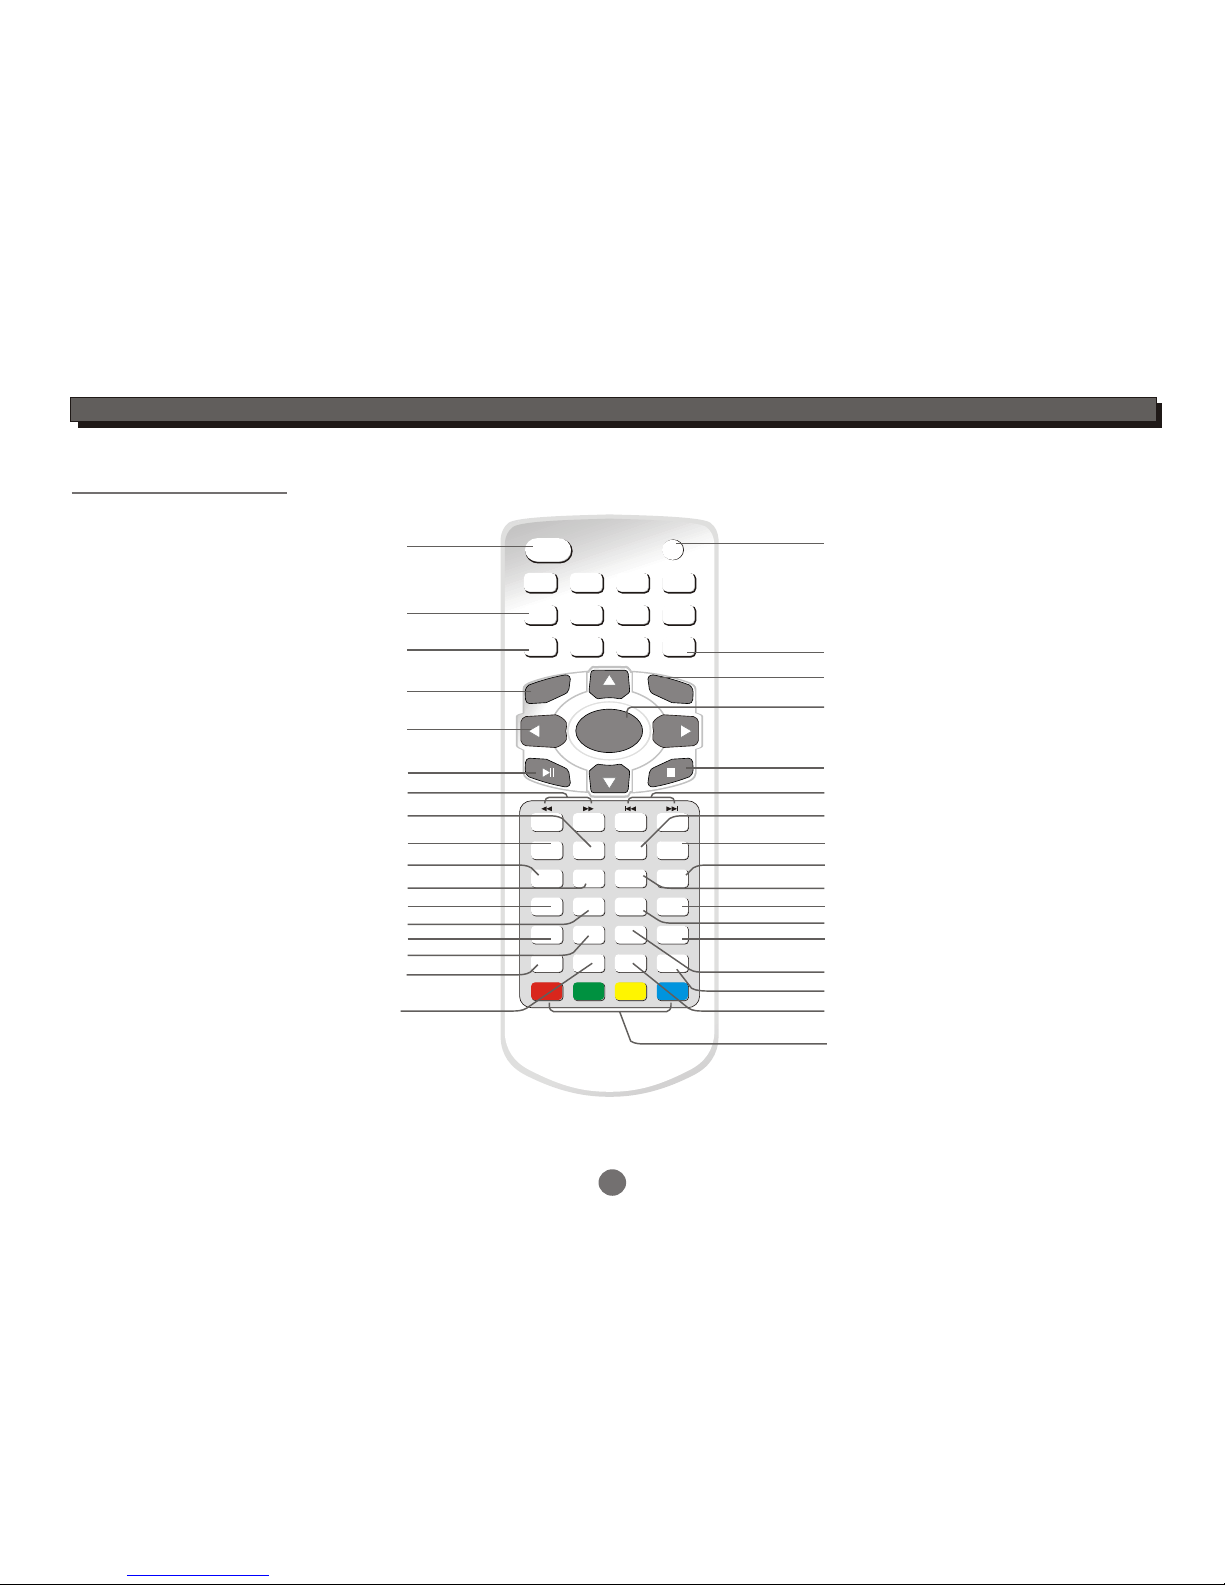
INTRODUCTION
Remote control
LCD display On/Off
Numeric entry
Programme setting
Repeat section A to B
LCD setup menu
Repeat playback(In DVD mode)
Open up the favourite channel list(in DVB mode)
Stop
Play/Pause
DVD/DVB/Card/USB mode select
Disc Skip backward/forward
The display screen up-down and left-right rotation
Turn up the volume
Clear the last entry
Return to DVD disc menu
Return to DVD disc title
DVD setup menu
Cursor:Up/Down/Left/Right
(Up/Down:Channel Up/Down in DVB mode)
Enter
Return to the upper menu
Angle select(disc feature)
Search backward/forward
Turn down the volume
AV in/AV out select
Goto
Slow
Turn off the audio output
For teletext function
Audio track select(disc feature)
DVD subtitle select(disc feature)
Electronic programme guide menu
Zoom
On Screen Display(in DVD mode)
Display channel information(in DVB mode) Switch between TV and Radio
Open up the text function,but it is
not available on all channels.
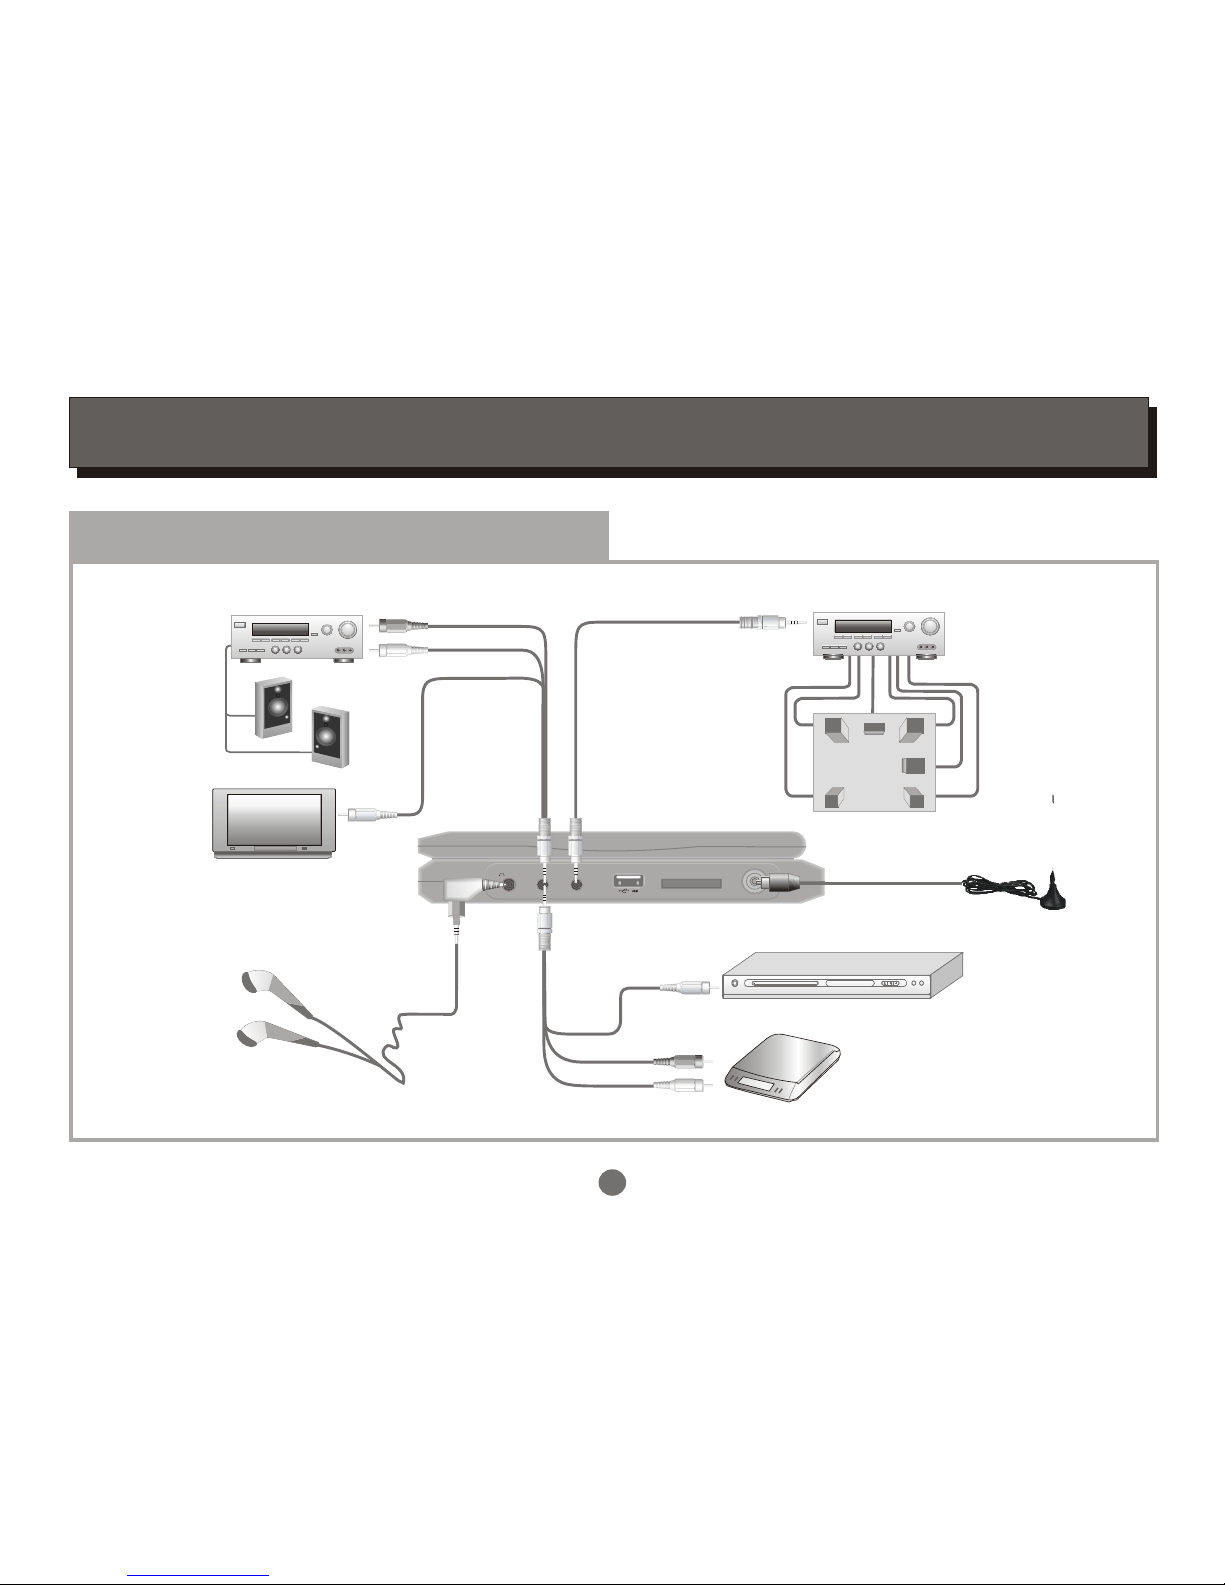
RF IN
SD / MS/ MMC CARD
AV/IN OUT COAXIAL
PHONE
5
Stereo Amplifier
LR
SL
SR
C
SW
Front Left Front Right
Surround Left Surround Right
Centre
Subwoofer
Digital decode Amplifier
5.1speakers system
To Coaxial input
Audio cable
Video cable
DVD player/VCR
Antenna
white
red
yellow
.........
.........
.........
.........
.........
.........
.........
.........
.........
.........
.........
.........
.........
.........
.........
.........
.........
.........
.........
.........
.........
.........
.........
.........
.........
.........
.........
.........
.........
.........
.........
.........
.........
.........
.........
.........
.........
.........
.........
.........
.........
.........
.........
.........
.........
.........
.........
.........
.........
.........
.........
.........
.........
.........
.........
.........
white
red
Video cable
yellow
Audio cable
TV Set
Earphone lines
To the Audio output of
External source
SYSTEM CONNECTION
System Connection
MultiMediaCard
SD
Memory Stick
MultiMediaCard
DC IN 12V ON OFF
DC IN 12V ON OFF
SYSTEM CONNECTION
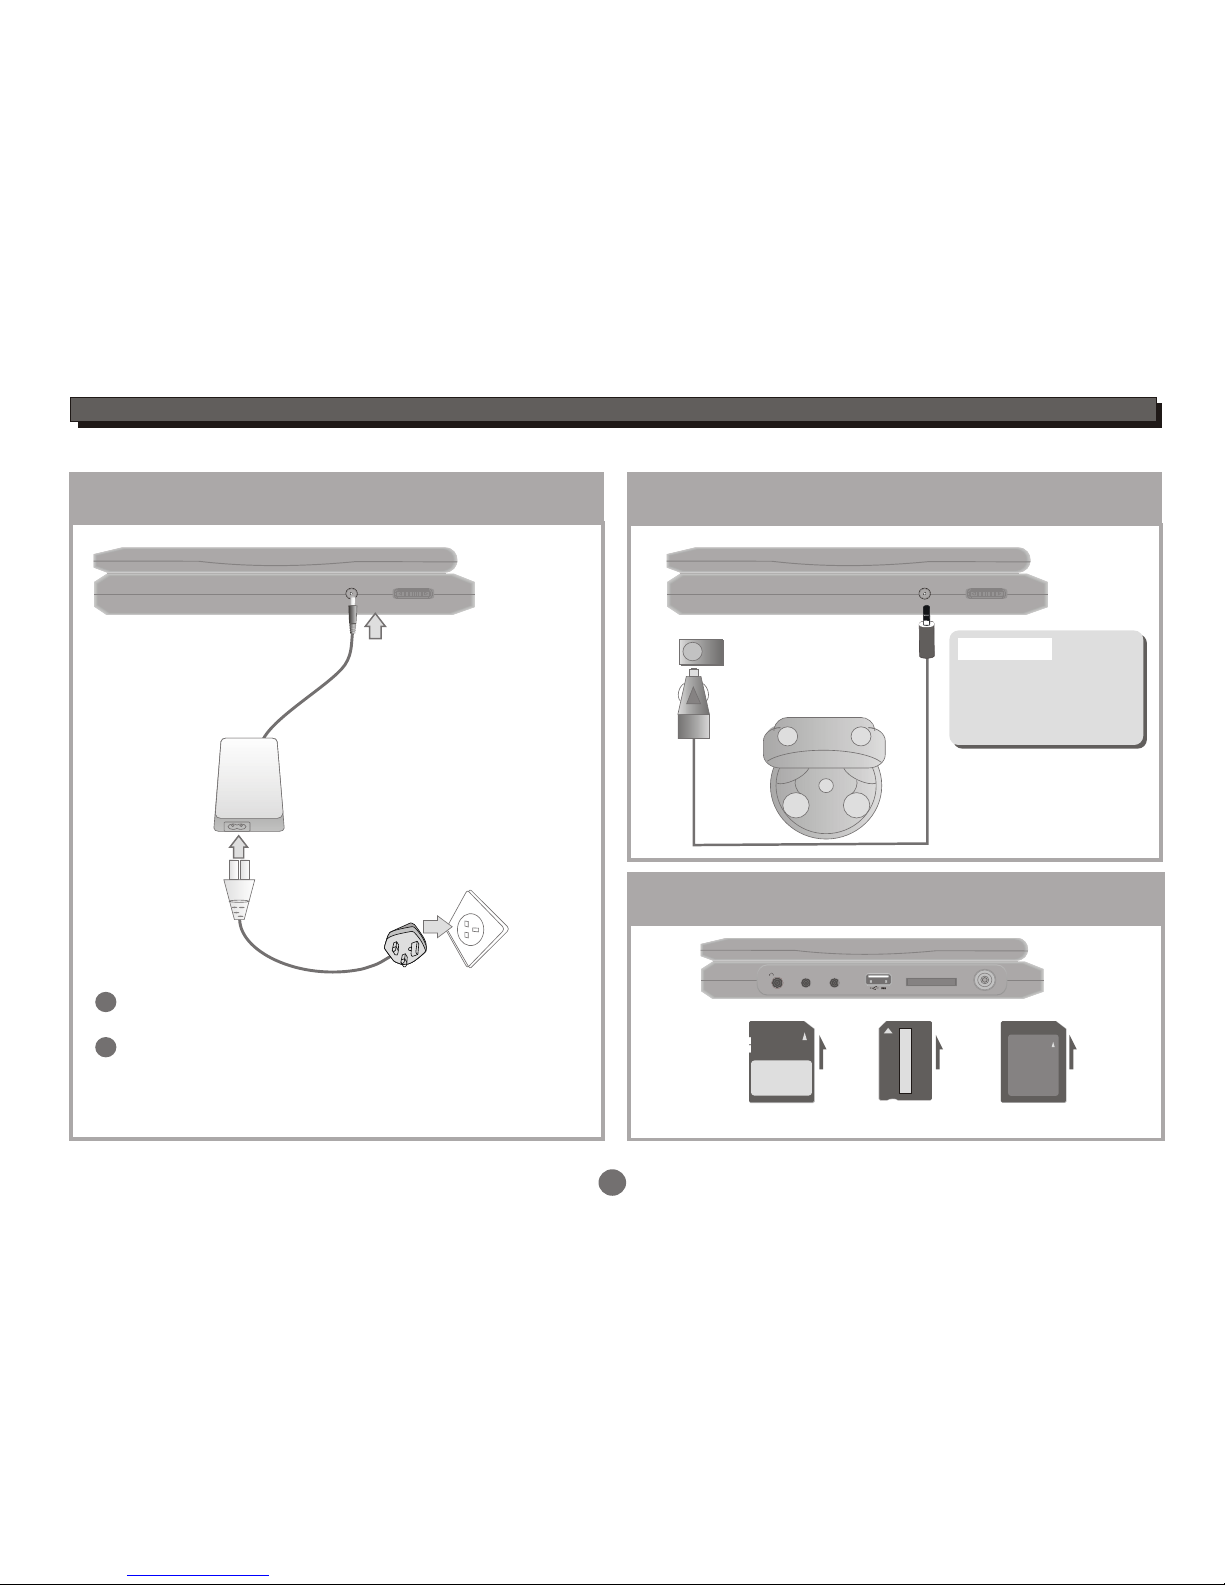
Connecting to External Power
2
1
6
Connect part 1 with 2,
insert the plug into outlet, then the unit will be
in standby status.
1
2
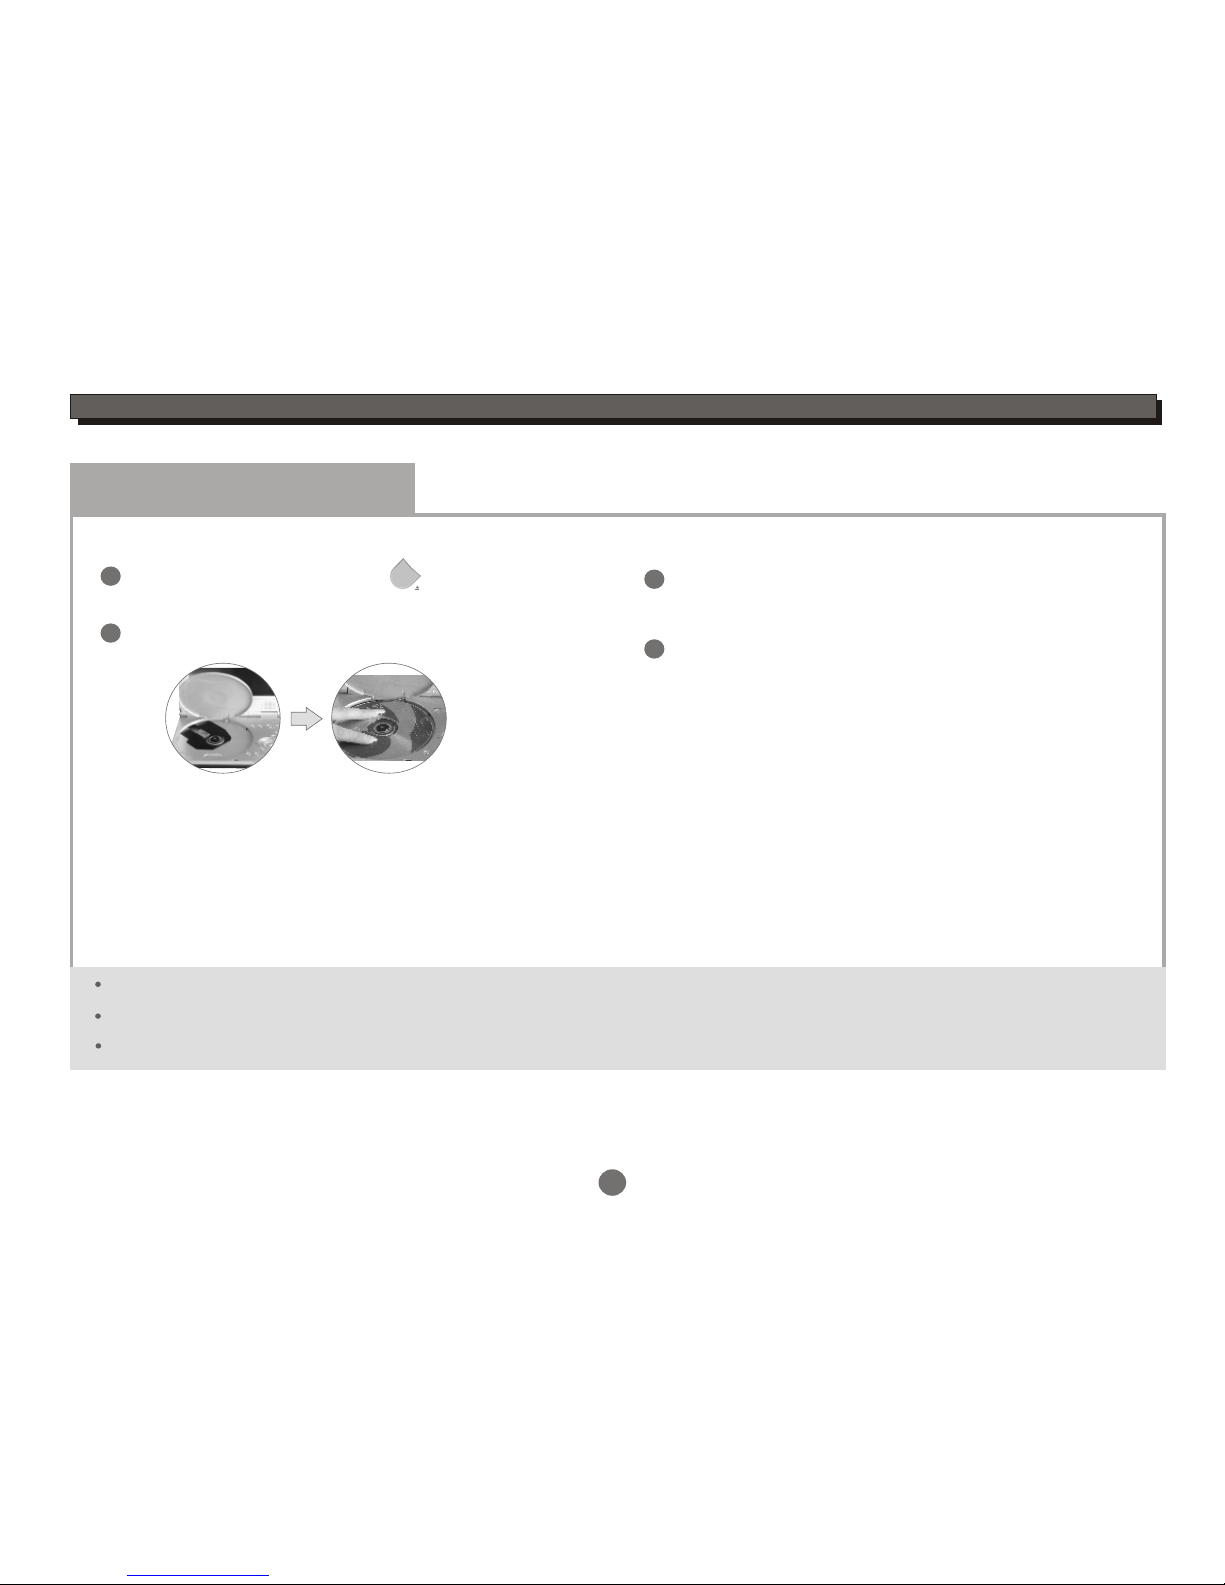
Connecting to Car Power
Automotive DC adaptor output
RF IN
SD/ MS / MMC CARD
AV/IN OUT COAXIAL
PHONE
Inserting the SD/MS/MMC card
SD: MS: MMC:
Refer to the drawing above,insert the card to card slot.
Connect this unit to DC
adaptor output on the car.
Do not use caradaptor
torecharge the Portable
DVD at the sametime
turns on car ignition
Warning:
The unit can be used
after starting the car.
3

7
GETTING STARTED
AV Mode
The player is equipped with two AV modes: AV IN and
AV OUT. Factory default of the unit is to AV OUT.
Press to switch between these two modes.
AV IN/OUT
AV IN/OUT
There will be Video or Audio output in this mode.
The unit will receive Video and Audio from the
external source.
Set up the system
Select the corresponding setting of TV set(AV1,AV2,
etc.) And the amplifier, until the DVD power on screen.
AV IN mode:
AV OUT mode:
Choose mode
Switch on the player
Connect with the adaptor.
Open the top cover of unit to suitable angle.
1
2
ON/OFF
Push ON/OFF button on the side to the left to turn
on the unit.
3
Select DVD or USB or Card or DVB mode
Press MODE button on the remote to select DVD,
USB or Card or DVB, then the corresponding logo
will display on the TV screen:
MODE
DVD mode
USB mode
Card mode
DVB mode
8
GETTING STARTED
DVD Mode
Press " PUSH OPEN" button on the panel to
open the disc tray.
Load a disc and close the disc tray.
Load a disc
1
2
3
Automatic Play
The unit will take a few seconds to download the disc
initial data,display the disc type logo in the left upper
corner of the TV screen,and then start playing
automatically.
Please remove the protected card on the loader if you use the unit first.
The label side must be upturned when you load a disc.
Please press the disc until the disc is fixed by loader when you load a disc.
If a DVD Disc Menu appears on screen
Press PLAY/PAUSEbutton on the remote (or on the
unit) to start playback.
or
Press CURSOR buttons to select the desired feature
in the menu,and then press ENTER button to confirm
a selection.
1
2
PUSH OPEN

GETTING STARTED
9
DVB Mode
Press the MODE button on the remote to enter DVB mode,then the DVB logo will display on the TV screen.
MODE
Auto Scan
Press SETUP button to enter the setup menu.
Highlight icon, press ENTER button to enter DVB-T setup menu.
Highlight Channel Setup, press ENTER button to enter Channel setup menu.
00:00
1
2
-- DVB-T Setup Page --
Area
Time Zone
Parental Age
Channel Setup
ENG
18
Enter Channel Setup
00:00
3
4
-- Channel Setup --
Auto Scan
Manual Scan
Adjust Channel
Channel Remap
Reserve Channel
Auto Scan
Start
00:00
Press the UP or DOWN cursor button to highlightAuto Scan, select theStart,
then press the ENTER button to confirm, a conversation window appears as
below:
Start to scan?
OK Cancel
Select "OK" or "Cancel" icon, press ENTER button to confirm.
The unit will scan for all the digital TV and Radio stations available in your
area and list them as bottom right corner.
Auto Scan
Status Found Channels
Freq:545000KHz
TV Total No:03
Radio Total No:00
Find TV No:03
Find Radio No:00
Progress 29%
TV 01 BBC ONE
TV 02 BBC CHOICE
TV 03 BBC TWO
When all the digital TV and Radio stations have been
found, the programme will play automatically after 3 seconds.
Make sure that the area you choose is correct before auto scan.
Otherwise you may not search any channels.
5

Manual Scan
Status Found Channels
Freq:474000KHz
Add
Find TV No: 03
Find Radio No: 00
TV 01 BBC ONE
TV 02 BBC CHOICE
TV 03 BBC TWO
Manual Scan
Status Found Channels
Freq:474000KHz
Scan
GETTING STARTED
10
2
3
4
Hight the Start item,press the ENTER button to enter the manual scan
setting menu.
Press the UP or DOWN cursor button to select the frequency you want, then press theENTER button to start
channels scan. Then the unit will scan for all the digital TV and Radio stations available in your area and list
them above Found Channels.
When all the digital TV and Radio stations have been found, highlight Add icon,press the ENTER button to
add channels.
Press the RETURN button to exit.
5
Make sure area you choose is correct before
auto scan! Otherwise you may not search
any channels.
Manual Scan
In Channel Setup menu,
press the UP or DOWN cursor button to highlight the Manual Scan,
and press theENTER button to select.
1
-- Channel Setup--
Auto Scan
Manual Scan
Adjust Channel
Channel Remap
Reserve Channel
Manual Scan
Start
00:00
GETTING STARTED
11
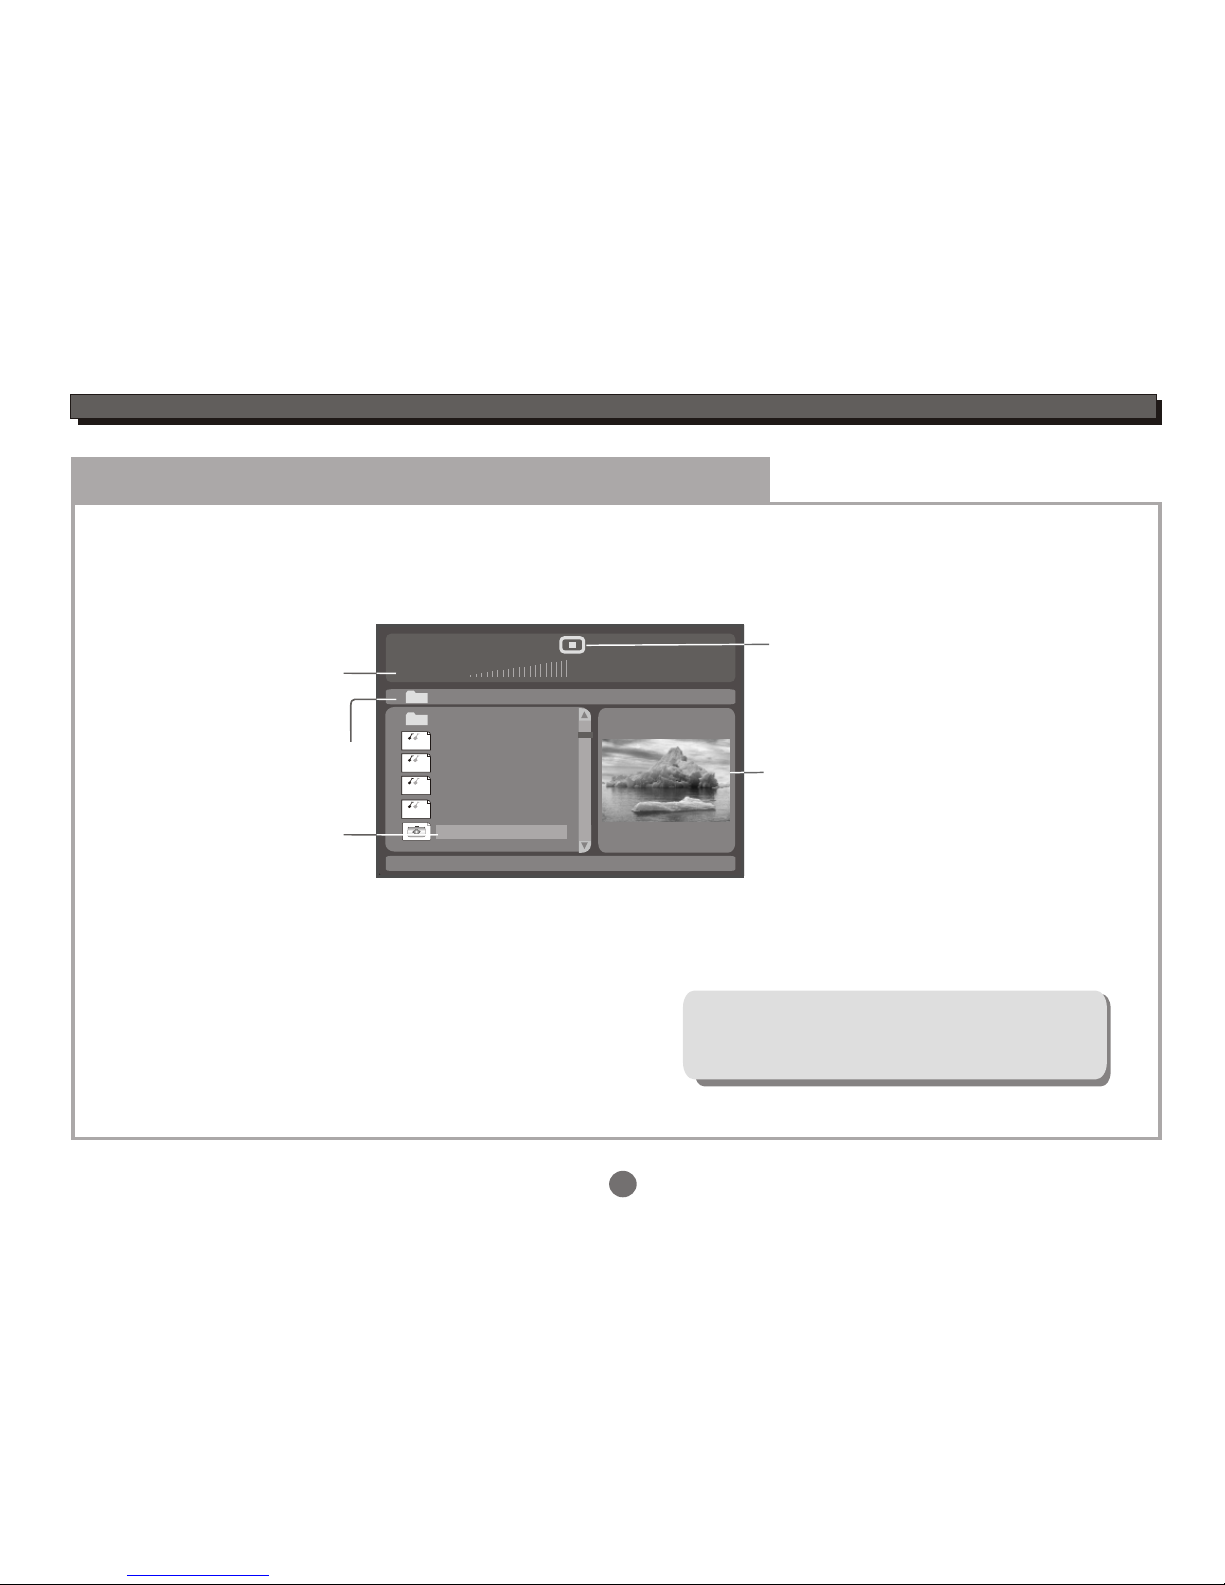
USB mode
Insert a USB stick to the USB slot in the unit.
Press the MODE button to select USB mode, an On Screen Display (OSD) indicator will appear on the TV screen,
which displays the file information and operation status.
Song: Track 02
00:00 00:00
001
002
003
004
005
006/011
Disc files
current files /
total files
Selection
highlight
(Press ENTER
button to play
this file)
\Folder ABC\
..
Playback
status
Current folder
MP3
MP3
MP3
MP3
Preview
Press the UP or DOWN cursor button to highlight the desired file or folder, and press the ENTER button to confirm.
Then the player will start playback.
The unit only supports USB flash disk, but
does not support USB hard disk!
Multi-playback for USB:
MPEG4(AVI),MP3,JPEG....
For operation details of the file, please see
"ON SCREEN DISPLAY".
USB MODE
GETTING STARTED
12
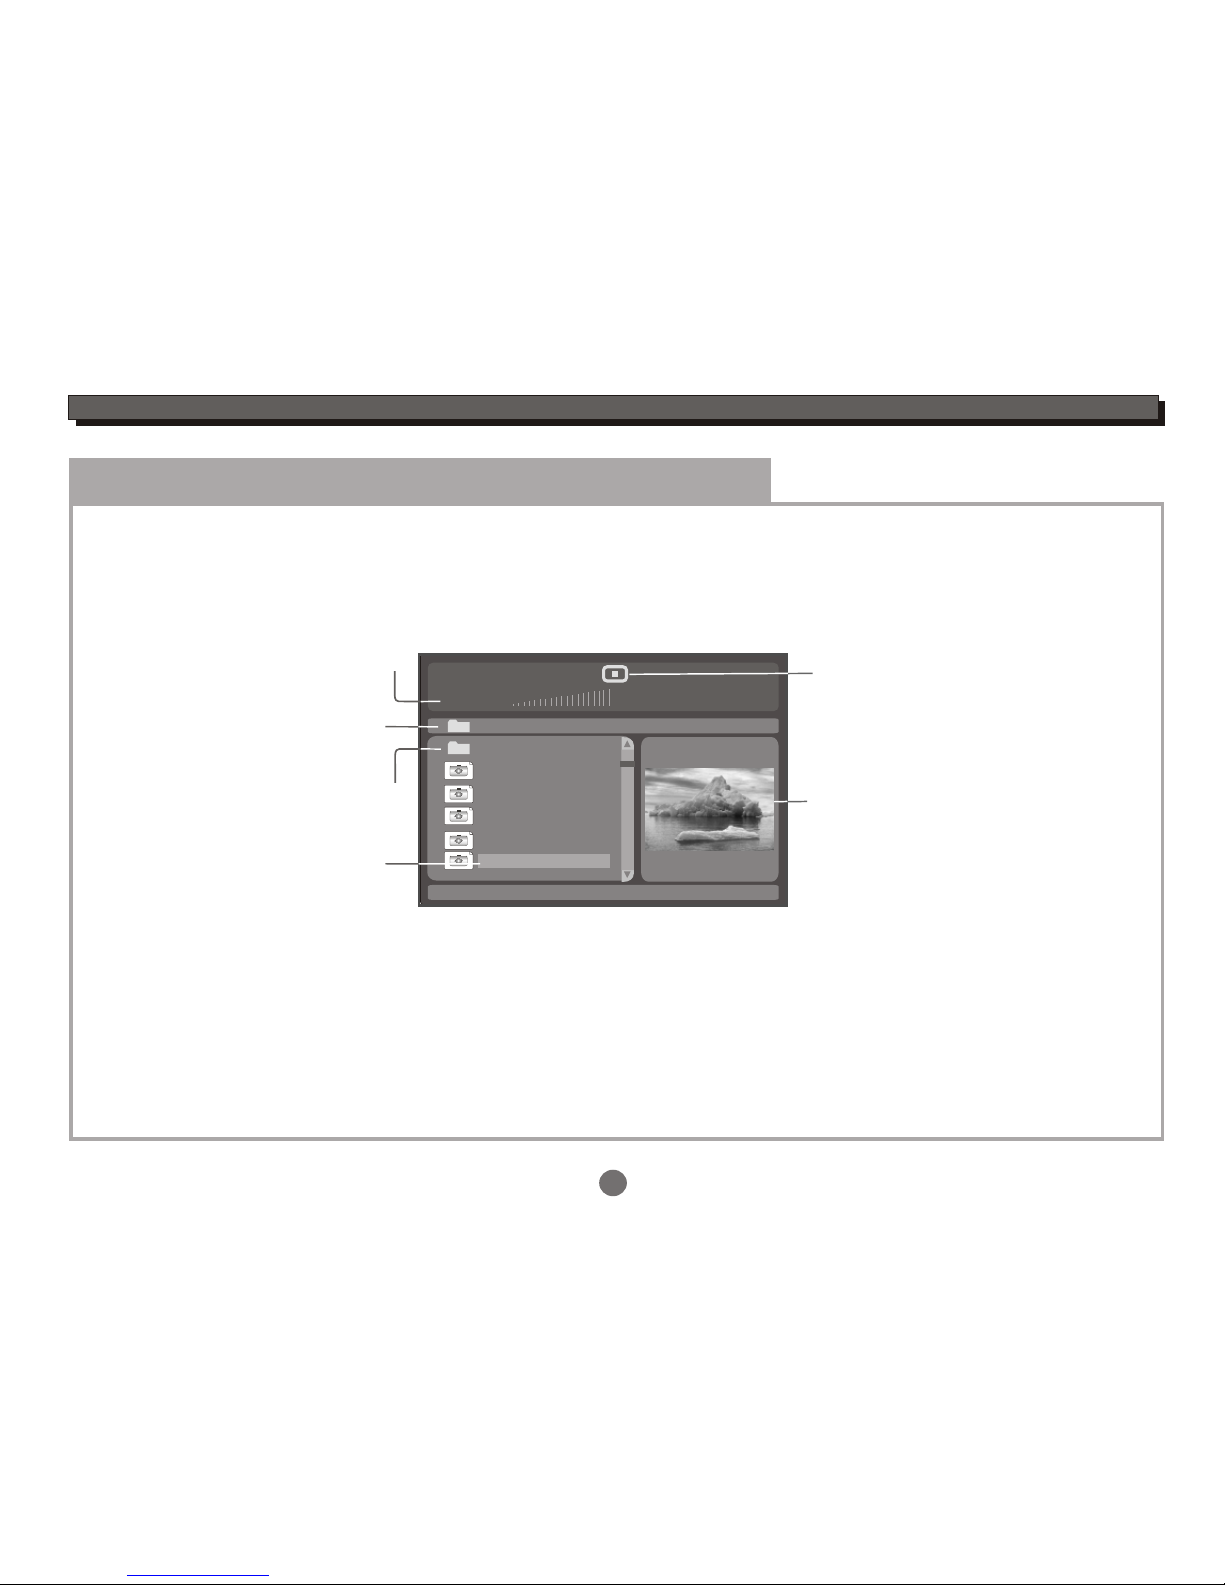
Card mode
Insert a card to the Card slot in the unit.
Press the MODE button to select Card mode, an On Screen Display (OSD) indicator will appear on the TV screen,
which displays the file information and operation status.
Song: Track 02
00:00 00:00
001
002
003
004
005
006/011
Card files
current files /
total files
Selection
highlight
(Press ENTER
button to play
this file)
\Folder ABC\
..
Playback
status
Current folder
Preview
Press the UP or DOWN cursor button to highlight the desired file or folder, and press theENTER button to confirm.
Then the player will start playback.
Upper folder
For operation details of JPEG file,please see"ON SCREEN DISPLAY\Kodak Picture CD mode".
CARD MODE

13
FUNCTION BUTTONS
Play / Pause / Stop
Press PLAY / PAUSEbutton to switch the player
between PLAY or PAUSE mode.
Press STOP button to stop in two modes:
a) Press Once : STOP memorizes the interrupt position.
( May resume with Play button )
b) Press Twice : To stop completely.
(Will NOT resume with Play button)
Player will not advance or reverse during
"WARNING" section of any disc.
Search Forward / Backward
Press to search forward
Repeat pressing the button to change search speed
Press to search backward
Repeat pressing the button to change search speed
Press PLAY/PAUSErepeatedly button to resume
normal playback
x2 x4 x8 x16 x32 (Play)
x2 x4 x8 x16 x32 (Play)
Slow Forward/Backward
Press SLOW button to play slow forward/backward.
Repeat pressing the button to change slow forward or
backward speed:
1/2 1/4 1/8 1/16
SLOW
(Play)
1/16 1/8 1/4 1/2
(Slow Forward)
(Slow Backward)
Press PLAY/PAUSErepeatedly button to resume normal
playback.
REP./FAV
Press REP./FAVbutton multiple times to reach desired
repeat mode (see below).
DVD disc
MPEG 4/Picture CD disc
Chapter
Title
ALL
Repeat the Chapter
Repeat the Title
Repeat the whole disc
REP./FAV
Track
ALL
Repeat the existing track
Repeat all tracks
CD disc
Play in shuffle order
Play in random order
Play the existing track once
Repeat the existing track
Repeat the existing folder
Play th existing folder once
Shuffle
Random
Single
Repeat One
Repeat Folder
Folder
In DVD mode:
Press the button to open the FAVOURITE LIST .REP./FAV
Press the UP or DOWN cursor button to select the
desired favourite channels.
In DVB mode:
REP./FAV
Repeat functionality
depends on different
disc's production format,
some DVD discs do not
allow repeat function.
NOTE

FUNCTION BUTTONS
14
24
A-B
To repeat playback of a desired section:
1) Press the A-B button at the beginning of the desired
section "A".
2) Press the A-B button again at the end of the desired
section "B".
The player will repeat playback of the section from A to B.
3) Press the A-B button again to cancel the function and
return to normal play.
During playback,
NOTE
A-B repeat functionality depends on different disc's production format,
some DVD discs do not allow repeat function.
A-B repeat function does not apply to Picture CD disc.
A-B
A-B
A-B
A B
LCD Setup
Press LCD SETUP button on the remote or TFT SETUP
button on the panel to adjust Brightness,Hue,Contrast,
Saturation and Sharpness.
TFT SETUP
LCD SETUP
Press UP/DOWN button to select the desired items and
setup by the LEFT/RIGHT button.
Press LCD SETUP button again to exit.
Brightness
Hue
Contrast
Saturation
Sharpness
31
Reset
31
31
31
31
ZOOM
Press the ZOOM button to enlarge viewable picture.
Press the button repeatedly to change the zoom scale:
Press the CURSOR buttons to adjust the zooming position.
ZOOM
Press the GOTO button to select GOTO mode.
DVD disc
Press DOWN button to highlight desired item and
press ENTER button to select.
CH-
GOTO
Input title number
Input chapter number
Press the GOTO button again to exit.
Title --
Chapter --
TT TIME -:--:-- Input time h:mm:ss
(Hour : Minute : Second)
ENTER
01/23
08/28
5.1 CH English
Off
Title Elapsed 0:28:32
Bitrate 55
Menu
Title
Chapter
Audio
Subtitle
GOTO
Table of contents
Other Nikkai Portable DVD Player manuals


