Grundig DVD-P 7850 User manual

PORTABLE
DVD-PLAYER
DVD-P 7850

2
CONTENTS____________________________________________
4 DVD-P 7850
4 Special features of your DVD player
4 Packing contents
5 Information and safety
6-9 Overview
6-7 Operating controls of the DVD player
7 Connections of the DVD player
8-9 The remote control
10-13 Connection and preparation
10 Connecting the television
10 Connecting external audio/video sources
11 Connecting a digital camera or an MP3 player
11 Operating with a memory card
12 Connecting earphones or headphones
12 Connecting the power supply unit
13 Activating the remote control battery
13 Replacing the remote control battery
13 Charging the battery
14-15 Initial setup
14 Switching on
14 Navigating in the menus
14-15 System settings
16 General functions
16 Switching on and off
16 Adjusting the volume
16 Setting the picture format
16 Setting the colour
16 Setting the brightness
16 Switching off the screen of the DVD player
16 Selecting the data medium
17-18 Disc features
19-23 DVD/CD playback
19 General information on disc playback
19 Preparing for disc playback
19 Disc playback
20 Displaying playback information
21 Selecting tracks and chapters using the DVD menu
21 Selecting a chapter, file or track
21 Fast search
22 Repeat functions
22 Switching the dubbed language or the audio format
22 Selecting and displaying subtitles
23 Changing the camera angle for particular scenes or passages

ENGLISH
3
24-26 Audio and video data playback
24 Connecting or inserting the data medium
24 Selecting the data medium
24 Playback
25 Navigating in the file browser
25 Sorting tracks in the file browser
25 Filter functions
26 Repeat functions
26 Additional picture playback functions
27-30 Settings
27 Language settings
28 Parental control
29 Displaying and hiding the multi-angle symbol
29 Changing the user menu colour
30 Activating and deactivating the screen saver
30 Resetting the DVD player to its original condition
31 Information
31 Technical data
31 Environmental note
32 General information on laser devices
32 Cleaning discs
33 Troubleshooting
CONTENTS____________________________________________

4
Special features of your DVD player
Your DVD player is suitable for playing:
– DVD, DVD+RW, DVD-RW, DVD+R, DVD-R
– Audio-CD (CD-DA)
– CD-R and CD-RW with MP3 data
– CD-Rs and CD-RWs with picture data (JPEG and picture CDs)
– CD-Rs and CD-RWs with audio/video data (MP4)
You can also play these data formats using the USB input or a
memory card (SD format – Secure Digital memory card – or MMC
– Multimedia Card.
The DVD player decodes digital audio signals into stereo or Dolby
Digital signals to be played back via speakers or headphones.
To do this, it converts the digital signals to analogue ones and
amplifies them.
Your DVD player has been given regional code 2. DVDs with other
regional codes cannot be played.
Packing contents
1DVD-P 7850 portable DVD player
2RC 785 remote control
with 1 lithium battery 3 V CR 2025
3Operating manual
4Audio/video adapter
512 V adapter
6Power supply unit
7Earphones
The DVD player and accessories have a
bag to transport the components.
Subject to changes in the scope of
delivery.
DVD-P 7850 DVD PLAYER_________________
1 2 3
4567

ENGLISH
5
INFORMATION AND SAFETY ____________
This DVD player is designed to play back video and audio signals from
compact discs (DVDs and CDs).
Any other use is expressly prohibited.
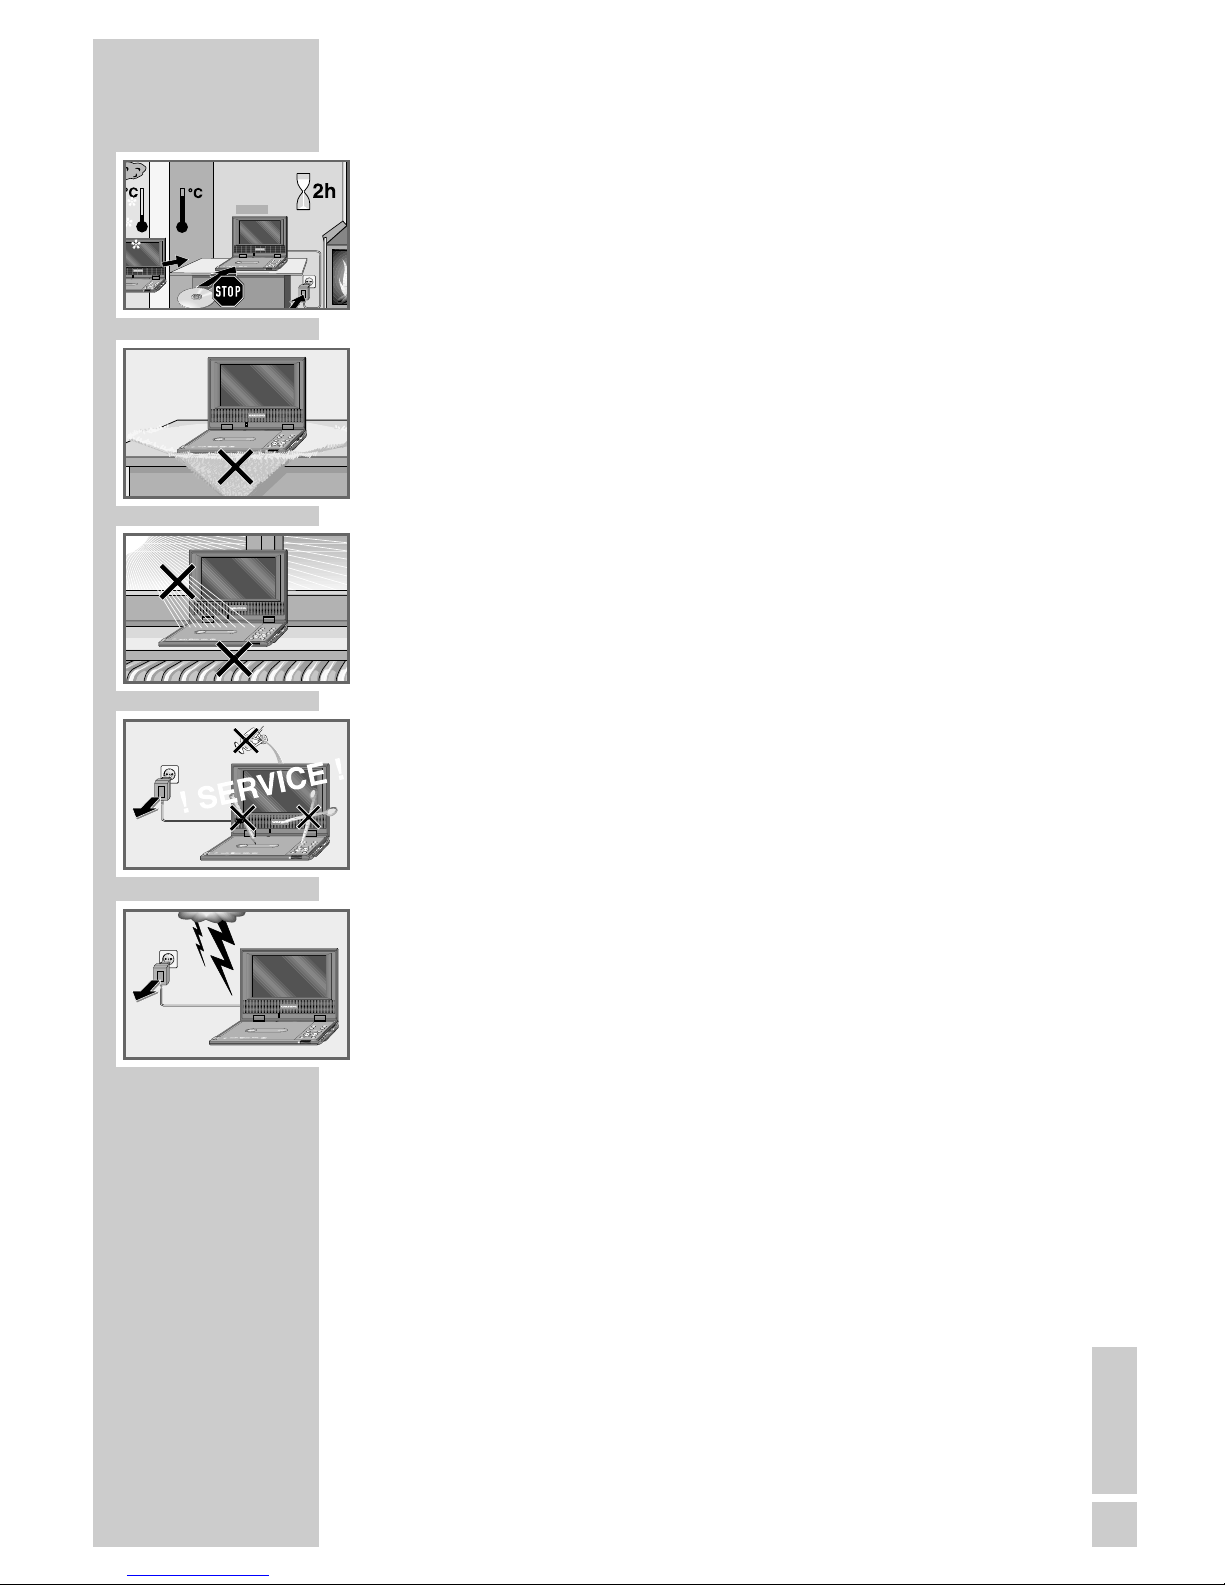
If the DVD player is subject to a sudden change in temperature, for example
if it is brought in from the cold to a warm room, connect it to the mains
supply and let it stand for at least two hours before you insert a DVD.
The DVD player is designed for use in dry rooms. If you do use it outdoors,
make sure it is protected from moisture such as dripping or splashing water.
Place the DVD player on a hard, level surface. Do not place any objects
such as newspapers on the DVD player, or any cloth or similar items under-
neath it.
Do not place the DVD player directly on top of an AV receiver or a sub-
woofer. The laser optics are sensitive to temperature and shocks.
Do not place the DVD player close to heating units or in direct sunlight,
as this will impair cooling.
Do not insert foreign objects in the disc compartment of the DVD player.
Never open the DVD player casing under any circumstances. No warranty
claims are accepted for damage caused by improper handling.
Do not place any vessels filled with liquid, such as vases, on the DVD player,
as they may tip over and spill the liquid, which poses an electrical hazard.
Do not place any objects such as burning candles on the DVD player or in its
immediate surroundings.
Thunderstorms are a danger to all electrical devices. Even if the DVD player
is switched off, it can be damaged by a lightning strike to the mains. Always
remove the power plug during a thunder storm.
If the DVD player cannot scan DVDs or CDs perfectly, use a commercially
available cleaning-CD to clean the laser optics. Other cleaning methods
may damage the laser optics.
When setting up the DVD player, note that furniture is often coated with
various types of varnish and plastic, which often contain chemical additives.
These additives may cause corrosion to the feet of the unit. This may leave
stains on the surface of the furniture which can be difficult or impossible to
remove.
Note:
Do not connect any other equipment while the device is switched on. Switch
off the other equipment as well before connecting it.
Only plug the power supply unit into the mains after you have connected the
external devices.
Important:
Due to juridical resasons it is not allowed to use the DVD player in the car.
The DVD player may not be used on boats and ships.

6
Operating controls of the DVD player
ON/OFF Sliding switch turns the DVD player on and off.
LCD screen.
Disc compartment under the cover panel.
Switch turns the LCD screen on and off when opening
and closing.
LCD For setting the picture format, colour and brightness.
SETUP Opens and closes the main menu of the DVD player.
MODE Selects the disc, USB, Card Reader and AV IN operating
modes.
MENU Opens the disc menu* of a DVD during playback.
– z+Adjusts the volume.
!Freeze-frame for DVDs, video CDs and MP4-CDs;
Pauses audio CDs and MP3 CDs;
in the menu: moves the cursor up.
§$ Switch to forward/reverse picture search at various
speeds during playback;
in the menu: move the cursor to the left/right.
PLAY SEL In disc mode: starts playback;
in the menu: confirms a selection in a menu.
D
C
B
A
OVERVIEW____________________________________________
A
B
C
D
E
F

ENGLISH
7
OVERVIEW____________________________________________
7In disc mode: interrupts or stops playback.
In the menu: moves the cursor down.
5as6Select the previous/next track or section during playback.
7
Mode indicator. Lights up green when operating,
lights up red when charging.
Infrared sensor for remote control signals.
Connections of the DVD player
yy Connection sockets for two stereo headphones or
earphones.
AV OUT Audio/video output.
AV IN Audio/video input.
USB USB port.
SD/MMC Card slot for inserting a memory card.
DC IN 12V Connection socket for the cable of the main power supply.
Ó
Caution:
Do not connect any devices while the DVD player is switched on. Switch off
the other device as well, before connecting it.
Never touch the inside of the sockets and plugs of the connecting cables.
Electrostatic discharge can damage the DVD player.
(
F
E
DC IN 12V
Ó

8
The remote control
iOpens and closes the main menu of the DVD
player.
DISPL. Switches the on-screen display between infor-
mation about the number of chapters or tracks
and playing time.
LCD For setting the picture format, colour and
brightness.
MODE Selects the disc, USB, Card Reader and AV
operating modes.
MENU Opens the disc menu* of a DVD during
playback.
!Freeze-frame for DVDs, video CDs, MP4 CDs.
Pause for audio CDs and MP3 CDs.
Hold down to switch to slow motion (DVD).
In the menu: moves the cursor up.
TITLE Opens the track menu* of the DVD during
playback.
yFor selecting and displaying subtitles* of the
DVD during playback.
§$ In disc mode: switch to forward or reverse
picture search at various speeds during
playback.
In the menu: move the cursor to the left/right.
PLAY SEL In disc mode: starts playback.
In the menu: confirms a selection in a menu.
nSelects various camera angles* for certain
scenes or passages on the DVD during
playback.
5as6Select the previous/next track or section
during playback.
7In disc mode: interrupts or stops playback.
In the menu: moves the cursor down.
OVERVIEW____________________________________________
* Depends on the DVD in use

ENGLISH
9
OVERVIEW____________________________________________
Switches between the original and the
dubbed language* during DVD playback.
Switches between the various sound formats.
1 ... 0 Numerical buttons for various entries.
bIn DVD mode: for repeating a chapter, track
or the entire DVD.
In CD mode: for repeating a track, a file
(MP3), all tracks or all files (MP3).
d
Switches the sound off (mute).
* Depends on the DVD in use

10
Note:
Do not connect any other equipment while the device is
switched on. Switch off the other equipment as well before
connecting it.
Only plug the power supply unit into the mains socket after you
have connected the external devices.
Connecting the television
1Insert the plug of the audio/video cable supplied into the
»AV OUT« socket on the right side of the DVD player.
2Insert the plug of the audio/video cable into the corresponding
input (AV IN) of the external device.
Connecting external audio/video sources
1Insert the plug of the audio/video cable supplied into the
»AV IN« socket on the right side of the DVD player.
2Insert the plug of the audio/video cable into the corresponding
output (AV Out) of the external device.
CONNECTION/PREPARATION _________

ENGLISH
11
Connecting a digital camera or an MP3 player
1Insert the digital camera or MP3 player cable into the »USB
«port on the right side of the DVD player.
Operating with a memory card
The DVD player supports SD format (Secure Digital memory card)
and MMC (Multimedia Card) memory cards.
Inserting the memory card
1Insert the card carefully into the » SD/MMC« card slot on
the right of the device, with the contacts facing upwards and the
contact side at the front, until it latches into place.
Important:
– Do not use excessive force when inserting the card. Only
apply slight pressure.
– Memory cards are resistant to dirt and moisture, but may only
be inserted into the DVD player in a dry and clean condition.
– Never remove memory cards during operation. This can
damage the memory card. This type of damage will invali-
date your warranty.
Removing the memory card
1Remove the memory card from the card slot by pressing the
card inwards slightly until the latch is released. Then pull out the
card.
(
CONNECTION/PREPARATION __________

12
CONNECTION/PREPARATION __________
Connecting earphones or headphones
You can also operate the DVD player with one or two headphone or
earphone sets. The loudspeakers are switched off automatically.
Adjust the volume of the headphones or earphones with
»– ß+«.
1Insert the headphones or earphones into the »y« sockets on the
right side of the DVD player.
Important:
Excessive volume levels when using headphones or earphones
can damage your hearing.
Connecting the power supply unit
You can run the DVD player using the power unit supplied or with
the built-in rechargeable battery.
If the DVD player is supplied with voltage from the mains when
switched on, the built-in battery is automatically switched off.
Important:
Always switch off the DVD player before connecting to or dis-
connecting from the mains.
Only use the power unit supplied. Using another power supply
unit could lead to malfunction and damage.
Unplug the power supply unit if you are not using it.
1Plug the power supply unit into the »DC IN 12V Ó«
socket of the DVD player.
2Plug the power supply unit into the wall socket.
Important:
The only way to completely disconnect the device from the
mains is to pull out the plug.

ENGLISH
13
Activating the remote control battery
1When using it for the first time, pull out the film protruding from
the battery holder.
Replacing the remote control battery
1Pull out the battery holder.
2When inserting the battery (3 V, lithium), make sure the positive
terminal (+) is facing upwards.
3Push the battery holder back into the remote control until it
latches into place.
Note:
If the DVD player no longer reacts properly to remote control
commands, the battery may be flat. Always remove used
batteries. The manufacturer accepts no liability for damage
caused by leaking batteries.
Environmental note:
Batteries, including those which contain no heavy metal, should
not be disposed of with household waste. Please dispose of
used batteries in an environmentally sound manner. Find out
about the legal regulations which apply in your area.
Charging the battery
1Plug the power supply unit into the »DC IN 12V Ó«
socket of the DVD player.
2Plug the power supply unit into the wall socket.
3Press »ON/OFF« on the left of the device to switch off the
DVD player.
– The rechargeable battery is charging. During the charging
process, the loading display on the rechargeable battery
glows red. When the battery is fully charged, the charging
display lamp goes out.
Note:
The charging time is 5 to 6 hours.
Important:
The battery may only be replaced by a specialist dealer.
There is a risk of explosion if the battery is not replaced
properly.
Only replace the battery with the same type of battery or an
equivalent (Spare part no. 759551418400).
CONNECTION/PREPARATION __________

14
Switching on
1Press »ON/OFF« on the left of the device to switch on the
DVD player.
Navigating in the menus
1Press »i« to open the main menu.
2Select the menu item, e.g. »Installation«, by pressing »7« or
»!« and press »$« to activate.
3Select the line, e.g. »OSD language«, using »7« or »!« and
press »$« to activate.
4Make the setting, e.g. »German«, with »7« or »!« and press
»PLAY SEL« to confirm.
5Switch off the main menu with »i«
or
select the »Quit the menu« menu item with »7« or »!« and
press »PLAY SEL« to confirm.
System settings
Selecting the menu language
There are eight languages available in the setup menu. The default
setting is »English«.
1Press »i« to open the main menu.
2Select the »Installation« menu item by pressing »7« or »!«
and press »$« to activate.
3Select »OSD language« with »7« or »!« and press »$« to
activate.
4Select your language using »7« or »!« and press »PLAY
SEL« to confirm.
Setting the picture format
1Press »i« to open the main menu.
2Select the »Video settings« menu item with »7« or »!« and
press »$« to activate.
3Select »TV format« with »7« or »!« and press »$« to acti-
vate.
4Press »7« or »!« to select the setting and press »PLAY SEL«
to confirm.
– »4:3 PS« – large picture cropped to the left and right.
– »4:3 LB« – wide picture with black bars at the top and bottom.
– »16:9« – for widescreen format. »16:9« is the default value.
INITIAL SETUP ______________________________________
Installation
: Select
➞
➞
➞
➞
8
OSD language
Menu language
Dubbed language
✔ English
German
Italian
Spanish
Subtitle language
s
s
s
s
Swedish
S
Installation
: Select
➞
➞
➞
➞
8
OSD language
Menu language
Dubbed language
Subtitle language
s
s
s
s
Video settings
: Select
➞
➞
➞
➞
8
≠Screen Saver
TV format
TV standard
4 : 3 PS
4 : 3 LB
✔ 16 : 9
Video output
s
s
s
s

ENGLISH
15
Setting the TV norm
The colour norm of the DVD player’s screen menus has to be
adapted to the format of your television or flat screen.
Select »NTSC« for televisions with the NTSC system, or »PAL« for
those with the PAL system.
1Press »i« to open the main menu.
2Select the »Video settings« menu item with »7« or »!« and
press »$« to activate.
3Select »TV standard« with »7« or »!« and press »$« to
activate.
4Select the setting (»NTSC« or »PAL«) with »7« or »!« and
press »PLAY SEL« to confirm.
Setting analog audio output
1Press »i« to open the main menu.
2Select the »Audio settings« menu item with »7« or »!« and
press »$« to activate.
3Activate »Audio output« with »W«.
4Select the setting (»2 Channel« or »Off«) by pressing »7« or
»!« and press »PLAY SEL« to confirm.
Exiting system settings
1Switch off the main menu with »i«.
INITIAL SETUP ______________________________________
Video settings
: Select
➞
➞
➞
➞
8
Screen Saver
TV format
TV standard
NTSC
✔ PAL
Video output
s
s
s
s
Audio settings
: Select
➞
➞
➞
➞
8
Audio output ✔ 2 Channel
Off
s

16
Switching on and off
1Press »ON/OFF« on the left of the DVD player to switch on
and off.
Adjusting the volume
1Press »– z+« to adjust the volume.
Setting the picture format
1Open the menu by pressing »LCD« until the »FORMAT« dis-
play appears.
2Press »§« or »$« to set the picture format.
Setting the colour
1Open the menu by pressing »LCD« until the »COLOR« display
appears.
2Press »§« or »$« to adjust the colour.
Setting the brightness
1Open the menu by pressing »LCD« until the »BRIGHTNESS«
display appears.
2Press »§« or »$« to adjust the picture brightness.
Switching off the DVD player screen
1Open the menu by pressing »LCD« until the »LCD On
« display appears.
2Switch off the DVD player screen by pressing »§« or »$« to
switch to »LCD Off« and confirm with »PLAY SEL«.
Note:
Press »LCD« once to switch on the screen.
Selecting the data medium
1Open the menu by pressing»MODE«, select the »Disc«, »USB«
or »Card reader« data medium with »7« or »!« and confirm
with »PLAY SEL«.
GENERAL FUNCTIONS________________________

ENGLISH
17
DVD features
You can recognise a DVD by the logo on the label.
The discs have one or more tracks depending on the content of the
DVD.
Each track can contain one or more chapter. Selecting the track and
chapter is simple and convenient.
You can control and direct playback of the DVD using the DVD
player’s menu.
Special DVD features
DVDs have an overview of all the tracks and track sections in the
track menu.
Some of the DVD player functions, such as slow motion, freeze-
frame and auto-play, can also be controlled by the DVD itself.
Because of this you may not be able to select these functions during
certain scenes.
Many DVDs have audio tracks recorded in up to eight languages.
You can select the language you prefer.
Many DVDs are recorded by the manufacturer with subtitles in several
languages. You can select subtitles from up to 32 languages.
Films are released at different times in different parts of the world.
This is why all DVD players all over the world have a regional code.
The regional code for your DVD player is 2.
DVDs can also have other regional codes. If you insert a DVD with
a different regional code into the DVD player, a message appears
on the screen with the regional code. The DVD cannot be played.
Notes:
If the » « symbol appears on the screen, then the selected
function is not possible with this DVD.
DISC FEATURES ____________________________________

18
MP4 video CD features
An MP4 video is an encoder/decoder, based on the MPEG-4 com-
pression system, which is used to decrypt and display compressed
video data.
This enables the DVD player to play back videos compressed in the
DivX©format. This results in playback quality with fewer artefacts
and higher compression.
MP4 video files have the suffix .AVI. MP4 video data is packed into
the AVI file along with audio data which is compressed as MP3
data, this means: MP4 video and MP3 audio form the AVI file.
MP3 CD features
MP3 stands for MPEG-1 Audio Layer 3. The MP3 format allows you
to store audio data with the quality of a CD on your computer. The
standard encoding bit rate for MP3 files is 128 kbps. The funda-
mental rule applies: the higher the bit rate of a file, the better the
sound quality.
Most MP3 files on the Internet are encoded at 128 or 160 kbps.
160 kbps is considered CD quality. MP3 files can be downloaded
from the Internet and then burned onto a CD ROM disc using
suitable PC software.
In MP3 mode, the terms “album” and “file” are very important.
“Album” corresponds to a folder on a PC, “file” to a file on a PC or
a CD-DA track.
JPEG or picture CD features
JPEG stands for Joint Picture Experts Group. This process was
designed to compress picture files.
The files on a JPEG CD can be organised in directories. This
structure is similar to that of an MP3 CD. JPEG CDs only contain
data in the compressed JPEG format. This is mostly data from digital
cameras or from imaging programs. The data (images) can be
displayed individually or in sequence in a slide show.
Audio CD features
An audio CD (CD-DA) is identified by this logo. Audio CDs only
contain sound recordings. They can be played in the normal
manner on an audio system. The individual tracks are stored in a
sequence. There are no folders.
As well as audio CDs, the DVD player can read CD-Rs and
CD-RWs with audio data.
DISC FEATURES ____________________________________

ENGLISH
19
General information on disc playback
Before starting DVD playback on the DVD player, ensure that there
is no cable connection to an external device via the »AV IN«
socket.
When you insert a disc, playback usually starts automatically.
Depending on the disc, a menu then appears on the screen where
you can control disc playback.
If the » « symbol appears on the screen in response to some
button commands, then this function has not been enabled by the
disc manufacturer or this function is not available in the current
operating mode.
Preparing for disc playback
1Press »ON/OFF« on the left of the DVD player to switch on.
– »No Disc« appears in the display if there is no disc in the
player.
Inserting the disc
1Open the disc compartment on the left side of the device.
2Put in the disc with its label facing upwards.
3Close the disc compartment.
Removing discs
1Open the disc compartment on the left side of the device.
2Remove the disc.
3Close the disc compartment.
Disc playback
1Press »PLAY SEL« to start playback.
2Press »!« to pause playback (freeze-frame).
3Press »!« to advance the scene frame by frame.
4Press »PLAY SEL« to resume normal playback.
5Press »7« (twice) to end playback.
DVD/CD PLAYBACK____________________________
Open
No Disc
Loading
IJ
ı
IJ
II
IJ
7

20
Pausing and resuming playback
In DVD mode, you can stop playback at any point and then continue
where you left off.
1To pause playback, press »7« once.
2Press »PLAY SEL« to resume normal playback.
3To end playback, press »7« twice.
Displaying playback information
In DVD mode
1Keep pressing »DISPL.« to display playback information.
– » «: current track number, total number of tracks.
– » «: current chapter number, total number of chapters.
– »Title Elapsed«: elapsed playing time of the track.
– »Title Remain«: remaining playing time of the track.
– »Chapter Elapsed«: elapsed playing time of the chapter.
– »Chapter Remain«: remaining playing time of the chapter.
– Additional information about subtitles, dubbed languages,
sound format and camera angle.
In audio CD mode
1Keep pressing »DISPL.« to display playback information.
– » «: current track number, total number of tracks.
– »Single Elapsed«: actual track number/total number of
tracks, elapsed playing time of track.
– »Single Remain«: actual track number/total number of tracks,
remaining playing time of track.
– »Total Elapsed«: actual track number/total number of tracks,
elapsed playing time of disc.
– »Total Remain«: actual track number/total number of tracks,
elapsed playing time of disc.
Note:
To hide the playback information, press »DISPL.« repeatedly
until the last display disappears.
DVD/CD PLAYBACK____________________________
Resume
IJ
7
Other manuals for DVD-P 7850
1
Table of contents
Other Grundig Portable DVD Player manuals

Grundig
Grundig DVD-P 6200 User manual

Grundig
Grundig DVD-P 7644 User manual

Grundig
Grundig DVD-P 8600 User manual

Grundig
Grundig DVD-P 8600/2 User manual

Grundig
Grundig DVD-P 7600 User manual

Grundig
Grundig DVD-P 7850 User manual

Grundig
Grundig DVD-P 7000 User manual

Grundig
Grundig DVD-P 8600 User manual

Grundig
Grundig DVD-P 7600 User manual

Grundig
Grundig DVD-P 7000 User manual