Nikkai a37hf User manual
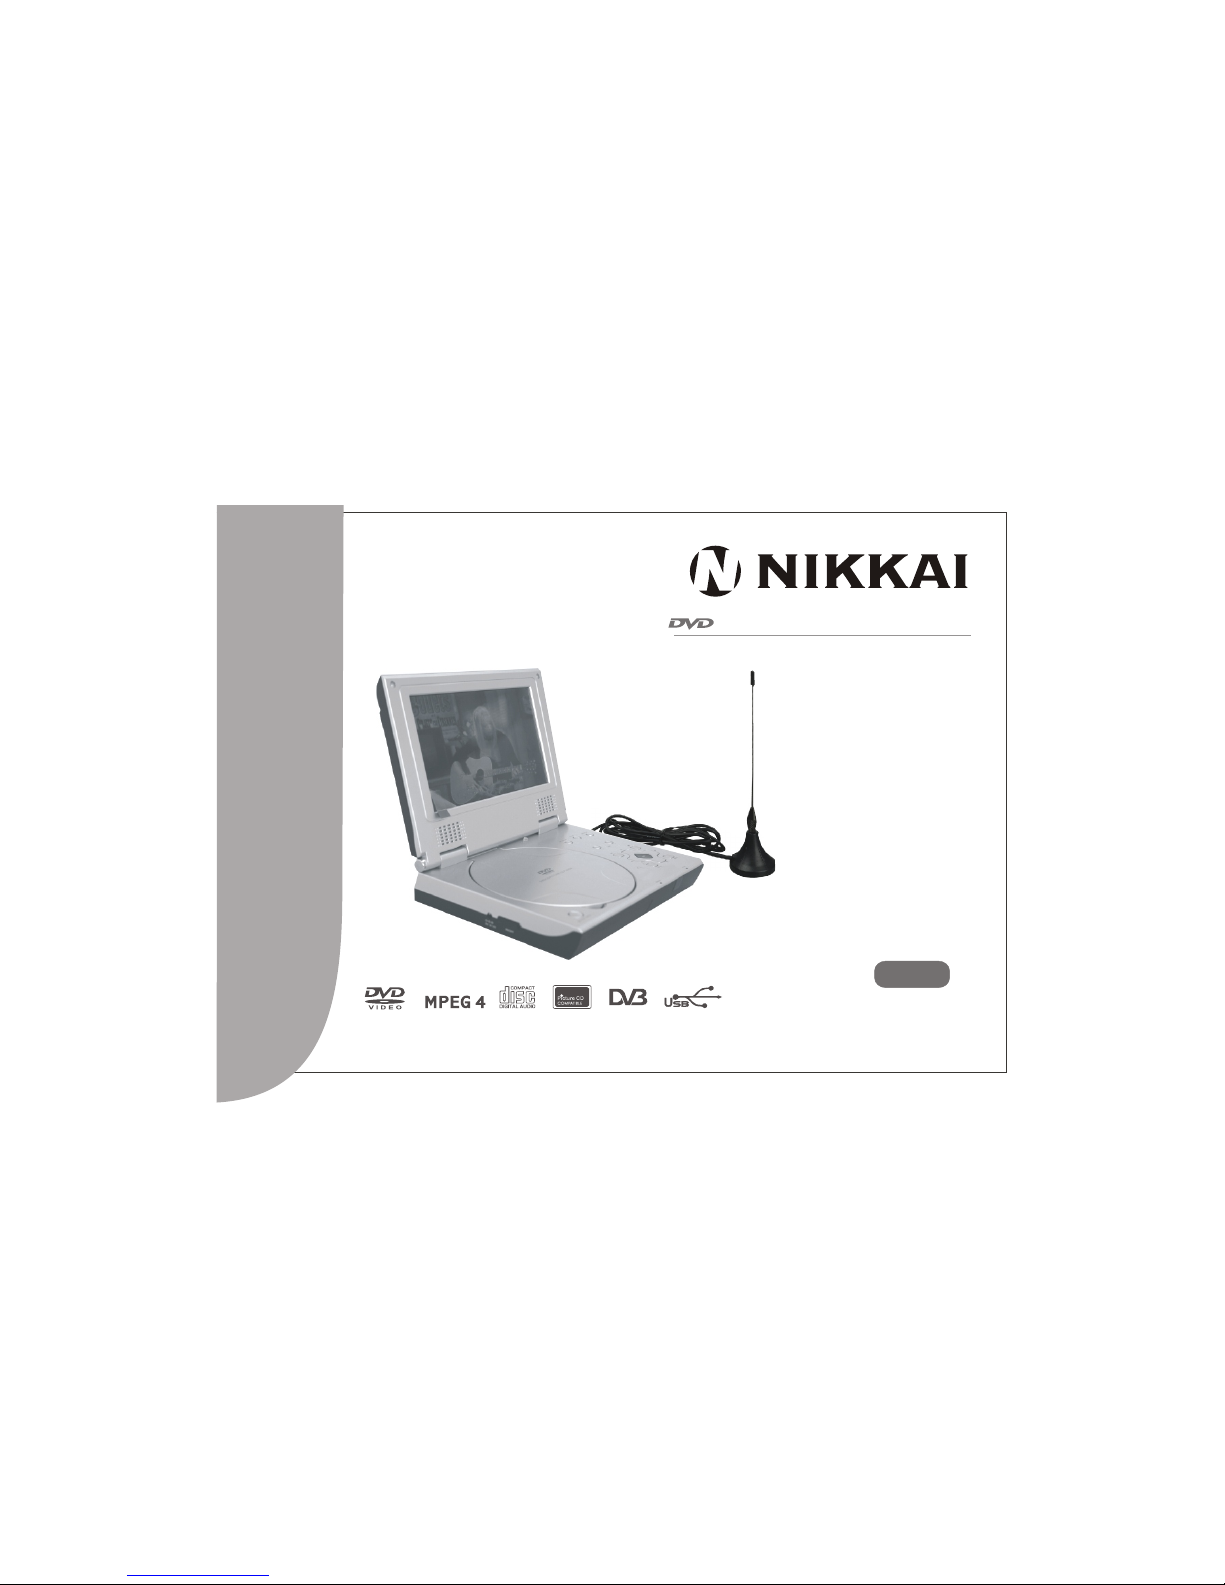
Portable Player with DVB-T
,
Owner s Manual
English
JPEG
SAFETY INFORMATION
TO REDUCE THERISK OF FIREAND ELECTRIC SHOCK, DO NOTEXPOSE THIS UNIT TO RAIN OR
MOISTURE.
IMPORTANT SAFEGUARDS
: To reducethe
risk of fire andelectric shock, do
not remove the cover(or back) of
the unit. Refer servicingonly to qualified servicepersonnel.
The lightning flash witharrowhead symbol, within anequilateral
triangle, is intended toalert the user tothe presence of uninsulated
"dangerous voltage" within product'senclosure that may beof
sufficient magnitude to constitutea risk of electricshock.
The exclamation point withinan equilateral triangle isintended to
alert the user tothe presence of importantoperation and servicing
instructions in the literatureaccompanying the appliance.
WARNING: TO REDUCETHE RISK OF FIREOR ELECTRIC SHOCK, DO
NOT EXPOSE THISAPPLIANCE TO RAIN ORMOISTURE.
CAUTION: TO PREVENTELECTRIC SHOCK, MATCHWIDE BLADE OF
PLUG TO WIDE SLOT, FULLY INSERT.
In addition to thecareful attention devoted toquality standards
in the manufacture ofyour video product, safetyis a major factor
in the design ofevery instrument. However,safety is your
responsibility, too.This sheet listsimportant information that will
help to assure yourenjoyment and proper useof the video
product and accessory equipment.Please read them carefully
before operation and usingyour video product.
CAUTION 1.
2.
3.
4.
5.
6.
7.
8.
Read and Follow Instructions-All the safety and operationinstructions should be
read before the video productis operated. Follow all operatinginstructions.
Retain Instructions- The safety andoperating instructions should be retainedfor
future reference.
Heed all Warnings-Comply withall warnings on the videoproduct and in the
operating instructions.
Polarization- Some video products areequipped with a polarized alternating-current
line plug. This plug willfit into the power outlet,try reversing the plug. Ifthe plug still
fails to fit, contact yourelectrician to replace your obsoleteoutlet. To prevent
electric shock, do not usethis polarized plug with anextension cord, receptacle, or
other outlet unless the bladescan be fully inserted withoutblade exposure. If you
need an extension cord, usea polarized cord.
Power Sources- This video productshould be operated only fromthe type of power
source indicated on the markinglabel. If you are notsure of the type of power
supply to your home, consultyour video dealer or localpower company. For video
products intended to operate frombattery power, or othersources, refer to the
operating instructions.
Overloading- Do not overload walloutlets or extension cords asthis can result in a
risk of fire or electricshock. Overloaded AC outlets,extension cords, frayed power
cords, damaged or cracked wireinsulation, and broken plugs aredangerous, They
may result in a shockor fire hazard. Periodically examinethe cord, and if its
appearance indicated damage or deterioratedinsulation, have it replaced byyour
service technician.
Power-Cord Protection- Power-supply cords shouldbe routed so that theyare not
likely to be walked onor pinched by items placedupon or against them, paying
particular attention to cords atplugs, convenience receptacles, and thepoint where
they exit from the videoproduct.
Ventilation- Slots and openingsin the case are providedfor ventilation to ensure
reliable operation of the videoproduct and to protect itfrom overheating. These
openings must not the blockedor covered. The openings shouldnever be blocked
by placing the video producton a bed, sofa, rug,or heat register. Thisvideo product
should not be placed ina built-in installation such asa book case or rack,unless
proper ventilation is provided orthe video product manufacturer's instructionshave
been followed.

9.
10.
11.
11a.
12.
13.
Attachments- Do not use attachmentsunless recommended by the videoproduct
manufacturer as they may causehazards.
Water and Moisture- donot use this video productnear water for example, neara
bath tub, wash bowl, kitchensink or laundry tub, ina wet basement, or neara
swimming pool etc. Caution: Maintainelectrical safety. Powerline
operated equipment or accessories connectedto this unit should bearsafety
certification mark on the accessoryitself and should not bemodified so as to
defeat the safety features. Thiswill help avoid any andshould not be modified so
as to defeat the safetyfeatures. This will help avoidany potential hazard from
electrical shock or fire. Ifin doubt, contact qualified servicepersonnel.
Accessories- Do not place thisvideo product on an unstablecart, stand, tripod,
bracket, or table. The videoproduct may fall, causing seriousinjury to a child or
adult as well as seriousdamage to the video product.Use this video product only
with a cart, stand, tripod,bracket, or table recommended bythe manufacturer's or
sold with the video product.Any mounting of theproduct should follow the
manufacturer's instructions and use ofa mounting accessory recommended bythe
manufacturer.
A video product andcart combination should be movedwith care. Quick stops,
excessive force, and uneven surfacesmay cause the video productand cart
combination to overturn.
Outdoor Aerial Grounding- Ifan outside aerial or cablesystem is connected to
the video product, be surethe antenna or cable systemis grounded so as to
provide some protection against voltagesurges and built-up static charges.
Section 810 of the NationalElectrical Code, ANSI/NFPANo.70-1984 (Section 54 of
Canadian Electrical Code, Part1) providesinformation with respect to proper
grounding of the mast andsupporting structure, grounding of thelead-in wire to an
antenna-discharge unit, connection to groundingelectrodes, and requirements for
the grounding electrode.
Power Lines-An outside aerial systemshould not be located inthe vicinity of
overhead power lines, other electriclight or power circuits, orwhere it can fall into
such power lines or circuits.When installing an outside aerialsystem, extreme
care should be taken tokeep from touching or approachingsuch power lines or
circuits, as contact with themmight be fatal. Installing anoutdoor aerial can be
hazardous and should be leftto a professional aerial installer.
Note to CATV systeminstaller
This reminder is provided tocall the CATV systeminstaller's attention to
Section 820-40 of the NECwhich provides guidelines for propergrounding
and, in particular, specifiesthat the cable ground shallbe connected to the
grounding system of the building,as close to the pointof cable entry as
practical.
SAFETY INFORMATION
Use
Cleaning- Unplug this video product from the wall outlet before cleaning.
Do not use liquid cleaners or aerosol cleaners. Use a damp cloth for cleaning.
Objects that may touch dangerous voltage points or "short-out" parts could result in a fire or
electric shock. Never spill liquid of any kind on the video product.
Lightning-For added protection for this video product during a lightning storm, or when it is left
unattended and unused for long periods of time, unplug it from the wall outlet and disconnect
the aerial or cable system. This will prevent damage to the video product due to lightning and
power line surges.
Service
Servicing-Do not attempt to service this video product yourself, as opening or removing covers
may expose you to dangerous voltage or other hazards. Refer all servicing to qualified service
personnel.
Conditions Requiring Service-Unplug this video product from the wall outlet and refer servicing
to qualified service personnel under the following conditions:
A.When the power-supply cord or plug is damaged.
B.If liquid has been spilled, or objects have fallen into the video product.
C.If the video product has been exposed to rain or water.
D.If the video does not operate normally by following the operating instructions.
Adjust only those controls that are covered by operating instructions.
Improper adjustment of other controls may result in damage and will often
require extensive work by a qualified technician to restore the video product
to its normal operation.
E.If the video product has been dropped or cabinet has been damaged.
F.When the video product exhibits a distinct change in performance-this
indicates a need for service.
Replacement Parts-When replacement parts are required, have the service technician verify
that the replacements he uses have the same safety characteristics as the original parts. Use
of replacements specified by the video product manufacturer can prevent fire, electric shock, or
other hazards.
Safety Check-Upon completion of any service or repairs to this video product, ask the service
technician to perform safety checks recommended by the manufacturer to determine that the
video product is in safe operating condition.
Wall or Ceiling Mounting- The product should be mounted to a wall or ceiling only as
recommended by the manufacturer.
Heat-The product should be situated away from heat sources such as radiators, heat registers,
stoves, or other products (including amplifiers) produce heat.
14.
15.
16.
17.
18.
19.
20.
21.
22.

FEATURES
LCD TFT Display
DVD,CD,MPEG 4,Picture CDJPEG compatible
CD-R, CD-RW capable
7 Inch TFTLCD
Polymer rechargeable battery, one fully
charged battery canlast for 2.5 hours
Intelligent charge whileplaying
With CarAdaptor
Earphone output
TV format:
PAL/ NTSCcolour system
4:3 / 16:9screen format select
Video output:
Composite Video output
Audio output:
Down-mix stereo output
Digital output(Coaxial)
DVD features:
Multi Subtitle select
Multi Language select
Multi Angle select
Other features:
On screen controlmenu
Digital zooming
Slow motion forward
Child lock
Auto screen saver
Electronic anti-shock
USB connection
(only support USBflash disk)
DVB-T features:
Auto scan
Manual scan
Parental control
Channel protect
Channel remap
Channel reserve
The apparatus andAC/DC adaptor shall notbe exposed to drippingor
splashing and no objectsfilled with liquids, suchas vases, should
be placed on apparatus.
For complete safety disconnectthe power input and the AC/DC
adapt from the mains.
The mains adaptor shouldnot be obstructed orshould be easily accessed
during intended use.
The marking plate forthe apparatus andAC/DC adaptor is locationat the
bottom of the enclosure.
The battery should notbe exposed to excessiveheat such as sunshine,
fire etc.

CONTENTS
Page
INTRODUCTION
SYSTEM CONNECTION
GETTING STARTED
About the player
Main body
Side
Remote control
System Connection
Connecting to External Power
Connecting to Car Power
AV mode
Choose mode
DVD mode
DVB mode
USB mode
2
3
4
5
6
6
7
7
8
9-10
11
SAFETY INFORMATION
FEATURES
FUNCTION BUTTONS
[ Play/Pause/Stop],[Search], [ Slow ] ,[Repeat]
[A-B] ,[ LCD Set Up ] ,[ Zoom],[GOTO ],
[ Program ] ,[Display],[FAV],[EPG]
12
13-14
14-16
SPECIFICATIONS
ON SCREEN DISPLAY
DVD SETUP MENU
TROUBLESHOOTING
DVD mode
CD mode
MPEG 4 mode
Kodak Picture CD mode
Language Setup
TV Display/Angle Mark/OSD Lang/Closed Captions
/Screen Saver/last Memory
Audio Setup
Speaker Setup/SPDIF Setup/Dolby digitalsetup
Video Setup
Quality
Preference Setup
TV Type/PBC/Audio/Subtitle/Disc Menu/
Parental Control/Defaults
Password Setup
Password Mode/Password
DVB-T Setup
Area Setting/Time Zone/ParentalAge/Channel Setup
17
17
18
18
19
19
19-20
20
21
21-22
23
24-25
INTRODUCTION
1
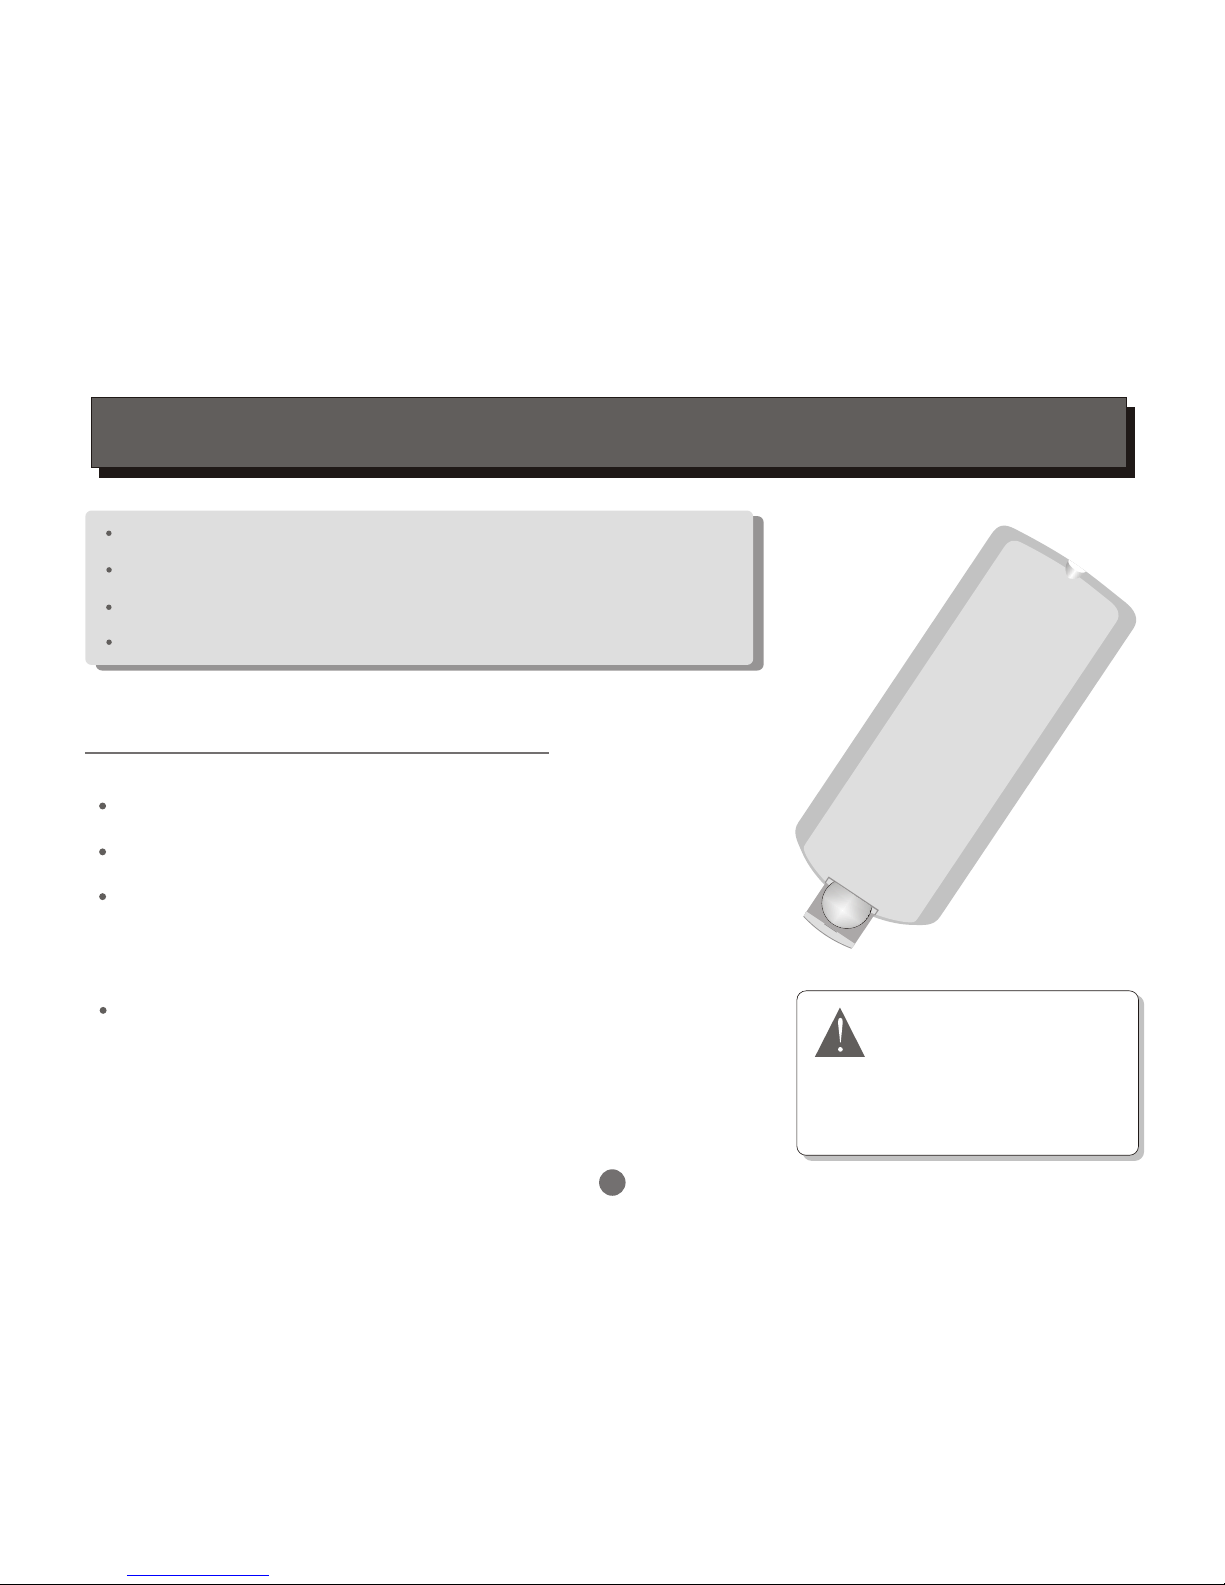
Pull the batterycompartment cover.
Insert a buttonbattery into the battery compartment.
Remove the batteryif the unit is not goingto be used
for a prolongedperiod of time.
Make sure thatthe battery has been inserted in
the correct polaritiesmatching to the symbols +, -
marked in thebattery compartment. Close the
battery compartment cover.
LOADING BATTERIES INTO THE REMOTE CONTROL
Inserting a batteryin the remote control
Unpack the unit.
Read through thisowner's manual before installation and use.
Takeout the protecting plastic film of battery .
Connect the system,make sure the connections are secured.
Danger of explosionif battery is
incorrectly replaced.Replace only
with the sameor equivalent type.
CAUTION
LITHIUM BATTERY
SETUP
TFT SETUP MODE
PORTABLE DVD PLAYER
VOL
-
MENU
PUSH OPEN
PowerBattery
+
+
VOL
CH
-
CH
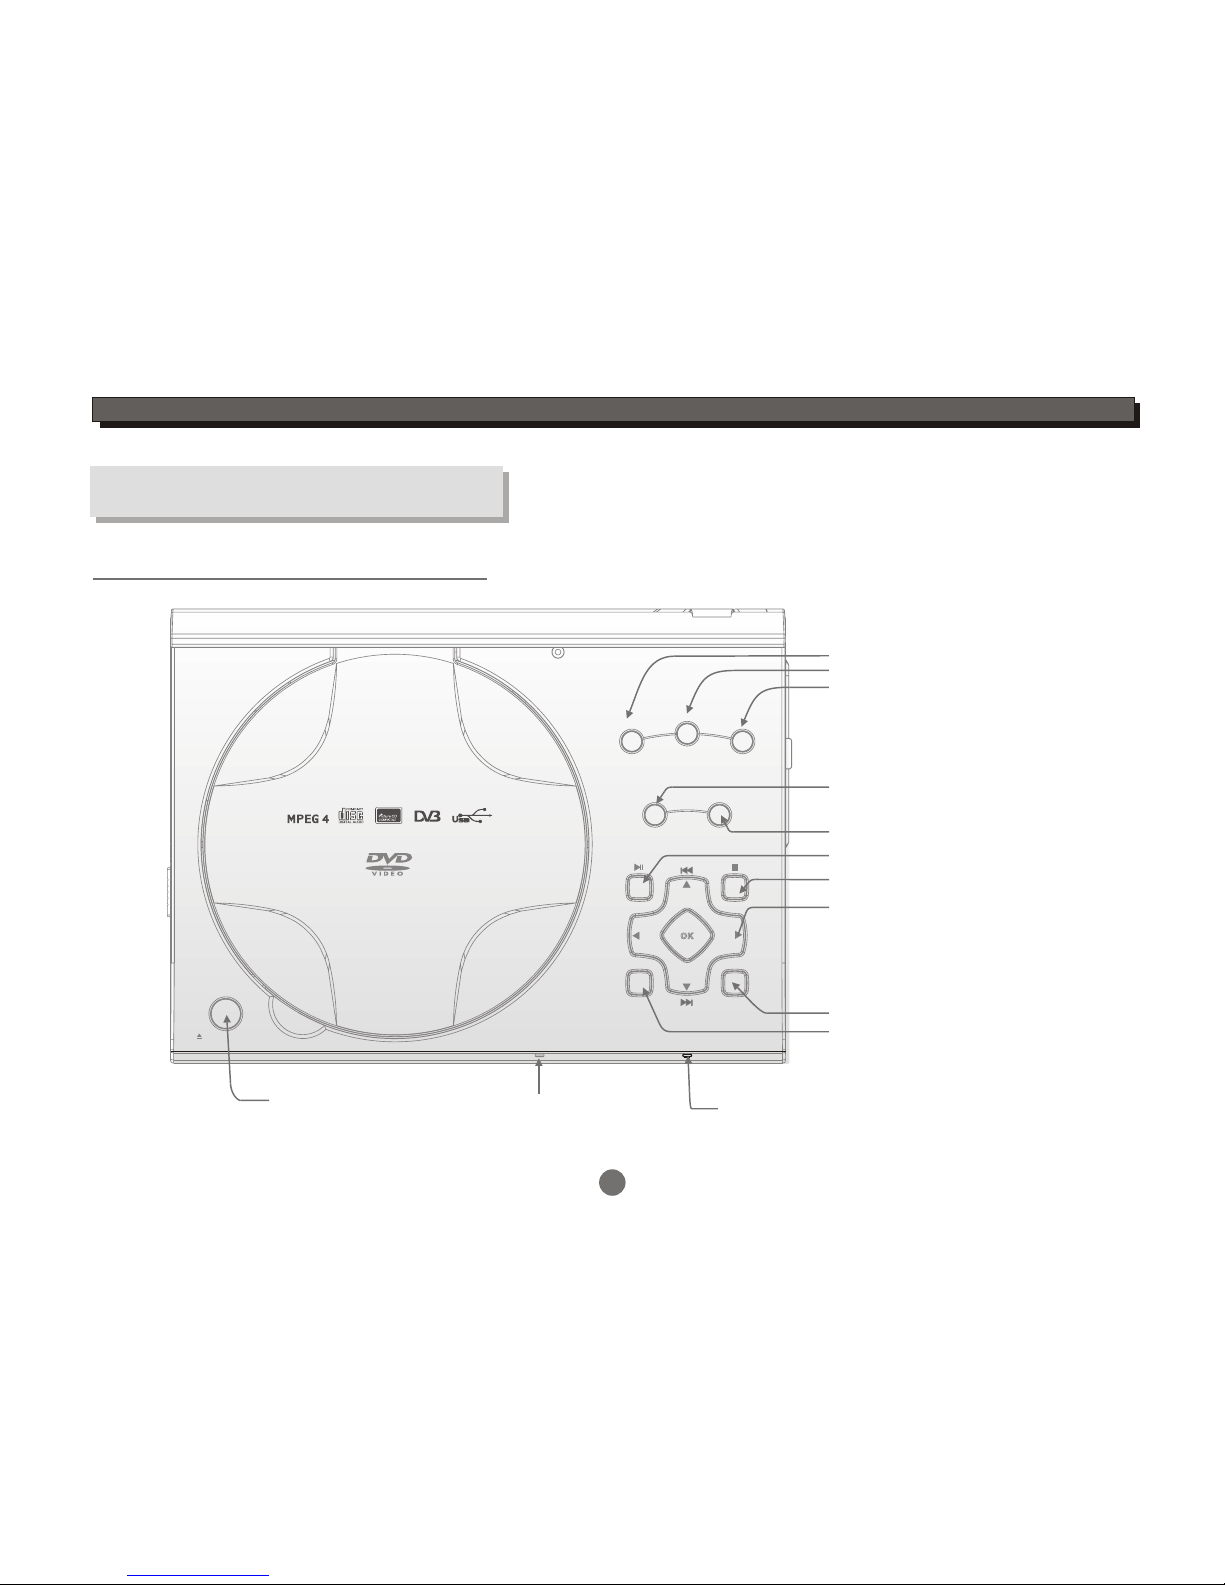
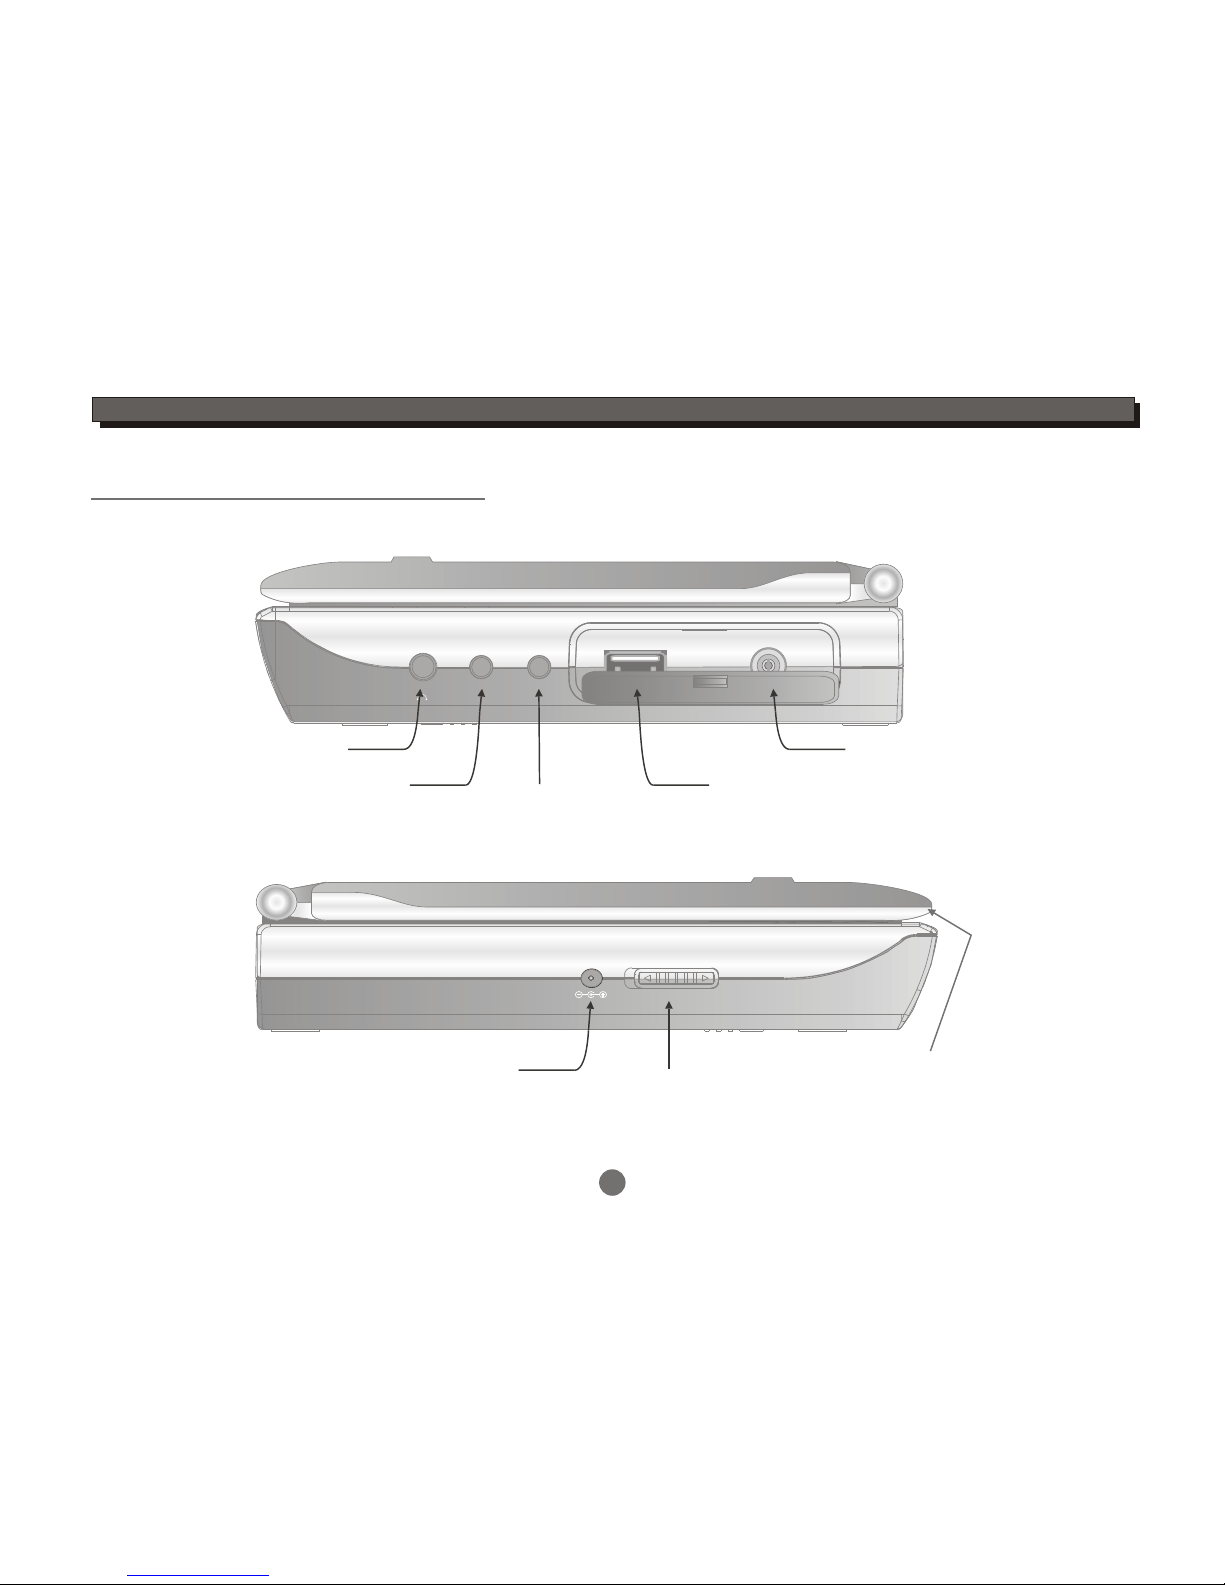
INTRODUCTION
About the player
Main body
Select DVD/DVB/USB mode
Menu
Stop
Play/Pause
Cursor(Up/Down/Left/Right)
In DVD mode:
Up/Down:Skip Forward/Backward
In DVB mode:
Left/Right:Channel Up/Down
Setup menu
TFT Setup
Push Open
(press the button to
open the disclid)
Power LED
(Green light whenthe unit ison)
2
Battery LED
( Green lightwhen the
battery is fullychargeable)
Title
Volume down
Volume UP
TITLE
JPEG
ON/OFF
DC IN 12V
PHONE AV IN OUT COAXIAL USB RF IN
Earphone Output
AV Input/Output Coaxial Output
DC input Open
3
Side
INTRODUCTION
Power Switch (In working mode, push
the button to the right to turn off the unit)
USB Slot
R INF

1 2 34
5678
9
GOTO 0
ENTER
LCD ON/OFF SETUP
LCD SETUP
ZOOM
SLOW
ANGLE
PROGRAM
TITLE
A-B REPEAT
MUTE
MENU
RETURN
AUDIO
AV IN/OUT
CLEAR
MODE
SUBTITLE
VOL+
CH+
CH-
VOL-
FAV
DISPLAY
EPG
TTX TV/RADIO
4
INTRODUCTION
Remote control
LCD display On/Off
Numeric entry
Program setting
Repeat section Ato B
LCD setup menu
Repeat playback
Stop
Play/Pause
DVD/DVB/USB mode select
Disc Skip backward/forward
Zoom
Volume Up
Clear the last entry
Return to DVDdisc menu
Return to DVDdisc title
DVD setup menu
Cursor:Up/Down/Left/Right
(Up/Down:Channel Up/Down in DVBmode)
Enter
Return to theupper menu
Angle select(disc feature)
Search backward/forward
Volume Down
AV in/AV out select
Goto
Slow
Mute
For teletext function
Audio track select(discfeature)
DVD subtitle select(discfeature)
Electronic programme guidemenu
Open up the favouritechannel list
On Screen Display(in DVDmode)
Display channel information(in DVBmode)
Switch between TVand Radio
Open up thetext function
PHONE AV IN OUT COAXIAL USB
RF IN
5
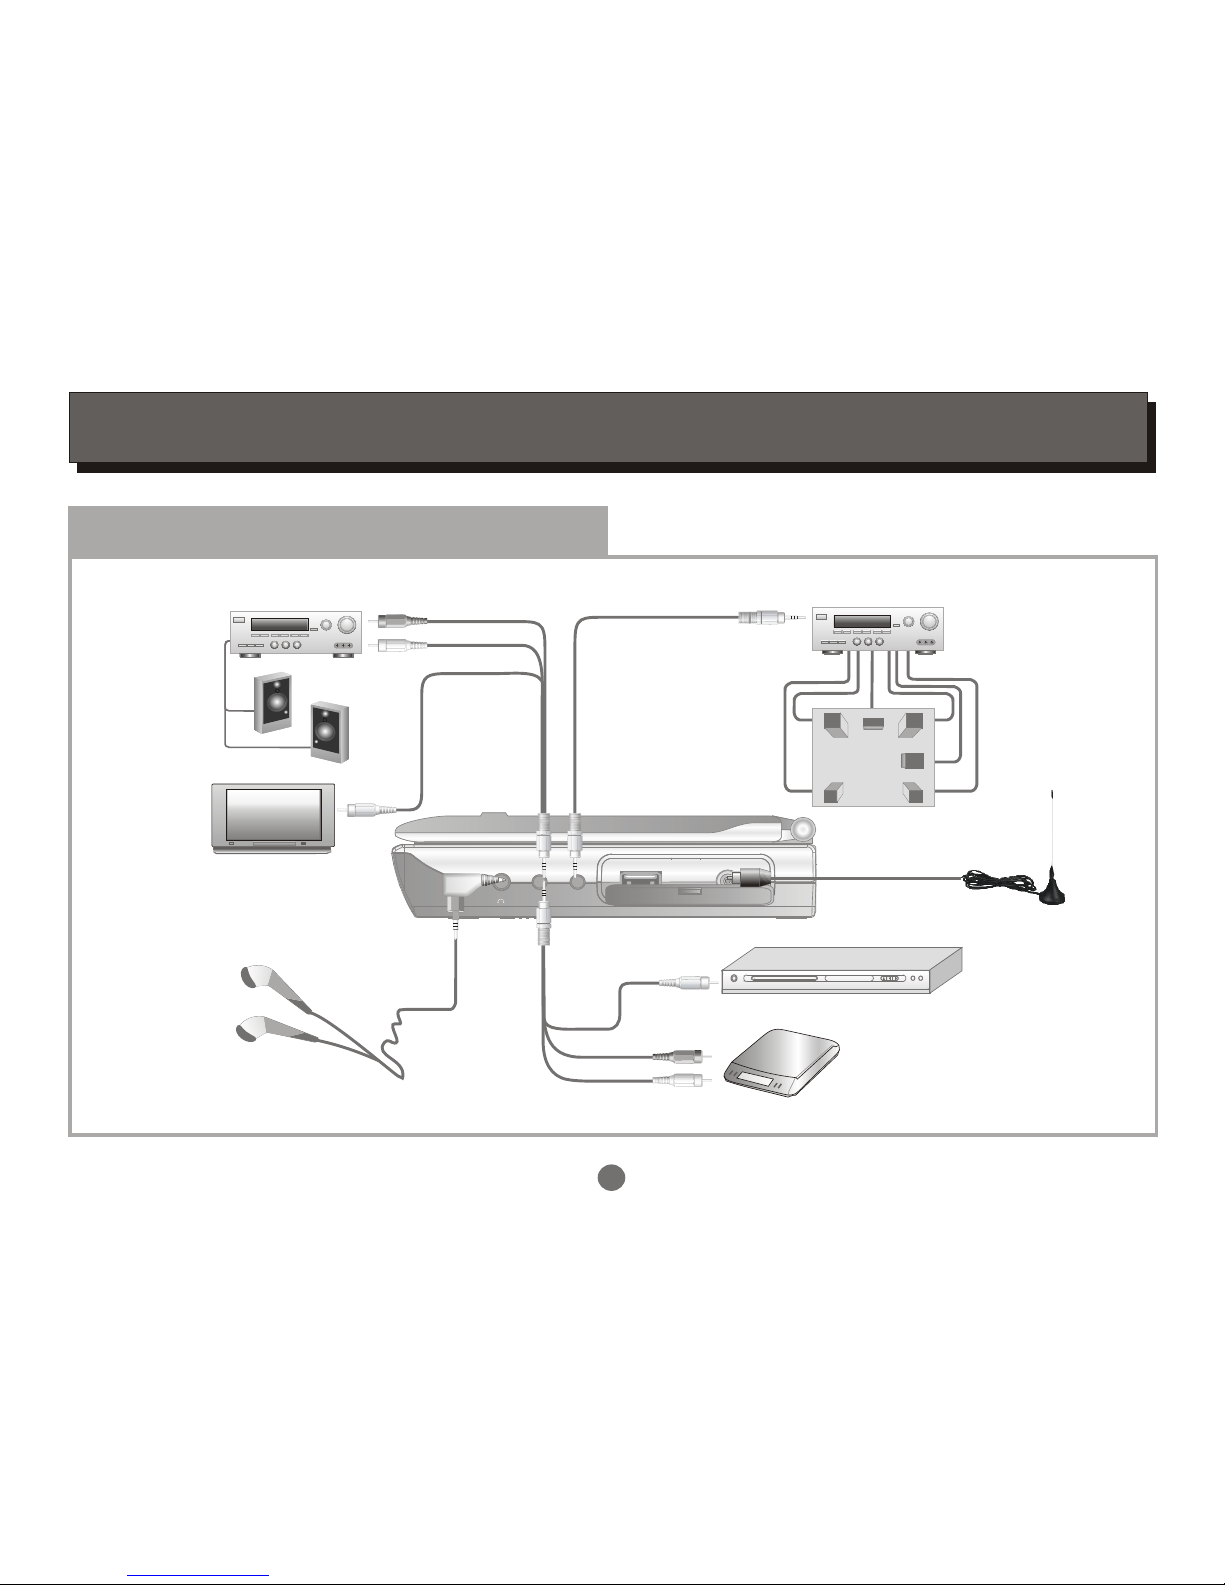
Stereo Amplifier
LR
SL
SR
C
SW
Front Left Front Right
Surround Left Surround Right
Centre
Subwoofer
Digital decode Amplifier
5.1speakers system
To Coaxial input
Audio cable
Video cable
DVD player/VCR
Antenna
white
red
yellow
.........
.........
.........
.........
.........
.........
.........
.........
.........
.........
.........
.........
.........
.........
.........
.........
.........
.........
.........
.........
.........
.........
.........
.........
.........
.........
.........
.........
.........
.........
.........
.........
.........
.........
.........
.........
.........
.........
.........
.........
.........
.........
.........
.........
.........
.........
.........
.........
.........
.........
.........
.........
.........
.........
.........
.........
white
red
Video cable
yellow
Audio cable
TV Set
Earphone lines
To the Audio output of
External source
SYSTEM CONNECTION
System Connection
ON/OFF
DC IN 12V
SYSTEM CONNECTION
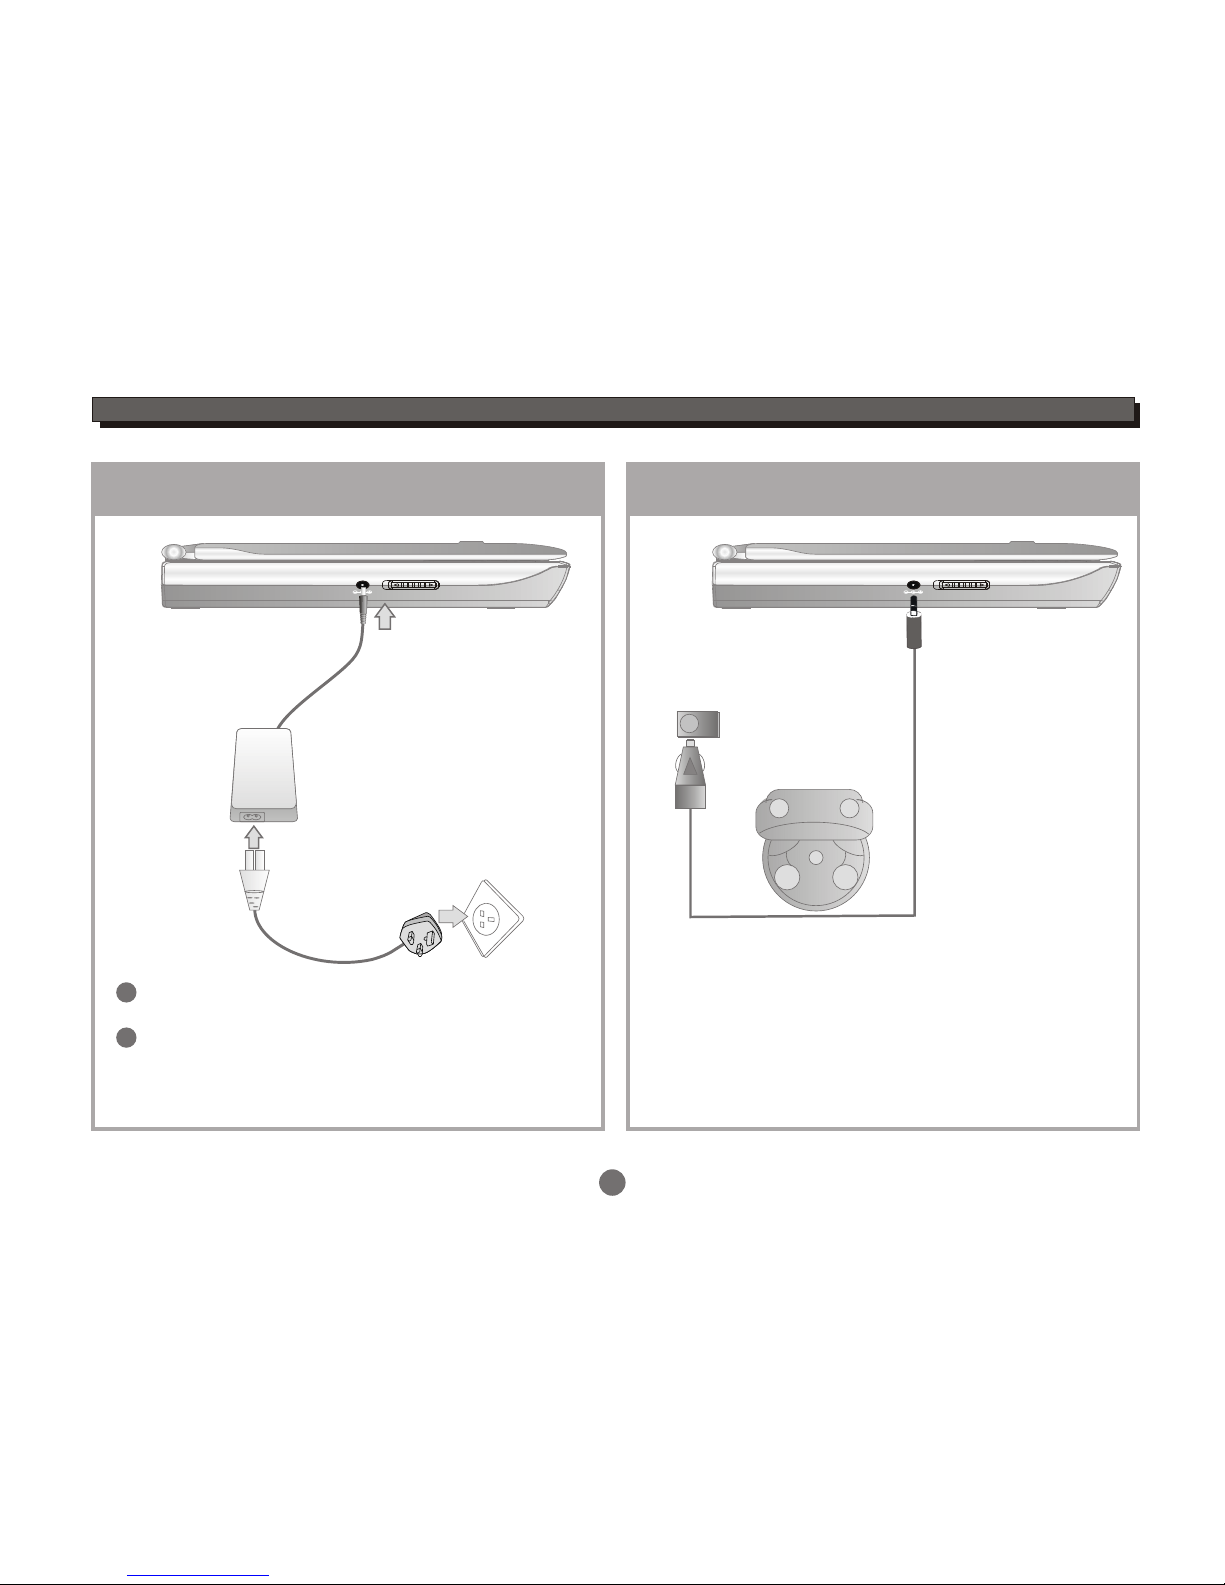
Connecting to External Power
2
1
6
3
Connect part 1 with 2,
Insert the plug into outlet, thenthe unit will be
in standby status.
1
2
ON/OFF
DC IN 12V
Connecting to Car Power
Automotive DC adaptor output
Connect this unit to DC adaptoroutput on the car .
The unit can be used afterstarting the car.
7
GETTING STARTED
AV Mode
The player is equippedwith two AV modes: AV IN
and AV OUT.Factory default of theunit is to AV OUT.
AV IN/OUT
Press to switchbetween these two modes.
AV IN/OUT
There will be Videoor Audio outputin this mode.
The unit will receiveVideo and Audiofrom the
external source
Set up thesystem
Select the correspondingsetting of the TV set(AV1,AV2,
etc.) Andthe amplifier,until the DVD power on screen.
AVIN mode:
AVOUT mode:
Switch on theplayer
ON/OFF
Connect with adaptor.
Open the topcover of unitto suitable angle
Push ON/OFF button on the sideto the left toturn
on the unit.
1
2
3
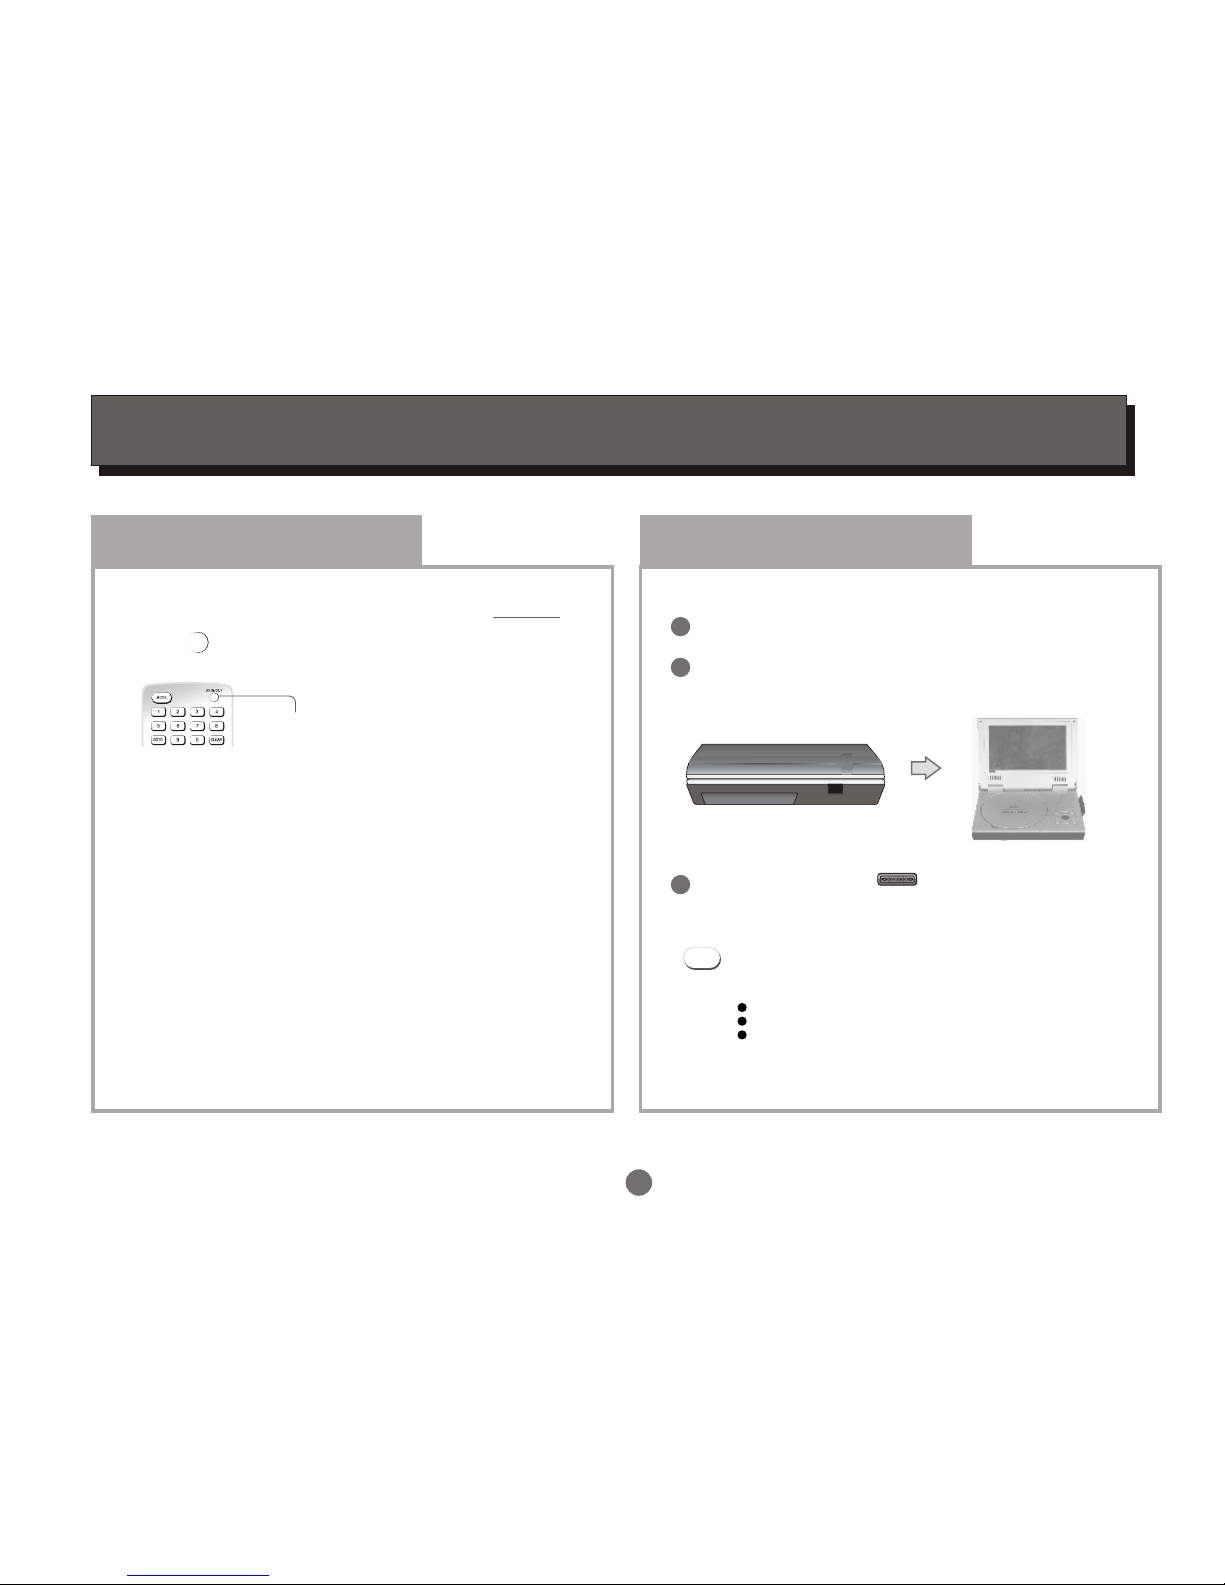
Choose mode
Select DVD or USB orDVB mode
Press MODE button on theremote to select DVD,
USB or DVB, then thecorresponding logo will
display on the TVscreen:
DVD mode
USB mode
DVB mode
MODE

8
GETTING STARTED
DVD Mode
PUSH OPEN
Press " PUSH OPEN" button on the panel to
open the disctray.
Load a discand close thedisc tray.
Load a disc
1
2
3
Automatic Play
The unit will takea few seconds todownload the disc
initial data,display thedisc type logoin the leftupper
corner of theTV screen,and thenstart playing
automatically.
If a DVDDisc Menu appears on screen
Press ENTER button on theremote (or onthe
unit) to start playback.
Or
Press CURSOR buttons to selectthe desired feature
in the menu,and thenpress ENTER button to confirm
a selection.
1
2
Please remove the protectivecard on the loaderif you use theunit first.
The label side mustbe upturned when youload a disc.
Please press the discuntil the disc isfixed in the loaderwhen you load adisc.

GETTING STARTED
9
DVB Mode (FREEVIEW)
Press the MODE button on the remote to enter DVB mode,then the DVB logo will display on the TV screen.
MODE
Auto Scan
Press SETUP button to enterthe setup menu.
Highlight icon, pressENTER button to enterDVB-T setup menu.
Highlight Channel Setup, press ENTER button to enter Channel setup menu.
00:00
-- DVB-T Setup Page --
Area
Time Zone
Parental Age
Channel Setup
ENG
18
Enter Channel Setup
00:00
-- Channel Setup --
Auto Scan
Manual Scan
Adjust Channel
Channel Remap
Reserve Channel
Auto Scan
Start
00:00
Press the UP or DOWN cursor button to highlight Auto Scan, select theStart,
then press theENTER button to confirm,a conversation window appears as
below:
Start to scan?
OK Cancel
Select "OK" or "Cancel"icon, press ENTER button to confirm.
The unit willscan for allthe digital TVand radio stations available in your
area and listthem as bottomright corner.
Auto Scan
Status Found Channels
Freq:545000KHz
TV Total No:03
Radio Total No:00
Find TV No:03
Find Radio No:00
Progress 29%
TV 01 BBC ONE
TV 02 BBC CHOICE
TV 03 BBC TWO
When all thedigital TV andradio stations have been
found, the programme willplay automatically after 3seconds.
Make sure thatthe area you choose is correct before auto scan.
Otherwise you may notsearch any channels.

Manual Scan
Status Found Channels
Freq:474000KHz
Add
Find TV No: 03
Find Radio No: 00
TV 01 BBC ONE
TV 02 BBC CHOICE
TV 03 BBC TWO
Manual Scan
Status Found Channels
Freq:474000KHz
Scan
GETTING STARTED
10
2
3
4
Highlight the Start item,press the ENTER button to enter the manual scan
setting menu.
Press the UP or DOWN cursor button to select the frequency you want, then press the ENTER button to start
channels scan. Theunit will scan forall the digitalTV and radio stationsavailable in your areaand list
them above Found Channels.
When all thedigital TV andRadio stations have been found, highlight Add icon,press the ENTER button to
add channels.
Press the RETURN button to exit.
5
Make sure area youchoose is correct before
auto scan! Otherwise youmay not be ableto
find any channels.
Manual Scan
In Channel Setupmenu,
press the UP or DOWN cursor button to highlight the Manual Scan,
and press theENTER button to select.
1-- Channel Setup--
Auto Scan
Manual Scan
Adjust Channel
Channel Remap
Reserve Channel
Manual Scan
Start
00:00

GETTING STARTED
11
USB mode
Insert a USB stickto the USB slotin the unit.
Press the MODE button to select USBmode, an On ScreenDisplay (OSD) indicator willappear on theTV screen,
which displays the fileinformation and operation status.
Song: Track 02
00:00 00:00
001
002
003
004
005
006/011
Disc files
current files /
total files
Selection
highlight
(Press ENTER
button to play
this file)
\Folder ABC\
..
Playback
status
Current folder
Preview
Press the UP or DOWN cursor button to highlightthe desired file orfolder, and pressthe ENTER button to confirm.
Then the player willstart playback.
The unit onlysupports USB flashdisk, but
does not support USBhard disk!
Multi-playback for USB:
MPEG4(AVI),JPEG....
For operation details ofthe file, please see
"ON SCREEN DISPLAY".
USB MODE
12
FUNCTION BUTTONS
Play / Pause / Stop
Press PLAY /PAUSE button to switch theplayer
between PLAYor PAUSE mode.
Press STOP button to stop intwo modes:
a) Press Once : STOP memorizes theinterrupt position.
( May resume withPlay button )
b) Press Twice : To stopcompletely.
(Will NOT resumewith Play button)
Player will not advanceor reverse during
"WARNING" section of any disc.
Search Forward /Backward
Press to search forward
Repeat pressing the buttonto change search speed
Press to search backward
Repeat pressing the buttonto change search speed
Press PLAY/PAUSErepeatedly to resume
normal playback
x2 x4 x8 x16 x32 (Play)
x2 x4 x8 x16 x32 (Play)
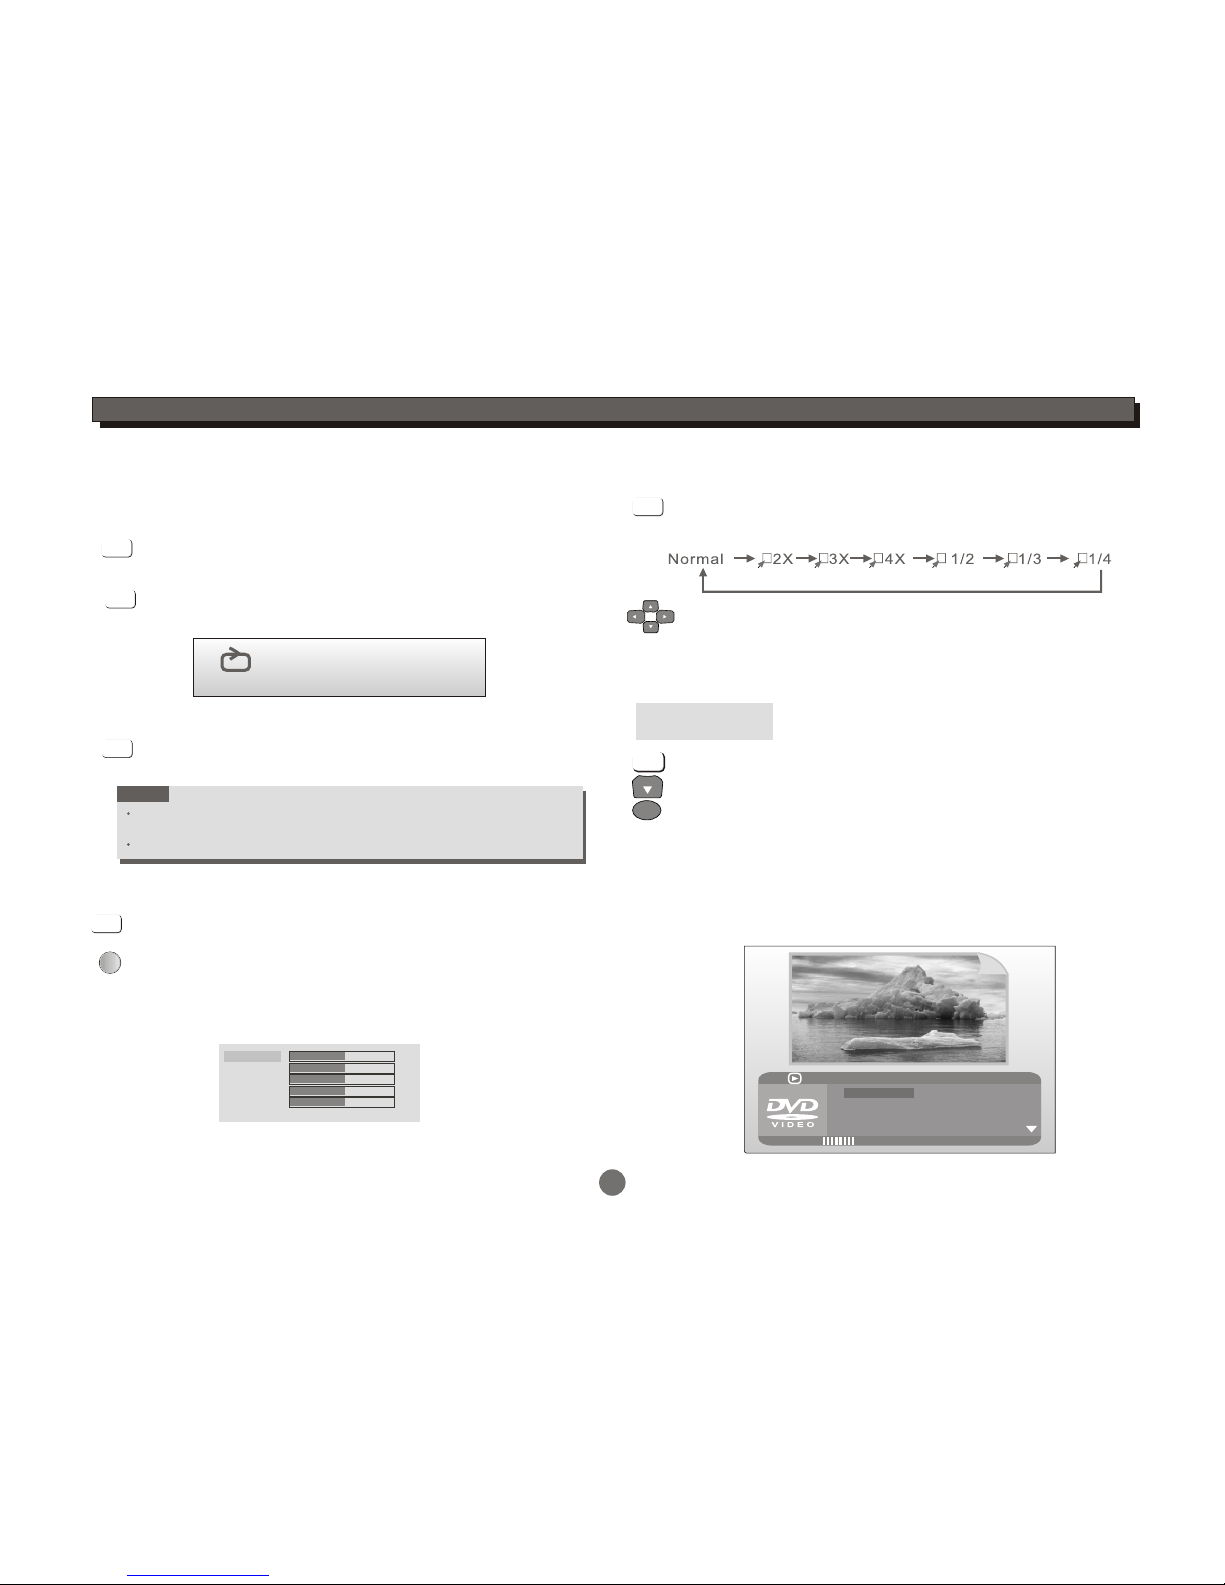
Slow Forward/Backward
Press SLOW button to play slow forward/backward.
Repeat pressing the button to changeslow forward or
backward speed:
1/2 1/4 1/8 1/16
SLOW
(Play)
1/16 1/8 1/4 1/2
(Slow Forward)
(Slow Backward)
Press PLAY/PAUSErepeatedly to resume normal
playback.
REPEAT
Press REPEAT button multiple timesto reach desired
repeat mode (see below).
DVD disc
MPEG 4/Picture CD disc
NOTE
Repeat functionality depends on adisc's production format,
some DVD discs donot allow repeat function.
Chapter
Title
ALL
Repeat the Chapter
Repeat the Title
Repeat the whole disc
REPEAT
Track
ALL
Repeat the existing track
Repeat all tracks
CD disc
Play in shuffle order
Play in random order
Play the existing track once
Repeat the existing track
Repeat the existing folder
Play the existing folder once
Shuffle
Random
Single
Repeat One
Repeat Folder
Folder
FUNCTION BUTTONS
13
24
A-B
To repeat playbackof a desired section:
1) Press the A-B button at the beginning of the desired
section "A".
2) Press the A-B button again at the end of the desired
section "B".
The player will repeat playback of thesection from Ato B.
3) Press the A-Bbutton again to cancel the functionand
return to normal play.
During playback,
NOTE
A-B repeat functionality depends ona disc's production format,
some DVD discs donot allow repeat function.
A-B repeat function does notapply to Picture CD disc.
A-B
A-B
A-B
A B
LCD Setup
Press LCD SETUP button on the remote or TFT SETUP
button on the panel to adjust Brightness,Hue,Contrast,
Saturation and Sharpness.
TFT SETUP
LCD SETUP
Press UP/DOWN button to select the desired itemsand
setup by the LEFT/RIGHT button.
Press LCD SETUP button again to exit.
Brightness
Hue
Contrast
Saturation
Sharpness
31
Reset
31
31
31
31
ZOOM
Press the ZOOM button to enlarge viewable picture.
Press the buttonrepeatedly to change the zoom scale:
Press the CURSOR buttons to adjust the zooming position.
ZOOM
Press the GOTO button to select GOTO mode.
DVD disc
Press DOWN button to highlight desireditem and
press ENTER button to select.
CH-
GOTO
Input title number
Input chapter number
Press the GOTO button again to exit.
Title --
Chapter --
TT TIME -:--:-- Input time h:mm:ss
(Hour : Minute: Second)
ENTER
01/23
08/28
5.1 CH English
Off
Title Elapsed 0:28:32
Bitrate 55
Menu
Title
Chapter
Audio
Subtitle
Search a desired section

14
FUNCTION BUTTONS
CD disc
Press the GOTO button to select GOTO mode.
Input desired time ofthe disc
mm:ss (Minute :Second)
Input desired time ofthe track
mm:ss (Minute :Second)
Input desired tracknumber
Disc Go To :--:--
Track Go To :--:--
Select Track :--
GOTO
TRACK 01/17 02:17
DISC GOTO:--:--
TRACK 01/17 02:17
TRACK GOTO:--:--
TRACK 01/17 02:17
SELECT TRACK:--/17
Select :---
Input desired titles ofthe disc
Input desired timeof the title
h:mm:ss (hour :Minute : Second)
Select :---
Go To-:--:--
MPEG4 disc
Press the GOTO button repeatedly to enter
different GOTO modes.
GOTO
PROGRAM
Program to playa DVD andCD disc ina desired sequence
automatically.
Load a DVD disc.
Use numeric key toinput the Titleand Chapter numbers,
Repeat inputting theTitle andChapter numbers until
programming is completed.
Press PROGRAM button,
the DVD programmenu will appear.
To clearthe last input, pressCLEAR button.
Highlight the "NEXT"icon to enterthe next page.
PROGRAM
CLEAR
ENTER
DVD program menu
Highlight the "Start" iconto confirm.
Press ENTER button to startthe program playback.
Highlight the "EXIT" iconand press ENTER button to quit
program menu.
Program: TT( 23 )/CH( -- )
TT: 05 CH: 07
TT:06 CH: 08
TT:03 CH: 02
TT: CH:
TT: CH:
Exit Start NEXT
TT: CH:
TT: CH:
TT: CH:
TT: CH:
TT: CH:TT: CH:
16
2
3
4
5
7
8
9
10
In program playback mode,pressSTOP button twice
to cancel the programplayback.

15
FUNCTION BUTTONS
Load a CD disc.
Use numeric key toinput the track numbers,
Repeat inputting thetrack numbers until
programming is completed.
Press PROGRAM button,
the CD programmenu will appear.
To clearthe last input, pressCLEAR button.
Highlight the "NEXT"icon to enterthe next page.
Highlight the "Start" iconto confirm.
Press ENTER button to startthe program playback.
Highlight the "EXIT" iconand press ENTER button
to quit programmenu.
PROGRAM
CLEAR
ENTER
CD program menu
In program playback mode,pressSTOP button twice
to cancel the programplayback.
For CD, the program functionis same as DVD disc.
Program funtiondoes notapply to MPEG4 andpicture CD.
Program: Track (01-16)
12
09
05
--
--
--
--
--
--
--
Exit Start NEXT
16
2
3
4
5
7
8
9
10
DISPLAY
Press DISPLAY button to switch theOSD indicator on oroff.
There are differentOSD indicators for different types of
discs: DVD, MPEG4, CDand Picture CD.See "ON
SCREEN DISPLAY"in this manual for the display detail.
This button hasdifferent functions inDVD or DVB mode.
In DVD mode:
DISPLAY
In DVB mode:
Press the DISPLAY button to display information about the
channel being viewed.Theinformation is shown as below:
Press the DISPLAY button again to display all
information including signal strengthand quality
shown as below:
Signal Strength:
Signal Quality:
0%
100%
DISPLAY
CA
CH-01 TV news
+
2006/12/19 10 25 28
Audio: 01/01 eng
TV
Table of contents
Other Nikkai Portable DVD Player manuals


