Nikkai A01JQ User manual

Operation Manual
LCD Colour Digital Television Receiver
Order Code: A01JQ

1
2
3
4
5
6
7
8
8
10
11
14
15
19
20
I Precautions
II Accessories
III Appearance
IV Description of Panel Buttons
V Description of Buttons on Remote Control
VI Connection of Main Interfaces
VII DVB-T Installation Guide
VIII DVB-T MENU Operation Guide
8.1 SETUP
8.2 TV/RADIO
8.3 MULTIMEDIA
8.4 GAME
IX ATV Menu
X Troubleshooting
XI Specifications
Contents

-1-
I Precautions
Storage
1. Keep this product away from extremely hot or cold places. The
storage temperature ranges from -20 to 60 and the working
temperature from 0 to 40 .
2. Do not use this product at damp environment like bathtubs, wash
basins, kitchens, washtubs, as well as basements, swimming pools
or similar places.
3. Do not expose your TV set to high humidity, dust or oil smoke.
4. Do not throw or drop this product.
5. Do not subject this device to the inside of a case or strong
vibrations, avoiding strong collision.
6. Do not push on or scrub this product with sharp objects.
Maintenance
1. Disconnect all cables of this device at first before cleaning.
2. Wipe the enclosure, screen and keys using soft cloth with a little
soft detergent on.
3. Do not use polishing cloth, abstergent, and all types of propellants
or chemical detergents like alcohol and benzene to clean your device.
Warning
1. Do not watch television programs or turn your TV set on for your
own and others' safety.
2. It is very dangerous to watch television programs or operate the
TV set while driving.
Bright spots or dark spots may appear on the screen. This is a
normal phenomenon associated with the active matrix display
technology and is not a sign of malfunction. Do not attempt to
maintain. For any failures, please turn off your TV set immediately
and contact us or your dealer. This device integrates a great deal of
fine electronic components. Disassembly or alternation may result in
damages or breaks.
Special Note

-2-
II Accessories
1. Car power adapter
2. AC power adapter
3. 75- antenna cable
4. Remote control
5. AAA battery
6. AV cable
7. Telescopic antenna
* Open the package and make sure all the items are included.

-3-
III Appearance
1. Telescopic antenna
2. PICT: Picture mode shift
button
3. MUTE: Mute button
4. EXIT: Return button
5. MENU: Menu button
6. /MODE: Standby/
Operation mode shift button
7. TFT-LCD screen
8. CH+/ : Channel Select/
Upward button
9. CH-/ : Channel Select/
Downward button
10. OK/MUSIC: Confirm button
/Music Background button
11. VOL+/ : Volume up/
Rightward button
12. VOL-/ : Volume down/
Leftward button
13. Power indicator
Red: Standby
Green: Power-on
14. Remote-control receive
window
15. Antenna input Jack
16. AV Output
17. AV Input
18. Headphone jack
19. DC Input
20. Speaker
21. SD/MMC/MS type CARD
input port
22. USB connect Jack

1. PICT: Long press for 3 seconds as
Picture mode under TV/AV mode,
under picture switch mode as
"STANDARD", "SOFT", "VIVID",
"LIGHT", "PERSONAL", Press for
Picture adjust/panel display mode/
reset selection key under DTV mode,
able to choose brightness, contrast,
chroma, hue (only available with NTSC
system), panel disply mode and reset.
Note: keep pressing for 3 seconds have
no functions under OSD menu in DTV mode.
2. MUTE: Press to switch between MUTE and sound under all mode.
3. EXIT: Return key: press to exit current menu and return to previous
menu.
4. MENU: menu key.
5
CH+/ Under DTV mode, press as direction key with DTV menu,
press as CH+ key without DTV menu; press as CH+ key under ATV
mode; press to select upward under CARD mode.
7. CH-/ : Under DTV mode, press as direction key with DTV menu,
press as CH- key without DTV menu; press as CH- key under ATV
mode; press to select downward under CARD mode.
8. OK/MUSIC: Under DTV mode: press as confirm key under Menu
surface, press to display program list without menu surface; Under
CARD mode: press as confirm key under Menu surface. After enter
Picture viewing mode, press for picutre display mode, long press for
background music function; Under ATV mode: keep press for 3
seconds for auto-search
9. VOL+/ : Under DTV mode, press as direction key with DTV menu,
press as VOL+ key without DTV menu; press as VOL+ key under ATV
mode; Under CARD mode, when playing music and video, press as
VOL+, press as rightward key when exit playing.
10. VOL-/ : Under DTV mode, press as direction key with DTV menu,
press as VOL- key without DTV menu; Press as VOL- key under ATV
mode; Under CARD mode, when playing music and video, press as
VOL-, press as leftward key when exit playing.
. /MODE(Standby/Operation mode shift button): Press to switch
modes between DTV/ATV/AV, press and hold over 3 seconds for
turning off TV.
6. :
-4-
IV Instruction of control panel buttons

-5-
V Remote control button
1. POWER: standby/off key.
2. MUTE: Mute key.
3. 0-9: digit keys.
4. --/-: channel direct selection and P/N switch key. Press for channel
direct selection under ATV mode. Press as P/N switch under DTV
mode.
5. : return key.
6. CH+/ : channel selection/upward key.
7. CH-/ : channel selection/downward key.
8. VOL+/ : volume up/rightward key.
9. VOL-/ : volume down/leftward key.
10. OK: confirm key.
11. MENU: Menu key.
12. EXIT: return key: press to exit current menu and return to previous
menu.
13. "RED" key: corresponding menu red function key.
14. "GREEN" key: corresponding menu green function key.
15. "YELLOW" key: corresponding menu yellow function key.
16. "BLUE" key: corresponding menu blue function key.
17. INFO: Disply current Channel information; Under MENU, press to
view software code. (only available under DTV mode).
18. TEXT: Turn teletext function: press OK to adjust the transparence
level of display background. (only available under DTV mode).
19. EPG: press to display electronic program guide (only available
under DTV mode).
20. SUBTITLE: Press to trun ON/OFF subtitles. (only available
under DTV mode).
21. P. ADJ: Picture adjustment key (only available under DTV mode).
Note: Under Menu surface, press this key will not have function..
22. AUDIO: Sound track switch key. (only available under DTV mode).
23. SEARCH: Search key.
24. LANG: OSD language switch key.
25. FAV: ON/OFF my favor channel function. (only available under
DTV mode)
26. GUIDE: Nine picture Guide function. (only available under DTV mode)
27. PAUSE: Press it to pause the picture and sound(only available under
DTV mode)
28. TV/RADIO: TV channel and radio channel switch key. (only available
under DTV mode)
29. PICT: Picture mode key, press for "STANDARD", "SOFT", "VIVID",
"LIGHT", "PERSONAL".
30. SLEEP: sleep turn off time setting key.
31. MODE: Press to switch between TV/DTV/AV.

-6-
VI Connection of Main Interfaces
3. Connection of AV cable
(1) AV input: Insert the external
video cable into the yellow end
of AV cable. Insert the audio left
channel cable into the white end
and the audio right channel cable
into the red end. Then, insert the
AV cable into AV IN jack.
(2) AV output: Insert the external
video cable into the yellow end of
AV cable. Insert the audio left
channel cable into the white end
and the audio right channel cable
into the red end. Then, insert the
AV cable into AV OUT jack.
Note: AV OUT is only available in DTV and CARD mode.
2. Connection of Antenna Cable:
Align one end of the attached antenna
cable plug in the antenna jack on TV
set and the other end plug in the
external antenna jack.
75ohm antenna conversion line
1. Connection of Power Supply:
Align the power supply plug on AC
adapter with the jack on the machine
rear cover marked with DC.
AV conversion cable

When first time usages or program list do not exist, the DVB-T
Installation Guide will display once the device is turned ON. Please
set up as the following Pictures.
VII DVB-T Installation Guide
Press key to move the cursor to your wanted item, press to
adjust with your local DVB-T standard setting.
Note: If the COUNTRY setting is incorrect, less or even no
channel can be received.
After setting, press OK key for auto scan or press the GREEN
key on the remote control for manul scan.
7.1 Auto-Scan will empty the program list, then following your
selected COUNTRY to scan the local DVB-T signal frequency and
bandwidth. It might take quite a while for the Auto-Scan, program
will be autosave. Press EXIT to stop Auto-Scan.
-7-
7.2 Manual-Scan enables to add Scaned program into the program
list, while the exist program list will not be dele. The same frequency
and bandwidth channel will be coverd. Choose the Channel number
for Manual-Scan (press the RED key on the remote control to
nput directly digit numbers to edit channel number) or insect correct
frequency and bandwidth, then press OK to start Manual-Scan.

VIII DVB-T MENU Operation Guide
Press MENU from the remote control or from the device to enter
MENU surface, there will be five menu and some sub-menu under.
Press to switch each menu, then press to select sub-menu,
press OK to enter sub-menu.
8.1 SETUP
There's 6 sub-menu under SETUP , press to setup specifications
and return to factory default, please confirm SETUP befare
receiveing channels.
8.1.1 Installation
(1) Antenna Setting: setting for ON/OFF the Antenna.
(2) Country Setting: select country according to your location.
(3) OSD Language: OSD Language setting.
(4) Audio Language: Language setting according to receiving signals
supported Languages.
(5) Subtitle Language: Language setting according to receiving
signals supported Languages.
(6) LCN: ON/OFF for logictal program list.
-8-
Press to move cursor to your wanted location.

-9-
8.1.2 TV Setup
Under Password , you can setup items you wish to lock with your
password (ie: MENU, Channels) or change password.
(1) Setup Menu Lock: when this function is activate, user will need to
enter password when re-enter Menu.
(2) Channel Lock: when this function is activate, user will need to
enter password if wish to enter TV/Radio List or Anto-Scan and
Manual-Scan.
(3) Censorship Lock: Able to setup according to age groups.
(4) Change Password: Enter both current and new password to
change password.
Under TV Setup Menu for the following items:
(1) TV format: Display mode, '4:3LB', '4:3PS', '16:9LB' and '16:9FIT'.
(2) TV mode: AV output system, selection of 'PAL', 'NTSC', 'AUTO'.
(3) OSD Transparency: Setting for OSD transparency levels.
(4) Banner Display Time: Menu banner time display setting.
(5) Video Enhancement: Setting for Picture enhancement.
Note: Some items request supported by the TS.
8.1.3 Password

-10-
The default password of the device is 0000, please memorize after
changing password.
8.1.4 Advance Timer
Uers can setup appointed time to watch appointed Channels, start
and finish time can be setup according to the timer system in this
device, please confirm with the timer system from this device before
setting up; Detailed guide as follow:
8.1.5 SW Update
Available to be updated via other device or external memory devices.
8.1.6 Set Default
Press key to move the cursor to Set Default , press OK
to confirm. After Set Default, program list will be deleted and return
to first time installation Gide surface.
8.2 TV/RADIO
For TV and Radio , List and Guide operation will remain
the same in both TV and RADIO mode, below are the
operational for TV .
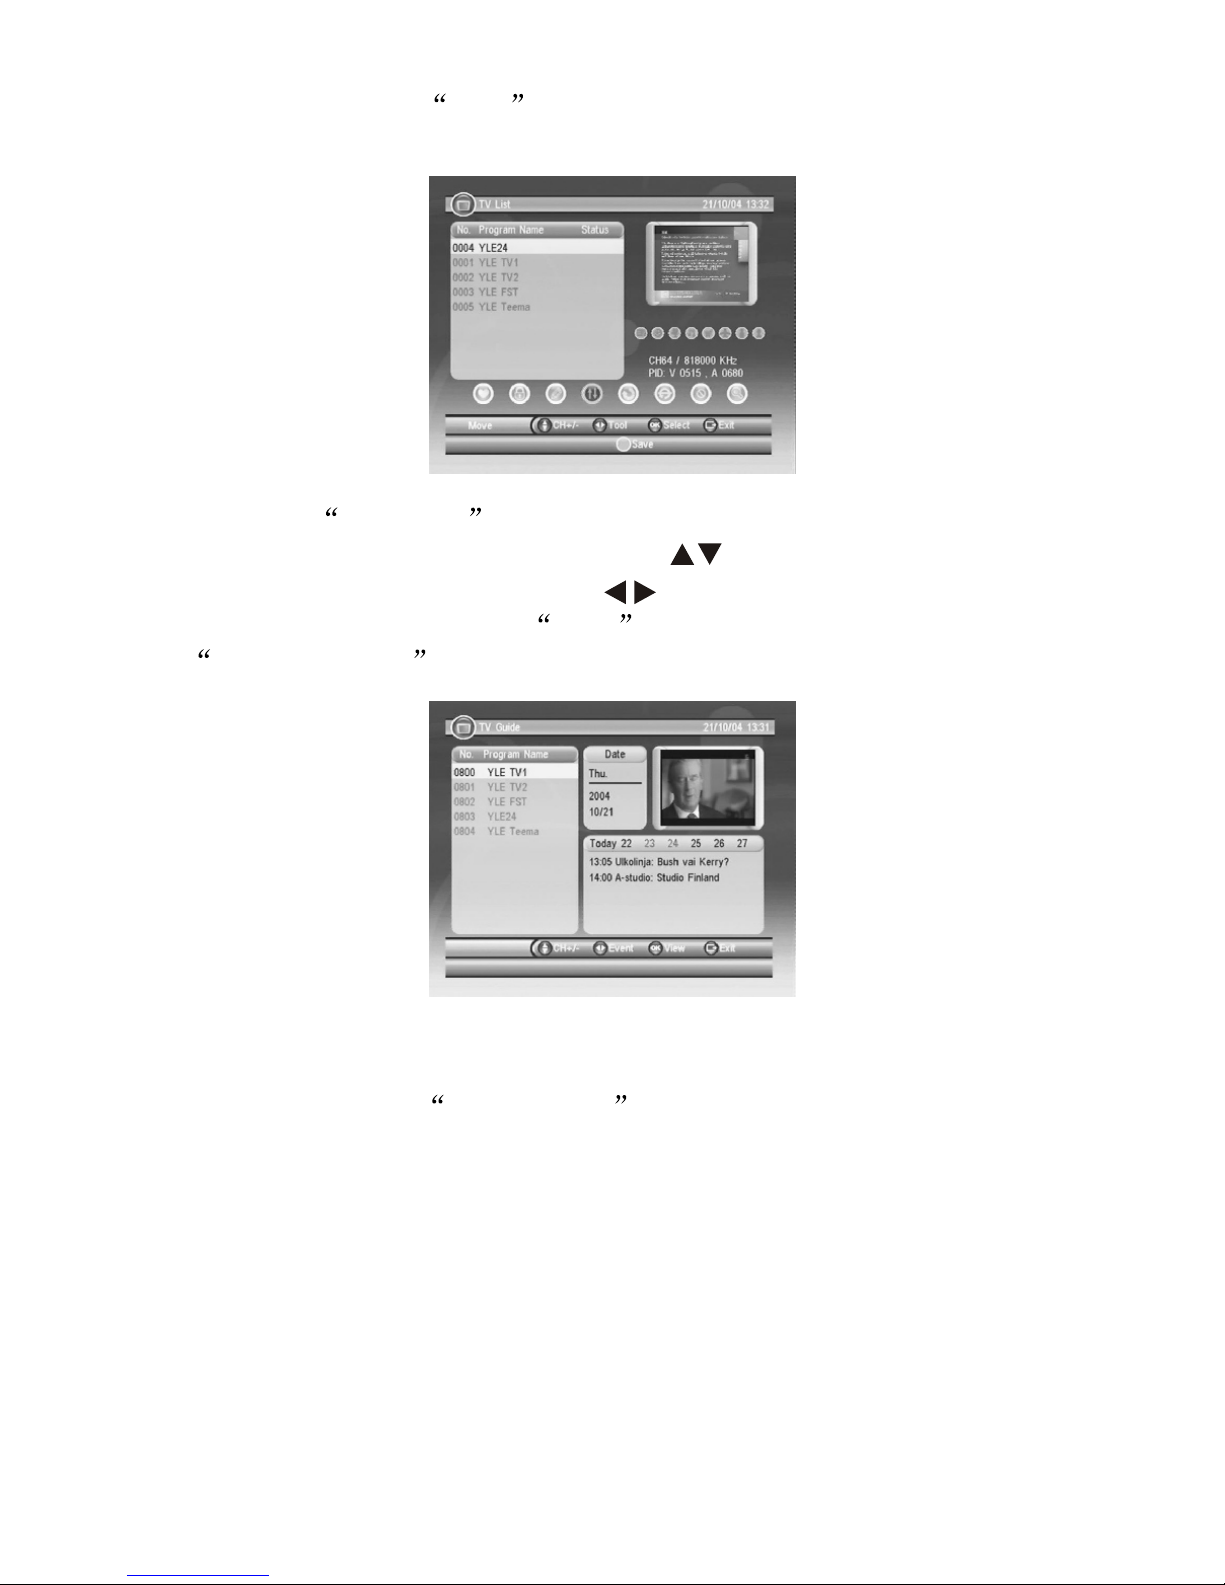
8.2.1 Enter TV List Menu, press to select the channels you
wish to edit, press to select the item you wish to edit, from left
to right as: Favorites, Lock, Edit, Skip, Delete and Search. Follow the
below picture to operate, press YELLOW key to save setup.
-11-
8.2.2 Enter TV Guide Menu, under the program gide, you can see
the current channels display list, press to move the cursor to the
channel you wish to watch, press key to enter the Guide timer of
the selected Channel, press RED key to move Channel
to Advance Timer .
8.3 MULTIMEDIA
Operation Guide for USB&CARD :
This device supports many brands of USB, Multi Media Card (MMC),
SD, Memory Stick (MS) in the market.
1. The memory of USB&CARD must within 2G.
2. This device supports JPEG, MP3, WMA, VCD and AVI (donot
support DIVX3.11 format and AC3 audio zip format.
Note:
1. TS under 1000KBP/S can be play very smoothly otherwise it may
stop.
2. The USB plug do not support Card reader, mobile harddisk, MP3
and MP4 device.
When LCN setup as OFF , (see 8.1.1) the following Menu surface
will be appear: Move and Sort are for setting channels in order.
-12-
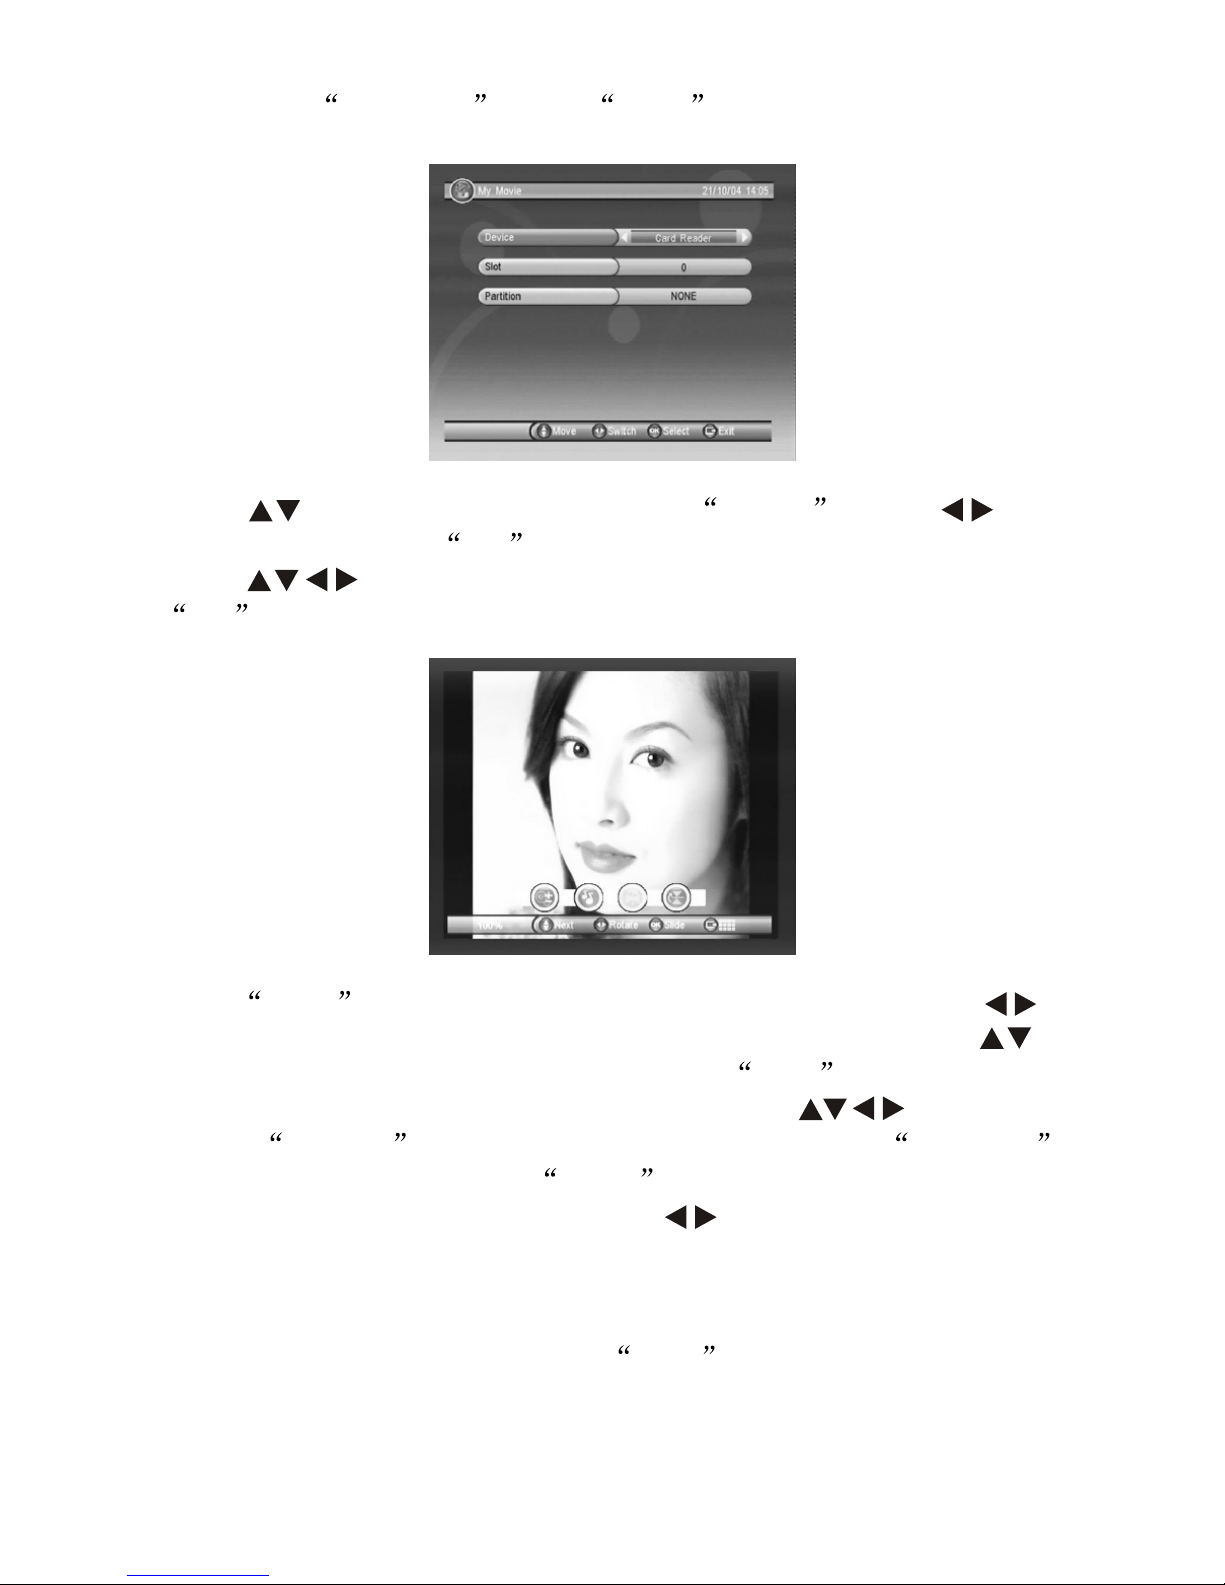
Press key to move cursor to select Device , press to
switch drivers, press OK to return to different file Menu surface.
Press key to select the picture you wish to view, press
OK to confirm as follow:
Press INFO from the remote control for viewing tools, press
key to move the picture for clock wise or anti-clock wise, press
key to select next or previous picture, press RED from the remote
control for Zoom in function, after zoom in, press key to move
picture. GREEN key for ON/OFF background music, YELLOW
key for leftward or rightward, BLUE key for upward or downward.
When background music is ON, press to for volume up or volume
down; background music play surface remains the same as in music
play surface, please refer to 8.3.4.
8.3.2 When viewing Picture, press EXIT key to enter 12 picture
Guide mode.
8.3.1 Enter My Album , press INFO to change drivers as shows
below:

-13-
Press key to select the picture you wish to view, press OK
to view, press 'BLUE' in the remote control to return to the original file
Menu.
8.3.3 When viewing Picture, press OK key to enter Picture
playing mode and auto-switch to different effect to view the picture.
Press INFO from the remote control for playing tools, press
key to select previous or next pictures, press RED for play/pause;
GREEN key to open background music surface, background
music play surface remains the same as in music play surface, please
refer to 8.3.4: YELLOW key for circulate mode, able to select
circulate play or single play; BLUE key for picutre play speed
setting, fast, medium and slow
8.3.4 Enter My Music surface, press INFO key to change driver
(mentioned in 8.3.1)

Press key to select the music you wish to play, press OK
to confirm, press RED from the remote control for play/pause,
GREEN key for stop, YELLOW key for repeat, press this key
respectively can select Repeating , Repeat all , Random ,
Repeat OFF ; BLUE key for fast forward, press this key
respectively can select X2, X3, X4, play.
Key in this case is volume key, when the music is not playing,
press this key as key.
8.3.5 Enter My Movie surface, press INFO key to change
driver (mentioned in 8.3.1)
Press key to select the item you wish watch, Press OK
key to play, as follow:
Press INFO for play tools, press key to select previous or
next movie, press RED key for play/pause; GREEN key for
stepforward; YELLOW key for fast backward, press this key
repectively for backward X2, X4, X8, X16, X32 and play; BLUE
key for fast forward, press this key repectively for forward X2, X4, X8,
X16, X32 and play; when playing movie, press AUDIO from the
remote control to switch left/right sound track.
8.4 GAME
Under GAME menu, there will be 3 sub-menu Gomoku ,
Calender , Calculator . Select the sub-menu, press OK to
enter.
Note: Calculator supports maximnm 9 digit numbers, INFO as
confirm key.
-14-

PICTURE
BRIGHT 50
CONTRAST 50
COLOUR 50
RESET
-15-
IX ATV Menu
Press the MENU button to pop up the following menu:
MAIN MENU
PICTURE
SYSTEM
PRESET
Press or to select one of the three entries above.
Press or to open the submenu.
9.1 PICTURE
Press or to select BRIGHT and press or to adjust its analog.
Press or to select CONTRAST and COLOUR in turn and adjust
the analog in the same way. Press or to select RESET. Then,
press or to have the analog you have set return to 50 .
9.2 SYSTEM

PRESET
POSITION 1
REMEMBER ON
AUTO-SEARCH
SWAP 1
FINE 0
SEARCH 551MHZ
SOUND-SYS DK
COLOR-SYS PAL
SYSTEM
ENGLISH
CLOCK OFF
16:9
1
BLUE BACK ON
-16-
: Allows you to select the language you want.
CLOCK: Allows you to set the time for auto shutdown.
: (Display screen mode) Allows you to switch the mode between
16:9/4:3.
: Allows you to revolve the image.
BLUE BACK: Allows you to activate or deactivate this function when
there are no signals.
9.3 PRESET
POSITION: Allows you to select a certain channel and activate
SWAP, FINE, SEARCH, SOUND-SYS and COLOR-SYS.
REMEMBER: Press or to select OFF. Thus, this channel does
not display when you change channels. If it is set to be ON, this
channel would display on changing channels.
AUTO-SEARCH: Press or to start AUTO-SEARCH function.
After AUTO-SEARCH, the system will save the channels
automatically. After selections of channels, the system will return to
the channel number 0 .

-17-
Note:
Before you start the AUTO-SEARCH, please set the SOUND/COLOR
as the corresponding local systems. Or, the channel program may
have no audio or have cacophony while the image may have no colour.
SWAP: Press or to select this entry. Press or to change
it to your required channel. To confirm, press or .
FINE: Use this entry to adjust the channel for perfect signal quality
when the signal quality is poor.
SEARCH: This entry is used to control the current channel. When
you SEARCH a signal in this way the receiving indication frequency
will stop. This indicates that a perfect position for you to save a
channel. If the channel features a poor signal quality, the system
will identify it as no signal.
SOUND-SYS: Press or to switch among I , DK and
BG in turn.
1. SOUND-SYS description: I refers to 6.0 M, DK 6.5 M and
BG 5.5 M. Please set the system to the local SOUND-SYS.
2. COLOR-SYS description:
A. For your selection of I mode, the COLOR-SYS refers to PAL-I;
B. For DK , the system refers to PAL-DK or SECAM-DK;
C. For BG , it refers to PAL-BG or SECAM-BG;
D. For L , it refers to SECAM-L.
3. For images without audio or with noise, check whether the audio
system is set properly.
Note
COLOR-SYS: Press the or button to switch among PAL, NTSC
and SECAM in turn.
If the signal intensity is very poor or too weak, ill images would still
occur with strong noise, swing and bad audio effect no matter how
you adjust the antenna. This is not the failure of your TV. Try an open
antenna or a cable TV if the telescopic antenna does not work.
Note

9.4 Proper Receiving
9.4.1 Access the setting entries of the Language in the System to
choose your required OSD language.
9.4.2 Access the setting entries of the SOUND-SYS and
COLOR-SYS and start searching channels according to specific
instructions in Part 9.3.
9.4.3 Access the setting entries of the AUTO-SEARCH and
SEARCH and make sure whether the systems are set according
to the responding transmitting requirements. Refer to Part 9.3 for
specific instructions.
9.4.4 To achieve the best effect for receiving channels, please adjust
the direction and angle of your antenna.
-18-
Table of contents
Other Nikkai TV Receiver manuals


