manuals.online logo
Brands
  1. Home
  2. •
  3. Brands
  4. •
  5. Haier
  6. •
  7. TV Receiver
  8. •
  9. Haier 51B3Y-N User manual

Haier 51B3Y-N User manual

Other manuals for 51B3Y-N

1

Other Haier TV Receiver manuals

Haier SV-HD1918W User manual

Haier

Haier SV-HD1918W User manual

Haier 29FV6 User manual

Haier

Haier 29FV6 User manual

Haier 25FA18-T User manual

Haier

Haier 25FA18-T User manual

Haier D34FV6 User manual

Haier

Haier D34FV6 User manual

Haier 29F5D User manual

Haier

Haier 29F5D User manual

Haier 21F3A User manual

Haier

Haier 21F3A User manual

Haier L19A11W User manual

Haier

Haier L19A11W User manual

Haier 34F9K User manual

Haier

Haier 34F9K User manual

Haier 21F6B-T User manual

Haier

Haier 21F6B-T User manual

Haier D29FV6-A, D29FV6, D34FV6-A, D3 User manual

Haier

Haier D29FV6-A, D29FV6, D34FV6-A, D3 User manual

Haier LT32F6 User manual

Haier

Haier LT32F6 User manual

Haier 21FA10-AM User manual

Haier

Haier 21FA10-AM User manual

Haier 51B3Y-N User manual

Haier

Haier 51B3Y-N User manual

Haier 25F9K-T User manual

Haier

Haier 25F9K-T User manual

Haier 21F9D-P User manual

Haier

Haier 21F9D-P User manual

Haier LET19C600F User manual

Haier

Haier LET19C600F User manual

Haier D29FA11-AKM User manual

Haier

Haier D29FA11-AKM User manual

Haier LT19A1 User manual

Haier

Haier LT19A1 User manual

Haier 21FA18-T User manual

Haier

Haier 21FA18-T User manual

Haier LET26C430F User manual

Haier

Haier LET26C430F User manual

Haier L1920A-C User manual

Haier

Haier L1920A-C User manual

Haier 21FA11-AM User manual

Haier

Haier 21FA11-AM User manual

Haier LEY19T1000H User manual

Haier

Haier LEY19T1000H User manual

Haier L3D42D25N User manual

Haier

Haier L3D42D25N User manual

Popular TV Receiver manuals by other brands

AXIL RT 0401 HD user manual

AXIL

AXIL RT 0401 HD user manual

Motorola DCT700 installation manual

Motorola

Motorola DCT700 installation manual

Edision Piccollino user guide

Edision

Edision Piccollino user guide

Strong SRT 2401 Troubleshooting

Strong

Strong SRT 2401 Troubleshooting

TerraTec CINERGY DT USB XS DIVERSITY Technical data

TerraTec

TerraTec CINERGY DT USB XS DIVERSITY Technical data

TechniSat DigiCom 1 operating instructions

TechniSat

TechniSat DigiCom 1 operating instructions

Triax CR 317 user manual

Triax

Triax CR 317 user manual

DirecTV D10-300 user guide

DirecTV

DirecTV D10-300 user guide

Motorola VIP2502W installation guide

Motorola

Motorola VIP2502W installation guide

Micro Prose MPI-500 user manual

Micro Prose

Micro Prose MPI-500 user manual

TechniSat DIGIT ISIO S Quick start manual

TechniSat

TechniSat DIGIT ISIO S Quick start manual

Rextor 3488 user manual

Rextor

Rextor 3488 user manual

Matsui DTR1 user manual

Matsui

Matsui DTR1 user manual

Sky Sat Royal HD PVR Ready user manual

Sky Sat

Sky Sat Royal HD PVR Ready user manual

Dyon Raptor Specifications

Dyon

Dyon Raptor Specifications

Best Buy Easy Home DVB-T Flip HD user manual

Best Buy

Best Buy Easy Home DVB-T Flip HD user manual

RCA F36715 Brochure & specs

RCA

RCA F36715 Brochure & specs

NPG SL-AT12PR quick guide

NPG

NPG SL-AT12PR quick guide

manuals.online logo
manuals.online logoBrands
  • About & Mission
  • Contact us
  • Privacy Policy
  • Terms and Conditions

Copyright 2025 Manuals.Online. All Rights Reserved.

Available Model:51B3Y-N
Haier Color TV Receiver
Owner's Manual
Please read this manual carefully before operating
the unit, and keep it for future reference.
All manuals and user guides at all-guides.com
all-guides.com
CONTENTS
Warning and cautions............................................... 1
Specifications.......................................................2
Preparation.........................................................3
Control panel....................................................... 4
Remote control board................................................5
6
Select channel and store.............................................
Picture set......................................................... 8
Sound set..........................................................9
Feature set........................................................10
Converge set.......................................................11
Basic operation.................................................... 12
External connection.................................................14
Trouble shooting guide..............................................16
All manuals and user guides at all-guides.com
1
War ning and Cautions
Maintenance:
1. When you clean the TV set, please pull out the power plug from AC outlet. Don't
clean the cabinet and the screen with benzene, petrol and other chemicals.
2. In order to prolong the using life of the TV set, please place it on a ventilated
place.
3. To prevent the TV set from firing or electric shock, don't expose the TV set to rain
or moisture.
Cautions
1.Don't place the power wire near heater and press it, when you insert or
remove the power wire, please hold the body of plug.
2.Overload will damage the TV set or cause electric shock, so when you use
the socket or outlet line on the wall, don't overload.
3. Don't open the back cover at random, otherwise it is possible to damage the
components in the TV set and harm you.
4. When the TV set is in thunder and lightening or it isn't going to be used for a
long time , please pull out the plug from AC outlet and the antenna plug from the
back cover of the TV set.
Cautions to use VGA
1.The display brightness of TV set is much higher than the computer's,in
order to protect your eyes, please keep a certain distance with the screen
when you use it, and adjust the brightness and contrast of TV set to be
proper.
2.When you connect the VGA output terminal of computer or other devices,
please set the display format of computer to 640x480 pixel and the brush
frequency of monitor to 60Hz. When the display format is above 640x480
pixel or brush frequency is above 60Hz, the TV set will not display the
picture correctly, the screen displays "OUT OF RANGE. SET 640x480
60Hz". Because different display card is different, when you use VGA
terminal to receive computer output signal, the picture and size may be
different, and the edge line of picture may not be straight, but it will not
have an effect on watching normally.
All manuals and user guides at all-guides.com
2
Specifications
The specifications offered you here are only for reference and, with the improvement
of the products ,there may be some different between the description and the practicality.
AC 180V-250V 50Hz/60Hz
51 B3 Y-N
PAL 、 NTSC、SECAM
D/K、I、B/G、M
Main audio 10W+10W
250W
111.5(Width)X50.0(Depth)X133.6(Height) (cm)
Three of 7”red,green,blue picture tubes(the viewable minimal dimension is 126cm)
Picture tube
M o d e l
Colour system
Sound system
Sound output power
Power requirements
Power consumption
Net dimension
Accessories
Remote control X1
Owner's manual X1
X2
Battery
Environment conditions
Working temperature
Working humidity
Storage temperature
Storage humidity
NOTE
Design and specifications are subject to change without notice.
The dimension in this manual is an approximation.
All manuals and user guides at all-guides.com
UHF
VHF
S-VIDEOS-VIDEO
VIDEOVIDEO
YY
YY
LLRR
CbCb
PbPb
CrCr
PrPr
ININ
ININ
OUTOUT
LL
AUDIOAUDIO
RR
AVAV11
AVAV22
AVAV
AUDIOAUDIO
VIDEOVIDEO
VGAVGA
3
Preparation
1.Antenna connection
Generally speaking, to enjoy a clearer picture, we recommend that you use a CATV
system or an outdoor antenna. In different places, the suitable antenna type and position
are different.
Antenna adapter
(additional purchase)
75 coaxial cable
Plug
(additional purchase)
AC power socket
Antenna input
(75 standard coaxial type)
Mixer
(additional
purchase)
300 twin-lead cable
Note:
It is recommended that you'd better use 75
Don't bind antenna cable and electric wire together.
If the connects to the , please remove its plug from the
antenna terminal socket w
coaxial cable to remove the disturbance
caused by airwave.
indoor antenna TV set
hen you use the outdoor antenna.
2.Preparation for the remote control
Batteries placement:
1.Remove the batteries cover.
2.Insert two size AAA batteries and match the +/-polarities of the battery to the +/- marks
inside the battery compartment.
Note:
(1)Do not drop, dampen or dismantle the remote control.
(2)When the remote control will not be used for a long period of time or when the batteries
are worn out, remove the batteries to prevent leakage or damaging the remote control.
(3)Replace two old batteries at the same time, don't charge the batteries.
(4)Don't use the charge batteries(Ni-Cd) or different types of batteries.
(5)Do not throw the batteries into a fire. Dispose of used batteries in the specified manner.
All manuals and user guides at all-guides.com
VGA
Y
R
OUT
IN
Y
L
Cb
L
Pb Pr
S-VIDEO
Cr
IN
R
VIDEO AUDIO
VIDEO
AV
AV2
AV1
S-VIDEOS-VIDEO
VIDEOVIDEO
YY
YY
LLRR
CbCb
PbPb
CrCr
PrPr
ININ
ININ
OUTOUT
LL
AUDIOAUDIO
RR
AVAV 11
AVAV 22
AVAV
AUDIOAUDIO
VIDEOVIDEO
VGAVGA
4
MENU
TV/AV
_
V V+ _
P P+
Control Panel
1.Front Control Panel
Main power switch: pressing this button to connect
the power supply, the power indicator will light.
Pressing this button again, the power supply of
this TV set will be cut off.
Main power switch button
Power indicator
TV/AV selection button
Menu button
Volume up/down button
Program up/down button
VGA input terminal
Antenna input terminal
Video input terminal
Audio input terminal
AV1 input terminal
AV2 input terminal
AV output terminal
S-VIDEO input terminal
2.Rear Control Panel
All manuals and user guides at all-guides.com
all-guides.com
5
Remote Control Board
1
4
7
YPbPr
SLEEP
V-
STILL
DISPLAY
P.MODE
LANGUAGE
4
5
6
7
8
9
1010
3
2
11
C.SYS
23
56
89
0
MENU
RECALL
P+
P-
V+
POWER
TV/AV
NICAM
MUTE
S.MODE
SCAN
HYF- 33L
11
12
13
14
14
15
16
17
18
19
20
22
1
2
3
4
7
8
12
14
17
18
19
6
9
1010
13
15
14
16
5
20
21
5
22 MUTE: Press to temporarily cut
off the sound
0~9 DIGIT: One digit selection buttons
POWER: Turns the TV on/off
TV/AV:TV/AV switch.
SLEEP: Press to select a preset time
MENU: Single button menu cycle selection
P+/-:Program switch or up/down
selection of menu.
V+/-:Volume is up/down or carry out
the menu
NICAM: Nicam button
P. MODE:Picture mode
DISPLAY: Display button
YPbPr: Y/Pb/Pr switch
LANGUAGE: Language selection button
S. MODE: Sound mode
-/--/---: One/Two/Three digital button
SCAN: Scan button
21
1011
STILL: Still button
-/--/---
S.SYS
NR
VGA
C.SYS: Color system
RECALL: Recall button
S.SYS: Sound system
NR: Noise reduction
VGA: VGA switch button
All manuals and user guides at all-guides.com
6
Select Channel and Store
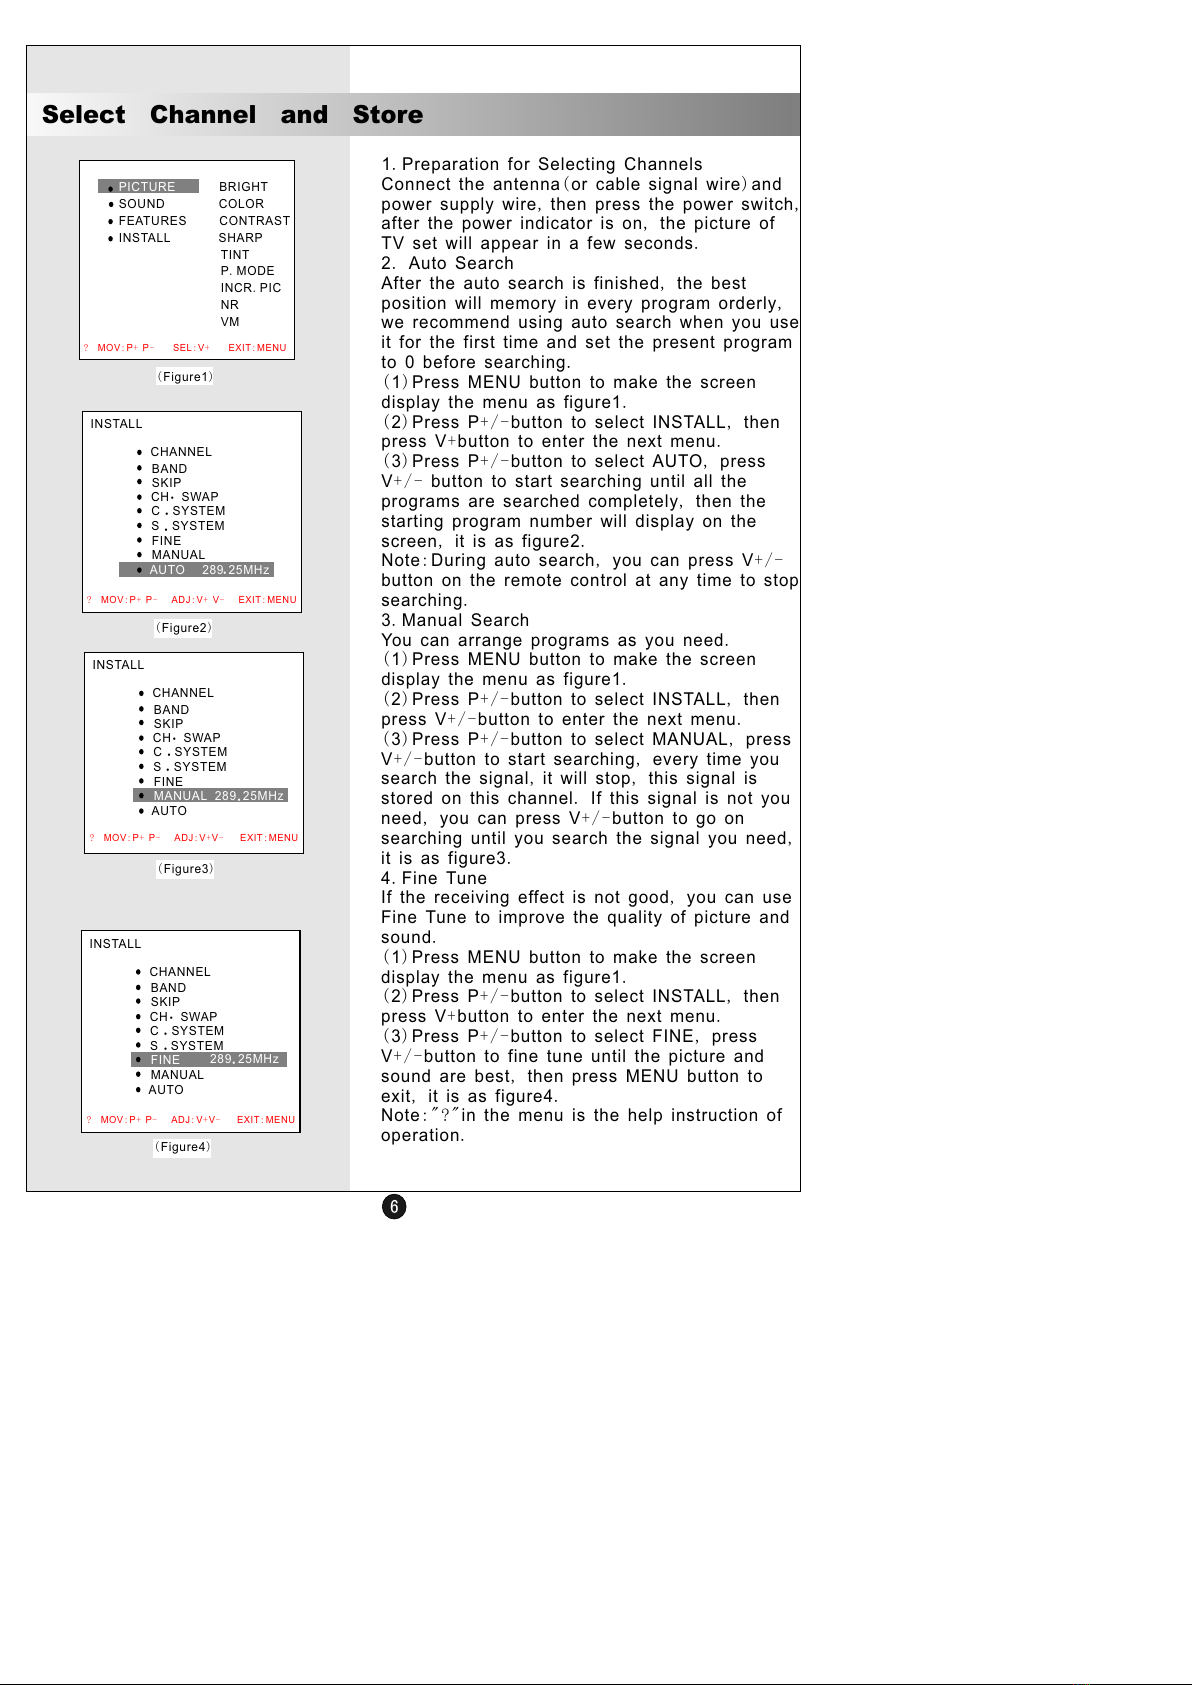
1.Preparation for Selecting Channels
Connect the antenna(or cable signal wire)and
power supply wire, then press the power switch,
after the power indicator is on, the picture of
TV set will appear in a few seconds.
2. Auto Search
After the auto search is finished, the best
position will memory in every program orderly,
we recommend using auto search when you use
it for the first time and set the present program
to 0 before searching.
(1)Press MENU button to make the screen
display the menu as figure1.
(2)Press P+/-button to select INSTALL, then
press V+button to enter the next menu.
(3)Press P+/-button to select AUTO, press
V+/ - button to start searching until all the
programs are searched completely, then the
starting program number will display on the
screen, it is as figure2.
Note:During auto search, you can press V+/-
button on the remote control at any time to stop
searching.
3.Manual Search
You can arrange programs as you need.
(1)Press MENU button to make the screen
display the menu as figure1.
(2)Press P+/-button to select INSTALL, then
press V+/-button to enter the next menu.
(3)Press P+/-button to select MANUAL, press
V+/-button to start searching, every time you
search the signal, it will stop, this signal is
stored on this channel. If this signal is not you
need, you can press V+/-button to go on
searching until you search the signal you need,
it is as figure3.
4.Fine Tune
If the receiving effect is not good, you can use
Fine Tune to improve the quality of picture and
sound.
(1)Press MENU button to make the screen
display the menu as figure1.
(2)Press P+/-button to select INSTALL, then
press V+button to enter the next menu.
(3)Press P+/-button to select FINE, press
V+/-button to fine tune until the picture and
sound are best, then press MENU button to
exit, it is as figure4.
Note:"?"in the menu is the help instruction of
operation.
PICTURE BRIGHT
SOUND COLOR
FEATURES CONTRAST
INSTALL SHARP
TINT
P.MODE
INCR.PIC
NR
VM
(Figure1)
INSTALL
CHANNEL
BAND
SKIP
.
CH SWAP
C.SYSTEM
.
S SYSTEM
FINE
MANUAL
AUTO 289.
25MHz
(Figure2)
INSTALL
CHANNEL
BAND
SKIP
.
CH SWAP
.
C SYSTEM
.
S SYSTEM
FINE
AUTO
289
MANUAL 25MHz
.
(Figure3)
INSTALL
CHANNEL
BAND
SKIP
.
CH SWAP
C SYSTEM
.
.
S SYSTEM
MANUAL
AUTO
25MHz
.
289
FINE
(Figure4)
? MOV:P+ P- SEL:V+ EXIT:MENU
? MOV:P+ P- ADJ:V+ V- EXIT:MENU
? MOV:P+ P- ADJ:V+V- EXIT:MENU
All manuals and user guides at all-guides.com
7
Select Channel and Store
5.Band
When it is in manual search, the signal you
want to search is not on the present band, you
can change the band to improve the speed of
searching.
(1)Press MENU button to make the screen
display the menu as figure1.
(2)Press P+/-button to select INSTALL, then
press V+button to enter the next menu.
(3)Press P+/-button to select BAND, then press
V+/-button continually, the signal band is
switched among VHFL-VHFH-UHF. You can
select the band you want, it is as figure5.
6.Skip
After pre-tuning the channel, you can skip the
channel number you don't need, such as
repeat signal, false signal and so on, so you
can select the channel you want to watch.
(1)Press MENU button to make the screen
display the menu as figure1.
(2)Press P+/-button to select INSTALL, then
press V+button to enter the next menu.
(3)Press P+/-button to select CHANNEL, it is
as figure6.
(4)Press V+/-button to skip the channel number
you need.
(5)Press P+/-button to select SKIP, it is as
figure7.
(6)Press V+/-button to preset SKIP ON mode.
Note: When a certain channel is in SKIP ON
mode, this channel will not appear when you
select program by pressing P+/-button,but this
channel will appear by pressing the digital select
button.
7.Change Swap
(1)Press MENU button to make the screen
display the menu as figure1.
(2)Press P+/-button to select INSTALL, then
press V+button to enter the next menu.
(3)Press P+/-button to select CH.SWAP, press
V+button to enter the next menu, it is as figure8.
(4)Press P+/-button to select FROM, then
press V+button to select the present channel.
(5)Press P+/-button to select TO, then press
V+button to set the channel you need.
(6)Press P+/-button to select EXCHANGE,
then press V+button to finish exchanging.
INSTALL
CHANNEL
SKIP
.
CH SWAP
C SYSTEM
.
S SYSTEM
.
FINE
MANUAL
AUTO
VHFL
BAND
(Figure5)
INSTALL
BAND
SKIP
.
CH SWAP
.
C SYSTEM
S SYSTEM
.
FINE
MANUAL
AUTO
CHANNEL 0
(Figure6)
INSTALL
BAND
.
CH SWAP
.
C SYSTEM
S.SYSTEM
FINE
MANUAL
AUTO
ON
SKIP
CHANNEL
(Figure7)
INSTALL
BAND
SKIP
.
C SYSTEM
S SYSTEM
.
FINE
MANUAL
AUTO
.
CH SWAP
CHANNEL
(Figure8)
=
? MOV:P+ P- ADJ:V+ EXIT:MENU
? MOV:P+ P- ADJ:V+V- EXIT:MENU
All manuals and user guides at all-guides.com
8
Select Channel and Store
8.Color System
(1)Press MENU button to make the screen
display the menu as figure1.
(2)Press P+/-button to select INSTALL, then
press V+button to enter the next menu.
(3)Press P+/-button to select C.SYSTEM, then
press V+/-button continually, the color system
will switch among AUTO-PAL443-NTSC358-
SECAM-NTSC443-PALM-PALN-PAL60, it is as
figure9.
9.Sound System
(1)Press MENU button to make the screen
display the menu as figure1.
(2)Press P+/-button to select INSTALL, then
press V+button to enter the next menu.
(3)Press P+/-button to select S.SYSTEM, then
press V+/-button continually, the sound system
will switch among AUTO DK BG I-M, it is as
figure10.
1.Simulative Value Adjustment
(1)Press MENU button, then press P+/-button
to select PICTURE, it is as figure11.
(2)Press V+button to enter the next menu.
(3)Press P+/-button to select BRIGHT, COLOR,
CONTRAST, SHARP or TINT that you need to
adjust.
(4)Press V+/-button to adjust the stimulative
value of BRIGHT, COLOR, CONTRAST, SHARP
or TINT.
Note: TINT is only valid in NTSC system.
2.Picture Mode
(1)Press MENU button, then press P+/-button
to select PICTURE, it is as figure11.
(2)Press V+button to enter the next menu.
(3)Press P+/-button to select P.MODE, it is as
figure11. Then press V+/-button, the picture
mode will switch among SOFT-NATURE-RICH-
USER.
3.INCR.PIC
(1)Press MENU button, then press P+/-button
to select PICTURE, it is as figure11.
(2)Press V+button to enter the next menu.
(3)Press P+/-button to select INCR.PIC, then
press V+/-button to set the INCR.PIC ON or
OFF, it is as figure13.
Picture Set
INSTALL
CHANNEL
BAND
SKIP
.
CH SWAP
S.SYSTEM
FINE
MANUAL
AUTO
.
C SYSTEM AUTO ( Figure9)
INSTALL
CHANNEL
BAND
SKIP
.
CH SWAP
.
C SYSTEM
FINE
MANUAL
AUTO
S SYSTEM
.
AUTO ( Figure10)
PICTURE BRIGHT
SOUND COLOR
FEATURES CONTRAST
INSTALL SHARP
TINT
P.MODE
INCR.PIC
NR
VM
(Figure11)
BRIGHT
COLOR
CONTRAST
SHARP
TINT
INCR.PIC
NR
VM
P.MODE USER
(Figure12)
PICTURE
BRIGHT
COLOR
CONTRAST
SHARP
TINT
P.MODE
NR
VM
INCR.PIC ON (Figure13)
PICTURE
? MOV:P+ P- SEL:V+ EXIT:MENU
? MOV:P+ P- ADJ:V+V- EXIT:MENU
All manuals and user guides at all-guides.com