Dish TV S7070PVR User manual

S7070PVR
USER MANUAL
www.dishtv.co.nz

Welcome
01
This Dish TV Digital Satellite Receiver gives you access to TV and Radio Channels broadcast on Freeview via
Satellite. For more information about Freeview, visit www.freeviewnz.tv
The Adopted Trademarks HDMI, HDMI High-Definition Multimedia Interface, and the HDMI Logo are trademarks
or registered trademarks of HDMI Licensing Administrator, Inc. in the United States and other countries.
Thank you for choosing the Dish TV S7070PVR Satellite Receiver.
The S7070PVR is a Freeview Approved Receiver for use with a Satellite Dish, that tunes
in the entire range of Freeview Channels.
This User Manual will cover the installation, and initial setup of the S7070PVR Receiver,
including the necessary steps to make full use of its various features. This User Manual
will explain the features unique to this Receiver in detail, to allow you to get the most out
of your S7070PVR.
Disclaimers:
© 2021 Dish TV Technologies Ltd. Dish TV is a trademark of Dish TV Technologies Ltd.
The Freeview Logo is a registered trademark, owned by Freeview Limited (NZ).
• Information in this User Manual is subject to change without notice. Images shown in this User Manual are for illustrative purposes only, and may
not be an exact representation of the product.
• Some services require broadband access through an ISP; usage will count towards the data limit of your broadband plan. ISP terms and charges
apply.
• Content, services, channels and apps on this device, including their availability or access, are subject to change at any time without prior notice.
HD programming is subject to HD broadcast availability.
• When recording TWO channels at the same time, channel selection is limited; some combinations might not be available.

Contents
02
Contents.............................................................................................................................
What’s in the Box?..........................................................................................................
Product Overview..............................................................................................................
Front/Back View..................................................................................................................
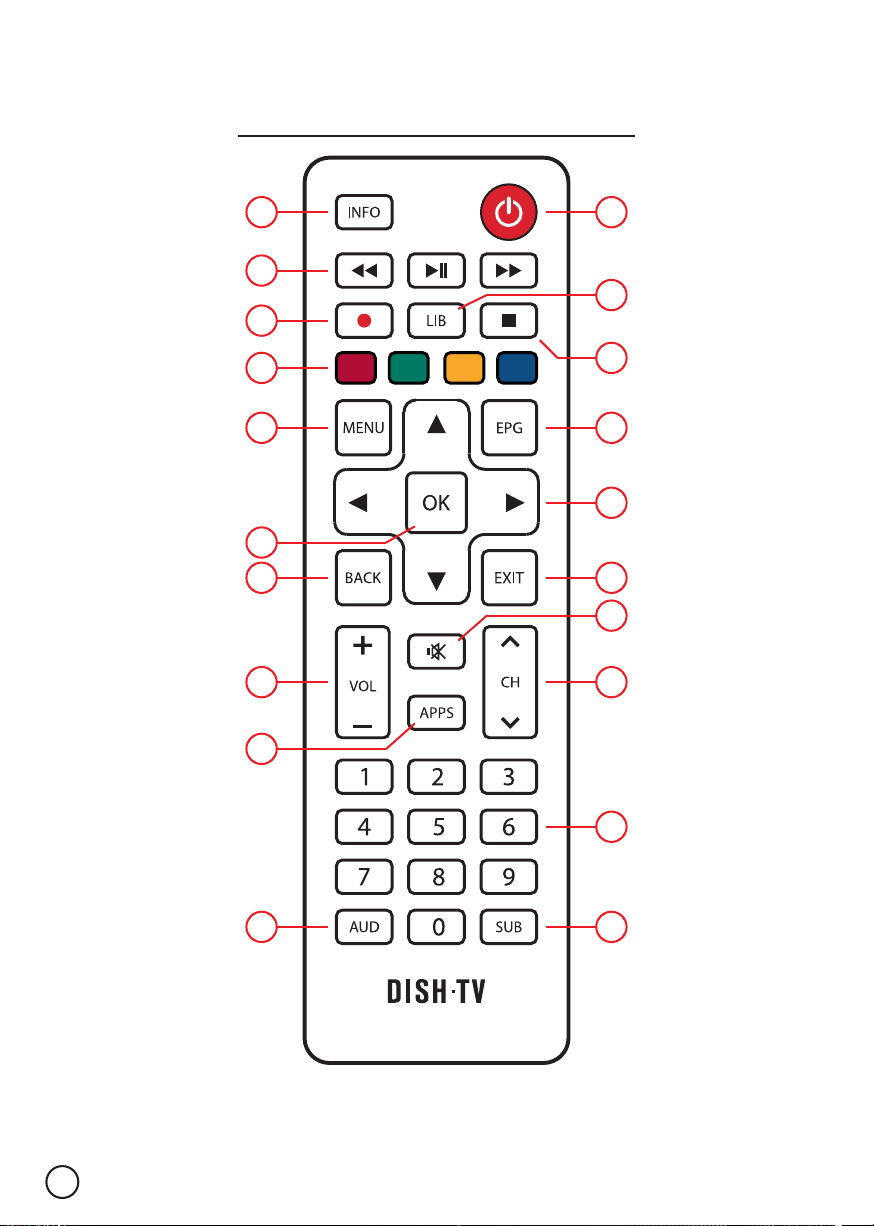
Remote Control...................................................................................................................
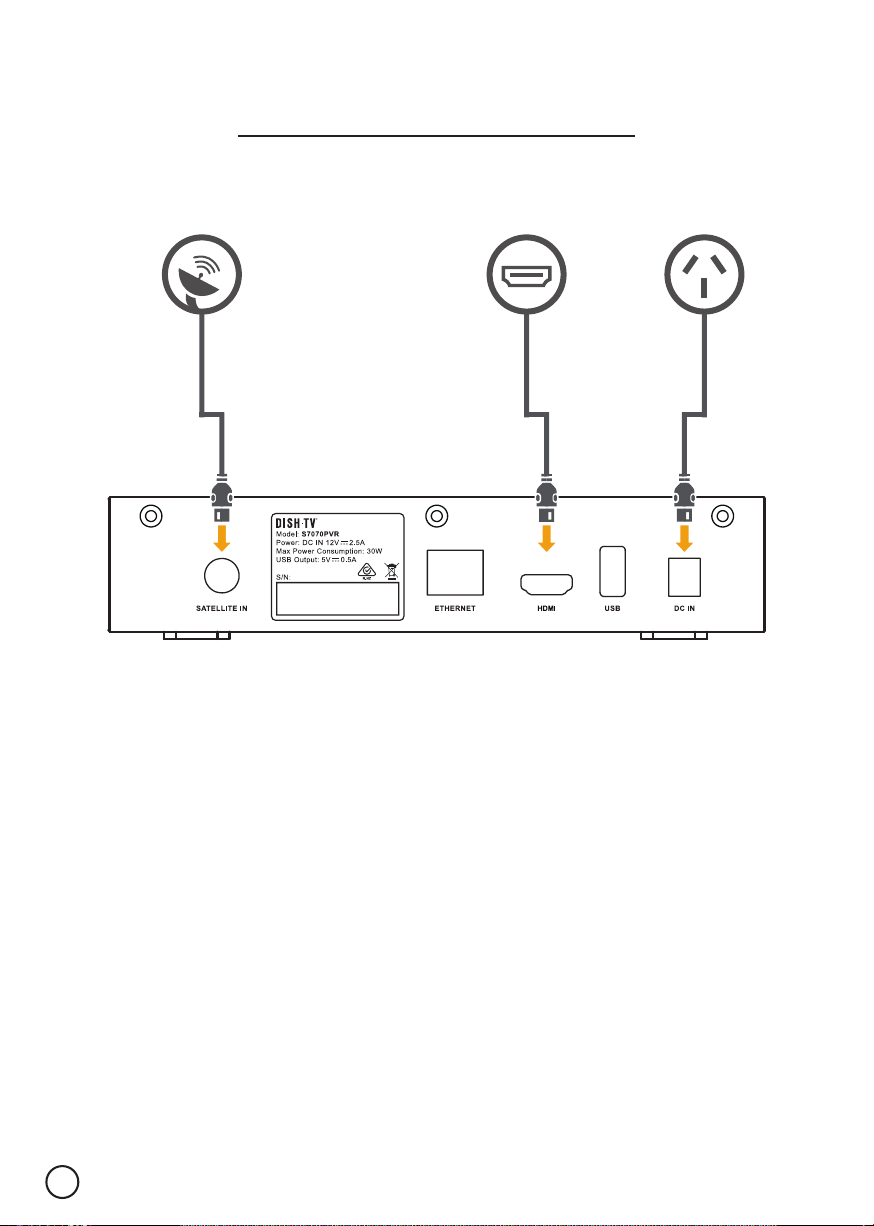
Getting Connected........................................................................................................
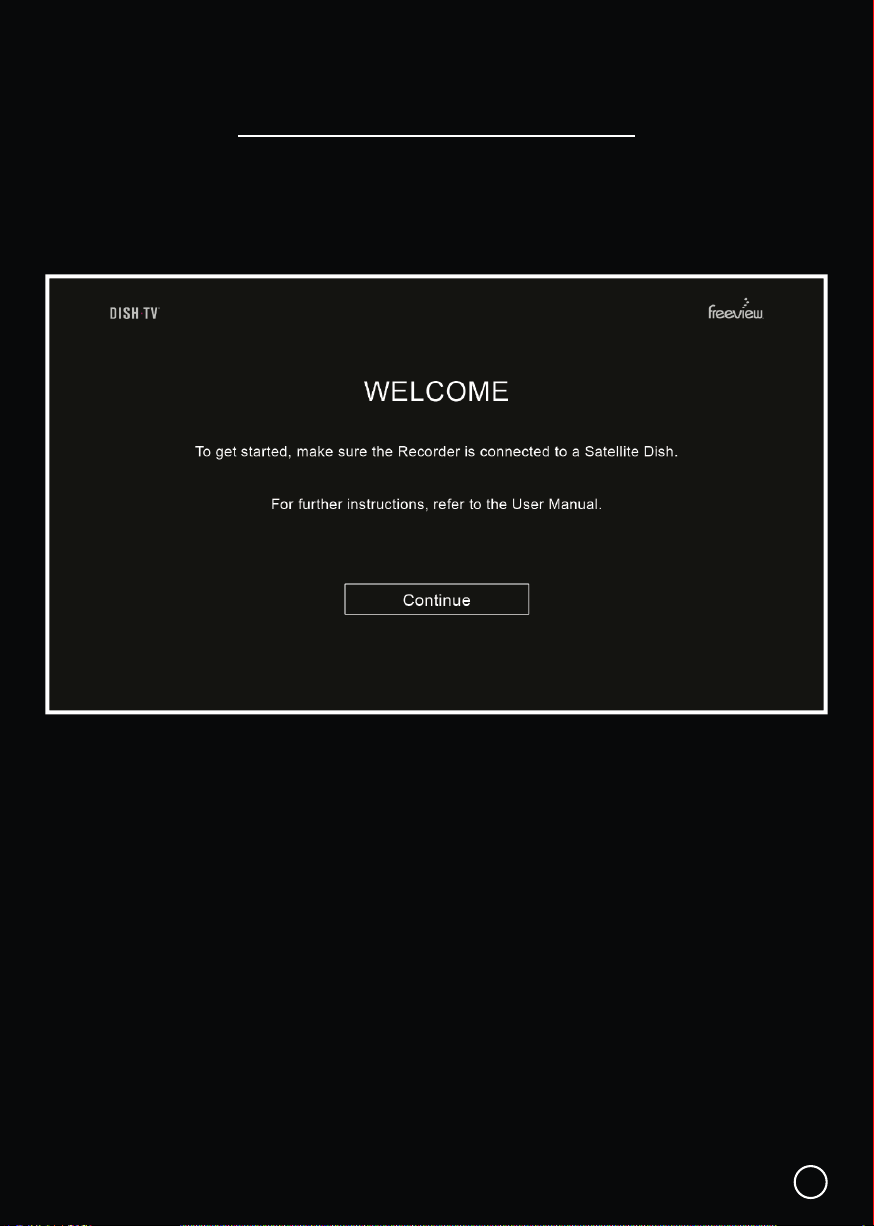
Welcome...........................................................................................................................
Daily Use.........................................................................................................................
Changing the Channel........................................................................................................
Audio & Subtitles................................................................................................................
Recording......................................................................................................................
Recording via the TV Guide............................................................................................
Instant Recording................................................................................................................
Time Shifting..................................................................................................................
Main Menu.....................................................................................................................
TV Guide.........................................................................................................................
Apps...............................................................................................................................
Recordings.......................................................................................................................
Network Setup................................................................................................................
Settings..........................................................................................................................
Installation......................................................................................................................
System Info....................................................................................................................
Installation..........................................................................................................................
Satellite...........................................................................................................................
Factory Reset...................................................................................................................
Troubleshooting...............................................................................................................
Placement Tips.............................................................................................................
Contact Us....................................................................................................................
Warranty Information.....................................................................................................
02
03
04
04
05
07
08
10
10
11
13
13
14
15
11
12
13
16
20
21
23
24
23
23
24
25
28
29
30

What’s in the Box?
03
Missing Items? Please contact the Retailer or Store you purchased this Receiver from.
Please check you have all of the following in your box:
Receiver (S7070PVR)
HDMI CableRemote Control Power Supply

Your Receiver
04
¹Since the infrared (IR) Remote uses light, it requires line of sight to operate the Receiver.
Back Panel
Front Panel
1. SATELLITE IN
Connect to Satellite Dish cable.
2. DETAILS
Model, Power, Serial Number.
3. ETHERNET
Wired Internet Connectivity.
4. HDMI
High Definition output for HDTV.
5. USB
USB Port for Firmware Updates.
6. DC IN
Connect the 12V Power Adapter.
1. LED STATUS
RED: Standby. GREEN: Power On.
01
02
2. IR RECEIVER¹
Receives IR commands from Remote.
04
03 05
01
06
02

Remote Control
05
This Remote requires 2x AAA Batteries to operate. Insert the Batteries, ensuring they
correctly align with the polarity (+/-) markings found inside the Battery Compartment.
04
09
03
12
18
16
15
20
19
14
06
17
07
08
05
13
10
11
01 02

Remote Control
06
Power On/Off
Play/Pause, Fast Forward, Rewind
Main Menu
Freeview TV Guide
Navigation Arrows
Apps
OK/Confirm Selection
Back/Return
Volume Up/Down
Info
Exit
Mute
Channel Up/Down
Stop
Colour Buttons
Library
Record
BUTTONS DESCRIPTION
Subtitles
Numeric Buttons
Audio
02
03
08
09
10
17
11
12
15
01
13
14
16
07
06
05
04

Getting Connected
07
1. Connect the Satellite Dish cable from your wall port to the Receiver.
2. Connect the HDMI cable from the Receiver to an HDMI port on your TV.
3. Plug the Receiver into a power socket and switch on at the wall.
4. Insert the Batteries into the Remote Control.
5. Follow the on-screen instructions displayed on your TV.
TIP: If you have an Ethernet cable handy, connect your Receiver directly to your Modem,
or Router for a reliable broadband connection.
01. 03.02.

First Time Installation
08
Step 01 - Getting Connected
• Ensure the S7070PVR has been correctly connected to the Satellite Dish, and the TV.
See Page 07.
Step 02 - Network Setup
• Either connect an Ethernet Cable from the Router to the S7070PVR, or select Set Up
Wi-Fi. See Page 20 for information on Network Setup.
• Select SKIP to skip the Network Setup, and progess to Region Select / Satellite Scan.
Step 03 - Region Select / Satellite Scan
• Select the Region closest to your location. Press OK to confirm selection and start the
Satellite Scan.
DO NOT press any buttons on the Remote during the Satellite Scan.
¹If the Welcome screen does not appear on the TV, go to Menu → Installation → Factory Reset → Yes. Default PIN is 0000.
This Receiver works with Satellite Dish. The Welcome screen should appear on the TV¹
when the S7070PVR is first turned ON. During the Initial Setup you will be prompted to
connect to the Network, and tune in the Receiver.

09
Channel Buttons
You can use either the CH+ or CH- buttons to scroll through the available Channels, or
use the NUMBER buttons to directly select a Channel.
Changing the Channel
Some options are only available, if the S7070PVR is connected to the Internet.
Mini Guide
While watching Live TV, press the OK button to open the Mini Guide, displaying
what’s on now and coming up next.
Use the Mini Guide to quickly browse through channels, or go directly to a Channel.
Press ◄ LEFT for the TV Guide.
Press ▲ UP or ▼ DOWN to explore other Channels.
Select a TV show that’s on now to change the Channel, or one that’s on later
to see more information, and the recording options for that TV show.

Broadcasters work with organisations such as Able NZ to make the content you find on
Freeview as accessible as possible for all. This means they provide Audio Descriptions
as well as Subtitles for selected Movies and TV shows.
Audio Description (AD)
Audio Descriptions are helpful for those who are visually impaired, narrating the selected
Movie/TV show with what’s happening on screen in between spoken dialogue.
1. Press the AUDIO button, to open
the Audio Options.
2. Scroll ◄ LEFT or ► RIGHT to toggle the
available Audio Options.
3. Audio will be ENGLISH by default. Select
ENGLISH (AD), press OK.
4. Then allow a moment for AD to turn ON.
Also see: Menu → Settings → Audio → Audio Description.
Subtitles
This feature is helpful to those who are hearing impaired, often a written rendering of the
dialog, displayed at the bottom of the screen.
1. Press the SUBTITLES button, to
open the Subtitle Options.
2. Scroll ◄ LEFT or ► RIGHT to toggle the
available Subtitle Options.
3. Subtitles will be OFF by default. Select
ENGLISH, press OK.
4. Allow a moment for Subtitles to turn ON.
Also see: Menu → Settings → Video → Subtitles.
Audio & Subtitles
10

11
The Main Menu brings everything together in one place.
While watching Live TV, press the MENU button to open/access the Main Menu.
TV Guide: Browse what’s on across the next eight days with the TV Guide.
Apps: Access the Dish TV Portal.
Recordings: Watch/Manage your Recordings, Booked List, and Media Info.
Network Setup: Configure Network Settings, connect via Wired or Wireless.
Settings: Adjust User Settings to customize your viewing experience.
Installation: Access all Channel Scan related options, or Factory Reset.
You can toggle between the options using the ◄ LEFT or ► RIGHT navigation arrows
on the Remote Control.
Main Menu
TV Guide Apps Network Setup Settings Installation
Menu
Recordings

12
TV Guide
The TV Guide provides schedules for the next eight days, with detailed information. A
preview of what’s currently playing on Live TV will display on the TV Guide, while you
browse.
Press the EPG button to open the TV Guide, or access it via the Mini Guide or
Main Menu.
Press ▲ UP or ▼ DOWN to explore the Channels.
Select a TV show that’s on now to change the Channel.
Select a TV show that’s on later to see more information, and the recording
options for that TV show.
TV Guide
Some options are only available, if the S7070PVR is connected to the Internet.

Recording via the TV Guide
The S7070PVR comes with a built-in 1TB Hard Drive, allows up to 500 Recording Hours.
You can record one off Episodes or Series Link your favourites to record, and then watch
when you want.
1. Press the EPG button on your Remote,
please allow a couple moments for the
TV Guide to load.
2. Browse the TV Guide, and select a TV
show to book for recording, then press
the OK button.
3. Select RECORD.
4. You will be prompted to confirm whether
you would like to record the the SERIES,
or only THIS EPISODE.
5. A RED dot will appear next to the title in
the TV Guide.
6. To cancel any bookings, select SERIES,
or THIS EPISODE again to turn OFF.
Also see: Menu → TV Guide.
Your online entertainment can be found in the Apps Portal¹.
Select Apps in the Main Menu or press the APPS button to open the Apps Portal.
TV Guide
Apps
¹Content, channels and apps on this device, including their availability or access, are subject to change at any time without prior notice.
13
BOOKED LIST
View all scheduled bookings set to record,
see Menu → Recordings → Booked List.

Instant Recording
How do I record Live TV?
If you would like to make a one off recording on the current viewed Channel you can use
Instant Record to record to the end of the TV show.
1. Press the RECORD button at any
time on Live TV to start recording.
2. The S7070PVR will start recording what’s
on the currently viewed Channel, until the
end of the current TV show, per the times
shown in the TV Guide.
3. Press the RECORD button again
on the same Channel to stop recording.
4. All recordings are saved to your Library.
Press the LIB button at any time on Live
TV to view your saved recordings. Refer
to Page 17-18.
14
Record 2 Channels? Watch Another?
Broadcasters transmit Channels within set frequencies, each frequency is often a
group / number of channels provided by one Broadcaster. More on Page 27.
Since the S7070PVR uses dual tuners, this allows it to tune into and record from
two separate frequencies at the same time; whilst limiting the Channels you can
watch to only Channels on those two frequencies for the recordings duration.

Time Shift
What is Time Shift?
With the S7070PVR you can pause Live TV so you will never miss a moment, or rewind
back to a point that you missed.
1. First, make sure that you have the correct
Time Shift options set. See PVR on Page
22.
2. Press the PAUSE button at any time from
Live TV to start Time Shifting.
3. Press the PLAY button to begin catch up
at any time, or the ►► FAST FORWARD
button to help catch up quickly.
4. When caught up to Live TV, a ‘Time Shift
Ended’ prompt will display in the top-right.
5. To stop Time Shifting at any time, change
the Channel. You can use either the CH+
or CH- buttons, or the NUMERIC buttons.
Prompt will display in the centre of the TV.
6. Select OK, EXIT LIVE PAUSE to stop the
Time Shift, or select SET TO RECORD to
save the Time Shift as a recording.
7. If the Auto Time Shift option is turned ON,
you can rewind the Live TV broadcast, up
until you started watching that Channel.
15
Restrictions:
Recordings will take priority over Time Shift. If the Tuners are required for use on
a recording, any Time Shift in progress will be stopped.
SET TO RECORD is unable to save the Time Shift as a recording, if both Tuners
are already active, and recording. Rewind with Auto Time Shift, is limited to when
you started watching the Channel. Changing the Channel resets Pause / Rewind.

Press the MENU button to open the Main Menu, then go to: Recordings.
Media Library¹
Recordings
16
Storage Space
The S7070PVR comes with a built-in 1TB Hard Drive, you can store up to 500 hours of
recordings! If you want to see how much storage space you have remaining, check out
the bar at the bottom left of your Library.
• Left-hand side (GREEN) shows how much storage space has been USED.
• Right-hand side (BLACK) shows how much storage space is FREE.
NOTE: Bookings in the Booked List allocate storage space, which is marked as USED.
Information
Press the INFO button on the Remote, to view more information for the selected
Episode. Such as Date, Duration, Synopsis, and Parental Rating. You can Play, Protect,
or Delete the Episode.
¹Press the LIB button on the Remote, to open the Media Library from Live TV.

17
Press the MENU button to open the Main Menu, then go to: Recordings.
Media Library¹
Recordings
Series/Episode View
Episode View is set by default, individual Episodes are listed as recorded in the Library.
Switch to Series View by pressing the BLUE button on the Remote. Series View groups
Episodes together for a Series. Select a Series, press OK to display the list of Episodes.
Playback Recording
Select an Episode you want to watch, press the ► PLAY or OK button on the Remote.
Delete Recording
Select an Episode you want to delete, press the RED button on the Remote. You will be
prompted to confirm that you want to delete the recording.
Options
Press the YELLOW button on the Remote to view the Options. Sort the Library by Date,
Channel, Name or Duration. Protect (Lock) or Rename selected Episodes and Series.
¹Press the LIB button on the Remote, to open the Media Library from Live TV.

18
Press the MENU button to open the Main Menu, then go to: Recordings.
Booked List
Recordings
Delete Booking
Select any scheduled Booking you want to delete, press the RED button on the Remote.
You will be prompted to confirm deletion of the Booking.
Mark
If you want to delete multiple Bookings at once. Select any scheduled Booking you want
to delete, press the GREEN button on the Remote to mark. When each desired Booking
has been marked, press the RED button on the Remote to delete the selected Bookings.
Sort
Press the YELLOW button on the Remote to view the Sort Options. Sort the Booked List
by Name or Date.
Single/Series
Press the BLUE button on the Remote to toggle the recording type set, Single or Series.
¹Press the INFO button on the Remote, to view more information or change the recording status for the selected Booking.

19
Press the MENU button to open the Main Menu, then go to: Recordings.
Media Info
Recordings
View all Media Devices such as USB Drives or the built-in 1TB Hard Drive and configure
them to work with the S7070PVR.
The first device listed will be the built-in Hard Drive (SATA), the default recording device.
All recorded programmes are saved to the built-in Hard Drive. As you connect additional
USB Devices, they will be listed too.
Detailed information, such as number of Video Titles, Used Space, and Free Space can
be found displayed along the bottom.
Media Format¹
You can Media Format any selected device by pressing the BLUE button on the Remote,
doing this will clear everything on the device, such as the built-in Hard Drive.
You can clear the built-in Hard Drive, to delete bulk programmes, and when starting new.
¹Default PIN is 0000.
Table of contents
Other Dish TV TV Receiver manuals